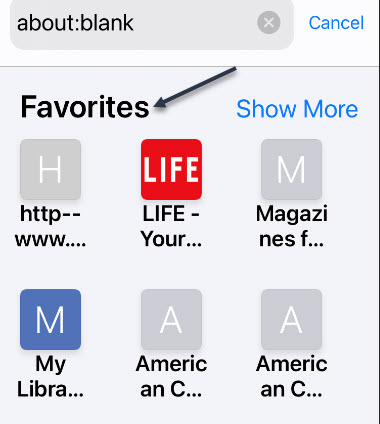
By default, Safari on iPhone and iPad displays a list of your Favorites when you open a new window or tab. We are going to choose another folder of bookmarks to display.
By default, Safari on iPhone and iPad displays a list of your Favorites when you open a new window or tab. We are going to choose another folder of bookmarks to display. Let’s explore how to do this.
This is for iPhone and iPad
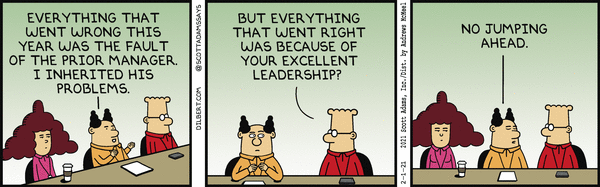
Copyright Scott Adams, Inc./Distributed by Universal Uclick for UFS
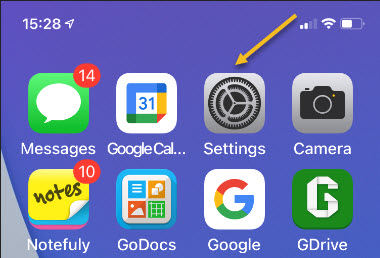
First, open Settings (the gear icon) app. Refer to below image:
Accessing Settings app
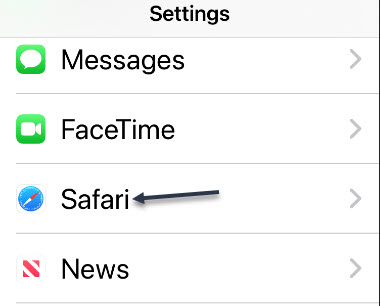
Next, scroll down and tap Safari. See below image:
Accessing Safari option
Now, tap Favorites. See following image:
Accessing Favorites option
Next, in the list that appears, choose another folder. (If no folders are present in the list, you can create a new folder in Safari by tapping the Bookmarks button, selecting Edit, then tapping the New Folder button.)
Note! Choosing a different folder here will also change your default Favorites folder. From now on, whenever you add a new bookmark to Favorites, it will appear in this folder. Refer to below image where we are choosing the Magazine folder for Favorites:
Selecting a bookmark folder
Now, tap back once, then exit Settings. The next time you open Safari to a New Tab page, you.will see a list of favorites pulled from the folder you just selected; in our case, the Magazine folder. See below image:
Your new Favorities folder
If you would prefer having nothing listed on your New Tab page, you can create an empty folder and select it instead. The next time you open a new tab, the page will be completely blank.
Please feel free to leave a comment. I would love hearing from you. Do you have a computer or smart device tech question? I will do my best to answer your inquiry. Just send an email to contact@techsavvy.life. Please mention the device, app and version that you are using. To help us out, you can send screenshots of your data related to your question.
The author’s Vietnam eBook on the Battle for Tra Bong: Events and Aftermath
A man has been jailed for two years after sabotaging a company by deleting 80% of their Microsoft 365 accounts; email, calendars, contact lists, docs, and so on. What did he do and what organizations should do to prevent a similar catastrophe.
Deepanshu Kher worked for an IT consultant firm and was deployed to work at Carlsbad Company who were migrating to Microsoft 365 hosting. Carlsbad were unhappy with Kher who eventually left both Carlsbad and the consultant firm.
He returned to India where he hacked into Carlsbad Company’s new Microsoft 365 system and deleted 1,200 of their 1,500 user accounts. That shut down the company for two days, unable to access email accounts, contacts, calendars, documents, directories plus Teams and video conferencing.
Customers and partners could not contact the company or vice-versa. There was no way to tell people what was happening and why.
It took three months and over half-a-million dollars for Carlsbad to get everything back into something like normal.
Lessons to be Learned
Details of the hack have not been disclosed but some reasonable guesses are possible with some preventative measures suggested. See end of this blog post for a link about the hack.
Revoke Accounts
When someone leaves an organization, especially admin level access, make sure their account privileges are suspended or revoked. It’s easily overlooked.
A former employee or contractor might have discovered other logins or know hacks into a system but most commonly they just login to their account.
Restoring Deleted Accounts
Microsoft’s default for deleting a mailbox or user account is a ‘soft’ deletion that’s held in a recycle bin for 30 days, with a Restore option, before full deletion. Unfortunately, there’s a second ‘hard’ option which immediately deletes the entire mailbox or user account. In some cases, hard deletion is necessary but perhaps Microsoft should make irreversible deletions a lot more difficult to access, even by administrators? Maybe require more than one admin to approve hard deletions?
Where is the Hacker Now?
Mr Kher did his nasty deed from India but that didn not stop the FBI from tracking him down and issuing an arrest warrant. When he tried to re-enter the US in January 2021 he was arrested, unaware of the outstanding warrant.
In US District Court he was found guilty of “Intentional Damage to a Protected Computer ” which carries a 10 year and $250,000 fine maximum. Kher was sentenced to two years jail, three years supervised release and ordered to pay restitution of $567,084 (the precise amount it cost Carlsbad to fix their systems).
I went to work thru a consultant agency for a manufacturing plant in the Port of Catoosa near Tulsa, Oklahoma. On my first day, around 9am, the admin person starting setting me up access to their system. Two hours later, he was still working; he did not know how to set my credentials. Also, a lady supervisor came by and gave me a foot high stack of paper and told me to go through it. I ask, “what am I looking for?”. She said, “just go through it.” Then she left. I did not do this; if she did not know what I was looking for, I sure did not know.
Around 11:am, the IT director came by and wanted to take me to lunch. His right-hand partner, he and I got into his vehicle. They did not ask me any questions on the ride to the restaurant or back to the company. During lunch, they did not even acknowledge my presence or ask me anything. They just talked to each other. So, I remained silent. I thought this was strange.
Back at the plant, he took me to several departments where I met a lot of people, names I could not remember. What I later realized, it was a “dog and pony” show. He was being pressured to do something about their IT “system”, so he talked to my consulting agency and they sent me. He expected me to fix their “system”. He knew this was an impossible task for one person; he set me up for failure.
Over the next two days, I was amazed at their “system”. Their plant was using Excel spreadsheets to run the company; I found thousands of them. I estimated 10,000 spreadsheets.
One department would enter info like name, supervisor, hours worked. Then that department would “pass” the spreadsheet to the next department where they added their own info and/or creating new Excel spreadsheets. And so it went to each department. It was a gigantic mess. I wrote him a letter saying he needed an enterprise system like SAP, IBM or Accenture. He ignored the letter. He had done his job by hiring me to be his savior.
I decided to start with the Time Keeping system. I create a database and the forms. At least, they could have something to visualize.
No one spoke to me. I tried to talk to the guys in IT, but they shut the door in my face. Very wierd.
After ten days, I came in on a Monday morning and starting working. Around 10:00am a supervisor comes by and says, “why are you hear, you were fired on Friday”. I said, “no one told me”. She left and I called my boss. They did not know either. I packed what work I had done and left.
After reading the main story above, I could have done major damage to the company by deleting thousands of Excel spreadsheets in a matter of minutes. I had full admin access. So, would I have been sentenced to jail? I do not think so because I was technically fired and no one told me or my boss. The company was to blame for their lack of communication and not revoking my credentials. So, pay attention to the above story, especially, if you are running a business.
That’s it. Please feel free to share this post! One way to share is via Twitter.
Just click the Tweet icon below. This will launch Twitter where you click its icon to post the Tweet.
Check out TechSavvy.Life for blog posts on smartphones, PCs, and Macs! You may email us at contact@techsavvy.life for comments or questions.
Please feel free to leave a comment. I would love hearing from you. Do you have a computer or smart device tech question? I will do my best to answer your inquiry. Just send an email to contact@techsavvy.life. Please mention the device, app and version that you are using. To help us out, you can send screenshots of your data related to your question.
The author’s Vietnam eBook on the Battle for Tra Bong: Events and Aftermath
You can use the Code Scanner to scan Quick Response (QR) codes for links to websites, apps, coupons, tickets, and more. The iPhone camera automatically detects and highlights a QR code.
You can use the Code Scanner to scan Quick Response (QR) codes for links to websites, apps, coupons, tickets, and more. The iPhone camera automatically detects and highlights a QR code.
This is for the iPhone running iOS 11 and higher
Copyright Scott Adams, Inc./Distributed by Universal Uclick for UFS
A QR code is a type of two-dimensional barcode that can be read by devices with camera or specialized barcode reader. Some QR codes even allow users to pay for goods, such as groceriess, as an alternative form of touchless payment.
The dedicated scanner is helpful for scanning QR codes in dark environments, as it enables you to use your camera’s flash as a light to illuminate the code.
First, open the Settings app (the gear icon). Refer to below image:
Accessing Settings
Next, scroll down and choose the Control Center option. See below image:
Accessing Control Center option
Now, scroll down and tap the “+” icon next to the Code Scanner option. See following image:
About to add the Code Scanner option to the Control Center
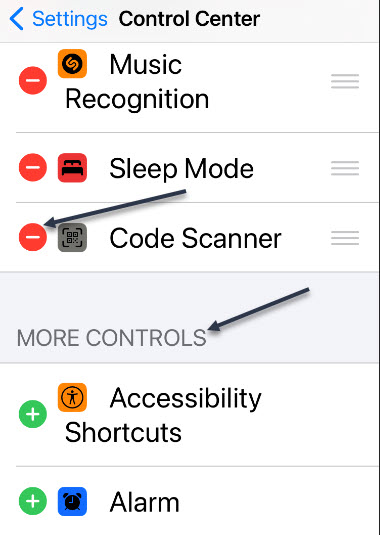
Now, the Code Scanner control will be added to the bottom of the Control Center. You will see the Code Scanner option with a “–” icon just above the More Controls section. This indicates that the Code Scanner is now embedded in the Control Center. Refer to below image:’
The Code Scanner added to the Control Center
It’s now time to use the feature to scan a QR code.To open Control Center, swipe down from the top-right corner of your iPhone’s screen.
Next, tap the new Code Scanner control. See below image:
The QR icon in the Control Center
This will open a dedicated QR code scanning interface. Just point your iPhone’s camera toward the QR code. See following image:
Scanning a QR code with the iPhone camera
It will be scanned after a second, and your iPhone will automatically open the designated app to complete the action. In our example, we are opening the USPS website regarding a customer experience questionarre. Refer to below image:
Opening the website corresponding to the QR code
You are finished. Also, you can use your iPhone to create your own QR code, like pointing to your website or Facebook page. Please feel free to share this post! One way to share is via Twitter.
Just click the Tweet icon below. This will launch Twitter where you click its icon to post the Tweet.
Check out TechSavvy.Life for blog posts on smartphones, PCs, and Macs! You may email us at contact@techsavvy.life for comments or questions.
Please feel free to leave a comment. I would love hearing from you. Do you have a computer or smart device tech question? I will do my best to answer your inquiry. Just send an email to contact@techsavvy.life. Please mention the device, app and version that you are using. To help us out, you can send screenshots of your data related to your question.
Copyright Scott Adams, Inc./Distributed by Universal Uclick for UFS
If you use the Google Assistant often, you might be getting tired of hearing the Assistant reply in the same voice. Fortunately, Google realized their customers wanted voice options for their devices, and introduced the ability to change your Assistant’s voice some time ago; and added a few surprise options.
If you use the Google Assistant often, you might be getting tired of hearing the Assistant reply in the same voice. Fortunately, Google realized their customers wanted voice options for their devices, and introduced the ability to change your Assistant’s voice some time ago; and added a few surprise options.
With a few simple steps, you can change the voice on all of your Google-powered devices, including your Chromebook and smartphones. Here’s the simple guide on how to change the Google Assistant’s voice.
This is for smartdevices using Google. Screenshots are from iPhone XR
Copyright Scott Adams, Inc./Distributed by Universal Uclick for UFS
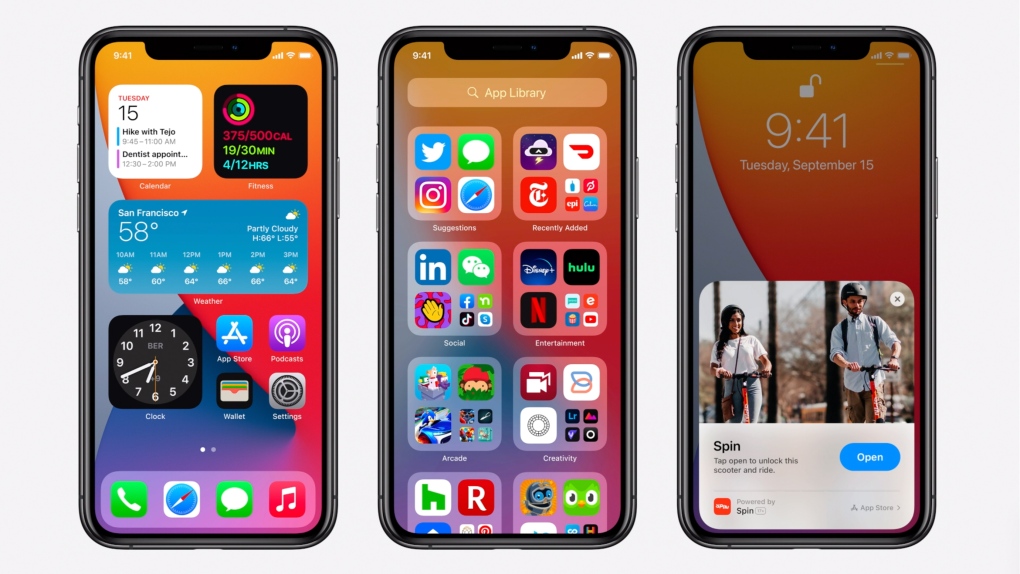
First, open the Google Assistant app from your iPhone App Library. Hold, swipe right, and release using the Dots bar at the bottom or swipe left all the way to open the App Library. Refer to below image:
Using the Dots bar
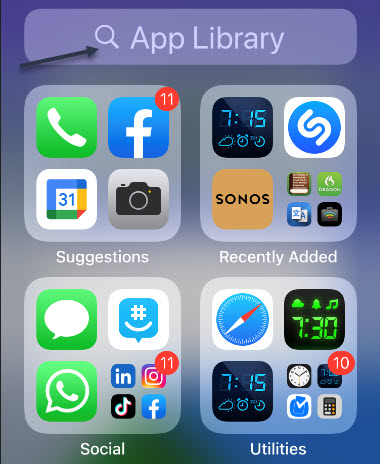
Next, at the top of your screen you will see a Search box. See below image:
The App Library screen
Now, in the Search bar, type in google assistant and tap the app to open. See following image:
The Google Assistant app
Here you will see a list of things you can do with the app. Locate the Assistant voice option and tap it. Refer to below image:
The Assistant Voice option
The default voice will be displayed, usually Red. At the bottom of your screen you will see the list of devices supporting this voice. See below image:
Selecting the Red voice, the default
To change the voice setting, just swipe the Dots bar to highlight one or tap a color bubble to hear a voice sample. After your selection, that voice will remain as your Google Assistant Voice setting. See following image;
Selecting the Amber voice
Google Assistant also has the option to assume a variety of celebrity voices, giving you some very unique options for your voice assistant. The range of celebrity voices available continues to grow, but popular options currently include John Legend and Issa Rae.
You may have found the celebrity voice options when looking at the voice settings we mentioned earlier, but there’s an, easier way to give your Google Home a celebrity voice. All you have to do is say, “Hey Google, talk like John Legend,” or whoever you prefer, and the voice assistant will address you in that voice until you tell it otherwise. All voices are not available in all areas.
Now, exit the Assistant. That’s it. Please feel free to share this post! One way to share is via Twitter.
Just click the Tweet icon below. This will launch Twitter where you click its icon to post the Tweet.
spacer
Check out TechSavvy.Life for blog posts on smartphones, PCs, and Macs! You may email us at contact@techsavvy.life for comments or questions.
Please feel free to leave a comment. I would love hearing from you. Do you have a computer or smart device tech question? I will do my best to answer your inquiry. Just send an email to contact@techsavvy.life. Please mention the device, app and version that you are using. To help us out, you can send screenshots of your data related to your question.
The author’s Vietnam eBook on the Battle for Tra Bong: Events and Aftermath
It is easy to setup birthday alerts on iPhone and make sure that you never forget birthdays of important people in your life.
It is easy to setup birthday alerts on iPhone and make sure that you never forget birthdays of important people in your life. You first need to tell your iPhone the birthday dates of your family members, friends, and relatives. This can be done using the Contacts app on iPhone, which allows you to add Birthdays and important dates in its Contact details section. Your iPhone can alert you on the day of the occasion, 1 day early, 2 days early or a week before the birthday.
This is for the iPhone
Copyright Scott Adams, Inc./Distributed by Universal Uclick for UFS
Couple of Prelimanary Steps
First, you must have notifications enabled for your Calendar app. To turn this on, visit:
Settings > Notifications > Calendar
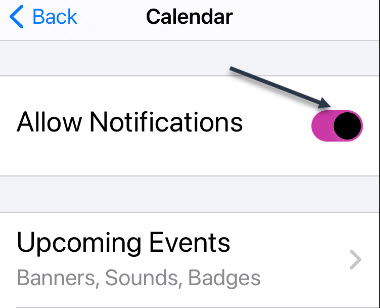
scroll down and set the toggle beside Allow Notifications to On. Now, exit Settings. Refer to below image:
Enabling Allow Notifications for Calendar app
Also, you will need to have some birthdays defined in your Contacts app. To do this, open Contacts, tap a contact from the list, and select Edit. Next, tap add birthday. See below image:
Selecting Add a Birthday option to a Contact
Set a Birthday Notification
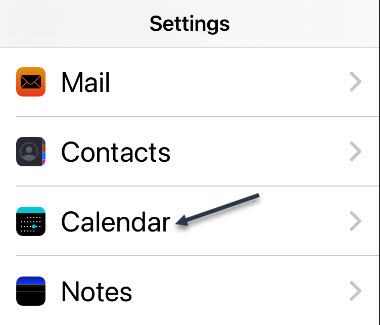
Now, exit Contacts. To turn on automatic Calendar birthday reminders, open Settings, scroll down and tap your Calendar app. See following image:
Selecting your Calendar app
Next, in Calendar settings, tap Default Alert Times. Refer to below image:
Selecting Default Alert Times option
Now, in Default Alert times, select Birthdays. See below image:
Seledting the Birthdays option
Next, on the Birthdays screen, you can pick a time when Calendar will alert you about upcoming birthdays. You can choose On day of event, 1 day before, 2 days before, or 1 week before. For the first three of those choices, your Calendar app will notify you at 9 a.m. on the day you selected. See following image:
Setting a time for the Birthday notification
Now, exit Settings. When the proper alert time comes, your Calendar app will send you a notification about the birthday. Refer to below image:
A birthday reminder
Depending on your notifications settings, you can potentially see this alert on your Lock Screen or Notification Center as well as via pop-ups on your screen.
That’s it. Please feel free to share this post! One way to share is via Twitter.
Just click the Tweet icon below. This will launch Twitter where you click its icon to post the Tweet.
Check out TechSavvy.Life for blog posts on smartphones, PCs, and Macs! You may email us at contact@techsavvy.life for comments or questions.
Please feel free to leave a comment. I would love hearing from you. Do you have a computer or smart device tech question? I will do my best to answer your inquiry. Just send an email to contact@techsavvy.life. Please mention the device, app and version that you are using. To help us out, you can send screenshots of your data related to your question.
The author’s Vietnam eBook on the Battle for Tra Bong: Events and Aftermath
Google collects and remembers “tons” of information about your activity, including your web, search, YouTube, and location history. Google auto-deletes for new users after 18 months but it will remember history forever if you previously enabled this feature with the default options.
Google collects and remembers “tons” of information about your activity, including your web, search, YouTube, and location history. Google auto-deletes for new users after 18 months but it will remember history forever if you previously enabled this feature with the default options.
As an existing user, you have four options in making Google delete your data; after 36 months, 18 months, 3 months, or stop activity collection entirely. The options are buried in Google Settings.
This is for devices running Google. Screenshots are from iPhone XR
Copyright Scott Adams, Inc./Distributed by Universal Uclick for UFS
Note! Google uses this history to personalize your experience, including your web search results and recommendations. Deleting it will make your Google experience less “personalized.”
Let’s explore how to set up this auto-delete function..
Control Web and App Activity
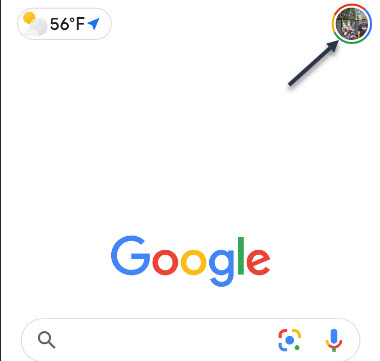
First, launch Google and tap your profile photo. Refer to below image:
Launch Google
Now, tap the Google Account settingsoption See below image:
Accessing Google Account option
Next, scroll down to Privacy & personalization section and tap Manage your data & personalization. See following image:
Accessing your data and personalization link
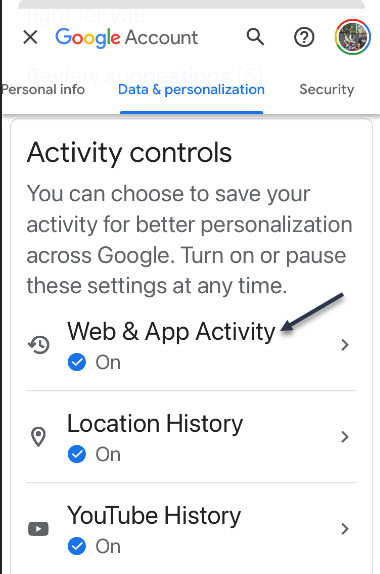
Now, scroll down to Activity controls section. Here, tap the Web & App Activity option. Refer to below image:
Accessing your Web & App Activity section
Next, toggle to On the Web & App Activity toggle. Next, tap the Auto-delete (Off) switch to turn in On. See below image:
Enabling Auto-delete by its link
Now, select one of four options. See following image where I selected Auto -delete activity older than 18 months and tap the Next button:
Selecting one of four options for Auto-delete
A Confirmation screen will be displayed. Just tap the Confirm button in lower right-hand corner. Refer to below image:
Confirming your selection
Now, you will see a Preference saved dialog box. Just tap GotIt text in lower right-hand corner. See below image:
Saving your preference
Control Location and YouTube Activity
Next, go back to Activity controls section and repeat above steps for Location History and YouTube History.
Let’s say you Search, read articles, watch videos, or see photos on ‘drones’. Google will send out ad links for ‘drones’, this is called ‘ad personalization’. Through these sponsored ads is one way Google makes money. You can turn off these ads but at the expense of a ‘depersonalization experience’.
Control Ad Personalization
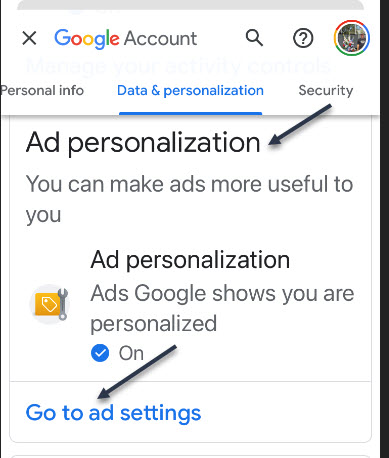
Now, go back to Activity controls and scroll down a little till you see the Ad personalization section and tap the Go to ad settings link. See following image:
Selecting your ad settings link
Next, toggle the Ad personalization switch to ON. Refer to below image:
Enabling your Ad personalization
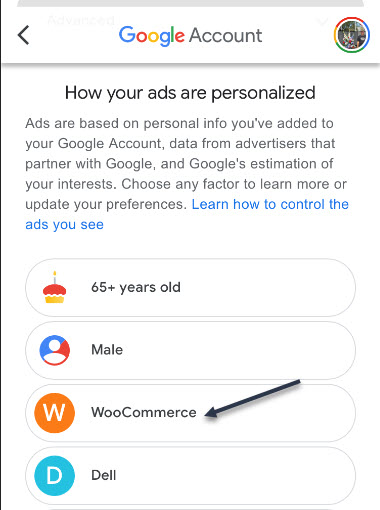
Here you will see a listing of companies/others who are using ad personalization. See below image where I selected WooCommerce:
Selecting a targeted ad
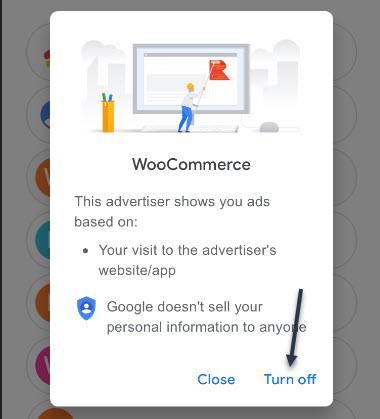
Now, you will be presented a dialog box to Turnoff or Close. Next, tap the Turn off button to no longer see this company/others targeted ads. See following image:
Turning off your targeted ad
Now, a confirmation dialog box appears where you have to tap the Turn off button again. Google makes you go through ‘hoops’ to reduce their ads. Refer to below image:
Your confirmation for turning off the targeted ad
Really, Turn Off Ads?
Google is making you go through a myriad of selections. Notice the text that states turning off your selected ad will stay off for at least 90 days. Your selected ad will stay off for this period, then guess what, the ad comes back! Google wants to make money off these ads; they do not want you to turn them off. See above image.
That’s it. Please feel free to share this post! One way to share is via Twitter.
Just click the Tweet icon below. This will launch Twitter where you click its icon to post the Tweet.
Check out TechSavvy.Life for blog posts on smartphones, PCs, and Macs! You may email us at contact@techsavvy.life for comments or questions.
Please feel free to leave a comment. I would love hearing from you. Do you have a computer or smart device tech question? I will do my best to answer your inquiry. Just send an email to contact@techsavvy.life. Please mention the device, app and version that you are using. To help us out, you can send screenshots of your data related to your question.
The author’s Vietnam eBook on the Battle for Tra Bong: Events and Aftermath
You might want to delete plain text messages because of the storage space they use. Also, you may want to delete messages for privacy reasons or just because it keeps your Messages app better organized. Plus, texts with images actually can take up a fair bit of room.
You might want to delete plain text messages because of the storage space they use. Also, you may want to delete messages for privacy reasons or just because it keeps your Messages app better organized. Plus, texts with images actually can take up a fair amount of space.
By default, your iPhone and iPad save every iMessage and SMS text message that comes your way. As a result, you could have years of messages synced to iCloud that follow you for the rest of your life, taking up valuable space. Fortunately, there’s a way to delete old text messages automatically. Lets explore how this is done.
This is for the iPhone and iPad. Screenshots are from an iPhone
Copyright Scott Adams, Inc./Distributed by Universal Uclick for UFS
First, lets check how much storage you are using for messages and attachments (like photos on an iPhone). Go to
Settings > General > iPhone Storage > (scroll down to) Messages
Notice the amount of storage used by Documents & Data, and tap on Review Large Attachments for more detail. Refer to below image where I can save 145 MB by deleting them:
Viewing how much storage space is being used
Now, exit back to Settings (the gear icon) on your iPhone or iPad. See below image:
Accessing Settings
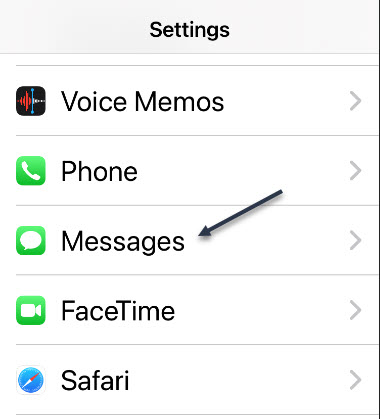
Now, in Settings, scroll down and tap the Messages option. See following image:
Accessing the Messages option
Next, in Messages, scroll down and tap the KeepMessages option. Refer to below image:
Accessing the Keep Messages option. The default is Forever
By default, Messages is set to keep your SMS text messages and iMessages forever. Next, tap either 30 Days or 1 Year depending on how long you would like to keep your old text messages. See below image:
Selecting your option on how long to keep text messages
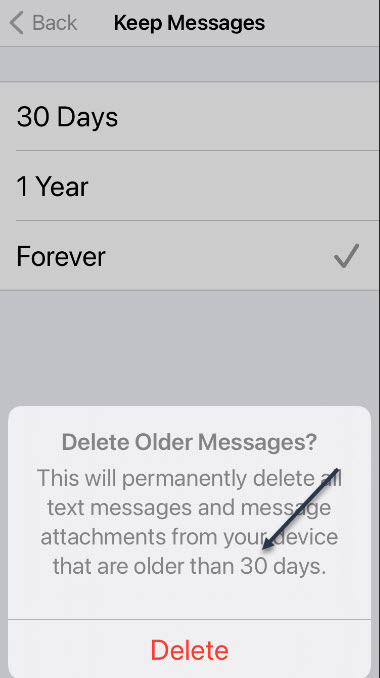
After tapping your preference, you will see a pop-up dialog asking whether you want to delete all messages older than the time period you specified. If you are sure, just tap the Delete button. See following image:
Pop-up window showing the option you selected
Next, exit Settings. From now on, Messages will automatically delete any messages once they hit the 30-day or 1-year mark, depending on which option you specified. Note! The default, Forever, will remain checked until you tap the Delete button.
Now, head back to
Settings > General > iPhone Storage > (scroll down to) Messages
and check your Messages storage for the amount of space you reclaimed.
That’s it. Please feel free to share this post! One way to share is via Twitter.
Just click the Tweet icon below. This will launch Twitter where you click its icon to post the Tweet.
Check out TechSavvy.Life for blog posts on smartphones, PCs, and Macs! You may email us at contact@techsavvy.life for comments or questions.
Please feel free to leave a comment. I would love hearing from you. Do you have a computer or smart device tech question? I will do my best to answer your inquiry. Just send an email to contact@techsavvy.life. Please mention the device, app and version that you are using. To help us out, you can send screenshots of your data related to your question.
The author’s Vietnam eBook on the Battle for Tra Bong: Events and Aftermath
Have you received the message “This post has been removed for misinformation… or deemed inappropriate….” on Facebook. Just who are these Facebook “Police”?
Who you goin to call, Fact Checkers? A ‘play on words’ from the movie ‘Ghostbusters’.
Have you received the message “This post has been removed for misinformation… or deemed inappropriate….” on Facebook. Just who are these Facebook “Police”?
You will be surprised at the number of people who use ‘fact checker’ or ‘gate keeper’ as their name
Facebook has partnered with independent third-party fact-checkers globally who are certified through the non-partisan International Fact-Checking Network (ICFN). This fact-checking program launched in 2016, and has continued to expand it since then to cover more languages and countries.
The focus of this program is to address viral misinformation; provably false claims, particularly those that have the potential to mislead or harm.
Fact-checking partners are able to review content across both Facebook and Instagram, including organicand boosted posts. They can also review videos, images, links or text-only posts.
There are a lot of guides on the Internet that tell you to block ‘fact checker’ from the Facebook block user function. However, all this does is block users and pages that call themselves ‘fact checker’. Facebook does not actually disclose who and where the ‘fact checker’ actually are, so blocking random pages named ‘fact checker’ won’t really do much. The same goes for ‘gate keeper’.
So, this post is just for fun and informational. You are unable to actually block a Facebook ‘fact checker’ or ‘gate keeper’. With that said, let’s explore how to block people who call themselves ‘fact checker’ or ‘gatekeeper’.
This is for devices running Facebook
Copyright Scott Adams, Inc./Distributed by Universal Uclick for UFS
Who Are Fact Checkers
Source: Facebook
Since we do not believe that a private company like Facebook should be the arbiters of truth, we rely on independent fact-checkers to identify and review potential misinformation, which enables us to take action.
Identify: We identify potential misinformation using a variety of signals, and our fact-checking partners can also proactively identify content on their own.
Review: Fact-checkers review and rate the accuracy of stories through original reporting, including interviewing primary sources, consulting public data, and conducting analyses of media, including photos and video.
Act: Once we have a rating from a fact-checking partner, we take action by ensuring that fewer people see that misinformation by surfacing fact-check articles to users across our platforms and showing labels on top of false stories.
Who Are Gate Keepers
Source: Slate
Facebook Oversight Board is their gatekeeper. A gatekeeper decides what is free speech or not. The board will act much like a court of appeals for the platform, and it will take on cases regarding how to handle controversial content on Facebook and Instagram. The board will also act in an advisory capacity, giving policy recommendations to the company.
Block a Fact Checker
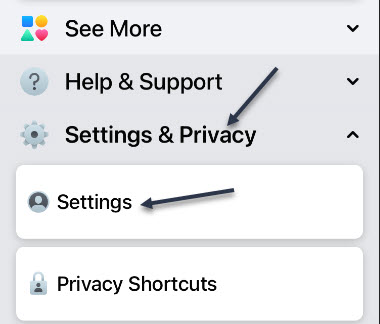
First, launch Facebook and tap the Menu icon. Refer to below image:
Accessing Facebook menu
Now, scroll down and open the Settings and Privacy section and tap Settings. See below image:
Accessing Facebook settings
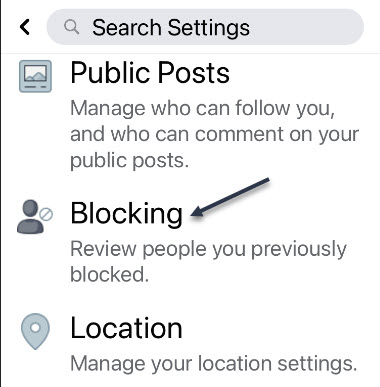
Next, scroll down to the Blocking section and tap it. See following image:
Accessing the Blocking section
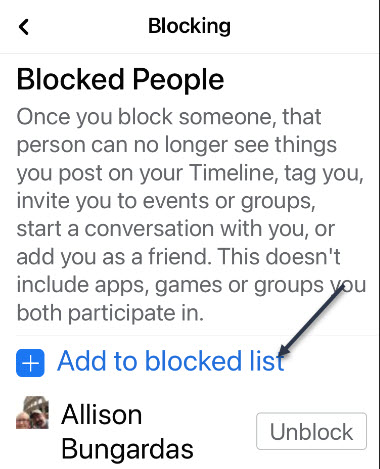
Next, tap the link Add to blocked list. Refer to below image:
Accessing the Add to blocked list link
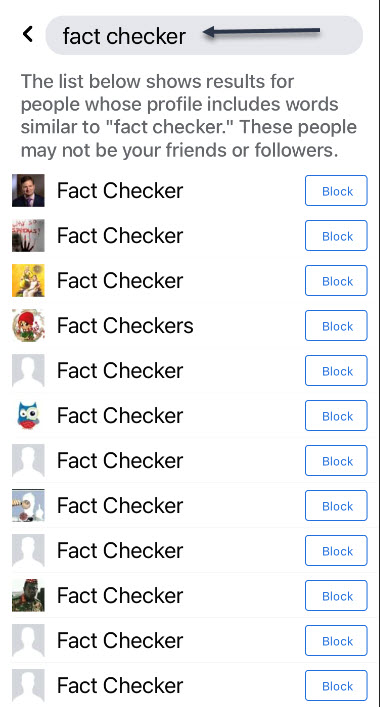
At the top of the page, in the Search box, type in: fact checker. Here you will see a long list of people using the name of ‘fact checker’. See below image:
Entering Fact Checker in the Search box
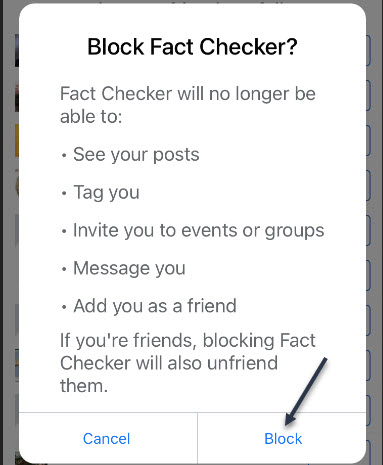
Next, tap a listing or the Block icon and you will be given a dialog box to Block or Cancel. Tap the Block icon. That person will be added to your Blocked People list. See following image:
Blocking a Fact Checker
Now, repeat the above for each ‘fact checker’ person you want to block. Next, in the Search box, type in: fact checkers. Here you will see another long list of people using the name of ‘fact checkers’. Next, tap a listing or the Block icon. Tap the Block icon and repeat for each person in the list as needed.
Block a Gate Keeper
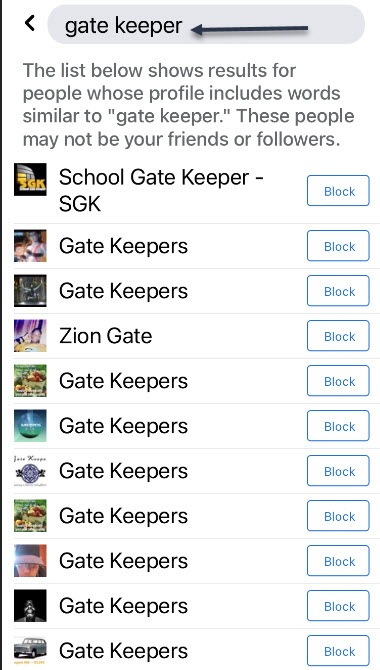
Go back to the Search box and type in: gate keeper. Here you will see a long list of people using the name of ‘gate keeper’. Refer to below image:
Entering Gate Keeper in the Search box
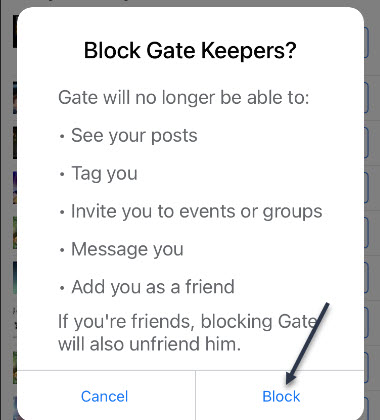
Next, tap a listing or the Block icon you will be given a dialog box to Block or Cancel. Tap the Block icon. See below image:
Blocking a Gate Keeper
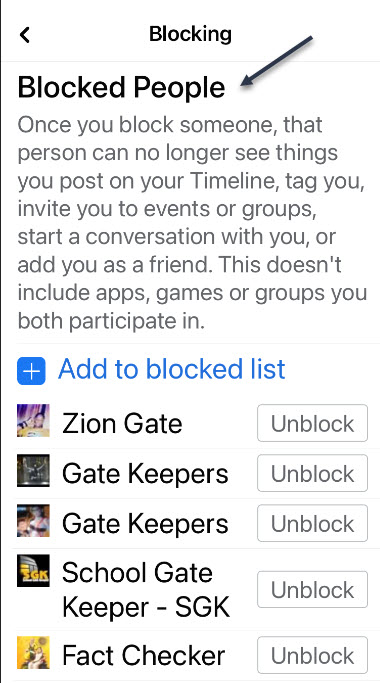
Repeat the above for a search of ‘gate keepers’ and block as needed. Next, tap the back button to see your BlockedPeople list that includes ‘fact checker’, ‘fact checkers’, ‘gate keeper’ and/or ‘gate keepers’. Why do people use such names? See following image:
Your Blocked People list
Now, tap all the way back using the Back button and exit Facebook.
I hope you learned something about the Facebook ‘Police’. We did. Well, that’s it. Please feel free to share this post! One way to share is via Twitter.
Just click the Tweet icon below. This will launch Twitter where you click its icon to post the Tweet.
Check out TechSavvy.Life for blog posts on smartphones, PCs or Macs! You may email us at contact@techsavvy.life for comments or questions.
Please feel free to leave a comment. I would love hearing from you. Do you have a computer or smart device tech question? I will do my best to answer your inquiry. Just send an email to contact@techsavvy.life. Please mention the device, app and version that you are using. To help us out, you can send screenshots of your data related to your question.
The author’s Vietnam eBook on the Battle for Tra Bong: Events and Aftermath
This is a fun and informational blog post about how an iPhone is designed, manufactured, tested, marketed and shipped. I learned a lot about one of the greatest achievements in technology.
This is an informational blog post about how an iPhone is designed, manufactured, tested, marketed and shipped. I learned a lot about one of the greatest achievements in technology and hope you will to.
This is for an iPhone
Copyright Scott Adams, Inc./Distributed by Universal Uclick for UFS
Did you know your iPhone screen is made up of eight layers? Each one plays an integral role in making sure users get the best experience every time the phone is used. Beyond the display, are many other layers, about 176 layers for iPhone 11 Pro Max.
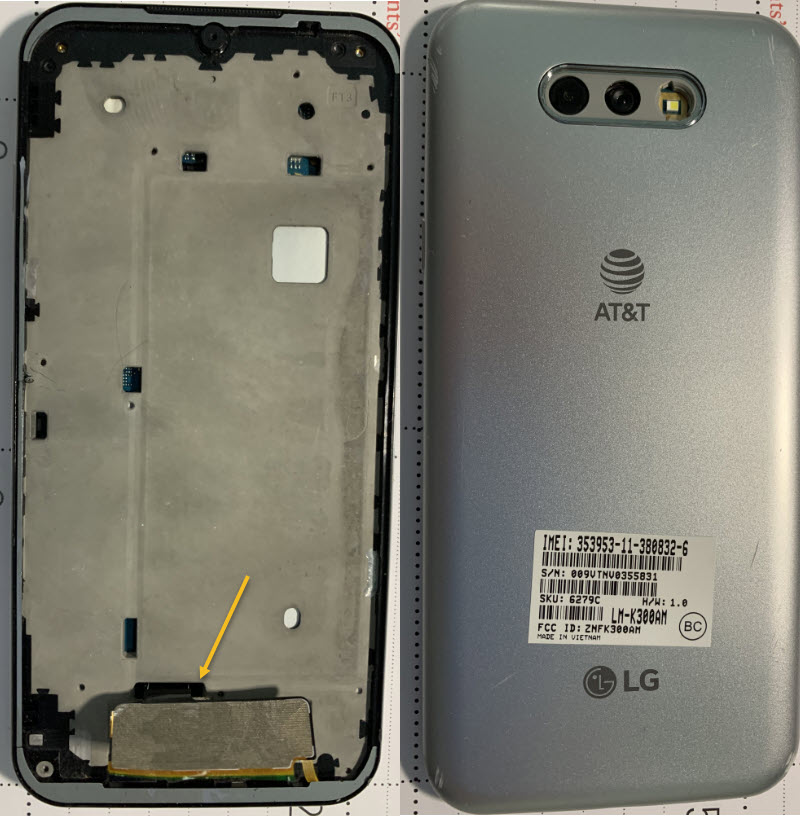
My wife and I were walking in our neighborhood. She noticed a smartphone on the ground so, I picked it up and noticed the display screen was missing. The arrow points to the ribbon connector for the missing display. Refer to below images of the AT&T LG smartphone we found made in Vietnam:
AT&T LG smartphone with missing display that we found
She said, “why not write a blog post about the making of a smartphone?” So, here are some snippets of information about the making of an iPhone. Read on if you want to learn more.
The cost to make the iPhone 11 Pro Max was $490.
The components manufactured by many companies around the world are ultimately sent to just two companies to assemble into iPods, iPhones, and iPads. Those companies are Foxconn and Pegatron, both of which are based in Taiwan.
Foxconn is Apple’s longest-running partner in building these devices. It currently assembles the majority of Apple’s iPhones in its Shenzen, China, location, although Foxconn maintains factories in countries across the world, including Thailand, Malaysia, the Czech Republic, South Korea, Singapore, and the Philippines.
Pegatron is a relatively recent addition to the iPhone assembly process. It is estimated that it builds around 30 percent of the orders.
Apple buys many of the components for iPhones — like the memory chip, the modem, the camera module, the microphone and the touch-screen controller — from more than 200 suppliers around the world. Foxconn, the Taiwanese company that runs the Zhengzhou facility, even produces some smaller parts, such as metal casings.
Foxconn’s facilities in Zhengzhou cover 2.2 square miles and can employ up to 350,000 workers, many of whom earn about $1.90 an hour. They work up to 12 hour shifts under intense pressure. The operation does what is called F.A.T.P., or final assembly, testing and packaging.
There are 94 production lines at the Zhengzhou manufacturing site, and it takes about 400 steps to assemble the iPhone, including polishing, soldering, drilling and fitting screws. The facility can produce 500,000 iPhones a day, or roughly 350 a minute.
After the iPhone rolls off the assembly line, it is placed in a sleek white fiberboard box, wrapped and put on a wooden pallet, and then wheeled out to waiting trucks.
As the final point of assembly for the iPhone, China also serves as a starting point for Apple’s global tax strategy. In Zhengzhou, often in the customs facility, Foxconn sells the completed iPhones to Apple, which in turn resells them to Apple affiliates around the world.
The process, most of which takes place electronically, allows Apple to assign a portion of its profits to an affiliate in Ireland, a tax-advantageous locale. The system is not unique to China.
Smartphones are small enough to be shipped by plane in huge quantities — and cost effectively. A single wide-body Boeing 747 can easily carry 150,000 iPhones tucked into its aluminum canisters.
From Zhengzhou, UPS, FedEx and other freight carriers typically fly United States-bound iPhones to Anchorage. There, they refuel, before going on to Louisville, Ky., a major logistics hub, or other points in the country.
Domestic-bound iPhones are typically loaded onto a large truck and taken on an 18-hour drive from Zhengzhou to Shanghai, in eastern China, where Apple has set up its national distribution center. A single tractor-trailer holds up to 36,000 iPhones. Because the vehicles have about $27 million worth of freight on board, they are equipped with cameras and sometimes accompanied by armed security guards.
After the iPhone leaves the Foxconn factory in Zhengzhou, it takes two days, on average, to get to a store in Shanghai, a 590-mile trip. It takes three days, on average, to get a store in San Francisco, some 6,300 miles away.
Apple does very little of its own manufacturing. Instead it relies on contract outsourcing companies like Foxconn (one of the largest employers in the world) to do this for them. This removes much of the headache of manufacturing for Apple while keeping production costs as low as possible. There is a significant market advantage to this approach and its one that many other electronics manufacturers are emulating now.
Like any good design company, the design process at Apple is not over when manufacturing begins. In fact, Apple iterates the design throughout manufacturing. The product is built, it’s tested and reviewed, then the design team improves on it and it’s built all over again. These cycles take 4-6 weeks at a time and may be run many times over a product’s development lifecycle.
This is a very costly approach but it’s one of the reasons that Apple has a reputation for quality. The more you invest in design, the more likely you are to build incredible market changing products. It’s the process that the iPod, the iPhone and the iPad go through.
The packaging room is a very-high security area in Apple and it’s where prototypes are unboxed. As you might expect, the security is to prevent leaks to the outside world. If you ever do see a leaked prototype for an Apple product – it won’t have come from here. It’s more likely to have vanished from a production line in China.
The final step in Apple’s product development is product launch. When the product is considered to be as good as it can be – it enters an action plan known as “the Rules of the Road”. This explains all the responsibilities and actions that must be taken prior to a commercial launch of the product. It is an extremely remarkable accomplishment to design, manufacture, market, and ship an iPhone.
It must be a nerve-wracking experience to be privy to the “Rules of the Road” because if you lose it or leak it, you are immediately fired.
Please feel free to leave a comment. I would love hearing from you. Do you have a computer or smart device tech question? I will do my best to answer your inquiry. Just send an email to contact@techsavvy.life. Please mention the device, app and version that you are using. To help us out, you can send screenshots of your data related to your question.
Copyright Scott Adams, Inc./Distributed by Universal Uclick for UFS
Facebook can feel a little overwhelming. What if you miss a post and you can not find it later? Thankfully, Facebook has a bookmarking feature to help you keep track of things and save them for later.
Facebook can feel a little overwhelming. What if you miss a post and you can not find it later? Thankfully, Facebook has a bookmarking feature to help you keep track of things and save them for later.
You can save shared links, posts, photos, videos, and even pages and events. These things can all be organized into Collections. Let’s explore how to do this.
This is for iPhone, iPad, and Android using Facebook
Copyright Scott Adams, Inc./Distributed by Universal Uclick for UFS
How to Save Facebook Posts
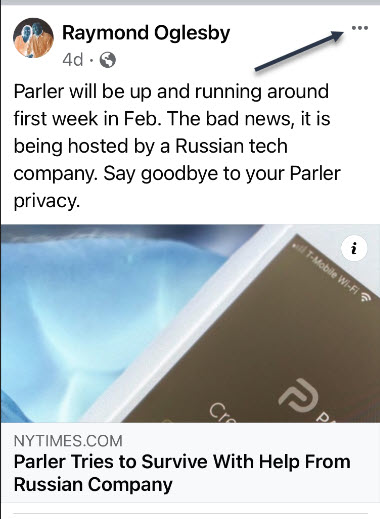
First, find any Facebook post you would like to save. Tap or click the three-dot hambuger icon in the upper right-hand corner of the post. Refer to below image:
Accessing the hamburger icon for a post
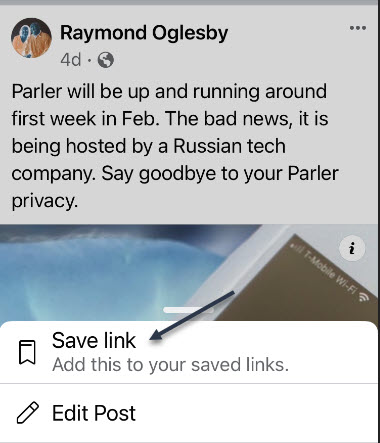
Next, select Save Post (or Save Event, Save Link, etc). In my example I am saving a link. See below image:
Accessing Save link option
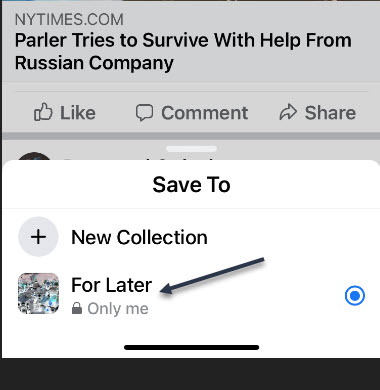
After you select Save Post or Link, etc, you will immediately get the choice to save it to a collection or create a new one. See following image:
Saving the link to collection For Later
How to Access Facebook Posts
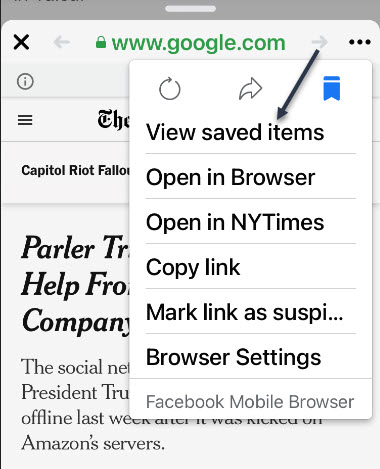
Now, you will need to open the post (if it is a link) and tap the hamburger icon. Next, select View Saved Items. Refer to below image:
Accessing View saved items option
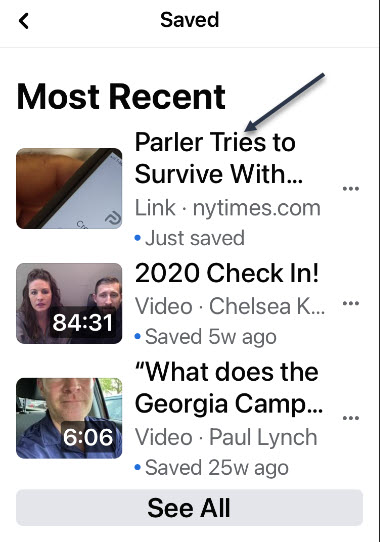
The most recent items will appear at the top, and Collections can be found underneath. See below image:
Listing of your most recent saves
Thje steps are similar for your desktop version of Facebook. That’s it! This is a nice little trick to save posts you enjoyed or to remember to read something later.
Just click the Tweet icon below. This will launch Twitter where you click its icon to post the Tweet.
Check out TechSavvy.Life for blog posts on smartphones, PCs, and Macs! You may email us at contact@techsavvy.life for comments or questions.
Please feel free to leave a comment. I would love hearing from you. Do you have a computer or smart device tech question? I will do my best to answer your inquiry. Just send an email to contact@techsavvy.life. Please mention the device, app and version that you are using. To help us out, you can send screenshots of your data related to your question.
The author’s Vietnam eBook on the Battle for Tra Bong: Events and Aftermath