When creating or modifying a Microsoft Word document, it can be beneficial to insert or embed another file into it. By inserting a file into a Word document, that file becomes a part of the Word document. A reader can open and view the embedded file without requiring special permission or access.
When creating or modifying a Microsoft Word document, it can be beneficial to insert or embed another file into it. By inserting a file into a Word document, that file becomes a part of the Word document. A reader can open and view the embedded file without requiring special permission or access.
Nearly any file can be inserted into a Word document, However, be aware that inserting a file into a Word document can increase its size significantly.
In this post, instead of using “copy and paste” from one document into another, we will show you another way, using the Insert feature.
This is for devices running Word
Copyright Scott Adams, Inc./Distributed by Universal Uclick for UFS
First, open the Word document that you would like to add the contents of, another Word document to.
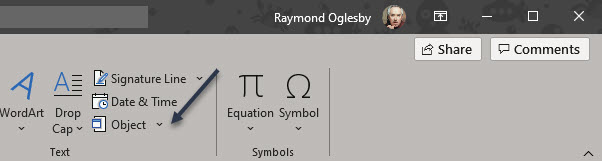
Next, in the Text group of the Insert tab, click the drop-down arrow next to the Object option. Refer to below image:
Accessing the Object option
A drop-down menu will appear. There are two options to choose from here; Object and Text From File.
Object: Embeds an object such as a Word document or Excel chart
Text From File: Inserts the text from another file into your Word document
The Text From File option is essentially a quicker way to “copy and paste” the content of another file into this one.
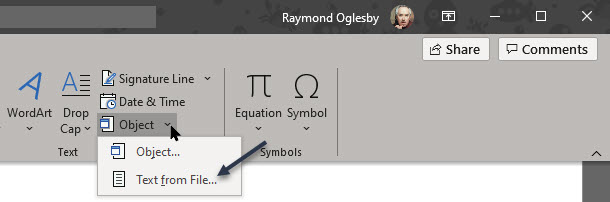
Now, click the Text From File option in the drop-down menu. See below image:
Accessing the Text from file option from drop-down menu
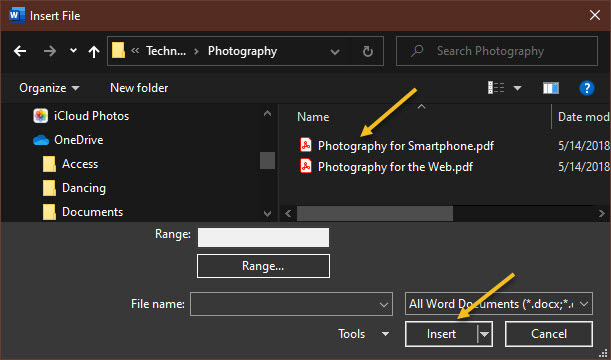
Next, the File Explorer (Finder on Mac) will open. Find the file you would like to copy the text from, select it, then click Insert. See following image:
Selecting the file to be inserted into original Word document
The contents of that Word document will now appear in the current Word document. This works well if there is not a lot of content in the other Word document, but if there is, embedding it may be a better option.
You may want to add headings/subheadings to the inserted document.
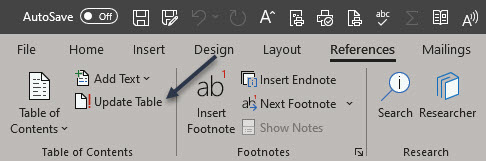
If your original Word document has a Table of Contents, make sure you update your table. First, under the References tab, select the Update Table option. Refer to below image:
Accessing Update Table option
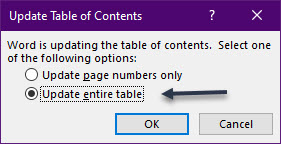
Now, from the pop-up window that will be displayed, select an option. It is recommended you choose the Update entire table option, then cli ck OK. See below image:
Selecting how you want the Table of Contents to be updated
That’s it. Please feel free to share this post! One way to share is via Twitter.
Just click the Tweet icon below. This will launch Twitter where you click its icon to post the Tweet.
Check out TechSavvy.Life for blog post on smartphones, PCs, and Macs! You may email us at contact@techsavvy.life for comments or questions.
Please feel free to leave a comment. I would love hearing from you. Do you have a computer or smart device tech question? I will do my best to answer your inquiry. Just send an email to contact@techsavvy.life. Please mention the device, app and version that you are using. To help us out, you can send screenshots of your data related to your question.
The author’s Vietnam eBook on the Battle for Tra Bong: Events and Aftermath
The default sound input device is the device that Windows uses to record or hear sound. When you connect more than one microphone or other recording devices to your PC, you can select which device you want to use by default.
The default sound input device is the device that Windows uses to record or hear sound. When you connect more than one microphone or other recording devices to your PC, you can select which device you want to use by default.
This is for devices running Windows 10
Copyright Scott Adams, Inc./Distributed by Universal Uclick for UFS
Windows 10 users often need to juggle several microphones. There might be one built into a PC, one on a webcam, on a headset, and perhaps a podcasting microphone.
It’s worth noting that in some apps (such as Zoom), you can select your microphone device within the app, and that choice will function independently of the Windows system sound settings.
To set your default microphone system-wide, follow the steps below. Every app that uses the default Windows microphone, that is the default option for most apps, will use it.
Using Settings to Set the Default Microphone
Before we begin, it’s worth mentioning that if you have only one microphone, it will be the default.
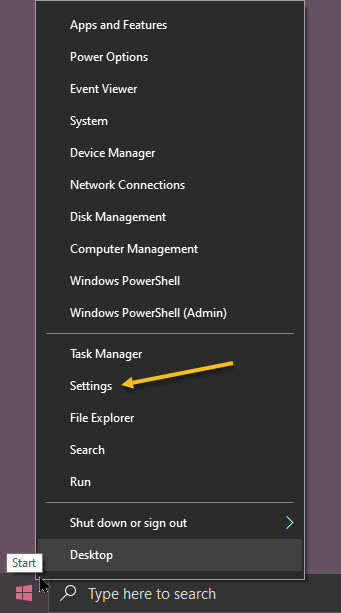
First, open Settings by clicking the Start menu and selecting the gear icon in the lower left-hand corner of your screen. You can also press Windows+i to open it. Refer to below image:
Accessing Settings
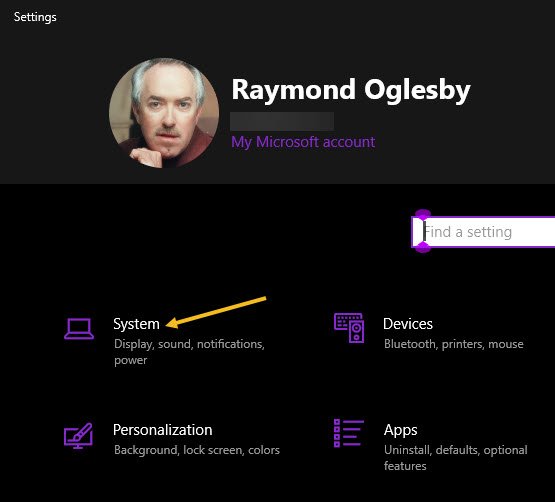
Now, in the Settings window, click the System option. See below image:
Accessing System option
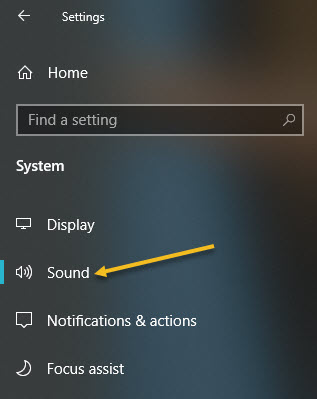
Next, on your System screen, click the Sound option from the sidebar menu. See following image:
Accessing Sound option
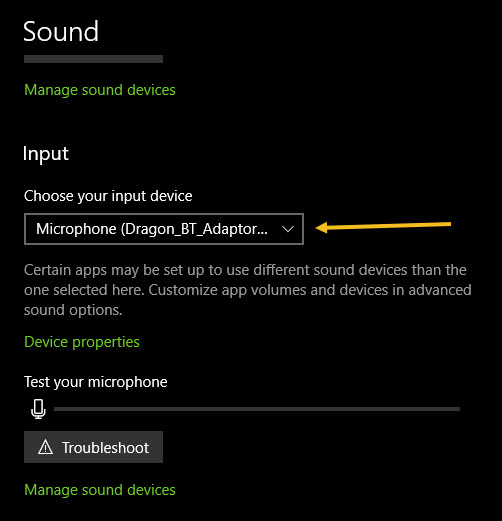
Now, scroll down to the Input section. In the drop-down menu labeled Choose your input device, select the microphone you would like to use as your default device. Refer to below image:
Selecting your default microphone
Once you have selected a device from the drop-down menu, Windows will use that device as your default microphone. Now, exit Settings.
Using Control Panel to Set the Default Microphone
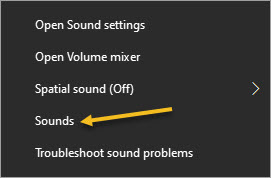
First, right-click the speaker icon in the system tray in the lower right-hand corner of your screen and select Sounds from the pop-up menu. See below image:
Accessing Sounds
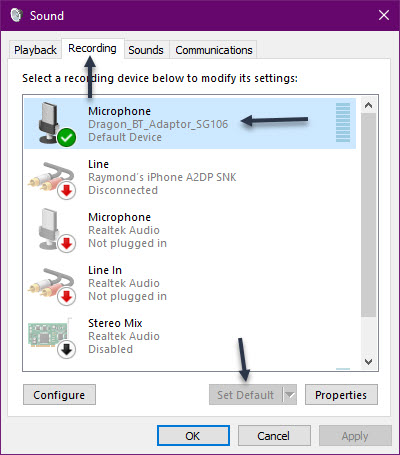
Next, click the Recording tab. Now, you will see a list of recording devices recognized by your system, which includes microphones. Select the microphone you would like to use as the default from the list and click the Set Default button. Note! If there is only one microphone listed, it will be the default. See following image:
Setting the default microphone
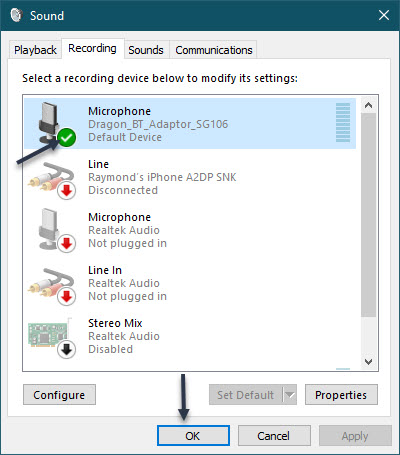
The microphone you have selected will have a green checkmark beside it and include the label DefaultDevice. Next, click OK to close your Sound window. Refer to below image:
Accepting the default microphone
If you want to change your default microphone again, just select Sounds from the speaker icon in the System tray and follow the above steps for using the Control Panel to set the default microphone.
You are finished setting your default microphone. Now you may close any openwindows. Please feel free to share this post! One way to share is via Twitter.
Just click the Tweet icon below. This will launch Twitter where you click its icon to post the Tweet.
Check out TechSavvy.Life for blog posts on smartphones, PCs, and Macs! You may email us at contact@techsavvy.life for comments or questions.
Please feel free to leave a comment. I would love hearing from you. Do you have a computer or smart device tech question? I will do my best to answer your inquiry. Just send an email to contact@techsavvy.life. Please mention the device, app and version that you are using. To help us out, you can send screenshots of your data related to your question.
The author’s Vietnam eBook on the Battle for Tra Bong: Events and Aftermath
Are you frustrated by Edge loading at Windows 10 startup? Do you prefer using Chrome as your default browser? In Windows 10 Home edition, Edge is the default browser, even if you make Chrome the default; Edge seems to ignore the Chrome setting.
Are you frustrated by Edge loading at Windows 10 startup? Do you prefer using Chrome as your default browser? In Windows 10 Home edition, Edge is the default browser, even if you make Chrome the default; Edge seems to ignore the Chrome setting.
To disable Edge, we are going to use the Group Policy Editor (the gpedit.msc file). But, back in Windows 7, Microsoft quit making the Editor a part of its operating system, especially the Home editions. So, we are going to install the Editor, and use the utility to disable preloading of Edge at startup in Windows 10.
This is for Windows 10
Copyright Scott Adams, Inc./Distributed by Universal Uclick for UFS
Install Group Policy Editor
Note! You will only need to do this if you have Windows 10 Home edition. If you have the Pro edition, you can bypass this step.
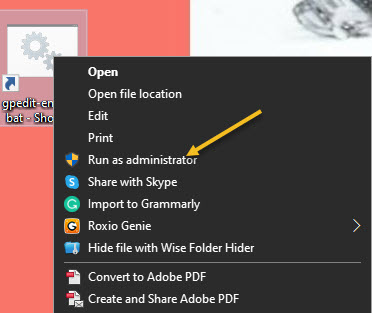
First, download the GPEdit Enabler script from the link below:
and save the “gpedit-enabler.bat” file to your desktop. Now, right-click the file and select Run as Administrator. Refer to below image:
Access gpedit batch file as Administrator
This will start the installation process. It may take some time depending upon your system performance. Once the process is complete, press any key to close the Command Prompt window. You may be prompted to download and install some Microsoft Net files; if so, allow permission to do so.
Although a restart is not required, if the policies are not working, you should restart your computer.
Run Group Policy Editor
First, open the Run dialog by pressing the Windows+R keys. Type gpedit.msc and press the Enter or OK button. This should open gpedit in Windows 10 Home or Pro.
On Windows 10, Microsoft Edge loads some processes in the background during startup to improve the speed when launching the application. But, we want to disable this feature and use Chrome instead.
How to Disable Preloading Edge
In the Group Policy Editor, browse to the following path:
Computer Configuration > Administrative Templates > Windows Components > Microsoft Edge
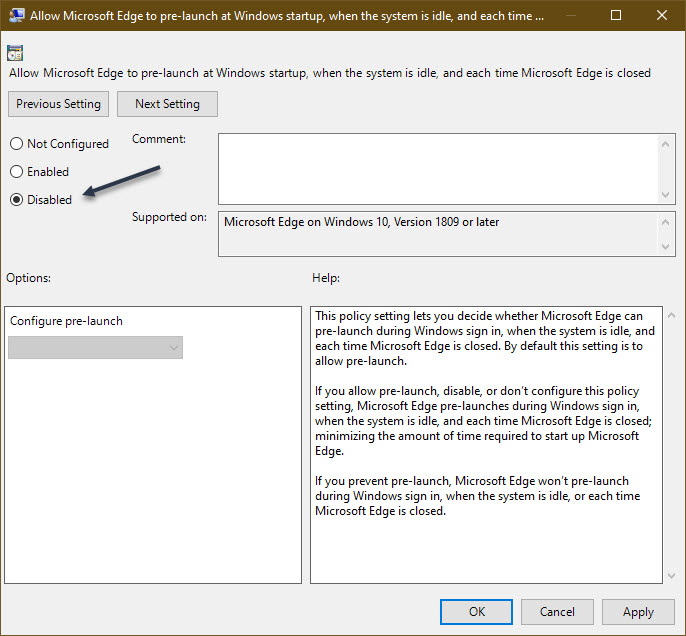
Now, click on the Setting column to sort it alphabetical. On the right side, double-click the Allow Microsoft Edge to pre-launch at Windows startup, when the system is idle, and each time Microsoft Edge is closed policy. See below image:
Accessing Group Policy Editor for Edge for pre-launch option
Now, select the Disabled option. See following image:
Selecting the pre-launch Disabled option
Next, click Apply, then OK.
Now, on the right side, double-click the Allow Microsoft Edge to start and load the Start and New Tab page at Windows startup and each time Microsoft Edge is closed policy. Refer to below image:
Accessing Group Policy for Edge for Start and New Tab option
Next, select the Disabled option. See below image:
Selecting the Start and New Tab Disabled option
Next, click Apply, then OK.
Now, repeat the above steps substituting User Configuration for Computer Configuration.
Now, exit the Editor and save any open work. You must RESTART your computer for the changes to take effect.
The Edge browser will no longer pre-load processes freeing up resources for more important apps and services.
In the case you change your mind, you can roll back the previous settings using the same instructions, but instead of selecting Disabled, select the Not Configured option.
Make Chrome the Default Browser
Click Start then Settings (the gear icon)
Click on Apps
Click on Default apps
Click on Web browser and select Google Chrome. See following image:
Setting Chrome as the default browser
That’s it. You have disabled Edge for pre-loading and saving resources. Please feel free to share this post! One way to share is via Twitter.
Just click the Tweet icon below. This will launch Twitter where you click its icon to post the Tweet.
Check out TechSavvy.Life for blog posts on smartphones, PCs, and Macs! You may email us at contact@techsavvy.life for comments or questions.
Please feel free to leave a comment. I would love hearing from you. Do you have a computer or smart device tech question? I will do my best to answer your inquiry. Just send an email to contact@techsavvy.life. Please mention the device, app and version that you are using. To help us out, you can send screenshots of your data related to your question.
Copyright Scott Adams, Inc./Distributed by Universal Uclick for UFS
Windows computers sometimes do get viruses and other malware, but not every slow or misbehaving PC is infected by malware. Let us explore how to check if you actually have a virus; and whether a suspicious process is dangerous or not.
Windows computers sometimes do get viruses and other malware, but not every slow or misbehaving PC is infected by malware. Let us explore how to check if you actually have a virus; and whether a suspicious process is dangerous or not.
This is for the PC
Copyright Scott Adams, Inc./Distributed by Universal Uclick for UFS
Signs of a Virus
If you notice any of the following issues with your computer, it may be infected with a virus:
Slow computer performance (taking a long time to start up or open programs)
Problems shutting down or restarting
Missing files, such as DLLs, or Master File Table, or Master Boot Record
Frequent system crashes and/or error messages
Unexpected pop-up windows
New applications (toolbars, etc.) that appear without you downloading them
Overworked hard drive (the fan makes sounds and seems to be whirring and working hard when you are not doing much)
Emails that send autonomously from your accounts
Browser lag or redirects
Malfunctioning antivirus programs or firewalls
Just because your PC is running fine does not mean it does not have malware. The viruses of a decade ago were often pranks that ran wild and used a lot of system resources. Modern malware is more likely to lurk silently and covertly in the background, trying to evade detection so it can capture your credit card numbers and other personal information. In other words, modern-day malware is often created by criminals just to make money, and well-crafted malware will not cause any noticeable PC problems at all.
There’s no one-size-fits-all piece of evidence to look for without actually scanning your PC for malware. Sometimes malware causes PC problems, and sometimes it’s well-behaved while sneakily accomplishing its goal in the background. The only way to know for sure whether you have malware is to examine your system for it.
Check Your Processes
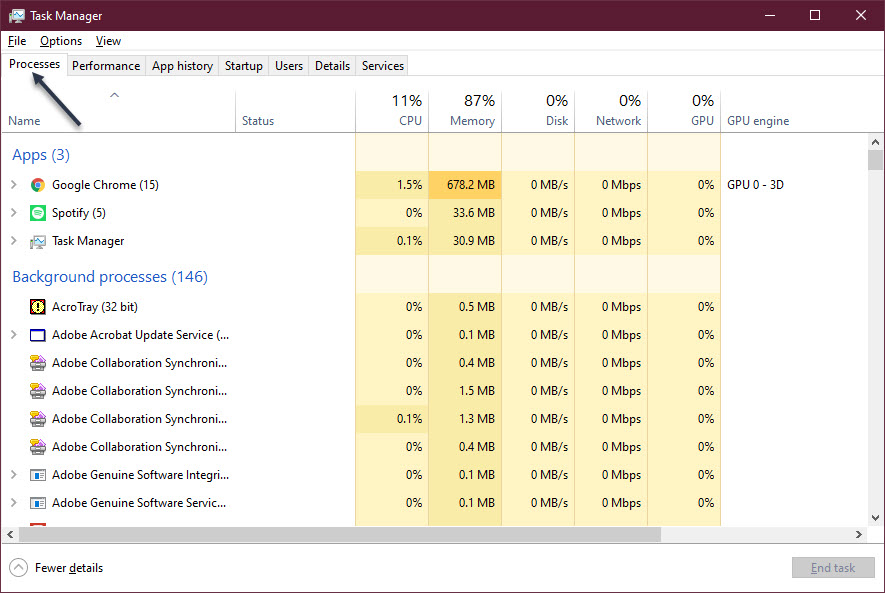
You might be wondering if your computer has a virus because you have seen a strange process in the Windows Task Manager.
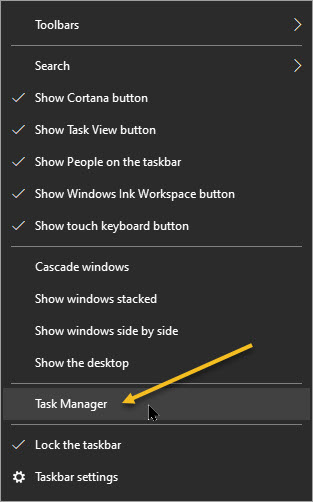
First, open the Task Manager by pressing Ctrl+Shift+Esc or by right-clicking the Windows taskbar and selecting Task Manager. Refer to below image:
Selecting the Task Manager
It is normal to see quite a few processes here. Many of these processes have strange, confusing names. That is normal. Windows includes quite a few background processes, your PC manufacturer added some, and applications you install often add them. See below image:
Accessing your system Processes
If you do not see many entries, click the More details link in bottom left-hand corner.
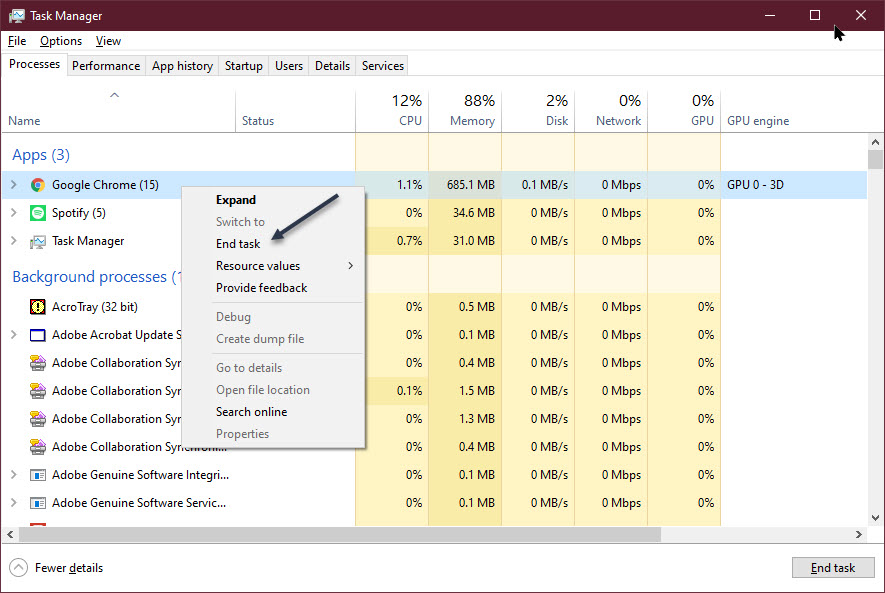
Badly behaved malware will often use a large amount of CPU, memory, or disk resources. GoogleChome and/or chrome.exe are resource ‘hogs’. If you see a lot of these entries, first, save and close all your work. Then. right click on each one and select End Task. Now, you will need to restart your computer and relaunch GoogleChrome to reopen this post. Now, access your processes again and check for Google Chrome and/or chrome.exe. If you still see entries that are using lots of system resources, continue reading for other options. See following image:
Ending a Task
If you are curious about whether a specific program is malicious, right-click it in the Task Manager and select Search Online to find more information.
If information about malware appears when you search the process, that is a sign you likely have malware. However, do not assume that your computer is virus-free just because a process looks legitimate. A process could lie and say it is Google Chrome or chrome.exe but it may just be malware impersonating Google Chrome that is located in a different folder on your system. If you are concerned you might have malware, we recommend performing an anti-malware scan.
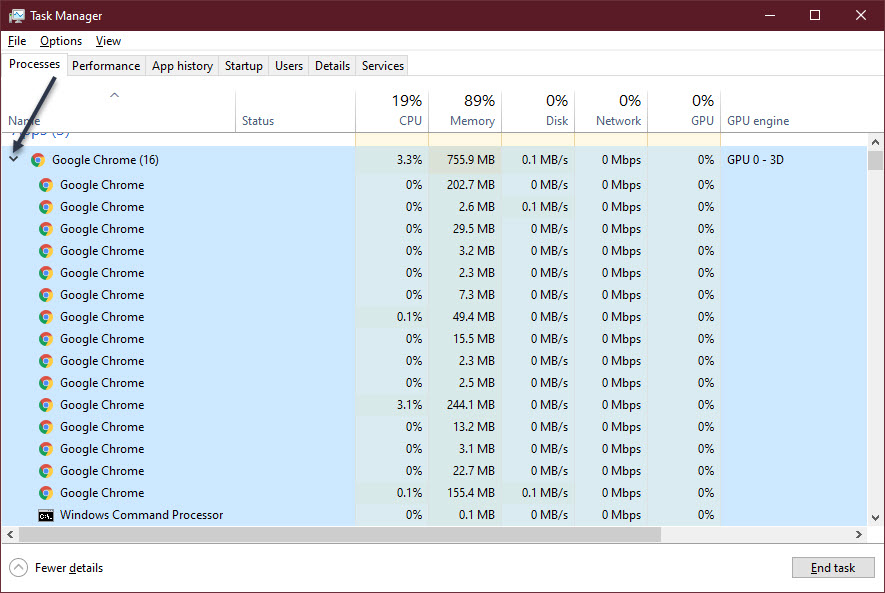
In our example, Google Chrome has a number at the end, number 15. This refers to the number of running Chrome instances. To see the detail, click its Expand arrow. If you use Chrome a lot, just ensure that the CPU percentage is very low; which means the Chrome task is “not overloading your system”. If it is, End Task as mentioned above. Refer to below image:
Expanding a Process
Scan Your Computer
By default, Windows 10 is always scanning your PC for malware with the integrated Windows Security application, also known as Windows Defender. You can, however, perform manual scans.
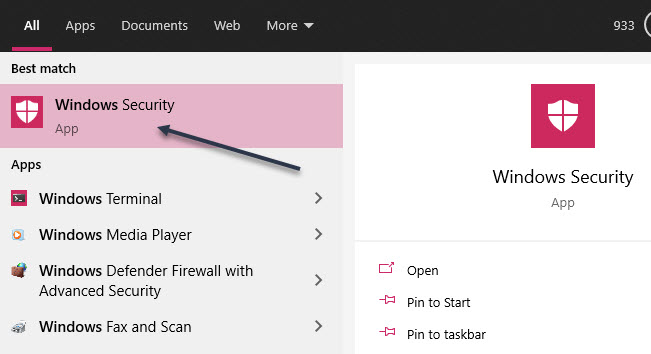
On Windows 10, open your Start menu, type WindowsSecurity in the Cortana search box. Now, click the Windows Security shortcut in upper left-hand corner to open it.
You can also navigate to:
Settings > Update & Security > Windows Security > Open Windows Security
See below image:
Selecting Windows Security
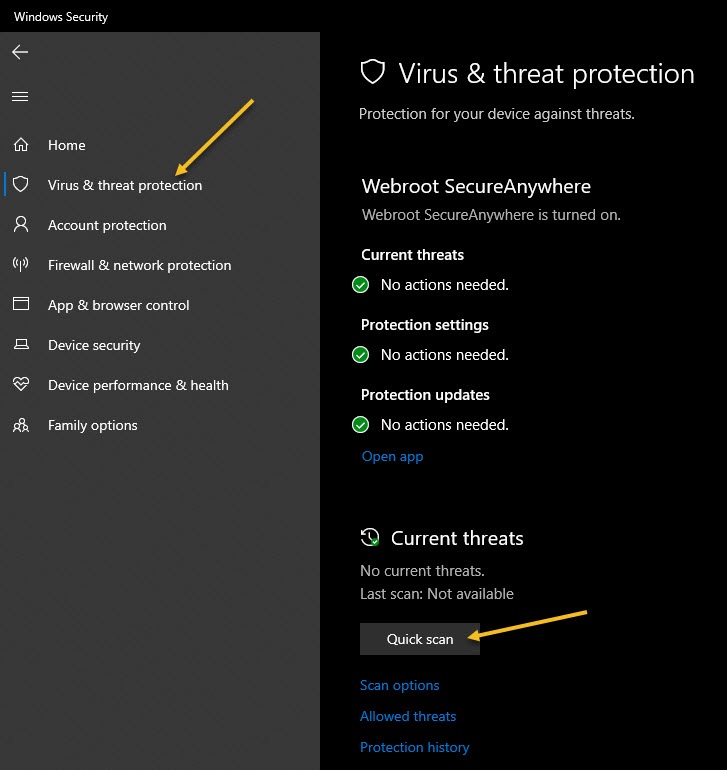
To perform an anti-malware scan, click Virus & threat protection in the sidebar. Now, click Quick Scan to scan your system for malware. If you do not see the Quick Scan option, ensure that Windows Defender is running. Windows Security will perform a scan and give you the results. If any malware is found, it will offer to remove it from your PC automatically. See following image:
Performing a Quick Scan
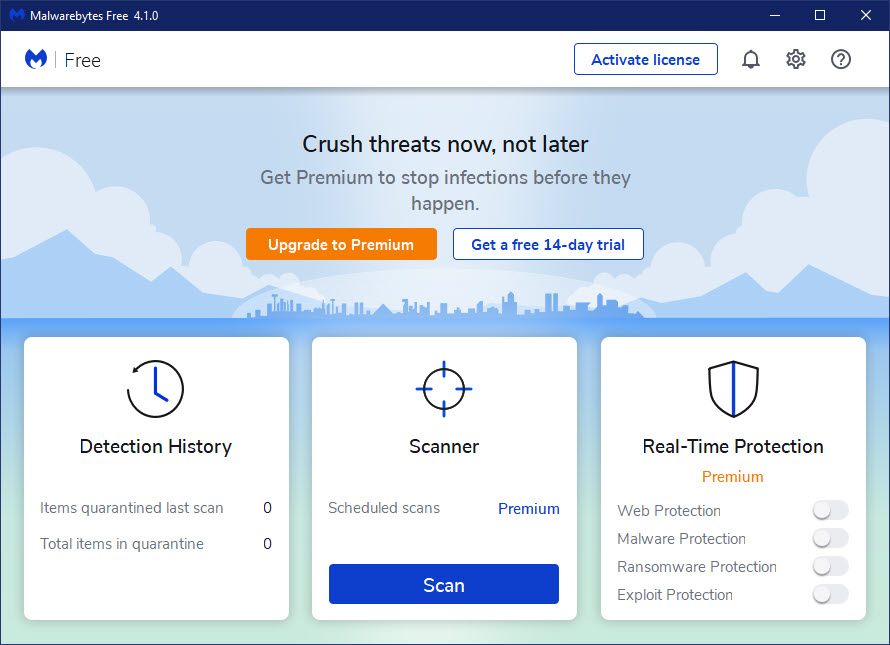
Another option is to use a third-party application. We recommend Malwarebytes. The free version of Malwarebytes will let you perform manual scans to check for viruses and other malware on your PC. The paid version adds real-time protection. But, the free version will work just fine to check your PC for malware.
To download, click here. Then install and run. You may receive an Update Now screen. If so, just click the Update Now button and follow the instructions. Then, click the “free 14-day trial” button to run a scan. Refer to below image for the opening screen of Malwarebytes:
Malwarebytes main screen
If any of the above steps fail, you can restart your computer in Safe Mode by pressing the Shift +Restart, or pressing the F8 key repeatly, or using a Recovery drive. When you get to the advanced troubleshooting tools, you will arrive at a screen that lets you access these tools. Click the Troubleshoot button to proceed.
You are finished. Please feel free to share this post! One way to share is via Twitter.
Just click the Tweet icon below. This will launch Twitter where you click its icon to post the Tweet.
Check out TechSavvy.Life for blog posts on smartphones, PCs, and Macs! You may email us at contact@techsavvy.life for comments or questions.
Please feel free to leave a comment. I would love hearing from you. Do you have a computer or smart device tech question? I will do my best to answer your inquiry. Just send an email to contact@techsavvy.life. Please mention the device, app and version that you are using. To help us out, you can send screenshots of your data related to your question.
The author’s Vietnam eBook on the Battle for Tra Bong: Events and Aftermath
On Windows 10, the process to rename a single file is easy, but it can become troublesome quickly when trying to change the name (or extension) to a long list of files within a folder.
On Windows 10, the process to rename a single file is easy, but it can become troublesome quickly when trying to change the name (or extension) to a long list of files within a folder.
Although, you can always built-in Windows 10 various tools to change the name of files like File Explorer, Command Prompt, and PowerShell, we are going to use another Microsoft tool, the PowerRename module in PowerToys.
This is for Windows 10
Copyright Scott Adams, Inc./Distributed by Universal Uclick for UFS
PowerRename Module in PowerToys
The PowerRename module is part of the free PowerToys. To download PowerToys from the Microsoft website, visit this link in your favorite browser and look for the latest release toward the top of the page. Download that file and run it to install the app
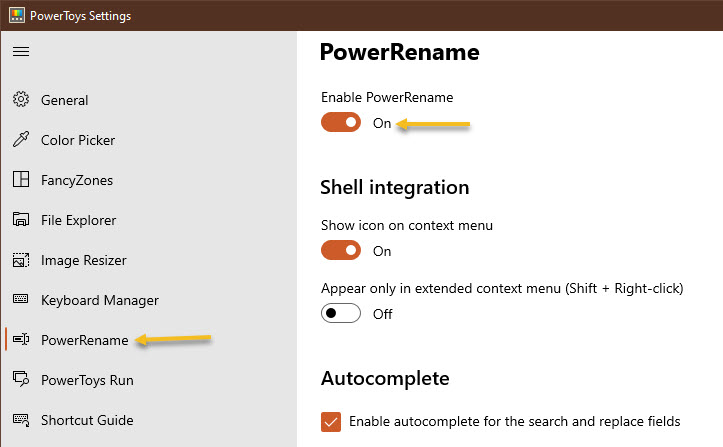
Once installed, an icon will be placed in your Tray Bar. Click on the icon to run PowerToys. Now, launch PowerToys Settings, and click PowerRename in the sidebar. Next, ensure that the switch beside Enable PowerRename is turned on. Refer to below image:
Enabling PowerRename
Now, close the PowerToys Settings window.
Renaming Options
Now that you have the app installed, renaming a bunch of files is as easy as a right-click a menu choice. First, locate the files that you want to rename in File Explorer or on the desktop and select them. See below image:
Photos to be renamed
Then right-click the files and select PowerRename from the menu that appears. See following image:
Selecting PowerRename
The PowerRename pop-up window will open. Refer to below image:
The PowerRename window
First, enter the criteria that will determine what gets renamed. By default, PowerRename works with simple search-and-replace functionality. In the first text box, type a search term. On the next line, enter what you want to replace it with. PowerRename will replace the first occurrence (or every occurrence if you check a box) of that term in all of the file names you have selected with the replacement text.
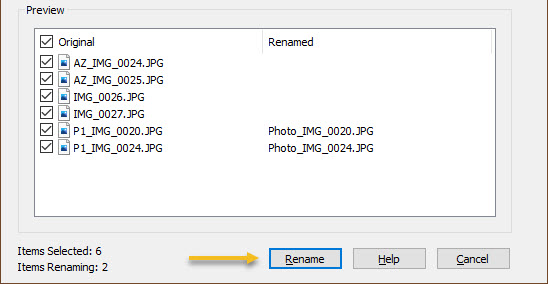
Here is an example where “P1_” in each file name has been replaced with “Photo_.” The neat thing is that PowerRename provides a preview of what the renamed files will look like right there in the window. That way, you do not have to guess what the result might be. See below image:
Selecting the criteria for the rename
Near the middle of the window, you will see other options that change how PowerRename works. Consider each one and place a checkmark beside those that you want to use. Here is what each option does:
Use Regular Expressions: This allows the use of powerful search strings known as regular expressions which can enable very in-depth or complex search-and-replace operations.
Case Sensitive: This option makes searches sensitive, whether the letters are capital or lowercase. For example, the term “cat” would match different results than “Cat.”
Match All Occurrences:Normally, only the first instance of the search term is replaced (from left to right). With this checked, all instances of the search term will be replaced.
Exclude Files: If this is checked, the operation will only apply to folders and not files.
Exclude Folders: If this is checked, the operation will only apply to files and not folders.
Exclude Subfolder Items: This excludes items in selected sub-folders from rename operations. For example, if you select a directory that has files within sub-folders, those will not be affected.
Enumerate Items: This will add a number, counting upward, to the end of each file that is renamed.
Item Name Only: If checked, the operation will only apply to the file or folder’s name and not its extension.
Item Extension Only: If checked, the operation will only apply to the file or folder’s extension and not its name.
When you are ready, click the Rename button, and PowerRename will perform the operation you have specified. See following image:
Selecting the Rename butoon to rename your file(s)
If you do not like the result, you can press Ctrl+Z in File Explorer to undo the rename process. A very handy shortcut to undo your change.
A Practical Example
What if you do not want to just replace a word in a file, but rather, you would like to replace the entire filename with something completely new? In that case, you would want a wildcard to match all of the files you have selected. To do that, you will need to use a very simple, regular expression, “.*”, which means “everything.”
In the below example, we are going to replace all file names selected with a base file name that gets progressively numbered. First, enter “.*” in the Search for box, then enter the name you would like to use in the Replace with box. Then check Use Regular Expressions, Enumerate Items, and Item Name Only. Refer to below image:
A Rename example
Now, you will end up with a series of similarly named files that are numbered in sequential order. When you are done setting it up, click Rename, and the operation will finish.
You are finioshed. Please feel free to share this post! One way to share is via Twitter.
Just click the Tweet icon below. This will launch Twitter where you click its icon to post the Tweet.
Check out TechSavvy.Life for blog posts on smartphones, PCs, and Macs! You may email us at contact@techsavvy.life for comments or questions.
Please feel free to leave a comment. I would love hearing from you. Do you have a computer or smart device tech question? I will do my best to answer your inquiry. Just send an email to contact@techsavvy.life. Please mention the device, app and version that you are using. To help us out, you can send screenshots of your data related to your question.
The author’s Vietnam eBook on the Battle for Tra Bong: Events and Aftermath
Meet Now in Windows 10 is a new feature that allows users to host and attend meetings remotely using Skype. Microsoft quietly introduced this feature in Windows 10. It was released to the general public in version “20H2” in October 2020.
Meet Now in Windows 10 is a new feature that allows users to host and attend meetings remotely using Skype. Microsoft quietly introduced this feature to the Windows 10 taskbar. It was released to the general public in version “20H2” in October 2020.
Since the feature was announced, folks have had mixed feelings about Microsoft’s approach, with some users calling ‘Meet Now’ bloatware. Author Note! Unless you have and use Skype, there is no reason to store the icon in your taskbar. With that said, let’s explore how to hide or disable this feature.
This is for devices running Windows 10
Copyright Scott Adams, Inc./Distributed by Universal Uclick for UFS
The Meet Now
The Meet Now icon looks like a small video camera symbol with curved lines above and below it. By default, it appears in the notification area of the Windows 10 taskbar. Refer to below image:
The Meet Now icon in your taskbar
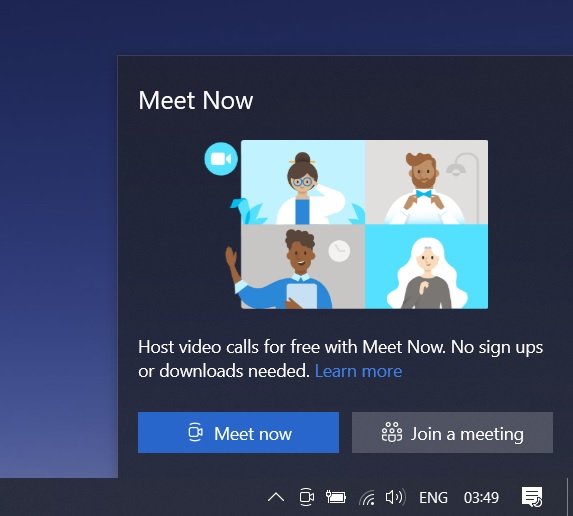
When clicked, the Meet Now button opens a small pop-up window that includes links to start or join meetings using Skype, a teleconferencing service owned by Microsoft. See below image:
The Meet Now window
If you do not have the Skype application installed, both links open the Skype website in your default web browser. If you do have Skype installed, the links will open the Skype application. There is no ‘Meet Now’ application.
How to Hide Meet Now
To hide the Meet Now icon, right-click it and select Hide from its context menu. See following image:
Hiding the Meet Now icon
The Meet Now icon in the taskbar will disappear. It will not reappear unless you enable it again (see the section at the end). This action effectively “disables” Meet Now, since the button is merely a set of links to Skype.
How to Disable Meet Now
First, launch Settings by clicking the gear icon in your Start menu (in lower left-hand corner) or by pressing Windows + I on your keyboard. Refer to below image:
Accessing Settings
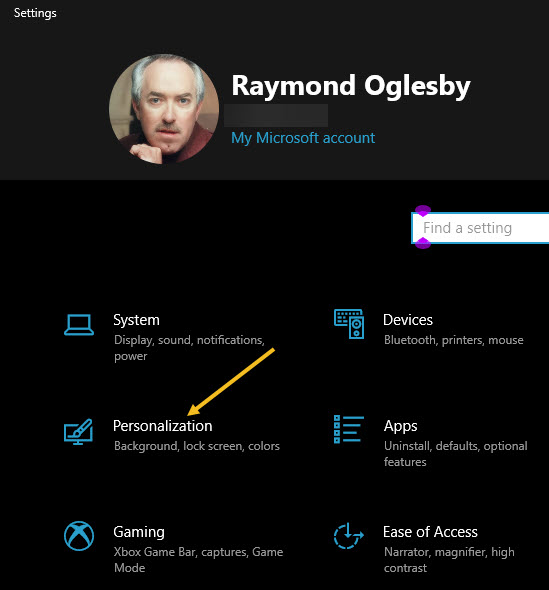
Next, click the Personalization option. See below image:
Accessing the Personalization option
Now, click the Taskbar option. See following image:
Accessing the Taskbar option
Next, in the Taskbar settings menu, scroll down and locate the Notification Area section and then click the Turn system icons on or off link. Refer to below image:
Accessing the Turn system icons on or off link
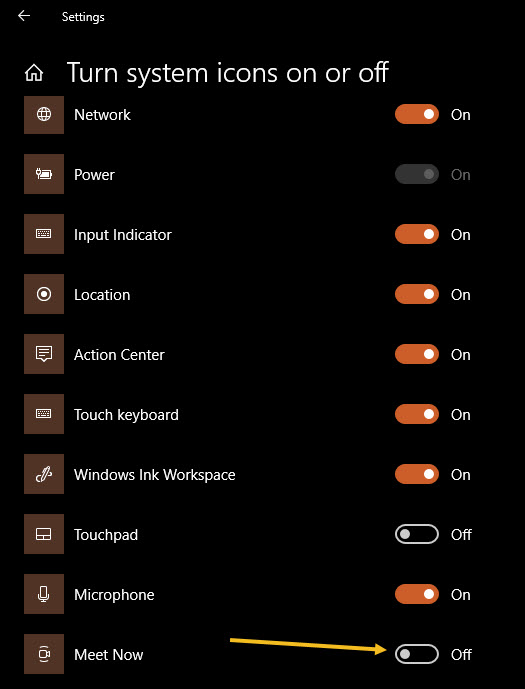
On this page, locate the Meet Now option (usually at the bottom right of your screen) and toggle the switch to turn it Off. See below image:
Disabling the Meet Now option
Now, the Meet Now icon will be disabled.
How to Restore Meet Now
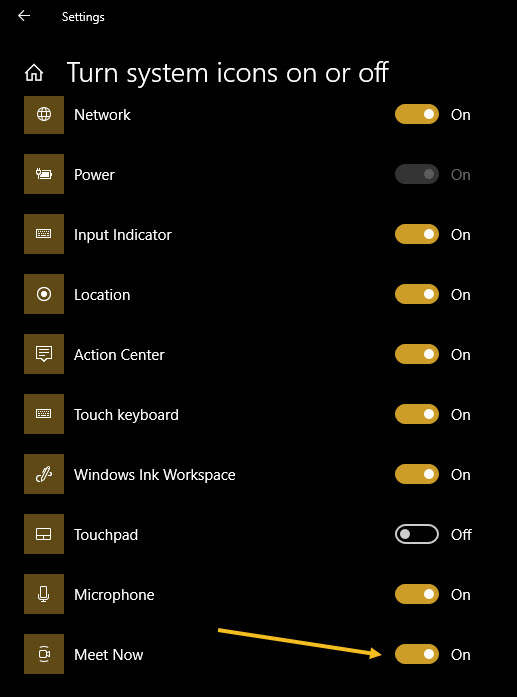
If you have hidden or disabled the Meet Now button and you would like to see it again, open Settings by clicking the gear icon in your Start menu (in lower left-hand corner) or by pressing Windows + I on your keyboard. Now, navigate to
Personalization > Taskbar > Turn system icons on or off
Next, flip the toggle beside Meet Now (usually at the bottom right of your screen) to turn it On. See following image:
Enabling the Meet Now option
The Meet Now icon will appear in the taskbar immediately, and it will remain there unless you hide or disable it again.
You are done with the Meet Now feature. Please feel free to share this post! One way to share is via Twitter.
Just click the Tweet icon below. This will launch Twitter where you click its icon to post the Tweet.
Check out TechSavvy.Life for blog posts on smartphones, PCs, and Macs! You may email us at contact@techsavvy.life for comments or questions.
Please feel free to leave a comment. I would love hearing from you. Do you have a computer or smart device tech question? I will do my best to answer your inquiry. Just send an email to contact@techsavvy.life. Please mention the device, app and version that you are using. To help us out, you can send screenshots of your data related to your question.
The author’s Vietnam eBook on the Battle for Tra Bong: Events and Aftermath
Windows 10 includes a number of ways to manage application windows. One of them is Task View, a built-in feature that shows thumbnails of all your open windows.
Windows 10 includes a number of ways to manage application windows. One of them is Task View, a built-in feature that shows thumbnails of all your open windows.
While using Windows 10, it’s easy to see thumbnails of all your open windows. Lets explore how to view your thumbnail in Windows 10.
This is for devices running Windows 10
Copyright Scott Adams, Inc./Distributed by Universal Uclick for UFS
Open Task View
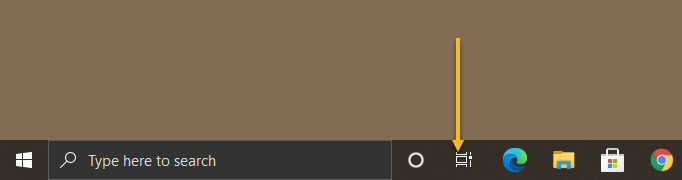
Click the Task View button on your taskbar, which is located just to the right of the Start button. Or you can press Windows+Tab keys on your keyboard. Refer to below image:
Launch Task View
If you can not find the button, right-click the taskbar and enable Show Task View Button in the context menu. See below image:
Show Task View
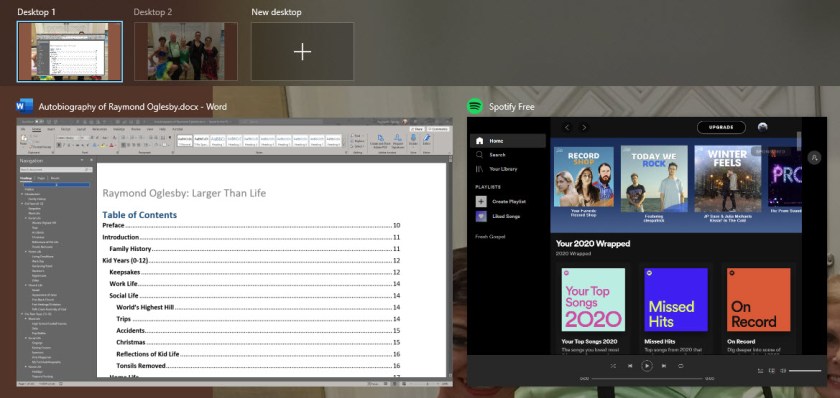
Once Task View opens, you will see thumbnails of every window you have open, and they will be arranged in neat rows. See following image:
Your open Windows 10 screens
Manage Task View
While open, use your keyboard’s arrow keys to select the window you want to view, then press the Enter key. Or you can just click the thumbnail with your mouse.
If the window you selected was already open, Windows 10 will open it in front of all other open windows. If it was minimized it will be restored and brought to the foreground.
If you want to close a window, hover over its thumbnail with your mouse until the “X” button appears, then click it. Alternately, you can select the window using your cursor keys and press the Delete key to close it. Refer to below image:
Close Task View
To close Task View and return to the desktop, just click any blank area of the screen or press the Escape key.
You are finished. Please feel free to share this post! One way to share is via Twitter, as mentioned below.
Just click the Tweet icon below. This will launch Twitter where you click its icon to post the Tweet.
Check out TechSavvy.Life for blog posts on smartphones, PCs, and Macs! You may email us at contact@techsavvy.life for comments or questions.
Please feel free to leave a comment. I would love hearing from you. Do you have a computer or smart device tech question? I will do my best to answer your inquiry. Just send an email to contact@techsavvy.life. Please mention the device, app and version that you are using. To help us out, you can send screenshots of your data related to your question.
The author’s Vietnam eBook on the Battle for Tra Bong: Events and Aftermath
Microsoft Edge is the default web browser app in Windows 10. It’s a universal Store app which has extension support, a fast rendering engine, and a simplified user interface. If you are using its InPrivate feature frequently, you might want to enable your favorite extensions in private mode.
Microsoft Edge is the default web browser app in Windows 10. It’s a universal Store app which has extension support, a fast rendering engine, and a simplified user interface. If you are using its InPrivate feature frequently, you might want to enable your favorite extensions in private mode.
By default, Microsoft Edge disables extensions in InPrivate mode to prevent unintentional privacy leaks. But sometimes you might need to use an extension while staying private.
The browser allows making specific extensions available in InPrivate mode. This can be done for each extension individually. Let’s explore how to do this.
This is for devices using Edge in Windows 10
Copyright Scott Adams, Inc./Distributed by Universal Uclick for UFS
First, open Edge. Now, in any Edge window, click the menu button (the three dots in upper right-hand corner) and select Extensions. Refer to below image:
Accessing Extensions
Next, in the Extensions tab, you will see a list of extensions you have installed, and each will have its own box. Now, locate the extension you would like to enable in InPrivate mode and clickits Details link. See below image:
Accessing an installed Extension details
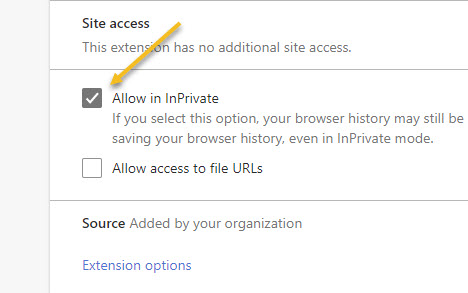
Now, on the Details screen for the extension, scroll down and check the box beside Allow in InPrivate. This will enable the extension to be used during private browsing.
Note! After checking this box, the extension could potentially collect and share your browsing history with a third party, so be sure you trust the extension before turning this feature on. See following image:
Enabling InPrivate browsing for an installed Extension
The change will take effect immediately. If you would like to use other extensions while private browsing, press back once to return to the Extensions screen and repeat these steps with each extension you would like to enable in InPrivate mode.
When you are done, close the Extensions tab. The next time you open an InPrivate window, you will notice that the extensions you enabled now work in that window too.
You are finished. Please feel free to share this post! One way to share is via Twitter.
Just click the Tweet icon below. This will launch Twitter where you click its icon to post the Tweet.
Check out TechSavvy.Life for blog posts on smartphones, PCs, and Macs! You may email us at contact@techsavvy.life for comments or questions.
Please feel free to leave a comment. I would love hearing from you. Do you have a computer or smart device tech question? I will do my best to answer your inquiry. Just send an email to contact@techsavvy.life. Please mention the device, app and version that you are using. To help us out, you can send screenshots of your data related to your question.
The author’s Vietnam eBook on the Battle for Tra Bong: Events and Aftermath
Need to clear your Google Chrome browsing data? Your browsing data is stored in a “cache” and at times, may cause a problem with the actual data stored on a website. By clearing your browsing data, you are starting with a “fresh cache” to avoid inconsistencies.
Need to clear your Google Chrome browsing data? Your browsing data is stored in a “cache” and at times, may cause a problem with the actual data stored on a website. By clearing your browsing data, you are starting with a “fresh cache” to avoid inconsistencies.
This is for PCs, Macs, iPhone and iPad
Copyright Scott Adams, Inc./Distributed by Universal Uclick for UFS
FIRST, before doing any of the following, launch your Google Chrome app. For the iPhone or iPad
Open an article or your account and tap the the hamburger icon (the 3 dots) in lower right-hand corner.
Tap History. (It may be labeled MoreHistory). Also, you can view more of your history at historygoogle.com
At the bottom, tap Clear Browsing Data.
Check Browsing history. It may be checked by default.
Uncheck any other items you don’t want to delete.
Tap Clear Browsing Data. Tap Clear Browsing Data again or Cancel if you do not want to proceed.
At the top right, tap Done, then tap Done again.
Refer to below image:
Clearing Chrome browsing data on an iPhone or iPad
For Windows, Mac, or Linux
Press Cntl+Shift+Delete keys for Windows or Linux. Press Command+Shift+Backspace for a Mac. The backspace key is labeled “Delete”.
Uncheck any items you don’t want to delete.
Press Clear data button in lower right.
Hit Enter or Return key.
See below image:
Clearing Chrome browsing data for Windows, Mac, or Linux
IMPORTANT: Be sure and close/quit your browser and restart it after clearing your browsing data.
Your browsing history will be cleared to the level you have chosen. You may repeat the above process to clear any unchecked items.
That’s it. Please feel free to share this post! One way to share is via Twitter, as mentioned below.
I hope you have found this post helpful. If so, click the Tweet icon below. This will launch Twitter where you click its icon to post the Tweet.
Check out TechSavvy.Life for blog posts on smartphones, PCs, and Macs! You may email us at contact@techsavvy.life for comments or questions.
Please feel free to leave a comment. I would love hearing from you. Do you have a computer or smart device tech question? I will do my best to answer your inquiry. Just send an email to contact@techsavvy.life. Please mention the device, app and version that you are using. To help us out, you can send screenshots of your data related to your question.
The author’s Vietnam eBook on the Battle for Tra Bong: Events and Aftermath
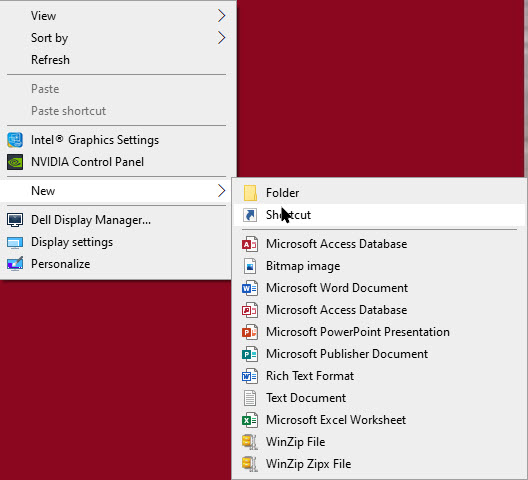
Microsoft says the System option in the Control Panel has been removed from Windows 10. As of the October 2020 Update, there is no way to access it. Here is a hidden command that opens the System Control Panel if it is missing. This command also works for the May 2020 Update.
Microsoft says the System option in the Control Panel has been removed from Windows 10. As of the October 2020 Update, there is no way to access it. There is a hidden command that opens the System Control Panel if it is missing. This command also works for the May 2020 Update.
This is for devices running Windows 10 operating system
Copyright Scott Adams, Inc./Distributed by Universal Uclick for UFS
Run the Command
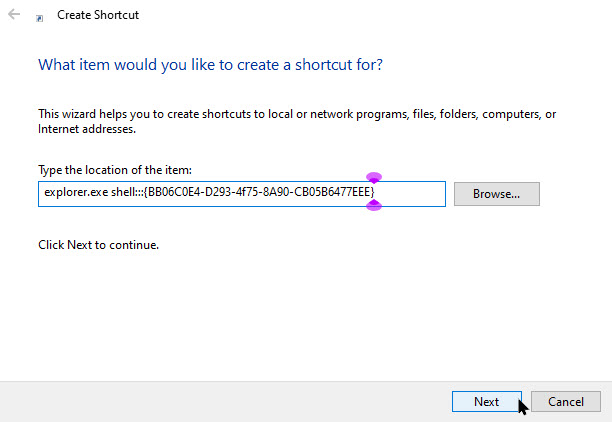
To run the command, press Windows+R to open the Run dialog. Next, copy and paste the following command into the Run dialog, then press Enter or click OK.
Next, assign a name for the shortcut and click Finish. In my example, it is named System Control Panel. See below image:
Assigning a name for the shortcut
Change Shortcut Icon
To change its icon, right-click it, and select
Properties > Shortcut tab > Change icon
Then, choose an icon and click OK.
Microsoft may remove the System pane completely from future versions of Windows 10. If so, this command will stop working.
Thanks to Spartan@HIDevolution on the NotebookReview forums for discovering this command!
That’s it. You now have a shortcut that opens the System Control Panel. I hope you have found this post helpful. If so, click the Tweet icon below. This will launch Twitter where you click its icon to post the Tweet.
I have found TechSavvy.Life blog posts extremely helpful. Check them out for posts on smartphones, Macs, and PCs! You may email us at contact@techsavvy.life for comments or questions.
Please feel free to leave a comment. I would love hearing from you. Do you have a computer or smart device tech question? I will do my best to answer your inquiry. Just send an email to contact@techsavvy.life. Please mention the device, app and version that you are using. To help us out, you can send screenshots of your data related to your question.
The author’s Vietnam eBook on the Battle for Tra Bong: Events and Aftermath