Enhance Your iPhone Photos with Simple Captions

The Photos app on iPhone allows users to add captions to photos without needing extra apps. These captions sync with iCloud and are searchable, enhancing photo organization and retrieval. The process involves selecting a photo, swiping up, and entering a caption. This functionality aids in remembering details of captured moments.

RAYMOND OGLESBY @RaymondOglesby2
July 29, 2025 – 4 minutes read time

Did you know that your Photos app comes with a built-in feature that allows you to add captions to photos on your iPhone? You do not need to download an extra app to add captions. Any captions added to photos on your iPhone will sync to the cloud if iCloud Photo Library is enabled.

Picture captions are handy for searching your iPhone’s Photo Library and reminding you of specific details when you come across the photo later. For these reasons, it’s best to keep the captions practical yet straightforward—we recommend including notes about a holiday or occasion, if applicable, and any other relevant keywords you may think of later when searching for that photo. Here’s how to name pictures on iPhone and iPad. 

  • Captions added to photos on iPhone or iPad help keep track of picture details.
  • Photo captions are searchable and appear in search results, making important photos easy to find.
  • Photo captions are automatically applied to your synced iCloud photos.

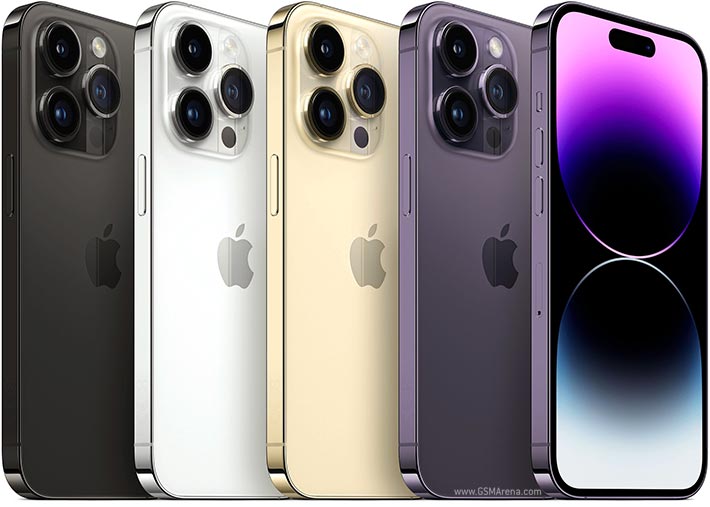
This tip works on most iPhones, but the screenshots below were captured on an iPhone 14 Pro running iOS 18.5.

Click here to learn how to update your iPhone to the latest iOS version.

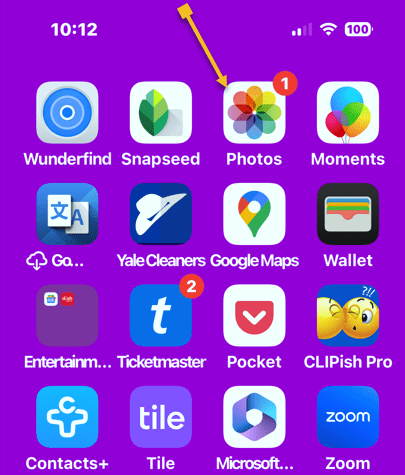
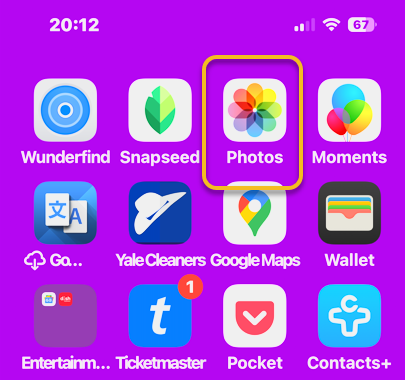
First, open the Photos app. Refer to the image below:
Caption 1
Selecting the Photos app

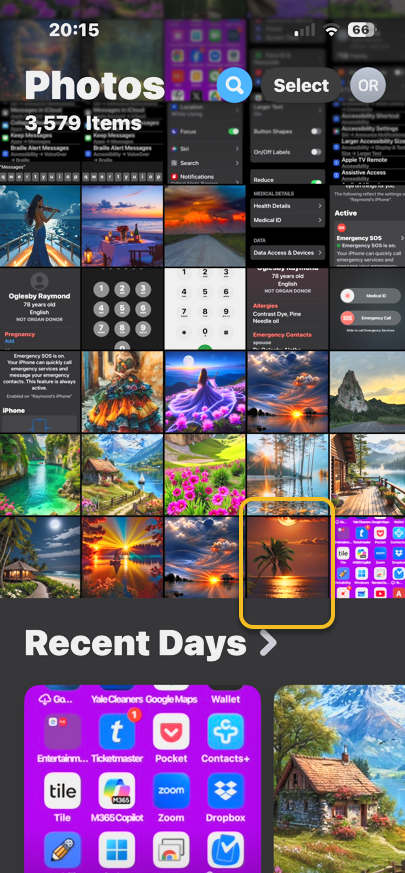
Next, tap on a photo you’d like to add a caption to. See the image below:
Caption 2
Selecting a photo

Now, when the photo opens, swipe up on the photo to reveal the Add a Caption area. 

Tip: Make sure to place your finger on the photo itself before you swipe up, otherwise, you might accidentally start scrolling through recent photos instead of pulling up the photo information card.

See the following image:
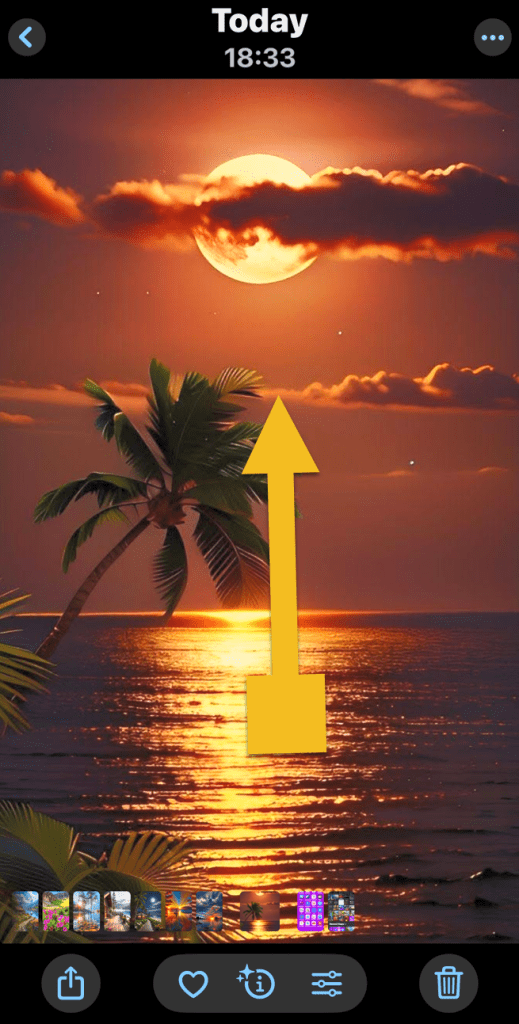
Caption 3
Swiping up to reveal hidden menu

Next, tap Add a Caption. Refer to the image below:
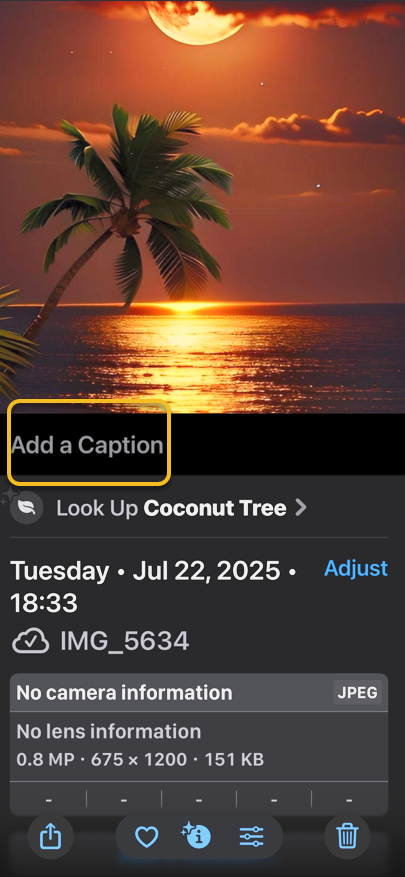
Caption 4
Selecting Add a Caption box

Now, type in your photo caption using the keyboard that appears, then tap Done to save it. See the image below:
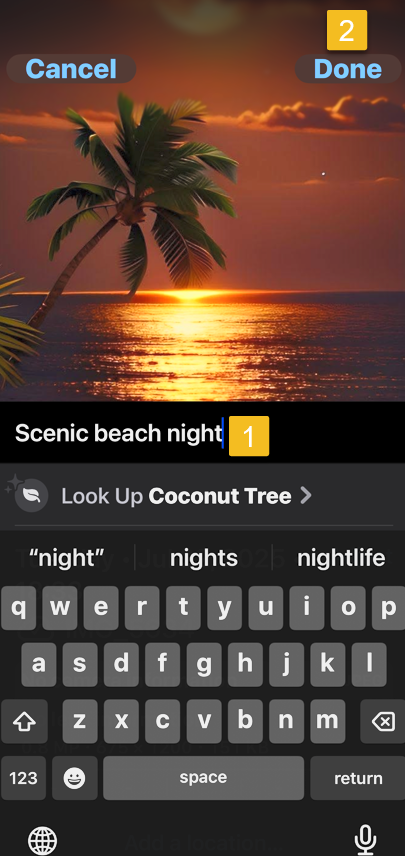
Caption 5
Adding and Saving your caption

Next, if you want to verify that your caption was added, tap on the original photo and swipe up to reveal the caption. See the following imag:
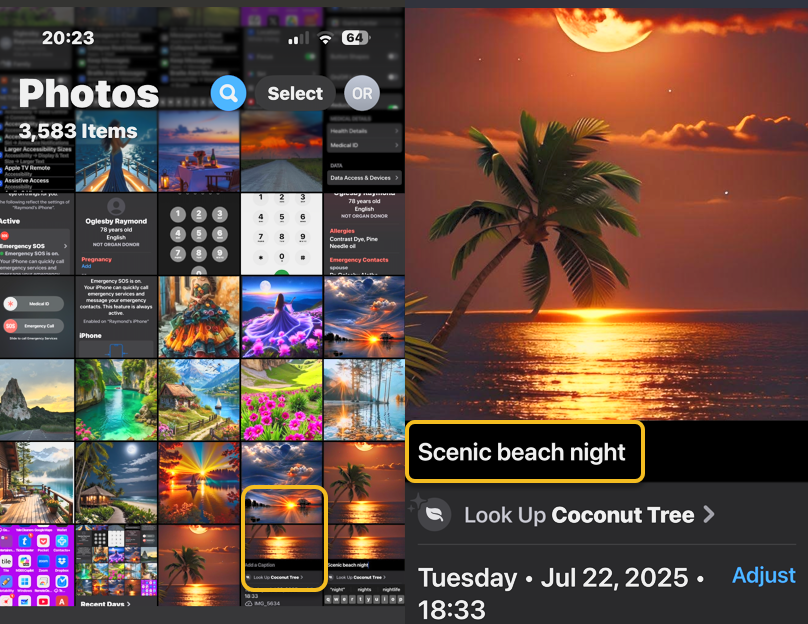
Caption 6
Your Caption added to the original photo

And that’s how you add a caption to an iPhone photo. We especially love being able to access these photo captions across our devices.

Disclaimer

Technology is constantly evolving, and smartphone and desktop tech rarely remains static. Therefore, the information in this post is only accurate as of the date it was written. Blog posts that are older than six months may contain instructions that are no longer compatible with your device or operating system. We hope that the content from previous posts continues to function as intended. Thank you for reading TechSavvy.Life, where technology works for you.

“Every once in a while, a new technology, an old problem, and a big idea turn into an innovation.”

– Dean Kamen, Inventor of the Segway

That’s it. Please feel free to share this post! One way to share is via Twitter.

Just click the Tweet icon below. This will launch Twitter where you click its icon to post the Tweet.

Checkout TechSavvy.Life for blog posts on smartphones, PCs, and Macs! You may email us at contact@techsavvy.life for comments or questions.

We value your feedback! Was this post helpful? Please share your comments with us. If you have a tech question related to your computer or smart device, feel free to reach out. Just send an email to contact@techsavvy.life, and be sure to include the device, app, and version you are using. To assist us further, you can also attach screenshots related to your inquiry.

Author’s eBook

The author’s Vietnam eBook on the “Battle for Tra Bong Vietnam: Events and Aftermath” can be accessed from a Kindle device or the Kindle App for a desktop or smartphone. The apps are free.
The author’s Vietnam eBook on the Battle for Tra Bong Vietnam: Events and Aftermath

How to Rearrange Albums in iPhone Photos

This post provides a guide on rearranging albums in Apple’s Photos app on iPhone and iPad. Users can sort albums by Date Modified, Name, or Custom Order, and utilize the drag-and-drop method for moving albums. The instructions are applicable for iOS 18.5 and emphasize a precise drag method for successful rearrangement.

IRAYMOND OGLESBY @RaymondOglesby2
July 15, 2025 – 3 minutes read time

Want to learn how to rearrange albums on an iPhone or iPad in Apple’s Photos app? When you make a photo album on your iPhone, the Photos app automatically sorts in the Albums tab when it was created.

You can rearrange albums on iPhone in two different ways. Let’s explore how to rearrange your albums in the Photos app.

  • Learn how to rearrange albums in Photos on your iPhone or iPad using the drag and drop method.
  • Learn how to sort albums on iPhone by Date Modified, Name, or Custom Order. 
  • Learn how to move albums around on iPhone so you can find your albums quickly and easily. 

This tip was performed in iPhone 14 Pro running iOS 18.5.

Click here to learn how to update your iPhone to the latest iOS version.

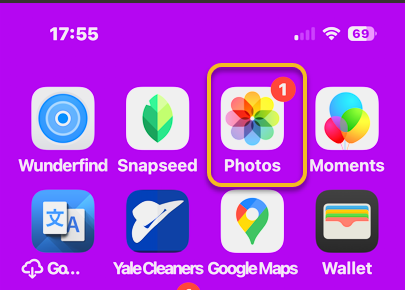
First, ipen the Photos app. Refer to the image below:

Photos 1
Selecting the Photos app

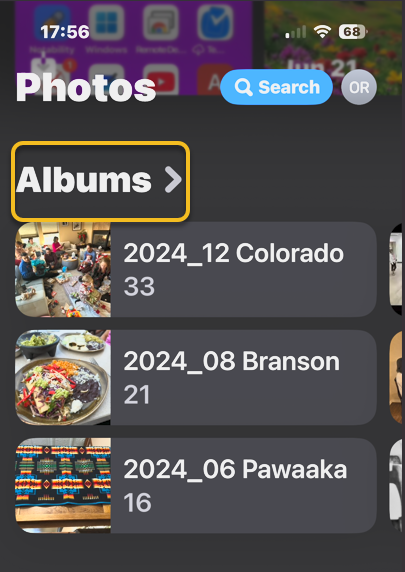
Next, scroll down and tap Albums. See the image below:

Photos 2
Selecting Albums

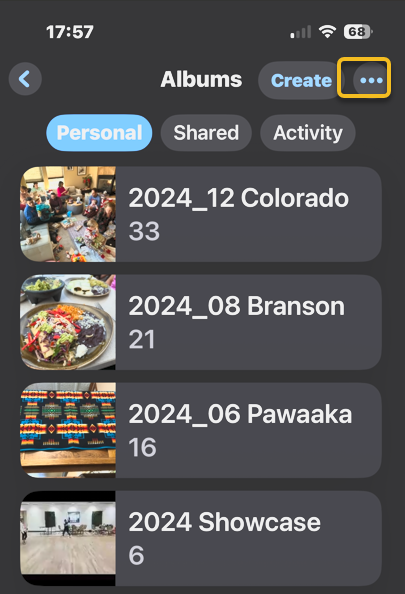
Now, tap the More icon. See the following image:

Photos 3
Selecting the More icon

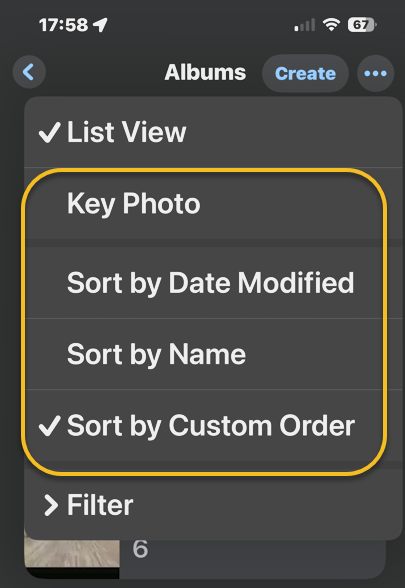
Next, tap a photo album sorting option. Refer to the image below:

Photos 4
Accessing the sort options

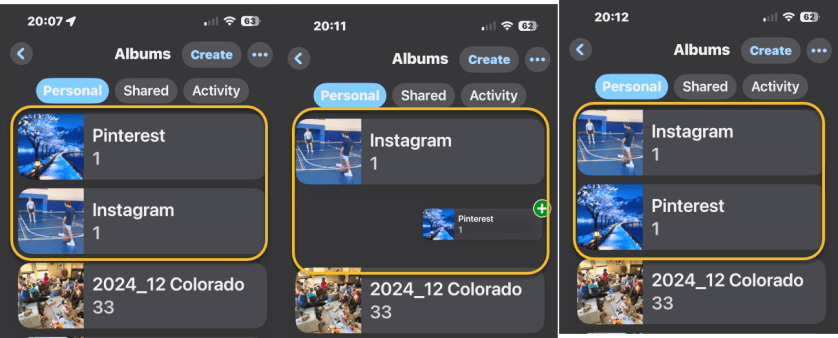
Now, back in Albums, you can also touch and hold the center of a photo album you want to move, then drag it to a new place. Release your finger to drop the album in its new location.

Note! Make sure you drag down or up and to the right. Dragging the album straight up or down will not work. In our example, we are moving the Pinterest album below the Instagram album. See the image below:

Photos 5
Moving the Pinterest album below the Instagram album

When you are done, close the Photos app, and you are finished rearranging albums on your iPhone or iPad.

Now you know how to reorder albums on iPhone and iPad!

Disclaimer

Technology is constantly evolving, and smartphone and desktop tech rarely remains static. Therefore, the information in this post is only accurate as of the date it was written. Blog posts that are older than six months may contain instructions that are no longer compatible with your device or operating system. We hope that the content from previous posts continues to function as intended. Thank you for reading TechSavvy.Life, where technology works for you.

“If you think technology can solve your security problems, then you don’t understand the problems and you don’t understand the technology.”

– Bruce Schneier, Security Technologist

That’s it. Please feel free to share this post! One way to share is via Twitter.

Just click the Tweet icon below. This will launch Twitter where you click its icon to post the Tweet.

Checkout TechSavvy.Life for blog posts on smartphones, PCs, and Macs! You may email us at contact@techsavvy.life for comments or questions.

We value your feedback! Was this post helpful? Please share your comments with us. If you have a tech question related to your computer or smart device, feel free to reach out. Just send an email to contact@techsavvy.life, and be sure to include the device, app, and version you are using. To assist us further, you can also attach screenshots related to your inquiry.

Author’s eBook

The author’s Vietnam eBook on the “Battle for Tra Bong Vietnam: Events and Aftermath” can be accessed from a Kindle device or the Kindle App for a desktop or smartphone. The apps are free.
The author’s Vietnam eBook on the Battle for Tra Bong Vietnam: Events and Aftermath

How to Forward Text Messages on iPhone

The post details how to forward text messages, including photos, on an iPhone. To forward a message, users should long press the message, select “More,” choose additional messages if desired, tap the forward icon, enter the recipient’s contact, and send it. This method allows efficient sharing without creating group texts.

RAYMOND OGLESBY @RaymondOglesby2
May 6, 2025– 4 minutes read time

You can easily forward texts from the Messages app, including photos. Just press and hold the message you want to forward. Let’s explore how to forward a text message on an iPhone.

Why You Will Like This Tip

  • Learn how to forward a text on iPhone to quickly send pictures you received in Messages to friends and family.
  • Use text message forwarding to send the same message to multiple people without making it a group text

This tip was performed on an iPhone 14 Pro running iOS 18.4..1.

Click here to learn how to update your iPhone to the latest iOS version.

Whether it’s sharing important information, funny memes, or heartfelt messages, we often find ourselves wanting to pass along these texts to others. Fortunately, forwarding a text message is a simple task that can be accomplished on most smartphones.

Text message forwarding allows you to send a message you have received to another recipient, either within the same messaging app or through a different platform like email. This feature is handy for sharing information quickly and efficiently.  However, remember that forwarded text messages can not be deleted once sent to another contact.

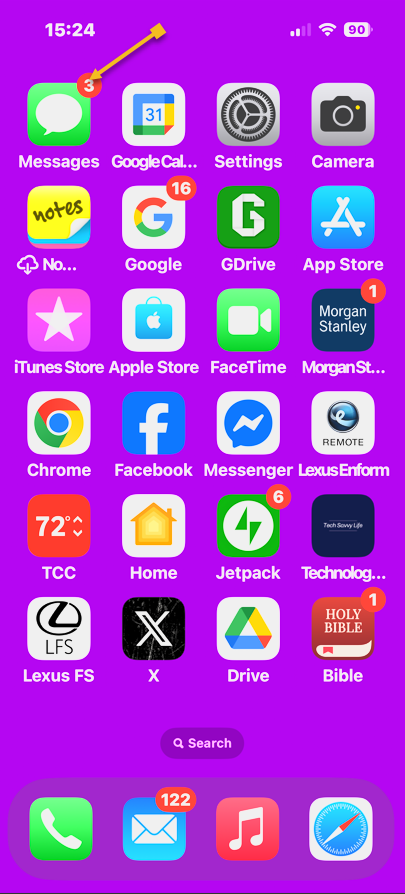
First, open the Messages app. Refer to the image below.

Forward 1
Selecting the Messages app

Next, tap the conversation containing the text you want to forward. See the below image:

Forward 2
Selecting a conversation

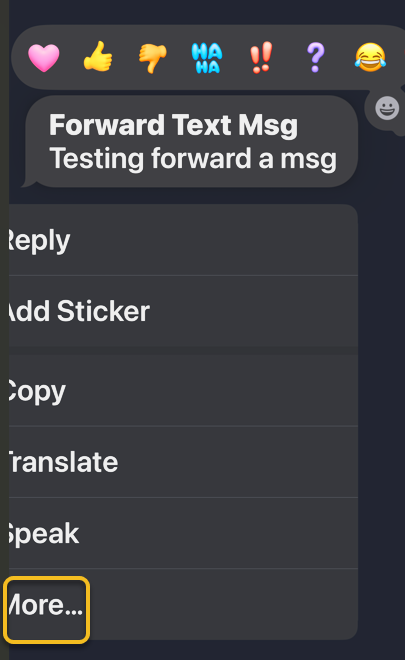
Now, long press on the body of the message you want to forward, then tap More. See the following image:

Forward 3
Selecting the More option

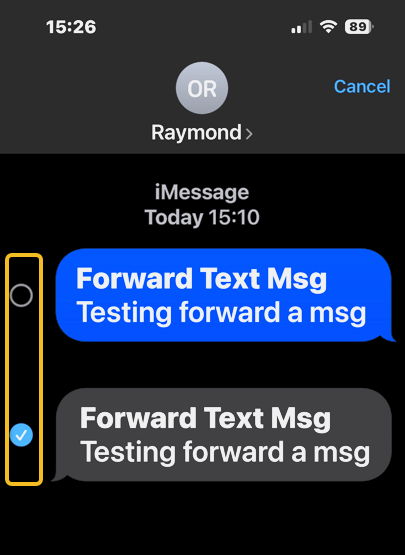
Next, all the messages will have small circles that will appear to the left of each text, with the chosen message already selected. If desired, tap the circle next to any other messages you want to forward. Refer to the image below:

Forward 4
Tapping the circle next to the message you want to forward

Now, tap the Forward icon, and a new message will open. See the below image:

Forward 5
Selecting the Forward icon

Next, enter your recipient’s contact information and tap the contact when it pops up. See the following image:

Forward 6
Entering a contact

Now, tap the Send icon. Refer to the image below:

Forward 5
Selecting the Send icon

Your friend will receive the text you have forwarded. So much easier than retyping a whole message or using copy and paste!

Disclaimer

Technology is constantly evolving, and smartphone and desktop tech rarely remains static. Therefore, the information in this post is only accurate as of the date it was written. Blog posts that are older than six months may contain instructions that are no longer compatible with your device or operating system. We hope that the content from previous posts continues to function as intended. Thank you for reading TechSavvy.Life, where technology works for you.

. “Even the technology that promises to unite us divides us. Each of us is now electronically connected to the globe, and yet we feel utterly alone.”

― Dan Brown

That’s it. Please feel free to share this post! One way to share is via Twitter.

Just click the Tweet icon below. This will launch Twitter where you click its icon to post the Tweet.

Checkout TechSavvy.Life for blog posts on smartphones, PCs, and Macs! You may email us at contact@techsavvy.life for comments or questions.

We value your feedback! Was this post helpful? Please share your comments with us. If you have a tech question related to your computer or smart device, feel free to reach out. Just send an email to contact@techsavvy.life, and be sure to include the device, app, and version you are using. To assist us further, you can also attach screenshots related to your inquiry.

Author’s eBook

The author’s Vietnam eBook on the “Battle for Tra Bong Vietnam: Events and Aftermath” can be accessed from a Kindle device or the Kindle App for a desktop or smartphone. The apps are free.
The author’s Vietnam eBook on the Battle for Tra Bong Vietnam: Events and Aftermath

iOS 18 Photos Search: Find Any Image Easily

Apple’s iOS 18 update enhances the Photos app with natural language search capabilities, allowing users to find images and videos more precisely by describing details. Users can combine elements or search for specific moments in videos.

InserRAYMOND OGLESBY @RaymondOglesby2
March 4, 2025 – 4 minutes read time

Apple’s iOS 18 update brings powerful new search functions to the Photos app, allowing you to find specific images with unprecedented precision. Let’s explore the new Photos app.

iOS 18, the key to effective searching in Photos is using natural language. Instead of simple keywords, try describing the photo you are looking for in detail. The app can now understand complex queries and find images based on specific elements within them.

The new search function is also pretty handy at finding objects and scenes. Try queries like “car next to lake” or “sunset over Tulsa.” You can combine multiple elements in your search, such as “blue flowers in vase by window.”

For food lovers, searches like “pizza with mushrooms” or “steak and chips on the table” can help you find culinary inspiration from your photo library. When searching for people, you can now include details about their appearance or actions. “Rachel in the green hat with a wine glass” or “Susan in a wedding dress” are examples of how specific you can get.

The Photos app can even search within videos. If you remember a specific moment in a video but can not recall which one, try describing the scene. For instance, “baby crawling” or “fireworks over Grand Lake” can take you directly to that moment.

Note! For these advanced search features to work, the Photos app needs time to index your library. This process happens on your device to protect your privacy, so be patient if searches aren’t immediately accurate after updating to iOS 18.

  • Find Photos of nearly anything using the new search feature.
  • Search for objects or text that appear in your photos.

This tip works on iPhones running iOS 18 or later. The screenshots are from iPhone 14 Pro running iOS 18.1

Click here to learn how to update your iPhone to the latest iOS version.

First, open the Photos app. Refer to the below image:

Photos 1
Selecting your Photos app

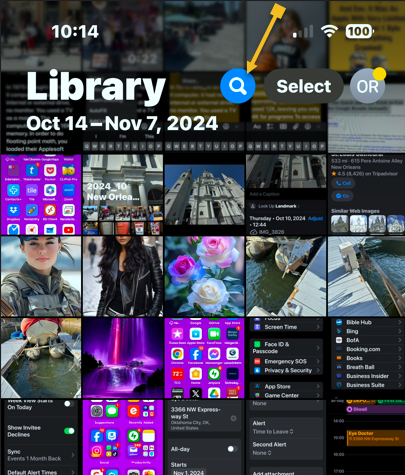
Next, tap the Search icon. See the below image:

Photos 2
Selecting the Search icon

Now, you will see some personalized suggestions, which you can tap. Or you can tap the Search bar to type in your own search terms. See the following image:

Photos 3
Selecting the Search button

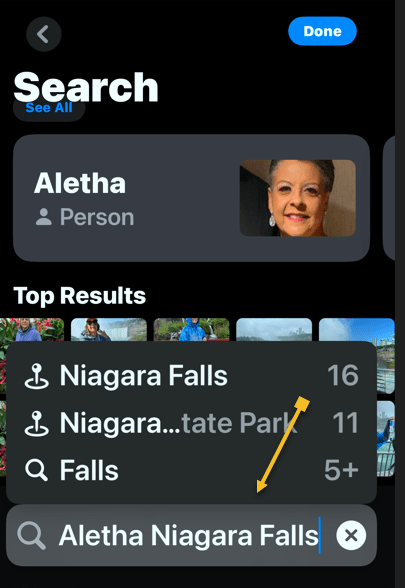
Next, once you enter a search term, you will see all the photos in your library that match. Refer to the below image:

Photos 4
Entering your Search criteria

For example, we are searching for “Aletha Niagara Falls”. Now, we can see all the photos related to “Aletha in Niagara Falls”. See the below image:

Photos 5
Your results

Aletha, my wife, also has a blog at Watercress Words, exploring and sharing the HEART of health.

That’s how to search photos or videos on the iPhone. Try it out yourself! Put in a few search terms and see what you get! While iOS 18 made some controversial changes to the Photos app, this is one change that you will love. It’s super easy to find the exact photo you are looking for every time.

Disclaimer

Technology is constantly evolving, and smartphone and desktop tech rarely remains static. Therefore, the information in this post is only accurate as of the date it was written. Blog posts that are older than six months may contain instructions that are no longer compatible with your device or operating system. We hope that the content from previous posts continues to function as intended. Thank you for reading TechSavvy.Life, where technology works for you.

. “We are stuck with technology when what we really want is just stuff that works.” 

― Douglas Adams

Pretty impressive Photos app? Please feel free to share this post! One way to share is via Twitter.

Just click the Tweet icon below. This will launch Twitter where you click its icon to post the Tweet.

Checkout TechSavvy.Life for blog posts on smartphones, PCs, and Macs! You may email us at contact@techsavvy.life for comments or questions.

We value your feedback! Was this post helpful? Please share your comments with us. If you have a tech question related to your computer or smart device, feel free to reach out. Just send an email to contact@techsavvy.life, and be sure to include the device, app, and version you are using. To assist us further, you can also attach screenshots related to your inquiry.

Author’s eBook

The author’s Vietnam eBook on the “Battle for Tra Bong Vietnam: Events and Aftermath” can be accessed from a Kindle device or the Kindle App for a desktop or smartphone. The apps are free.
The author’s Vietnam eBook on the Battle for Tra Bong Vietnam: Events and Aftermath

Identify Landmarks Easily with Visual Look Up on iPhone

The Visual Look Up feature in the Photos app allows iOS users to identify landmarks in their images using AI. This tool enhances travel experiences by providing information about locations, helping users remember where photos were taken.

RAYMOND OGLESBY @RaymondOglesby2
July 23, 2024 – 2 minutes read time

If you are familiar with the Photos app, you might be familiar with a feature called Visual Look Up, which uses AI to identify objects in your photos. Most people have heard about its ability to recognize specific faces and identify plants. But, did you know that you can also use Visual Look Up to identify locations and important landmarks?

It’s so cool to know at a glance exactly where a photo was taken, especially if you have recently been traveling and have been to numerous historical sights or landmarks. It can be difficult to keep track of what photo was taken where. Now with the AI of the Visual Look Up feature, you no longer have to remember!

  • Get the most out of the Visual Look Up feature by learning to use it to identify locations.
  • Quickly and easily obtain additional info about the landmarks and locations you have visited.
  • Not sure what that cool landmark in front of you is? Use Visual Look Up to find out!

This is for iPhones running iOS 16 or later. Screenshots are from iPhone 14 Pro running iOS 18+

Click here to learn how to update your iPhone to the latest iOS version.

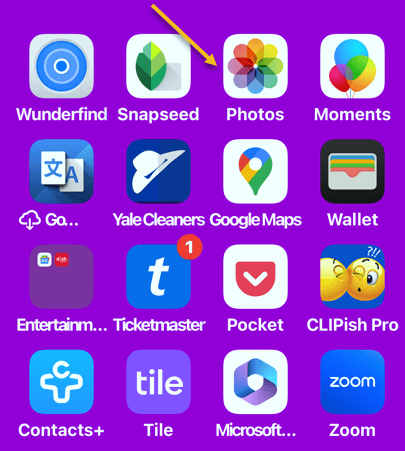
First, open the Photos app. Refer to the below image:

Landmark 1
Accessing the Photos app

Next, select a photo that features a famous location or landmark. (This will not work if the photo is of your shoes at the statue of Andrew Jackson. It needs to be a photo of Andrew Jackson himself, otherwise, the AI will not be able to identify it.) See the below image:

Landmarks 2
Select a photo

Now, tap the info button at the bottom. If the AI works on this photo, the Info button will be decorated with sparkles. See the following image:

Landmarks 3
Selecting the Info button

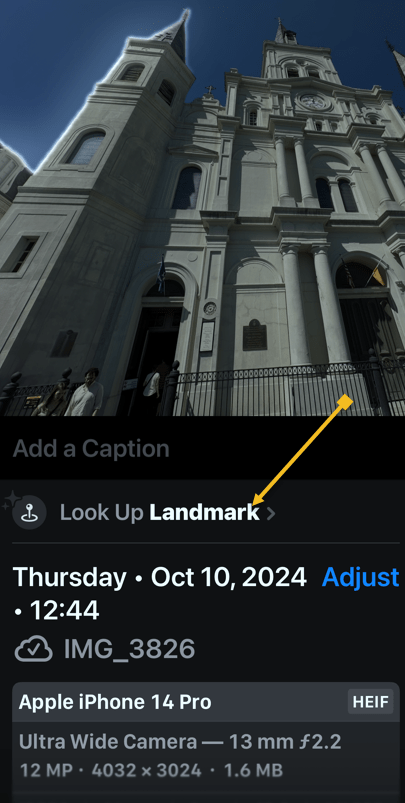
Next, tap the Look Up Landmark. Refer to the below image:

Landmarks 4
Selecting the Look Up Landmark option

Now, you can select various options for further inquiry, like getting directions, placing a call to the location, or looking up further information about the location via the Internet. See the below image:

Landmarks 5
Options for your landmark photo

Now you can use Visual Look Up which uses AI to identify locations and important landmarks in your photos.

It can be difficult to keep track of what photo was taken where. But now with this feature. you no longer have to remember the landmark photo location.

Disclaimer

Technology is always changing. Rarely is there static tech for smartphones and desktops. Thus, the contents of this post are only valid at the time of writing. Blog posts older than six months may have directions incompatible with your device or OS. Hopefully, older post content will continue to work as advertised. Thank you for reading TechSavvy.Life for Technology at Work For You.

“The great myth of our times is that technology is communication.”

 Libby Larsen

A very nice feature for iOS. Please feel free to share this post! One way to share is via Twitter.

Just click the Tweet icon below. This will launch Twitter where you click its icon to post the Tweet.

Checkout TechSavvy.Life for blog posts on smartphones, PCs, and Macs! You may email us at contact@techsavvy.life for comments or questions.

Was this post helpful? We would love to hear your comments. Do you have a computer or smart device tech question? I will do my best to answer your inquiry. Just send an email to contact@techsavvy.life. Please mention the device, app, and version you are using. To help us, you can send screenshots of the data related to your question.

The author’s Vietnam eBook on the “Battle for Tra Bong Vietnam: Events and Aftermath” can be accessed from a Kindle device or the Kindle App for a desktop or smartphone. The apps are free.
The author’s Vietnam eBook on the Battle for Tra Bong Vietnam: Events and Aftermath

How to Recover Deleted Photos from iPhone

This post provides detailed instructions on recovering deleted photos and videos on iPhone, emphasizing the 30-day recovery period and the importance of backups. It also suggests using Google Photos and mentions third-party solutions for permanent deletions.

RAYMOND OGLESBY @RaymondOglesby2
July 9, 2024 – 3 minute read

This is for the iPhone. Screenshots are from iPhone 14 Pro running iOS 17+

The first thing we used to do to free storage on my previous iPhones was to head to the Photos app and delete pictures and videos. We usually did this after a backup or AirDrop the files we wanted to keep to our PC. However, there were exceptions to the rule, and we sometimes accidentally deleted photos and videos we still needed.

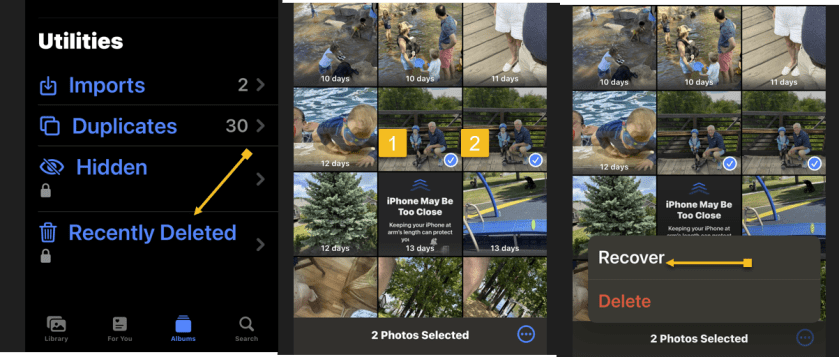
If you accidentally delete files while cleaning up, you should not panic. The files are not actually lost. Go to the Albums section of your iPhone and look for the Recently Deleted folder. You must unlock it with Face ID, Touch ID, or PIN code. In there, tap the Select button and check the photos you deleted by mistake, tap the three dots menu button at the bottom, and then tap Recover. Refer to the below image:

Recover Photo 1
Selecting your photos to recover

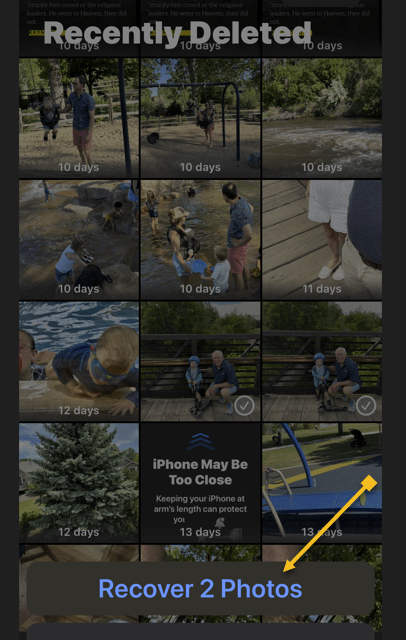
If you have selected more than one photo, click the recover multiple photos button. See the below image:

Recover Photo 2
Recover your photos

We already knew how to rescue those files, as there’s a simple rule about deleting stuff on iPhone. The files do not get permanently removed. Instead, they sit for 30 days in the Trash folders of the various apps where you can delete content. The Photos app is one of them. And that’s how easy it is to recover those deleted photos and videos.

It gets even better if you do regular backups via iCloud or use a third-party alternative to Apple Photos. Google Photos easily comes to mind, as it’s a great app to store and back up photos.

Most iPhone users will use the default Photos app. That’s where to start when viewing photos and videos and managing the storage.

Another option is to bring a single photo into view and then look for the same Recover button. This method only lets you recover photos and videos one by one.

Once that’s done, the recovered files will be available in the Photos app.

You have to remember to recover your deleted photos within 30 days. That’s how long you have until the iPhone permanently removes them. We went to this folder on iPhones with lower storage than my current iPhone 14 Pro to permanently delete the files we did not need. That’s the only way to free storage immediately.

The best way to ensure your photos and videos are safe is to perform routine backups. Whether via iCloud or your PC, the backups will help you recover files. Another option is to manually transfer the photos to a computer and store them on external devices.

There are many Photo Recovery apps from the App Store you can install.

Google Photos is a handy tool for storing images and photos on your iPhone. But, like the default Apple Photos app, you can accidentally delete files in Google Photos.

The solution is similar to Apple Photos. Google does not delete the images directly, moving them to a Trash file in the Library tab. You have 30 days to recover the file if the photo or video was not backed up to the cloud. That goes up to 60 days if the files you deleted accidentally were backed up to the cloud.

Google Photos is also available on the web and other devices.

Whether you forget the 30-day recovery deadline or accidentally empty the trash, recovering permanently deleted files might be a big problem. Third-party software solutions might help you get those files back. 

But as Gizmodo points out, not all of them might work. The blog also mentions Stellar Data Recovery as a well-reviewed solution for recovering deleted files from iPads and iPhones.

The software is not free, starting at $49.99, and there are no guarantees it will work. But if you must try anything to recover a particularly dear deleted photo from your iPhone, you will want to look into third-party apps that claim they can do the job.

Disclaimer

Technology is always changing. Rarely is there static tech for smartphones and desktops. Thus, the contents of this post are only valid at the time of writing. Blog posts older than six months may have directions incompatible with your device or OS. Hopefully, older post content will continue to work as advertised. Thank you for reading TechSavvy.Life for Technology at Work For You.

Kites rise highest against the wind, not with it.

Winston Churchill

That’s it. Please feel free to share this post! One way to share is via Twitter.

Just click the Tweet icon below. This will launch Twitter where you click its icon to post the Tweet.

Checkout TechSavvy.Life for blog posts on smartphones, PCs, and Macs! You may email us at contact@techsavvy.life for comments or questions.

Was this post helpful? We would love to hear your comments. Do you have a computer or smart device tech question? I will do my best to answer your inquiry. Just send an email to contact@techsavvy.life. Please mention the device, app, and version you are using. To help us out, you can send screenshots of your data related to your question.

You can access the E-book from a Kindle device, or the Kindle App for a desktop or smartphone. The apps are free.

The author’s Vietnam eBook on the Battle for Tra Bong Vietnam: Events and Aftermath

How to Fix Photo Quality on iPhone

TechSavvy.Life explores an iPhone Camera app setting called Prioritize Faster Shooting, which allows quick, successive photography, specifically for iPhone models XS/XR or later running on iOS 14 and above. However, enabling this feature reduces photo quality due to shorter image processing time. Users can personalize this setting in their iPhone settings.

RAYMOND OGLESBY @RaymondOglesby2
January 16, 2024

This is for the iPhone XS/XR or later running iOS 14 or higher. Screenshots are from iPhone 14 Pro running iOS 17+

The iPhone is a great camera out of the box. Just set the phone up and start taking photos and recording videos without worrying about advanced settings. However, if you do want to take your photo skills to the next level, all sorts of iPhone photo tricks can help you improve your game. The iPhone’s Camera app holds settings that can also enhance the pictures and clips coming out of your iPhone.

One of those image settings can come in handy when you do not want to miss a shot. But it can also ruin photo quality, as the iPhone might devote less time to processing the image.

Called Prioritize Faster Shooting, the setting is straightforward. It does what it says; it enables faster shooting, especially if you take lots of burst photos. The setting lets the iPhone capture more shots per unit of time, which can be useful if you are following certain events and want to capture everything. But it might not be worth taking so many shots if the quality of the resulting images has to suffer.

The setting comes enabled by default. To disable this feature, head to:

Settings > Camera > Prioritize Faster Shooting

and toggle to the OFF position. Reger to the below image:

Fix Photo 1
To disable, turn the option to OFF

To enable, set the toggle to the ON position.

If you do not find the setting, you probably use an older iPhone or iOS. You must either update the software or get a new iPhone to take advantage of Prioritize Faster Shooting.

Technology is always changing and rarely is there static tech for smartphones and desktops. Thus, the contents of this post are only valid at the time of writing. Blog posts older than six months may have directions incompatible with your device or OS. Hopefully, older post content will continue to work as advertised. Thank you for reading TechSavvy.Life for Technology at Work For You.

. “You don’t learn to walk by following rules. You learn by doing and falling over.”

Richard Branson

That’s it. Please feel free to share this post! One way to share is via Twitter.

Just click the Tweet icon below. This will launch Twitter where you click its icon to post the Tweet.

Checkout TechSavvy.Life for blog posts on smartphones, PCs, and Macs! You may email us at contact@techsavvy.life for comments or questions.

Please feel free to leave a comment. I would love to hear from you. Do you have a computer or smart device tech question? I will do my best to answer your inquiry. Just send an email to contact@techsavvy.life. Please mention the device, app, and version you are using. To help us out, you can send screenshots of your data related to your question.

You can access the e-book from a Kindle device, the Kindle App for the desktop or smartphone, which is a free app.

The author’s Vietnam eBook on the Battle for Tra Bong Vietnam: Events and Aftermath

How to Search Your Photos on iPhone

The simplest way to search your Photos library is to use the Search tab at the top. However, you can also find specific photos and videos by filtering images by app name, camera or device, and even location.

RAYMOND OGLESBY @RaymondOglesby2
January 31, 2023

Summary: The simplest way to search your Photos library is to use the Search tab at the top. However, you can also find specific photos and videos by filtering images by app name, camera or device, and even location. Using iPhone’s Live Text feature, you can also search for text within images.

This is for the iPhone. Screenshots are from iPhone 14 Pro running iOS 16+

Dilbert and Employee
Copyright Scott Adams, Inc./Distributed by Universal Uclick for UFS. This is one of my favorites

Finding that favorite photo you took can be frustrating when you have thousands to sift through. Fortunately, there are plenty of useful tips for searching and filtering your media, including photos, videos, imports, and more. Let’s discover some of these tips.

Find Specific People and Objects

Using the Search tab, you can search for people, animals, and objects in the Photos app. The Search function works well for finding animals like cats and dogs, objects like cars and boats, clothing like hats and sunglasses, or natural features like rivers and mountains.

First, launch Photos and select Search from the Toolbar at the bottom. Then type your criteria into the Search bar. Refer to the below image:

Photos 1
Search for flowers

Next, you can get as descriptive as you like. For example, you can look for food items like steak or rooms in your house like the bedroom. Start typing “at the concert” and see what you find.

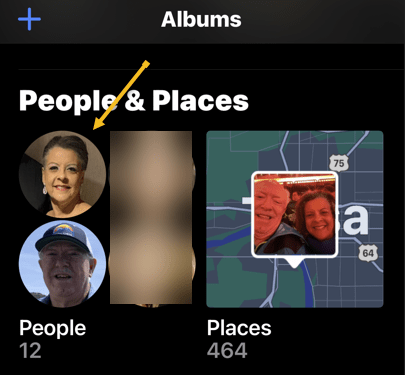
Now, for the search to work with people, you will need to link their likeness to a contact. Tap on the Albums tab. Scroll down to People and Places and tap on the selection of faces that Photos have generated. See the below image:

Photos 2
Search for faces

Next, you can tap on individual people, then tap Add Name at the top to link the likeness to a contact. See the following image:

Photos 3
Add a person’s name

Now, tap Next in the upper right-hand corner to see the tagged person, then click Done in the upper right-hand corner. Refer to the below image:

Photos 4
The person’s name has been added

Next, to train Photos to recognize people better, click each photo and look for the Review button. You can then confirm or deny likenesses. You may find some people have multiple entries due to changes in appearance, like a new haircut. Just tag them with the same name. See the below image:

Photos 5
Review your photos

Now, return to your Albums tab and tap on People. Here, you will see your tagged entries. See the following image:

Photos 6
Your named people’s photos

Find Text and Captions

Next, thanks to the iPhone’s Live Text feature, you can search for text within images. For example, you can search for words on a page, titles of books, road signs, or notices. You may even be able to pick up handwriting if it’s legible enough for the iPhone to recognize. Refer to the below image:

Photos 7
Find text in your photos

Now, you can give yourself a chance at finding something specific later by attaching a caption to it. To do so, find the photo in your library, then swipe up to reveal more information about it. Then tap the Add a Caption field and type your description.

Find Old Objects

Your iPhone can surface images from this time last year, three years ago, or even ten years ago if your media files go back that far. These sometimes appear on the For You tab or as Memories Notifications, but you can also search for them manually.

Next, the key is to type the phrase exactly to see the relevant entry. For example, you can type Three Years Ago and then tap on the event that shows up. Also, you can do this for Last Month or Last Week. Head to the Albums tab and tap on Search at the bottom of the Toolbar. See the below image:

Photos 8
Find photos from last month

Now, you can even filter by images taken in a particular month and year by searching for it, like July 2022. Also, you could search by scrolling down to the date range in your Library tab and selecting a date, but doing the above is much quicker. See the following image:

Photos 9
Find photos with a specific date

Find Hidden or Deleted

Next, in iOS 16, the Hidden and Recently Deleted albums are protected by Face ID or Touch ID. You can still find them in the usual place on the Albums tab by scrolling down to the bottom of the page and tapping on the Hidden or Recently Deleted album label in the Utility section.

Note: Recently Deleted photos will be removed after 30 days.

Refer to the below image:

Photos 10
Find Hidden or Recently Deleted photos

Find Duplicates and Delete Them

Now, the Photos app can also find and merge duplicate photos and videos to save space. Scroll to the bottom of your Albums tab and tap Duplicates in the Utility section to see a list of duplicate photos or videos. See the below image:

Photos 11
Find Duplicate photos

Next, you can review each entry and then tap Merge. Your iPhone will then keep the highest quality version of any duplicates. See the following image:

Photos 12
Merge Duplicate photos

You can also merge all of your duplicates at once by tapping:

Select > Select All > Merge (###)

Where “###” is the number of duplicates you are going to merge shown at the bottom of your screen. Refer to the below image:

Photos 13
Merge all Duplicate photos

The iPhone Photos app is both useful and powerful. These tips are just some of what you can do.

Disclaimer

Technology is always changing, and rarely is their static tech for smartphones and desktops. Thus, the contents of this post are only valid at the time of writing. Blog posts older than six months may have directions incompatible with your device or OS. Hopefully, older post content will continue to work as advertised. Thank you for reading TechSavvy.Life for Technology at Work For You.

Quote For the Day

We refuse to turn off our computers, turn off our phone, log off Facebook, and just sit in silence because in those moments we might actually have to face up to who we really are.

Jefferson Bethke

Tweet Info

That’s it. Please feel free to share this post! One way to share is via Twitter.

Just click the Tweet icon below. This will launch Twitter where you click its icon to post the Tweet.

Checkout TechSavvy.Life for blog posts on smartphones, PCs, and Macs! You may email us at contact@techsavvy.life for comments or questions.

I Would Like to Hear From You

Please feel free to leave a comment. I would love to hear from you. Do you have a computer or smart device tech question? I will do my best to answer your inquiry. Just send an email to contact@techsavvy.life. Please mention the device, app, and version you are using. To help us out, you can send screenshots of your data related to your question.

Author’s E-Book

You can access the e-book from a Kindle device, the Kindle App for the desktop or smartphone, which is a free app.

The author’s Vietnam eBook on the Battle for Tra Bong Vietnam: Events and Aftermath

How to Delete Duplicate Photos and Videos on iPhone

Duplicate photos and videos take up precious space on your iPhone. Since iOS 16, Apple has offered the ability to easily find and delete duplicates in the Photos app; no third-party app is required.

RAYMOND OGLESBY @RaymondOglesby2
December 13, 2022

Duplicate photos and videos take up precious space on your iPhone. Since iOS 16, Apple has offered the ability to easily find and delete duplicates in the Photos app; no third-party app is required. Let’s explore how to do this.

This is for the iPhone running iOS 16+. Screenshots are from iPhone XR

Dilbert and Network
Copyright Scott Adams, Inc./Distributed by Universal Uclick for UFS

iOS 16 Required

This feature was released with iOS 16. You can see your current iOS version under:

Settings > General > About > iOS Version

Refer to the below image:

Duplicates 1
Your iOS version

If you need to, you can upgrade to iOS 16 by going to

Settings > General > Software Update

Find and Delete Duplicates in Photos

Note! After updating the iOS. It could take anything from a few hours to a few days for the Duplicates album to appear.

First, to find duplicate photos and videos, open the Photos app on your iPhone and tap the Albums tab at the bottom of the screen. See the below image:

Du;licates 2
Selecting your Albums

Next, scroll down to the bottom of the page to the Utilities section where you will find the Duplicates album. See the following image:

Duplicates 3
Selecting Duplications option

Now, tap on Duplicates to see a list of all the duplicate photos and videos found on your iPhone. Refer to the below image:

Duplicates 4
Your Duplications total

Next, you will see a preview of each image and the relevant file size. You can review each duplicate entry individually, then tap on Merge to save one of the photos or videos. iOS will automatically keep the higher-quality version.

Now, you will need to confirm that you wish to merge the photos or videos in the pop-up window that opens. See the below image:

Duplicates 5
Merge the current Duplicate

Next, if you do not have time to merge each duplicate individually, you can merge everything at once. To do this, tap Select at the top of the screen followed by Select All. Then, tap Merge at the bottom of the screen. See the following image:

Duplicates 6
Merge all your Duplicates

Processing Your Photos

You might find that after merging all of your duplicates, more appear as your whole library finishes processing.

Apple states that the detection process requires your iPhone to be locked and connected to power. The size of your library and the tasks running on your device will influence the speed at which the process completes.

If your photos are stored in an iCloud Photo Library, removing duplicates is a good way of freeing up precious iCloud storage.

Quote For the Day

Cars will soon have the Internet on the dashboard. I worry that this will distract me from my texting.

Andy Borowitz

Tweet Info

That’s it. Please feel free to share this post! One way to share is via Twitter.

Just click the Tweet icon below. This will launch Twitter where you click its icon to post the Tweet.

Checkout TechSavvy.Life for blog posts on smartphones, PCs, and Macs! You may email us at contact@techsavvy.life for comments or questions.

I Would Like to Hear From You

Please feel free to leave a comment. I would love to hear from you. Do you have a computer or smart device tech question? I will do my best to answer your inquiry. Just send an email to contact@techsavvy.life. Please mention the device, app, and version you are using. To help us out, you can send screenshots of your data related to your question.

Author’s E-Book

You can access the e-book from a Kindle device, the Kindle App for the desktop or smartphone, which is a free app.

The author’s Vietnam eBook on the Battle for Tra Bong Vietnam: Events and Aftermath

How to Attach Photos and Files to an Email on iPhone

Your iPhone’s Mail app makes it easy to add photos, videos, and other file types as attachments to your emails. We will show you how to add files from various sources to your emails on your iPhone.

RAYMOND OGLESBY @RaymondOglesby2
June 14, 2022

Your iPhone’s Mail app makes it easy to add photos, videos, and other file types as attachments to your emails. We will show you how to add files from various sources to your emails on your iPhone.

This is for the iPhone

Dilbert and Ethical
Copyright Scott Adams, Inc./Distributed by Universal Uclick for UFS

When you choose to attach a photo or video, Mail opens iPhone’s default Photos app to let you add your items. For other file types, Mail opens iCloud Drive from where you can choose and attach your files. You may also choose other cloud storage providers to attach your files.

Attach Photo or Video

First, launch Mail on your iPhone. Then, in Mail’s bottom right-hand corner, tap the Pencil icon to compose a new email. Refer to the below image:

Mail 1
Selecting to compose an email

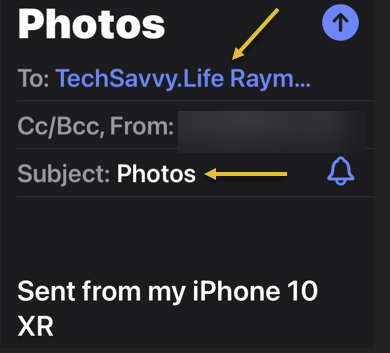
Next, you will see a New Message page. Here, tap the To field and enter the recipient’s email address, then tap the Subject and enter a subject for your email. See the below image:

Mail 2
Addressing the email

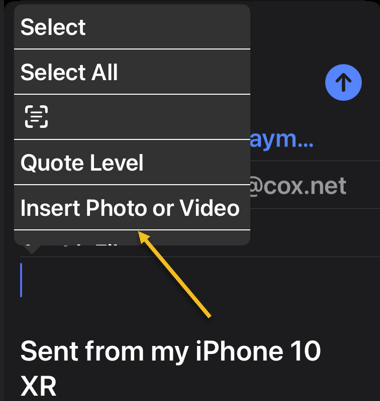
Now, to attach a photo or video to this email, tap and hold anywhere on the email’s body (the large text area). Then in the menu that opens, choose Insert Photo or Video. See the following image:

Mail 3
Selecting the Insert a Photo or Video option

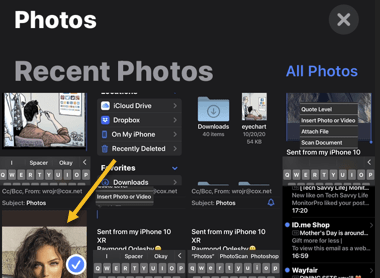
Next, Mail will open your iPhone’s Photos app where you can select the photo or video you want to add to your email. Tap an item when your item opens in full screen. Refer to the below image:

Mail 4
Selecting a photo

N0w, back on the New Message page, you will see your selected photo or video attached to your email. See the below image:

Mail 2
Your selected photo

Attach Other File Types

Next, to attach another file type, tap and hold on the email body and choose Attach File. See the following image:

Mail 6
Selecting Attach File option

Now, your iCloud Drive page will open where you can select a file to add to your email. Refer to the below image:

Mail 7
Select a file from iCloud Drive

Next, to use another cloud storage, in the top-left-hand corner, tap Locations Select your cloud storage to pick your files. See the below image:

Mail 8
Selecting a Location to attach a file

Your files are now attached to your email, and you may send out your email as usual. The recipient will get your email with your attached content.

Quote For the Day

Defect-free software does not exist.

Wietse Venema

Tweet Info

That’s it. Please feel free to share this post! One way to share is via Twitter.

Just click the Tweet icon below. This will launch Twitter where you click its icon to post the Tweet.

Check out TechSavvy.Life for blog posts on smartphones, PCs, and Macs! You may email us at techsavvy.life for comments or questions.

I Would Like to Hear From You

Please feel free to leave a comment. I would love to hear from you. Do you have a computer or smart device tech question? I will do my best to answer your inquiry. Just send an email to contact@techsavvy.life. Please mention the device, app, and version you are using. To help us out, you can send screenshots of your data related to your question.

Author’s E-book

You can access the e-book from a Kindle device, the Kindle App for the desktop or smartphone, which is a free app.

The author’s Vietnam eBook on the Battle for Tra Bong Vietnam: Events and Aftermath