The Hidden Video Editor in Windows 10

Windows 10 has a hidden video editor that works a bit like Windows Movie Maker or Apple iMovie. You can use it to trim videos or create your own home movies and slideshows. You can even have it create videos automatically. Lets explore how to find and use the Video Editor.

Windows 10 has a hidden video editor that works a bit like Windows Movie Maker or Apple iMovie. You can use it to trim videos or create your own home movies and slideshows. You can even have it create videos automatically. Lets explore how to find and use the Video Editor.

This is for devices running Windows 10

Dilbert and Engineer
Copyright Scott Adams, Inc./Distributed by Universal Uclick for UFS

Open Video Editor Inside of Photos App

You can get started with a custom video project by launching the Photos app from your Start menu. Enter “Photos” (without quotes) in the Cortana search box next to Start. Now, click the the New Video button and select an entry from the drop-down list. Also, you can switch to the Video Editor app. This is confusing; launching the Video Editor inside of Photos. Where to launch the Video Editor depends on what you are trying to do. (See section on Determine Where to Launch the Video Editor below). Refer to below image:

Video 1
Selecting a new video inside the Photos app

Open Video Editor Outside of Photos app

Also, Windows 10 now lets you launch the Video Editor from the Start menu, too. First, click the Start menu. Next, in the Cortana search box next to Start, enter “Video Editor” (without quotes). Now, in the upper left-hand corner, click the Video Editor app shortcut. See below image:

Video 2
Selecting the Video Editor app outside of the Photos app

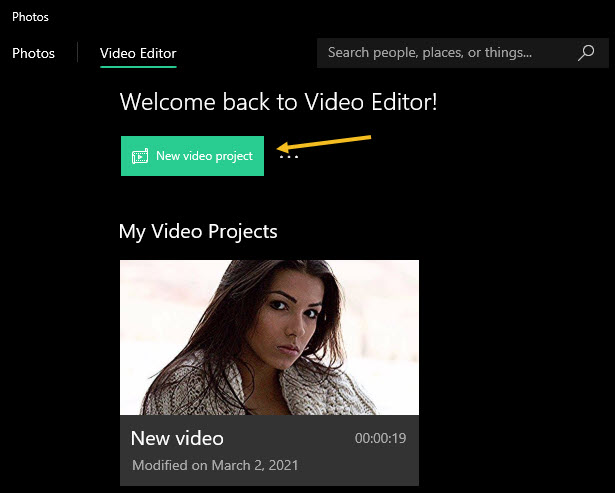
Now, launch the New video project shortcut in the upper left-hand corner. If you have used the Video Editor, a Welcome Back message will be displayed. Note! You are now in the Photos app under the Video Editor tab. See following image:

Video 3
Selecting a new video project

This shortcut opens the list of “Video Projects” in the Photos app. From here, you can create a new video using the New Video tab, then click the Add button and chose a location for your photos. Also, you may edit an existing video using the Pencil icon. Refer to below image:

Video 4
Create or Edit a video

Determine Where to Launch the Video Editor

To quickly make smaller edits on individual videos—for example, to trim an individual video rather than combining multiple videos together; you must open those videos directly in the Photos app from File Explorer.

Using the File Explorer

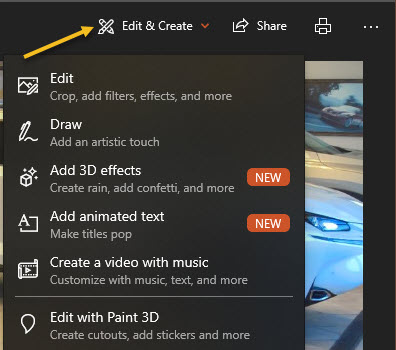
First, select an image from the File Explorer, open the image in the Photos app, Now, click on the Edit & Create button and select an entry from the drop-down list. See below image:

Video 5
Create. add effects, or edit a video

From here, play around with the various tools and effects. Click Finish when done to export your video in mp4 format. Have fun in creating and editing your videos.

That’s it. Please feel free to share this post! One way to share is via Twitter.

Just click the Tweet icon below. This will launch Twitter where you click its icon to post the Tweet.

Check out TechSavvy.Life for blog posts on smartphones, PCs, and Macs! You may email us at contact@techsavvy.life for comments or questions.

I Woould Like to Hear From You

Please feel free to leave a comment. I would love hearing from you. Do you have a computer or smart device tech question? I will do my best to answer your inquiry. Just send an email to contact@techsavvy.life. Please mention the device, app and version that you are using. To help us out, you can send screenshots of your data related to your question.

The author’s Vietnam eBook on the Battle for Tra Bong: Events and Aftermath

How to Make an Audio Call on FaceTime

Tired of low-quality cell phone calls? Thanks to FaceTime, you can make audio-only calls with crystal-clear high-resolution sound using an iPhone, iPad, iPod Touch, or Mac.

Tired of low-quality cell phone calls? Thanks to FaceTime, you can make audio-only calls with crystal-clear high-resolution sound using an iPhone, iPad, iPod Touch, or Mac. 

Facetime, the built-in video calling app on Apple devices, has an undisputed audience base. Besides its video calling services, users also count on it for making audio calls to their friends. Reason being, its seamless and error-free connectivity in a secured environment. 

This is for the iPhone, iPad, iPod Touch, and Mac. Screenshots are from an iPhone

Copyright Scott Adams, Inc./Distributed by Universal Uclick for UFS

FaceTime Audio Explained

Most people think of FaceTime as a video chat service, but it also supports audio calls that operate like regular phone calls. Your device’s video camera is not used, and it stays off during the call.

FaceTime Audio is a great alternative to regular phone calls because it uses the Internet to place free calls with crystal-clear high-definition audio compared to a regular phone call. Since it’s an Internet call, your Apple device can take advantage of the extra bandwidth to make the call sound much better. The only requirement is that both ends of the call own Apple devices that support FaceTime, which includes iPhones, iPads, iPod Touches, and Macs.

Make a FaceTime Audio Call

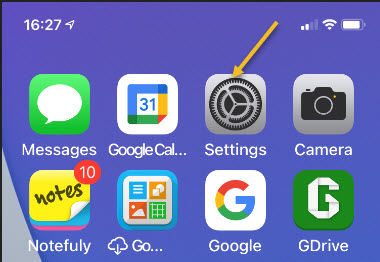
First, on your iPhone, iPad, or iPod Touch, launch Settings (the gear icon). Refer to below image:

Accessing Settings

Next, scroll down and tap the FaceTime option. See below image:

Accessing FaceTime option

In the FaceTime settings, toggle the switch beside the FaceTime option to turn it on. See following image:

Enabling FaceTime

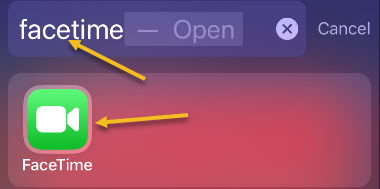
Now, search for the FaceTime app from your Search screen (your first or last screen) or locate the app on a Home screen. Refer to below image where we are searching for the app:

Accessing FaceTime app

Next, launch the FaceTime app. On the main FaceTime screen, tap the plus button (+). See below image:

Selecting the add button for a FaceTime Audio call

In the To: field, enter the name or number of the person you are trying to call. As you type, your Contacts list will be searched and any matching contacts will appear below. Just tap to select the person you want to call. See following image:

Entering and selecting a person to call

Next, tap the Audio button. If the Audio button is greyed out or does not appear, the contact you are trying to call does not have ‌FaceTime‌ enabled or has not set up a ‌FaceTime‌ account. Refer to below image:

Selecting the Audio button to make a call

Your call will be placed. You will see a message at the top of your screen denoting this is a FaceTime Audio call. During the call, you can switch to a video FaceTime call using the FaceTime icon, or you can disconnect by tapping the red phone receiver icon. See below image:

Disconnecting the FaceTime Audio call

Making a FaceTime Audio call on the Mac is similar to the above steps. One of the coolest things about FaceTime is that it works between all major Apple devices, so you can use your Mac to call iPhones, iPads, and iPod Touches.

You are finished. Please feel free to share this post! One way to share is via Twitter.

Just click the Tweet icon below. This will launch Twitter where you click its icon to post the Tweet.

Check out TechSavvy.Life for blog posts on smartphones, PCs, and Macs! You may email us at contact@techsavvy.life for comments or questions.

I Would Like to Hear From You

Please feel free to leave a comment. I would love hearing from you. Do you have a computer or smart device tech question? I will do my best to answer your inquiry. Just send an email to contact@techsavvy.life. Please mention the device, app and version that you are using. To help us out, you can send screenshots of your data related to your question.

The author’s Vietnam eBook on the Battle for Tra Bong: Events and Aftermath

How to Create a Restore Point and Recover in Windows 10

Has Windows been acting flaky? It could be a specific piece of software that’s wreaking havoc on your system. Maybe you have installed a new application or driver. Perhaps Windows is crashing or blue screening and you have no idea why. Do not worry because all is not lost if you have a system Restore Point waiting to roll your PC back to functionality.

Has Windows been acting flaky? It could be a specific piece of software that’s wreaking havoc on your system. Maybe you have installed a new application or driver. Perhaps Windows is crashing or blue screening and you have no idea why. Do not worry because all is not lost if you have a system Restore Point waiting to roll your PC back to functionality.

This is for devices running Windows 10. Also works for Windows 8 and 7. Screenshots are from Windows 10

click Turn on System Protection.
Copyright Scott Adams, Inc./Distributed by Universal Uclick for UFS

A Restore Point is essentially a snapshot of Windows at any given time. You can create restore points on a regular basis, and if Windows ever breaks, you can bring it back to a point from before the problem occurred. The best part of using this method over a Recovery Drive is that only system files and settings will be affected, while all your documents and personal files will be left untouched.

Windows automatically creates a Restore Point, if enabled, at key moments, such as when you install certain software programs and drivers or apply Windows updates. However, you should manually create these points yourself on a regular basis, perhaps once a month, to ensure that your system can be restored to a recent state in the event of a mishap. You should also create one before you attempt any type of major change to Windows that could inadvertently lead to unstable behavior or other issues.

Create a Automatic Restore Point

First, locate the Restore Point utility by clicking Start and entering the text “restore” (without quotes) in the Cortana search box located next to Start. Refer to below image:

Restore A
Entering the Restore search criteria in Cortana search boc

Next, click your search result, Create a restore point, in upper left-hand corner. See below image:

Restore 1
Selecting the Control Panel applet to Create a Restore Point

Now, you will be taken to the System Protection tab of the System Properties window.

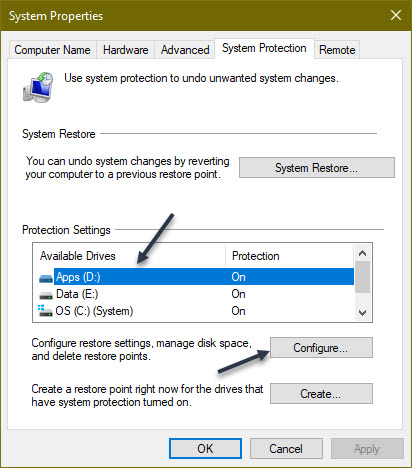
If System Protection has not yet been enabled, the Create button is grayed out. In this case, select the drive you want to protect and then click the Configure button.

If System Protection is enabled for a drive, highlight the drive and click the Configure button. See following image:

Restore 3
Selecting a drive to Configure

Next, click the Turn on System Protection radio button if not enabled. You will now need to decide how much disk space you want to devote to all your restore points. If you run out of space, the oldest restore points will start getting deleted. If you have ample free space, then you may want to devote more storage for the restore points. Otherwise, you can stick with the suggested percentage, usually anywhere from 1% to 3% depending on the overall size of the drive or move the slider to the percentage you want. Once set, click OK. Refer to below image:

Restore 3
Configuring the drive and amount of storage space for a Restore Point

Your restore points will be created automatically at certain key moments. You can repeat these steps if you have other drives that you wish to protect. You can also return to this screen in the future to delete all existing system restore points if you are running low on disk space. To do this, click the Delete button and click Continue to confirm the deletion.

Create a Manual Restore Point

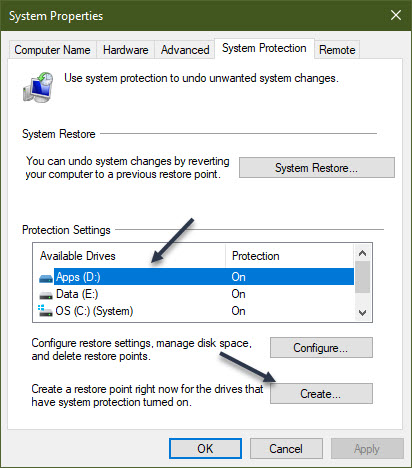
Head back to the Configure screen (second image above). This time, highlight an available drive and click the Create button. See below image:

Restore 5
Selecting to create a manual Restore Point

Next, type in a name for the restore point. Since the current date and time will automatically be added to the name, you might want to include a note about the action you are about to take or another reason for the restore point. If you have multiple drives, include the drive name or letter in the name. Now, click the Create button. See following image:

Restore 6
Assigning a name for the Restore Point

Windows will tell you if the restore point was created successfully. Now, click the Close button. Refer to below image:

Restore 8
Pop-up message indicating the success of creating a Restore Point

You can repeat the above steps if you want to create a restore point for your other drives. When done, click OK to shut down the System Protection window

Restore to a Previous State

If you have an issue, you can return to the System Protection window and click the System Restore button. See below image:

Restore 9
Selecting the System Restore button

At the Restore system files and settings screen, Windows explains what System Restore does. Click Next to continue. See following image:

Restore 7
Verbage screen about the Restore

Now, select a drive restore point, then click the Scan for affected programs button. Refer to below image:

Restore 10
Selecting Scan for affected programs button

Windows scans for any applications that were added since the last restore point in order to delete them and looks for any that were removed in order to restore them. It also scans for any programs and drivers that might be restored but may not work correctly and may need to be reinstalled. Note the results if Windows finds anything important. After the scan completes, click Close to return to the previous System Restore window. See below image:

Restore 11a
Displaying the results (if any) of the scan. PAY CLOSE ATTENTION to this screen!

Make sure the restore point you want to use is selected. Now, click Next. See following image:

Restore 11
Continuing the Restore

Windows will display a Confirm your restore point window. Next, click the Finish button. Refer to below image:

Restore 12
Confirming your Restore. PAY CLOSE ATTENTION to this screen!

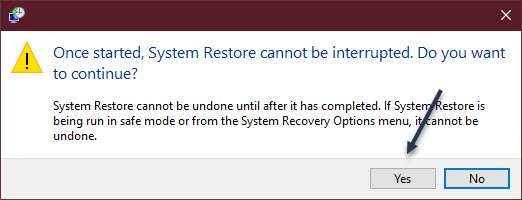
You will be told that the System Restore cannot be interrupted. Next, click Yes to continue. See below image:

Restore 13
One last chance to back out of the Restore. PAY CLOSE ATTENTION to this screen!

Windows will bring your system back to the restore point you selected and reboot, telling you that your files and settings are being restored. Once Windows is back up again, you can log back in. 

Next, you should receive a pop-up screen regarding the success of the Restore. You may now need to reinstall any applications, drivers, or other software that were removed. You will also want to play around in Windows to see if the problem that prompted you to restore it has been eliminated.

You are now finished. Now you know how to create a system Restore Point for all your hard drives and restore your system to a previous state. Please feel free to share this post! One way to share is via Twitter.

Just click the Tweet icon below. This will launch Twitter where you click its icon to post the Tweet.

Check out TechSavvy.Life for blog posts on smartphones, PCs, and Macs! You may email us at contact@techsavvy.life for comments or questions.

I Would Like to Hear From You

Please feel free to leave a comment. I would love hearing from you. Do you have a computer or smart device tech question? I will do my best to answer your inquiry. Just send an email to contact@techsavvy.life. Please mention the device, app and version that you are using. To help us out, you can send screenshots of your data related to your question.
CThe author’s Vietnam eBook on the Battle for Tra Bong: Events and Aftermath

How to Turn On Safer Browsing in Google Chrome

Google has some built-in tools in Chrome that attempt to make browsing safer. Enhanced Safe Browsing is one such tool.

With Safe Browsing, you get alerts about malware, risky extensions, phishing, or sites on Google’s list of potentially unsafe sites.

Google has some built-in tools in Chrome that attempt to make browsing safer. Enhanced Safe Browsing is one such tool. Let’s explore how to turn on this feature.

This is for the desktop version of Chrome and Android. Screenshots are from Chrome on Windows 10.

Copyright Scott Adams, Inc./Distributed by Universal Uclick for UFS

Enhanced Safe Browsing Explained

Safe Browsing is a list of dangerous URLs that is maintained by Google and used to protect users from malicious sites. Enhanced Safe Browsing builds upon this feature with some additional tools.

With Enhanced Safe Browsing enabled, Chrome shares even more browsing data with Google. This allows for threat assessments to be more accurate and proactive, though it does present a privacy concern in itself. You are letting Google monitor your browsing.

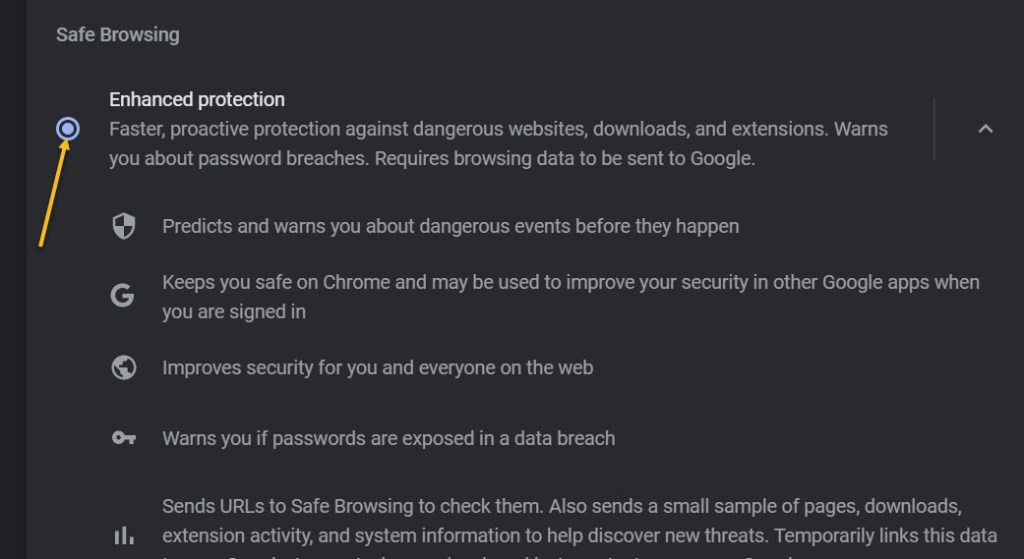
Per Google’s description, Enhanced Safe Browsing enables the following:

  • It predicts and warns you about dangerous events before they happen.
  • It keeps you safe on Chrome and may be used to improve your security in other Google apps when you are signed in.
  • It improves security for you and everyone on the web.
  • It warns you if passwords are exposed in a data breach.

Enable This Feature

The feature is available for Chrome on the desktop and Android. It is not available for iPhone and iPad. The process for enabling it is very similar on both platforms.

First, launch Chrome. Next, select the three-dot menu (the hamburger) icon in the top-right corner of Chrome. Now, choose Settings from the menu. Refer to below image:

Selecting Settings

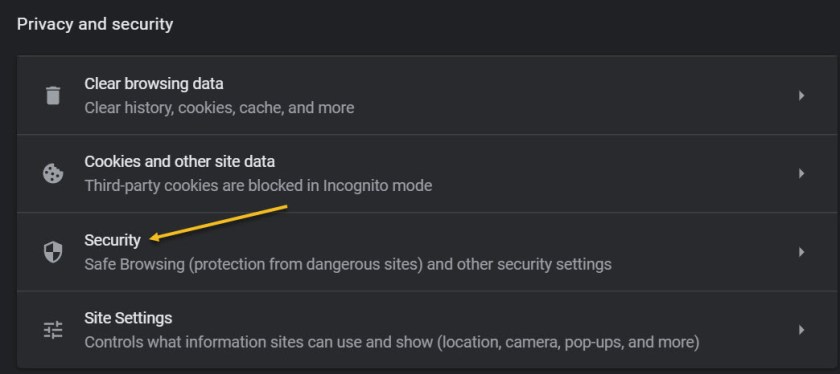
Next, go to the Privacy and Security section. See below image:

Accessing Privacy and security option

Now, on the desktop, click Security. On the Android, it is called Safe Browsing. See following image:

Browsing 3
Accessing the Security option

Next, click or tap on the radio button to enable Enhanced protection. Refer to below image:

Enabling Enhanced protection

Now, exit Settings. You are finished. You will not notice anything different in your everyday browsing, but you will now have better protection. In the event that something is amiss, Google Chrome will give you a warning.

Please feel free to share this post! One way to share is via Twitter.

Just click the Tweet icon below. This will launch Twitter where you click its icon to post the Tweet.

Check out TechSavvy.Life for blog possts on smartphones, PCs, and Macs! You may email us at contact@techsavvy.life for comments or questions.

I Would Like to Hear From You

Please feel free to leave a comment. I would love hearing from you. Do you have a computer or smart device tech question? I will do my best to answer your inquiry. Just send an email to contact@techsavvy.life. Please mention the device, app and version that you are using. To help us out, you can send screenshots of your data related to your question.

The author’s Vietnam eBook on the Battle for Tra Bong: Events and Aftermath

How to Check Your iPhone and iPad Warranty

In the USA, every iPhone and iPad comes with a one year warranty against manufacturing defects and hardware failures. Other jurisdictions, like the E.U. and Australia, come with two years. If you choose, you can also extend that warranty for two years with AppleCare+. Regardless of which warranty you have, you can easily find out whether or not your Apple device is currently covered.

In the USA, every iPhone and iPad comes with a one year warranty against manufacturing defects and hardware failures. Other jurisdictions, like the E.U. and Australia, come with two years. If you choose, you can also extend that warranty for two years with AppleCare+. Regardless of which warranty you have, you can easily find out whether or not your Apple device is currently covered. Let’s find out the warranty status for your iPhone and iPad.

This is for the iPhone and iPad

Copyright Scott Adams, Inc./Distributed by Universal Uclick for UFS

Check Your Warranty Status in Settings

You can check the warranty status of your iPhone and iPad using the Settings app. This will tell you whether you are covered by the basic one-year limited warranty, AppleCare+, or whether your coverage has expired.

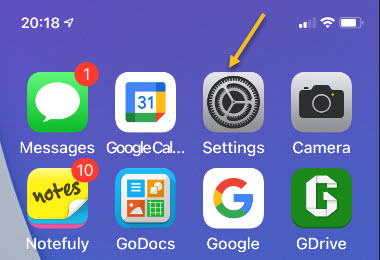
First, launch the Settings app. Refer to below image:

Accessing the Settings app

Next, tap the General option. See below image:

Accessing the General option

Now, tap the About option. See following image:

Accessing the About option

Below your Serial Number you should see a description of your your current warranty status. It will either say “Limited Warranty,” “AppleCare+,” or “Coverage Expired.” Refer to below image:

Your Coverage from iPhone or iPad

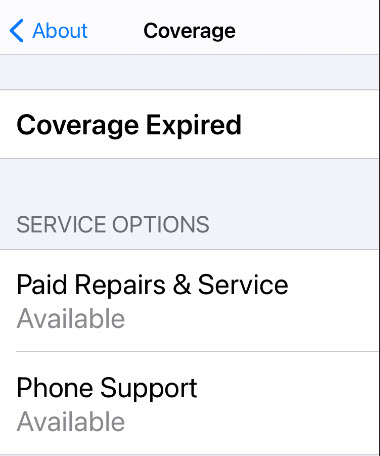
Now, tap it to see more information. See below image:

More information about your Coverage from your iPhone or iiPad

If your device is no longer covered, like mine, you may still be able to get repairs and phone support from Apple, which will be listed on the above screen. Also, you should be able to find a link to the Apple Support app for getting help.

Check Your Warranty Status From Apple’s Website

If you would like to check your coverage using Apple’s website, you can do so for virtually any Apple device at check coverage here. Open the website, then enter the Serial Number into the box, (you can find this number by following the above steps for an iPhone and iPad). See following image:

Checking your Coverage on the web

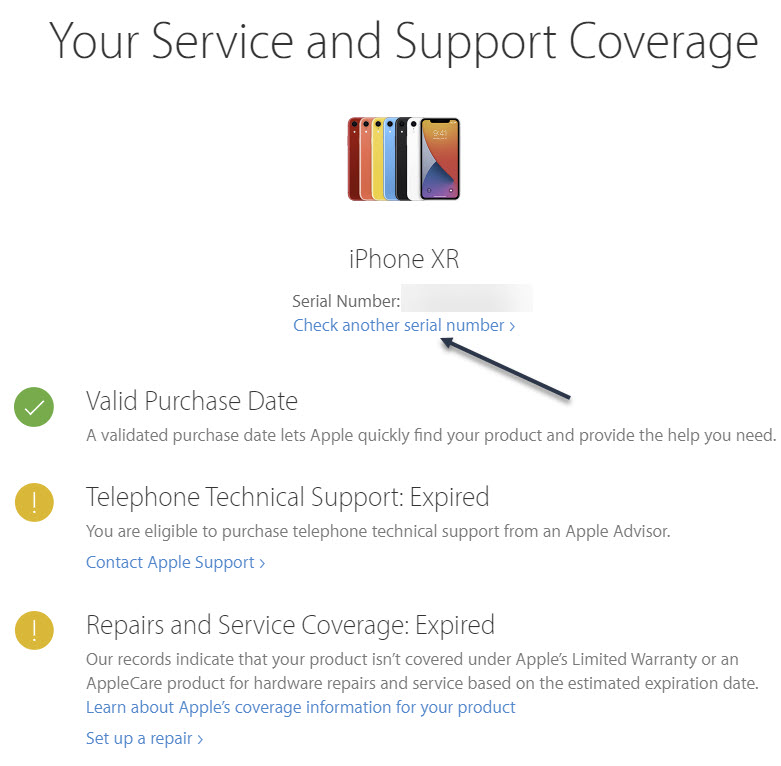
Also, you might want to check your other Apple devices. Just click the blue link labeled Check another serial number. Each device has its own Serial Number, which you would enter as mentioned above. Refer to below image:

Your Coverage from the web

What’s In Your Warranty

Apple’s limited one-year warranty covers manufacturer defects, including poor battery performance or faults that arise from regular use. It does not cover accidental damage, such as a cracked screen caused by a drop. Apple will check certain markers (like strips that detect moisture inside the chassis) to determine whether any damage has been caused by user error.

AppleCare+ plan covers you for two incidents of accidental damage over two years. If you break your screen, then you will have to pay a service fee of $29. For other damages, the fee goes up to $99.

Now you know about your warranty for an iPhone and iPad. That’s it. Please feel free to share this post! One way to share is via Twitter.

Just click the Tweet icon below. This will launch Twitter where you click its icon to post the Tweet.

Check out TechSavvy.Life for blog posts on smartphones, PCs, and Macs! You may email us at contact@techsavvy.life for comments or questions.

I Would Like to Hear From You

Please feel free to leave a comment. I would love hearing from you. Do you have a computer or smart device tech question? I will do my best to answer your inquiry. Just send an email to contact@techsavvy.life. Please mention the device, app and version that you are using. To help us out, you can send screenshots of your data related to your question.
The author’s Vietnam eBook on the Battle for Tra Bong: Events and Aftermath

How to Automatically Resume Apps on Startup in Windows 10

Have you ever been getting things done with a bunch of apps open then suddenly need to logout or restart your PC? It can be annoying when you log back in and having to restart all the apps you were using. For some good news, Windows 10 offers a switch in Settings that will resume select apps after logging out and back in again. This makes Windows remember which apps to reopen so you can resume where you left off.

Have you ever been getting things done with a bunch of apps open then suddenly need to logout or restart your PC? It can be annoying when you log back in and having to restart all the apps you were using. For some good news, Windows 10 offers a switch in Settings that will resume select apps after logging out and back in again. This makes Windows remember which apps to reopen so you can resume where you left off.

This is for devices running Windows 10

Dilbert and Social
Copyright Scott Adams, Inc./Distributed by Universal Uclick for UFS

This feature works with most modern apps like Office, Edge, other apps you have downloaded from the Microsoft Store, or those apps considered restartable. It might not work with legacy desktop apps like Photoshop, for example. Still this is a nice feature, so let’s explore how this is done.

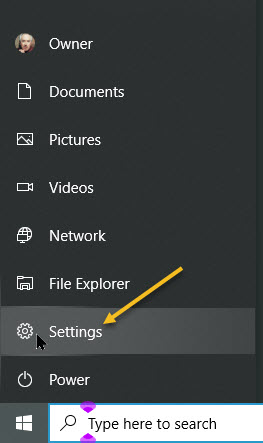
First, open Settings by clicking the Start menu and select the small gear icon, or press Windows+I. Refer to below image:

Resume 1
Accessing Settings

Next, in the Settings screen, click on Accounts. See below image:

Resume 2
Accessing Accounts

Now, on the Accounts screen, click Sign-in options in the sidebar. See following image:

Resume 3
Accessing Sign-in options

In Sign-in options, scroll down the page until you see the Restart apps option. Toggle the switch just below it until it’s turned On.

Resume 4
Turning on Restart apps

Now, you may exit Settings.

The next time you log out and log back in, what Microsoft calls your “restartable apps” will be reloaded automatically.

These are its universal apps available through the Store. The Windows Store only includes apps written for Microsoft’s new “Universal Windows Platform,” or UWP.

Legacy apps (that use the Win32 API) written for Windows versions prior to Windows 8 may not be restarted automatically. Still, you may find this feature useful.

That’s it. Please feel free to share this post! One way to share is via Twitter.

Just click the Tweet icon below. This will launch Twitter where you click its icon to post the Tweet.

Check out TechSavvy.Life for blog posts on smartphones, PCs, and Macs! You may email us at contact@techsavvy.life for comments or questions.

I Would Like to Hear From You

Please feel free to leave a comment. I would love hearing from you. Do you have a computer or smart device tech question? I will do my best to answer your inquiry. Just send an email to contact@techsavvy.life. Please mention the device, app and version that you are using. To help us out, you can send screenshots of your data related to your question.
The author’s Vietnam eBook on the Battle for Tra Bong: Events and Aftermath

How to Find the Model Number for iPhone and iPad

How do you know which version you have? All you have to do is find the model number of your iPhone and iPad. But it’s a little tricky and hidden. Why, I do not know.

How do you know which version you have? All you have to do is find the model number of your iPhone and iPad. But it’s a little tricky and hidden. Why, I do not know. Let’s find out.

This is for the iPhone and iPad

Dilbert and Lunch
Copyright Scott Adams, Inc./Distributed by Universal Uclick for UFS

You can find the model number of your iPhone or iPad using the hardware or the software. The fastest way is using the Settings app.

First, open the Settings (the gear icon) app. Refer to below image:

Model 1
Accessing Settings app

Next, scroll down to the General option. See below image:

Model 2
Accessing General option

Now, select the About option. See following image:

Model 3
Accessing About option

Next, tap on the number next to the Model Number option. Refer to below image:

Model 3
Accessing Model Number option. This is really the Part Number

The number will change to reveal the real model number for your iPhone and iPad. The first number displayed is the part number and the second number is the model number. Tricky by the Apple engineers. See below image:

Model 5
Accessing the real Model Number

If your iPhone will not boot up, you can also check the model number from the device. If you are using an iPhone 8 or higher, remove the SIM tray. You will find the model number etched on top in very small letters.

If you are using an iPhone 7 or older, you will find the model number inscribed on the back of the case.

With your iPhone and iPad’s model number, you can determine the exact model name of your device, and the region it came from. Just perform a web search for the model number to find out which iPhone and iPad you have and where it came from.

That’s it. Please feel free to share this post! One way to share is via Twitter.

Just click the Tweet icon below. This will launch Twitter where you click its icon to post the Tweet.

Check out TechSavvy.Life for blog posts on smartphones, PCs, and Macs! You may email us at contact@techsavvy.life for comments or questions.

I Would Like to Hear From You

Please feel free to leave a comment. I would love hearing from you. Do you have a computer or smart device tech question? I will do my best to answer your inquiry. Just send an email to contact@techsavvy.life. Please mention the device, app and version that you are using. To help us out, you can send screenshots of your data related to your question.
The author’s Vietnam eBook on the Battle for Tra Bong: Events and Aftermath

How to Force Chrome to Always Open Previously Open Tabs

Let’s say you are in the middle of a complex task in Chrome but you need to restart, log out, or Chrome has crashed. With one quick settings change, Chrome can remember all of your open tabs and reload them automatically the next time you start Chrome. Let’s explore how to setup this feature.

Let’s say you are in the middle of a complex task in Chrome but you need to restart, log out, or Chrome has crashed. With one quick settings change, Chrome can remember all of your open tabs and reload them automatically the next time you start Chrome. Let’s explore how to setup this feature.

This is for devices running Google Chrome. Screenshots are from Windows 10

Copyright Scott Adams, Inc./Distributed by Universal Uclick for UFS

First, launch Chrome. In any window, click the three vertical dots button (the hamburger icon) in the upper right-hand corner and select Settings from the menu. Refer to below image:

Accessing Settings

Next, select On startup option in the sidebar. See below image:

Selecting On startup option

Now, in the On startup section, select the radio button beside Continue where you left off. See following image:

Enabling opening your previous tabs

You can also force Chrome to launch with a set of your favorite pages. In the same On startup page in Chrome Settings just select Open a specific page or set of pages instead. Refer to below image where you can open the browser to Chrome apps using the text of chrome://apps/.

Enabling open to a specific page

Here you will see your Google (and non Google) apps. Yes, you can add third party apps to your opening Chrome apps page. See below image:

Your Google apps screen

If you want Chrome to always open with a fresh, empty browser state, you can head back to this screen and select Open the New Tab page instead.

After that, close Settings, The next time you restart Chrome, all of your tabs will open again exactly where you left off.

Note! If you were browsing through Incognito (private mode) and you lose your tabs, Chrome will not remember them.

That’s it. Please feel free to share this post! One way to share is via Twitter.

Just click the Tweet icon below. This will launch Twitter where you click its icon to post the Tweet.

Check out TechSavvy.Life for blog posts on smartphones, PCs, and Macs! You may email us at contact@techsavvy.life for comments or questions.

I Would Like to Hear From You

Please feel free to leave a comment. I would love hearing from you. Do you have a computer or smart device tech question? I will do my best to answer your inquiry. Just send an email to contact@techsavvy.life. Please mention the device, app and version that you are using. To help us out, you can send screenshots of your data related to your question.

The author’s Vietnam eBook on the Battle for Tra Bong: Events and Aftermath

How to Choose Your Safari Favorites Folder for iPhone and iPad

By default, Safari on iPhone and iPad displays a list of your Favorites when you open a new window or tab. We are going to choose another folder of bookmarks to display.

By default, Safari on iPhone and iPad displays a list of your Favorites when you open a new window or tab. We are going to choose another folder of bookmarks to display. Let’s explore how to do this.

This is for iPhone and iPad

Dilbert and Lunch
Copyright Scott Adams, Inc./Distributed by Universal Uclick for UFS

First, open Settings (the gear icon) app. Refer to below image:

Safari 1
Accessing Settings app

Next, scroll down and tap Safari. See below image:

Safari 2
Accessing Safari option

Now, tap Favorites. See following image:

Safari 3
Accessing Favorites option

Next, in the list that appears, choose another folder. (If no folders are present in the list, you can create a new folder in Safari by tapping the Bookmarks button, selecting Edit, then tapping the New Folder button.)

Note! Choosing a different folder here will also change your default Favorites folder. From now on, whenever you add a new bookmark to Favorites, it will appear in this folder. Refer to below image where we are choosing the Magazine folder for Favorites:

Safari 4
Selecting a bookmark folder

Now, tap back once, then exit Settings. The next time you open Safari to a New Tab page, you.will see a list of favorites pulled from the folder you just selected; in our case, the Magazine folder. See below image:

Safari 5
Your new Favorities folder

If you would prefer having nothing listed on your New Tab page, you can create an empty folder and select it instead. The next time you open a new tab, the page will be completely blank.

Related

How Do You Start Safari With a Blank Page

That’s it. Please feel free to share this post! One way to share is via Twitter.

Just click the Tweet icon below. This will launch Twitter where you click its icon to post the Tweet.

Check out TechSavvy.life for blog posts on smartphones, PCs, and Macs! You may email us at contact@techsavvy.life for comments or questions.

I Would Like to Hear From You

Please feel free to leave a comment. I would love hearing from you. Do you have a computer or smart device tech question? I will do my best to answer your inquiry. Just send an email to contact@techsavvy.life. Please mention the device, app and version that you are using. To help us out, you can send screenshots of your data related to your question.

The author’s Vietnam eBook on the Battle for Tra Bong: Events and Aftermath

Deleting Microsoft Accounts Gets Man Two Years in Jail

This post is for information only, no screenshots. At the end of the main story, I added one of my own IT consultant stories.

This post is for information only, no screenshots. At the end of the main story, I added one of my own IT consultant stories.

This is for businesses

Source: Office Watch

A man has been jailed for two years after sabotaging a company by deleting 80% of their Microsoft 365 accounts; email, calendars, contact lists, docs, and so on. What did he do and what organizations should do to prevent a similar catastrophe.

Deepanshu Kher worked for an IT consultant firm and was deployed to work at Carlsbad Company who were migrating to Microsoft 365 hosting. Carlsbad were unhappy with Kher who eventually left both Carlsbad and the consultant firm.

He returned to India where he hacked into Carlsbad Company’s new Microsoft 365 system and deleted 1,200 of their 1,500 user accounts. That shut down the company for two days, unable to access email accounts, contacts, calendars, documents, directories plus Teams and video conferencing.

Customers and partners could not contact the company or vice-versa. There was no way to tell people what was happening and why.

It took three months and over half-a-million dollars for Carlsbad to get everything back into something like normal.

Lessons to be Learned

Details of the hack have not been disclosed but some reasonable guesses are possible with some preventative measures suggested. See end of this blog post for a link about the hack.

Revoke Accounts

When someone leaves an organization, especially admin level access, make sure their account privileges are suspended or revoked.  It’s easily overlooked.

A former employee or contractor might have discovered other logins or know hacks into a system but most commonly they just login to their account.

Restoring Deleted Accounts

Microsoft’s default for deleting a mailbox or user account is a ‘soft’ deletion that’s held in a recycle bin for 30 days, with a Restore option, before full deletion. Unfortunately, there’s a second ‘hard’ option which immediately deletes the entire mailbox or user account. In some cases, hard deletion is necessary but perhaps Microsoft should make irreversible deletions a lot more difficult to access, even by administrators? Maybe require more than one admin to approve hard deletions?

Where is the Hacker Now?

Mr Kher did his nasty deed from India but that didn not stop the FBI from tracking him down and issuing an arrest warrant. When he tried to re-enter the US in January 2021 he was arrested, unaware of the outstanding warrant.

In US District Court he was found guilty of “Intentional Damage to a Protected Computer ” which carries a 10 year and $250,000 fine maximum. Kher was sentenced to two years jail, three years supervised release and ordered to pay restitution of $567,084 (the precise amount it cost Carlsbad to fix their systems).

See Justice.gov for details.

One of my Personal IT Consultant Jobs

I went to work thru a consultant agency for a manufacturing plant in the Port of Catoosa near Tulsa, Oklahoma. On my first day, around 9am, the admin person starting setting me up access to their system. Two hours later, he was still working; he did not know how to set my credentials. Also, a lady supervisor came by and gave me a foot high stack of paper and told me to go through it. I ask, “what am I looking for?”. She said, “just go through it.” Then she left. I did not do this; if she did not know what I was looking for, I sure did not know.

Around 11:am, the IT director came by and wanted to take me to lunch. His right-hand partner, he and I got into his vehicle. They did not ask me any questions on the ride to the restaurant or back to the company. During lunch, they did not even acknowledge my presence or ask me anything. They just talked to each other. So, I remained silent. I thought this was strange.

Back at the plant, he took me to several departments where I met a lot of people, names I could not remember. What I later realized, it was a “dog and pony” show. He was being pressured to do something about their IT “system”, so he talked to my consulting agency and they sent me. He expected me to fix their “system”. He knew this was an impossible task for one person; he set me up for failure.

Over the next two days, I was amazed at their “system”. Their plant was using Excel spreadsheets to run the company; I found thousands of them. I estimated 10,000 spreadsheets.

One department would enter info like name, supervisor, hours worked. Then that department would “pass” the spreadsheet to the next department where they added their own info and/or creating new Excel spreadsheets. And so it went to each department. It was a gigantic mess. I wrote him a letter saying he needed an enterprise system like SAP, IBM or Accenture. He ignored the letter. He had done his job by hiring me to be his savior.

I decided to start with the Time Keeping system. I create a database and the forms. At least, they could have something to visualize.

No one spoke to me. I tried to talk to the guys in IT, but they shut the door in my face. Very wierd.

After ten days, I came in on a Monday morning and starting working. Around 10:00am a supervisor comes by and says, “why are you hear, you were fired on Friday”. I said, “no one told me”. She left and I called my boss. They did not know either. I packed what work I had done and left.

After reading the main story above, I could have done major damage to the company by deleting thousands of Excel spreadsheets in a matter of minutes. I had full admin access. So, would I have been sentenced to jail? I do not think so because I was technically fired and no one told me or my boss. The company was to blame for their lack of communication and not revoking my credentials. So, pay attention to the above story, especially, if you are running a business.

That’s it. Please feel free to share this post! One way to share is via Twitter.

Just click the Tweet icon below. This will launch Twitter where you click its icon to post the Tweet.

Check out TechSavvy.Life for blog posts on smartphones, PCs, and Macs! You may email us at contact@techsavvy.life for comments or questions.

I Would Like to Hear From You

Please feel free to leave a comment. I would love hearing from you. Do you have a computer or smart device tech question? I will do my best to answer your inquiry. Just send an email to contact@techsavvy.life. Please mention the device, app and version that you are using. To help us out, you can send screenshots of your data related to your question.

The author’s Vietnam eBook on the Battle for Tra Bong: Events and Aftermath