I am Raymond Oglesby, an Information Technology (IT) specialist with 30 years in the field. I have taught Microsoft Applications and troubleshot computers in 15 countries and many States. My career was focused on mainframes and desktops from application development to implementation. I have written hundreds of programs for various architectures. I decided to start a blog to share my knowledge and experiences with you. I plan on updating this blog at least twice a week about smart phone apps to Windows.
Please feel free to leave a Comment or Tweet. I would love to hear from you. Do you have a computer tech question? I will do my best to answer your inquiry. Please mention the app and version that you are using. To help me out, you can send screenshots of your data related to your question.
The default sound input device is the device that Windows uses to record or hear sound. When you connect more than one microphone or other recording devices to your PC, you can select which device you want to use by default.
The default sound input device is the device that Windows uses to record or hear sound. When you connect more than one microphone or other recording devices to your PC, you can select which device you want to use by default.
This is for devices running Windows 10
Copyright Scott Adams, Inc./Distributed by Universal Uclick for UFS
Windows 10 users often need to juggle several microphones. There might be one built into a PC, one on a webcam, on a headset, and perhaps a podcasting microphone.
It’s worth noting that in some apps (such as Zoom), you can select your microphone device within the app, and that choice will function independently of the Windows system sound settings.
To set your default microphone system-wide, follow the steps below. Every app that uses the default Windows microphone, that is the default option for most apps, will use it.
Using Settings to Set the Default Microphone
Before we begin, it’s worth mentioning that if you have only one microphone, it will be the default.
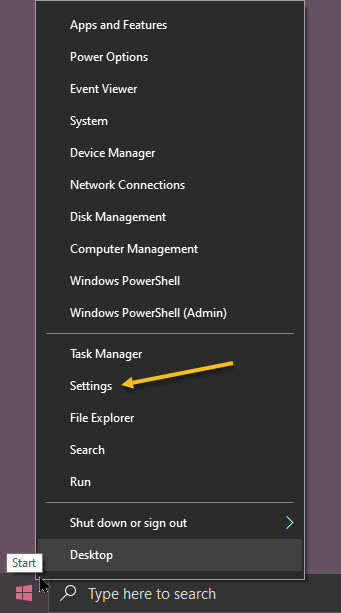
First, open Settings by clicking the Start menu and selecting the gear icon in the lower left-hand corner of your screen. You can also press Windows+i to open it. Refer to below image:
Accessing Settings
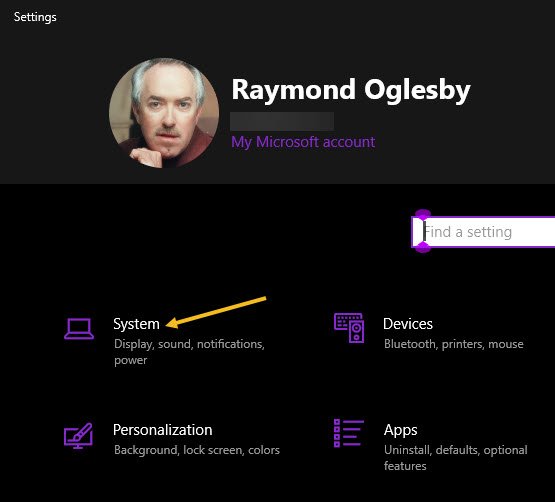
Now, in the Settings window, click the System option. See below image:
Accessing System option
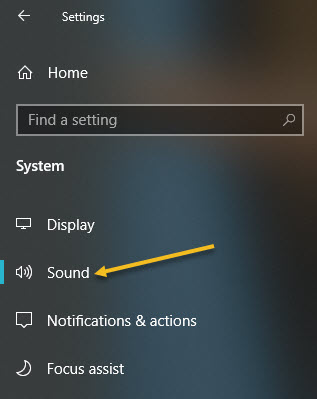
Next, on your System screen, click the Sound option from the sidebar menu. See following image:
Accessing Sound option
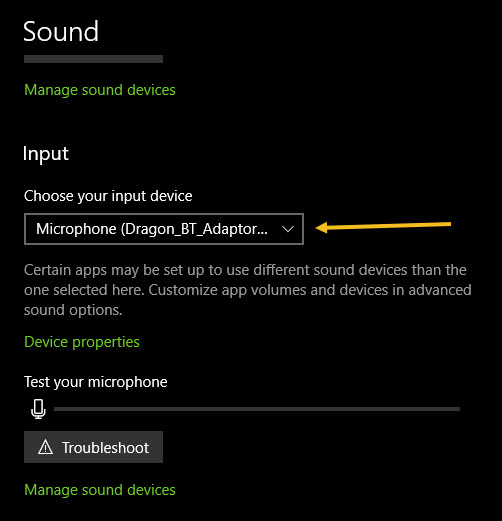
Now, scroll down to the Input section. In the drop-down menu labeled Choose your input device, select the microphone you would like to use as your default device. Refer to below image:
Selecting your default microphone
Once you have selected a device from the drop-down menu, Windows will use that device as your default microphone. Now, exit Settings.
Using Control Panel to Set the Default Microphone
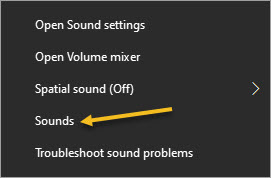
First, right-click the speaker icon in the system tray in the lower right-hand corner of your screen and select Sounds from the pop-up menu. See below image:
Accessing Sounds
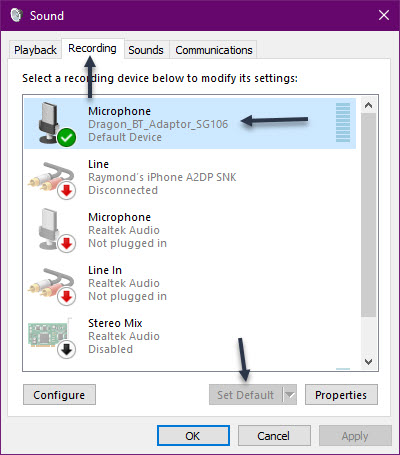
Next, click the Recording tab. Now, you will see a list of recording devices recognized by your system, which includes microphones. Select the microphone you would like to use as the default from the list and click the Set Default button. Note! If there is only one microphone listed, it will be the default. See following image:
Setting the default microphone
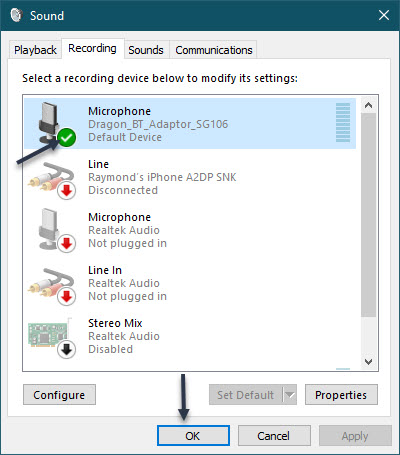
The microphone you have selected will have a green checkmark beside it and include the label DefaultDevice. Next, click OK to close your Sound window. Refer to below image:
Accepting the default microphone
If you want to change your default microphone again, just select Sounds from the speaker icon in the System tray and follow the above steps for using the Control Panel to set the default microphone.
You are finished setting your default microphone. Now you may close any openwindows. Please feel free to share this post! One way to share is via Twitter.
Just click the Tweet icon below. This will launch Twitter where you click its icon to post the Tweet.
Check out TechSavvy.Life for blog posts on smartphones, PCs, and Macs! You may email us at contact@techsavvy.life for comments or questions.
Please feel free to leave a comment. I would love hearing from you. Do you have a computer or smart device tech question? I will do my best to answer your inquiry. Just send an email to contact@techsavvy.life. Please mention the device, app and version that you are using. To help us out, you can send screenshots of your data related to your question.
The author’s Vietnam eBook on the Battle for Tra Bong: Events and Aftermath
Some iPhone apps require camera/microphone access to function properly, and some do not. Apple has introduced new app privacy settings with iOS 14 and higher, which allow you to see what apps have camera/microphone access. This way, you can change camera/microphone settings for any app, all in the same place, so apps that do not need to see or hear you, can not.
Some iPhone apps require camera/microphone access to function properly, and some do not. Apple has introduced new app privacy settings with iOS 14 and higher, which allow you to see what apps have camera/microphone access. This way, you can change camera/microphone settings for any app, all in the same place, so apps that do not need to see or hear you, can not.
Let’s explore how to allow camera/microphone access on your iPhone or turn it off.
This is for iPhone running iOS 14+
Copyright Scott Adams, Inc./Distributed by Universal Uclick for UFS
First, open Settings (the gear icon) on your iPhone. Refer to below image:
Accessing Settings
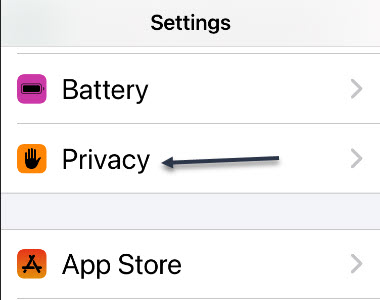
Next, scroll down and tap the Privacy option. See below image:
Accessing Privacy option
Now, scroll down and tap the Camera or Microphone option. See following image:
Accessing Microphone or Camera option
Here, you will see a list of apps that have asked you for camera or microphone access in the past. Apps that currently have access to your iPhone camera/microphone will have the switch turned On. Apps that do not have access will have its switch turned Off. Refer to below image:
List of apps with Facebook and Gmail turned On
If you.would like to remove iPhone camera/microphone access from an app, tap its switch to turn it off Off. Likewise, you can also grant camera/microphone access to a listed app by turning the switch On. See below image:
Facebook app is turned Off
Now, exit Settings.
If you want to know if your camera/microphone is in use, look in the upper-right corner of your screen at the status bar. If you see a green dot there, then an app is using the camera. If there’s an orange dot, that means your microphone is in use. The color scheme depends on your display mode. See following image for microphone in use as a blue dot:
Colored coded dots to indicate if Microphone or Camera is in use
If an app is using your camera/microphone when you do not expect it to, revisit the above steps and flip its switch to Off.
You are finished setting your access to camera or microphone. Please feel free to share this post! One way to share is via Twitter.
Just click the Tweet icon below. This will launch Twitter where you click its icon to post the Tweet.
Check out TechSavvy.Life for blog posts on smartphones, PCs, and Macs! You may email us at contact@techsavvy.life for comments or questions.
Please feel free to leave a comment. I would love hearing from you. Do you have a computer or smart device tech question? I will do my best to answer your inquiry. Just send an email to contact@techsavvy.life. Please mention the device, app and version that you are using. To help us out, you can send screenshots of your data related to your question.
The author’s Vietnam eBook on the Battle for Tra Bong: Events and Aftermath
Are you frustrated by Edge loading at Windows 10 startup? Do you prefer using Chrome as your default browser? In Windows 10 Home edition, Edge is the default browser, even if you make Chrome the default; Edge seems to ignore the Chrome setting.
Are you frustrated by Edge loading at Windows 10 startup? Do you prefer using Chrome as your default browser? In Windows 10 Home edition, Edge is the default browser, even if you make Chrome the default; Edge seems to ignore the Chrome setting.
To disable Edge, we are going to use the Group Policy Editor (the gpedit.msc file). But, back in Windows 7, Microsoft quit making the Editor a part of its operating system, especially the Home editions. So, we are going to install the Editor, and use the utility to disable preloading of Edge at startup in Windows 10.
This is for Windows 10
Copyright Scott Adams, Inc./Distributed by Universal Uclick for UFS
Install Group Policy Editor
Note! You will only need to do this if you have Windows 10 Home edition. If you have the Pro edition, you can bypass this step.
First, download the GPEdit Enabler script from the link below:
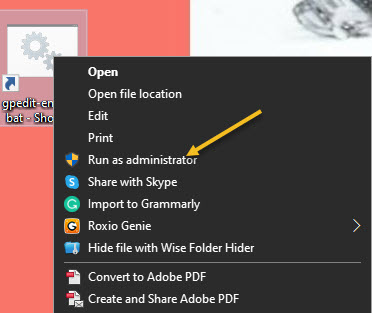
and save the “gpedit-enabler.bat” file to your desktop. Now, right-click the file and select Run as Administrator. Refer to below image:
Access gpedit batch file as Administrator
This will start the installation process. It may take some time depending upon your system performance. Once the process is complete, press any key to close the Command Prompt window. You may be prompted to download and install some Microsoft Net files; if so, allow permission to do so.
Although a restart is not required, if the policies are not working, you should restart your computer.
Run Group Policy Editor
First, open the Run dialog by pressing the Windows+R keys. Type gpedit.msc and press the Enter or OK button. This should open gpedit in Windows 10 Home or Pro.
On Windows 10, Microsoft Edge loads some processes in the background during startup to improve the speed when launching the application. But, we want to disable this feature and use Chrome instead.
How to Disable Preloading Edge
In the Group Policy Editor, browse to the following path:
Computer Configuration > Administrative Templates > Windows Components > Microsoft Edge
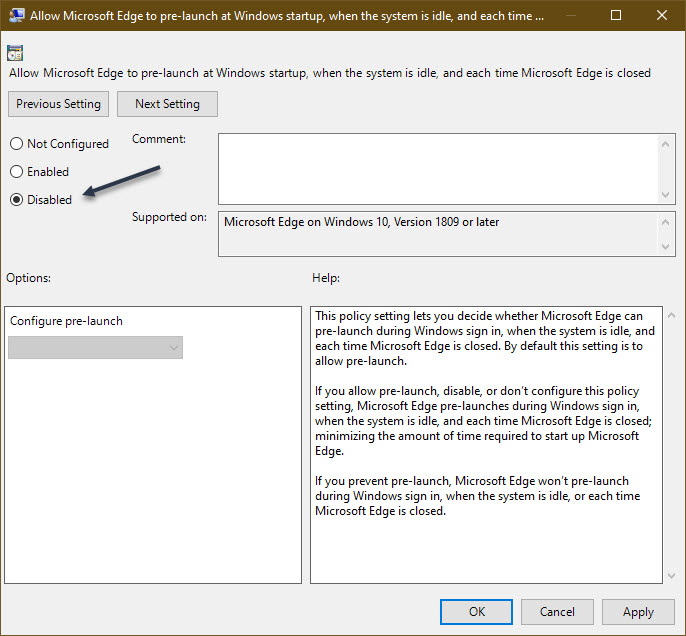
Now, click on the Setting column to sort it alphabetical. On the right side, double-click the Allow Microsoft Edge to pre-launch at Windows startup, when the system is idle, and each time Microsoft Edge is closed policy. See below image:
Accessing Group Policy Editor for Edge for pre-launch option
Now, select the Disabled option. See following image:
Selecting the pre-launch Disabled option
Next, click Apply, then OK.
Now, on the right side, double-click the Allow Microsoft Edge to start and load the Start and New Tab page at Windows startup and each time Microsoft Edge is closed policy. Refer to below image:
Accessing Group Policy for Edge for Start and New Tab option
Next, select the Disabled option. See below image:
Selecting the Start and New Tab Disabled option
Next, click Apply, then OK.
Now, repeat the above steps substituting User Configuration for Computer Configuration.
Now, exit the Editor and save any open work. You must RESTART your computer for the changes to take effect.
The Edge browser will no longer pre-load processes freeing up resources for more important apps and services.
In the case you change your mind, you can roll back the previous settings using the same instructions, but instead of selecting Disabled, select the Not Configured option.
Make Chrome the Default Browser
Click Start then Settings (the gear icon)
Click on Apps
Click on Default apps
Click on Web browser and select Google Chrome. See following image:
Setting Chrome as the default browser
That’s it. You have disabled Edge for pre-loading and saving resources. Please feel free to share this post! One way to share is via Twitter.
Just click the Tweet icon below. This will launch Twitter where you click its icon to post the Tweet.
Check out TechSavvy.Life for blog posts on smartphones, PCs, and Macs! You may email us at contact@techsavvy.life for comments or questions.
Please feel free to leave a comment. I would love hearing from you. Do you have a computer or smart device tech question? I will do my best to answer your inquiry. Just send an email to contact@techsavvy.life. Please mention the device, app and version that you are using. To help us out, you can send screenshots of your data related to your question.
Copyright Scott Adams, Inc./Distributed by Universal Uclick for UFS
If you are like me, you are not too keen on being tracked. So when an app asks you if it can track your iPhone activity across other programs and websites for ads, the answer is pretty much always “NO”. If you are tired of choosing Ask App Not to Track over and over again, there is a way to stop apps from even being able to ask in the first place.
If you are like me, you are not too keen on being tracked. So when an app asks you if it can track your iPhone activity across other programs and websites for ads, the answer is pretty much always “NO”. If you are tired of choosing Ask App Not to Track over and over again, there is a way to stop apps from even being able to ask in the first place.
While the setting was available in earlier versions of iOS 14, it was not useful because developers were not required to ask for tracking permission until iOS 14.4. So if you are not running iOS 14.4 or later, you may see the setting, but you will not get any tracking requests from apps.
With one system-wide setting disabled, most of the apps on your iPhone will not be able to (or are not supposed to) track your activity across other apps and websites.
But, permission is not a hard and fast rule. According to Apple, some apps might try to track you without getting the “OK” from you first.
With that in mind, let us explore this “not asking” feature.
This is for iPhone and iPad running iOS or iPadOS 14.4+
Copyright Scott Adams, Inc./Distributed by Universal Uclick for UFS
First, open Settings (the gear icon) on your iPhone or iPad. Refer to below image:
Accessing Settings
Next, scroll down to the Privacy option and tap it. See below image:
Accessing Privacy option
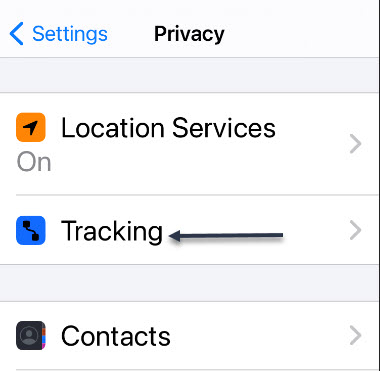
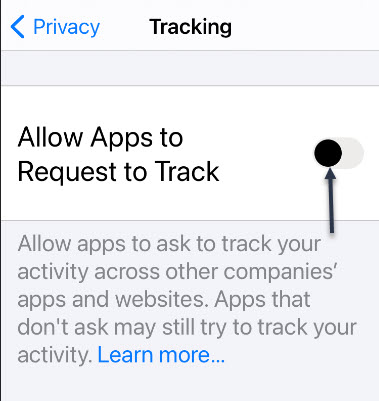
Now, tap Tracking near the top of your screen. See following image:
Accessing Tracking option
Next, tap the toggle beside Allow Apps to Request to Track to turn it off (to the left position). Refer to below image:
Disabling Request to Track option
Now, exit Settings. From now on, apps will no longer pop-up requests asking to track you. This means that you are telling all apps not to profile you for targeted advertising; unless you have previously given them permission to do so.
To change which apps can track you for targeted advertising individually, follow the above steps and turn off the toggles beside any app listed there. It is important to note that even with this option disabled, you can still be tracked while using the web on your iPhone or iPad.
That’s it. Please feel free to share this post! One way to share is via Twitter.
Just click the Tweet icon below. This will launch Twitter where you click its icon to post the Tweet.
Check out TechSavvy.Life for blog posts on smartphones, PCs, and Macs. You may email us at contact@techsavvy.life for comments or questions.
Please feel free to leave a comment. I would love hearing from you. Do you have a computer or smart device tech question? I will do my best to answer your inquiry. Just send an email to contact@techsavvy.life. Please mention the device, app and version that you are using. To help us out, you can send screenshots of your data related to your question.
The author’s Vietnam eBook on the Battle for Tra Bong: Events and Aftermath
Windows computers sometimes do get viruses and other malware, but not every slow or misbehaving PC is infected by malware. Let us explore how to check if you actually have a virus; and whether a suspicious process is dangerous or not.
Windows computers sometimes do get viruses and other malware, but not every slow or misbehaving PC is infected by malware. Let us explore how to check if you actually have a virus; and whether a suspicious process is dangerous or not.
This is for the PC
Copyright Scott Adams, Inc./Distributed by Universal Uclick for UFS
Signs of a Virus
If you notice any of the following issues with your computer, it may be infected with a virus:
Slow computer performance (taking a long time to start up or open programs)
Problems shutting down or restarting
Missing files, such as DLLs, or Master File Table, or Master Boot Record
Frequent system crashes and/or error messages
Unexpected pop-up windows
New applications (toolbars, etc.) that appear without you downloading them
Overworked hard drive (the fan makes sounds and seems to be whirring and working hard when you are not doing much)
Emails that send autonomously from your accounts
Browser lag or redirects
Malfunctioning antivirus programs or firewalls
Just because your PC is running fine does not mean it does not have malware. The viruses of a decade ago were often pranks that ran wild and used a lot of system resources. Modern malware is more likely to lurk silently and covertly in the background, trying to evade detection so it can capture your credit card numbers and other personal information. In other words, modern-day malware is often created by criminals just to make money, and well-crafted malware will not cause any noticeable PC problems at all.
There’s no one-size-fits-all piece of evidence to look for without actually scanning your PC for malware. Sometimes malware causes PC problems, and sometimes it’s well-behaved while sneakily accomplishing its goal in the background. The only way to know for sure whether you have malware is to examine your system for it.
Check Your Processes
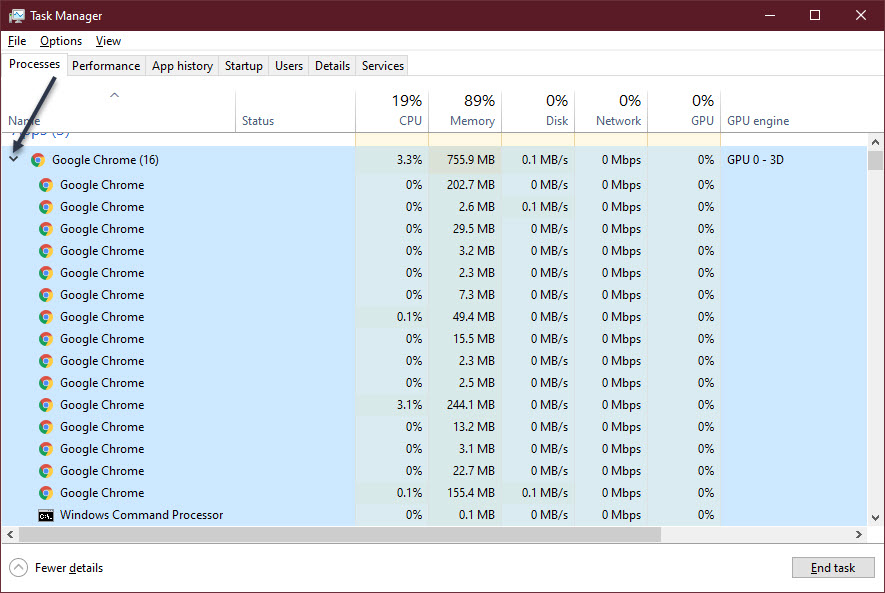
You might be wondering if your computer has a virus because you have seen a strange process in the Windows Task Manager.
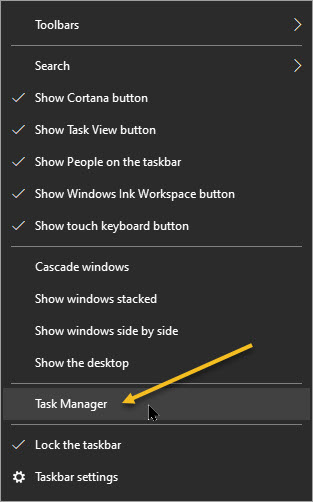
First, open the Task Manager by pressing Ctrl+Shift+Esc or by right-clicking the Windows taskbar and selecting Task Manager. Refer to below image:
Selecting the Task Manager
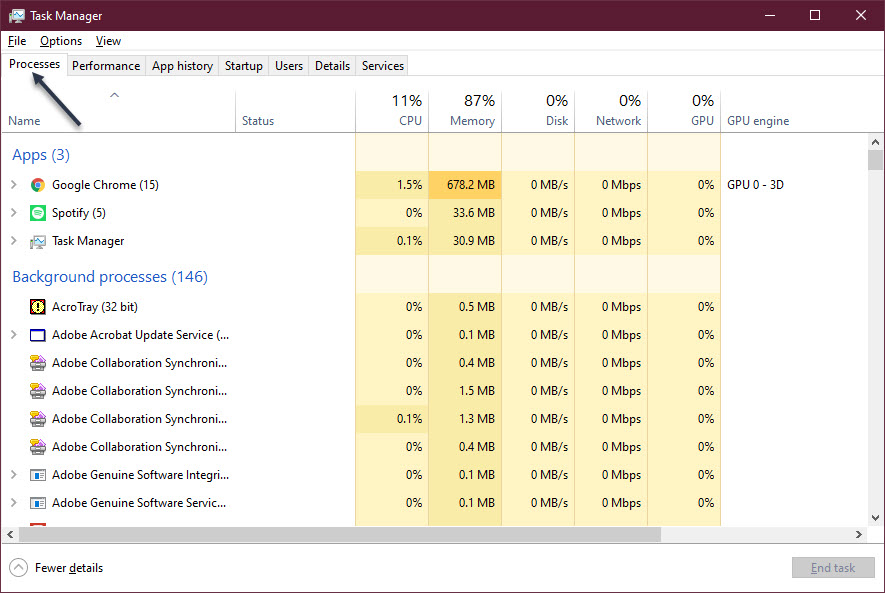
It is normal to see quite a few processes here. Many of these processes have strange, confusing names. That is normal. Windows includes quite a few background processes, your PC manufacturer added some, and applications you install often add them. See below image:
Accessing your system Processes
If you do not see many entries, click the More details link in bottom left-hand corner.
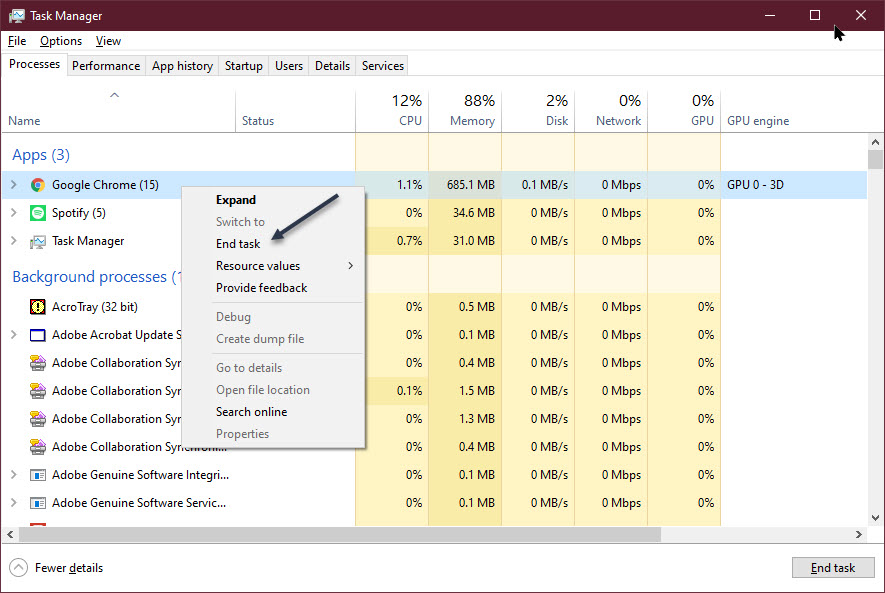
Badly behaved malware will often use a large amount of CPU, memory, or disk resources. GoogleChome and/or chrome.exe are resource ‘hogs’. If you see a lot of these entries, first, save and close all your work. Then. right click on each one and select End Task. Now, you will need to restart your computer and relaunch GoogleChrome to reopen this post. Now, access your processes again and check for Google Chrome and/or chrome.exe. If you still see entries that are using lots of system resources, continue reading for other options. See following image:
Ending a Task
If you are curious about whether a specific program is malicious, right-click it in the Task Manager and select Search Online to find more information.
If information about malware appears when you search the process, that is a sign you likely have malware. However, do not assume that your computer is virus-free just because a process looks legitimate. A process could lie and say it is Google Chrome or chrome.exe but it may just be malware impersonating Google Chrome that is located in a different folder on your system. If you are concerned you might have malware, we recommend performing an anti-malware scan.
In our example, Google Chrome has a number at the end, number 15. This refers to the number of running Chrome instances. To see the detail, click its Expand arrow. If you use Chrome a lot, just ensure that the CPU percentage is very low; which means the Chrome task is “not overloading your system”. If it is, End Task as mentioned above. Refer to below image:
Expanding a Process
Scan Your Computer
By default, Windows 10 is always scanning your PC for malware with the integrated Windows Security application, also known as Windows Defender. You can, however, perform manual scans.
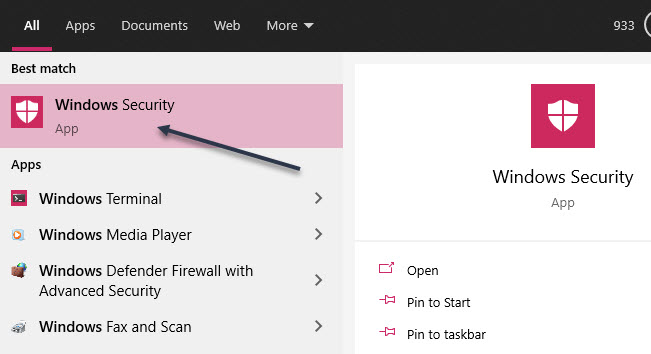
On Windows 10, open your Start menu, type WindowsSecurity in the Cortana search box. Now, click the Windows Security shortcut in upper left-hand corner to open it.
You can also navigate to:
Settings > Update & Security > Windows Security > Open Windows Security
See below image:
Selecting Windows Security
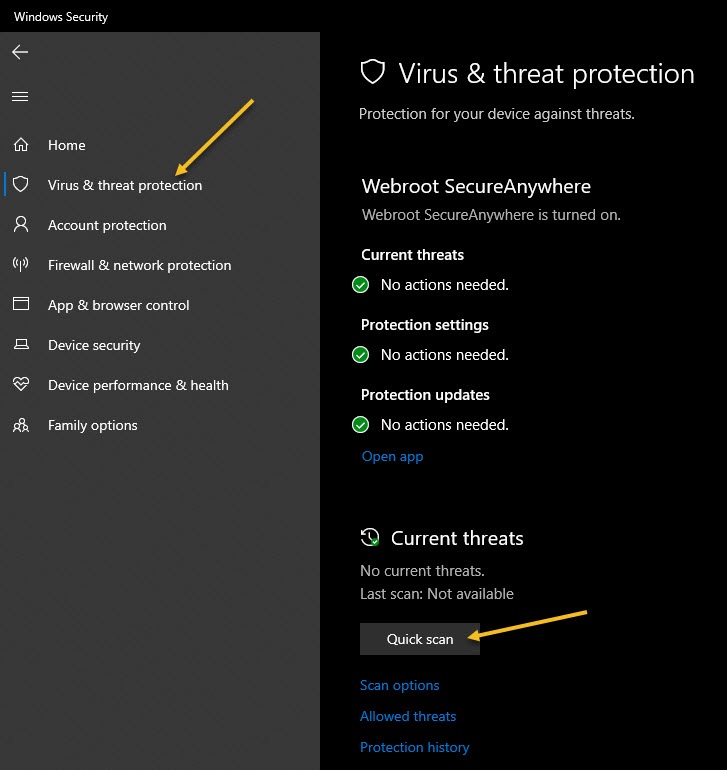
To perform an anti-malware scan, click Virus & threat protection in the sidebar. Now, click Quick Scan to scan your system for malware. If you do not see the Quick Scan option, ensure that Windows Defender is running. Windows Security will perform a scan and give you the results. If any malware is found, it will offer to remove it from your PC automatically. See following image:
Performing a Quick Scan
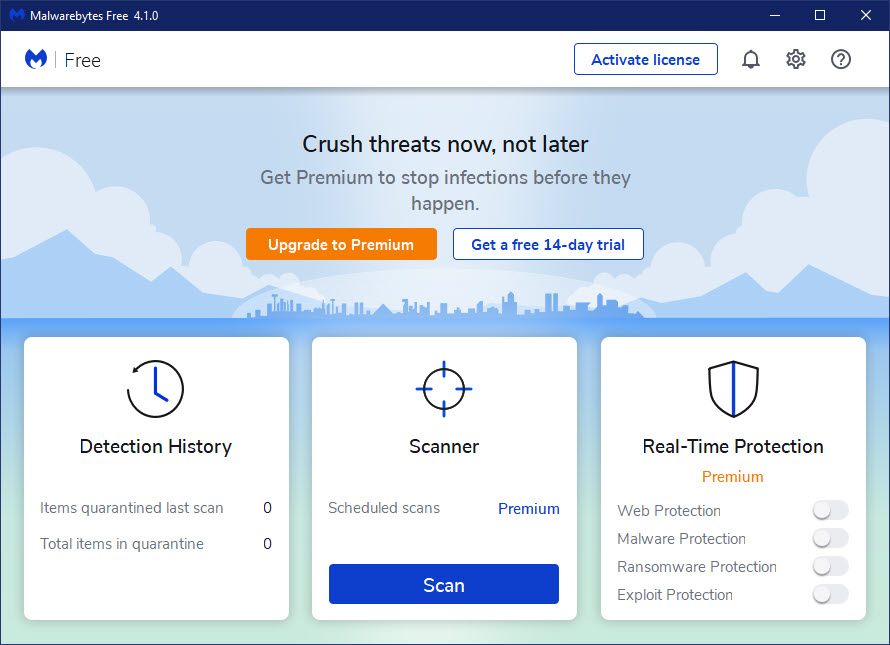
Another option is to use a third-party application. We recommend Malwarebytes. The free version of Malwarebytes will let you perform manual scans to check for viruses and other malware on your PC. The paid version adds real-time protection. But, the free version will work just fine to check your PC for malware.
To download, click here. Then install and run. You may receive an Update Now screen. If so, just click the Update Now button and follow the instructions. Then, click the “free 14-day trial” button to run a scan. Refer to below image for the opening screen of Malwarebytes:
Malwarebytes main screen
If any of the above steps fail, you can restart your computer in Safe Mode by pressing the Shift +Restart, or pressing the F8 key repeatly, or using a Recovery drive. When you get to the advanced troubleshooting tools, you will arrive at a screen that lets you access these tools. Click the Troubleshoot button to proceed.
You are finished. Please feel free to share this post! One way to share is via Twitter.
Just click the Tweet icon below. This will launch Twitter where you click its icon to post the Tweet.
Check out TechSavvy.Life for blog posts on smartphones, PCs, and Macs! You may email us at contact@techsavvy.life for comments or questions.
Please feel free to leave a comment. I would love hearing from you. Do you have a computer or smart device tech question? I will do my best to answer your inquiry. Just send an email to contact@techsavvy.life. Please mention the device, app and version that you are using. To help us out, you can send screenshots of your data related to your question.
The author’s Vietnam eBook on the Battle for Tra Bong: Events and Aftermath
If your iPhone or iPad is displaying contact names differently than what you want, like last name before the first name (or vice versa,) you can fix it. This will change how names appear in Mail, Messages, Phone, Contacts, and other apps that follow this setting.
If your iPhone or iPad is displaying contact names differently than what you want, like last name before the first name (or vice versa,) you can fix it. This will change how names appear in Mail, Messages, Phone, Contacts, and other apps that follow this setting.
This is for iPhone and iPad
Copyright Scott Adams, Inc./Distributed by Universal Uclick for UFS
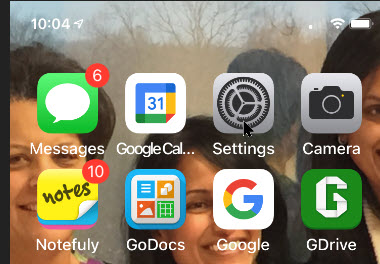
First, launch Settings (the gear icon). Refer to below image:
Accessing Settings
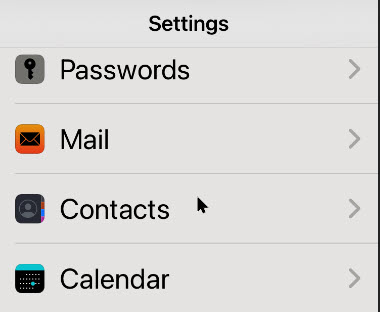
Next, scroll down to the Contacts option and tap it. See below image:
Accessing Contacts option
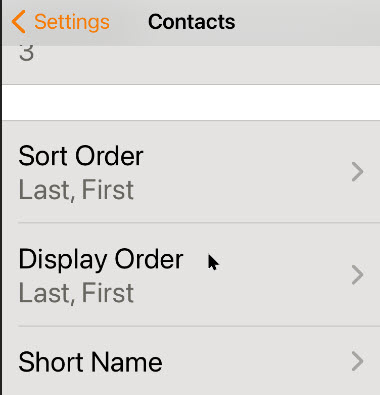
Now, in the Contacts settings, tap Display Order. See following image:
Accessing Display Order option
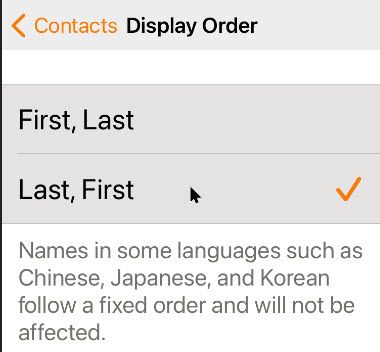
In Display Order you have two choices. Choose whichever one you prefer. Refer to below image:
Selecting your Display Order preference
The Short Name feature in the Contacts settings also determines how you will see names in apps such as Mail. With Short Name enabled, the app may display only a first name instead of the full name order you just set. See below image:
Accessing Short Name option
By default, Short Name is enabled. If you would like to see a full name with the order you just chose instead, tap the switch to turn Short Name off. See following image:
Enable/disable Short Name option
Now, tap Back once, then exit Settings.
The next time you use an app that pulls information from your contacts (like Apple’s Mail app), you will see the names in the order you just set. If you do not see the changes reflected yet, you might need to exit the application first so it can reload the settings. Then, tap the app icon to launch it again.
You are finished. Please feel free to share this post! One way to share is via Twitter.
Just click the Tweet icon below. This will launch Twitter where you click its icon to post the Tweet.
Check out TechSavvy.Life for blog posts on smartphones, PCs, and Macs! You may email us at contact@techsavvy.life for comments or questions.
Please feel free to leave a comment. I would love hearing from you. Do you have a computer or smart device tech question? I will do my best to answer your inquiry. Just send an email to contact@techsavvy.life. Please mention the device, app and version that you are using. To help us out, you can send screenshots of your data related to your question.
The author’s Vietnam eBook on the Battle for Tra Bong: Events and Aftermath
On Windows 10, the process to rename a single file is easy, but it can become troublesome quickly when trying to change the name (or extension) to a long list of files within a folder.
On Windows 10, the process to rename a single file is easy, but it can become troublesome quickly when trying to change the name (or extension) to a long list of files within a folder.
Although, you can always built-in Windows 10 various tools to change the name of files like File Explorer, Command Prompt, and PowerShell, we are going to use another Microsoft tool, the PowerRename module in PowerToys.
This is for Windows 10
Copyright Scott Adams, Inc./Distributed by Universal Uclick for UFS
PowerRename Module in PowerToys
The PowerRename module is part of the free PowerToys. To download PowerToys from the Microsoft website, visit this link in your favorite browser and look for the latest release toward the top of the page. Download that file and run it to install the app
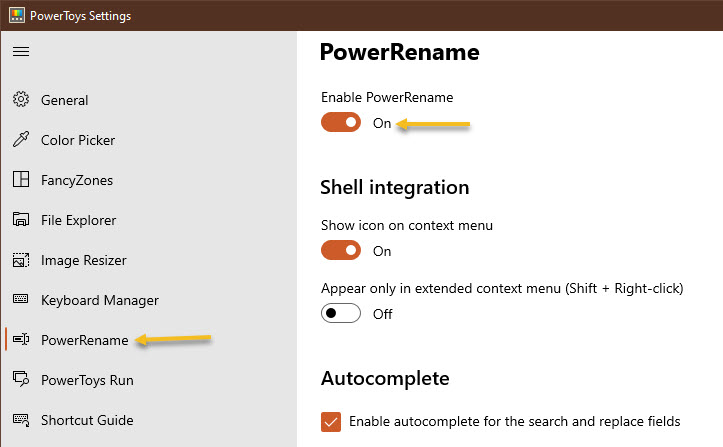
Once installed, an icon will be placed in your Tray Bar. Click on the icon to run PowerToys. Now, launch PowerToys Settings, and click PowerRename in the sidebar. Next, ensure that the switch beside Enable PowerRename is turned on. Refer to below image:
Enabling PowerRename
Now, close the PowerToys Settings window.
Renaming Options
Now that you have the app installed, renaming a bunch of files is as easy as a right-click a menu choice. First, locate the files that you want to rename in File Explorer or on the desktop and select them. See below image:
Photos to be renamed
Then right-click the files and select PowerRename from the menu that appears. See following image:
Selecting PowerRename
The PowerRename pop-up window will open. Refer to below image:
The PowerRename window
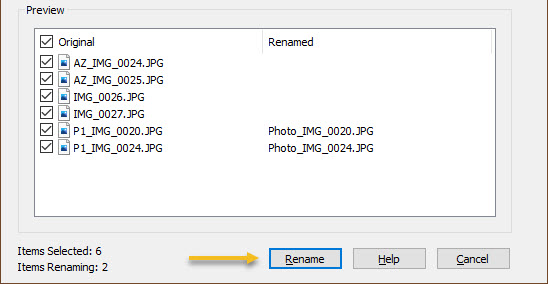
First, enter the criteria that will determine what gets renamed. By default, PowerRename works with simple search-and-replace functionality. In the first text box, type a search term. On the next line, enter what you want to replace it with. PowerRename will replace the first occurrence (or every occurrence if you check a box) of that term in all of the file names you have selected with the replacement text.
Here is an example where “P1_” in each file name has been replaced with “Photo_.” The neat thing is that PowerRename provides a preview of what the renamed files will look like right there in the window. That way, you do not have to guess what the result might be. See below image:
Selecting the criteria for the rename
Near the middle of the window, you will see other options that change how PowerRename works. Consider each one and place a checkmark beside those that you want to use. Here is what each option does:
Use Regular Expressions: This allows the use of powerful search strings known as regular expressions which can enable very in-depth or complex search-and-replace operations.
Case Sensitive: This option makes searches sensitive, whether the letters are capital or lowercase. For example, the term “cat” would match different results than “Cat.”
Match All Occurrences:Normally, only the first instance of the search term is replaced (from left to right). With this checked, all instances of the search term will be replaced.
Exclude Files: If this is checked, the operation will only apply to folders and not files.
Exclude Folders: If this is checked, the operation will only apply to files and not folders.
Exclude Subfolder Items: This excludes items in selected sub-folders from rename operations. For example, if you select a directory that has files within sub-folders, those will not be affected.
Enumerate Items: This will add a number, counting upward, to the end of each file that is renamed.
Item Name Only: If checked, the operation will only apply to the file or folder’s name and not its extension.
Item Extension Only: If checked, the operation will only apply to the file or folder’s extension and not its name.
When you are ready, click the Rename button, and PowerRename will perform the operation you have specified. See following image:
Selecting the Rename butoon to rename your file(s)
If you do not like the result, you can press Ctrl+Z in File Explorer to undo the rename process. A very handy shortcut to undo your change.
A Practical Example
What if you do not want to just replace a word in a file, but rather, you would like to replace the entire filename with something completely new? In that case, you would want a wildcard to match all of the files you have selected. To do that, you will need to use a very simple, regular expression, “.*”, which means “everything.”
In the below example, we are going to replace all file names selected with a base file name that gets progressively numbered. First, enter “.*” in the Search for box, then enter the name you would like to use in the Replace with box. Then check Use Regular Expressions, Enumerate Items, and Item Name Only. Refer to below image:
A Rename example
Now, you will end up with a series of similarly named files that are numbered in sequential order. When you are done setting it up, click Rename, and the operation will finish.
You are finioshed. Please feel free to share this post! One way to share is via Twitter.
Just click the Tweet icon below. This will launch Twitter where you click its icon to post the Tweet.
Check out TechSavvy.Life for blog posts on smartphones, PCs, and Macs! You may email us at contact@techsavvy.life for comments or questions.
Please feel free to leave a comment. I would love hearing from you. Do you have a computer or smart device tech question? I will do my best to answer your inquiry. Just send an email to contact@techsavvy.life. Please mention the device, app and version that you are using. To help us out, you can send screenshots of your data related to your question.
The author’s Vietnam eBook on the Battle for Tra Bong: Events and Aftermath
FaceTime Eye Contact feature, which Apple released with iOS 14 and higher. makes it appear like you are looking right at the camera, even when you are actually looking at your friend on the screen. If you find this artificial trick a bit creepy, rest assured you can turn it off at any time. This feature tells me that Apple engineers have too much time on their hands; it is a weird feature.
FaceTime Eye Contact feature, which Apple released with iOS 14 and higher. makes it appear like you are looking right at the camera, even when you are actually looking at your friend on the screen. If you find this artificial trick a bit creepy, rest assured you can turn it off at any time. This feature tells me that Apple engineers have too much time on their hands; it is a weird feature.
In typical video chat scenarios, you want to look at your friend while you talk to them. When you do, you are obviously not looking at the camera. So from your friend’s perspective, you look like you are looking slightly below eye level. The new feature aims to fix that issue by using software to “move” your eyes into an eye contact position. It works really well; perhaps a little too well.
Aside from creating the “fake” feeling of authentic eye contact during a video conversation, FaceTime’s new feature can also make the other caller feel like you are staring into the abyss of your camera and not at them. We have gotten so used to where the eyes actually are in video calls that when they are pointed right at us all of the time, it looks intimidating and unnatural; like you are not really paying attention; and that’s not necessarily how a regular talk goes.
The somewhat spooky Eye Contact feature for FaceTime, is only available for iPhone XS and above. Ironically, this feature is turned On by default. Let’s explore how to turn this feature Off.
This is for the iPhone running iOS 14
Copyright Scott Adams, Inc./Distributed by Universal Uclick for UFS
First, open Settings (the gear icon) on your iPhone. Refer to below image:
Accessing Settings
Next, in Settings, scroll down and tap FaceTime. See below image:
Accessing FaceTime option
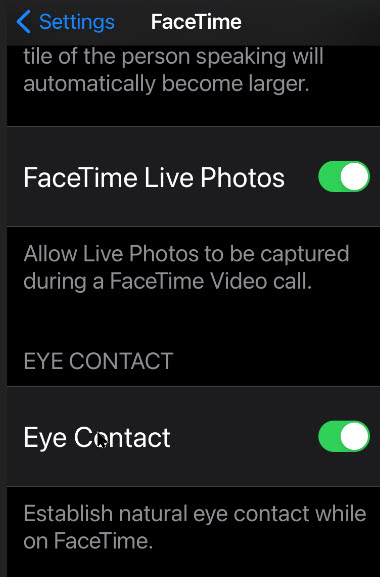
Now. In FaceTime settings, scroll down and toggle the switch beside Eye Contact to turn it Off. See below image:
Accessing Eye Contact toggle
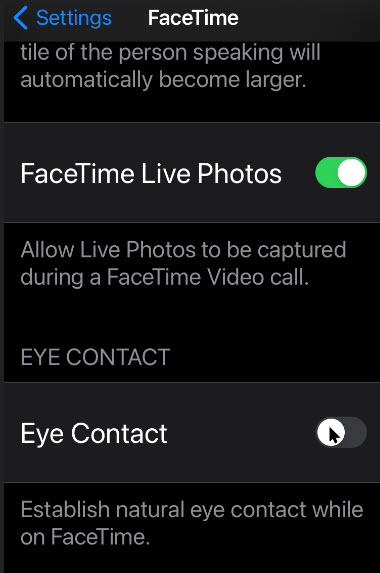
This disables the fake and creepy “natural eye contact” feature. Refer to below image:
Disabling Eye Contact toggle
Now, exit the Settings app. The next time you use FaceTime, your pupils will be exactly where you would expect them to be. Reality wins over this creepy feature.
That was easy. Please feel free to share this post! One way to share is via Twitter, as mentioned below.
I hope you have found this post helpful. If so, click the Tweet icon below. This will launch Twitter where you click its icon to post the Tweet.
Check our TechSavvy.Life for blog posts on smartphones, PCs, and Macs! You may contact us at contact@techsavvy.life for comments or questions.
Please feel free to leave a comment. I would love hearing from you. Do you have a computer or smart device tech question? I will do my best to answer your inquiry. Just send an email to contact@techsavvy.life. Please mention the device, app and version that you are using. To help us out, you can send screenshots of your data related to your question.
The author’s Vietnam eBook on the Battle for Tra Bong: Events and Aftermath
Google is making it even easier to work with Microsoft Office files, with the company now allowing you to directly edit attached Office files in Gmail as well as Google Docs, Sheets and Slides. It’s available to all Gmail users, free and paid accounts. No more document conversion hassles, at long last!
Google is making it even easier to work with Microsoft Office files, with the company now allowing you to directly edit attached Office files in Gmail as well as Google Docs, Sheets and Slides. It’s available to all Gmail users, free and paid accounts. No more document conversion hassles, at long last!
This is for devices using Google Gmail
Copyright Scott Adams, Inc./Distributed by Universal Uclick for UFS
Google Editing Explained
Previously, documents had to be imported into Google Drive in order to edit or modify them; while emailed attachments were only able to be viewed.
The new workflow, however, streamlines that process considerably. Now, you can directly open and edit an Office file using the Google Docs editor just by clicking on it; just like you would a native Google Docs. But the new editing function does not convert Office files into Google Docs, instead preserving the original file format.
Gmail will allow you to respond to the original email and include the now-updated file (still in an Office file format) without first requiring you to download and re-attach the updated file.
This means you can now edit your Word, Excel and PowerPoint files without ever leaving Gmail.
For example, when you receive a Word document as an email attachment, you can open it and start editing in Docs with a single click while still preserving the Word file format.
With the new change, Microsoft Office attachments will have a new “edit” option and when edits are complete, there will be a new option to share the document via email.
Remove a Chrome Extension
First, you must remove an Extension (if installed) from Google Chrome.
Sign into your managed Google Account.
In a Chrome browser, click More.
Scroll down to More tools.
Click Extensions.
Find the Office Editing for Docs, Sheets. & Slides extension and click Remove.
Once you have removed the Extension you can use the Office editing feature.
Directly Edit Office Attachments
Any incoming email with a Microsoft Office document appears in the Inbox list with icons, preview pane, and the name of the document attachment. Refer to below image:
Accessing the email with attached Office files
Clicking one of those panes opens a pop-up windows with various options. At top right there is a download button; use that to save a copy for opening in Word, Excel or PowerPoint on your computer. Now, click on the Edit icon to edit your file. See below image where we are selecting the Word file to edit:
Selecting the Edit for a Word file
Hover your mouse over each attachment to see some options:
Download – save to your computer
Save to Google Drive
Edit with Google Docs – opens a new browser window ready to edit.
After Google Editing
Once you have edited the attachment, there are various options for sharing the revised document. Look under the File menu. See following image for the Email option:
Your Email option
Now, checkout your various options to save the document. Refer to below image for the Download options:
Your Download options
Google Editing of Office Files
Word docx files can be edited directly with Google Docs, look for the .DOCX icon at top left. See below image:
Edit a Word document
Excel xlsx files can be edited directly with Google Sheets look for the .XLSX icon at top left. See following image:
Edit an Excel file
PowerPoint .pptx files can be edited directly with Google Slides, look for the .PPTX icon at top left. Refer to below image:
Edit a PowerPoint file
Note! There may be compatibility problems between Excel and Sheets or PowerPoint and Slides.
You are finished. Please feel free to share this post! One way to share is via Twitter.
Just click the Tweet icon below. This will launch Twitter where you click its icon to post the Tweet.
Check out TechSavvy.Life for blog posts on smartphones, PCs, and Macs! You may contact us at contact@techsavvy.life for comments or questions.
Please feel free to leave a comment. I would love hearing from you. Do you have a computer or smart device tech question? I will do my best to answer your inquiry. Just send an email to contact@techsavvy.life. Please mention the device, app and version that you are using. To help us out, you can send screenshots of your data related to your question.
The author’s Vietnam eBook on the Battle for Tra Bong: Events and Aftermath
The iPhone’s user-friendly Camera app makes it possible for anyone to take great photos. But the app does not get it right every time, and sometimes you might want to brighten or darken your scene.
The iPhone’s user-friendly Camera app makes it possible for anyone to take great photos. But the app does not get it right every time, and sometimes you might want to brighten or darken your scene.
To do that, you will need to use the Exposure Compensation dial. Apple added it in the iOS 14 update released in September 2020. This built-in feature works on the iPhone 11, iPhone 11 Pro, and newer iPhones. On older iPhones, you will have to use a third-party camera app.
This is for the iPhone running iOS 14
Copyright Scott Adams, Inc./Distributed by Universal Uclick for UFS
Exposure Compensation Dial
To enable the Exposure Compensation dial, launch the Camera app, and tap on the arrow at the top of the viewfinder in portrait orientation.
A row of icons will appear just above the shutter button. The Exposure Compensation slider is the plus/minus (+/-) icon. Tap on it and a new slider will appear along the bottom of the frame.
You can now move the slider left and right to decrease or increase the amount of light in your scene.
If you tap on the plus/minus (+/-) again, you will get back to the main row of icons. You can close the menu using the arrow at the top of the viewfinder. Keep in mind that, if you set an exposure compensation value, it will persist until the next time you open the camera app; even if you close this menu.
The Exposure Compensation feature added in iOS 14 is not full manual control, but fine-tuning of a scene. As you move around the Camera app will continue to adapt to lighting conditions unless you manually lock exposure and focus. It is an effective way to get more control over the image without having to go fully manual.
If you do not have an iPhone 11 or newer, you will not see this option as it is not available on older devices.
Third Party Apps
If you own an iPhone XS, XR, or earlier, you will not be able to access the Exposure Compensation dial. You’ll have to make do with the old method of doing things, which means locking focus and exposure to a single point and then making micro-adjustments inside the yellow box.
If you have an older device and want to set exposure and focus separately in a more intuitive way, try VSCO, Manual, or Camera+ 2. My favorite is the latter, Camera+2.
I hope you have found this post helpful. If so, click the Tweet icon below. This will launch Twitter where you click its icon to post the Tweet.
Check out TechSavvy.Life for blog posts on smartphones, PCs, and Macs! You may email us at contact@techsavvy.life for comments or questions.
Please feel free to leave a comment. I would love hearing from you. Do you have a computer or smart device tech question? I will do my best to answer your inquiry. Just send an email to contact@techsavvy.life. Please mention the device, app and version that you are using. To help us out, you can send screenshots of your data related to your question.
The author’s Vietnam eBook on the Battle for Tra Bong: Events and Aftermath