How to Check Privacy Polices of Your iPhone Apps

Apple recently introduced new “nutrition labels” for privacy in the iPhone App Store. With the help of these labels, you can quickly learn how an app can track you or use your personal information.

Apple recently introduced new “nutrition labels” for privacy in the iPhone App Store. With the help of these labels, you can quickly learn how an app can track you or use your personal information. Let’s explore how to view the privacy policies of apps you already have on your device.

This is for the iPhone

Dilbert and Stock
Copyright Scott Adams, Inc./Distributed by Universal Uclick for UFS

First, open the App Store on your iPhone. Next, tap your profile image in the upper-right corner of your screen. Refer to below image:

Privacy 1
Selecting your Profile

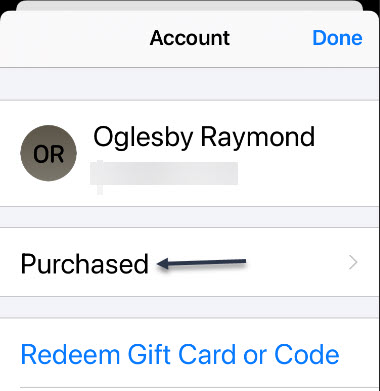
Now, in your Profile, tap Purchased. See below image:

Privacy 2
Selecting your Purchased apps

Next, select My Purchases. See following image:

Privacy 3
Selecting your Purchases

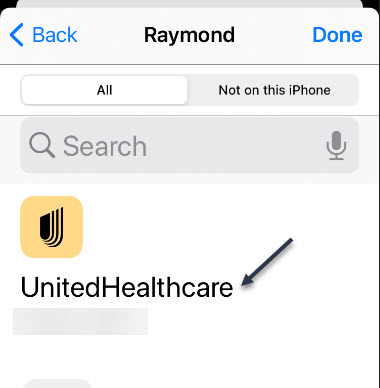
Next, you will see a list of every app you have purchased or downloaded to your iPhone. Scroll through the list and tap the icon of the one whose privacy policies you would like to check. Refer to below image:

Privacy 4
Selecting an app to check its Privacy policy

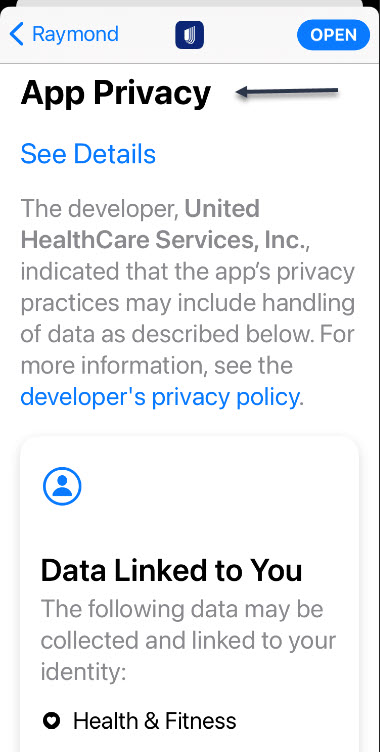
Now, you will be taken to the App Store page for that particular app. Scroll down the page until you see the App Privacy section. Here, you will see summaries of how the app tracks you or uses your data in sections like Data Used to Track You and Data Linked to You. See below image:

Privacy 5
Selecting your App Privacy option

To see more details about the app Privacy, tap on the See Details link. See following image:

Privacy 5
Selecting the Details option

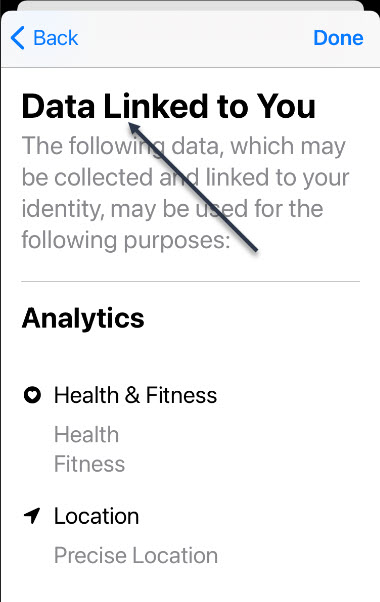
Here, you will get a detailed rundown about what information the app stores and how it is used. Refer to below image:

Privacy 7
View the details about your app Privacy

Once you are done, tap Back twice and return to the list of purchased apps. To check another app, tap its icon and repeat the process above. If you do not like what you see, you can always delete the app.

You are finished. Please feel free to share this post! One way to share is via Twitter.

Just click the Tweet icon below. This will launch Twitter where you click its icon to post the Tweet.

Check out TechSavvy.Life for blog posts on smartphones, PCs, and Macs!.You may email us at contact@techsavvy.life for comments or questions.

I Would Like to Hear From You

Please feel free to leave a comment. I would love hearing from you. Do you have a computer or smart device tech question? I will do my best to answer your inquiry. Just send an email to contact@techsavvy.life. Please mention the device, app and version that you are using. To help us out, you can send screenshots of your data related to your question.
The author’s Vietnam eBook on the Battle for Tra Bong: Events and Aftermath

How to Adjust Microphone Volume in Windows 10

Unfortunately, not all microphones are created equal. Baseline volume levels differ significantly between models, and while one may sound more than adequate, another may be vastly underpowered. The issue can be particularly pronounced when using microphones with communication applications such as Skype.

Unfortunately, not all microphones are created equal. Baseline volume levels differ significantly between models, and while one may sound more than adequate, another may be vastly underpowered. The issue can be particularly pronounced when using microphones with communication applications such as Skype. Let’s explore how to adjust your microphone volume.

This is for devices running Windows 10

Dilbert and Happy
Copyright Scott Adams, Inc./Distributed by Universal Uclick for UFS

All microphones, whether you are using an internal or external one, have different base volumes when transmitting your voice to other parties. If you find that people often complain of not being able to hear you during meetings, the most likely culprit is the out volume of your PC’s microphone.

Use Settings

First, click the Start menu, then select the gear icon on the bottom left to open Settings. You can also press Windows+i to open it. Refer to below image:

Microphone 1
Accessing Settings

Now, click the System option. See below image:

Microphone 2
Selecting the System option

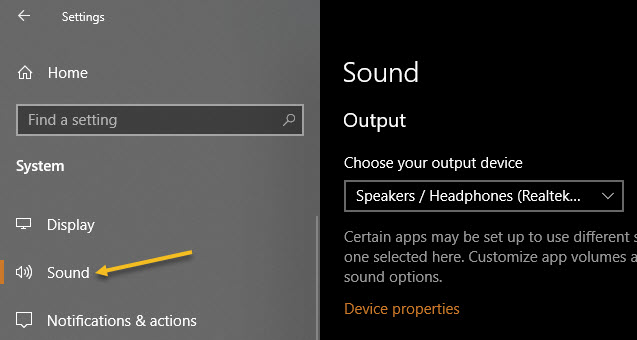
Next, select Sound in the sidebar. See following image:

Microphone 3
Selecting the Sound option

Now, scroll down to the Input section and select the device you would like to configure using the Choose your output device drop-down list. Then click Device properties option. Refer to below image:

Microphone 4
Accessing the selected device properties

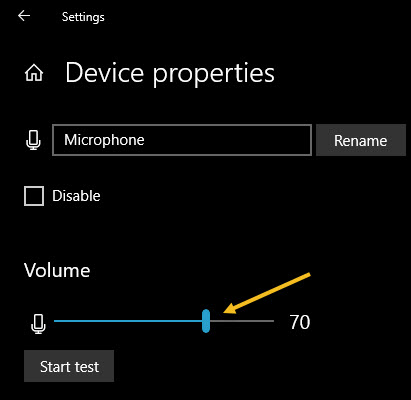
Next, use the Volume slider to adjust the output level of the microphone. See below image:

Microphone 5
Adjusting the Sound volume

The louder the volume, the louder the output signal will be when you use the microphone. Louder is not always better, however, if the signal is too loud, your voice will be distorted. Try to find the ideal volume where your voice (or other sound source) is loud enough without having any kind of distortion.

If you need help, click the Start test button and speak into the microphone at a normal volume. See following image:

Microphone 6
Running a sound test

When you click Stop test, you will see the highest percentage level registered by the test program. You can then adjust the volume slider accordingly. If you keep hitting 100% by talking at a normal volume, then the volume slider is adjusted too high. Reduce the volume and try again. Refer to below image where you will get a zero percent if no microphone is plugged in:

Microphone 7
Results of your sound test

When you are satisfied, close Settings. If you ever need to adjust it again, revisit the above steps.

Use Control Panel

You can launch this tool from the speaker icon in your taskbar’s notification area, which is opposite the Start button. First, right-click the speaker icon and select Sounds from the menu that appears. See below image:

Microphone 8
Accessing the Sounds option

Now, click the Recording tab. See following image:

Microphone 9
Selecting the Recording tab

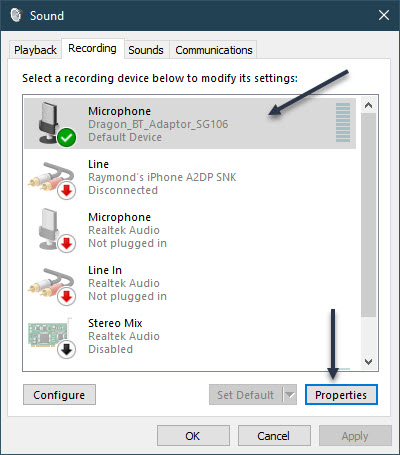
You will see a list of microphones installed on your system. Select the one you would like to adjust, then click the Properties button. Refer to below image:

Microphone 10
Accessing the selected Microphone properties

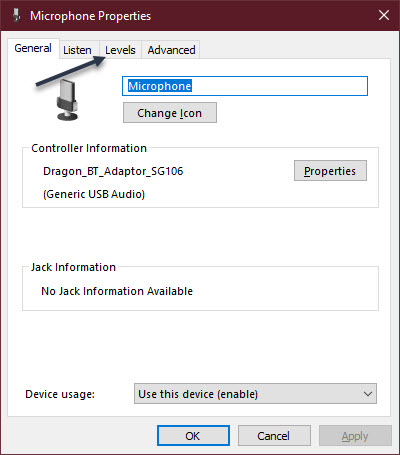
Next, click the Levels tab. See below image:

Microphone 11
Selecting the Levels tab

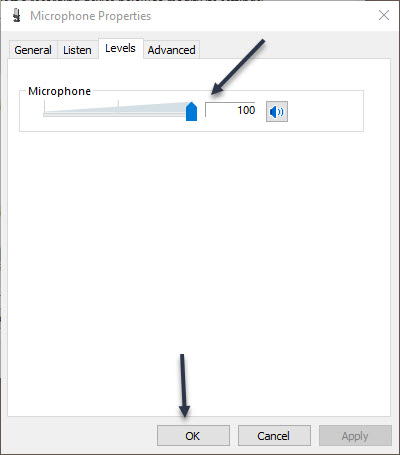
Now, use the Microphone slider to adjust the output level of the microphone. The higher the level, the louder your microphone signal will be while it is in use. That means your voice will come through louder. But a signal that is too loud will distort, so try to find the sweet spot where it is loud enough but not too loud to distort your voice. Next, click OK, then click OK again to close the Sound window. See following image:

Microphone 12
Adjusting the Sound volume

If you need to adjust the level again, revisit the above steps.

That’s it. Please feel free to share this post! One way to share is via Twitter.

Just click the Tweet icon below. This will launch Twitter where you click its icon to post the Tweet.

Check out TechSavvy.Life for blog posts on smartphones, PCs, and Macs! You may email us at contact@techsavvy.life for comments or questions.

I Would Like to Hear From You

Please feel free to leave a comment. I would love hearing from you. Do you have a computer or smart device tech question? I will do my best to answer your inquiry. Just send an email to contact@techsavvy.life. Please mention the device, app and version that you are using. To help us out, you can send screenshots of your data related to your question.
The author’s Vietnam eBook on the Battle for Tra Bong: Events and Aftermath

Are you Receiving COVID-19 Exposure Notifications on iPhone

There is a good chance you will see a “COVID-19 Exposure Notifications Are Available” pop-up on your iPhone sometime soon; if you have not already seen it. Apple and Google launched this feature in May 2020 for the iPhone.

There is a good chance you will see a “COVID-19 Exposure Notifications Are Available” pop-up on your iPhone sometime soon; if you have not already seen it. Apple and Google launched this feature in May 2020 for the iPhone.

This is for the iPhone

Dilbert and Smell
Copyright Scott Adams, Inc./Distributed by Universal Uclick for UFS

The contact-tracing feature is dependent on apps from your local health authority that take advantage of it. In the USA, this means your state government generally has to roll out its own contact-tracing app. Not all state governments have done this yet.

You will see this notification when your local health authority rolls out its app if it has not already done so. If you travel between states or countries, you may see the notification when you arrive in a location that has such an app, too.

Contact-tracing is not enabled by default, and it does not do anything unless you choose to enable it. Also, it is just an API that your local public health authority; for example, your state government health agency; can use. If your local public health authority has not released an app that takes advantage of the API, there is no way to use it. Additionally, other people must be using the app for contact-tracing to work.

Turn On Exposure Notifications

You can choose to activate exposure notifications through Settings. First, open Settings (the gear icon), scroll down and tap Exposure Notifications to enable it. Refer to below image:

Accessing Notifications

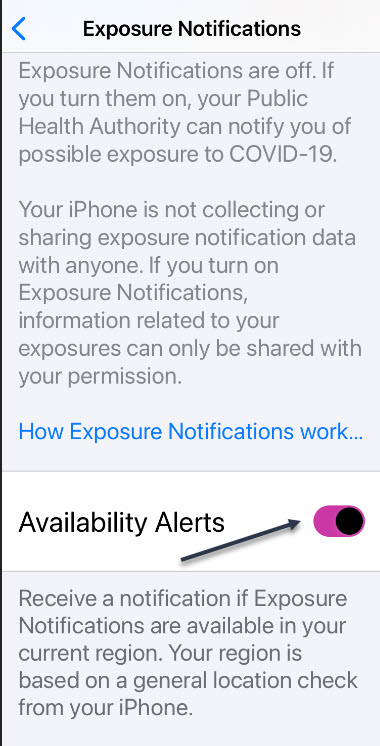
Now, tap on the Turn On Exposure Notifications link. Also, enable the toggle Availability Alerts to On. See below image:

Enabling Notifications

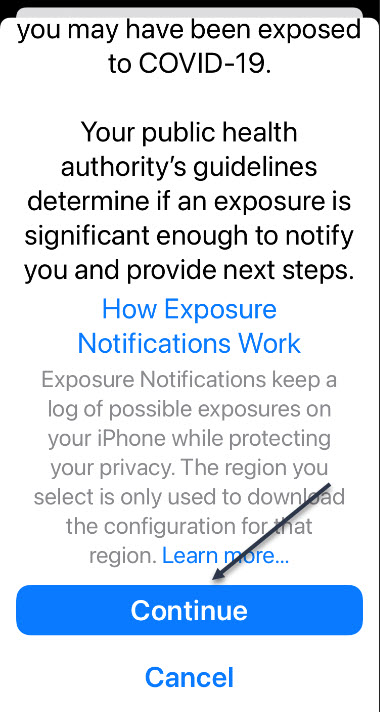
If you want the notifications, scroll down and tap Continue and you will be prompted to install the app from your local public health authority, if not already installed. See following two images:

Continuing Exposure Notifications

Next, scroll and select your your Country. See below image:

Selecting your Country

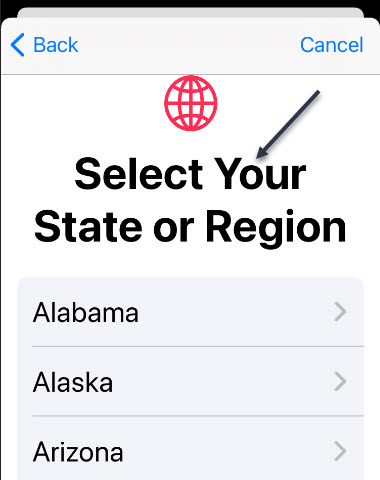
Now, scroll and select your your State (for USA). See following image:

Selecting your State

You will be shown a screen whether Exposure Notifications is available or not. In our case, we selected our state, Oklahoma, where Exposure Notifications is NOT available. Next, click Done. Refer to below image:

Checking if Exposure Notification is available

Turn Off Exposure Notifications

If you do not want to see availability alerts when a COVID-19 tracking app is available in your area, head to

Settings > Exposure Notifications

And switch the Availability Alerts toggle to Off. See below image:

Turning off Exposure Notifications

Now, exit Settings. You are finished. Please feel free to share this post! One way to share is via Twitter.

Just click the Tweet icon below. This will launch Twitter where you click its icon to post the Tweet.

Check our TechSavvy.Life for blog posts on smartphones, PCs, and Macs! You may email us at contact@techsavvy.life for comments or questions.

I Would Like to Hear From You

Please feel free to leave a comment. I would love hearing from you. Do you have a computer or smart device tech question? I will do my best to answer your inquiry. Just send an email to contact@techsavvy.life. Please mention the device, app and version that you are using. To help us out, you can send screenshots of your data related to your question.

The author’s Vietnam eBook on the Battle for Tra Bong: Events and Aftermath

How to Insert a File into Another Word Document

When creating or modifying a Microsoft Word document, it can be beneficial to insert or embed another file into it. By inserting a file into a Word document, that file becomes a part of the Word document. A reader can open and view the embedded file without requiring special permission or access.

When creating or modifying a Microsoft Word document, it can be beneficial to insert or embed another file into it. By inserting a file into a Word document, that file becomes a part of the Word document. A reader can open and view the embedded file without requiring special permission or access.

Nearly any file can be inserted into a Word document, However, be aware that inserting a file into a Word document can increase its size significantly.

In this post, instead of using “copy and paste” from one document into another, we will show you another way, using the Insert feature.

This is for devices running Word

Dilbert and Keyboard
Copyright Scott Adams, Inc./Distributed by Universal Uclick for UFS

First, open the Word document that you would like to add the contents of, another Word document to.

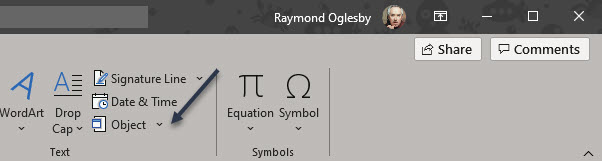
Next, in the Text group of the Insert tab, click the drop-down arrow next to the Object option. Refer to below image:

Copy 1
Accessing the Object option

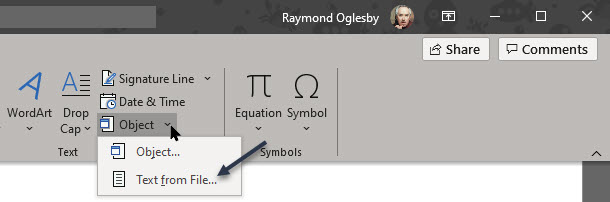
A drop-down menu will appear. There are two options to choose from here; Object and Text From File.

  • Object: Embeds an object such as a Word document or Excel chart
  • Text From File: Inserts the text from another file into your Word document

The Text From File option is essentially a quicker way to “copy and paste” the content of another file into this one.

Now, click the Text From File option in the drop-down menu. See below image:

Copy 2
Accessing the Text from file option from drop-down menu

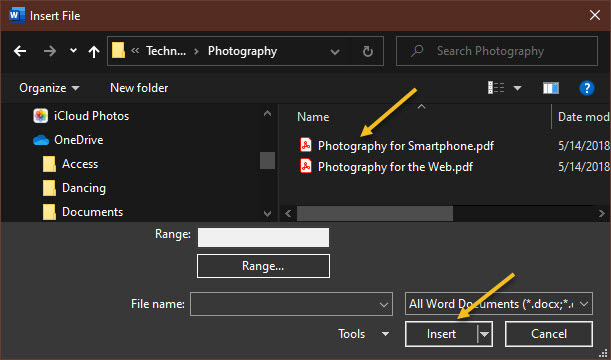
Next, the File Explorer (Finder on Mac) will open. Find the file you would like to copy the text from, select it, then click Insert. See following image:

Copy 3
Selecting the file to be inserted into original Word document

The contents of that Word document will now appear in the current Word document. This works well if there is not a lot of content in the other Word document, but if there is, embedding it may be a better option.

You may want to add headings/subheadings to the inserted document.

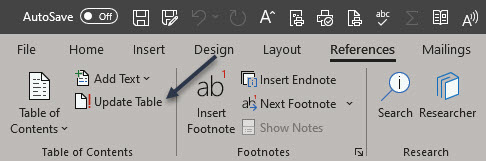
If your original Word document has a Table of Contents, make sure you update your table. First, under the References tab, select the Update Table option. Refer to below image:

Copy 4
Accessing Update Table option

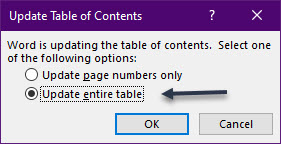
Now, from the pop-up window that will be displayed, select an option. It is recommended you choose the Update entire table option, then cli ck OK. See below image:

Copy 5
Selecting how you want the Table of Contents to be updated

That’s it. Please feel free to share this post! One way to share is via Twitter.

Just click the Tweet icon below. This will launch Twitter where you click its icon to post the Tweet.

Check out TechSavvy.Life for blog post on smartphones, PCs, and Macs! You may email us at contact@techsavvy.life for comments or questions.

I Would Like to Hear From You

Please feel free to leave a comment. I would love hearing from you. Do you have a computer or smart device tech question? I will do my best to answer your inquiry. Just send an email to contact@techsavvy.life. Please mention the device, app and version that you are using. To help us out, you can send screenshots of your data related to your question.

The author’s Vietnam eBook on the Battle for Tra Bong: Events and Aftermath

How to Open Scientific Calculator on iPhone

The Calculator app on your iPhone may seem boring and basic, but there are a few interesting tricks worth knowing. You can ask Siri to perform calculations for you, long-press on results to copy them, long-press the field to paste numbers in, and swipe left or right above the keypad to delete digits one by one. The app can also be used as a scientific calculator with just a simple maneuver

The Calculator app on your iPhone may seem boring and basic, but there are a few interesting tricks worth knowing. You can ask Siri to perform calculations for you, long-press on results to copy them, long-press the field to paste numbers in, and swipe left or right above the keypad to delete digits one by one. The app can also be used as a scientific calculator with just a simple maneuver. Lets explore how to find this calculator.

This is for the iPhone

Copyright Scott Adams, Inc./Distributed by Universal Uclick for UFS

First, swipe left all the way to the App Library (the last page). In the Search box, type calculator and select the Calculator app. Refer to below image:

Selecting the Calculator

Next, the Standard Calculator will be displayed with basic mathematical operations. See below image:

The Standard Calculator

To enter scientific calculator mode, rotate your iPhone 90 degrees until it is in landscape orientation. Your Calculator app will automatically adjust to fit the wide orientation of your screen, and new scientific calculator buttons will be added to your display. See following image:

The Scienific Calculator

If your calculator does not change into scientific mode then it’s likely that your have orientation lock enabled. To disable it, navigate to the Control Center by swiping down from upper right-hand corner. Now, tap the orientation lock icon until it is no longer highlighted. You will see a brief message at the top saying Portrait Orinetation Lock: Off. Refer to below image:

Checking the Orientation Lock

Now, you may close the Calculator. You are finished. Please feel free to share this post! One way to share is via Twitter.

Just click the Tweet icon below. This will launch Twitter where you click its icon to post the Tweet.

Check out TechSavvy.Life for blog posts on smartphones, PCs, and Macs! You may email us at contact@techsavvy.life for comments or questions.

I Would Like to Hear From You

Please feel free to leave a comment. I would love hearing from you. Do you have a computer or smart device tech question? I will do my best to answer your inquiry. Just send an email to contact@techsavvy.life. Please mention the device, app and version that you are using. To help us out, you can send screenshots of your data related to your question.
The author’s Vietnam eBook on the Battle for Tra Bong: Events and Aftermath

How to See Which Apps Can View Your iPhone Photos

Over time it can be easy to forget all the different apps you have allowed to have read/write access to the Photos app on iPhone.

Over time it can be easy to forget all the different apps you have allowed to have read/write access to the Photos app on iPhone.

Your photos include not only visual information but also metadata that might reveal your location or when the photo was taken, among other information..

Whether you are doing some regular maintenance or want to check on a specific app, let’s explore how to see which apps have access to your photos and even revoke access.

This is for the iPhone

Dilbert and Customers
Copyright Scott Adams, Inc./Distributed by Universal Uclick for UFS

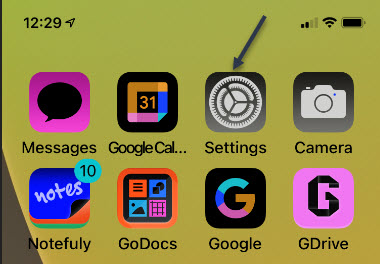
First, open Settings (the gear icon) on your iPhone. Refer to below image:

Photos 1
Accessing Settings

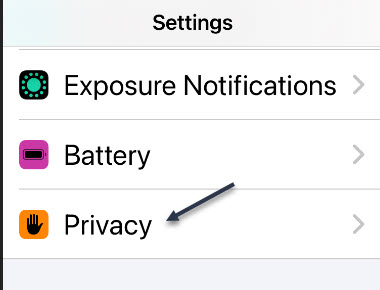
Next, scroll down and tap the Privacy option. See below image:

Photos 2
Accessing the Privacy option

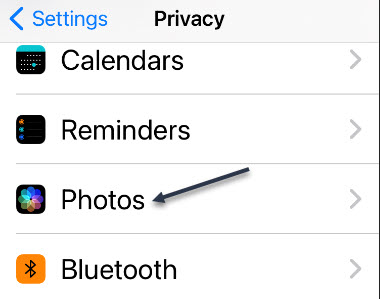
Now, tap the Photos option. See following image:

Photos 3
Accessing the Photos option

Here, you will see a list of installed apps that have requested access to your photos. Beside each one is a status that shows one of three options. Here is their meaning:

  • Selected Photos: The app can access only a set of photos that you manually select.
  • All Photos: The app can access all photos on your device.
  • None: The app cannot access any of your photos.

To change these settings, tap an app name in the list. Refer to below image:

Photos 4
Accessing an app

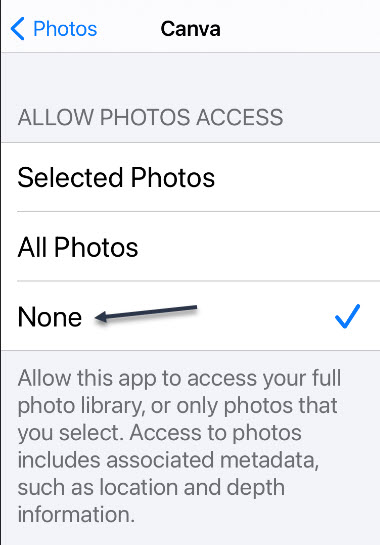
On the details screen for the app, you can change whether or not the particular app you selected can access your photos. See below image:

Photos 5
Enabling the None option for the selected app

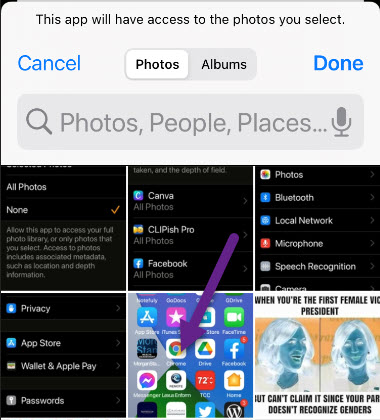
Alternately, you can choose Selected Photos and a pop-up that browses your photo library will appear. See following image:

Photos 6
Your photos. Select which one(s) you want Photos access

Tap any photos you would like the app to access, then tap Done. Any photos you do not select will be unavailable to the app.

Now, tap Photos in the corner to go back one screen, then exit Settings. The change will take effect immediately. If you ever need to change the setting again, just revisit the above steps.

That’s it. Please feel free to share this post! One way to share is via Twitter.

Just click the Tweet icon below. This will launch Twitter where you click its icon to post the Tweet.

Check out TechSavvy.Life for blog posts on smartphones, PCs, and Macs! You may email us at contact@techsavvy.life for comments or questions.

I Would Like to Hear From You

Please feel free to leave a comment. I would love hearing from you. Do you have a computer or smart device tech question? I will do my best to answer your inquiry. Just send an email to contact@techsavvy.life. Please mention the device, app and version that you are using. To help us out, you can send screenshots of your data related to your question.
The author’s Vietnam eBook on the Battle for Tra Bong: Events and Aftermath

How to Set Default Microphone in Windows 10

The default sound input device is the device that Windows uses to record or hear sound. When you connect more than one microphone or other recording devices to your PC, you can select which device you want to use by default.

The default sound input device is the device that Windows uses to record or hear sound. When you connect more than one microphone or other recording devices to your PC, you can select which device you want to use by default.

This is for devices running Windows 10

Dilbert and Moron
Copyright Scott Adams, Inc./Distributed by Universal Uclick for UFS

Windows 10 users often need to juggle several microphones. There might be one built into a PC, one on a webcam, on a headset, and perhaps a podcasting microphone.

It’s worth noting that in some apps (such as Zoom), you can select your microphone device within the app, and that choice will function independently of the Windows system sound settings.

To set your default microphone system-wide, follow the steps below. Every app that uses the default Windows microphone, that is the default option for most apps, will use it.

Using Settings to Set the Default Microphone

Before we begin, it’s worth mentioning that if you have only one microphone, it will be the default.

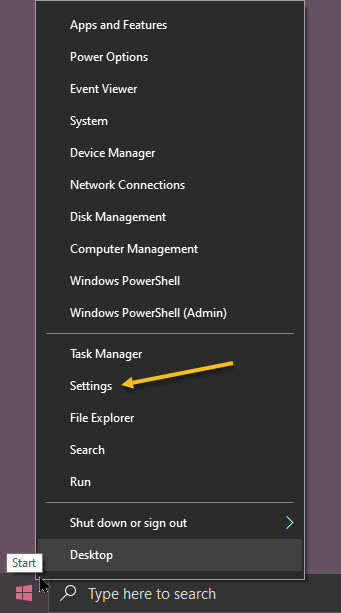
First, open Settings by clicking the Start menu and selecting the gear icon in the lower left-hand corner of your screen. You can also press Windows+i to open it. Refer to below image:

Microphone 1
Accessing Settings

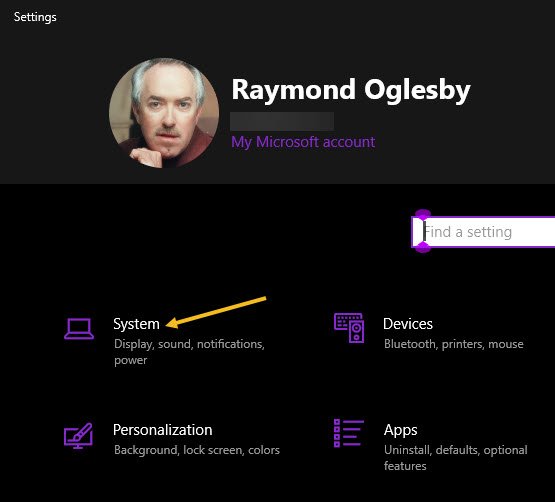
Now, in the Settings window, click the System option. See below image:

Microphone 2
Accessing System option

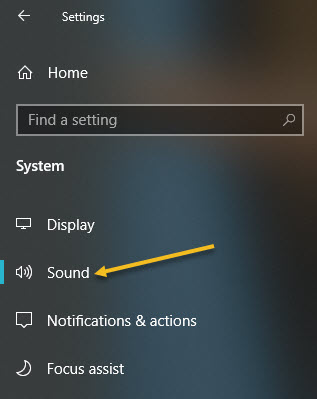
Next, on your System screen, click the Sound option from the sidebar menu. See following image:

Microphone 3
Accessing Sound option

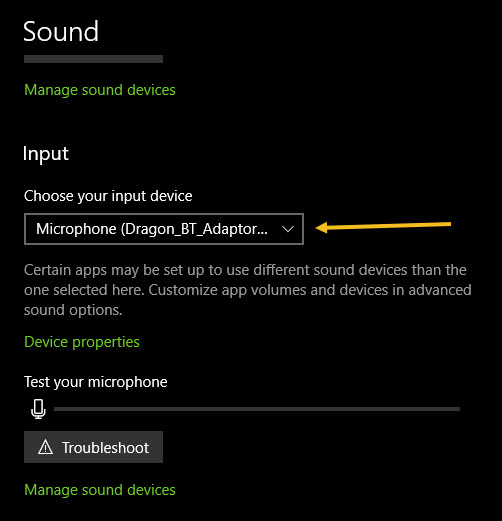
Now, scroll down to the Input section. In the drop-down menu labeled Choose your input device, select the microphone you would like to use as your default device. Refer to below image:

Microphone 4
Selecting your default microphone

Once you have selected a device from the drop-down menu, Windows will use that device as your default microphone. Now, exit Settings.

Using Control Panel to Set the Default Microphone

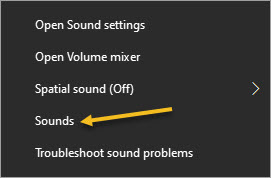
First, right-click the speaker icon in the system tray in the lower right-hand corner of your screen and select Sounds from the pop-up menu. See below image:

Microphone 5
Accessing Sounds

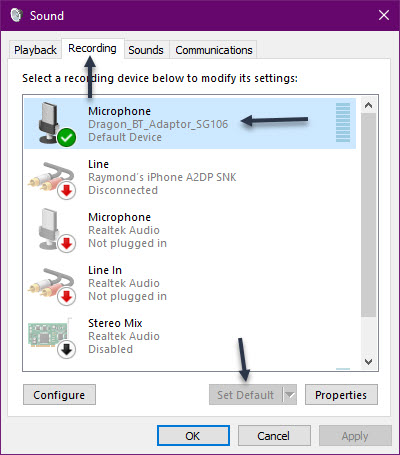
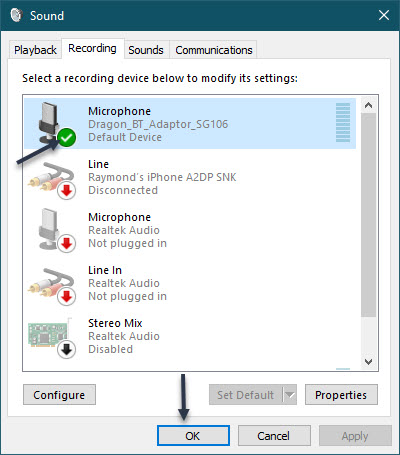
Next, click the Recording tab. Now, you will see a list of recording devices recognized by your system, which includes microphones. Select the microphone you would like to use as the default from the list and click the Set Default button. Note! If there is only one microphone listed, it will be the default. See following image:

Microphone 6
Setting the default microphone

The microphone you have selected will have a green checkmark beside it and include the label Default Device. Next, click OK to close your Sound window. Refer to below image:

Microphone 7
Accepting the default microphone

If you want to change your default microphone again, just select Sounds from the speaker icon in the System tray and follow the above steps for using the Control Panel to set the default microphone.

You are finished setting your default microphone. Now you may close any openwindows. Please feel free to share this post! One way to share is via Twitter.

Just click the Tweet icon below. This will launch Twitter where you click its icon to post the Tweet.

Check out TechSavvy.Life for blog posts on smartphones, PCs, and Macs! You may email us at contact@techsavvy.life for comments or questions.

I Would Like to Hear From You

Please feel free to leave a comment. I would love hearing from you. Do you have a computer or smart device tech question? I will do my best to answer your inquiry. Just send an email to contact@techsavvy.life. Please mention the device, app and version that you are using. To help us out, you can send screenshots of your data related to your question.
The author’s Vietnam eBook on the Battle for Tra Bong: Events and Aftermath

How to See Which Apps Are Accessing Your Camera or Microphone on iPhone

Some iPhone apps require camera/microphone access to function properly, and some do not. Apple has introduced new app privacy settings with iOS 14 and higher, which allow you to see what apps have camera/microphone access. This way, you can change camera/microphone settings for any app, all in the same place, so apps that do not need to see or hear you, can not.

Some iPhone apps require camera/microphone access to function properly, and some do not. Apple has introduced new app privacy settings with iOS 14 and higher, which allow you to see what apps have camera/microphone access. This way, you can change camera/microphone settings for any app, all in the same place, so apps that do not need to see or hear you, can not.

Let’s explore how to allow camera/microphone access on your iPhone or turn it off.

This is for iPhone running iOS 14+

Dilbert and Idiot
Copyright Scott Adams, Inc./Distributed by Universal Uclick for UFS

First, open Settings (the gear icon) on your iPhone. Refer to below image:

Camera 1
Accessing Settings

Next, scroll down and tap the Privacy option. See below image:

Camera 2
Accessing Privacy option

Now, scroll down and tap the Camera or Microphone option. See following image:

Camera 3
Accessing Microphone or Camera option

Here, you will see a list of apps that have asked you for camera or microphone access in the past. Apps that currently have access to your iPhone camera/microphone will have the switch turned On. Apps that do not have access will have its switch turned Off. Refer to below image:

Camera 4
List of apps with Facebook and Gmail turned On

If you.would like to remove iPhone camera/microphone access from an app, tap its switch to turn it off Off. Likewise, you can also grant camera/microphone access to a listed app by turning the switch On. See below image:

Camera 5
Facebook app is turned Off

Now, exit Settings.

If you want to know if your camera/microphone is in use, look in the upper-right corner of your screen at the status bar. If you see a green dot there, then an app is using the camera. If there’s an orange dot, that means your microphone is in use. The color scheme depends on your display mode. See following image for microphone in use as a blue dot:

Camera 6
Colored coded dots to indicate if Microphone or Camera is in use

If an app is using your camera/microphone when you do not expect it to, revisit the above steps and flip its switch to Off.

You are finished setting your access to camera or microphone. Please feel free to share this post! One way to share is via Twitter.

Just click the Tweet icon below. This will launch Twitter where you click its icon to post the Tweet.

Check out TechSavvy.Life for blog posts on smartphones, PCs, and Macs! You may email us at contact@techsavvy.life for comments or questions.

I Would Like to Hear From You

Please feel free to leave a comment. I would love hearing from you. Do you have a computer or smart device tech question? I will do my best to answer your inquiry. Just send an email to contact@techsavvy.life. Please mention the device, app and version that you are using. To help us out, you can send screenshots of your data related to your question.
The author’s Vietnam eBook on the Battle for Tra Bong: Events and Aftermath

How to Disable Preloading of Microsoft Edge at Startup using Group Policy Editor

Are you frustrated by Edge loading at Windows 10 startup? Do you prefer using Chrome as your default browser? In Windows 10 Home edition, Edge is the default browser, even if you make Chrome the default; Edge seems to ignore the Chrome setting.

Are you frustrated by Edge loading at Windows 10 startup? Do you prefer using Chrome as your default browser? In Windows 10 Home edition, Edge is the default browser, even if you make Chrome the default; Edge seems to ignore the Chrome setting.

To disable Edge, we are going to use the Group Policy Editor (the gpedit.msc file). But, back in Windows 7, Microsoft quit making the Editor a part of its operating system, especially the Home editions. So, we are going to install the Editor, and use the utility to disable preloading of Edge at startup in Windows 10.

This is for Windows 10

Dilbert and Picture
Copyright Scott Adams, Inc./Distributed by Universal Uclick for UFS

Install Group Policy Editor

Note! You will only need to do this if you have Windows 10 Home edition. If you have the Pro edition, you can bypass this step.

First, download the GPEdit Enabler script from the link below:

GPEdit Enabler for Windows 10 Home Edition

and save the “gpedit-enabler.bat” file to your desktop. Now, right-click the file and select Run as Administrator. Refer to below image:

Policy 1
Access gpedit batch file as Administrator

This will start the installation process. It may take some time depending upon your system performance. Once the process is complete, press any key to close the Command Prompt window. You may be prompted to download and install some Microsoft Net files; if so, allow permission to do so.

Although a restart is not required, if the policies are not working, you should restart your computer.

Run Group Policy Editor

First, open the Run dialog by pressing the Windows+R keys. Type gpedit.msc and press the Enter or OK button. This should open gpedit in Windows 10 Home or Pro.

On Windows 10, Microsoft Edge loads some processes in the background during startup to improve the speed when launching the application. But, we want to disable this feature and use Chrome instead.

How to Disable Preloading Edge

In the Group Policy Editor, browse to the following path:

Computer Configuration > Administrative Templates > Windows Components > Microsoft Edge

Now, click on the Setting column to sort it alphabetical. On the right side, double-click the Allow Microsoft Edge to pre-launch at Windows startup, when the system is idle, and each time Microsoft Edge is closed policy. See below image:

Policy 3
Accessing Group Policy Editor for Edge for pre-launch option

Now, select the Disabled option. See following image:

Policy 4
Selecting the pre-launch Disabled option

Next, click Apply, then OK.

Now, on the right side, double-click the Allow Microsoft Edge to start and load the Start and New Tab page at Windows startup and each time Microsoft Edge is closed policy. Refer to below image:

Policy 5
Accessing Group Policy for Edge for Start and New Tab option

Next, select the Disabled option. See below image:

Policy 6
Selecting the Start and New Tab Disabled option

Next, click Apply, then OK.

Now, repeat the above steps substituting User Configuration for Computer Configuration.

Now, exit the Editor and save any open work. You must RESTART your computer for the changes to take effect.

The Edge browser will no longer pre-load processes freeing up resources for more important apps and services.

In the case you change your mind, you can roll back the previous settings using the same instructions, but instead of selecting Disabled, select the Not Configured option.

Make Chrome the Default Browser

  • Click Start then Settings (the gear icon)
  • Click on Apps
  • Click on Default apps
  • Click on Web browser and select Google Chrome. See following image:
Policy 7
Setting Chrome as the default browser

That’s it. You have disabled Edge for pre-loading and saving resources. Please feel free to share this post! One way to share is via Twitter.

Just click the Tweet icon below. This will launch Twitter where you click its icon to post the Tweet.

Check out TechSavvy.Life for blog posts on smartphones, PCs, and Macs! You may email us at contact@techsavvy.life for comments or questions.

I Would Like to Hear From You

Please feel free to leave a comment. I would love hearing from you. Do you have a computer or smart device tech question? I will do my best to answer your inquiry. Just send an email to contact@techsavvy.life. Please mention the device, app and version that you are using. To help us out, you can send screenshots of your data related to your question.
Copyright Scott Adams, Inc./Distributed by Universal Uclick for UFS

How to Stop Apps From Asking to Track You

If you are like me, you are not too keen on being tracked. So when an app asks you if it can track your iPhone activity across other programs and websites for ads, the answer is pretty much always “NO”. If you are tired of choosing Ask App Not to Track over and over again, there is a way to stop apps from even being able to ask in the first place.

If you are like me, you are not too keen on being tracked. So when an app asks you if it can track your iPhone activity across other programs and websites for ads, the answer is pretty much always “NO”. If you are tired of choosing Ask App Not to Track over and over again, there is a way to stop apps from even being able to ask in the first place.

While the setting was available in earlier versions of iOS 14, it was not useful because developers were not required to ask for tracking permission until iOS 14.4. So if you are not running iOS 14.4 or later, you may see the setting, but you will not get any tracking requests from apps.

With one system-wide setting disabled, most of the apps on your iPhone will not be able to (or are not supposed to) track your activity across other apps and websites.

But, permission is not a hard and fast rule. According to Apple, some apps might try to track you without getting the “OK” from you first.

With that in mind, let us explore this “not asking” feature.

This is for iPhone and iPad running iOS or iPadOS 14.4+

Copyright Scott Adams, Inc./Distributed by Universal Uclick for UFS

First, open Settings (the gear icon) on your iPhone or iPad. Refer to below image:

Contact 1
Accessing Settings

Next, scroll down to the Privacy option and tap it. See below image:

Contact 2
Accessing Privacy option

Now, tap Tracking near the top of your screen. See following image:

Contact 3
Accessing Tracking option

Next, tap the toggle beside Allow Apps to Request to Track to turn it off (to the left position). Refer to below image:

Contact 4
Disabling Request to Track option

Now, exit Settings. From now on, apps will no longer pop-up requests asking to track you. This means that you are telling all apps not to profile you for targeted advertising; unless you have previously given them permission to do so.

To change which apps can track you for targeted advertising individually, follow the above steps and turn off the toggles beside any app listed there. It is important to note that even with this option disabled, you can still be tracked while using the web on your iPhone or iPad.

That’s it. Please feel free to share this post! One way to share is via Twitter.

Just click the Tweet icon below. This will launch Twitter where you click its icon to post the Tweet.

Check out TechSavvy.Life for blog posts on smartphones, PCs, and Macs. You may email us at contact@techsavvy.life for comments or questions.

I Would Like to Hear From You

Please feel free to leave a comment. I would love hearing from you. Do you have a computer or smart device tech question? I will do my best to answer your inquiry. Just send an email to contact@techsavvy.life. Please mention the device, app and version that you are using. To help us out, you can send screenshots of your data related to your question.
The author’s Vietnam eBook on the Battle for Tra Bong: Events and Aftermath