I am Raymond Oglesby, an Information Technology (IT) specialist with 30 years in the field. I have taught Microsoft Applications and troubleshot computers in 15 countries and many States. My career was focused on mainframes and desktops from application development to implementation. I have written hundreds of programs for various architectures. I decided to start a blog to share my knowledge and experiences with you. I plan on updating this blog at least twice a week about smart phone apps to Windows.
Please feel free to leave a Comment or Tweet. I would love to hear from you. Do you have a computer tech question? I will do my best to answer your inquiry. Please mention the app and version that you are using. To help me out, you can send screenshots of your data related to your question.
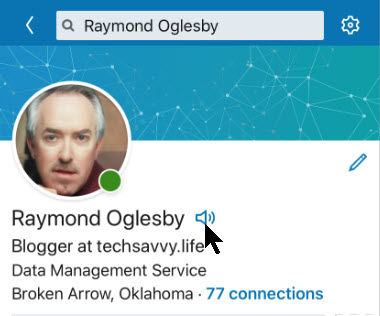
Pronouncing a name correctly isn’t just polite. It’s a way of recognizing someone’s identity. LinkedIn has introduced a new feature that lets members add a 10-second audio recording of their name pronunciation. Other users will be able to hear the clip by pressing a small speaker icon on a member’s profile.
Pronouncing a name correctly isn’t just polite. It’s a way of recognizing someone’s identity. LinkedIn has introduced a new feature that lets members add a 10-second audio recording of their name pronunciation. Other users will be able to hear the clip by pressing a small speaker icon on a member’s profile.
To use the feature, you’ll have to record your name on a mobile device (iOS or Android), but you’ll be able to play name pronunciations on mobile or a desktop. Let’s explore how to enable this feature.
This is for devices supporting LinkedIn
Copyright Scott Adams, Inc./Distributed by Universal Uclick for UFS
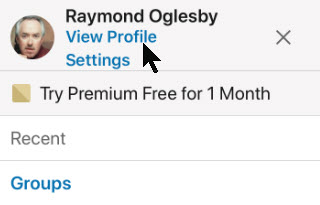
First, open the LinkedIn app on your smart device (iOS or Android). Next, from the the upper left hand corner, tap your Profile Photo. Refer to below image:
Accessing your Profile
Now, in the top menu, select the View Profile blue link . See below image
Selecting viewing your Profile
Next, tap on the Pencil icon next to your photo to edit your Profile. See following image:
Selecting edit your Profile
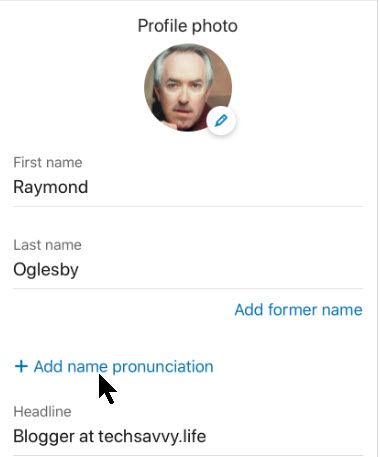
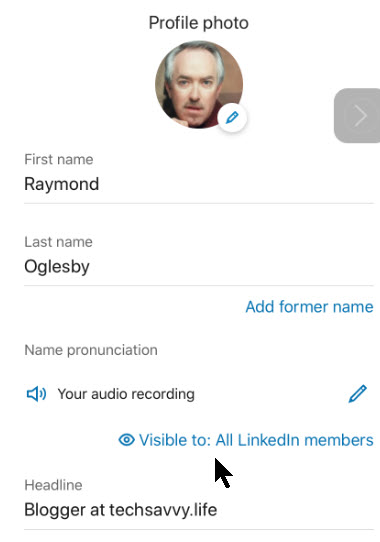
Next, tap on the Add Name Pronunciation blue link found under your First and Last name sections. Refer to below image:
Selecting add a recording of your name
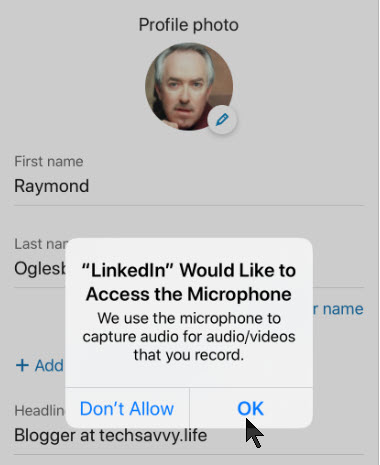
Now, grant the LinkedIn app permission to access your smart device’s microphone. See below image:
Giving permission to access your microphone
Recording Your Name
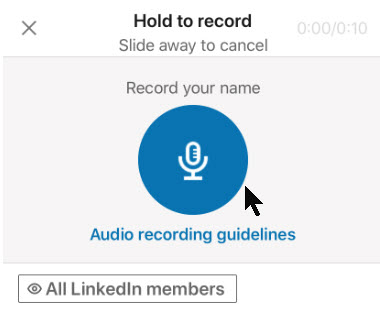
Press and hold on the blue microphone button to record your name. You have up to 10 seconds to record your first and last name. LinkedIn recommends that you limit background noise, speak slowly and pronounce clearly. Also, hold your phone about four inches from your mouth. See following image:
Recording your name
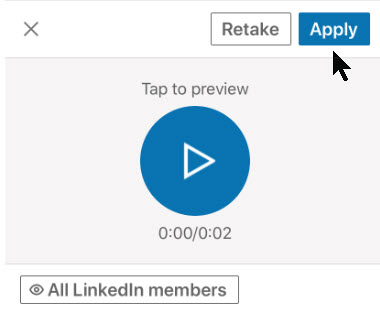
Tap the Play button to hear your audio recording played back to you. If you aren’t happy with it, select the Retake button. When you are satisfied with the recording, tap the Apply button. Refer to below image:
Saving your name recording
Choosing Your Audience
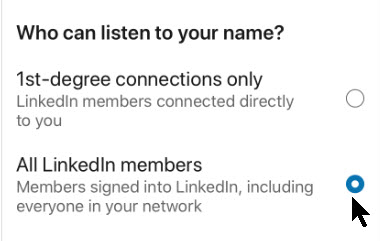
Before you leave the editing page, you can modify who can listen to your name pronunciation recording. To do so, tap the Visible To blue link at the bottom of the screen. See below image:
Accessing your audience
Here you have two sharing options to choose from. Either all Linkedin members can listen to your name (the default option) or only 1st-degree connections only. See following image:
Selecting your audience
Saving Your Changes
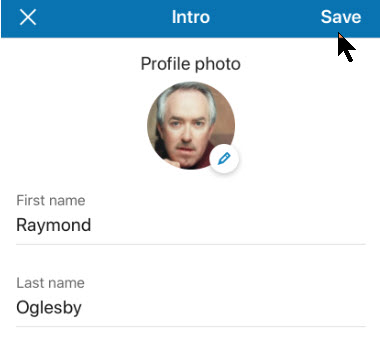
When you’re all set to exit the LinkedIn profile editing process, in the top right hand corner, tap the Save button. Refer to below image:
Saving your changes
View and Test Your Recording
Now, you (or someone else) should see the tiny Audio icon next to your profile name. Select the icon to hear your name pronunciation. See following image:
Testing your name recording
That its. You and those you have selected can now hear the proper annunciation of your name.
I find TechSavvy.Life blog posts extremely helpful!
Please feel free to leave a comment. I would love hearing from you. Do you have a computer or smart device tech question? I will do my best to answer your inquiry. Please mention the device, app and version that you are using. To help us out, you can send screenshots of your data related to your question.
The author’s Vietnam eBook on the Battle for Tra Bong: Events and Aftermath
Using Apple Notes is a fast way to capture thoughts and take notes on your iPhone or iPad. You can do more than just take plain text notes. Instead you can organize your notes by using formatting tools to make them stand out from plain text. Let’s explore how to do this.
This is for iPhone and iPad
Copyright Scott Adams, Inc./Distributed by Universal Uclick for UFS
When you start a new note, Apple formats the first line into a Title format. You can change this by going to your Settings app, then navigate to:
Notes > New Notes > Starts With
and select your format. By default, the rest of your note is plain text.
As mentioned earlier, you can use formatting tools. These tools include headings, lists, indentations and more. These features are somewhat obscure for a new user.
The Formatting Toolbar
After opening a new note, tap on the screen to bring up the keyboard, if not already in view. Next, tap on the Aa button above the keyboard, the format row. You will see the text formatting tools that you can use. Refer to below image:
Accessing the formatting toolbar
The keyboard is replaced by the formatting toolbar split into three rows. See below image:
The formatting toolbar
From the first row, the Title Heading, Subheading and more are available to use. Monospaced is the only available font style to use in Notes. See following image:
The titles formatting
When the toolbar is open, tap the X to close, tap the plus sign (+) to open, both to the left of the toolbar.
From the middle row, you can change selected text to Bold, Italic, Underline or Strikethrough formats. You may select multiple formats. Refer to below image:
The text formatting
The last row has different bullet styles, indent and outdent formats. See below image:
The lists formatting
The Checklist is separate from the formatting toolbar. To add a checklist, tap on the Checklist icon. Simply, start typing in your item. Tap the Enter key to add a new item. To stop the checklist, tap the Enter key on an empty line. Refer to below image:
The checkbox formatting
To create a numbered list, start by typing 1 and then your first entry. To end your list, tap the Enter key on a blank line.
The Toolbar Examples
For a look at all our examples, see below image:
The entire formatting examples
I Would Like to Hear From You
Please feel free to leave a comment. I would love hearing from you. Do you have a computer or smart device tech question? I will do my best to answer your inquiry. Please mention the device, app and version that you are using. To help us out, you can send screenshots of your data related to your question.
The author’s Vietnam eBook on the Battle for Tra Bong: Events and Aftermath
The Microsoft Windows 10 Whiteboard app is fully integrated and can now be accessed by all users. Let’s learn how to use it and share your whiteboard projects with others.
The Microsoft Windows 10 Whiteboard app features cloud storage and collaboration which are dependent on an active Microsoft account. This post shows how to access the Microsoft Whiteboard and share your whiteboard creations with others.
This is for Wiondows 10 operating system
Copyright Scott Adams, Inc./Distributed by Universal Uclick for UFS
Access the Whiteboard App
Access to the Whiteboard app is available from the System Tray if you activate that feature in your taskbar settings. (Optionally, the app is available from the Start menu and can be pinned to the Taskbar). Right-click an empty area of the Windows 10 Taskbar and select the Show Windows Ink Workspace button item from the list. Refer to below image:
Enable the Whiteboard option
A new icon will be added to the System Tray. See below image:
The Whiteboard icon in the Tray Bar
Click the new icon and you will be able to choose the Whiteboard app. See following image:
Starting the Whiteboard app
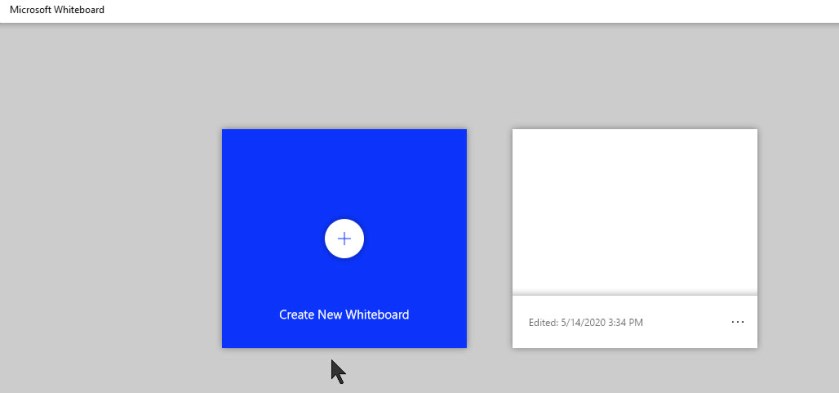
Now, click the Whiteboard app entry. You will be presented with thumbnails representing previous whiteboard projects, if any. Assuming you logged into Windows 10 with an active Microsoft account, those previous projects will be accessed from Microsoft’s cloud servers. Refer to below image for my screenshot with no whiteboard projects since this is my first time in using the Whiteboard app:
Opening the Whiteboard app
Create and Edit a Whiteboard
To create a Whiteboard project, simply click on the thumbnail Create New Whiteboard. If you have a touch screen you may use the pencil icon to draw on the whiteboard or just use text. There are several other options available such as add an image, insert a note and and add documents. Refer to below image:
Creating and editing a Whiteboard
Also, you can click on the Hamburger icon in upper right hand corner for the Settings menu. If you right-click on an empty whiteboard space, you will see even more features.
Share the Whiteboard
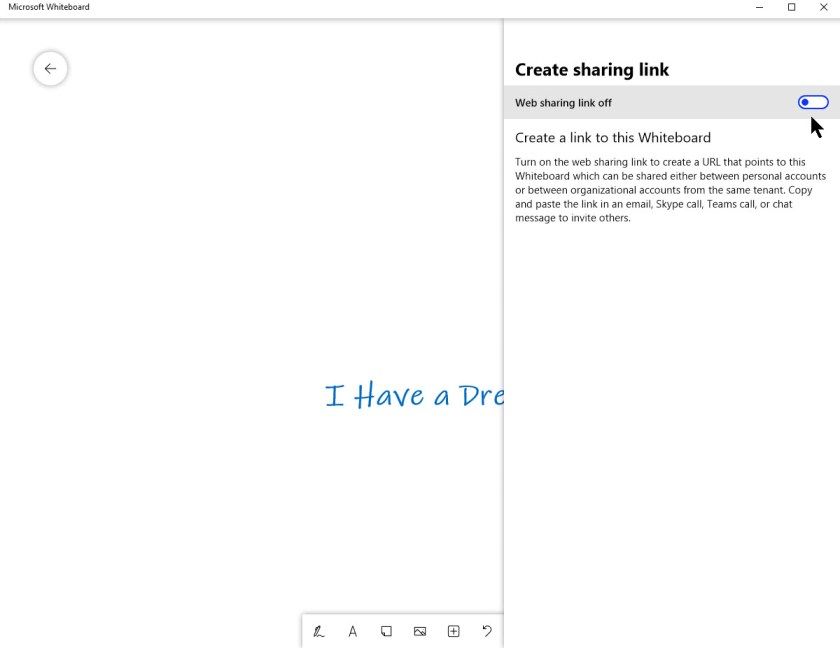
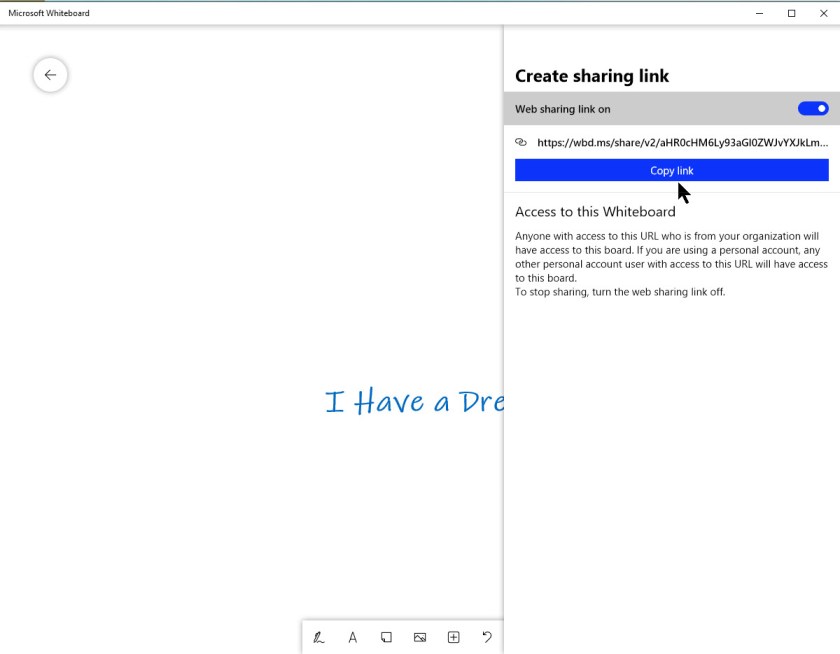
To share your current Whiteboard with another user, click the Invitation icon in upper left-hand corner. The app will ask you to turn on the feature. When turned on, the app will create a link that you can copy and paste in an email, text message or an online meeting. See below image:
Creating a Share link for the Whiteboard
Now, click the Copy link button. See following image:
Copying a share link for the Whiteboard
In my example I am sharing the link by an email to myself. Refer to below image for using Outlook as the email client:
Sending the share link by Outlook
View Your Whiteboard
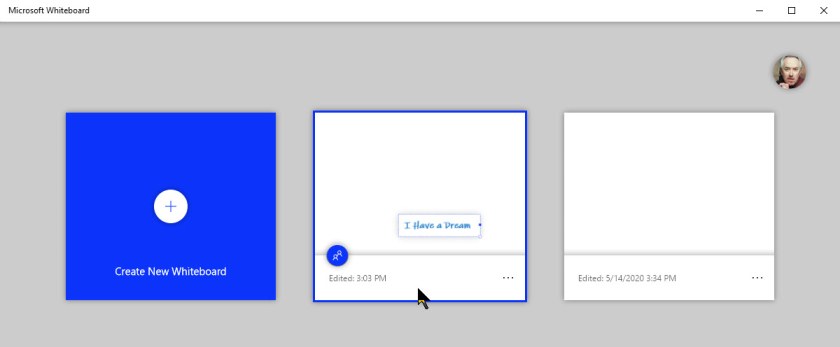
When you exit the Whiteboard your creation will be saved to your cloud storage. Now, when you restart the Whiteboard app, you will see thumbnails of your projects. See below image:
Viewing your shared Whiteboards
Of course, access to your Whiteboard creations will require proper credentials and authorizations arranged ahead of time.
If you want to share without collaboration, you can export your creation as an image file and send by a messaging interface.
While the Whiteboard will function with a mouse and keyboard combination, serious artistic collaboration will be more effective with a pencil input on a touchscreen device like a tablet. The Whiteboard has settings and features specifically designed to take advantage of that interface.
I Would Like to Hear From You
Please feel free to leave a comment. I would love hearing from you. Do you have a computer or smart device tech question? I will do my best to answer your inquiry. Please mention the device, app and version that you are using. To help us out, you can send screenshots of your data related to your question.
The author’s Vietnam eBook on the Battle for Tra Bong: Events and Aftermath
With the Remote Desktop Mobile app for iOS and Android, you can connect to and control a remote Windows computer to work with your files and applications. This can be done from computer to computer, or you can use Microsoft’s Remote Desktop Mobile toolto access a remote PC from an iOS or Android device. With it, you can view the screen, open files and work with applications as easily as if you were in front of that computer. Let’s explore how to use the mobile app to access a remote computer.
We will first discuss setting up your PC for remote access, then explore what needs to be done on your iPhone or iPad. The steps for an Android will be similar
This is for PCs running Windows 10 and iPhones. The screenshots are for a PC and iPhone. Android devices will be similar.
Copyright Scott Adams, Inc./Distributed by Universal Uclick for UFS
Allow Remote Access
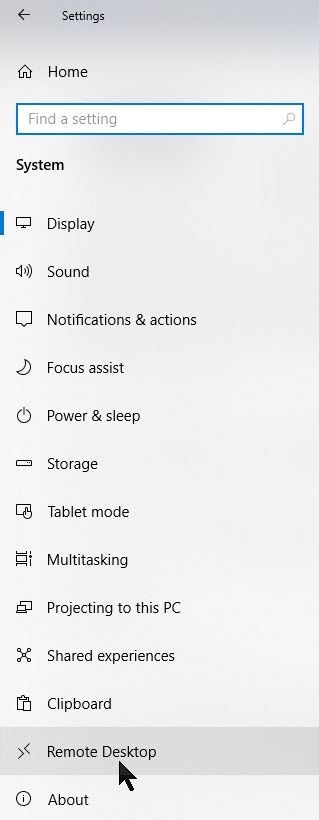
First, open Settings by typing in Settings in the Cortana search bar followed by clicking the app in upper left hand corner or click the Start button then click on the Settings tile (the cog wheel).
Next, click on the System option. Refer to below image:
Access the System option
Now, click on the Remote Desktop option. See below image:
Access Remote Desktop option for the PC
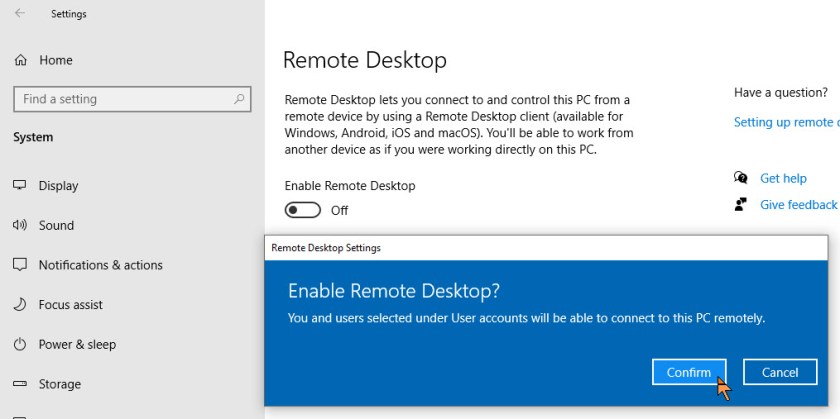
Next, slide the Enable Remote Desktop to the ON position. You will be presented with a confirmation screen. Just click Confirm to enable it. See following image:
Confirm Enable Remote Desktop access
By default, the options for Keep your PC awake for connections when it is plugged in and Make my PC discoverable on private networks to enable automatic connection from a remote device may both be enabled. To view or modify either option, click the corresponding link to Show settings, but you can leave both turned on at this point.
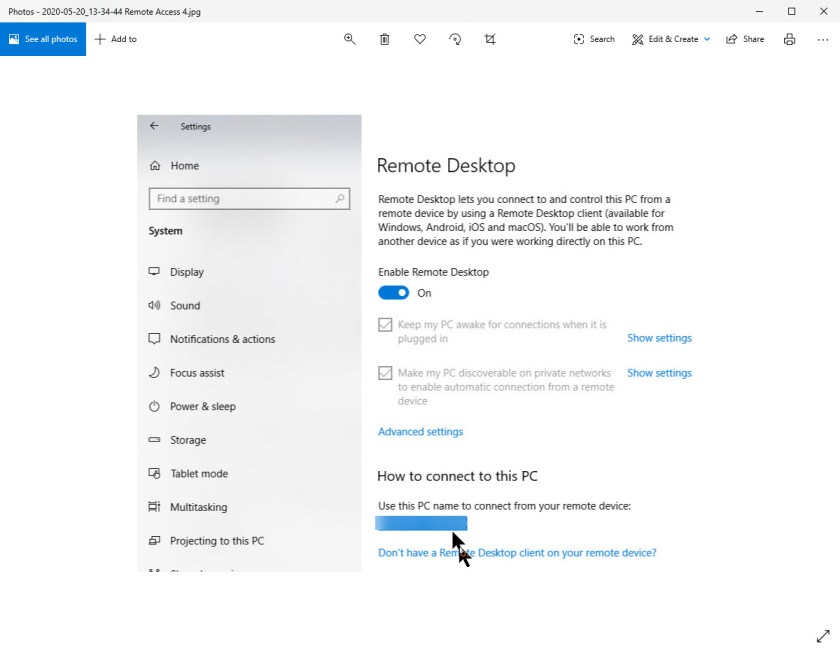
While you’re here, write down or copy the name of the PC as you may need it when you set up the connection. Refer to below image:
The Remote Desktop options for the PC
Remote Access Settings
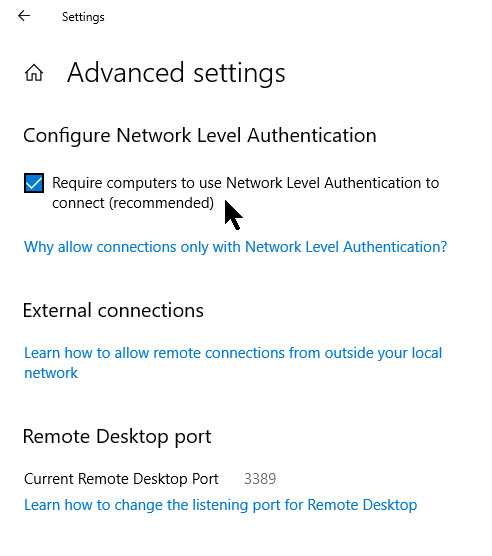
Let’s check a few more options while in Settings. Click the Advanced settings link and make sure the box for Configure Network Level Authentication is turned on. This feature provides an extra layer of protection to ward off uninvited guests.
If you’ll be connecting to the computer on the same network via a Virtual Private Network (VPN) or other means, ignore the section for External connections. The section for Remote Desktop port shows the default port to listen for and accept a remote connection. Refer to below image:
Advanced Settings for Remote Desktop
Allowing User to Signin Remotely
By default, any user who has an administrative account on the remote PC can access it. Assuming you’re using a Microsoft Account or company account to sign into Windows, your best bet is to use that account to sign in remotely.
If you want to give remote access to a different account, click the link at the bottom for Select users that can remotely access this PC. Click Add and enter the user name for the account you want to use. See below image:
Setup users to access the remote computer
Access Your IP Address
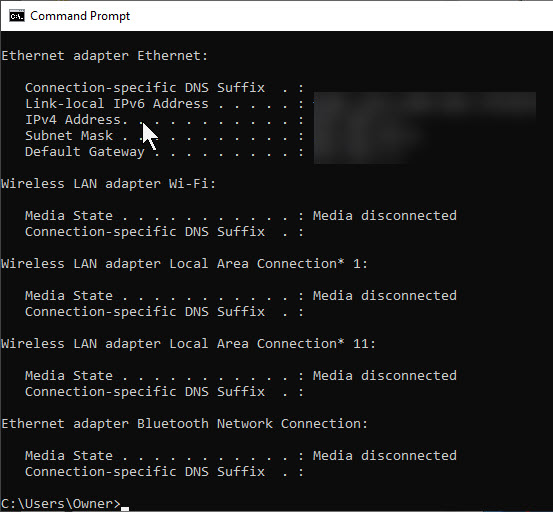
In the Cortana search box, enter cmd and press the Enter key. The Command Prompt app will open. Next, enter ipconfig and press the Enter key. Copy or write down your IP addresses (especially the IP4 address) for later use. Refer to below image: (Note! I have blanked out my IP addresses for security reasons).
Access your User Account Name
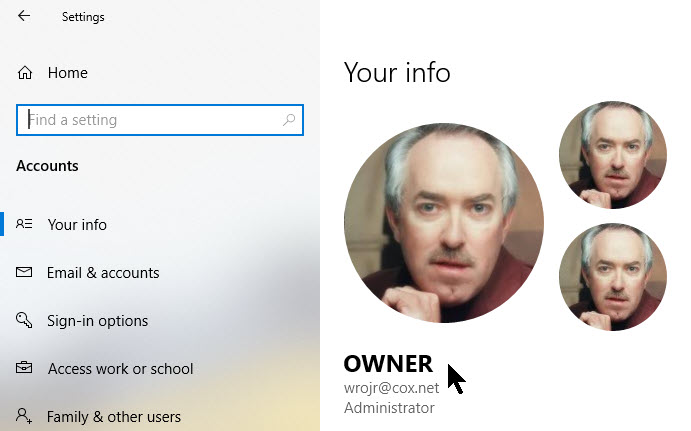
If you are using a local account to sign in for Windows 10 and forgot your User Account name, navigate to the Settings app by:
Pressing the Windows key + I
Click the Accounts option
Click on Your Info
Your User Account name will be in bold under your profile photo. See my info below:
Your Settings info
Download Remote Access for Your iPhone or iPad
Now, let’s explore the second part of our remote access, the iPhone or iPad setup.
To access the computer from your iPhone or iPad, download and install the Remote Desktop Mobile app from Apple’s App Store. Open the app, tap the plus (+) symbol in upper right hand, and choose the option to Add PC. See following image:
Add a PC to connect remotely
Setup Remote Access for iOS
At the Add PC window, enter the computer name or IP Address (both copied down earlier, normally this would be your IP4 address) in the PC Name field. Type the account name you want to use in the User Account field and password or leave the field set to Ask When Required if you’d rather enter the name each time for security reasons.
Under the General section, type a name in the field for Friendly Name to add a more convenient label for this connection. Turning on the switch for Admin Mode connects you to a console session to manage a Windows server; normally you would leave this turned off. The option for Swap Mouse Buttons swaps the left and right mouse buttons.
In the Gateway section, you will need to enable and set up the option for Gateway only if your organization uses a Remote Desktop Gateway to secure remote connections. See below image:
The Add PC options
Configure Session Features
Swipe down to the Device & Audio Redirection section to enable any features on your iOS device that you wish to use during a remote connection. You’d likely want to direct the Sound to play on this device. You may also want to enable the Clipboard if you plan to copy and paste back and forth. You can also enable the Microphone, Camera and Remote Storage. When finished, tap Save in the upper-right corner. Refer to below image:
Configure device features
Connect to Remote PC on iOS
The computer you wish to access will be displayed in the app. Tap the name and icon of the computer connection you just set up. The first time you try to access the computer, Remote Desktop may ask to verify the connection to that computer. Enable the option for Don’t ask me again for connections to this computer and then tap Accept. You may click the hamburger icon (the 3 dots) in lower left hand corner to edit your entries. See following image:
The connect icon to a PC from your smart device
Remote Connection Toolbar for iOS
You now should be connected to the remote computer. You may now open apps and windows, manage the desktop and do just about everything you can do if you were sitting in front of the PC.
If you get the error code “0x204”, navigate back to the section Setup Remote Access for iOS and enter the IP4 address in the PC Name field. If you still get the error code, then click here on guidelines to resolve this issue.
To help you control your remote session, the app displays a small toolbar at the top. Tap the Magnifying glass icon to zoom in on the screen. Tap it again to zoom back out. Tap the Keyboard icon to display your device’s keyboard. Refer to below image:
The Remote Desktop Connection toolbar
Manage Remote Connections
Tap the middle icon to view all your remote connections. Tap on a different remote connection to jump to another session. This page has its own toolbar at the top. Tap the Home icon to return to the home screen, where you can set up or access another connection. Tap the Hand icon to switch to touch-screen mode and tap the Mouse icon to switch to mouse mode.
Tap the X button in the thumbnail to terminate the connection for that session. Otherwise, tap Disconnect All PCs to end every current session. See below image:
Access Remote Desktop options on the smartdevice
I Would Like to Hear From You
Please feel free to leave a comment. I would love hearing from you. Do you have a computer or smart device tech question? I will do my best to answer your inquiry. Please mention the device, app and version that you are using. To help us out, you can send screenshots of your data related to your question.
The author’s Vietnam eBook on the Battle for Tra Bong: Events and Aftermath
There are numerous books, eBooks, social media, online and printed magazine articles, and posts on how to improve the performance of your PC desktop, laptop or tablet running Windows. Out of hundreds of examples, we are going to explore three little know tips on how to speed up your device.
These enhancements involve a couple of Settings examples and one Control Panel tip. There are no Yes or Okay buttons to click, simple make the change and its automatically saved. So, lets get started.
This is for PCs and similar devices running Windows. Screenshots are for Windows 10.
Copyright Scott Adams, Inc./Distributed by Universal Uclick for UFS
Adjusting Your Restart Settings
First, we are going to open the Settings dialog for changing our Sign-in Privacy option to improve performance. There are three ways to open Settings on your device:
Navigate to the Settings app by clicking the Start button and then select the Settings option (the cog wheel) in lower left of the Start menu
Type in Settings in the Cortana search bar, located in lower left hand of your screen, then click on the Settings app in upper left hand of the screen
Click the Start button, then click on the Settings tile (the cog wheel) on your display
Now, select the Accounts option. Refer to below image:
Selecting the Accounts option
Next, select the Sign-in options. See below image:
Selecting the Sign-in options
Then, under the Privacy group, turn off the slider for Use my sign-in info to automatically finish setting up my device and reopen my apps after an update or restart. See following image:
Turning off the sign-in info option
Tweaking Your Power Plan
By default, Windows 10 uses the Balanced power usage plan that can sometimes hamper performance. We can increase the CPU speed by choosing another plan through the Control Panel.
First, type in Control Panel in the Cortana search bar, located in lower left hand of your screen.
Next, click on the app in the upper left hand of your screen. You will see a similar screen as displayed below.
Note! Your screen may be different depending on how the Control Panel is configured.
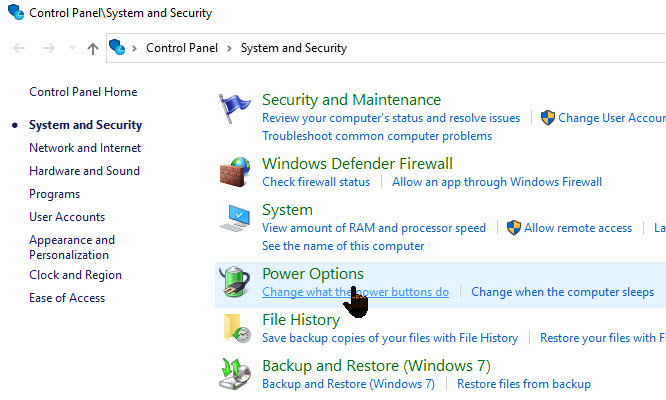
Selecting the System and Security option
Now, select the Power Options. Refer to below image:
Selecting the Power Options
Then, select the High Performance option. We are not overclocking the CPU, that is a different option outside of Windows. See following image:
Turning on the High performance option
Recovering From a Sudden Slowdown
If your PC is suddenly slowing down, there are two culprits to look at, Microsoft updates and Malware.
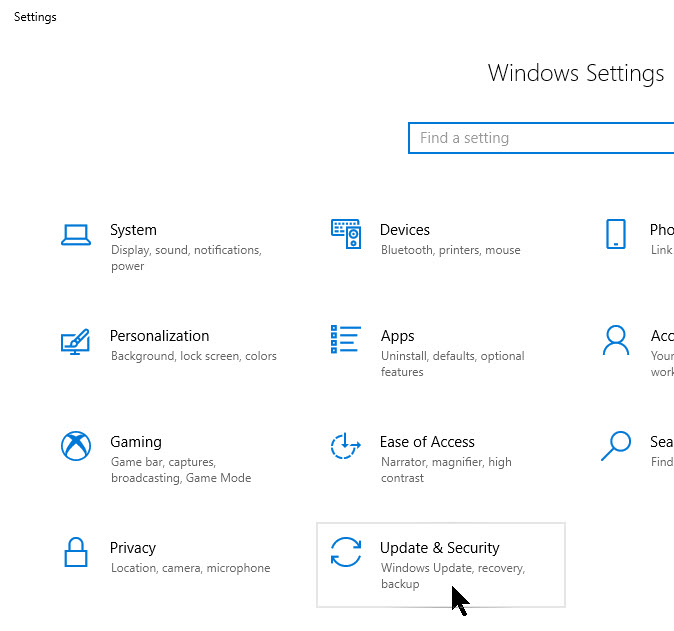
First culprit may be Microsoft updates. Open the Settings app by one of the three methods listed under Adjusting Your Restart Settings at the beginning of this post.
Now, select the Update & Security option. Refer to below image:
Selecting Update & Security option
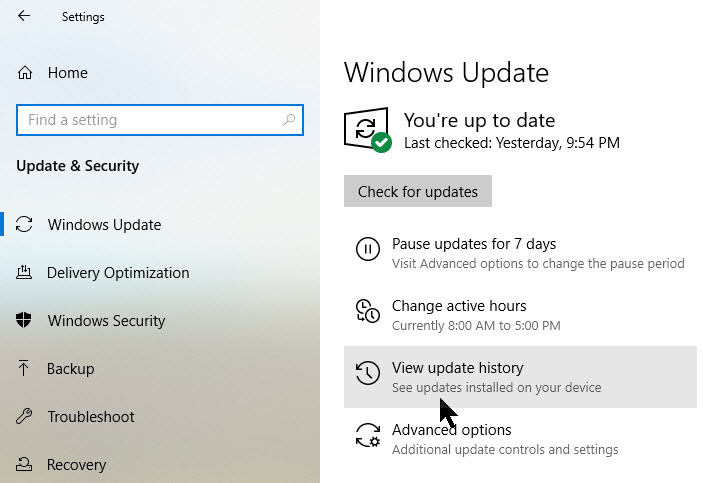
Next, select View update history. See below image:
Selecting View update history option
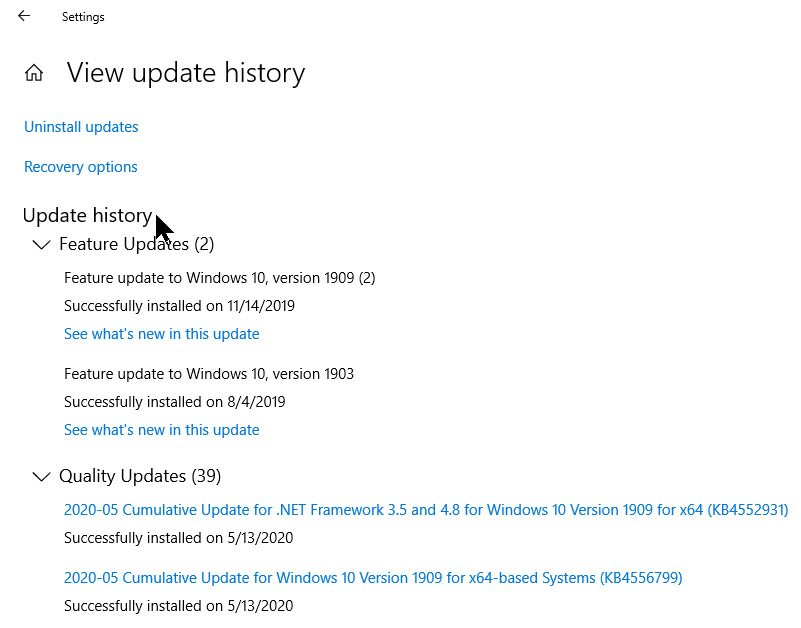
Your Microsoft updates will be displayed. Now, search online by the update’s Knowledge Base (KB) number (it’s in brackets at the end of each update title) to see if anyone else is having problems about the update from your browser results, PC news sites, forums or social media posts. To view infomation abou the update, just click the blue link for that KB number.
If lots of people are having trouble since that update, then you may need to uninstall it (click on Uninstall updates blue link at top of the screen and find the KB number) or wait for Microsoft to send a fix. See following image:
Please feel free to leave a comment. I would love hearing from you. Do you have a computer or smart device tech question? I will do my best to answer your inquiry. Please mention the device, app and version that you are using. To help us out, you can send screenshots of your data related to your question.
The author’s Vietnam eBook on the Battle for Tra Bong: Events and Aftermath
When you swipe right on your iPhone Lock or Home screen, you are presented with the Today View screen. On this screen are widgets from Apple main apps. If you want to customize this screen, you can add and customize widgets from Apple and/or third-party apps. Also, you can rearrange these widgets to your liking.
By default, Apple shows you the widgets from the Calendar, Siri App Suggestions, News, Weather and more. But that’s not all. When you go into the editing mode, you’ll discover that many of the apps that you have installed (whether they’re popular apps or not) include useful widgets.
You can add extra functionality to your iPhone using third-party app widgets. Here are a couple of recommendations:
This is for iPhone and iPad devices. Text and screenshots are for the iPhone.
Copyright Scott Adams, Inc./Distributed by Universal Uclick for UFS
Accessing Your Widgets
Lets get started. First, swipe right when you’re on your iPhone’s Lock or Home screen to access the Today View. Here, you can swipe up to view more widgets and tap on any of the arrow buttons (to the right of the widget name) to expand or contract a widget. Refer to below image:
Your Widgets screenshot
Editing a Widget
If we want to edit a widget, swipe all the way down to the bottom of the widgets screen and tap on the Edit button. See below image:
Accessing the Edit button
At the top of the list are the widgets installed on your iPhone, they have a “-“ sign next to the widget name. See following image:
Displaying your Widgets
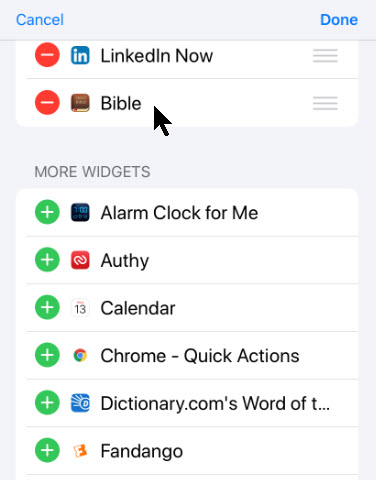
Scroll down till you see the More Widgets listing, denoted by the “+” sign. Refer to below image:
Listing of Widges you can add
Adding a Widget
When you see a widget you want to add, tap on that “+” sign next to the widget label. It will be added to the bottom of the enabled widgets list. Simply do this for each widget you want to add. In my example, I added the Bible widget. See following screen:
Selecting a Widget to add
Remove a Widget
To remove a widget, navigate to the top of the list for the enabled widgets. Tap the “-“ sign left of the widget name, then tap the Remove option. Refer to below image for my removal of the Dropbox widget:
Selecting a Widget to remove
This does not delete the iPhone app, only the widget associated with it.
Reorder Widgets
To reorder widgets, tap on the Hamburger icon to the right of the widget name and drag each item to a new location. See following image where I moved Siri App Suggestions to the top of the list:
Rearrange a Widget
Saving Your Changes
To save all your changes, tap Done in upper right hand corner at the top of your enabled widgets list. Refer to below image:
Saving all your changes
Note: Your must tap the Done option, if not, all your changes will be lost.
You will be taken back to the Today View with your saved changes.
When you add new apps, you can go back to the Edit screen and add new widgets to the Today View by following the above steps.
Checking if an App Has a Widget
To see if a widget is available for an app, press and hold the app icon. If it supports widgets, you will see the Add Widget link. Tap on it to add the widget to the bottom of Today View screen. See following image where I added back the Dropbox widget:
Checking if your app has a Widget
As a confirmation, the Add Widget link will be replaced with a check mark. Refer to below image:
Confirming your Widget has been added
That’s it. You have learned how to add, remove and rearrange your iPhone widgets. The process is similar for an iPad.
Feel free to tweet me. Thanks for reading this post and others.
Please feel free to leave a comment. I would love hearing from you. Do you have a computer or smart device tech question? I will do my best to answer your inquiry. Please mention the device, app and version that you are using. To help us out, you can send screenshots of your data related to your question.
The author’s Vietnam eBook on the Battle for Tra Bong: Events and Aftermath
So, how do you fix the Windows detected a hard disk problem error in your PC? We are going to look at two ways to resolve this error.
Note! It is recommended to exit all running programs. Also, you may want to backup your important documents and files to an external drive or cloud storage.
This for for the Windows 10 operating system, other versions will be similar.
Copyright Scott Adams, Inc./Distributed by Universal Uclick for UFS
First, we have to open an administrative Command Prompt by using the Start menu. Click Start, type command in the Cortana search bar and you’ll see the Command Prompt menu options on the right. Now, just click the Run as administrator option. Refer to below image:
The Command Prompt option to run as administrator
If you get the User Account Control dialog box, just click the Yes button.
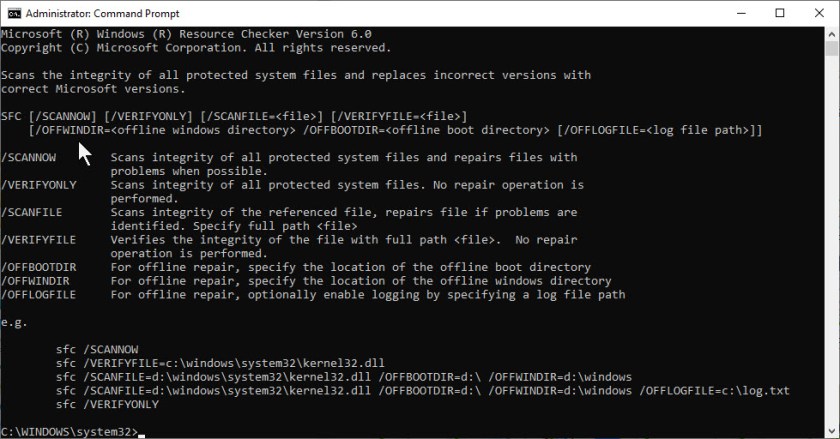
Using the System File Checker Utility
To preview the available options in using this utility, type in sfc help and press Enter. See below image:
The help screen for System File Checkder
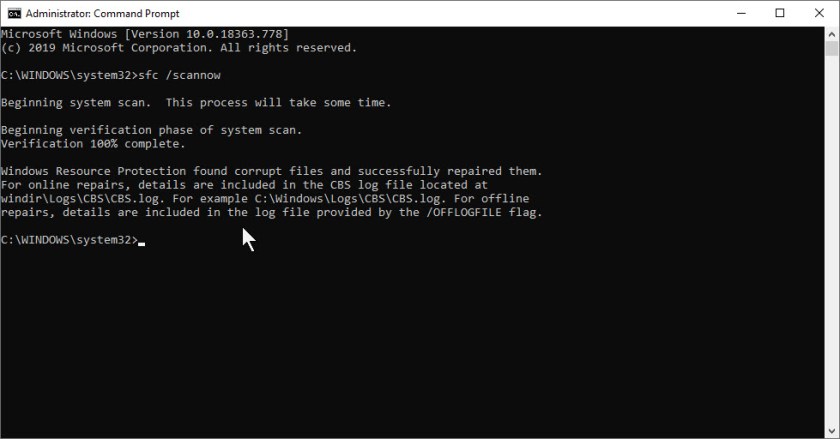
We are going to opt in for the scannow option. Now, type in sfc /scannow and press Enter. This may take a little while, so be patient. Before you close this Command Prompt window, ensure that it is 100% complete. See following image for a result similar to yours:
The result of running System File Checker
This option will scan all protected system files and replace all corrupted files with a backup copy. After the process is 100% finished, exit the Command Prompt, restart your machine and see if the problem is resolved. Notice, I had corrupted files that the utility resolved.
If you are still experiencing problems, lets try the second method to fix the error.
Using the Check Disk Utility
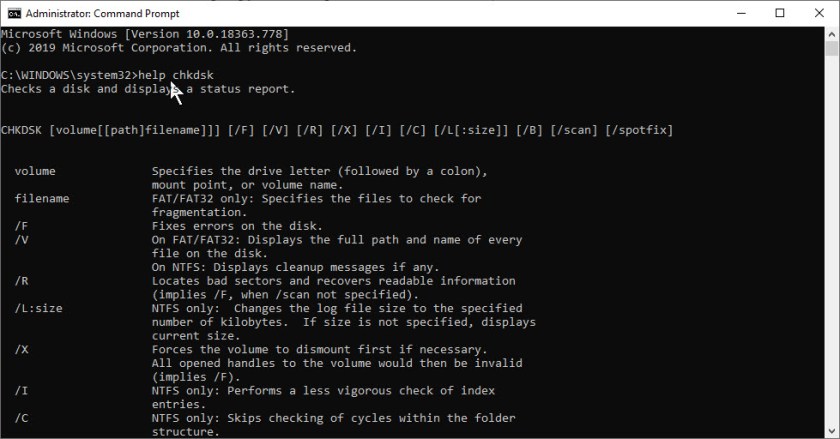
To preview the available options in using this utility, first open the Command Prompt and select the Run as administrator option as noted in the first image above. Then type in help chkdsk and press Enter. See below image:
The help screen for Check Disk Utility
First, lets scan your main volume, or drive C. Type in chkcsk C: /scan and press Enter. Refer to below image for results similar to yours:
Running a scan of a hard drive partition
If the scan shows no errors, then you are finished and your hard drive should be funcational. If not, we are going to opt in for several options as follows:
/f – fixes errors on the selected volume
/r – locates bad sectors and recovers readable information
/x – forces the volume to dismount first if necessary. Imples using the /f option.
Now, type in chkdsk C: /f/r/x and press the Enter key.
You may receive the following screen denoting that chkdsk needs to run after a restart. If so, respond with a y, exit the Command Prompt and restart your device. See below image:
Repairing a hard drive partition using Check Disk Utility after a restart
If you need to check and fix a hard drive problem on other partitions, replace the drive letter C: with those partition letter (s).
Getting Rid of the Hard Disk Failure Message
Sometimes the message Windows detected a hard disk problem pops up even when there are no errors with the hard disk. In order to not be annoyed by this, you can follow the steps below to disable it.
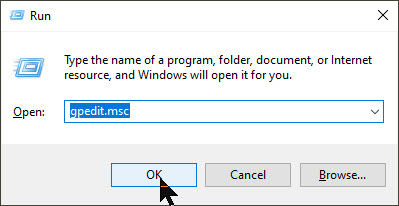
First, open the Run dialog box by pressing Windows+R key. Then type in gpedit.msc and click OK. Refer to below image:
Starting the Group Policy Editor using the Run command
Next, head to Administrative Templates > System > Troubleshooting and Diagnostics > Disk Diagnostics. Then double-click on Disk Diagnostics: Configure execution level on the right pane. See below image:
Finding the error message location for detected hard drive error
Now, click on Disabled option and click OK. See following image:
Diabling the hard drive error detected message.
Finally, exit the dialog box and restart your PC. Your hard drive should now be fixed. If the error message no longer appears, navigate back to the image above and click the Enabled option, then exit and restart your machine. Congratulations, you are finished. Please feel free to share this post! One way to share is via Twitter, as mentioned below.
I hope you have found this post helpful. If so, click the Tweet icon below. This will launch Twitter where you click its icon to post the Tweet.
I have found TechSavvy.Life blog posts extremely helpful. Check them out for posts on smart phone apps, Macs and PCs!
Please feel free to leave a comment. I would love hearing from you. Do you have a computer or smart device tech question? I will do my best to answer your inquiry. Please mention the device, app and version that you are using. To help us out, you can send screenshots of your data related to your question.
The author’s Vietnam eBook on the Battle for Tra Bong: Events and Aftermath
Microsoft Word will auto adjust table column widths to fit the content you are entering. This is the default setting for a Word table. There are times you may not want this, instead, you want to control the column widths.
The default setting may push the table beyond the right margin or a column widens unnecessarily.
So, let’s see how to turn off AutoFit option and do table adjustments yourself.
This is for Office 365 Microsoft Word on PCs, Macs and similar platforms. Other versions of Word will be similar.
Copyright Scott Adams, Inc./Distributed by Universal Uclick for UFS
Turn Off AutoFit Feature
To turn off this feature, first, place your cursor anywhere in the table you want to change.
Next, go to the Layout tab located in right hand side, not to be confused with the other Layout tab to the left side of the screen. Note! This option only appears when you are in a table. Refer to below image:
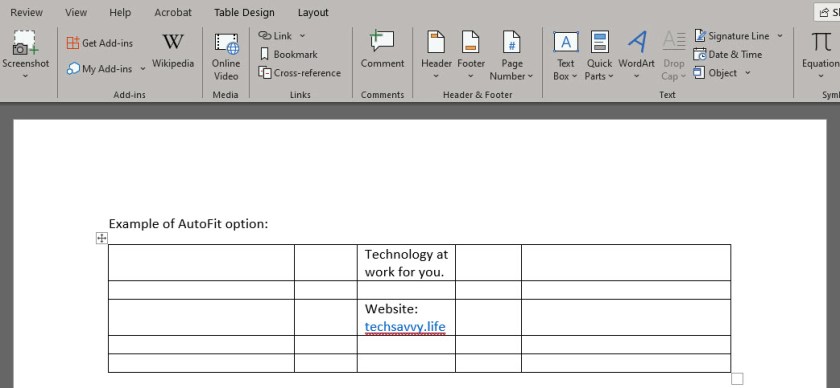
Now, click AutoFit and select the Fixed Column Width option. See below image:
You can now drag the column borders to your desired width. The column borders you set will stay that way even if you enter longer text into them. See following image:
Now, you can control Word’s table column widths. That’s it.
I Would Like to Hear From You
Please feel free to leave a comment. I would love hearing from you. Do you have a computer or smart device tech question? I will do my best to answer your inquiry. Please mention the device, app and version that you are using. To help us out, you can send screenshots of your data related to your question.
The author’s Vietnam eBook on the Battle for Tra Bong: Events and Aftermath
It is easy to preview files without opening them in Windows 10, thanks to the Preview Pane feature in File Explorer. You can see thumbnails of most images, videos, audio files and some text-based documents. Lets see how to do this.
You may have heard about a security flaw in using the preview pane, but that was fixed in Windows 10 update released on April 14, 2020. If you have the latest updates, it’s safe to use.
This is for Windows 10 operating system
Copyright Scott Adams, Inc./Distributed by Universal Uclick for UFS
Opening File Explorer
There are at least three ways to access the File Explorer:
Open File Explorer by pressing Windows+E
Click the Explorer folder icon in your taskbar
Click the Explorer option in your Start menu
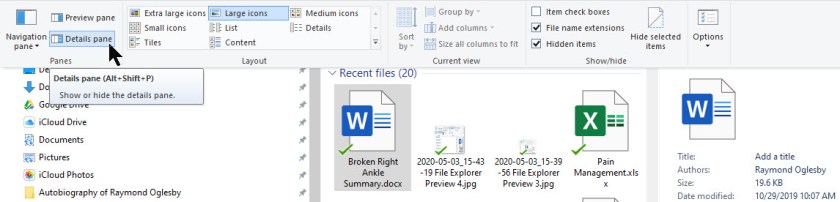
Accessing the Preview Pane
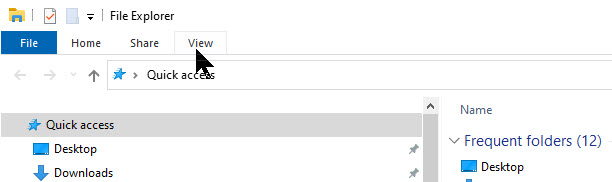
In the menu bar at the top of the File Explorer window, click View. See below image:
Selecting the View option
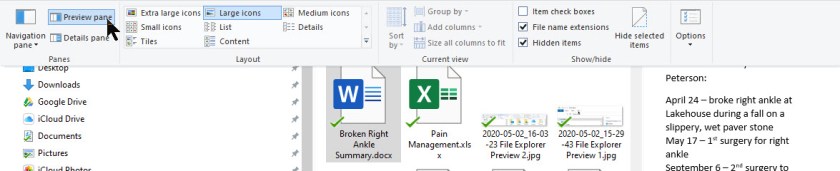
Find Preview pane option in the upper-left of the toolbar and click on it. Refer to below image:
Selecting the Preview pane option
The Preview pane will be highlighted and isnow activated. Navigate the File Explorer to a folder that has documents you’d like to preview. When you select a file, you will see its preview thumbnail in the right side of the window. See following image:
The results of Previw pane option displayed on the right
Accessing the Details Pane
File Explorer also has a related feature called Details Pane. To turn it on, click View in the Explorer menu bar, then click the Details pane option in the toolbar (it’s right below the Preview pane option). Refer to below image:
Selecting the Details pane option
When you highlight a file with Details pane turned on, you will see a tiny thumbnail (for applicable file types) and some details about the file, such as its size, date created, date modified, etc. in the right portion of the window. See following image:
The results of Details pane option displayed on the right
To return to the normal view of File Explorer, first, you have to click on View, then, either click the Preview or Details pane option depending on which one is highlighted.
You also have other options under the View tab to see your contents; like the size of your icons; extra large, large, medium and small, as well as by list, details, tiles and content.
Keyboard Shortcuts
It’s also possible to quickly toggle the Preview and Details panes using keyboard shortcuts. First, open File Explorer, then use the below shortcuts:
Press Alt+P to open or close the Preview pane
Press Alt+Shift+P to open or close the Details pane
That its. You have successfully explored two seldom used options of the File Explorer in Windows 10.
I Would Like to Hear From You
Please feel free to leave a comment. I would love hearing from you. Do you have a computer or smart device tech question? I will do my best to answer your inquiry. Please mention the device, app and version that you are using. To help us out, you can send screenshots of your data related to your question.
The author’s Vietnam eBook on the Battle for Tra Bong: Events and Aftermath
With the release of iOS 13.4 and above, you can now share files and folders using your favorite share connection. This feature is built into the Files app.
Apple engineers took a long time in releasing this feature. It’s about time. Let’s see how this is done.
This is for iPhone and iPad running iOS 13.4 or higher
Copyright Scott Adams, Inc./Distributed by Universal Uclick for UFS
Sharing a Folder
First, launch the Files app. Navigate to the iCloud folder you would like to share. Next, press and hold the folder until a menu appears. Now, select Share. See below image:
Selecting the Share option for a folder
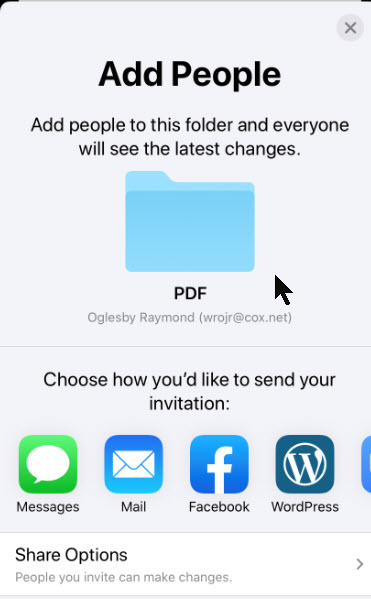
Next, select Add People. Refer to below image:
Selecting the Add People option for the folder to be shared
Now, select a share method from the options like Mail, Messages, Messenger and so on. See following image:
Selecting the share connection for the folder
Type in your subject and message, if necessary, then select your audience. When finished, Send your message. See below image:
Selecting the recipient(s) for sharing the folder
Change Access Rights
First, launch the Files app. Navigate to the shared iCloud folder. Next, press and hold the folder until a menu appears. Select Share then select Show People. Refer to below image:
Accessing the Show People option
Tap a person in the list. Refer below to my list:
Selecting the recipient(s) to change access rights
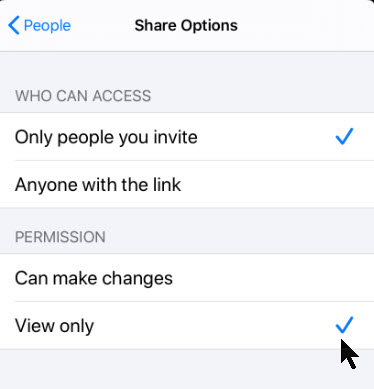
You are given two options for Permission: Can make changes and View only. You can also change Who Can Access options for the folder by selecting Only people you invite and Anyone with the link. See below image:
Setting the access rights
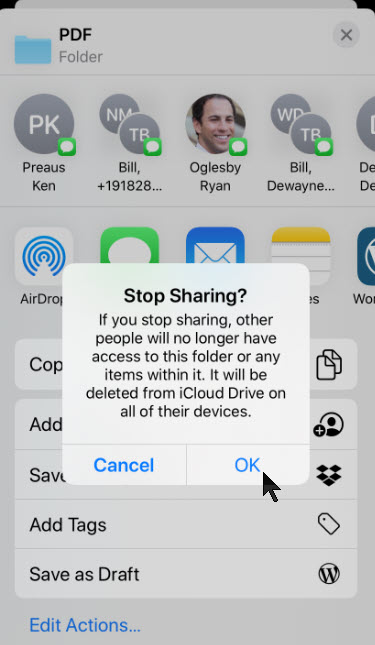
There is the option to remove the user’s access, just tap Stop Sharing and tap OK. See following image:
Cancelling the sharing
I Would Like to Hear From You
Please feel free to leave a comment. I would love hearing from you. Do you have a computer or smart device tech question? I will do my best to answer your inquiry. Please mention the device, app and version that you are using. To help us out, you can send screenshots of your data related to your question.
The author’s Vietnam eBook on the Battle for Tra Bong: Events and Aftermath