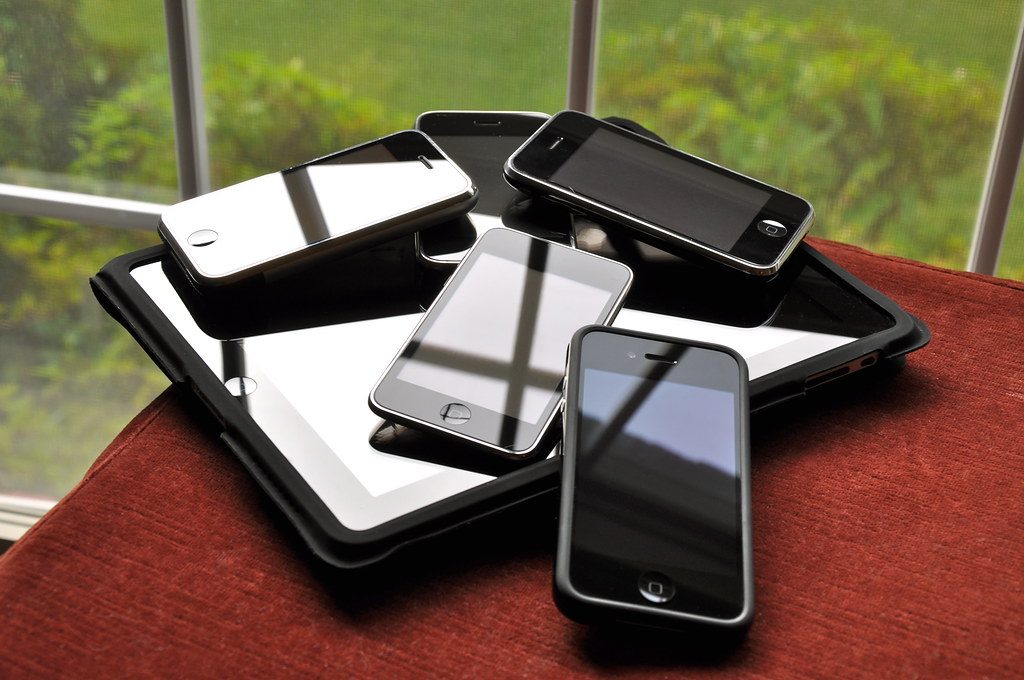
You do not always need the greatest, shiniest device for smartphones. After all, a new phone is often a very expensive purchase. More people are realizing that, as new numbers show used phones are more popular than ever.
Sales of used smartphones are higher than ever now, as over 282 million used phones were reportedly sold through 2022, according to data from the IDC. This represents an 11.5% year-on-year increase, and while new phones are still selling like hotcakes, it does show a growing trend of people buying second-hand instead. The second-hand market is full of great deals, letting you get old phones for really cheap or even knocking a few hundred bucks off a current, slightly used model.
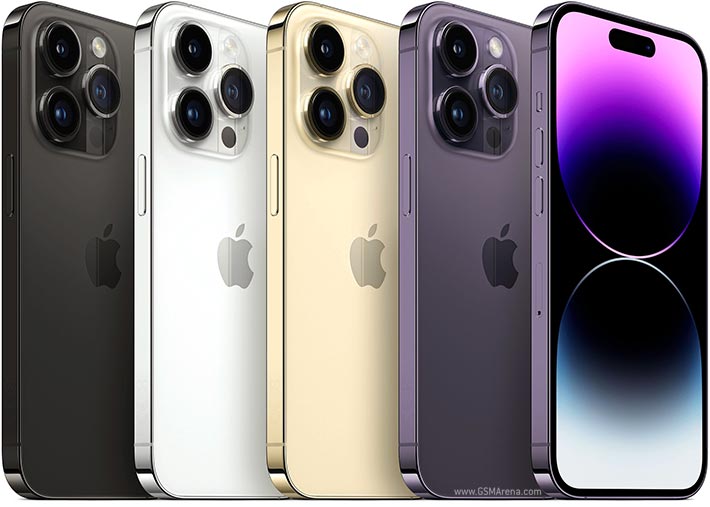
The reason for this is not particularly hard to guess. Economic inflation was a problem for most of 2022 (and has not gone away), and buying a brand-new smartphone is probably not a priority for people with other bills to pay. The iPhone 14 Pro Max can start at $1,100, while you can get used iPhone 12 or 13 devices for as low as $300.
It’s considered good practice to buy a used, older flagship model than going for a new smartphone
Courtesy of: The Register
Disclaimer
Technology is always changing, and rarely is there static tech for smartphones and desktops. Thus, the contents of this post are only valid at the time of writing. Blog posts older than six months may have directions incompatible with your device or OS. Hopefully, older post content will continue to work as advertised. Thank you for reading TechSavvy.Life for Technology at Work For You.
Quote For the Day
What did people do when they went to the bathroom before smartphones?
Aaron Cobra
Tweet Info
That’s it. Please feel free to share this post! One way to share is via Twitter.
Just click the Tweet icon below. This will launch Twitter where you click its icon to post the Tweet.
Checkout TechSavvy.Life for blog posts on smartphones, PCs, and Macs! You may email us at contact@techsavvy.life for comments or questions.
Please feel free to leave a comment. I would love to hear from you. Do you have a computer or smart device tech question? I will do my best to answer your inquiry. Just send an email to contact@techsavvy.life. Please mention the device, app, and version you are using. To help us out, you can send screenshots of your data related to your question.
Author’s E-Book
You can access the e-book from a Kindle device, the Kindle App for the desktop or smartphone, which is a free app.
The author’s Vietnam eBook on the Battle for Tra Bong Vietnam: Events and Aftermath
Open the Settings app, tap Safari, and toggle Block Pop-ups to OFF. This allows pop-ups in Safari on your iPhone. You can also allow pop-ups in other browsers like Google Chrome. Open your browser app’s Settings to find this option.
Summary: Open the Settings app, tap Safari, and toggle Block Pop-ups to OFF. This allows pop-ups in Safari on your iPhone. You can also allow pop-ups in other browsers like Google Chrome. Open your browser app’s Settings to find this option.
This is for the Safari and Chrome. Screenshots are from iPhone 14 Pro running iOS 16+
Copyright Scott Adams, Inc./Distributed by Universal Uclick for UFS
Allow Pop-Ups in Safari
To allow sites to open pop-up windows in your Safari browser, first, open the Settings app on your iPhone.
Next, in Settings, scroll down and tap Safari. Refer to the below image:
Accessing Safari
Now, on the Safari page, scroll down and toggle Block Pop-Ups to OFF.
Tip: To turn on Safari’s pop-up blocker in the future, re-enable the Block Pop-Ups option.
See the below image:
Toggle OFF to disable pop-ups
Allow Pop-Ups in Chrome
To enable pop-up windows in Chrome, first, launch the browser on your iPhone.
Next, when Chrome launches, in the bottom right-hand corner, tap the three-dot Menu and choose Settings. See the following image:
Accessing Chrome Settings
Now, in Settings, scroll down and tap Content Settings. Refer to the below image:
Accessing Content Settings
Next, tap Block Pop-Ups. See the below image:
Accessing Block Pop-ups
Now, toggle Block Pop-Ups to OFF. Then, in the top right-hand corner, tap Done.
Tip: To re-enable pop-ups in Google Chrome in the future, activate the Block Pop-Ups option.
See the following image:
Toggle OFF to disable pop-ups and tap Done
Disclaimer
Technology is always changing, and rarely is their static tech for smartphones and desktops. Thus, the contents of this post are only valid at the time of writing. Blog posts older than six months may have directions incompatible with your device or OS. Hopefully, older post content will continue to work as advertised. Thank you for reading TechSavvy.Life for Technology at Work For You.
Quote For the Day
We refuse to turn off our computers, turn off our phone, log off Facebook, and just sit in silence because in those moments we might actually have to face up to who we really are.
Jefferson Bethke
Tweet Info
That’s it. Please feel free to share this post! One way to share is via Twitter.
Just click the Tweet icon below. This will launch Twitter where you click its icon to post the Tweet.
Checkout TechSavvy.Life for blog posts on smartphones, PCs, and Macs! You may email us at contact@techsavvy.life for comments or questions.
Please feel free to leave a comment. I would love to hear from you. Do you have a computer or smart device tech question? I will do my best to answer your inquiry. Just send an email to contact@techsavvy.life. Please mention the device, app, and version you are using. To help us out, you can send screenshots of your data related to your question.
Author’s E-Book
You can access the e-book from a Kindle device, the Kindle App for the desktop or smartphone, which is a free app.
The author’s Vietnam eBook on the Battle for Tra Bong Vietnam: Events and Aftermath
Google’s Image Search results are sometimes so impressive that you want to save some of those images to your device. If you have found yourself in this situation, let’s explore how to download those images from your search results.
This is for mobile and desktop devices. Screenshots are from Windows 10 and iPhone 14 Pro running iOS 16+
Copyright Scott Adams, Inc./Distributed by Universal Uclick for UFS
Save Images On Desktop
To download an image on a desktop, you just pick your image, click an option, and your image is saved to your computer.
First, launch your favorite web browser on your computer and open Google Image Search. There, find the image you want to save to your machine. Refer to the below image:
Search Google Images
Next, on the search results page, access the image that you want to download. See the below image:
Find an image
Now, right-click your image, and from the menu that opens, choose to Save image as. See the following image:
Check the option to save your image
Next, your browser will open your computer’s standard Save As window. Here, select a folder to save your image in, type your image name in the File Name field, then click Save. Refer to the below image:
Save your image
Now, you have successfully downloaded your favorite image from your Image Search results. If you are not sure exactly where the image file went, check your Downloads folder from File Explorer.
If your downloaded file is of low resolution, then try downloading that image directly from the source site. To do that, on the Image Search results page, click the link, beneath the image, and not the image, to be taken to the image site. There, right-click the image and choose Save image as.
Download Images On Mobile
On your mobile phone, you can download images from Google’s Image Search results using Google Chrome, Apple Safari, or Microsoft Edge. Mozilla Firefox does not offer the option to save images.
To start, first, open your web browser (we are using Safari) and launch Google Image Search or type into the search box “images.google.com”. Find the image you would like to save to your phone.
Next, on the search results page, tap the image to download. See the below image:
Tap an image you want to download
Now, on your image full-screen page, tap and hold the image. See the following image:
Press and hold your image
Next, on iPhone or iPad, from the menu that opens in Safari, tap Save to Photos. Refer to the below image:
Select the option to save your image
Your iPhone will download and save the image on your local storage or in our example using Safari, your Photos app. See the below image:
Your saved image
Disclaimer
Technology is always changing and rarely is static for smartphones and desktops. Thus, the contents of this post are only valid at the time of writing. Blog posts older than six months may have directions incompatible with your device or OS. Hopefully, older post content will continue to work as advertised. Thank you for reading TechSavvy.Life for Technology at Work For You.
Quote For the Day
The technology you use impresses no one. The experience you create with it is everything.
Sean Cerety
Tweet Info
You are finished. Please feel free to share this post! One way to share is via Twitter.
Just click the Tweet icon below. This will launch Twitter where you click its icon to post the Tweet.
Checkout TechSavvy.Life for blog posts on smartphones, PCs, and Macs! You may email us at contact@techsavvy.life for comments or questions.
Please feel free to leave a comment. I would love to hear from you. Do you have a computer or smart device tech question? I will do my best to answer your inquiry. Just send an email to contact@techsavvy.life. Please mention the device, app, and version you are using. To help us out, you can send screenshots of your data related to your question.
Author’s E-Book
You can access the e-book from a Kindle device, the Kindle App for the desktop or smartphone, which is a free app.
The author’s Vietnam eBook on the Battle for Tra Bong Vietnam: Events and Aftermath
The simplest way to search your Photos library is to use the Search tab at the top. However, you can also find specific photos and videos by filtering images by app name, camera or device, and even location.
Summary: The simplest way to search your Photos library is to use the Search tab at the top. However, you can also find specific photos and videos by filtering images by app name, camera or device, and even location. Using iPhone’s Live Text feature, you can also search for text within images.
This is for the iPhone. Screenshots are from iPhone 14 Pro running iOS 16+
Copyright Scott Adams, Inc./Distributed by Universal Uclick for UFS. This is one of my favorites
Finding that favorite photo you took can be frustrating when you have thousands to sift through. Fortunately, there are plenty of useful tips for searching and filtering your media, including photos, videos, imports, and more. Let’s discover some of these tips.
Find Specific People and Objects
Using the Search tab, you can search for people, animals, and objects in the Photos app. The Search function works well for finding animals like cats and dogs, objects like cars and boats, clothing like hats and sunglasses, or natural features like rivers and mountains.
First, launch Photos and select Search from the Toolbar at the bottom. Then type your criteria into the Search bar. Refer to the below image:
Search for flowers
Next, you can get as descriptive as you like. For example, you can look for food items like steak or rooms in your house like the bedroom. Start typing “at the concert” and see what you find.
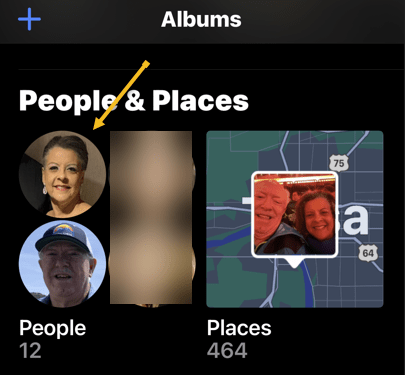
Now, for the search to work with people, you will need to link their likeness to a contact. Tap on the Albums tab. Scroll down to People and Places and tap on the selection of faces that Photos have generated. See the below image:
Search for faces
Next, you can tap on individual people, then tap Add Name at the top to link the likeness to a contact. See the following image:
Add a person’s name
Now, tap Next in the upper right-hand corner to see the tagged person, then click Done in the upper right-hand corner. Refer to the below image:
The person’s name has been added
Next, to train Photos to recognize people better, click each photo and look for the Review button. You can then confirm or deny likenesses. You may find some people have multiple entries due to changes in appearance, like a new haircut. Just tag them with the same name. See the below image:
Review your photos
Now, return to your Albums tab and tap on People. Here, you will see your tagged entries. See the following image:
Your named people’s photos
Find Text and Captions
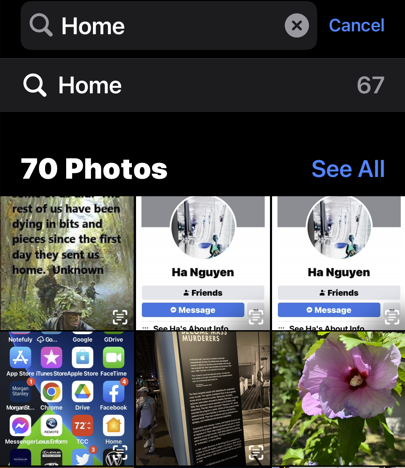
Next, thanks to the iPhone’s Live Text feature, you can search for text within images. For example, you can search for words on a page, titles of books, road signs, or notices. You may even be able to pick up handwriting if it’s legible enough for the iPhone to recognize. Refer to the below image:
Find text in your photos
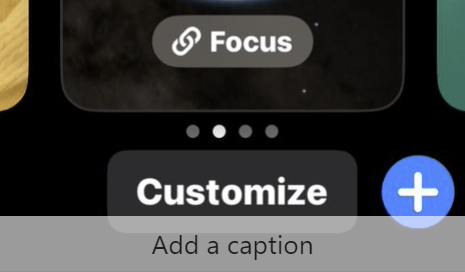
Now, you can give yourself a chance at finding something specific later by attaching a caption to it. To do so, find the photo in your library, then swipe up to reveal more information about it. Then tap the Add a Caption field and type your description.
Find Old Objects
Your iPhone can surface images from this time last year, three years ago, or even ten years ago if your media files go back that far. These sometimes appear on the For You tab or as Memories Notifications, but you can also search for them manually.
Next, the key is to type the phrase exactly to see the relevant entry. For example, you can type Three Years Ago and then tap on the event that shows up. Also, you can do this for Last Month or Last Week. Head to the Albums tab and tap on Search at the bottom of the Toolbar. See the below image:
Find photos from last month
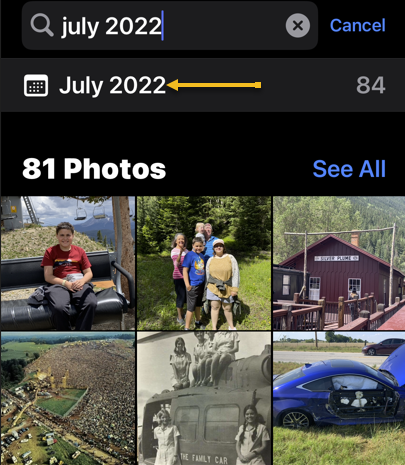
Now, you can even filter by images taken in a particular month and year by searching for it, like July 2022. Also, you could search by scrolling down to the date range in your Library tab and selecting a date, but doing the above is much quicker. See the following image:
Find photos with a specific date
Find Hidden or Deleted
Next, in iOS 16, the Hidden and Recently Deleted albums are protected by Face ID or Touch ID. You can still find them in the usual place on the Albums tab by scrolling down to the bottom of the page and tapping on the Hidden or Recently Deleted album label in the Utility section.
Note:Recently Deleted photos will be removed after 30 days.
Refer to the below image:
Find Hidden or Recently Deleted photos
Find Duplicates and Delete Them
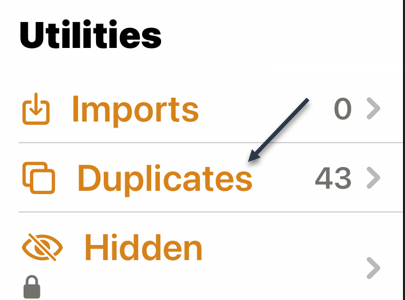
Now, the Photos app can also find and merge duplicate photos and videos to save space. Scroll to the bottom of your Albums tab and tap Duplicates in the Utility section to see a list of duplicate photos or videos. See the below image:
Find Duplicate photos
Next, you can review each entry and then tap Merge. Your iPhone will then keep the highest quality version of any duplicates. See the following image:
Merge Duplicate photos
You can also merge all of your duplicates at once by tapping:
Select > Select All > Merge (###)
Where “###” is the number of duplicates you are going to merge shown at the bottom of your screen. Refer to the below image:
Merge all Duplicate photos
The iPhone Photos app is both useful and powerful. These tips are just some of what you can do.
Disclaimer
Technology is always changing, and rarely is their static tech for smartphones and desktops. Thus, the contents of this post are only valid at the time of writing. Blog posts older than six months may have directions incompatible with your device or OS. Hopefully, older post content will continue to work as advertised. Thank you for reading TechSavvy.Life for Technology at Work For You.
Quote For the Day
We refuse to turn off our computers, turn off our phone, log off Facebook, and just sit in silence because in those moments we might actually have to face up to who we really are.
Jefferson Bethke
Tweet Info
That’s it. Please feel free to share this post! One way to share is via Twitter.
Just click the Tweet icon below. This will launch Twitter where you click its icon to post the Tweet.
Checkout TechSavvy.Life for blog posts on smartphones, PCs, and Macs! You may email us at contact@techsavvy.life for comments or questions.
Please feel free to leave a comment. I would love to hear from you. Do you have a computer or smart device tech question? I will do my best to answer your inquiry. Just send an email to contact@techsavvy.life. Please mention the device, app, and version you are using. To help us out, you can send screenshots of your data related to your question.
Author’s E-Book
You can access the e-book from a Kindle device, the Kindle App for the desktop or smartphone, which is a free app.
The author’s Vietnam eBook on the Battle for Tra Bong Vietnam: Events and Aftermath
Do you feel bombarded by iPhone notifications? If so, there’s a way to silence all of your notifications. Or, you can pick and choose the notifications you want to see and those you want to ignore.
Do you feel bombarded by iPhone notifications? If so, there’s a way to silence all of your notifications. Or, you can pick and choose the notifications you want to see and those you want to ignore. Let’s examine how to gain control over your notifications.
This is for the iPhone. Screenshots are from iPhone 14 Pro running iOS 16+
Copyright Scott Adams, Inc./Distributed by Universal Uclick for UFS
Using Do Not Disturb Mode
The easiest way to silence your notifications is to turn on Do Not Disturb mode from the Control Center. Swipe down from the very top-right of your screen. Then, select:
Focus > Do Not Disturb
Refer to the below image:
Accessing the Do Not Disturb button
Using Focus
If you want to schedule Do Not Disturb mode for a specific time, you can use Focus too.
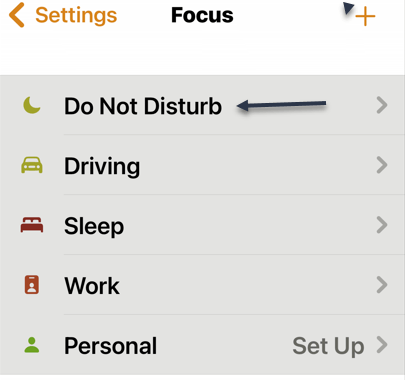
First, launch the Settings app on your iPhone. In Settings, tap:
Focus > Do Not Disturb
See the below image:
Accessing the Do Not Disturb option from Focus
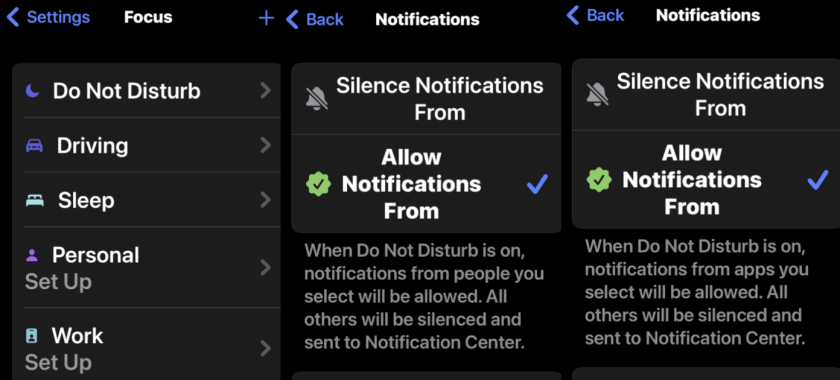
Next, you can set which notifications you allow (if any) and choose a custom Home or Lock screen to use in Do Not Disturb mode. See the following image:
Choosing Lock or Home screen
Now, under Set a Schedule, tap Add Schedule to set when you would like to enable Do Not Disturb mode. Refer to the below image:
About to Set a Schedule
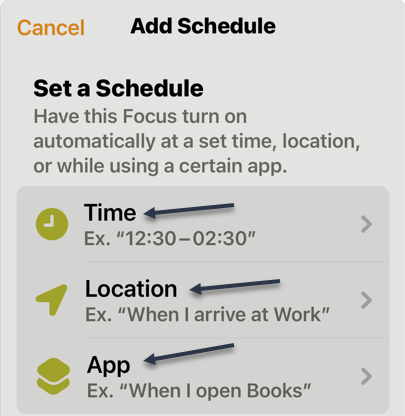
Next, you have three options for setting a schedule. see the below image:
Set a Schedule via three options
Next, you can set a Time, Location, and App to silence notifications. See the following image:
Your three options
Quiet App-Specific
If you want to disable notifications for a specific app, you can manage the notification settings for each app on your iPhone.
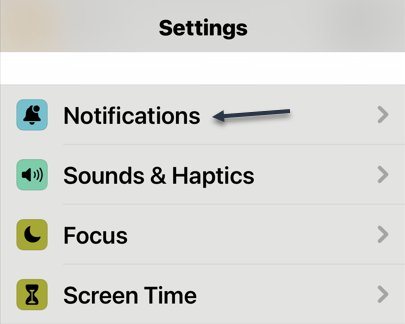
First, open Settings on your device. Then, tap Notifications. Refer to the below image:
Accessing Notifications
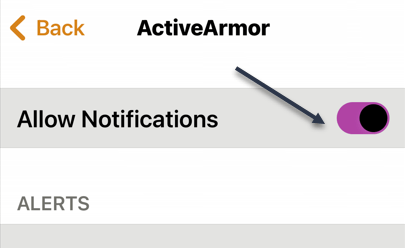
Next, on the Notifications page, in the Notification Style section, tap the app for which you want to disable notifications.See the below image where we are choosing the ActiveArmor app:
Selecting an App
Now, on the app page, at the top, toggle OFF the Allow Notifications option. See the following image:
Toggle Notifications to OFF
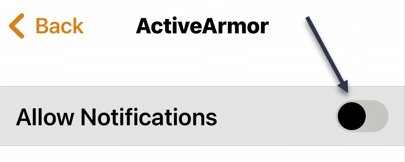
Next, a screen will open showing the Allow Notifications option is OFF. Refer to the below image:
Notifications are OFF for the App
Now, tap the Back icon and notice that notifications for ActiveArmor are OFF. See the below image:
Showing Notifications is OFF for the App
Your iPhone will not send you notifications from your chosen app.
Disclaimer
Technology is always changing, and rarely is their static tech for smartphones and desktops. Thus, the contents of this post are only valid at the time of writing. Blog posts older than six months may have directions incompatible with your device or OS. Hopefully, older post content will continue to work as advertised. Thank you for reading TechSavvy.Life for Technology at Work For You.
Quote For the Day
As technology advances in complexity and scope, fear becomes more primitive.
Don DeLillo
Tweet Info
That’s it. Please feel free to share this post! One way to share is via Twitter.
Just click the Tweet icon below. This will launch Twitter where you click its icon to post the Tweet.
Checkout TechSavvy.Life for blog posts on smartphones, PCs, and Macs! You may email us at contact@techsavvy.life for comments or questions.
Please feel free to leave a comment. I would love to hear from you. Do you have a computer or smart device tech question? I will do my best to answer your inquiry. Just send an email to contact@techsavvy.life. Please mention the device, app, and version you are using. To help us out, you can send screenshots of your data related to your question.
Author’s E-Book
You can access the e-book from a Kindle device, the Kindle App for the desktop or smartphone, which is a free app.
The author’s Vietnam eBook on the Battle for Tra Bong Vietnam: Events and Aftermath
Among the things that can slow your iPhone down, a big pile of tabs in Safari is not one of them.
Safari tabs simply do not slow the iPhone down. In fact, you can have 500 tabs open, and it has zero performance impact. And 500 more if you make a new group. And 500 more if you use private browsing. And 500 more if you make another group. Whether we had 50 tabs or 5,000 tabs in Safari for iPhone, there was simply no difference in performance.
This is for devices using Safari. Screenshots are from iPhone 14 Pro running iOS 16+
Copyright Scott Adams, Inc./Distributed by Universal Uclick for UFS
If you dislike the clutter and it feels like your mental burden is lighter if the tabs in your phone’s browser are wiped away, by all means, feel free to tidy up.
Your iPhone automatically manages Safari tabs, and the number of tabs has no impact on the performance of the phone. Open tabs cannot do work or use resources in the background.
There are, in fact, things that can slow down your phone. A really old and worn battery can make a phone feel sluggish. Updating an older phone to a current release of iOS can really show you how old the hardware has become. Stuffing your phone’s storage full of unused apps and undeleted blurry photos will do the trick, too.
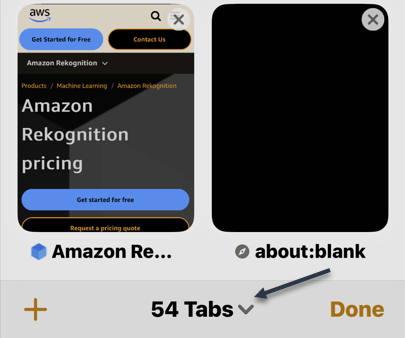
View Number open Tabs
To see how many Safari tabs you have open, first, launch Safari and tap the double rectangle icon on the lower right-hand corner of your screen. Next, at the bottom, you will see your number of open tabs. Refer to the below image:
Your number of open Safari tabs
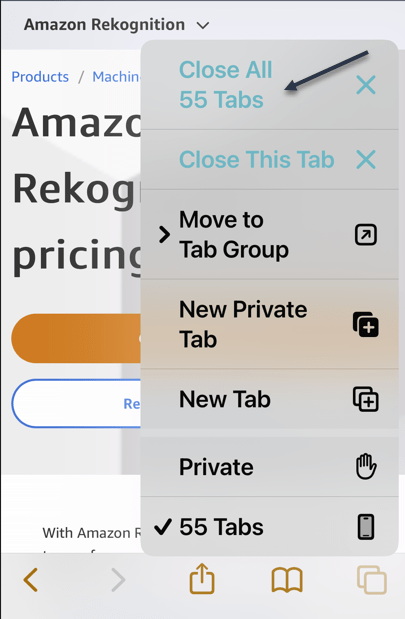
Close All Open Tabs
It’s easy to close all tabs at once in Safari on an iPhone or iPad. First, launch the browser, then tap and hold the View Tabs button in the bottom-right corner of the screen. Next, choose the Close All Tabs option to nuke your browsing session entirely. This works for the current session, so if you are in a Private browsing session then this will close all open private tabs. See the below image:
Selecting to close all open Safari tabs
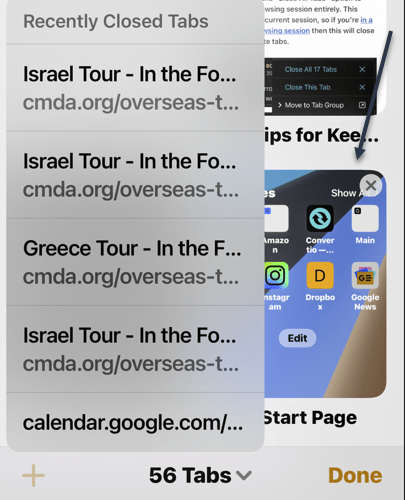
Reopen a Closed Tab
You can also get back any tabs you have recently closed. First, launch Safari, then tap tap the double rectangle icon on the lower right-hand corner of your screen.
Next, long-press the plus “+”(New Tab) button. Now, select a tab to reopen. The recently closed tab will be launched in the new tab. See the following image:
Launching a recently closed Safari tab
These tabs are limited only to tabs you have closed on the device you are using, rather than another device (like a Mac).
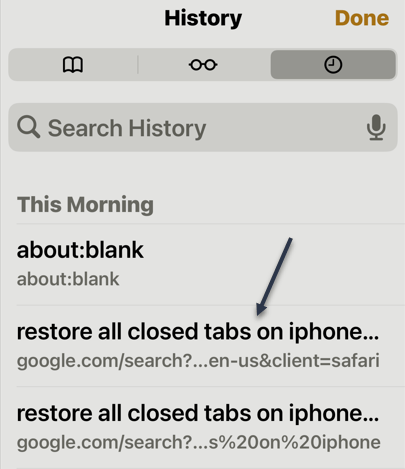
Reopen From History
Using History, you can also get back any tabs you have recently closed. First, launch Safari, then tap the Book icon on the lower part of your screen.
Next, tap the History icon in the upper right-hand corner of your screen. Now, select a tab to reopen. The selected closed tab will be launched in the new tab. Refer to the below image:
Launching a Safari tab from History
These tabs are limited only to tabs you have closed on the device you are using, rather than another device (like a Mac).
Disclaimer
Technology is always changing, and rarely is their static tech for smartphones and desktops. Thus, the contents of this post are only valid at the time of writing. Blog posts older than six months may have directions that are incompatible with your device or OS. Hopefully, older post content will continue to work as advertised. Thank you for reading TechSavvy.Life for Technology at Work For You.
Quote For the Day
I’d rather check my Facebook than face my checkbook.
Craig Coelho
Tweet Info
That’s it. Please feel free to share this post! One way to share is via Twitter.
Just click the Tweet icon below. This will launch Twitter where you click its icon to post the Tweet.
Just click the Tweet icon below. This will launch Twitter where you click its icon to post the Tweet.
Please feel free to leave a comment. I would love to hear from you. Do you have a computer or smart device tech question? I will do my best to answer your inquiry. Just send an email to contact@techsavvy.life. Please mention the device, app, and version you are using. To help us out, you can send screenshots of your data related to your question.
Author’s E-Book
You can access the e-book from a Kindle device, the Kindle App for the desktop or smartphone, which is a free app.
The author’s Vietnam eBook on the Battle for Tra Bong Vietnam: Events and Aftermath
The iPhone is generally considered a “simple” smartphone to use, but it has become packed with features over the years. “Focus” is one feature that is particularly jam-packed with powerful tools.
The iPhone is generally considered a “simple” smartphone to use, but it has become packed with features over the years. “Focus” is one feature that is particularly jam-packed with powerful tools. Let’s take a look at this feature.
This is for the iPhone. Screenshots are from iPhone XR running iOS 16+
Copyright Scott Adams, Inc./Distributed by Universal Uclick for UFS
What is Focus
Focus Mode, actually called just “Focus” on the iPhone, is essentially Do Not Disturb for specific situations. Rather than having a one-size-fits-all Do Not Disturb mode, Apple made it possible to create a bunch of specialized modes.
The long-standing Do Not Disturb mode is still present, by the way, but Focus makes it more useful. While you may have only used Do Not Disturb while you sleep, now it can be customized for a bunch of different situations.
Distractions management is still a core part of Focus, but it goes far beyond traditional Do Not Disturb. Each Focus Mode you create can be customized with which people and apps you want to allow to send notifications. Maybe you do not care about getting a text from your friend in the middle of your workout, but you might not want that distraction while studying.
The cool thing about Focus is it can go beyond just simply allowing certain people and apps to send notifications. It can actually filter out conversations from the Messages apps, hide calendars in the Calendar app, and limit you to specific Tab Groups in Safari.
That’s part of the reason why Focus is so useful. With other Do Not Disturb modes, you may be able to block notifications, but all the distractions are still on your phone if you look. Focus not only can block notifications, but it can also block the actual distraction too.
Different iPhones For Different Situations
Enabling Focus
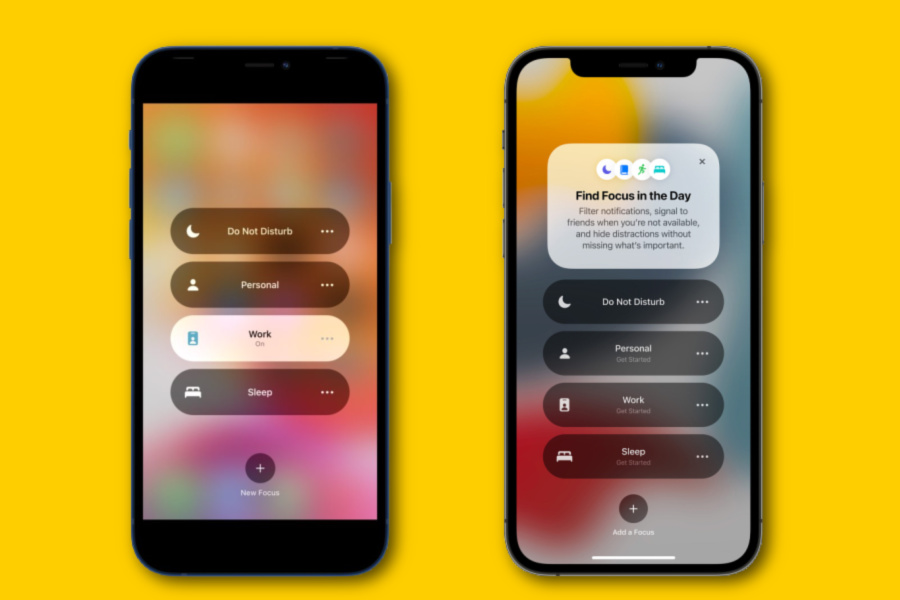
Another big part of Focus is customizable screens. You can actually create a specific Lock screen and Home screen setup to use in different Focus modes. It’s like having a different iPhone for each situation.
Let’s say you have a Focus Mode you use while you are at work. You can create a Lock screen with Widgets that pertain to your job and set up a Home screen with the apps you use throughout the workday. You could also create a “Weekend” mode for unwinding with a plain Lock screen and a single Home screen page with only essential apps.
It’s essentially like switching between user profiles. Set up the Focus mode once, then it’s simply a matter of tapping a toggle and you are looking at a whole new phone.
So Much to Discover
If you have not noticed, a lot is going on with Focus. Apple has really fleshed out this feature into a powerful tool, but it does require some poking around to get the most out of it.
For example, you can set up an “Auto Reply” message to text messages when you are in Focus Mode. You can share your “Focus state” across devices, to let people know you are not ignoring them. Focus modes can be scheduled to come on automatically by time, location, or when opening specific apps.
Focus is packed with cool and useful options, and if you have not taken the time to dive in, you owe it to yourself to take a look. You can really make your iPhone more enjoyable to use by setting up a few Focus modes.
Quote For the Day
We are stuck with technology when what we really want is just stuff that works.
Douglas Adams
Tweet Info
That’s it. Please feel free to share this post! One way to share is via Twitter.
Just click the Tweet icon below. This will launch Twitter where you click its icon to post the Tweet.
Checkout TechSavvy.Life for blog posts on smartphones, PCs, and Macs! You may email us at contact@techsavvy.life for comments or questions.
Please feel free to leave a comment. I would love to hear from you. Do you have a computer or smart device tech question? I will do my best to answer your inquiry. Just send an email to contact@techsavvy.life. Please mention the device, app, and version you are using. To help us out, you can send screenshots of your data related to your question.
Author’s E-Book
You can access the e-book from a Kindle device, the Kindle App for the desktop or smartphone, which is a free app.
The author’s Vietnam eBook on the Battle for Tra Bong Vietnam: Events and Aftermath
Google has confusing named products, and that might be most apparent with Google Wallet and Google Pay. These two apps have taken a convoluted path to get where they are today. So, which one should you be using?
Google has confusing named products, and that might be most apparent with Google Wallet and Google Pay. These two apps have taken a convoluted path to get where they are today. So, which one should you be using?
This is for diPhone and Android. Screenshots are from iPhone XR running iOS 16+
Copyright Scott Adams, Inc./Distributed by Universal Uclick for UFS
Both Google Wallet and Pay have seen some pretty drastic revamps over the years. Their purposes have changed a lot and confused many people in the process. Let’s see what these products have to offer.
Some History
You may be surprised to learn that the original version of Google Wallet was introduced way back in 2011. The service was primarily for sending money to people and there was a physical Google Wallet credit card as well.
The Google Wallet card allowed people to pay for things in physical and online stores with the funds in their accounts. This was before mobile payments with tap-to-pay were widely supported. The Wallet card was a very clever solution.
Eventually, tap-to-pay gained enough traction that Google launched AndroidPay in 2015. It maintained Google Wallet and Android Pay separately until 2018 when the two were combined into a single service called Google Pay. The Wallet card was discontinued in 2016.
Then, in 2020, Google Pay got a massive overhaul with a bunch of new features. All of Google’s mobile payment services were under one umbrella… for a while. In the summer of 2022, the service was split in two, with the Google Wallet branding making a return.
That’s where things stand as of September 2022. Google Pay and Google Wallet exist as two separate products; sometimes. More on that later.
Google Wallet
Google Wallet can most easily be summed up by its name; it’s a digital wallet. You can add credit cards, debit cards, loyalty cards, transportation passes, event tickets, vaccine cards, and gift cards.
Basically, Google Wallet is for paying for things online and in physical stores with tap-to-pay. It features a very simple interface that shows your cards, tickets, and passes. Google Wallet is only available for Android since the iPhone does not allow non-Apple apps for tap-to-pay.
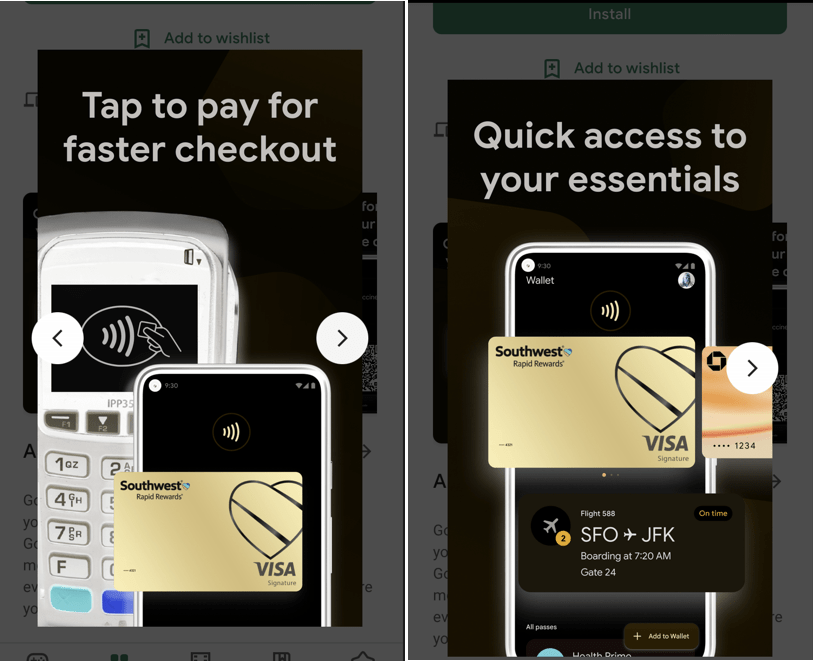
Google Wallet can generally be used with any card reader that has an Apple Wallet, Google Pay, or the contactless tap-to-pay icon. For online purchases, look for the Google Pay or Google Wallet buttons at checkout. It will take some time for the Wallet branding to replace Google Pay. Refer to the below image:
Google Wallet
Google Pay
Google Pay received a massive overhaul in 2020, and it’s pretty much the same experience now. The tap-to-pay functionality is still present in Google Pay, but that’s not the only thing it can do.
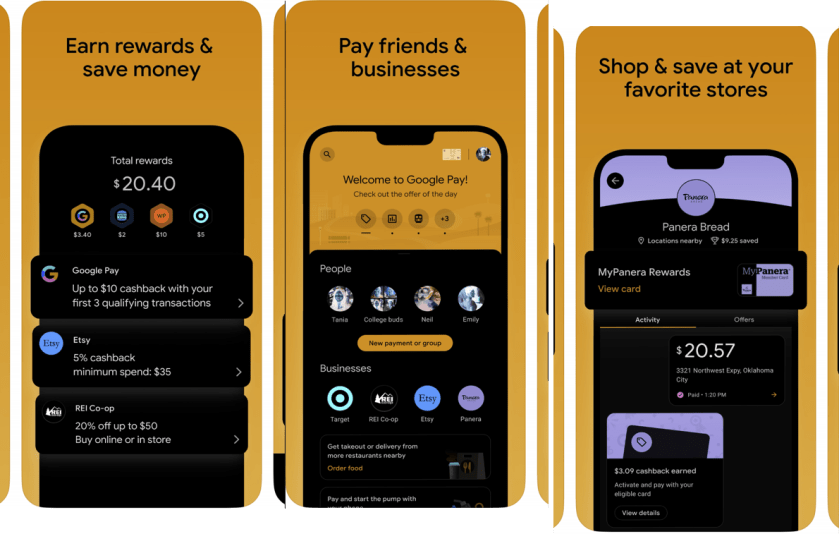
The Google Pay app has peer-to-peer payments, shopping deals, cashback offers, and a full-blown banking experience with personal finance insights. You can think of Pay as a combination of services similar to Venmo, PayPal, RetailMeNot, and Mint.
Unlike Google Wallet, Google Pay is available on both Android and iPhone. The tap-to-pay functionality does not work on the iPhone, but the other features do. It’s a feature-packed app that tries to do a lot of things. In fact, it might be too much for some people, which is why Google Wallet exists. See the below image:
Google Pay
Which App to Use?
Depending on where you live, you may not even need to decide which app to use. Google Pay and Google Wallet only exist side-by-side in the U.S. and Singapore. In every other country, Google Wallet entirely replaced Google Pay, and India does not have Wallet at all (as of September 2022).
Google Pay can do everything Google Wallet can do, but Google Wallet can not do everything Google Pay can do. If you are in a country that has both, you can choose between the full experience (Pay) or just mobile payments (Wallet). There’s no reason to have both.
Use Google Pay if you want peer-to-peer payments, deals, rewards, or personal finance tools. If you only care about mobile payments, Google Wallet is a much more streamlined experience for that. The choice is even simpler for iPhone users; Google Pay is the only option.
In closing, Google Wallet is for mobile payments, Google Pay is for mobile payments, and more. In the author’s opinion, it’s still too complicated.
-Courtesy of other tech blog posts
Quote For the Day
Books don’t need batteries.
Nadine Gordimer
Tweet Info
That’s it. Please feel free to share this post! One way to share is via Twitter.
Just click the Tweet icon below. This will launch Twitter where you click its icon to post the Tweet.
Checkout TechSavvy.Life for blog posts on smartphones, PCs, and Macs! You may email us at contact@techsavvy.life for comments or questions.
Please feel free to leave a comment. I would love to hear from you. Do you have a computer or smart device tech question? I will do my best to answer your inquiry. Just send an email to contact@techsavvy.life. Please mention the device, app, and version you are using. To help us out, you can send screenshots of your data related to your question.
Author’s E-Book
You can access the e-book from a Kindle device, the Kindle App for the desktop or smartphone, which is a free app.
The author’s Vietnam eBook on the Battle for Tra Bong Vietnam: Events and Aftermath
Duplicate photos and videos take up precious space on your iPhone. Since iOS 16, Apple has offered the ability to easily find and delete duplicates in the Photos app; no third-party app is required.
Duplicate photos and videos take up precious space on your iPhone. Since iOS 16, Apple has offered the ability to easily find and delete duplicates in the Photos app; no third-party app is required. Let’s explore how to do this.
This is for the iPhone running iOS 16+. Screenshots are from iPhone XR
Copyright Scott Adams, Inc./Distributed by Universal Uclick for UFS
iOS 16 Required
This feature was released with iOS 16. You can see your current iOS version under:
Settings > General > About > iOS Version
Refer to the below image:
Your iOS version
If you need to, you can upgrade to iOS 16 by going to
Settings > General > Software Update
Find and Delete Duplicates in Photos
Note! After updating the iOS. It could take anything from a few hours to a few days for the Duplicates album to appear.
First, to find duplicate photos and videos, open the Photos app on your iPhone and tap the Albums tab at the bottom of the screen. See the below image:
Selecting your Albums
Next, scroll down to the bottom of the page to the Utilities section where you will find the Duplicates album. See the following image:
Selecting Duplications option
Now, tap on Duplicates to see a list of all the duplicate photos and videos found on your iPhone. Refer to the below image:
Your Duplications total
Next, you will see a preview of each image and the relevant file size. You can review each duplicate entry individually, then tap on Merge to save one of the photos or videos. iOS will automatically keep the higher-quality version.
Now, you will need to confirm that you wish to merge the photos or videos in the pop-up window that opens. See the below image:
Merge the current Duplicate
Next, if you do not have time to merge each duplicate individually, you can merge everything at once. To do this, tap Select at the top of the screen followed by Select All. Then, tap Merge at the bottom of the screen. See the following image:
Merge all your Duplicates
Processing Your Photos
You might find that after merging all of your duplicates, more appear as your whole library finishes processing.
Apple states that the detection process requires your iPhone to be locked and connected to power. The size of your library and the tasks running on your device will influence the speed at which the process completes.
If your photos are stored in an iCloud Photo Library, removing duplicates is a good way of freeing up precious iCloud storage.
Quote For the Day
Cars will soon have the Internet on the dashboard. I worry that this will distract me from my texting.
Andy Borowitz
Tweet Info
That’s it. Please feel free to share this post! One way to share is via Twitter.
Just click the Tweet icon below. This will launch Twitter where you click its icon to post the Tweet.
Checkout TechSavvy.Life for blog posts on smartphones, PCs, and Macs! You may email us at contact@techsavvy.life for comments or questions.
Please feel free to leave a comment. I would love to hear from you. Do you have a computer or smart device tech question? I will do my best to answer your inquiry. Just send an email to contact@techsavvy.life. Please mention the device, app, and version you are using. To help us out, you can send screenshots of your data related to your question.
Author’s E-Book
You can access the e-book from a Kindle device, the Kindle App for the desktop or smartphone, which is a free app.
The author’s Vietnam eBook on the Battle for Tra Bong Vietnam: Events and Aftermath
Notifications are a blessing and a curse. They can be great in a lot of situations, but you probably ignore most of them. There are several things we can do to make Notifications on your iPhone work a little better.
Unfortunately, the notification situation on the iPhone is a bit messy. There are a lot of settings and options, but Apple does not explain a lot of them well. Let’s explore some things to get the best notification experience.
This is for the iPhone. Screenshots are from iPhone XR running iOS 16+
Copyright Scott Adams, Inc./Distributed by Universal Uclick for UFS
Stop From Turning on the Screen
By default, iPhone notifications always turn on the screen. Not only can this be annoying, but it also drains the battery faster if you get a lot of them.
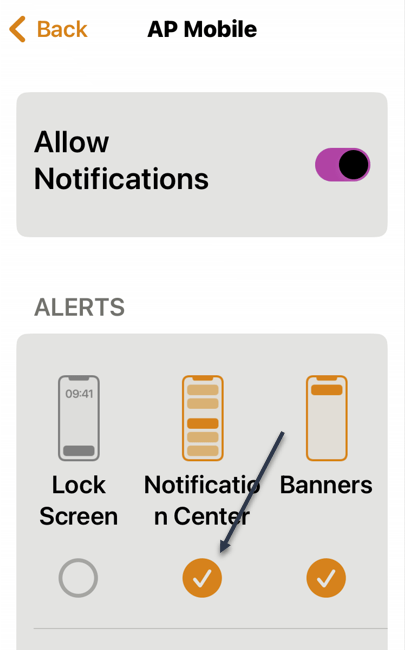
Each app has three different types of alerts it can do; Lock Screen, Notification Center, and Banners. Simply turning off the Lock Screen option will prevent notifications from turning on the screen. First, head to:
Settings > Notifications
and scroll down and find an app, then tap on the app. Under the Alerts section, uncheck the Lock Screen option. Refer to the below image:
Disabling the Lock Screen option
Delivery Quietly
Notifications do not have to be loud and annoying. You have the option to make them appear Quietly. This can be done directly from the notification, as shown above, or from Settings.
When a notification is delivered quietly, it basically just appears on your device without any fanfare. You will still see it in the Notification Center and Home screen badge, but not on the Lock screen, and it will not vibrate or make a sound.
First, head to:
Settings > Notifications
and scroll down and find an app, then tap on the app. Under the Alerts section, check the Notification Center option. See the below image:
Enabling Deliver Quietly option
Group/Ungroup
Notifications from the same app can be grouped together. They appear as a bundle on the Lock screen and Notification Center. This is enabled by default, but it can be tweaked for any app.
Each app has three different options for Notification Grouping, Automatic is the default.
Automatic: The Notifications from the app are intelligently grouped by threads, topics, and other criteria.
By App: All the Notifications from the app are grouped together.
Off: Notifications are not grouped at all.
Just tap on Notification Grouping to see the options See the following image:
Selecting Group or Ungroup option
Using Focus
One of the iPhone’s most powerful notification features is called Focus. It’s essentially a way to make personalized Do Not Disturb modes for specific situations. First, head to:
Settings > Focus
and select one or create your own. Refer to the below image:
Setup Focus
iPhone notifications can be great and they can be awful. It’s up to you to customize the experience to your liking. If your iPhone is becoming too much of a distraction and frustration, try the above tips.
Quote For the Day
The human spirit must prevail over technology.
Albert Einstein
Tweet Info
You are finished. Please feel free to share this post! One way to share is via Twitter.
Just click the Tweet icon below. This will launch Twitter where you click its icon to post the Tweet.
Checkout TechSavvy.Life for blog posts on smartphones, PCs, and Macs! You may email us at contact@techsavvy.life for comments or questions.
Please feel free to leave a comment. I would love to hear from you. Do you have a computer or smart device tech question? I will do my best to answer your inquiry. Just send an email to contact@techsavvy.life. Please mention the device, app, and version you are using. To help us out, you can send screenshots of your data related to your question.
Author’s E-Book
You can access the e-book from a Kindle device, the Kindle App for the desktop or smartphone, which is a free app.
The author’s Vietnam eBook on the Battle for Tra Bong Vietnam: Events and Aftermath