Wondering, “How do I turn off a Live Photo?” If a Live Photo you take captures a bit of video or audio you do not want, you can convert the Live Photo to a still image and keep or delete the original.
Wondering, “How do I turn off a Live Photo?” If a Live Photo you take captures a bit of video or audio you do not want, you can convert the Live Photo to a still image and keep or delete the original. Let’s explore how to change a Live Photo to a still picture.
This is for the iPhone
Copyright Scott Adams, Inc./Distributed by Universal Uclick for UFS
Can you save a still from a Live Photo? Yes! It’s easy to save a Live Photo as still and keep the Live Photo intact. This is helpful if you plan to edit a Live Photo but do not want to lose the live version, or if you just want to save iPhone storage.
First, Open the Photos App. Refer to the below image:
Accessing the Photos app
Next, tap the Albums tab, then scroll to the bottom and tap Live Photos. See the below image:
Accessing the Live Photos option
Now, tap the Live Photo you want to turn into a still, then tap the Share icon. See the following image:
Selecting the Share icon
Next, scroll down and tap Duplicate. Refer to the below image.
Selecting the Duplicate option
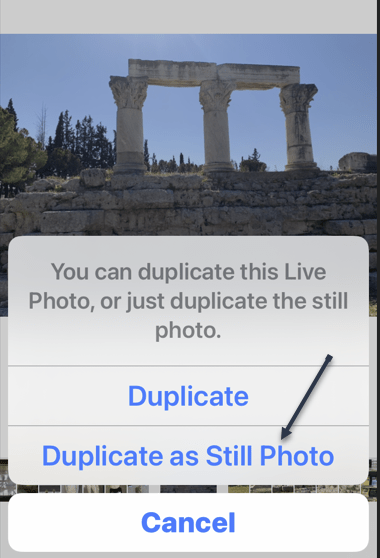
Now, tap Duplicate as Still Photo. See the below image:
Selecting Duplicate as Still Photo option
Next, if you want to delete the Live or Still photo, locate it, and tap the Trash icon in the lower right-hand corner. See the following image:
Deleting the photo
Quote For the Day
The real problem is not whether machines think but whether men do.
B. F. Skinner
Tweet Info
That’s it. Please feel free to share this post! One way to share is via Twitter.
Just click the Tweet icon below. This will launch Twitter where you click its icon to post the Tweet.
Checkout TechSavvy.Life for blog posts on smartphones, PCs, and Macs! You may email us at contact@techsavvy.life for comments or questions.
Please feel free to leave a comment. I would love to hear from you. Do you have a computer or smart device tech question? I will do my best to answer your inquiry. Just send an email to contact@techsavvy.life. Please mention the device, app, and version you are using. To help us out, you can send screenshots of your data related to your question.
Author’s E-book
You can access the e-book from a Kindle device, the Kindle App for the desktop or smartphone, which is a free app.
The author’s Vietnam eBook on the Battle for Tra Bong Vietnam: Events and Aftermath
By default, modern iPhones capture small videos called Live Photos every time you take a picture with the Camera app. These Live Photos take up a lot of expensive storage space, and if you do not use them, they could be wasting your money.
By default, modern iPhones capture small videos called Live Photos every time you take a picture with the Camera app. These Live Photos take up a lot of expensive storage space, and if you do not use them, they could be wasting your money. Let’s explore what you should do instead.
This is for the iPhone
Copyright Scott Adams, Inc./Distributed by Universal Uclick for UFS
Storage Space is Expensive
If you regularly enjoy taking and sharing Live Photos, they are not a waste of space. Live Photos are a neat feature. But if you never use them, you are storing a lot of unnecessary data that could be costing you money.
Storage space comes at a premium in the Apple universe, with larger storage sizes on iPhones often costing hundreds of dollars more than the lower-end models. You pay more for larger iCloud storage as well which holds your iCloud Photo backups.
An Apple Live Photo captures three seconds of audio and video in addition to a still photo. Typically, a video takes up more space than a still photo because it incorporates many still photo frames and audio as well.
Taking test photos on an iPhone 13 we examined the Live Photo file sizes. The still photo part of a typical Live Photo was about 5 megabytes, and the video file was about 8 megabytes, totaling 13 megabytes for a complete Live Photo. Multiply that out by the thousands of photos people usually store on their devices, and the 8 MB of extra video data adds up quickly. If you take 1000 live photos at 13 megabytes each, that’s 13 gigabytes of space. If you take 1000 still photos instead (at 5 megabytes each), that would only take up 5 gigabytes of space. You have saved 8 gigabytes of wasted space by turning off Live Photos.
Disable Taking Live Photos
Apple makes it easy to disable Live Photos, but the process is still somewhat confusing.
First, open the Camera app and make sure you are in “Photo” mode (not “Video” or “Portrait,” for example).
Next, locate the Live Photo button on the toolbar, which looks like three concentric circles (one of which is a dotted circle). This will disable Live Photo for this session, and you can confirm it when you see the Live Off message and a slash through the Live Photo icon. Refer to the below image:
Live Photo is off
Now, this change is only temporary; for now. By default, the next time you re-launch the Camera app, the Live Photo feature will turn back on automatically. To make sure it stays off, you will need to toggle a switch in Settings.
Next, to make the necessary change, open the Settings app, which you can usually find on your Home screen. See the below image:
Accessing Settings
Now, In Settings, navigate to:
Camera > Preserve Settings
See the following image:
Accessing the Preserve Settings option
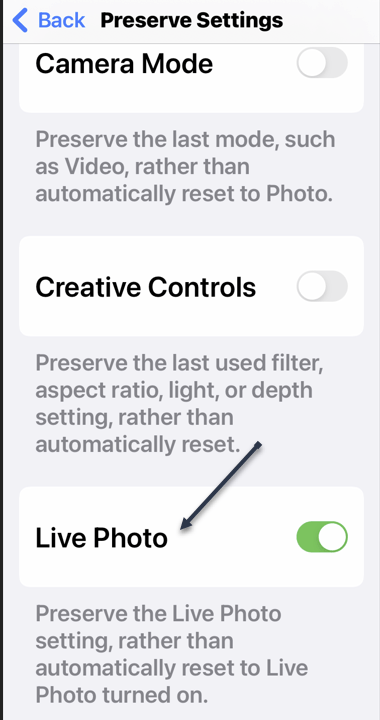
Next, scroll down and toggle the switch beside Live Photo to the OFF position. Refer to the below image:
Accessing the Live Photo option
This switch makes the Camera app preserve your Live Photo on or off setting between sessions. So if you turn it off and relaunch the Camera app later, Live Photo will still be off the next time.
(If you change your mind, you can still manually turn Live Photos to ON at any time by tapping the Live Photo icon on the toolbar in Camera.)
After a while of taking normal still photos, you will notice that they do not take up as much space as Live Photos, and that means you will have room for even more photos on your iPhone (and in your iCloud Drive). If you already have thousands of Live Photos stored, there’s no easy way to convert them all to still photos to save space. You can do the conversion process one at a time, however.
Quote For the Day
t has become appallingly obvious that our technology has exceeded our humanity.
Unknown
Tweet Info
That’s it. Please feel free to share this post! One way to share is via Twitter.
Just click the Tweet icon below. This will launch Twitter where you click its icon to post the Tweet.
Checkout TechSavvy.LIfe for blog posts on smartphones, PCs, and Macs! You may email us at contact@techsavvy.life for comments or questions.
Please feel free to leave a comment. I would love to hear from you. Do you have a computer or smart device tech question? I will do my best to answer your inquiry. Just send an email to contact@techsavvy.life. Please mention the device, app, and version you are using. To help us out, you can send screenshots of your data related to your question.
Author’s E-book
You can access the e-book from a Kindle device, the Kindle App for the desktop or smartphone, which is a free app.
The author’s Vietnam eBook on the Battle for Tra Bong Vietnam: Events and Aftermath
Microsoft Word has a ‘profanity’ check to warn you about rude, offensive, or swear words in some places. In others, the same word will not get any special marking. This feature is helpful in a work environment using Microsoft. We will explain how to set up and use Microsoft Word’s Profanity check, then show its limitations and traps.
Microsoft Word has a ‘profanity’ check to warn you about rude, offensive, or swear words in some places. In others, the same word will not get any special marking. This feature can be helpful in a work environment that is using Microsoft. We will explain how to set up and use Microsoft Word’s ProfanityCheck, then show its limitations and traps.
This is for Microsoft Word 365, Outlook 365, and parts of Microsoft Office 365
Copyright Scott Adams, Inc./Distributed by Universal Uclick for UFS
Note! We will be discreet in this article but the topic means there’s plenty of blurred text or Asterix. Please do not proceed if you might be offended.
Word’s Profanity Check
Modern Word has an optional profanity check that’s supposed to warn about rude, offensive, obscene, or bad words.
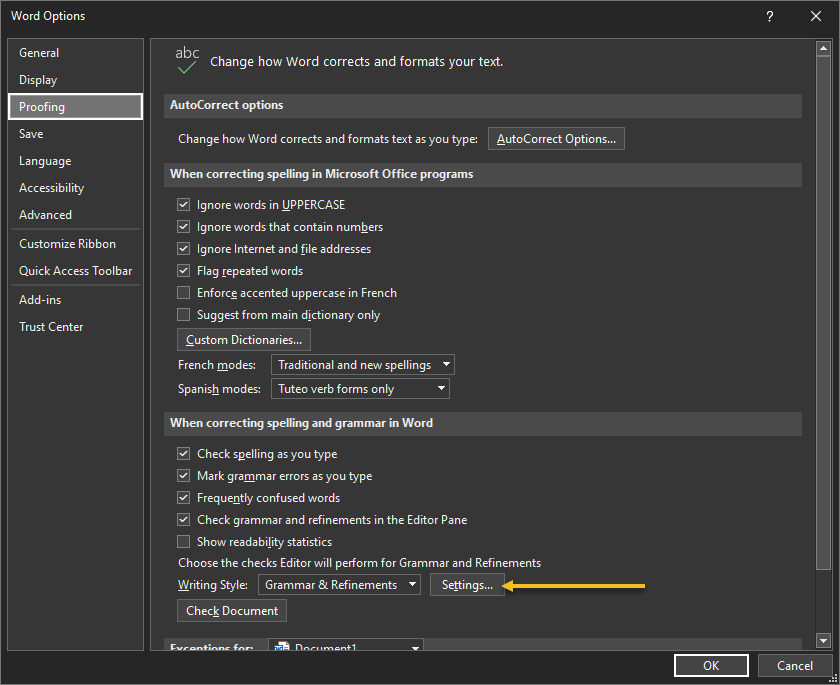
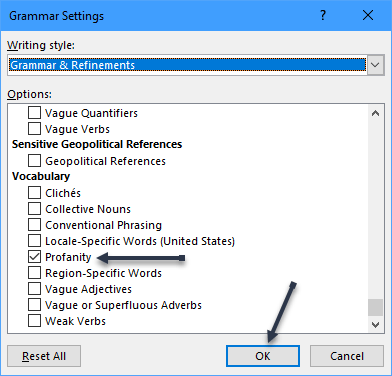
Next, scroll down to the bottom. Under Vocabulary look for the Profanity option, and checkmark it. When finished, click OK. Click OK again to exit. See the below image:
Enabling Profanity option
How the Feature is Suppose to Work
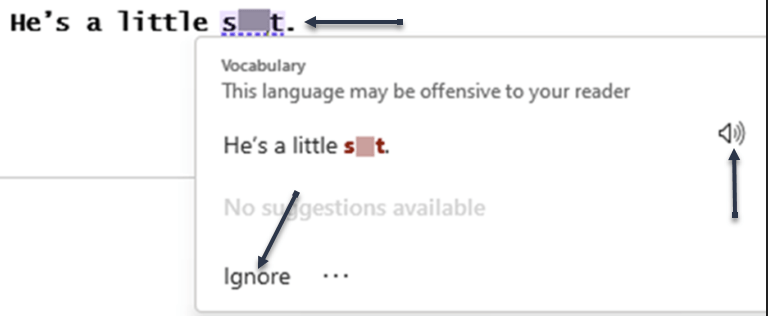
Now, when Word ‘sees’ a profane word, it adds a blue dotted line. Click on the word to see an explanation This language may be offensive to you. See the following image:
Showing Profanity check
Next, choose Ignore to remove the dashes. Click the Speaker icon at the right to hear the word and sentence.
That’s how it’s supposed to work but there’s more to it in the real world.
How the Feature Really Works or Not
Word’s Profanity check mostly works only for lower case words. Anything with a Capital letter is usually ignored. For us, this is a huge drawback to the feature. Refer to the below image:
Profanity checking
Microsoft’s Value Judgements
One person’s plain speaking is another’s profanity.
We were intrigued that ‘ass’ is not marked as an offensive word while ‘damn’ is. Apparently, Microsoft decided to err on the side of caution, for whatever that is worth.
Use of Capital Letters
In a similar way to some of the other Grammar and refinements checks, most words starting with a Capital letter are ignored.
As you can see, that’s not consistent. We can not explain why two words on the list above are marked as ‘profane’ regardless of capitalization but others do not.
Word’s grammar checks, etc, treat most capitalized words like proper nouns, so it ignores them. Of course, that makes no sense if the word starts a sentence, but that’s a distinction Word does not make. Word does have some contextual spell checking but that’s not been extended to Profanity and other grammar checks.
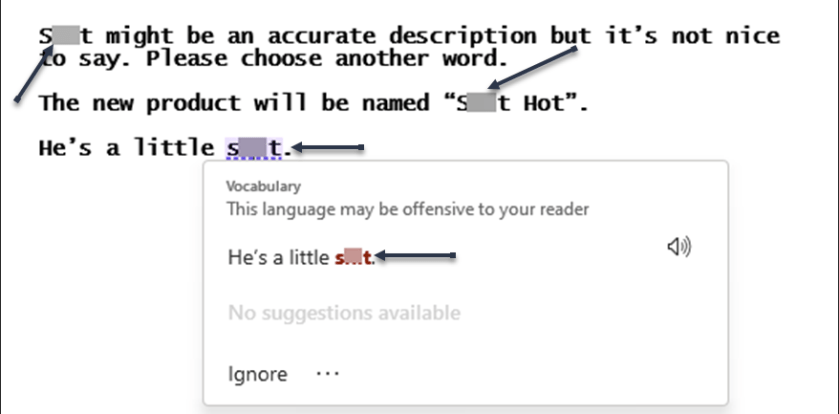
Here are three examples of s**t to demonstrate that only the lower-case word is marked as ‘offensive’. See the below image:
Upper and lower case Profanity check
A Judgment Call
Do not just rely on Word’s Profanity test (among others) so that there are no ‘naughty words’ in your documents or emails.
As you can see, there are limits to what Word will detect.
Capitalized words are almost always ignored.
Words with multiple meanings are always ignored with no consideration of the context.
Please feel free to leave a comment. I would love to hear from you. Do you have a computer or smart device tech question? I will do my best to answer your inquiry. Just send an email to contact@techsavvy.life. Please mention the device, app, and version you are using. To help us out, you can send screenshots of your data related to your question.
Author’s E-book
You can access the e-book from a Kindle device, the Kindle App for the desktop or smartphone, which is a free app.
The author’s Vietnam eBook on the Battle for Tra Bong Vietnam: Events and Aftermath
Thanks to the iPhone’s built-in Photos app, you can make a slideshow and have your photos and/or videos play one after another without manual interaction. You can choose a custom background music track, theme, and even the speed of the slideshow.
Thanks to the iPhone’s built-in Photos app, you can make a slideshow and have your photos and/or videos play one after another without manual interaction. You can choose a custom background music track, theme, and even the speed of the slideshow.
Note: The Photos app only lets you play your content as a slideshow; you can not save these slideshows to play at a later time on another device. However, as a workaround, you could record a video of your iPhone’s screen while it plays and save it, or stream it to your Apple TV using AirPlay.
This is for the iPhone
Copyright Scott Adams, Inc./Distributed by Universal Uclick for UFS
Create a Slideshow
First, launch the Photos app on your iPhone.
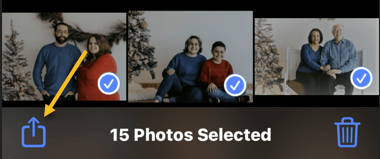
In the Photos app, select the photos and/or videos you would like to include in your slideshow. Refer to the below image where we have selected 15 photos:
Selected photos
Next, when you have selected your photos and/or videos, in the bottom left-hand corner of your screen, tap the Share icon. See the below image:
Selecting the Share icon
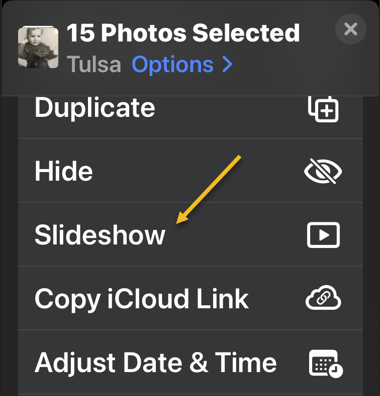
Now, in the Share menu that opens, tap the Slideshow option. See the following image:
Selecting the Slideshow option
Next, your iPhone will automatically create and play a slideshow containing your photos and/or videos.
Now, to customize this slideshow, tap on the slideshow and then select Options in the bottom right-hand corner. Refer to the below image:
Selecting Options
Next, on the Slideshow Options page, choose the item you would like to change for your slideshow. Your options are:
Theme: Use this option to change your slideshow’s theme.
Music: Change your slideshow’s background music with this option. You can load music from the Music app as well.
Repeat: To play your slideshow in a loop, enable this option.
Slider: Use this slider to change your slideshow’s playback speed. Dragging the slider to the left decreases the speed, while dragging it to the right increases the speed.
Now, when you have specified custom options, save your settings by tapping Done in the top right-hand corner. See the below image:
Saving your options
Enjoy the customized slideshow of your favorite photos and/or videos! If only Apple allowed you to save the slideshow for later playback would make this a nifty feature.
Another way to make a slideshow on your iPhone or other devices is to use Google Photos.
Quote For the Day
Everybody gets so much information all day long that they lose their common sense.
Gertrude Stein
Tweet Info
That’s it. Please feel free to share this post! One way to share is via Twitter.
Just click the Tweet icon below. This will launch Twitter where you click its icon to post the Tweet.
Check ourt TechSavvy.Life for blog posts on smartphones, PCs, and Macs! You may email us at contact@techsavvy.life for comments or questions.
Please feel free to leave a comment. I would love to hear from you. Do you have a computer or smart device tech question? I will do my best to answer your inquiry. Just send an email to contact@techsavvy.life. Please mention the device, app, and version you are using. To help us out, you can send screenshots of your data related to your question.
Author’s E-book
You can access the e-book from a Kindle device, the Kindle App for the desktop or smartphone, which is a free app.
The author’s Vietnam eBook on the Battle for Tra Bong Vietnam: Events and Aftermath
If you do not want to use an email folder in Microsoft Outlook anymore, you can delete that folder as well as all its contents at once. We will show you how to do that in Outlook’s desktop and web versions, as the mobile version does not allow it.
If you do not want to use an email folder in Microsoft Outlook anymore, you can delete that folder as well as all its contents at once. We will show you how to do that in Outlook’s desktop and web versions, as the mobile version does not allow it.
Note! You can only delete the folders you have created in Outlook. The app does not allow you to remove the default folders, like Inbox, Sent Mail, and so on. Also, if you ever end up removing a folder accidentally, you can restore it from the Deleted Items folder.
This is for devices using Outlook. Screenshots are from Microsoft Outlook for Office 365
Copyright Scott Adams, Inc./Distributed by Universal Uclick for UFS
Using the Desktop
To delete a folder from the Outlook app on your desktop, first, launch the Outlook app.
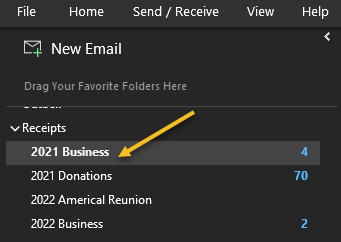
Next, from the sidebar on the left, find the folder you would like to delete. Refer to the below image:
Selecting a folder to delete
Now, right-click that folder and choose the Delete Folder option. See the below image:
Selecting Delete Folder option
Next, select Yes in the prompt that opens. See the following image:
Confirm the deletion
Now, your chosen folder is now removed from Outlook’s main interface.
Later, if you would like to restore a deleted folder, then open the Trash folder and drag and drop your deleted folder out of it.
Using the Web
To remove your email folders from Outlook’s web version, first, launch your preferred web browser and open the Outlook site.
Next, log in to your account if you have not already.
Now, after logging in, from the folder list on the left, find the folder to delete. Refer to the below image:
Selecting a folder to delete
Next, right-click your folder and choose the Delete folder option. See the below image:
Selecting the Delete folder option
Now, click OK in the prompt. See the following image:
Confirm the deletion
Now, your chosen folder is now removed from Outlook’s main interface.
Later, if you would like to restore a deleted folder, then open the Trash folder and drag and drop your deleted folder out of it.
And that’s all there is to removing unwanted folders from your Outlook app.
Quote For the Day
If we continue to develop our technology without wisdom or prudence, our servant may prove to be our executioner.
Omar N. Bradley
Tweet Info
That’s it. Please feel free to share this post! One way to share is via Twitter.
Just click the Tweet icon below. This will launch Twitter where you click its icon to post the Tweet.
Check out TechSavvy.Life for blog posts on smartphones, PCs, and Macs! You may email us at contact@techsavvy.life for comments or questions.
Please feel free to leave a comment. I would love to hear from you. Do you have a computer or smart device tech question? I will do my best to answer your inquiry. Just send an email to contact@techsavvy.life. Please mention the device, app, and version you are using. To help us out, you can send screenshots of your data related to your question.
Author’s E-book
You can access the e-book from a Kindle device, the Kindle App for the desktop or smartphone, which is a free app.
The author’s Vietnam eBook on the Battle for Tra Bong Vietnam: Events and Aftermath
When shopping for a new or used iPhone, you will need to keep a vital number in mind: Storage capacity. The storage size of your iPhone will determine how many apps, photos, videos, and other data you can keep locally on your device.
When shopping for a new or used iPhone, you will need to keep a vital number in mind: Storage capacity. The storage size of your iPhone will determine how many apps, photos, videos, and other data you can keep locally on your device. Let’s explore the iPhone storage capacity.
This is for the iPhone
Copyright Scott Adams, Inc./Distributed by Universal Uclick for UFS
Purchase For the Future
When it comes to iPhones, more storage capacity is almost always better, with a big catch: It costs more money. Using an example from March 2022, an unlocked 128 GB iPhone 13 cost $829, while an unlocked 512 GB iPhone 13 cost $1,129. That’s a $300 difference for four times more onboard storage.
As of March 2022, Apple sells iPhones with storage capacities that range from 64 GB to 1 TB. Here’s Apple’s March 2022 iPhone lineup with the typical spread of capacities available:
iPhone SE: 64 GB / 128 GB / 256 GB
iPhone 11: 64 GB / 128 GB
iPhone 12: 64 GB / 128 GB / 256 GB
iPhone 13: 128 GB / 256 GB / 512 GB
iPhone 13 Pro: 128 GB / 256 GB / 512 GB / 1 TB
Why do you need more storage? Photos and videos in particular take up a lot of space, along with podcasts, music, and large apps such as games. If you are a light-duty iPhone user that typically just uses it to make calls, text people, send emails, and browse the web, you can potentially get by with less storage space on your iPhone.
But if you like to take lots of photos and videos, use hundreds of apps, and want to carry a large music collection in your pocket, you will want as much iPhone storage capacity as possible. Keep in mind that, unlike some Android phones, the iPhone’s storage space is not expandable or upgradeable. Once you buy a model with a certain capacity, it will always be that way.
64 GB Is Too Low
Even if you are not a heavy-duty iPhone user, you might find yourself running up against storage limits rather quickly if you only have 64 GB on your iPhone. Keep in mind that not only will you store your emails, messages (and any video or photo attachments), media files, and apps on your iPhone, but you often need 8-10 GB free just to install iOS updates. Running up against the limit and micromanaging a small amount of free space is not worth the trouble.
While storage needs are subjective and vary from person to person, here’s a rough guide that might help you make a decision about which iPhone is right for you.
64 GB: Not recommended for anything but very light use: Few apps, not much media storage.
128 GB: Good size for medium-duty use. This should be the minimum size Apple offers.
256 GB: Great for heavy mobile games, and will allow storing more photos and other media files locally.
512 GB: Lots of media storage space for professionals or people who take many videos.
1 TB: Good for pro use, storing 4K video, and more.
To offset lower-capacity phones, you can sometimes rely on iCloud, which is Apple’s cloud storage service. With iCloud, you can keep older photos and videos stored in the cloud for later access, which lets you free up storage space on your iPhone without losing any data. iCloud is nice, but it’s no replacement for on-device storage, which is available instantly whenever you need it.
So the bottom line is: Get as much storage as you can afford, but avoid 64 GB if possible. When purchasing computer-related devices, including smartphones, buy the best while factoring in obsolescence.
Quote For the Day
All truth passes through three stages. First, it is ridiculed. Second, it is violently opposed. Third, it is accepted as being self-evident.
Arthur Schopenhauer
Tweet info
That’s it. Please feel free to share this post! One way to share is via Twitter.
Just click the Tweet icon below. This will launch Twitter where you click its icon to post the Tweet.
Check out TechSavvy.Life for blog posts on smartphones, PCs, and Macs! You may email us at contact@techsavvy.life for comments or questions.
Please feel free to leave a comment. I would love to hear from you. Do you have a computer or smart device tech question? I will do my best to answer your inquiry. Just send an email to contact@techsavvy.life. Please mention the device, app, and version you are using. To help us out, you can send screenshots of your data related to your question.
Author’s E-book
You can access the e-book from a Kindle device, the Kindle App for the desktop or smartphone, which is a free app.
The author’s Vietnam eBook on the Battle for Tra Bong Vietnam: Events and Aftermath
You can not really hide apps on an iPhone, but you can make them hard to find. If you can not find an app on your iPhone’s Home screen, it might still be available in your App Library. Also, some hidden app purchases can be revealed.
You can not really hide apps on an iPhone, but you can make them hard to find. If you can not find an app on your iPhone’s Home Screen, it might still be available in your App Library. Also, some hidden app purchases can be revealed. Let’s explore this feature.
This is for the iPhone. Screenshots are from iPhone XR
Copyright Scott Adams, Inc./Distributed by Universal Uclick for UFS
Reveal “Hiding” Apps
Starting with iOS 14, Apple introduced an App Library page to your iPhone that shows an organized list of all the apps installed on your device. An app can be installed on your iPhone that is not listed on your Home Screen but is still accessible in your App Library. If that’s the case, you can easily add the app to your Home Screen.
To open your App Library, first, repeatedly swipe to the left on your home screen of icons or swipe the page icons until you reach the last page, then swipe once more, and the App Library will open. You will see a grid of icons in different categories representing apps you have installed. Tap the Search bar at the top of the screen and type in the name of the app you are looking for. Refer to the below image:
Finding an app using Search
Next, when you find it, tap and hold your finger on its icon in the results list. In the menu that appears, select Add to Home Screen. See the below image:
Adding an app to your Home Screen
Now, you can go back to your Home Screen, and you will see the app icon you just added to your Home Screen on one of the pages.
In the future, if you want all newly downloaded apps to appear on your Home Screen automatically, head to:
Settings > Home Screen
and place a checkmark beside Add to Home Screen. See the following image:
Selecting always add apps to Home Screen
Reveal “Hidden” App Purchases
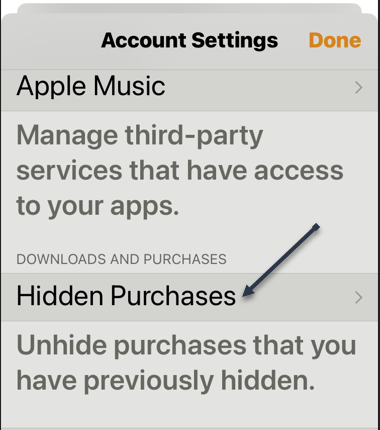
Next, using your Apple ID settings, it’s possible to hide previous purchases of items such as apps. If you can not find an app you want to download in your Purchase History, head to:
Settings > Apple ID > Media & Purchases > View Account > Hidden Purchase
Refer to the below image:
Accessing Hidden Purchases
Now, on the next screen, you will see a list of purchases you have previously hidden. Tap Unhide behind any app you would like to reveal again. See the below image:
Selecting to Unhide an app
Next, the app will appear in your Purchase History.
Head to:
Settings> Apple ID > Media & Purchases > Purchase History
See the following image:
Your previously hidden app
If the app is not already installed on your iPhone, you will need to re-download it from the App Store.
“Hide” a Purchase App
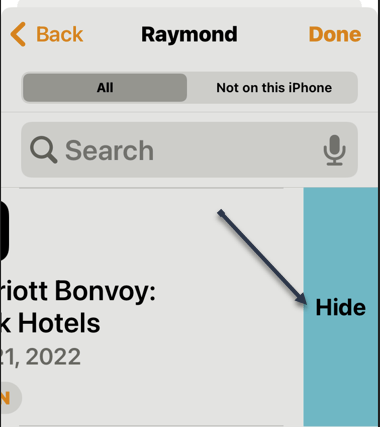
Now, to “hide” an app, navigate to:
App Store > Your Initials (in upper right-hand corner) > Purchased > My Purchases
and you will see a listing of your purchased apps (some may be free). Swipe left on an app, then tap Hide and your app will be “hidden”. Refer to the below image:
Selecting to Hide an app
Quote For the Day
The thirst for powerful sensations takes the upper hand both over fear and over compassion for the grief of others.
Anton Chekhov
Tweet Info
You are finished. Please feel free to share this post! One way to share is via Twitter.
Just click the Tweet icon below. This will launch Twitter where you click its icon to post the Tweet.
Check out TechSavvy.Life for blog posts on smartphones, PCs, and Macs! You may email us at techsavvy.life for comments or questions.
Please feel free to leave a comment. I would love to hear from you. Do you have a computer or smart device tech question? I will do my best to answer your inquiry. Just send an email to contact@techsavvy.life. Please mention the device, app, and version you are using. To help us out, you can send screenshots of your data related to your question.
Author’s E-book
You can access the e-book from a Kindle device, the Kindle App for the desktop or smartphone, which is a free app.
The author’s Vietnam eBook on the Battle for Tra Bong Vietnam: Events and Aftermath
If you need to tweet an image or video of something with a content warning, it’s a good idea to mark the media as “sensitive.” Doing so will hide the image or video unless someone clicks the Show button.
If you need to tweet an image or video of something with a content warning, it’s a good idea to mark the media as “sensitive.” Doing so will hide the image or video unless someone clicks the Show button. Here’s how to do this.
This is for devices using Twitter. Screenshots are from iPhone XR
Copyright Scott Adams, Inc./Distributed by Universal Uclick for UFS
First, visit the Twitter website or open the Twitter app. Begin composing a tweet and attach an image or a video. For this post, we are using an image in reverse color. Your video or image should display normally.
If you are using the Twitter app, tap the Paintbrush icon below the image thumbnail to begin editing. If you are on the web version of Twitter, click Edit in the lower right-hand corner of the image. Refer to the below image:
Edit the image
Next, tap or click the Flag icon. On the Twitter app, it’s in the lower right-hand corner of the screen. On the web, you will find the Flag as a tab in the upper right-hand corner, just above the image thumbnail. See the below image:
Select the Flag icon
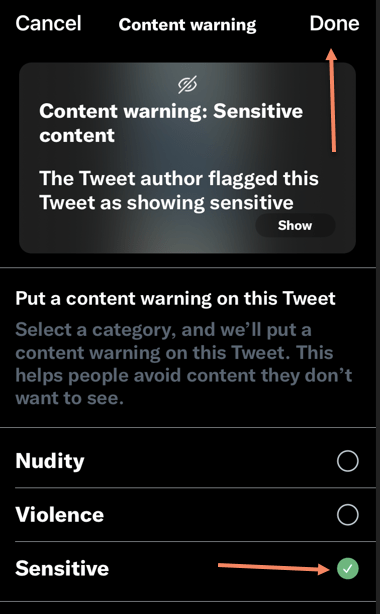
Now, under the Put a content warning on this tweet menu, place a checkmark beside any of the items that apply. If you are posting a spoiler on Twitter, the Sensitive setting works the best. Once finished, tap Done then Save on the Twitter app, or just Save on the web version of Twitter. See the following image:
Select your option(s)
Next, tap Save on the Twitter app. Refer to the below image:
Select Save if using the Twitter app
Now, Tweet your post. See the below image:
Tweet your post
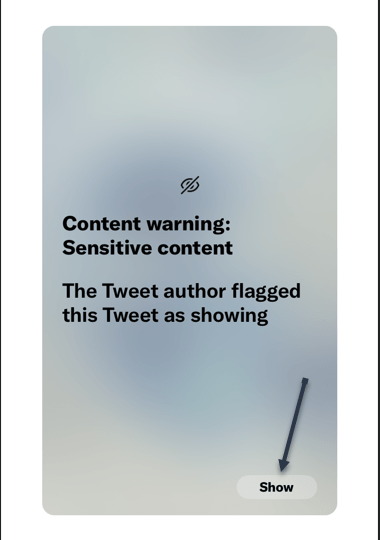
Next, after tweeting, other Twitter users will see the content warning obscuring your image or video unless they click or tap the Show button. See the following image:
Select Show to see the image
The final image is as follows:
The final image
Pretty easy, Just make sure that you do not violate Twitter’s terms of service along the way.
Quote For the Day
People don’t notice whether it’s winter or summer when they’re happy.
Anton Chekhov
Tweet Info
That’s it. Please feel free to share this post! One way to share is via Twitter.
Just click the Tweet icon below. This will launch Twitter where you click its icon to post the Tweet.
Check out TechSavvy.Life for blog posts on smartphones, PCs, and Macs! You may email us at contact@techsavvy.life for comments or questions.
Please feel free to leave a comment. I would love to hear from you. Do you have a computer or smart device tech question? I will do my best to answer your inquiry. Just send an email to contact@techsavvy.life. Please mention the device, app, and version you are using. To help us out, you can send screenshots of your data related to your question.
Author’s E-book
You can access the e-book from a Kindle device, the Kindle App for the desktop or smartphone, which is a free app.
The author’s Vietnam eBook on the Battle for Tra Bong Vietnam: Events and Aftermath
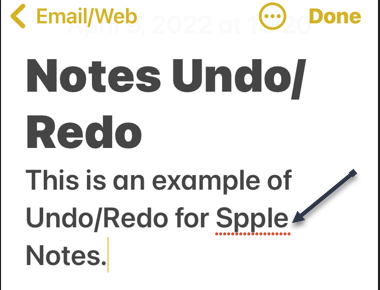
If you ever make a mistake when using Apple Notes, you have a couple of ways to quickly undo and redo your changes. Let’s explore how they work on your iPhone.
This is for devices using Apple Notes. Screenshots are from iPhone XR
Copyright Scott Adams, Inc./Distributed by Universal Uclick for UFS
Enable Shake to Undo
If you use Notes on your iPhone, let’s ensure that Shake to Undo is enabled. For iOS 15 or higher, head to:
Settings > Accessibility > Touch
and enable the toggle Shake to Undo to ON. Refer to the below image:
Enable Shake to Undo toggle
Undo/Redo By a Shake
First, make sure the note in which you want to undo or redo changes is open on your iPhone. See the below image:
The Apple Note with incorrect spelling
Next, bring up the Undo menu by shaking your phone. Just do this as if you are shaking a bottle.
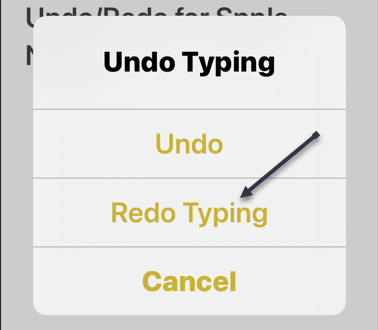
Now, you see an Undo Typing menu. Tap Undo here to delete the changes you just made to your note. See the following image:
Selecting Undo option
Next, if you would like to redo your changes, shake your iPhone again. This time, in the Undo Typing menu, tap the Redo Typing option. Refer to the below image:
Selecting Undo Typing option
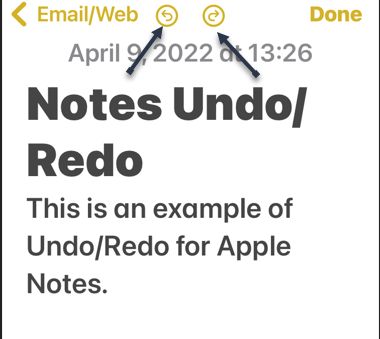
Undo/Redo By a Menu
If your movement is restricted, use the menu option to undo and redo your changes.
First, on your Note’s screen, tap the Markup icon at the bottom. See the below image:
Selecting Markup option
Next, you will see two icons at the top of your Note’s screen. The arrow pointing in the left direction is for undoing changes, and the arrow pointing in the right direction is for redoing changes. Tap one of these two icons. See the following image:
Selecting Undo or Redo option
And your changes will be made to your current note.
Undo Deleted Notes
If you have mistakenly deleted a note, you can also undo that note deletion. Your removed notes are available to restore for up to 30 days.
First, in the Notes app, open the Recently Deleted folder. Refer to the below mage:
Selecting the Recently Deleted folder
Next, in the top right-hand corner, select Edit and choose the note(s) to recover. Then, in the bottom left-hand corner, tap Move. See the below image:
Selecting an Apple Note to be moved
Now, select the folder in which you would like to store your notes. See the following image:
Choosing a folder for the deleted note to be moved to
And your deleted notes are now back.
Quote For the Day
To advise is not to compel.
Anton Chekhov
Tweet Info
That’s it. Please feel free to share this post! One way to share is via Twitter.
Just click the Tweet icon below. This will launch Twitter where you click its icon to post the Tweet.
Check out TechSavvy.Life for blog posts on smartphones, PCs, and Macs! You may email us at contact@techsavvy.life for comments or questions.
Please feel free to leave a comment. I would love to hear from you. Do you have a computer or smart device tech question? I will do my best to answer your inquiry. Just send an email to contact@techsavvy.life. Please mention the device, app, and version you are using. To help us out, you can send screenshots of your data related to your question.
Author’s E-book
You can access the e-book from a Kindle device, the Kindle App for the desktop or smartphone, which is a free app.
The author’s Vietnam eBook on the Battle for Tra Bong Vietnam: Events and Aftermath
With iOS 15 or iPadOS 15.1 or later, you can use Live Text to copy the text in photos, translate languages, make phone calls, and more. Let’s explore this feature.
This is for iPhone and iPad running OS 15 or higher. Screenshots are from iPhone XR
Copyright Scott Adams, Inc./Distributed by Universal Uclick for UFS
The Live Text feature can easily identify text. The text can then be copied, translated, or used for a search. Live Text also can capture text from your photos. So, instead of retyping text from a photo, the use of Live Text is a time saver.
To use Live Text, you need an iPhone XR, iPhone XS, or a newer model. For the iPad, an iPad 8th generation or later, iPad Mini 5th generation or later, iPad Pro 11 inches or 12.9 inches.
Enable Live Text
First, to turn on Live Text for all supported languages, head to:
Settings > General > Language & Region
Next, toggle the Live Text switch to ON. Refer to the below image:
Enabling Live Text
Copy and Paste Text
First, open a photo with some text. See the below image:
Opening a photo that contains text
Next, touch and hold some word(s), and move the handles to adjust your selection.
Now. a pop-up menu will open. Here, either tap Select or Select All. You can also select all by tapping the Live Text button in the lower right-hand corner of the image. See the following image:
Selecting All of the photo text
Next, from the pop-up menu, you can Paste your copied photo text. In our example, we are pasting it into Apple Notes. Refer to the below image:
Selecting the Paste option in Apple Notes
Now, you will see your copied text. Tap Done when finished. See the below image:
Your pasted text from a photo
Translate Text
To Translate text, you follow the above steps, except chose a photo with text in a foreign language. First, from the pop-up menu, tap on Translate. You might need to tap Continue, then choose a language to translate in or tap Change Language. Your copied and pasted text will be translated. See the following image:
Selecting to Translate your photo text
Additionally, you can copy and paste links and even make phone calls using Live Text.
Quote For the Day
The more refined one is, the more unhappy.
Anton Chekhov
Tweet Info
That’s it. Please feel free to share this post! One way to share is via Twitter.
Just click the Tweet icon below. This will launch Twitter where you click its icon to post the Tweet.
Check out TechSavvy.Life for blogposts on smartphones, PCs, and Macs! You may email us at contact@techsavvy.life for comments or questions.
Please feel free to leave a comment. I would love to hear from you. Do you have a computer or smart device tech question? I will do my best to answer your inquiry. Just send an email to contact@techsavvy.life. Please mention the device, app, and version you are using. To help us out, you can send screenshots of your data related to your question.
Author’s E-book
You can access the e-book from a Kindle device, the Kindle App for the desktop or smartphone, which is a free app.
The author’s Vietnam eBook on the Battle for Tra Bong Vietnam: Events and AftermathQR code for this blog post