How to Setup Contacts in Zoom

Is your business using Zoom for collaboration during the Coronavirus outbreak? Zoom has become a key tool for working at home and a top choice for vittual meetings. Zoom is free for one-on-one calls that last as long as you like. For three or more people, your calls are limited to 40 minutes. Zoom also has a paid version for an enterprise; it can handle 1000 people.There’s also a plan for small and medium businesses that supports up to 300 participates per call..

Click here for a detailed review of Zoom from PCMag Labs

Click here for setup and install of Zoom from Office Watch

Zoom Meeting’s free account is generous. You can host up to 100 people on a call for free and you can see as many as 49 people on an active call in a gallery-style view. There’s no limit on how many meetings you can host. 

So, how do we setup our contacts with coworkers using Zoom? In this post we offer insight on how to do this.

This post is for Windows 7 or greater, iPhone or iPad with iOS 7 or later, Android 4 or greater, Web browsers, Macs and the Zoom app or program

Dilber and Ted Talk
Copyright Scott Adams, Inc./Distributed by Universal Uclick for UFS

Before you Begin

Of course, you have already setup the app. Linking to other people in Zoom is necessary before you can call them. A person has to be added to your Zoom contacts list and they have to add you before a call is made.

Zoom contacts are separate from Outlook and other contacts list.

Zoom links people by matching email addresses. Some people have multiple email addresses; for example, personal and work or different ones for different purposes or multiple old email addresses.

Which Email Address to Use?

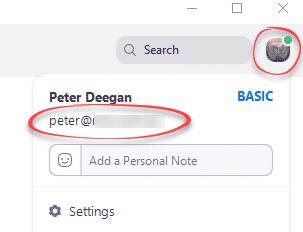
Before adding a person to your contacts list it’s a good idea to check with them on which email address they use to login to Zoom.

To check, they can click on their Zoom Profile in the top right where their name and address is displayed. Refer to below image:
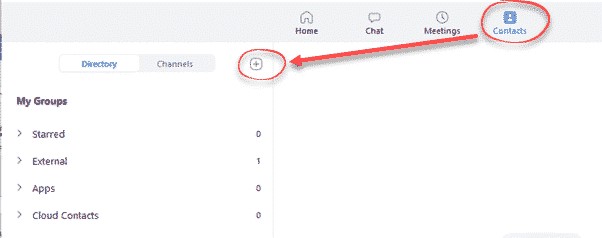
Zoom Contacts 1
Locate the correct email address

Invite a Contact

To link with someone, in the Zoom app, go to the Contacts section, then click the plus “+ “symbol. See following image:

Zoom Contacts 2
Linking a Zoom contact

Enter the email address of the contact you want to add to Zoom. See below image:

Zoom Contacts 3
Adding a Zoom contact

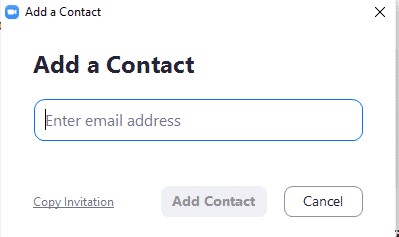
Then you have two options:

  1. Add Contact – sends a contact request to that person’s Zoom account.
  2. Copy Invitation – copies to your clipboard with web link.  Paste that into an email or instant message.

Refer to below image:

Zoom Contacts 4
Web address for the Zoom contact

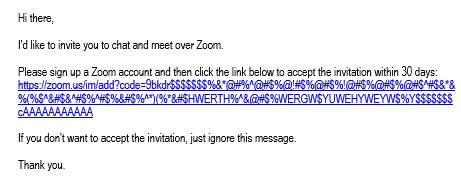
There is no need to paste the entire text, change it to suit you. The web link is the important part to pass along. Make sure you include the whole web link; it’s a long link using multiple lines.

Accept a Contact Request

If a participate adds you to their Zoom contact list, you’ll see a pop-up alert. See following image:

Zoom Contacts 5
Pop-up box for a contact request

Or open your Zoom app/web page. Under Contacts look at Contact Requests.  The request will be displayed with options to Accept or Decline. Refer to below image:

Zoom Contacts 6
Accept or Decline a contact request

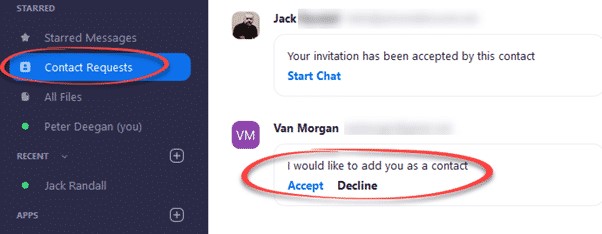
As you can see above, the Contact Requests you’ve made will also appear with their current status.

What to Do Next?

Now that you’ve linked with someone on Zoom, you can call them (voice, video, text, etc). If someone wants to invite you into a Zoom meeting, give them you Zoom linked email address.

That’s it on setting up your Zoom contacts. Try it out.

I Would Like to Hear from You

Please feel free to leave a comment. I would love hearing from you. Do you have a computer or smart device tech question? I will do my best to answer your inquiry. Please mention the device, app and version that you are using. To help me out, you can send screenshots of your data related to your question.

The author’s Vietnam eBook on the Battle for Tra Bong: Events and Aftermath

How to Create Rolling Credits in PowerPoint

Do you need to give people credit for your PowerPoint presentation? If so, you can add these credits to your final slide by using the scrolling text animation feature. You can use an existing presentation or add this to your next one. In our example, we are using an existing PowerPoint slide show.

This is for PowerPoint for Office 365 Windows and Mac versions. Other versions of PowerPoint will be similar.

Setting Up the Slide

  • Open an existing presentation or create a new one
  • Navigate to the final slide
  • Click the Insert tab
  • Insert a blank text box by clicking the Text Box icon in the Text group. Your cursor will turn into an down arrow. After you click, the cursor changes to a crossbar. Click and drag the cursor to draw the text box. See followin image:
Rolling Credits 1
PowerPoint drawing the text box for the Credits

Entering Your Presentation Credits

  • Enter your credits. The text box will expand, if necessary, as you enter the names.
  • Highlight your entries
  • Select the Home tab
  • Since credits are usually centered, select the Center alignment icon in the Paragraph group. See following screen:
Rolling Credits 2
PowerPoint Credits completed and centered

Adding the Animation Effects

Now lets add the animation to the text box. With the textbox selected:

  • Click the Animations tab
  • Select Add Animation button in the Advanced Animation group. See following image:
Rolling Credits 3
PowerPoint about to add the animations
  • A drop down menu will appear. Scroll to the bottom and select More Entrance effects. The Add Entrance Effect window will be shown. See following image:
Rolling Credits 4
PowerPoint Add Entrance Effect drop down menu

Setting the Credits Animation

  • Scroll down to the Exciting group and select Credits. You will see the credits animation scrolling effect in the background.
  • Click OK to save your changes
Rolling Credits 5
PowerPoint selecting the Credits animation

The rolling credits will be added to your presentation. You may now view your slideshow from the beginning or from the current slide to see the Rolling Credits in action.

Thats it. You are finished.

I Would Like to Hear from You

Please feel free to leave a comment. I would love hearing from you. Do you have a computer or smart device tech question? I will do my best to answer your inquiry. Please mention the device, app and version that you are using. To help us out, you can send screenshots of your data related to your question.

The author’s Vietnam eBook on the Battle for Tra Bong: Events and Aftermath


How to Use FaceTime During the Time of Social Distancing

During our time of social distancing, you can still reach out to your friends or relatives using FaceTime video or audio on your iPhone or iPad.

You can use FaceTime over Wi-Fi or over cellular on iOS 12.1 or later devices. Also, you need an iPhone 6s or later. FaceTime supports up to 32 people simultaneously.

This is for iPhone or iPad

Turn on FaceTime

Open the FaceTime app and sign in with your Apple ID. You can also do this from Settings > FaceTime

If you’re using an iPhone, FaceTime automatically registers your phone number. To also register your email address on your iPhone or iPad, go to Settings > FaceTime > Use your Apple ID for FaceTime and sign in with your Apple ID.

Make a FaceTime Call

To make a FaceTime call, you need the person’s phone number or registered email address. There are a few ways to make a FaceTime call:

  • In the FaceTime app, tap the plus button and type the person’s phone number or email address. Tap the number or address, then tap Audio or Video
  • If you have the person’s phone number or email address saved in your Contacts, you can start typing their name and tap the name when it appears. Then tap Audio or Video
  • You can also start a FaceTime video call from your iPhone during a phone call. Tap the FaceTime icon in the iPhone app to switch to FaceTime.

Now you don’t have to be alone, you can reach out to people using your Apple smart devices.

I Would Like to Hear From You

Please feel free to leave a comment. I would love hearing from you. Do you have a computer or smart device tech question? I will do my best to answer your inquiry. Please mention the device, app and version that you are using. To help me out, you can send screenshots of your data related to your question.

How to Lock your iPhone or iPad Screen Orientation

Do you get frustrated when your smart device switches to landscape from portrait mode (or vice versa) when you don’t want it to? There is a way to prevent this behavior through Orientation Lock.

This is for iOS devices iPhone and iPad running iOS 7 and above

Set the Lock

To do this, launch the Control Center by one of the following ways:

1. iPhone 10 and above – Swipe down from upper right hand corner

2. iPhone 8 or earlier – Swipe up from bottom of screen

See below image:

iPhone Screen Lock 1
The Orientation Lock screen
  • Tap the Orientation Lock icon (the one with an open lock and a curved arrow) to set the lock to its current position. A brief message will appear at the top to confirm the lock and the icon will be highlighted. Refer to following image:
iPhone Screen Lock 2
Turning on the Orientation Lock
  • Swipe to close Control Center

Verify the Lock

  • Launch the Control Center. A small lock icon will be displayed in the Status Bar next to the Battery Level icon. See following image:
iPhone Screen Lock 3
Verifying the Orientation Lock is on
  • Swipe to close Control Center

Turn Off the Lock

  • Launch the Control Center
  • Tap the Orientation Lock icon

A brief message will appear at the top to confirm the lock is turned off and the icon will no longer be highlighted. See following image:

iPhone Screen Lock 4
Turning off the Orientation Lock
  • Swipe to close the Control Center

Note! Not all apps support screen rotation. Some apps only work in portrait or landscape mode. This is particularly true of some games and video apps. For those apps, your screen rotation settings don’t matter. The app will only display in the orientation it supports.

I Would Like to Hear from You

Please feel free to leave a comment. I would love hearing from you. Do you have a computer tech or smart device question? I will do my best to answer your inquiry. Please mention the device, app and version that you are using. To help us out, you can send screenshots of your data related to your question.

The author’s Vietnam eBook on the Battle for Tra Bong: Events and Aftermath

Five Tips for Using Your iPhone at Night

Apple added the Dark Mode feature in iOS 13+. This allows less eye strain, especially at night, and promotes a healthier sleep. You can use Dark Mode all the time or have your iPhone automatically turn it on.

This is for iPhone and iPad

1. Enable Dark Mode

  • Tap Settings
  • Tap Display and Brightness
  • Select Light or Dark
  • Toggle on Automatic to enable auto switching. You can also setup a schedule under Options. Refer to following image:
Dark Mode 1
Enable Dark Mode on automatic schedule

Note! Not all apps support Dark Mode, especially Facebook and Messenger.

2. Enable Night Shift

This feature is for iOS 9.3 and above. It limits blue light and makes the iPhone “warmer” for a healthier sleep.

  • Tap Settings
  • Tap Display and Brightness
  • Tap Night Shift
  • You can enable a “Sunset to Sunrise” automatic schedule or choose a custom schedule. See following image:
Dark Mode 2
Enabling Night Shift on a schedule

3. Enable Night Vision

Night vision naturally occurs in low light as our pupils adjust to reduced light. By using a red filter, the iPhone simulates night vision. This feature places a red filter across the screen. You can adjust the amount of red color being displayed.

  • Tap Settings
  • Tap Accessibility
  • Tap Display and Text Size
  • Scroll down and tap Color Filters and toggle it on. Tap Color Tint from the list. Move the Intensity and Hue sliders all the way to the right. The screen will be very red in color. Refer to following image: (Note! The reddish color does not show up in a screenshot)
Dark Mode 3
Enabling Night Vision

4. Adjust the Flashlight

To do this, launch the Control Center by one of the following ways:

1. iPhone 10 and above – Swipe down from upper right hand corner

2. iPhone 8 or earlier – Swipe up from bottom of screen

See below image:

  • Tap and hold the Flashlight icon. You will see a segmented bar in five sections. Tap a section to control the brightness of the Flashlight. It will keep this brightness setting until you change it by following the above steps. Refer to below image:
Dark Mode 5
Adjusting the Flashlight intensity

5. Enable Led Flash for Alerts

Let’s say you are on silent mode and want to be notified of alerts at night. We can use the camera flash to alert you of a push notification or a phone call.

  • Tap Settings
  • Tap Accessibility
  • Tap Audio/Visual
  • Toggle on LED Flash for Alerts. Optionally, you can toggle on Flash on Silent. See following image:
Dark Mode 4
Enabling LED flash on alerts

Personally, I like the auto switching of Dark Mode. This feature reduced my eye strain at night. I wrote this post at night using Dark Mode on my iPhone. It was much easier to write and edit than using Light Mode.

I Would Like to Hear from You

Please feel free to leave a comment. I would love hearing from you. Do you have a computer tech or smart device question? I will do my best to answer your inquiry. Please mention the device, app and version that you are using. To help us out, you can send screenshots of your data related to your question.

How to Find an App on iPhone or iPad

If you are like me, you have dozens of apps on your smart device. Instead of swiping screen by screen to locate and launch an app, let’s explore another method using Spotlight Search.

This is for iPhone and iPad

Launch Spotlight Search

  • Near the middle of any screen, especially the Home screen, tap and swipe down. This will open the Spotlight with a keyboard and a search bar. See below image:
iPhone Find App 1
Launch of Spotlight

Finding an App

  • Type a few letters of the app name. In my example, I am searching for “TV App”. See following image:
iPhone Find App 2
Finding an app using Spotlight search
  • Spotlight will suggest a “Top Hit” and other possibilities. Refer to below image:
iPhone Find App 3
Spotlight Top Hit for your search

Launch the App

  • Once you find your app, tap it’s icon to launch. See following image for launching “TV App”:
iPhone Find App 4
Launching the Spotlight search app
  • You can also use Siri to locate and launch an app. Once Siri is activated, just say “Launch” followed by the app name.

I Would Like to Hear from You

Please feel free to leave a comment. I would love hearing from you. Do you have a computer tech or smart device question? I will do my best to answer your inquiry. Please mention the device, app and version that you are using. To help me out, you can send screenshots of your data related to your question.

Related

How to hide an app on your iPhone or iPad

How to Hide an App on Your iPhone or iPad

You have some choices but you can’t completely “hide” an app. You can delete an app by a tap and hold on the icon until the “X” appears, then tap it.

The choices are making the app hard to find via a search or using Siri. To do this we are going to turn off some of an app features.

This is for iPhone and iPad

Hide an App

  • Launch Settings
  • Tap Siri and Search. See below image:
iPhone Hide App 1
The Settings screen for Siri & Search
  • Find the app you want to “hide” from your list of installed apps. I selected the app “Yale Cleaners”. Refer to below image:
Phone Hide App 2
My Yale Cleaners app
  • On this screen, disable all items by toggling them off. The Show App toggle will be revealed; disable this toggle as well. This will exclude the app from all search results and and suggestions screens. See below image:
Phone Hide App 3
Disabling all Yale Cleaners searches

Note! The Settings app does not follow the rules. Any app you try to “hide” will appear in Settings and it’s search field.

Find Your Hidden App

To find the “hidden” app, you have to find its icon somewhere among your installed apps to launch it.

Unhide Your App

  • Launch Settings
  • Find the app from your list of installed apps.
  • Tap Siri & Search and toggle on each feature
  • Tap Notifications and toggle it on. Refer to below image:
iPhone Hide App 4
Unhide Yale Cleaners for searches

I Would Like to Hear from You

Please feel free to leave a comment. I would love hearing from you. Do you have a computer tech or smart device question? I will do my best to answer your inquiry. Please mention the device, app and version that you are using. To help me out, you can send screenshots of your data related to your question.

Related

How to find an app on your iPhone or iPad

Want to Fix Your Crooked iPhone Photos?

Your photos are off center and you want to fix one or more. The Apple iOS 13 photo editor can straighten a photo. But what if you want more control over the photo. I am going to introduce to you to a free third party app called Snapseed from Google.

This is for iOS devices iPhone and iPad

  • Either take a crooked photo or select one that you want to fix. See my following crooked photo:
iPhone Crocked Photo Cropped 1
My crooked iPhone photo

Cropping the Photo

  • Tap the Edit button
  • Tap the Crop button at the bottom of the screen

The photo will be automatically crop and the perspective will be changed. Sometimes, this is enough. If so, just click Done and your finished. In my case, I had to use the Straighten tool to rotate the photo then I clicked Done. Notice I rotated the photo a -18. Refer to below image for my result:

iPhone Crocked Photo Cropped 3
Editing with iPhone photo editor

If you are using iOS 13+, head over to the App Store to download and install the free program Snapseed. Once installed:

The Snapseed Tools

  • Open your crooked photo in Snapseed
  • Click on Tools at the bottom of the screen. You will see the following image:
iPhone Crocked Photo Cropped 5
Snapseed tool set

As you will notice, there are lots of tools to chose from for your photo.

  • Click on the Perspective icon. You can tilt up or down, rotate right or left, scale the photo or free hand the perspective. Refer to my below image:
iPhone Crocked Photo Cropped 6
Using the Snapseed Perspective tool

The app is super sensitive to your touch, much more precise than the built in iPhone photo editor. As you move the perspective, the app will automatically fill in the edges. Check out all the other tools you can use for photo editing. Once you are finished, click Done. Notice at the top of the screen the Straighten is precise to the hundreds of a percent. See the below image:

Phone Crocked Photo Cropped 7
Final image with Snapseed. This photo was cropped showing white edges

Saving Your Photo

  • Tap on the Checkmark icon in the lower right of your screen
  • Tap on Export. You will see the following image:
iPhone Crocked Photo Cropped 8
Saving your photo
  • Tap on Save to save your changes or Save a copy to preserve your original photo. You are now finished.

I Would Like to Hear from You

Please feel free to leave a comment. I would love hearing from you. Do you have a computer or smart device tech question? I will do my best to answer your inquiry. Please mention the device, app and version that you are using. To help me out, you can send screenshots of your data related to your question.

A Few Notable Features in Safari for iOS 13

Apple had made some new enhancements to its feature browser, Safari, for the iPhone/iPad. There are a few notable features that increase our productivity regarding bookmarks and open tabs. Safari’s toolbar has only five choices for you to select from, Forward, Backward, Share, Bookmarks and New Tab/Page. Instead of just taping on a choice, we are going to press down on these icons and see what happens.

This is for an iPhone/iPad and Mac iOS 13 operating system

This seems to be an Apple feature. I have gotten into the habit of pressing down on every icon in iOS 13. Just press and hold the Share icon, the one with an up arrow, nothing happens until you release your hold. You will get the regular Share screen, like the image below:

Safari Share Behavior

Safari Bookmarks

So much for that.

The Bookmarks

Let’s try pressing and holding the Bookmarks icon. You will get the following screenshot:

Safari Add Bookmark

Well, that worked. I do not recommend adding Bookmarks for all open tabs; this would tend to make your bookmarks messy. It would be better just to add a Bookmark for the current tab.

Testing the New Tab/Page

Okay, lets press and hold the New Tab/Page icon. You should get the following screen:

Safari Close Tabs

Yea, two out of three have the press and hold feature. From this screen, you can close all open tabs or just the current one. Also, you can create a new Private Tab or a New Tab.

This time, just press the New Tab/Page icon to reveal your open tabs (normal behavior). Press and hold a tab to move it into a different location. This works in portrait or landscape mode.

Setting the Time Interval

There is another feature to explore; setting a time interval as to when tabs are closed.

Go to Settings and select Safari. You will see the following image:

Safari Close Tabs Timeline

Click the Close Tabs button. Your screen should display options on when to close your Safari tabs like the following image:

Safari Close Tabs Timeframe

Select your choice from the four options.

Okay, for now. Thanks for trying out these iPhone/iPad features for Safari in IOS 13+.

I Would Like to Hear from You

Please feel free to leave a comment. I would love hearing from you. Do you have a computer tech question? I will do my best to answer your inquiry. Please mention the app and version that you are using. To help me out, you can send screenshots of your data related to your question.

How to Transfer iPhone Contacts to Windows 10

Have you ever wanted to share your iPhone contacts with your Windows 10 PC? I have wanted to do this for a year. It used to work but my PC went “south” last year. I finally did some research and came up with this post for you to implement. You can share your smart device contacts through Apple’s iCloud service. To use this service, your contacts must be synced with iCloud. So, lets get started.

This is for iPhone or iPad and Windows 10 operating system

  • Open the Settings app on your iPhone. Its usually located on your home screen. Your screen should look similar to the following image:
Win 10 Contacts Settings
My iPhone home screen
  • Tap your name at the top of the screen. See following screenshot:
Win 10 Contacts Profile
My iPhone Settings screen

Syncing Contacts

  • Tap iCloud
  • Verify that your Contacts is being synced. Either the toggle switch will be green or you will see iCloud storage being used like the below image. If not, tap the toggle button to enable the process and sync your contacts.
Win 10 Contacts Storage
My iPhone iCloud Storage screen
  • On your Windows 10 PC, log in to iCloud website with your Apple ID and Password
  • Click on the Contacts applet. See following screenshot:
Win 10 iCloud Contacts
iCloud applets on Windows 10 PC screen

Selecting/Exporting Contacts

  • Select a Contact from your list. See the following image for my selection of Chris Dow:
Win 10 iCloud Selection
iCloud Contacts screen
  • Click the small gear icon at the bottom left corner
  • Select Export vCard. Refer to following screenshot:
Win 10 iCloud Export
Selecting and Exporting an iCloud Contact screen

You can select more than one contact by selecting a single name and using the “Shift” key to select the last contact. There is an option to Create Group at the bottom right for your multiple contact selection.

Note! It is best to export just one contact. Although you can select multiple contacts, only one contact data (the first one selected) is exported, especially for Outlook.

By default, the exported VCF file is placed in your PC Downloads folder.

  • Open your File Explore and find the VCF file. Refer to following image:
Win 10 iCloud Downloads
File Explorer Downloads folder screen with Chris Dow VCF file

Using Your VCF File

  • Right click on the VCF file and select Open
  • Select where you want to install your contact(s). You have several choices, like Outlook, the People app and Windows Contacts
  • Select your choice and click OK

Your choice will open for your review.

  • For Outlook, click the Save & Close option to complete the export. See following screen::
Win 10 iCloud Outlook
Exported VCF file from iCloud to Microsoft Outlook in Windows 10 screen

That’s it. You are done.

Enable iCloud Contacts Sharing

BUT WAIT, I want to share all my Contacts via iCloud to my Windows 10 PC, not just a few. You can use iCloud for Windows to synchronize your contacts and other data between your iOS device and Outlook. Lets get started.

This works with the following variations of Outlook:

Outlook for Office 365, Outlook 2019, Outlook 2016, Outlook 2013 and Outlook 2010

  • Download and install iCloud for Windows.
  • After installation, launch the iCloud app and sign in with your Apple ID and Password. Your screen should look like the below image:
Win 10 Outlook iCloud Screen
iCloud for Windows screenshot
  • Select the option to sync Mail, Contacts, Calendars, and Tasks. You can select other options to sync from this screen.
  • Click Apply
  • Click Close

Once the setup has finished, launch Outlook. Your iCloud email, contacts and calendars should now be synchronizing with Outlook.

  • To verify, in Outlook, open a new email. In the Address Book drop down box, select iCloud like the image below:
Win 10 Outlook iCloud Names
Windows 10 iCloud contacts screen
  • You should see ALL your iCloud contacts
  • Close Outlook

If you are experiencing problems please click here for Apple help.

I Would Like to Hear from You

Please feel free to leave a comment. I would love hearing from you. Do you have a computer tech question? I will do my best to answer your inquiry. Please mention the app and version that you are using. To help me out, you can send screenshots of your data related to your question.