Chances are good you will never seen malware up close and personal. Even if you threw caution to the winds and visited a dangerous site or clicked a treacherous link, your antivirus software probably wiped out any offending program before the latter could say boo. So, you might wonder, just what does malware look like? Would I even recognize a malware program if I saw it?
To be fair, a lot of malicious programs do not look like anything at all. A virus, for example, tries its best to hide from view while infecting other files and computers. A bot sits quietly on your computer until it gets orders from the command and control center to spew some spam or participate in a DDoS attack on a major website. Trojans, by contrast, appear to be useful, legitimate programs, putting up a pretty façade to hide background activities like stealing your personal data. And when ransomware hollers for your attention, it’s bad news.
This is for all devices

The Horror of Ransomware
If a ransomware attack hits your computer, you will not know it at first. The ransomware stays out of sight, quietly encrypting your important files. Once the dirty work is done, the malware totally demands your attention with its ransom note. The perpetrators promise that if you pay the specified ransom (usually in Bitcoin or some other cryptocurrency) you will get your files back, but if they take your money and run, you do not have any recourse. You really do not want a direct encounter with ransomware.
Malware Bundled
Sometimes the problem with an installation is notthe program itself, but the software that’s bundled with it. You may find completely legitimate software—even antivirus programs; bundled with adware, spyware, or other unwanted trash. In a case like that, the security vendor is not to blame. A third party created the deceptive bundle. AppEsteem is a young company with a mission to expose these deceptors and to warn legitimate companies when they stray too far toward the dark side of bundling.
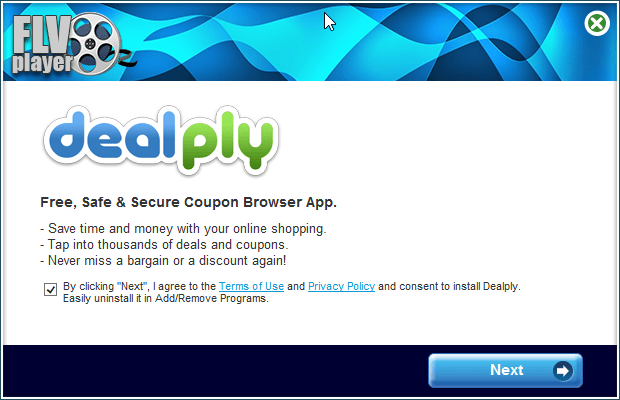
The installer shown here offers a free player for FLV video files. Along with the player you are privileged to receive a shady Adware program masquerading as a coupon browser. There’s a checkbox that says you agree to its terms; uncheck the box and you can not proceed. No video player for you! The best thing that can happen with this kind of bundling is that you’re forced to install a program you did not want. Mostly it’s worse than that, because the bundled bonus is malware. Refer to below image:
Now here’s something handy; a multi-utility install program. If you read Russian, you know it’s “the fastest and most convenient way to install programs.” Just check the boxes for the ones you want and turn the installer loose. The list includes browsers, messenger programs, video players, even antivirus utilities. But when you install them, you also get a dose of malware. See below image:

Trojan Horses
Here, we have a sharp-looking utility designed, apparently, to ensure that your PC does not limp along with old, outdated drivers. However, if you try to update any drivers, or back up your existing drivers, you must pay. This is a model used both by some legitimate programs and by rogue antivirus scareware utilities. Lucky you, though: there’s a promotional price that ends today. Its overt activities are just a wee bit suspicious. See following image:

Want to get into smartphone repair? This set of tools and manuals looks like it might be a big help. Alas, you ca not see just what you’re getting until you pay for your registration. While you are perusing schematics, it collects personal information behind the scenes and takes orders for further unwanted activity from a remote command and control server. Refer to below image:

You probably do not know this, but the EXE files that represent programs on your Windows computer are also called PE files, short for Portable Executable. Every PE file starts with an extensive header that contains a ton of information telling Windows about the program. Malware researchers learn a lot by digging into that header. See below image:

Lets Hope You Don’t See These
As you can see, malicious programs, like legitimate programs, run the gamut from sad-looking attempts to totally professional ones. With any luck, and with powerful, up-to-date antivirus protection, these images are the only malware you will ever see. Malware is just one of many threats to your devices and private information.
The best utility for finding Malware on your device is Malwarebytes, download here.
Email/Phone Scams
A few reminders to keep the bad guys away in your emails and phone calls:
- Do not click that link. Instead hover your mouse over each element of the email and look for anything suspicious. If suspicious, do not click that link – per my son, VP at True Digital Security.
- Do not open emails from FedX, USPS, Wells Fargo, Walmart, Cox Communications, Thank You, SSA, or VA if you have no dealings with them. They will contact you by mail not by phone.
- Do not give out personal informati0n over the phone. If you need to contact someone, you initiate the call.
- Never buy gift cards or give out their serial number.
- If your Userid or Password has been leaked in a data breech, change them as soon as possible.
Quote For the Day
I don’t pretend we have all the answers. But the questions are certainly worth thinking about.
Arthur C Clarke
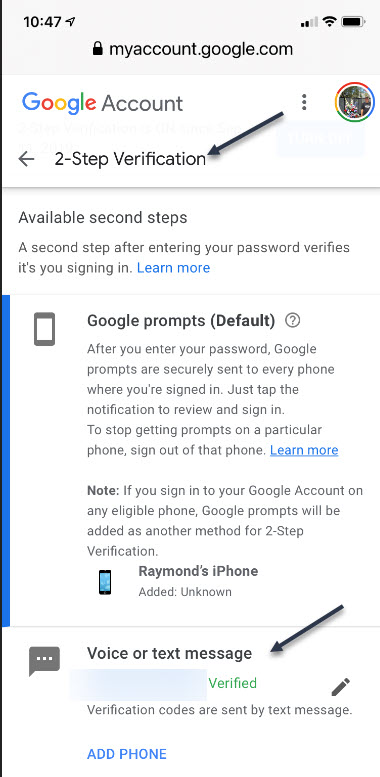
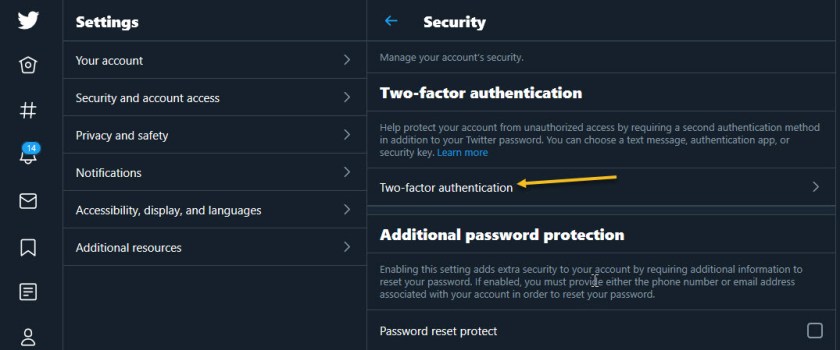
That’s it. Please feel free to share this post! One way to share is via Twitter.
Just click the Tweet icon below. This will launch Twitter where you click its icon to post the Tweet.
Check out TechSavvy.Life for blog posts on smartphones, PCs, and Macs! You may email us at contact@techsavvy.life for comments or questions.
Tweet
I Would Like to Hear From You
Please feel free to leave a comment. I would love hearing from you. Do you have a computer or smart device tech question? I will do my best to answer your inquiry. Just send an email to contact@techsavvy.life. Please mention the device, app and version that you are using. To help us out, you can send screenshots of your data related to your question.