Generally speaking, the more you tweet, the further your past tweets move down your profile page. However, Twitter makes it possible to pin a tweet so that it stays at the top of your page until you remove it.
If you use Twitter regularly, you may occasionally post a message that gains attention with other users or that you want to stand out from the rest of your feed.
Generally speaking, the more you tweet, the further your past tweets move down your profile page. However, Twitter makes it possible to pin a tweet so that it stays at the top of your page until you remove it.
Pinning tweets to the top of your Twitter profile will not take more than a few seconds, and you can unpin a tweet or choose a new one to pin in its place at any time. Let’s explore how to do this.
Note! You can only have one pinned tweet at a time. Pinning a new tweet will unpin any tweet you already have pinned.
This is for the iPhone and Android using Twitter
Copyright Scott Adams, Inc./Distributed by Universal Uclick for UFS
Pin a Tweet
Twitter’s mobile apps for iOS and Android allow you to pin tweets to your profile. You can also do this on your desktop.
First, open the Twitter app. Make sure you are logged in to your account.
Next, in the top-left corner of the app, tap the three horizontal lines. Refer to below image:
Accessing the Twitter menu
In the menu that opens, select Profile. See below image:
Accessing your Profile
Your Twitter profile opens. Now, scroll down and find the tweet to pin.
When you find the tweet, at the top-right corner of that tweet, tap the three-dots hamburger menu. See following image:
Accessing the Tweet menu
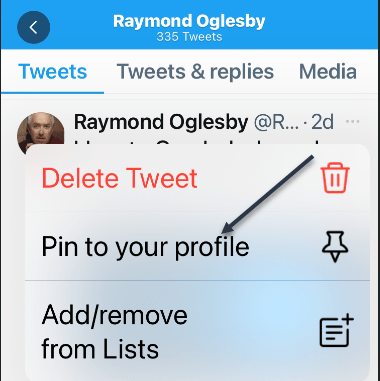
From the menu that pops up from the bottom of your phone’s screen, select Pin to profile. Refer to below image:
Accessing Pin tweet to your Profile
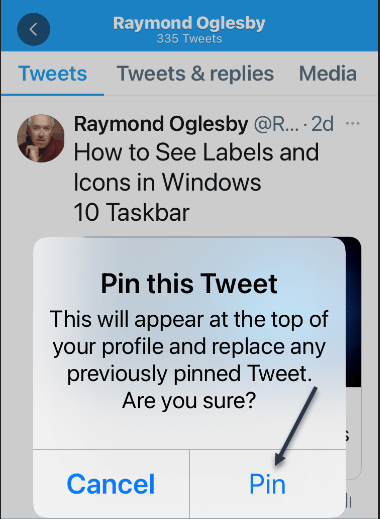
Select Pin in the prompt that appears in the middle of your phone’s screen. See below image:
Pin your tweet
Your selected tweet is now pinned to your profile page. See following image:
Your pinned tweet
Unpin a Tweet
To unpin the tweet, scroll to the top of your profile page in Twitter’s mobile app. Then, at the top-right corner of the pinned tweet, tap the three-dots hamburger menu. Refer to below image:
Accessing your tweet menu
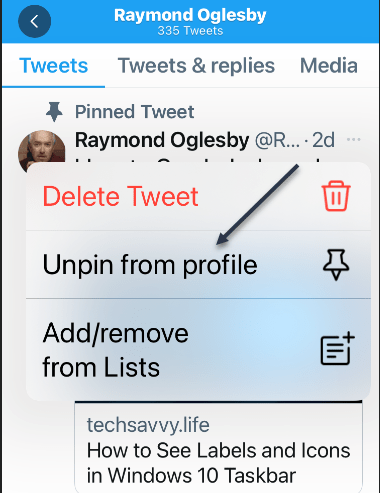
In the menu that appears from the bottom of your phone’s screen, tap Unpin from profile. See below image:
Accessing Unpin tweet from your Profile
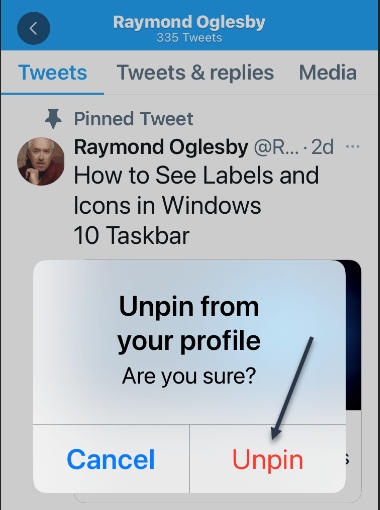
Select Unpin in the prompt. See following image:
Unpin your tweet
And your tweet disappears from the top area of your Twitter profile.
It’s easy to pin and unpin tweets on Twitter, and you should make use of this feature to display your most important tweet at the top of your profile page.
Quote For the Day
The true sign of intelligence is not knowledge but imagination.
Albert Einstein
That’s it, a nifty feature. Please feel free to share this post! One way to share is via Twitter.
Just click the Tweet icon below. This will launch Twitter where you click its icon to post the Tweet.
Check out TechSavvy.Life for blog posts on smartphones, PCs, and Macs! You may email us at contact@techsavvy.life for comments or questions.
Please feel free to leave a comment. I would love hearing from you. Do you have a computer or smart device tech question? I will do my best to answer your inquiry. Just send an email to contact@techsavvy.life. Please mention the device, app and version that you are using. To help us out, you can send screenshots of your data related to your question.
The author’s Vietnam eBook on the Battle for Tra Bong: Events and Aftermath
If your iPhone or iPad storage is full, or you just want to clean up, it’s easy to delete screenshots that you might not need on your device using the built-in Photos app. The latest iOS and iPadOS versions have a separate folder for just screenshots.
If your iPhone or iPad storage is full, or you just want to clean up, it’s easy to delete screenshots that you might not need on your device using the built-in Photos app. The latest iOS and iPadOS versions have a separate folder for just screenshots. Let’s explore how to delete screenshots.
This is for the iPhone and iPad
Copyright Scott Adams, Inc./Distributed by Universal Uclick for UFS
Accessing Media Types
First, open the Photos app on your iPhone or iPad. If you can not find it, swipe downward with one finger from the middle of the home screen to open Spotlight search. Now, type “photos,” and then tap the Photos app icon. Refer to below image:
Accessing Photos
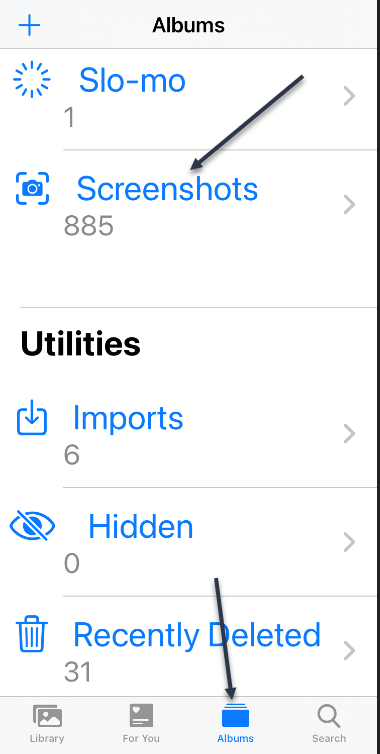
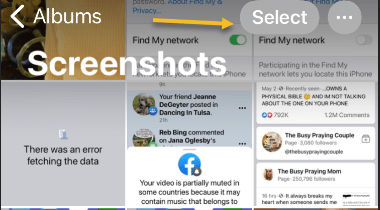
For the iPhone: Tap Albums at the bottom of the screen, and then select Screenshots from the Media Types list. See below image:
Accessing Screenshots for iPhone
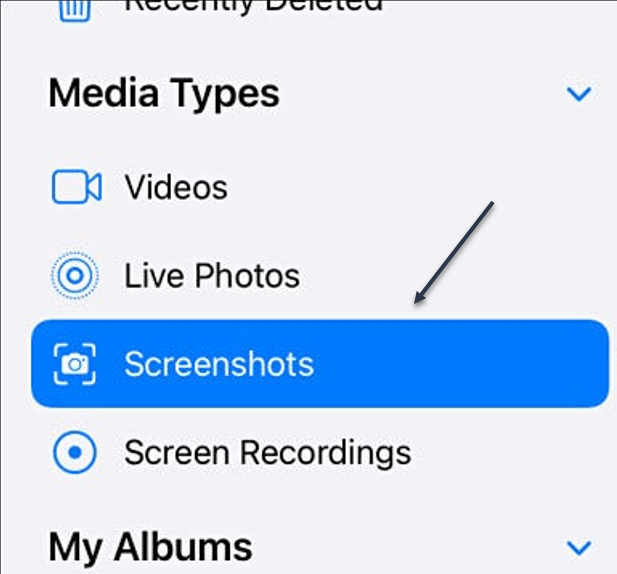
For the iPad: In Photos, open the sidebar by tapping Photos in the upper-left corner of the screen. Now, select Screenshots from the Media Types section. See following image:
Accessing Screenshots for iPad
Delete a Screenshot
Your album of all the screenshots stored on your device will be displayed. To delete a single screenshot, tap its thumbnail to open it in a detailed view. Refer to below image:
Open a Screenshot
Next, when you have a screenshot open for closer viewing, delete it by tapping the Trashcan icon in the lower-left (iPhone) or upper-right (iPad) corner of the screen. See below image:
Delete a single Screenshot
Now, you will see a pop-up menu asking to confirm. Just select Delete Photo.
Delete Multiple Screenshots
To delete multiple screenshots, go back to the Screenshots album overview that shows thumbnails of all your screenshots. Next, tap the Select button in the upper-right corner of the screen. See following image:
Selecting multiple Screenshots
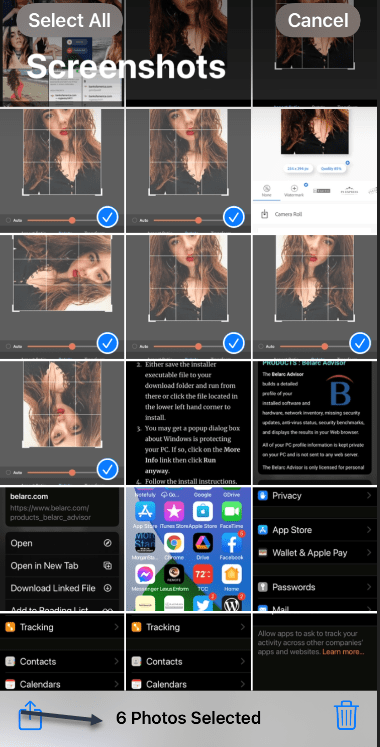
You are now in selection mode. You can select all the screenshots in the album by tapping Select All, or you can select multiple screenshots by tapping their thumbnails. When it’s selected, each photo’s thumbnail will have a small circle with a check mark in the lower-right corner. Refer to below image:
Your selected Screenshots
You can also quickly select a large number of screenshots by tapping a thumbnail with your finger and holding it down lightly while you drag it halfway down the screen. The screenshot thumbnail list will start scrolling while selecting images. To stop selecting, lift your finger.
When you have selected all the screenshots that you want to delete, tap the Trashcan icon in the corner of the screen. Next, when you are asked to confirm, tap Delete Photos. See below image:
Delete your selected Screenshots
By default, the screenshots that you just deleted will be permanently removed from your device in 30 days.
Delete All Screenshots
If you want to permanently remove the screenshots sooner, first, navigate to your Recently Deleted album in the Photos app.
For the iPhone: Navigate to Albums > Recently Deleted.
For the iPad: Open the sidebar and tap Recently Deleted under Utilities.
See following image:
Open Recently Deleted album
When you see the gallery of your recently deleted screenshot thumbnails, you can individually select and delete them with the Delete button. To delete all Recently Deleted images at once, tap Select in the corner of the screen, and then select Delete All. Refer to below image:
Delete All Screenshots
Now, when you are asked to confirm, tap Delete Photos. All of your screenshots will be permanently deleted.
Quote For the Day
Look up at the stars and not down at your feet. Try to make sense of what you see, and wonder about what makes the universe exist. Be curious.
Stephen Hawking
You are finished. Please feel free to share this post! One way to share is via Twitter.
Just click the Tweet icon below. This will launch Twitter where you click its icon to post the Tweet.
Check out TechSavvy.Life blog posts for smartphones, PCs, and Macs! You may email us at contact@techsavvy.life for comments or questions.
Please feel free to leave a comment. I would love hearing from you. Do you have a computer or smart device tech question? I will do my best to answer your inquiry. Just send an email to contact@techsavvy.life. Please mention the device, app and version that you are using. To help us out, you can send screenshots of your data related to your question.
The author’s Vietnam eBook on the Battle for Tra Bong: Events and Aftermath
Turning off your iPhone seems like it should be a simple task; and it is, provided you remember the specific buttons you are supposed to press to power down your device. The challenge is that Apple has changed the method every few models so that turning off your iPhone on an older device is quite different than what’s required to turn off the newer models.
Turning off your iPhone seems like it should be a simple task; and it is, provided you remember the specific buttons you are supposed to press to power down your device. The challenge is that Apple has changed the method every few models so that turning off your iPhone on an older device is quite different than what’s required to turn off the newer models. Let’s explore how to turn off and on your device.
This is for the iPhone
Copyright Scott Adams, Inc./Distributed by Universal Uclick for UFS
To help you turn off your iPhone, there are the different ways you can shut down an iPhone based on Apple’s assorted models. It all comes down to the position of the Sleep/Wake button and whether your iPhone is unlocked with a Passcode, Touch ID, or FaceID.
Sometimes you need to completely shut down your iPhone, perhaps to help with troubleshooting, or to save your battery life during a long period of inactivity, or the device is acting strangely. Fortunately, it’s easy to do.
What is Sleep Mode vs Shutting Down
Normally, when you briefly press the top or side button on your iPhone, the screen on your device turns off, but the iPhone stays running. This is called sleep mode or lock mode. While it turns off the screen, it does not completely power off the device.
In contrast, shutting down your iPhone starts a special software shutdown process where your iPhone cleans up and prepares for power-off. Then, your iPhone turns off completely.
Perform Hardware Shutdown
If you need to turn off your iPhone, the easiest way to do so is by using a hardware button on your device. How to do this varies slightly by model, since certain iPhones include different types of buttons:
On iPhones without a Home Button: Simultaneously hold the side button and the volume up or down button for about four seconds until the power-off slider appears on the screen.
On iPhones with a Home Button and a Side Button: Hold the side button for a few seconds until the power-off slider appears.
On iPhones with a Home Button and a Top Button: Press and hold the top button until the power-off slider appears.
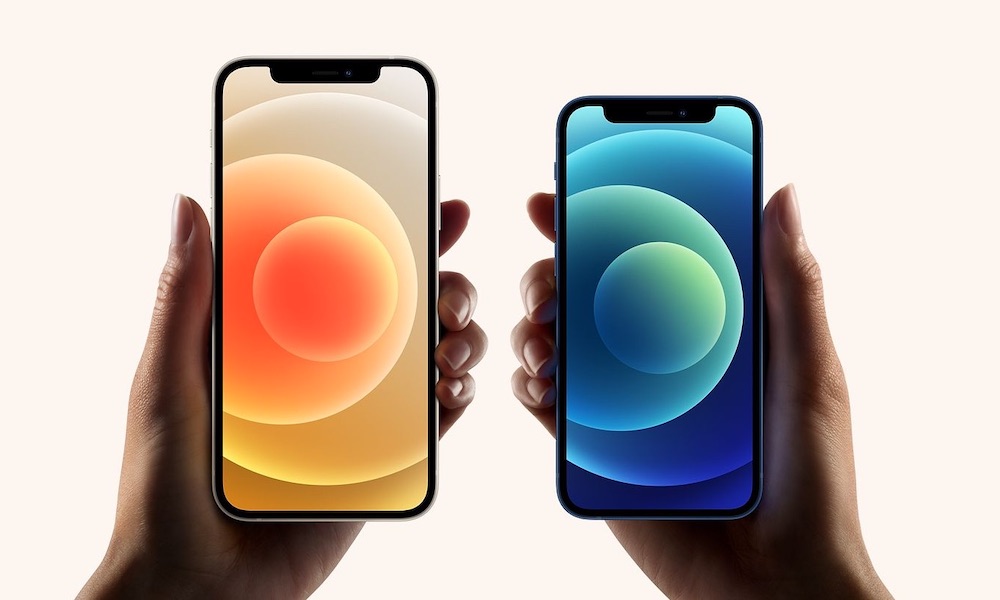
Refer to below image:
Apple
When the Slide to Power Off slider appears, swipe your finger to the right. See below image:
Hardware shut down
Now, your iPhone will shut down and power off completely.
Perform Shutdown via Settings
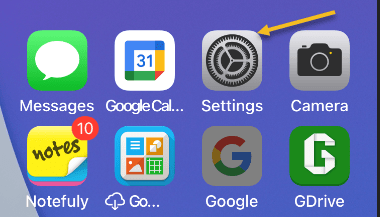
First, open Settings on your iPhone. See following image:
Accessing Settings
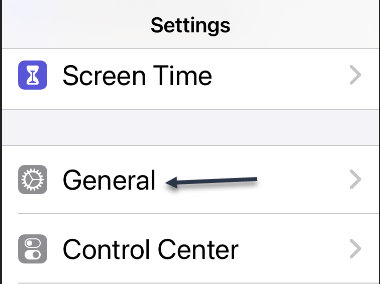
Next, in the Settings app, tap General. Refer to below image:
Accessing General option
Now, on the General page, scroll down to the bottom of the page and tap Shut Down. See below image:
Accessing Shut Down option
When the Slide to Power Off slider appears, swipe your finger to the right. See following image:
Software shut down
Now, your iPhone will shut down and power off completely.
Restart
If you just powered off, waiting 10 seconds is a good rule of thumb before a restart.
For newer models, (12, 11, 10), press and quickly release the volume up button, press and quickly release the volume down button, then press and hold the side button. When the Apple logo appears, release the button.
For iPhone SE (2nd generation), 8, 7, or 6, press and hold the side button until you see the Apple logo, then release the button.
Quote For the Day
A little more persistence, a little more effort, and what seemed hopeless failure may turn to glorious success.
Elbert Hubbard
That was easy.. Please feel free to share this post! One way to share is via Twitter.
Just click the Tweet icon below. This will launch Twitter where you click its icon to post the Tweet.
Check out TechSavvy.Life for blog posts on smartphones, PCs, and Macs! You may email us at techsavvy.life for comments or questions.
Please feel free to leave a comment. I would love hearing from you. Do you have a computer or smart device tech question? I will do my best to answer your inquiry. Just send an email to contact@techsavvy.life. Please mention the device, app and version that you are using. To help us out, you can send screenshots of your data related to your question.
The author’s Vietnam eBook on the Battle for Tra Bong: Events and Aftermath
Safari on the iPhone and iPad has a hidden feature that lets you quickly bookmark all open websites to a single folder. To keep things as you had left it, quickly bookmark all the tabs in Safari using this feature.
This is for iPhone and iPad
Copyright Scott Adams, Inc./Distributed by Universal Uclick for UFS
First, open the Safari app on your iPhone or iPad and then tap the URL bar. Here, enter a URL and then press the Go button to open the website. Repeat this process to open all of the websites that you want to bookmark at once. Refer to below image:
Entering a URL to save
Method 1 – Closing a Few Bookmarks
If you already have websites open, tap the Tabs button, and close any webpage that you do not want to bookmark.
Method 2 – Closing All Bookmarks
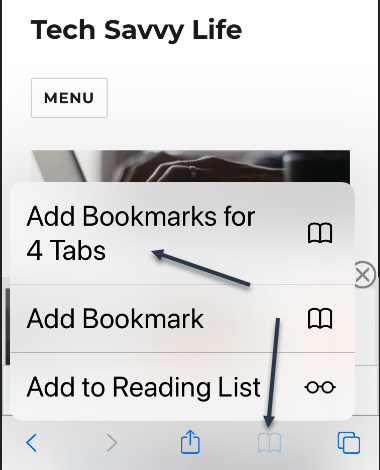
If you have lots of open bookmarks, tap and hold the Bookmarks button and then view the Add BookmarksFor X Tabs option. You may want to close all, then add tabs using the above process. (In my example. I am closing 208 and adding 4 bookmarks). Once you have done this, select the Add BookmarksFor X Tabs option.
Now, from the next page, give the new folder a name. By default, Safari will save the folder in Favorites but you can tap the button to see all available locations.
Next, after choosing the folder, tap the Save button. (In my example, I entered a new folder of New Bookmarks with 4 tabs). See following image:
Creating a new bookmarks folder
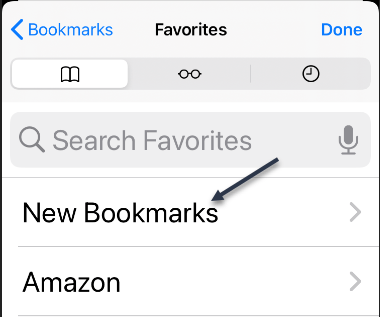
Safari has now saved all of your open tabs. To access the tabs later, tap the Bookmarks button from the bottom toolbar. Refer to below image:
Accessing the bookmarks
Now, locate the folder where you saved the bookmarks. Then tap and hold the folder to see the options. See below image:
Accessing your new bookmarks folder
Deletion Process
Next, tap the Open In New Tabs button to reopen all of the tabs. Also, you can tap the Delete button to delete the folder. See following image:
Open or Delete bookmark(s)
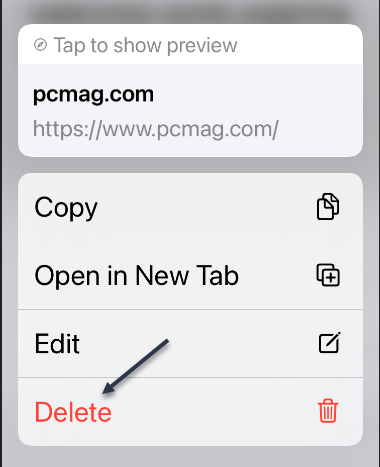
Now, select a tab to see its options, then tap the Delete option to delete the bookmark. Note! If you do not select a bookmark and press Delete, all your tabs will be deleted, so be careful. Refer to below image:
Delete a bookmark
Quote For the Day
The past, like the future, is indefinite and exists only as a spectrum of possibilities.
Stephen Hawking
That’s it. Please feel free to share this post! One way to share is via Twitter.
Just click the Tweet icon below. This will launch Twitter where you click its icon to post the Tweet
Check out TechSavvy.Life for blog posts on smartphones, PCs, and Macs! You may email us at contact@techsavvy.life for comments or questions.
Please feel free to leave a comment. I would love hearing from you. Do you have a computer or smart device tech question? I will do my best to answer your inquiry. Just send an email to contact@techsavvy.life. Please mention the device, app and version that you are using. To help us out, you can send screenshots of your data related to your question.
The author’s Vietnam eBook on the Battle for Tra Bong: Events and Aftermath
Autofill gives you the ability to save contact and credit card information on Safari so you do not have to re-enter the long card number and expiration date every time you buy something on the Web.
Old cards remain saved on Autofill, even when they have expired. Let’s explore this feature.
This is for iPhone and iPad
Copyright Scott Adams, Inc./Distributed by Universal Uclick for UFS
View Your Credit Cards
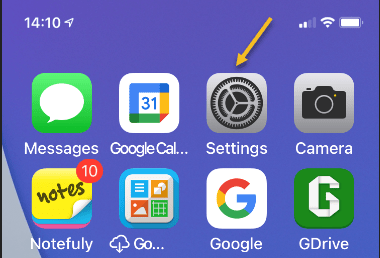
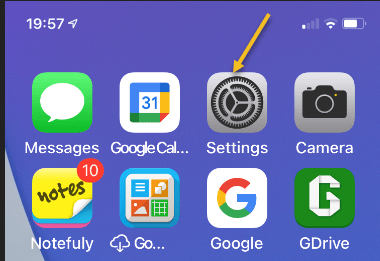
First, open Settings on your iPhone or iPad. Refer to below image:
Accessing Settings
Next, in Settings, tap Safari. See below image:
Accessing Safari option
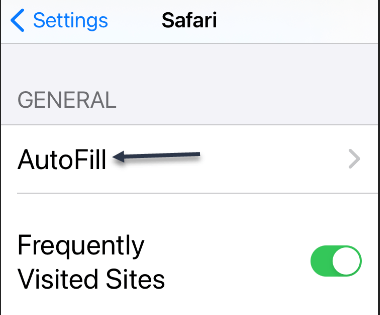
Now, in Safari, tap AutoFill. See following image:
Accessing AutoFill option
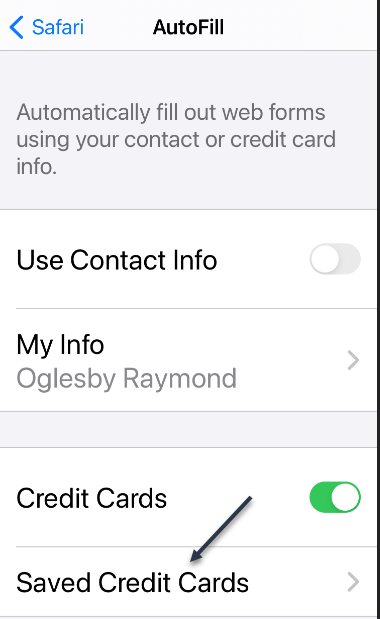
Next, in Safar’sAutoFill settings, tap Saved Credit Cards. Refer to below image:
Accessing your Saved Credit Cards
Now, when prompted, enter your PIN or validate your identity with Touch ID or Face ID, Next, you will see a list of credit cards that Safari has saved. Tap any entry in the list to see more details.
On the details screen, you will see the full credit card number and expiration date for the card if Safari has saved that information (Note that the three-digit CVV number on the card’s back is never stored.) See below image:
Viewing Saved Credit Card list
Next, if you need to edit the information on the card, tap Edit in the upper right-hand corner. See following image:
Editing a credit card
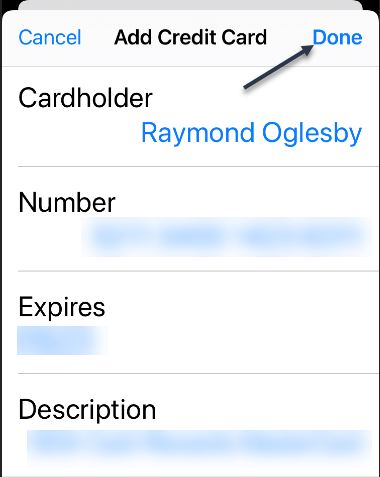
Now, when you are done editing, tap Done.
Add a CreditCard
If you go back one screen to the credit card list, you can also add a credit card to the list by tapping Add Credit Card. Just enter your information for the credit card. Refer to below image:
Adding a credit card
Delete a CreditCard
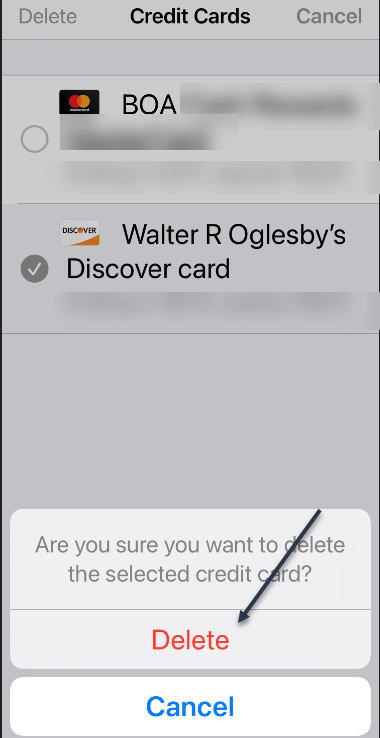
As well as add, you can delete a card from the list by tapping Edit, checkmark the card, and tapping Delete. See below image:
Deleting a credit card
A pop-up message will appear asking you to confirm the deletion. See following image:
Confirming the deletion
When you are done, exit Settings.
Quote For the Day
Technology is a useful servant but a dangerous master.
Christian Lous Lange
You are finished. Please feel free to share this post! One way to share is via Twitter.
Just click the Tweet icon below. This will launch Twitter where you click its icon to post the Tweet.
Check out TechSavvy.Life for blog posts on smartphones, PCs, and Macs! You may email us at contact#@techsavvy.life for comments or questions.
Please feel free to leave a comment. I would love hearing from you. Do you have a computer or smart device tech question? I will do my best to answer your inquiry. Just send an email to contact@techsavvy.life. Please mention the device, app and version that you are using. To help us out, you can send screenshots of your data related to your question.
Copyright Scott Adams, Inc./Distributed by Universal Uclick for UFS
In iOS 14 and iPadOS 14 or higher you can train Siri to learn your go-to music app. Siri will ask you which audio app you would like to use and remembers your choice.
This if for the iPhone and iPad running iOS or iPadOS 14 or higher
Copyright Scott Adams, Inc./Distributed by Universal Uclick for UFS
First, update your iOS/iPadOS to 14 or higher. Next, launch Siri. On newer Apple devices, you can do this by saying “Hey Siri” (if you have it turned on) or long-press the Side/Top/Power button on your iPhone or iPad with Face ID. Refer to below image:
Accessing the Power button
On older iPhones or iPads with a Touch ID sensor, long-press the Home button.
Now, Siri will start listening for a voice command when you see its icon appear on-screen. Ask your phone or tablet to play a song, artist, podcast, or audiobook. For example, you can say “Play Carole King,” or “Play Horse With No Name,” or “Listen to the Vergecast.” See below image:
Siri enabled and listening
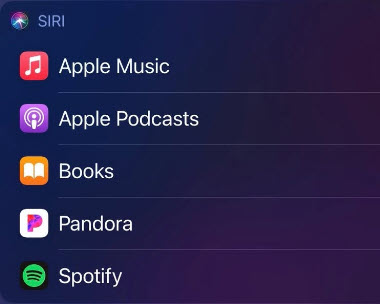
Next, your device will ask you which music or audio app you would like to listen to the song, artist, podcast, or audiobook on. Tap the app that you would like to use. See following image:
Select an audio app
Occasionally, Siri might ask for your permission to access an app’s data before it can control playback. Just grant the voice assistant permission by tapping the Yes button from the pop-up screen. Refer to below image:
Giving permission to access app
Now, Siri’s on-screen overlay will transform into an audio widget. You can control playback, volume, and more from this window. Tapping outside of the widget will make it disappear, but your music, audio, or podcast will continue playing in the background. See below image for the jazz song “Touching Peace.”
Siri audio widget
For the full playback screen from Apple Music, see following image:
Siri audio widget in full screen
From now on, if you ask Siri to play a song or audio program, your device will default to whichever app you selected. It will no longer automatically open the Apple Music app.
As mentioned, setting the default music app is not a setting “baked” into your device. On occasion, Siri might prompt you to reselect which audio app you would like to use to help train the Voice Assistant.
Also, you are not locked into only using the app you just chose. Instead, you can be specific in your command to Siri to open a song, artist, podcast, or audiobook in a particular app that you have installed on your device. For example, you can say, “Listen to 1984 by George Orwell in Audible.”
Quote For the Day
He who has a why to live can bear almost any how.
Friedrich Nietzsche
You are finished. Please feel free to share this post! One way to share is via Twitter.
Just click the Tweet icon below. This will launch Twitter where you click its icon to post the Tweet.
Check out TechSavvy.Life for blog posts on smartphones, PCs, and Macs! You may email us at contact@techsavvy.life for comments or questions.
Please feel free to leave a comment. I would love hearing from you. Do you have a computer or smart device tech question? I will do my best to answer your inquiry. Just send an email to contact@techsavvy.life. Please mention the device, app and version that you are using. To help us out, you can send screenshots of your data related to your question.
The author’s Vietnam eBook on the Battle for Tra Bong: Events and Aftermath
If you lose your Apple device or an object tagged with an AirTag, you can utilize a network of hundreds of millions of Apple devices with Bluetooth to help get it back.
If you lose your Apple device or an object tagged with an AirTag, you can utilize a network of hundreds of millions of Apple devices with Bluetooth to help get it back. Let’s explore this feature.
This is for Apple devices. Screenshots are from Apple and iPhone XR
Copyright Scott Adams, Inc./Distributed by Universal Uclick for UFS
What is Find My Network
Apple’s Find My network is a crowdsourced method of locating your lost iPhone, iPad, iPod Touch, AirPods, Apple Watch, or Mac. You can also use it to locate lost items that have AirTags attached to them. It’s available as a free service to Apple device owners.
The Find My network utilizes Bluetooth sensors on hundreds of millions of Apple products to report the location of missing Apple devices around them. When an Apple device on the network detects a missing Apple device nearby, it reports the lost item’s approximate location back to the device’s owner through the Internet.
What About Privacy
You might think that with a network of almost a billion Apple devices reporting back on the location of lost items, there might be some privacy issues. However, Apple has taken privacy into account when designing this network.
Apple has worked to avoid privacy issues whenever possible, engineering a system that utilizes end-to-end encryption while also transmitting anonymized data to keep your device’s location known only to you while also keeping your identity and location private when using a device that’s active in the Find My network. According to Apple, neither it nor third parties can access the location of your devices on the Find My network. Only the person seeking the lost device can see the item’s location. Hey, if you don’t trust Apple, who can you trust? I am pessimistic on this feature.
Apple’s AirTags do pose more of a privacy risk, but Apple has taken steps to make it harder to track people who use AirTags without their knowledge. Time will tell if those measures are sufficient.
Setup the Feature
To do so on an iPhone, iPad, or iPod Touch, navigate to:
Settings > Apple ID > Find My > Find My iPhone/iPad/iPod Touch
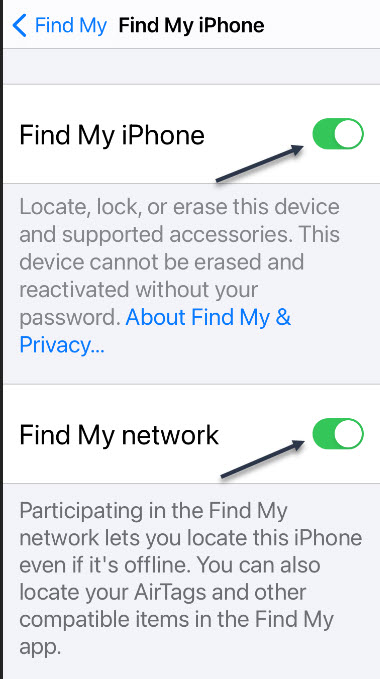
and tap to turn the Find My network switch On. While here, turn On the Find My <device>, for example, Find My iPhone as shown below. Now, exit Settings. Refer to below image:
Enabling the feature
How to Use the Feature
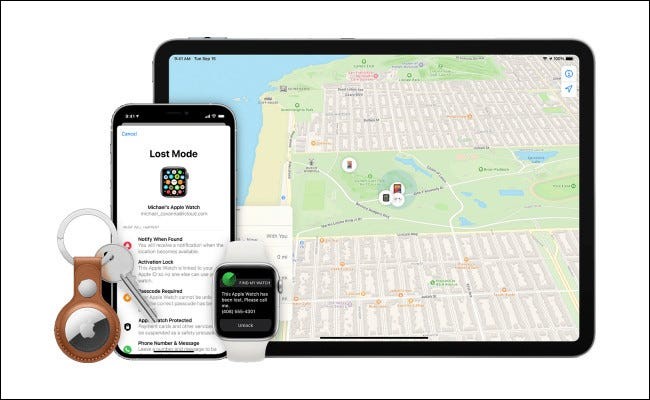
For you to use the Find My network your lost item or AirTag must first have Find My enabled and also be registered to your Apple ID. To locate the item, open the Find My app on your iPhone, iPad, iPod Touch, or Mac. Choose the devices tab, tap the device’s name, and you will see its location on a map. If you can’t see it, you can mark the device as lost and hope that someone finds it later and returns it to you. See below image from Apple:
Map of lost device – per Apple
Can I Opt Out
Even though the Find My network does not represent a privacy issue for most people (unless you work in a sensitive, high-security field, werecommend that you keep it enabled), you can still turn it off (and opt out) if you would like.
To do so on an iPhone, iPad, or iPod Touch, navigate to:
Settings > Apple ID > Find My > Find My iPhone/iPad/iPod Touch
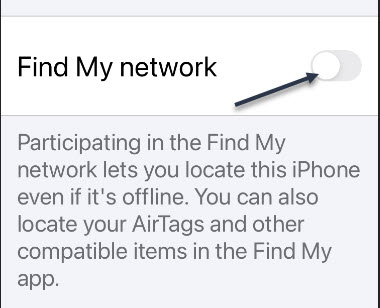
and tap to turn the Find My network switch to Off. Now, exit Settings. See following image:
Disabling the feature
To opt out of Find My network on a Mac, open:
System Preferences > Apple ID > iCloud
and then click the Options button beside Find My Mac. In the pop-up window, click the Turn Off button beside Find My network.
Keep in mind that if you turn off the Find My network feature not only will your device’s Bluetooth sensors stop assisting others in locating lost devices, but also, you will not be able to take advantage of its benefits if you lose your device.
Throttled Back
Although not a part of this feature, Apple has been noted in recent lab tests to have “throttled back” (reduced speed) in iOS 14.5.1 on iPhone models 10, 11,and 12. You have to wait for the next iOS update for Apple to fix this issue.
Quote For the Day
Opportunity is missed by most people because it is dressed in overalls and looks like work.
Thomas A. Edison
You are finished. Please feel free to share this post! One way to share is via Twitter.
Just click the Tweet icon below. This will launch Twitter where you click its icon to post the Tweet.
Check out Techsavvy.Life for blog posts on smartphones, PCs, and Macs! You may email us at contact@techsavvy.life for comments or questions.
Please feel free to leave a comment. I would love hearing from you. Do you have a computer or smart device tech question? I will do my best to answer your inquiry. Just send an email to contact@techsavvy.life. Please mention the device, app and version that you are using. To help us out, you can send screenshots of your data related to your question.
The author’s Vietnam eBook on the Battle for Tra Bong: Events and Aftermath
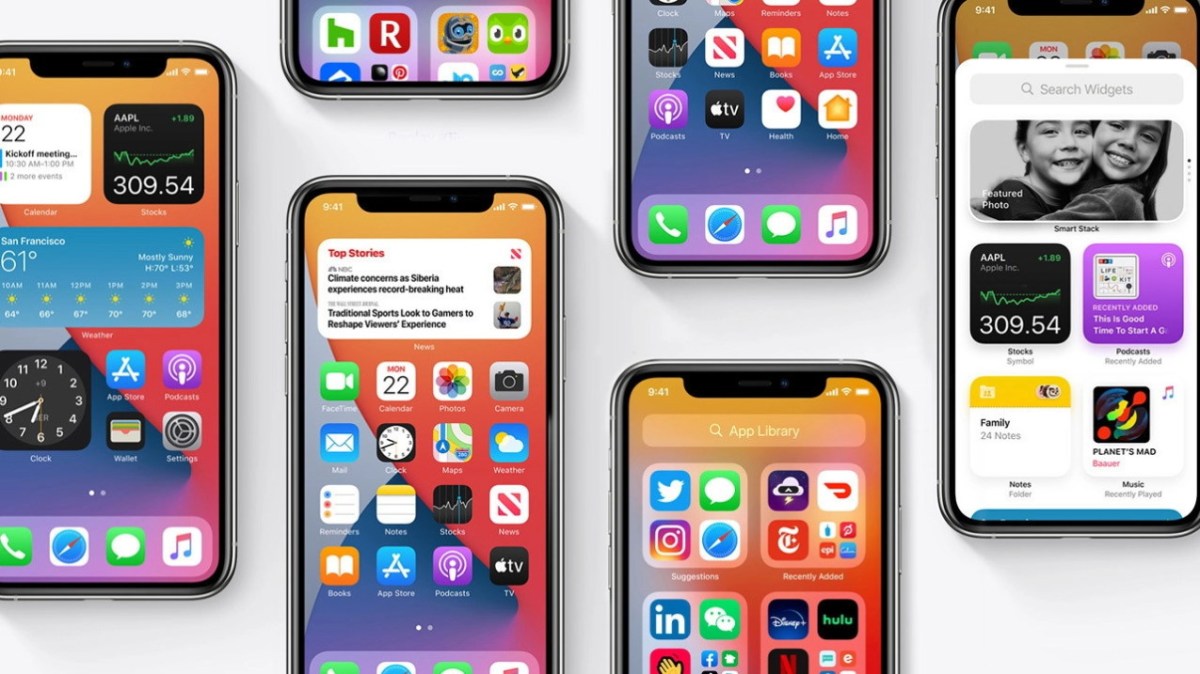
Apple in June 2021 introduced the latest version of its iOS operating system, iOS 15, which is set to be released in the fall. iOS 15 introduces new features for FaceTime calls, tools to reduce distractions, a new notifications experience, added privacy features, complete redesigns for Safari, Weather, and Maps, and more.
In June 2021 Apple introduced the latest version of its iOS operating system, iOS 15, which is set to be released in the fall. iOS 15 introduces new features for FaceTime calls, tools to reduce distractions, a new notifications experience, added privacy features, complete redesigns for Safari, Weather, and Maps, and more.
This is for devices running iOS and iPadOS 15
Copyright Scott Adams, Inc./Distributed by Universal Uclick for UFS
Notifications have been redesigned in iOS 15, adding contact photos for people and larger icons for apps. To reduce distraction, a notification summary collects notifications together for delivery at an appropriate time and arranges notifications by priority.
Focus is a new feature that can filter notifications and apps based on what a user wishes to focus on at a certain time. When a user’s Focus is blocking incoming notifications, their status will be displayed to others in Messages. iOS will suggest a Focus for different occasions, such as work hours or winding down for bed, using on-device intelligence, but users can also create a custom Focus. When a Focus is set on one Apple device, it automatically applies to other Apple devices.
Safari features a completely new design. Controls are now easier to reach with one hand and give more focus to a webpage’s content. There is a new, compact tab bar that floats at the bottom of the screen so users can easily swipe between tabs. Tab Groups allow users to save tabs and easily access them at any time across devices. There is also a customizable start page and web extensions for the first time.
The Maps app now offers a new 3D view in cities with significantly enhanced details, showing buildings, pedestrian crosswalks, bike lanes, and more. There is a new city-driving experience with added road details and improved Transit features, such as pinned favorite lines, notifications to disembark, and walking directions.
iOS 15 brings voice isolation and Spatial Audio to FaceTime calls so that voices appear to sound as if they are coming from where the person is located on the screen.
FaceTime also supports Portrait mode and offers a new grid view to see more faces at the same time. SharePlay is a new feature that allows users to share media together in sync during a FaceTime call. Users can also generate shareable links to a scheduled FaceTime call, which can also be opened in Android and Windows devices.
The Weather app has been redesigned in iOS 15, showing more graphical displays of weather data, full-screen maps, and dynamic layouts that change based on weather conditions. Totally new animated backgrounds can now more accurately reflect the sun’s position and current precipitation, and there are notifications to highlight when rain or snow starts and stops.
The Wallet app adds support for new key types in iOS 15, such as homes, offices, or hotel rooms. Later this year, customers in participating U.S. states will be able to add a driver’s license or state ID to the Wallet app.
The Photos app features a major update to Memories with a new design and an interactive interface. Memories how supports integration with Apple Music, using on-device intelligence to offer song suggestions for personalized Memories.
Live Text is a new feature that uses on-device intelligence to recognize text in a photo that users can search for, highlight, and copy it. Spotlight can now search for photos by location, people, scenes, objects, and text. Spotlight now offers web image search and richer results for actors, musicians, TV shows, and movies. Enhanced results for contacts show recent conversations, shared photos, and even their location if shared through Find My.
iOS 15 also introduces new privacy measures, such as processing Siri requests directly on the iPhone, which has the added benefit of better responsiveness, Mail Privacy Protection to stop senders knowing if an email has been opened and detecting a recipient’s IP address, and an App Privacy Report view to show how often apps use the permissions they have been granted.
There are dozens of tweaks and changes for other apps, such as user-created tags, mentions, and an Activity view in the Notes app, Trends, Walking Steadiness, and a new sharing tab in the Health app, a systemwide Shared with You feature for highlighting content that has been shared in Messages conversations, and a new For All of You row in the TV app to suggest entertainment for the whole household.
iOS 15 is compatible with the iPhone 6s and later, which means it runs on all devices able to run iOS 14, and will be released this fall, 2021.
As you have read, lots of new features. Look forward to learning about iOS 15 in upcoming TechSavvy.Life blog posts.
Quote For the Day
I am just a child who has never grown up. I still keep asking these ‘how’ and ‘why’ questions. Occasionally, I find an answer.
Stephen Hawking
That’s it. Please feel free to share this post! One way to share is via Twitter.
Just click the Tweet icon below. This will launch Twitter where you click its icon to post the Tweet.
Check out TechSavvy.Life for blog posts on smartphones, PCs, and Macs! You may email us at contact@techsavvy.life for comments oar questions.
Please feel free to leave a comment. I would love hearing from you. Do you have a computer or smart device tech question? I will do my best to answer your inquiry. Just send an email to contact@techsavvy.life. Please mention the device, app and version that you are using. To help us out, you can send screenshots of your data related to your question.
The author’s Vietnam eBook on the Battle for Tra Bong: Events and Aftermath
If you need to quickly take a photo or video on your iPhone, you can swipe into the Camera app quickly without unlocking your phone. Let’s explore how this is done.
This is for the iPhone
Copyright Scott Adams, Inc./Distributed by Universal Uclick for UFS
First, wake up your iPhone. Place your finger anywhere on the lock screen and swipe it to the left until the Camera app appears. If you try to swipe on a notification that will reveal options for the notification rather than opening the Camera app. Refer to below image:
Swipe left to open the Camera
Next, with the Camera app open, you can take photos or videos as you normally would, and they will be saved automatically to your Photos library. You can even use the volume buttons to trigger the shutter if you like. See below image that will be saved to Photos library:
Your photo
Now, to exit Camera mode, press the top button (for iPhones with home buttons) or the side button (for iPhones without home buttons) to turn off your screen. The photos you took will still be saved.
iPhones Without Home Button
If you have an iPhone without a home button (one that uses Face ID) you might notice a tiny camera icon in the lower-right corner of your lock screen. See following image:
Access Camera by the photo icon
You can use this button to launch the Camera app with a long-press. Just place your finger on the camera icon for a moment. When you lift your finger, the Camera app will launch.
When you are done, press the side button, and the photos and videos you have taken will be saved automatically.
Quote For the Day
The beginning is the most important part of the work.
Plato
You are finished. Please feel free to share this post! One way to share is via Twitter.
Just click the Tweet icon below. This will launch Twitter where you click its icon to post the Tweet.
Check out TechSavvy.Life for blog posts on smartphones, PCs, and Macs! You may email us at contact@techsavvy.life for comments or questions.
Please feel free to leave a comment. I would love hearing from you. Do you have a computer or smart device tech question? I will do my best to answer your inquiry. Just send an email to contact@techsavvy.life. Please mention the device, app and version that you are using. To help us out, you can send screenshots of your data related to your question.

The author’s Vietnam eBook on the Battle for Tra Bong: Events and Aftermath
Two-Factor authentication (2FA) adds an extra security layer to your accounts across the internet. 2FA means your accounts require information beyond user name and password to confirm you are who you say you are before you can get into the accounts. Let’s explore how to access 2FA.
This is for iPhone, iPad, PCs and Macs. Screenshots are from Windows 10 and iPhone XR
Copyright Scott Adams, Inc./Distributed by Universal Uclick for UFS
The “second factor” comes in after you enter your username and password, which are considered to be the “first factor.” 2FA can be used to confirm your identity by asking for an extra piece of information. The additional information can be:
Something you know, like an additional passcode.
Something you have, like your phone to receive a one time authorization code.
Something you are, like a fingerprint or voice print. This is also called biometric security.
The idea is to provide another piece of information a hacker would not have, making it harder for the bad guy to break into your account.
The following is not an exhaustive list of services with 2FA ability, but we cover the major services everyone tends to use, and walk you through how to access. We will cover Amazon, Apple, Facebook, Google, Instagram, LinkedIn, Microsoft, and Twitter. Activate 2FA on all of these and you will be more secure. Once you have found their 2FA screens you can can set it up for each app.
Amazon
First, launch Amazon.com on the desktop and login in to your account. Next, click the Menu icon in upper left-hand corner. Now, scroll down the drop-down menu to Your Account option.
Next, click on the Login & Security big button. Now, on the next page, click Edit next to Two-Step Verification (2SV) Settings. The preferred method is an authentication app (scan the QR code); phone number(s) are the backup method. Refer to below image where I already have 2SV based on my phone number (which is dimmed out):
Amazon 2SV
If you think your account has been comprised, go back to Login & Security and click the Edit button next to Secure Your Account.
Apple
Following are the steps on how to access 2FA for Apple using either iOS or macOS.
On iOS go to:
Settings > [your name at the top] > Password & Security > Turn on Two-Factor Authentication.
On macOS go to:
System Preferences > iCloud, then sign in, click Account Details > Security > Turn on Two-Factor Authentication.
Note! once Apple 2FA is activated for two weeks, you can not turn it off. “Certain features in the latest versions of iOS and macOS require this extra level of security, which is designed to protect your information,” according to Apple. See below image for iOS:
Apple 2FA
Facebook
First, login to Facebook on your desktop. Next, click the Down arrow in upper right-hand corner. Now, from the drop-down menu that appears, click on the Settings & Privacy option. On the next screen, click the Privacy & Checkup option. From there, click on the topic How to keep your account secure. Under this topic, you can access 2FA for Facebook. See following image where 2FA is On with a backup method of sending a text message to a phone number.
First, sign in to your Google account on your smart device. Next, at the top of the screen, locate the Security tab and tap it. Now, scroll down and tap the 2- Step Verification option. You can continuing scrolling to see more ways to verify you. Refer to below image where my 2SV is already turned On and I am using the backup method of Voice or text message:
Google 2SV
Google calls its system 2SV . It’s all about identifying you via phone. When you enter a password to access your Google account for almost any service, if 2SV is on, there are multiple options to get that second step. First among them now: the Google Prompt. You simply add your smartphone to your account, make sure the Google search app is on the phone, and at login, you can go to the phone and simply acknowledge with a tap that you are the one signing in.
Instagram
First, launch Instagram on your smart device. Next, go to your Profile in lower right-hand corner, then tap the menu (the hamburger icon) on the top-right. Tap Settings > Security > Two-Factor Authentication. There you can choose how you would like to get your authentication code by tapping the Get Started button. See below image:
Instagram 2FA
Linkedin
Business social network Linkedin makes it easy to set up verification, either by SMS texts or authentication app.
First, launch Linkedin on you smart device, then go to your Profile at upper left-hand screen. Next, go to Settings > Sign in & Security > Account > Two-step verification to activate it or deactivate. See following image:
Linkedin 2SV
Microsoft
First sign into your Microsoft account on your smart device. Now, tap your Profile. Next, scroll down and tap Security. 2FA is the second option, tap on it. Once again, tap Two -step verification > Manage. Microsoft will suggest you get app passwords as needed for older service or devices (like Xbox 360); go in later to generate one as needed. Refer to below image:
Microsoft 2SV
Twitter
First, to activate Login Verification on Twitter.com on the desktop, login to Twitter, Click the More menu on the left (the three dots) and select Security & Account Access > Security > Two-Factor Authentication. See following image:
Twitter 2FA
Quote For the Day
Technology is a useful servant but a dangerous master.
Christian Louis Lange
That’s it. With 2FA activated on these apps you are more secure. Please feel free to share this post! One way to share is via Twitter.
Just click the Tweet icon below. This will launch Twitter where you click its icon to post the Tweet.
Check out TechSavvy.Life for blog posts on smartphones, PCs, and Macs! You may email us at contact@techsavvy.life for comments or questions.
Please feel free to leave a comment. I would love hearing from you. Do you have a computer or smart device tech question? I will do my best to answer your inquiry. Just send an email to contact@techsavvy.life. Please mention the device, app and version that you are using. To help us out, you can send screenshots of your data related to your question.
The author’s Vietnam eBook on the Battle for Tra Bong: Events and Aftermath