If you would like to access your favorite website from your iPhone or iPad Home screen (the first page), it’s easy to do. Using Safari, we can create a shortcut icon that allows you to just tap it to launch the site. It’s a handy way to speed up your iPhone or iPad experience. Note! The following guide is for an iPhone, but the steps are similar for an iPad.
This is for iPhone/iPad
Copyright Scott Adams, Inc./Distributed by Universal Uclick for UFS
Four Easy Steps
First, open Safari and navigate to the website you would like to appear on your Home screen. After the site has loaded, tap near the bottom of your screen. Now, make sure you can see the navigation toolbar at the bottom, then tap the Share icon (the rectangle with an up arrow). Refer to below image:
Selecting the Share icon
The Share menu will appear. Swipe down thru the list, then tap Add to Home Screen. See below image:
Chosing the option to add to Home screen
The menu for Add to Home Screen will appear. From this menu, give a name to the web icon using the on-screen keyboard. Next, tap Add in upper right hand corner. See following image:
Assigning a name to the icon
The icon for the website will appear on your Home screen. If the first page of your Home screen is full of icons, your newly created icon will be placed in the first available page. Now, when you tap on the shortcut icon, Safari will open and load the website. Refer to below image:
Your website icon on your Home screen or first available page
About the Web Shortcut Icon
The website icon we created with Safari looks and behaves like a regular app icon on the iPhone’s or iPad’s Home screen. You can rearrange it along with other apps, add it to a folder or drag it to the Dock.
You might notice that some websites have Home screen icons that seem perfectly tailored to the iPhone or iPad interface. That’s because these sites specifically created an image for this purpose. Your iPhone or iPad will generate a tiny thumbnail of the website to use as its icon.
I Would Like to Hear From You
Please feel free to leave a comment. I would love hearing from you. Do you have a computer or smart device tech question? I will do my best to answer your inquiry. Please mention the device, app and version that you are using. To help us out, you can send screenshots of your data related to your question.
The author’s Vietnam eBook on the Battle for Tra Bong: Events and Aftermath
You have searched for a favorite photo or video on Facebook but are unable to locate it. Facebook has an option to backup most anything saved through its app. This would allow for easier searching instead of scrolling endlessly through Facebook posts.
You may have decided to deactivate your account for health reasons or you just want a backup. There is no such thing as “too many backups”. In my IT career, I have been “burned” by not having adequate backups resulting in lost time in recreating them.
Depending on how long you have been a Facebook user, the backup file can be quite large. If you have limited storage or on a free storage plan for your mobile device, you might consider backing up to a PC or Mac.
Using this post as a guide, I am backing up thirteen years of Facebook photos and videos on a Windows 10 PC. My backup file, in Zip format, was a 1.4 GB file.
This is for PCs, Mac, mobile devices and similar platforms using Facebook
Copyright Scott Adams, Inc./Distributed by Universal Uclick for UFS
Accessing Facebook Settings
Launch Facebook. in the upper right hand corner, click on the Account icon. Next, click the Settings & Privacy option. See below image
The Settings and Privacy option
Next, click on the Settings option. Refer to below image:
The Settings option
Downloading Your Facebook Information
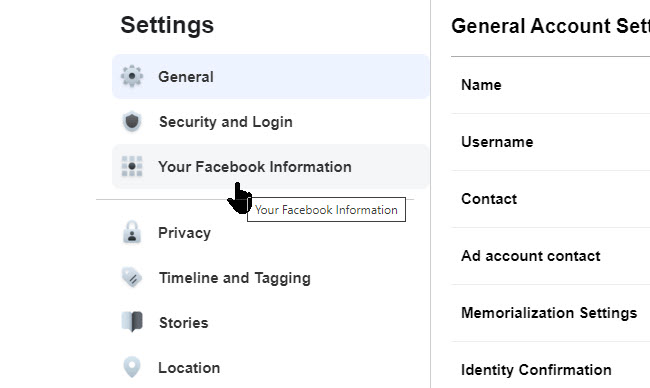
Then click on Your Facebook Information. See following image:
The Facebook Information option
Next, click on Download Your Information. See below image:
Download your information option
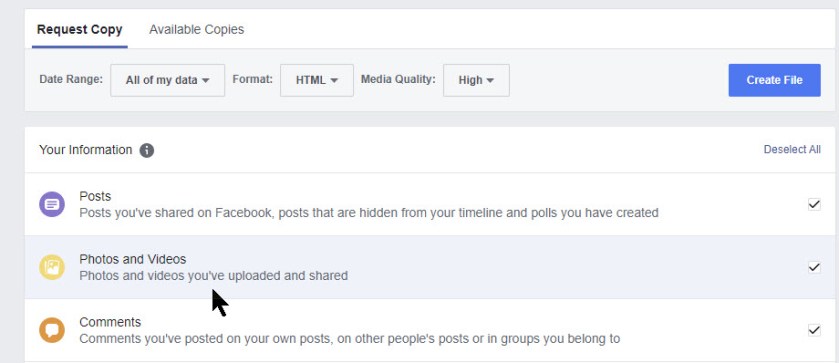
Selecting ONLY Photos and Videos
From here, click on Deselect All link. Then select only Photos and Videos option. From this screen there are many options on what to backup. For our purposes, we only want photos and videos. Refer to below image:
Deselecting all, then selecting only photos and videos option
Once photos and videos have been selected and all other option are unselected, click the Create File button. See below image:
Clicking the Create File option
Messages and Emails From Facebook
You will receive a pop-up message regarding the creation of your Facebook backup for photos and videos. Refer to below image:
Facebook response to iyour request
Check your email that is associated with your Facebook account for the file request. See below image:
Email from Facebook about your request
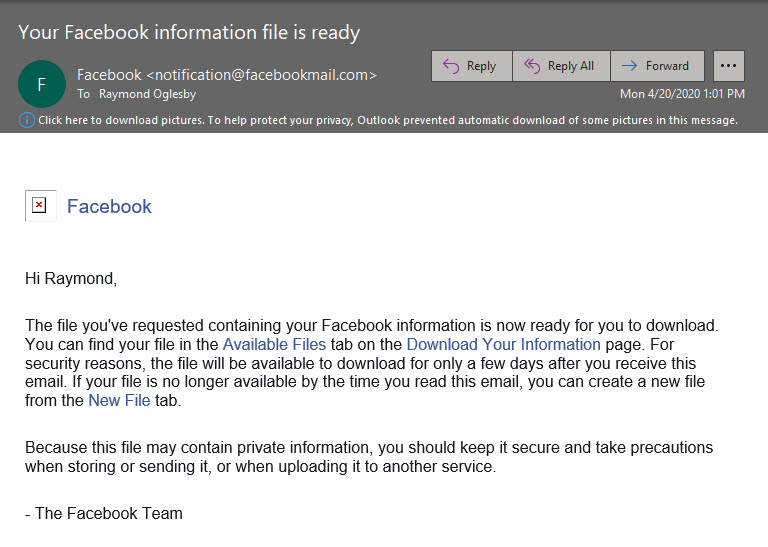
It may take several hours for Facebook to process your request. When the file is ready, you will receive an email that your file is ready. Follow the directions in the message. Refer to below image:
Email from Facebook that your backup file is ready
Downloading Your Photos and Videos Backup
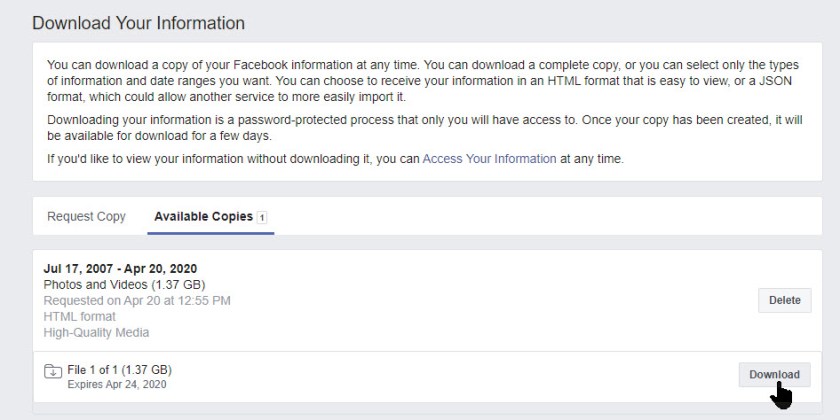
Click on the link for Download Your Information. Then, click the Available Copies tab. You should see information about your download file. Now, click the Download button. See following image:
Download option to your Downloads folder
Facebook will ask you to enter your Password, then click Submit. See below image:
Submitting your password
Viewing Your Downloaded Zip File via File Explorer
Your photos and videos backup file will be in your Downloads folder in Zip format. Below is a screenshot of my backup file. Notice it contains over 3000 files. Your backuped file number will depend on how often you post photos and videos and how many years on Facebook. Refer to below image:
An example of your downloaded Facebook photos and videos file
What I would like to see is an option to select a date range for the backup instead of everything.
I Would Like to Hear From You
Please feel free to leave a comment. I would love hearing from you. Do you have a computer or smart device tech question? I will do my best to answer your inquiry. Please mention the device, app and version that you are using. To help us out, you can send screenshots of your data related to your question.
The author’s Vietnam eBook on the Battle for Tra Bong: Events and Aftermath
Storing important and or sensitive documents in Google Drive isn’t the most secure way to protect your data, but if you are, your iPhone and iPad can help keep everything safe. Let’s see how to protect this cloud storage mobile app using Face ID or Touch ID.
Your mobile device may already be setup to use Face ID or Touch ID. You may ask, why set this up for a particular app, the Google Drive? A friend may ask to see your device. What if they accessed your documents via Google Drive without your knowledge? There is nothing to stop them because you already unlocked your device. So, we are going to add another layer of protection. Of course, enabling two factor authentication for your Google account is the best way to keep prying eyes out of your cloud files.
Note! To follow this guide, you will need the Passcode for your device. The screenshots are for an iPhone.
This is for iPhone and iPad devices
Copyright Scott Adams, Inc./Distributed by Universal Uclick for UFS
Open Google Drive
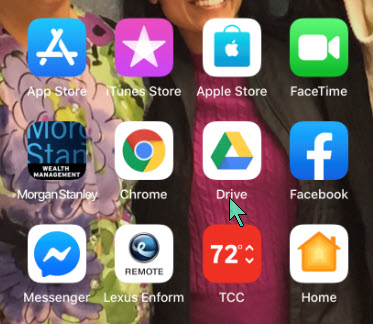
Start by opening the Google Drive app. Use Apple’s built-in Spotlight Search if you can’t find it on your Home screen. Refer to below image:
Locating Google Drive app
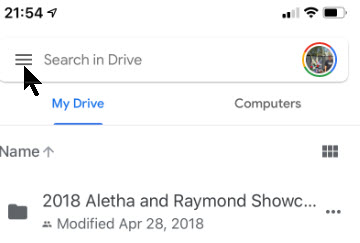
Next, tap the Hamburger icon in upper left of the screen. See following image:
The Hamburger icon
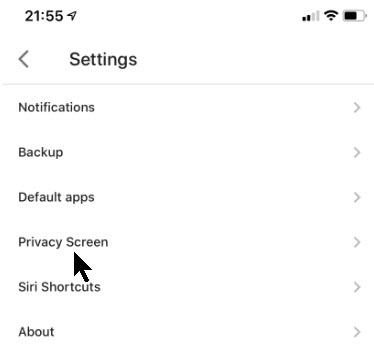
Open the Settings
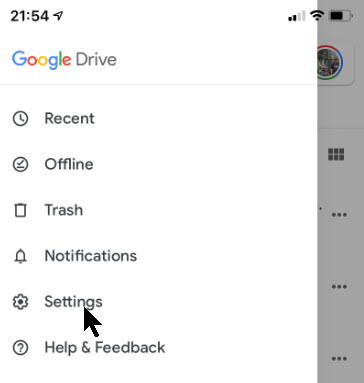
From the slide out menu that appears, select the Settings option. See below image:
Opening Settings
Next, tap on the Privacy Screen option. Refer to below image:
Opening the Privacy Screen option
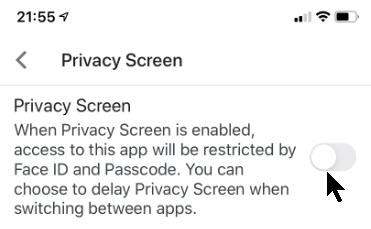
Set the Privacy Option
From here, toggle on the Privacy Screen option. See following image:
Turning on the Privacy Screen option
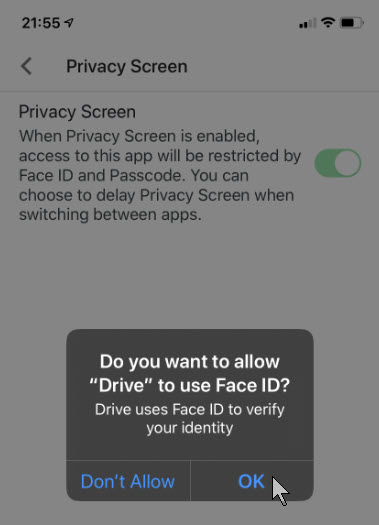
Allow Permission
Now, your iPhone or iPad will display a pop-up box asking for permission to access Face ID or Touch ID. Tap the OK button to allow permission. Refer to below image:
Allowing permission for Google Drive by Face ID
The next time you exit and reopen Google Drive, you will be presented a screen for your face or fingerprint to access your cloud storage.
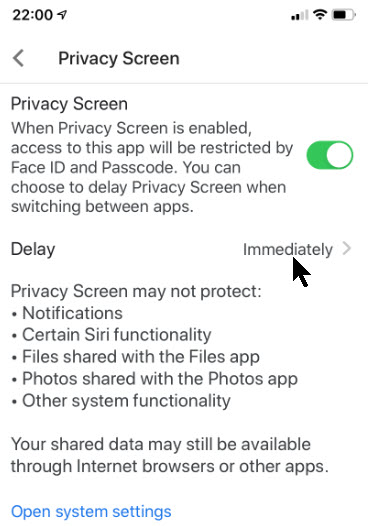
Now that the Privacy Screen setting is enabled, you will see several new options to customize the feature further.
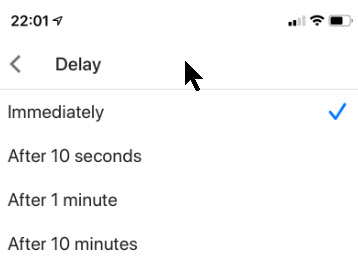
Set Privacy Screen Delay
By default, the Privacy Screen feature locks the Drive app the moment you lock your iPhone’s or iPad’s display or leave the app. If you want to add a time delay, tap on the option that corresponds to the Delay listing. See below image:
Accessing Privacy Screen Delay options
You have four options to choose from:
Immediately (the default)
After 10 seconds
After 1 minute
After 10 minutes
Once you have checkmarked your selection, tap the Back arrow. By default, the Immediately option is selected and is the recommended setting. Refer to below image:
Setting the Privacy Screen Delay option
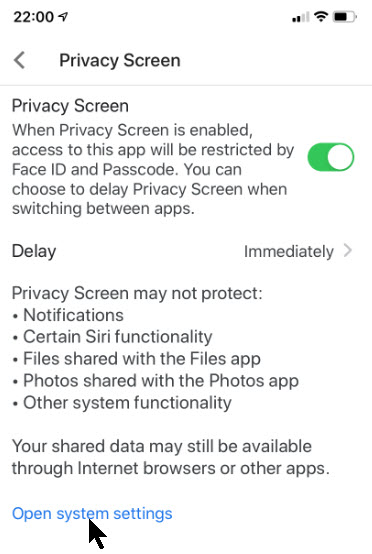
Using the Passcode Method
You have the option of using your Passcode to protect your files instead of your Face ID or Touch ID. This feature offers a more secure method of accessing Google Drive.
To do this, let’s go back to the Privacy Screen settings menu, then tap the Open System Settings blue link. See following image:
Opening System Settings to change access method
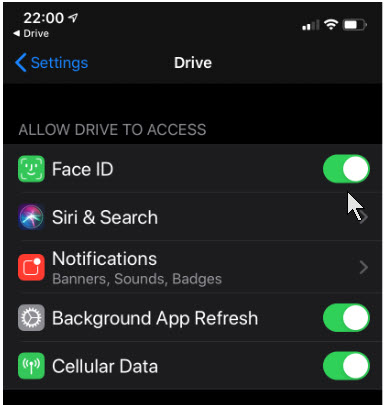
You are taken to the Drive’s section for your iPhone or iPad Settings menu. Here, just toggle off permission to use Face ID or Touch ID. See below image:
Turning off Face ID permission
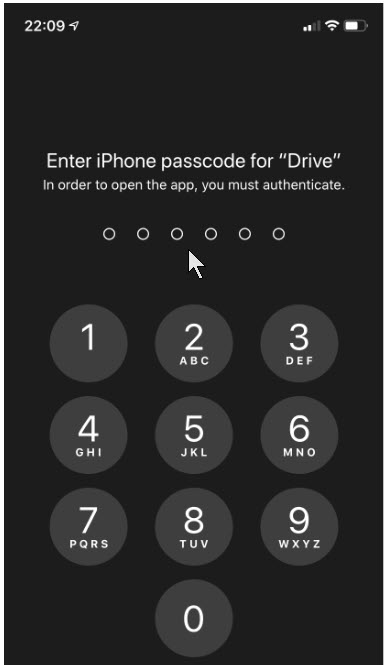
Now, the next time you open the Google Drive app,you will be required to enter your device’s lock screen Passcode. Refer to below image:
Entering your Passcode to access Google Drive
You have successfully locked your Google Drive app either using your Face ID/Touch ID or your Passcode. That’s it.
I Would Like to Hear From You
Please feel free to leave a comment. I would love hearing from you. Do you have a computer or smart device tech question? I will do my best to answer your inquiry. Please mention the device, app and version that you are using. To help us out, you can send screenshots of your data related to your question.
The author’s Vietnam eBook on the Battle for Tra Bong: Events and Aftermath
You’ve received or need to send a PDF through email that must be signed and sent to the other party. If you’re working with the email on your iPhone or iPad, you can sign the document directly from your mobile device. This handy capability is possible due to the Markup feature. With iOS 13, you can use a variety of tools. In this post, we will look at the SignatureMarkup tool.
This is for iPhone/iPad or similar devices using iOS 13 or above
Copyright Scott Adams, Inc./Distributed by Universal Uclick for UFS
How to Add a Signature
Follow these steps when you want to email someone a PDF from your iPhone or iPad but need to sign it before sending it.
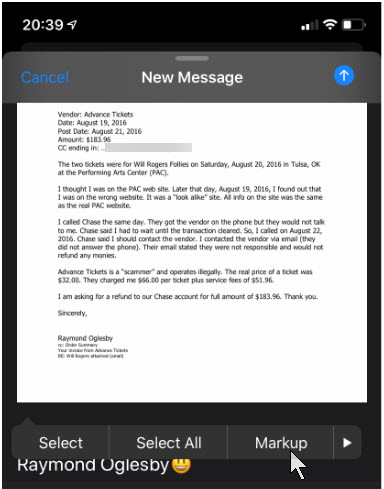
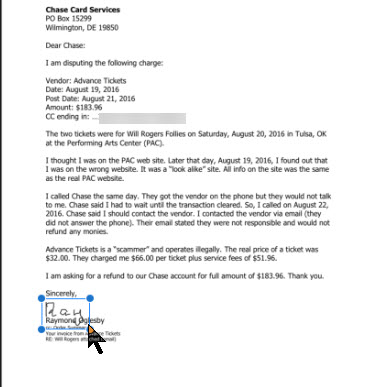
1. Make sure the PDF is stored in a convenient location, such as OneDrive, iCloud Drive or other online service accessible from your iPhone or iPad 2. Attach the file to your email 3. Tap the attachment and select Markup from the toolbar. Refer to below image:
Selecting the Markup option
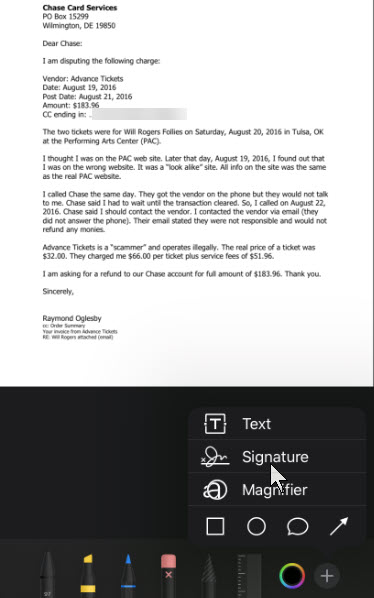
4. Swipe down to the area where you need to sign. If not, the Signature will be placed in the middle. 5. On the Markup toolbar at the bottom, tap the “+” icon and select Signature. See below image:
Selecting the Signature option
Drawing Your Signature
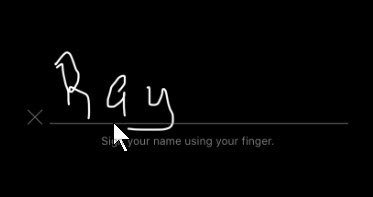
6. If you’re doing this for the first time, write your Signature via your finger tip or a stylus 7. Tap Clear if you wish to start over. See following image:
Writing your Signature
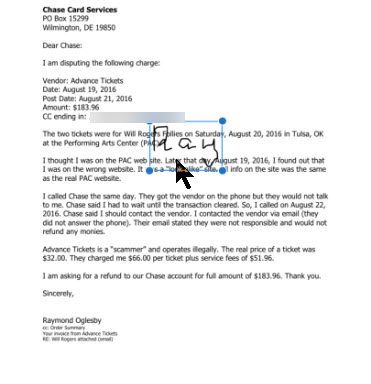
8. When you’re satisfied with your Signature, tap Done. See below image:
Your Signature in the document
Position Your Signature
9. Move the text box for your Signature to the right spot. You can also resize the box by dragging any of the corners. Refer to below image:
Positioning your Signature
Email Your Signed Document
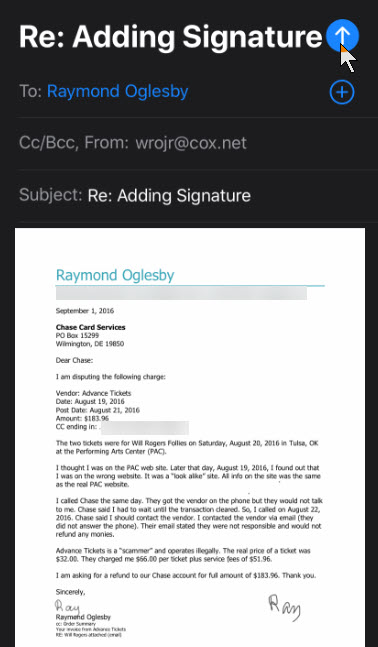
10. When the Signature is sized and positioned correctly, tap Done at the upper left corner for the new Signature. Now you are ready to send your email by tapping on the Up Arrow icon. See following image:
Email your signed document
How to Reply With Your Signature
If you receive an attachment that you need to sign and send back to the sender, the process is similar.
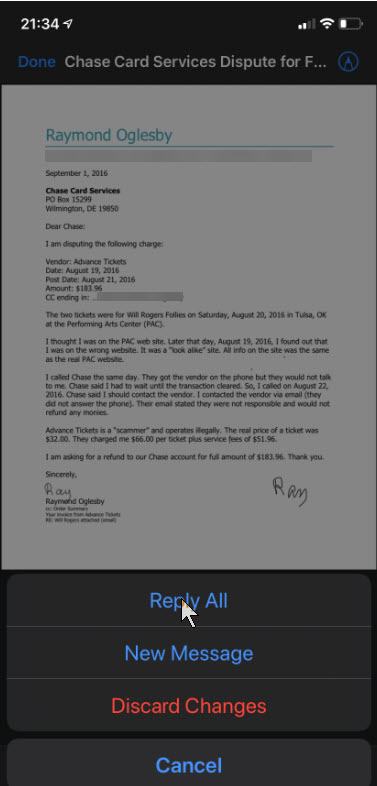
1. Tap the PDF to open it and swipe down to the area that requires your Signature 2. Tap the Markup icon in the upper right (the one that resumbles a pen tip) 3. Tap the “+” icon on the Markup toolbar at bottom righ hand corner and select Signature. Your Signature will automatically appear if you already created it via Markup. 4. Tap your Signature, position and resize it accordingly 5. When finished, tap Done 6, Tap New Message or Reply All and send the signed document back to the sender. For demonstration purposes, I just placed my Signature again, this time in lower right hand corner. Refer to below image:
Selecting the Reply All option
7. Tap the Up Arrow icon to send your return message. See below image:
Returing your signed document back to the sender
You have successfully adding your Signature to a PDF file, emailed the attachment and replied to the other party with your Signature.
I Would Like to Hear From You
Please feel free to leave a comment. I would love hearing from you. Do you have a computer or smart device tech question? I will do my best to answer your inquiry. Please mention the device, app and version that you are using. To help us out, you can send screenshots of your data related to your question.
The author’s Vietnam eBook on the Battle for Tra Bong: Events and Aftermath
If you are not careful when starting new apps, you will find yourself immersed in annoying notifications. They take up your time and are somewhat hard to turn off via the Settings app. Let’s explore how to quickly disable these notifications on your iPhone or iPad.
This is for iPhone and iPad
Copyright Scott Adams, Inc./Distributed by Universal Uclick for UFS
Turn Off Notifications
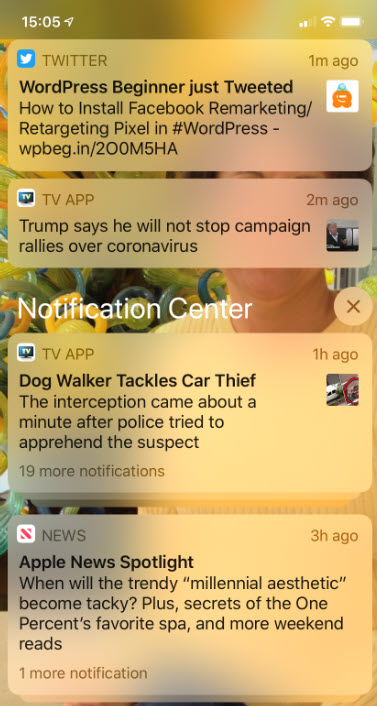
First, unlock your device to display your Home screen. On this screen, hold and swipe down from the top center of your screen to reveal your Notifications. Refer to below image:
The Notifications screen
On a Notification you would like to disable, hold and swipe to the left. See following image for WordPress Beginner notification:
Revealing your Notification actions
A sliding menu option will be displayed for three actions you may take. The actions are as follows:
Manage – allows you to manage future Notifications, and to disable it.
View – takes you to the app that initiated the Notification.
Clear – removes the Notification from your screen, but does not remove it.
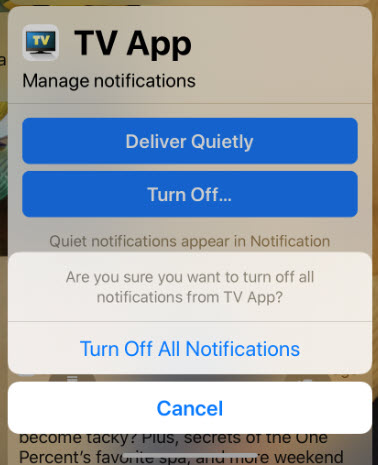
In my example, I decided to choose the TV App. Simply tap Turn Off to disable the Notification. Tapping the Deliver Quietly option allows you to receive future Notifications without receiving a sound or vibration. Refer to below image:
Turning off your Notification
A pop-up confirmation message will ask if you really want to turn off all Notifications for this app. Just tap Turn Off All Notifications. See following image:
Confirming your Notification action
From now on you will no longer receive Notifications for the chosen app.
Turn On Notifications
Let’s say you want to enable Notifications for the app you just turned off or any other Notification. In my example, I am enabling the TV App which I just turned off. To do this:
Tap Settings
Tap Notifications
Scroll down until you find the app and tap it
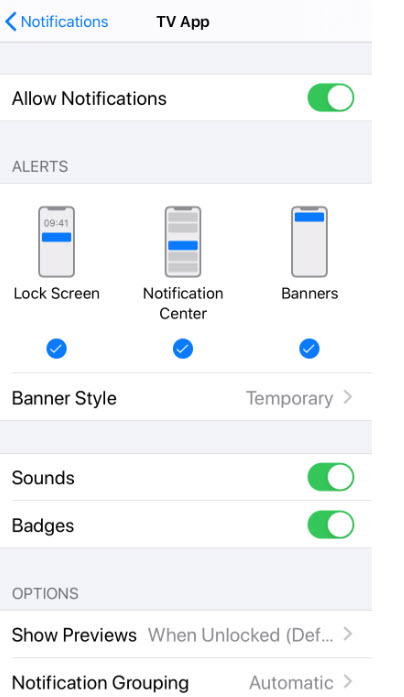
Tap the Allow Notifications toggle switch. Refer to below image:
Enabling your Notification for a particular app
The toggle will turn green and Settings will display other options you may want to configure. See below image:
Additional Notification actions
That was fairly easy. You now know how to quickly disable and enable your apps Notification.
I Would Like to Hear from You
Please feel free to leave a comment. I would love hearing from you. Do you have a computer or smart device tech question? I will do my best to answer your inquiry. Please mention the device, app and version that you are using. To help us out, you can send screenshots of your data related to your question.
The author’s Vietnam eBook on the Battle for Tra Bong: Events and Aftermath
The Files app got a huge upgrade with iOS 13 and iPadOS 13 and its support for external storage. One of the new things was the native support for Zip files. You’ll no longer need to download third-party apps and shuffle between different apps just to open a Zip file.
Note! The naming convention of zip or compressed, and unzip or uncompressed, are interchangeable. Your original files are left unchanged.
The main reason for compressing your photos or documents is to reduce the file size to send as an email attachment. Without the Zip capability, the file could be too large for emailing.
This is for iPhone/iPad running iOS 13 or higher
Copyright Scott Adams, Inc./Distributed by Universal Uclick for UFS
Creating a Zip File
To compress files, you’ll first need to add them to the Files app. You can do this easily using the Share sheet feature.
In this example, we’ll walk you through the process of ziping and unziping photos from the Photos app, but it will work using any other type of document.
Note! Your original photos or documents are left unchanged. They are just being compressed to a different location.
Open the Photos app and navigate to the album containing your photos. From there, tap on the Select button in upper right hand corner and select the Photos you want to compress by tapping on them. Refer to below image:
Selecting photos from the Photos album to be compressed
Next, tap the Share button in lower left hand corner. See below image:
Selecting the Share button in bottom left hand corner
From the Share sheet, tap on the Save to Files option. See following image:
Selecting the Save to Files option
Choose the On My iPhone or On My iPad option. Refer to below image:
Setlecting the location of your compressed photos
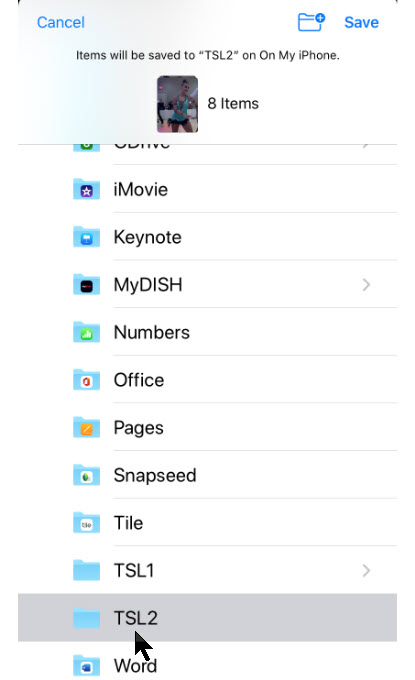
Here you can select an existing folder or create a new one, then tap the Save option. You will see a message at top of the screen displaying number of items, the folder name and On My iPhone or On My iPad location. See below image:
Selecting the folder of your compressed photos
Accessing the Files App
Navigate to the Files app and open the folder or location where you saved the photos. Then tap the Select button and select all the photos. Next, tap on the hamburger icon (the one with 3 dots) in lower right hand corner. Refer to below image:
Selecting all your photos and tapping the hamburger icon in lower right hand corner
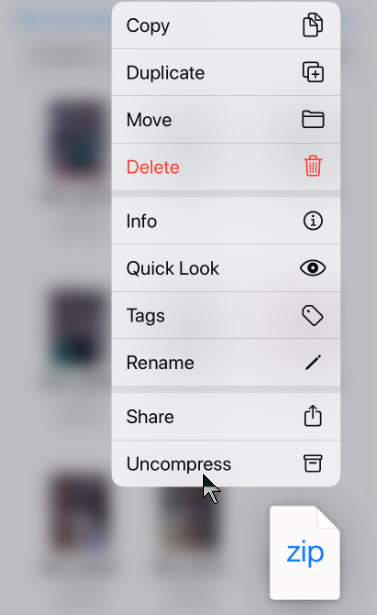
In the context pop-up menu, tap on the Compress button. See below image:
Choosing the Compress option from the context pop-up menu
You will see a new file labeled Archive.zip in the same folder. Refer to below image:
Creating the default Zip file of your compressed photos
Renaming the Zip File
To rename the Zip file, tap and hold on it until the see its Context pop-up menu. See below image:
Selecting the Rename option
Now, tap on the Rename option and type in a new name, then tap Done. See following image:
Renaming the default Zip file name
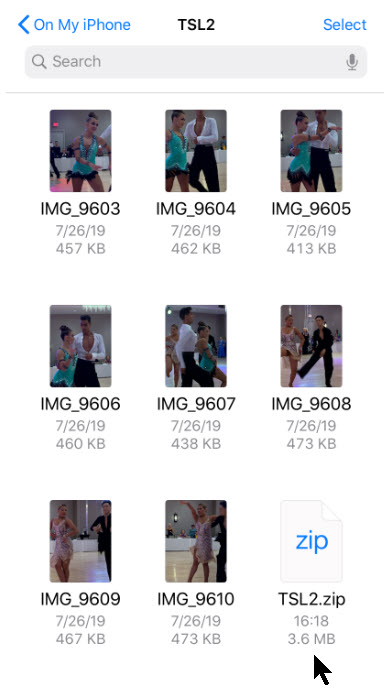
Your new compressed file will now be displayed. Refer to below image:
Viewing your new Zip file
Now you are able to send the Zip file as an email attachment or to a service like Dropbox, Google Drive or OneDrive to share with others.
Choosing Another Location to Save Your Files
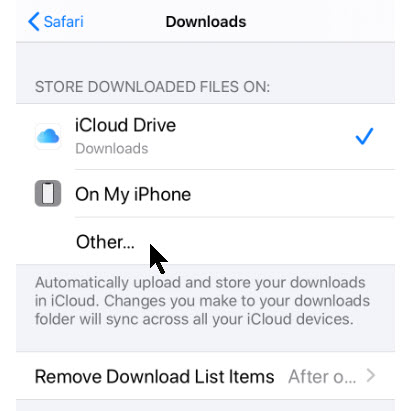
For future downloads, you might want to change your default storage location. The downloaded files, by default, are saved to the Downloads folder in iCloud Drive in the Files app. This is a great option if you have a paid iCloud storage plan because it allows your downloaded files to sync across all your devices. But if you’re on the free 5GB plan, you might not have space for storing large files, even if they are compressed.
Thankfully, you can change the default location to local or on-line storage. To do this on your smartdevice:
Open Settings app
Navigate to Safari
Select Downloads
Tap on the Other option to select any folder from the local storage (or from a cloud storage option). Note! The default is the Downloads folder. For our example, we are using the default location and folder. See below image:
Selecting where to save your iPhone downloads
Unzip your File
The process of unzipping an archive in the Files app is relative easy.
Again, you’ll need the Zip file to be in the Files app. You can follow the same process we did in the previous section to add a Zip file to the Files app.
Navigate to the location where you saved the Zip file. Refer to below image:
Location of your saved Zip file
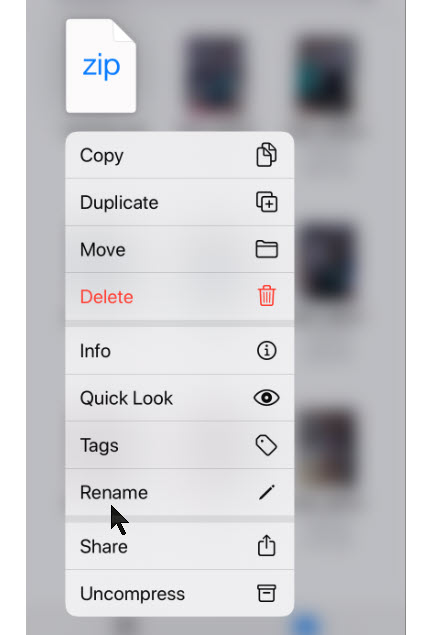
Tap and hold on the file name. Select the Uncompress option from the context pop-up menu. See following image:
Selecting the Uncompress option from the context pop-up menu
You will see a new folder with the same name as the Zip file. Tap on it to see the contents of the Zip file. Your photos are now unzipped. See below image:
The unzipped files
You have successfully compressed and uncompressed your photos.
I Would Like to Hear from You
Please feel free to leave a comment. I would love hearing from you. Do you have a computer or smart device tech question? I will do my best to answer your inquiry. Please mention the device, app and version that you are using. To help us out, you can send screenshots of your data related to your question.
The author’s Vietnam eBook on the Battle for Tra Bong: Events and Aftermath
As you are browsing the web, you may come across a PDF file you want to save for later viewing. Let’s examine how to do this.
This if for Apple iPhone and iPad
Copyright Scott Adams, Inc./Distributed by Universal Uclick for UFS
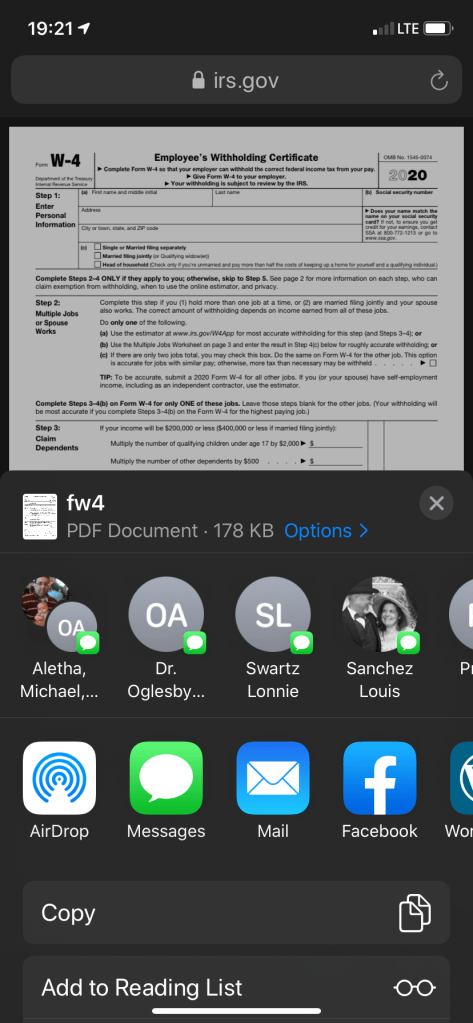
While viewing the PDF file in Safari, tap on the Share button. The Share button resembles a rectangle with an up arrow. On an iPhone, the button will be at the bottom of the screen. For an iPad, the Share button is located just to the right of the browser’s address bar. See following image for the iPhone location:
The Share icon at bottom center of the screen
Ways to Save Your File
After tapping the Share button, you will see a list of ways to share or save the file, including sending the file to others by a text message or email. Refer to below image:
Ways to share your file
Swipe down the list to find the app you want to open with. See following image:
More ways to save your file. Showing the Save to Files option
Use Built-In Apps
You may want to chose the built-in apps like Books or Files. If you want to use Books, the file will be available in the Books app. If you chose Files, then chose your save location.
Use Outside Services
Some people prefer to save their file to an outside service like Dropbox, Google Drive or Microsoft OneDrive. The choice is up to you.
My Example
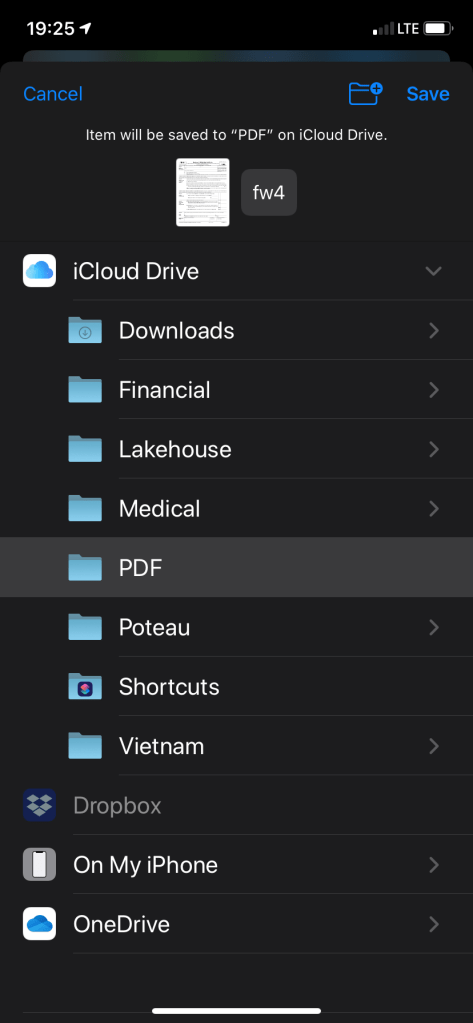
For my example, I am saving the file using the Files option to the PDF folder on the iCloud Drive. Refer to below image:
Saveing the file to iCloud Drive using the PDF folder
Later, if you chose the Files app, you will see the PDF file you just downloaded; same for the Books app. See following image on my choosing the Files app:
Chosing the Files App
Getting ready to open the PDF file
As you have seen, you have a lot of choices, thanks to Apple engineers.
I Would Like to Hear from You
Please feel free to leave a comment. I would love hearing from you. Do you have a computer or smart device tech question? I will do my best to answer your inquiry. Please mention the device, app and version that you are using. To help me out, you can send screenshots of your data related to your question.
The author’s Vietnam eBook on the Battle for Tra Bong: Events and Aftermath
This is a summary of Zoom posts I have blogged about over the past few weeks. During the COVID-19 pandemic, many of us are working from home using Zoom for video/audio conferencing. If you take some time, you can make the video meeting a smooth experience for all participants. The host of the Zoom meeting has the responsiblity to setup and run the meeting. By exploring the following blog posts, you can achieve your goal of hosting a successful meeting, making it easy for the participants to join the video conference and keeping the Zoom troll attacks at a minimum.
This if for a PCs and Macs browsers and smartdevices that support Zoom
Copyright Scott Adams, Inc./Distributed by Universal Uclick for UFS
Following are my blog links for a Zoom video/audio meeting:
Please feel free to leave a comment. I would love hearing from you. Do you have a computer or smart device tech question? I will do my best to answer your inquiry. Please mention the device, app and version that you are using. To help us out, you can send screenshots of your data related to your question.
The author’s Vietnam eBook on the Battle for Tra Bong: Events and Aftermath
For most users, battery life can last most all day on modern iOS devices. However, you can change some iOS 13 settings to maximize the most of your battery usage.
This is for iOS devices iPhone and iPad running iOS 13 and above. Some tips can be applied in earlier versions.
Copyright Scott Adams, Inc./Distributed by Universal Uclick for UFS
Disable Dynamic Wallpapers on Your iOS Device
Dynamic Wallpapers was a fun UI feature that was added to iOS 7, but it drains battery life. If you use Dynamic Wallpapers and experience issues with battery life, you might want to disable the app and pick a standard background image by following these steps:
Open the Settings app
Select Wallpaper > Choose a New Wallpaper > Stills
Select a solid color, then set it as the Home Screen background and Lock Screen background.
Note: Selecting the solid black wallpaper on an OLED screen will cause the device to use less power. Solid black pixels do not use power to display the screen.
Use Dark Mode on Your Device
Using Dark Mode can increase the battery life on OLED devices because it swaps out the white backgrounds for dark backgrounds that use less battery life as mentioned above. To enable Dark Mode follow these steps:
Open the Settings app
Select Display & Brightness
Change the Appearance from Light to Dark
Disable Raise to Wake
Raise to Wake was introduced with the iPhone X as a way to view the Lock Screen Notifications by raising your iPhone into portrait mode. This is a great feature, but it can cause your screen to turn on throughout the day and drain your battery life. To disable this feature, perform the following steps:
Open the Settings app
Navigate to Display & Brightness
Disable the option for Raise To Wake
With this feature disabled, you can still tap the screen to turn it on, but raising it will not cause the screen to turn on.
Disable Background App Refresh on Cellular
Background App Refresh is a great feature in iOS that allows apps to update in the background so that the next time you launch an app, everything is already loaded.
While you shouldn’t disable this feature for all apps, it’s good to review the apps that do use it and disable any that aren’t regularly used so they aren’t wasting battery life.
To check which apps are using Background App Refresh, follow these steps:
Open the Settings app
Navigate to General > Background App Refresh
Disable this feature for any apps in this list that aren’t frequently used
When Background App Refresh is disabled and you quit an app that’s in this list, it will no longer download data in the backgroud; instead, you must open the app for it to download new content.
Background App Refresh has a feature that allows apps to use it only when you’re connected to Wi-Fi, not when you’re running on cellular data. To enable Wi-Fi-only Background App Refresh, complete the following steps:
Open the Settings app
Navigate to General > Background App Refresh > Background App Refresh
Select Wi-Fi instead of the default Wi-Fi & Cellular
Ensuring that apps use Background App Refresh only when on Wi-Fi means it will not use battery-draining cellular data to perform the requests.
Disable Motion Effects on Your iOS Device
Disabling motion effects means that the cute animations throughout iOS and third-party apps won’t be as prominent, but if you can live without them, you can save battery life.
To disable motion effects, perform the following steps:
Open the Settings app
Navigate to Accessibility > Motion
Enable the option for Reduce Motion
Manage Bluetooth Connections on Your iOS Device
If you have multiple Bluetooth devices connected to your iOS device and are not using them, it may be a good opportunity to review the items and remove any you’re not currently using.
Follow these steps to review and remove Bluetooth devices:
Open the Settings app
Select Bluetooth, and tap the “i” next to the connected devices you wish to disconnect
Tap Forget This Device (or Disconnect), if available
You can also turn Bluetooth off completely by following these steps\:
Open the Settings app
Select Bluetooth
Toggle the switch to OFF
Manage Location Settings on Your iOS Device
Location and the use of GPS to track your device for various apps can be a huge battery hog, and iOS 13 includes a new way to manage these settings.
It’s worthwhile to manage your loccation settings in apps to ensure only those that need to use your location have access to do so.
To review and manage location tracking follow the below steps:
Open the Settings app
Select Privacy
Tap Location Services
You should check and control the location tracking for each individual app. Remember that disabling Location Services may hinder the apps functionally.
Place Your iPhone Face Down When Not in Use
This is more of a tip than a setting change. Starting with the iPhone 6, Apple made its iPhones so that if you turn one face down it will keep the screen from lighting up upon notifications, which helps prevent battery drain.
I Would Like to Hear from You
Please feel free to leave a comment. I would love hearing from you. Do you have a computer or smart device tech question? I will do my best to answer your inquiry. Please mention the device, app and version that you are using. To help us out, you can send screenshots of your data related to your question.
The author’s Vietnam eBook on the Battle for Tra Bong: Events and Aftermath
Internet trolls are crashing Zoom video conferences and flooding them with inappropriate content. Here are some ways to stablize your meetings and keep Zoom running smoothly.
This if for a PCs and Macs browsers and smartdevices that support Zoom
opyright Scott Adams, Inc./Distributed by Universal Uclick for UFS
1. Close All Running Apps
Before you start your video conference call or join the on-line meeting, save your work and close all running apps. Too many open apps will slow down your computer while you’re on a video call. This is because the call requires a lot of resources, especially if you’re on a lightweight laptop.
2. Check the Speed of Your Browser
Before your call, use a speed test tool, like Fast.com or Speedtest.net, to test your internet speed. If you’re not getting enough speed, move closer to your Wi-Fi router or try some other tips to boost your Wi-Fi signal. You can also use one of these tools to speed up your internet connection. Minimum bandwidth is 600 Kbps (up/down) and recommended is 1.5 Mbps (up/down). You may need to call your internet service provider and/or upgrade your equipment, which would be the best choice, if your equipment does not meet the minimum.
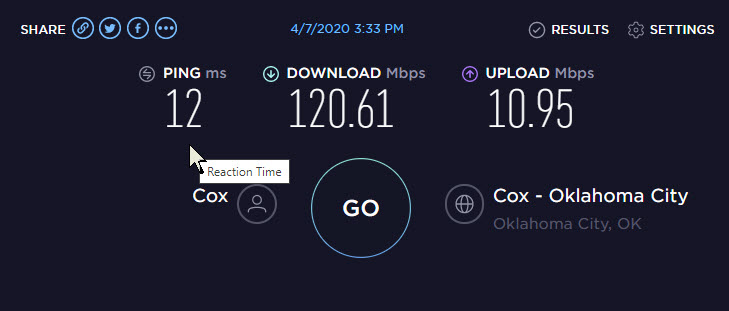
If you run both programs, you will notice a signifance difference in the speed test. This is due to the time of day you run the test, servers they are using and its location. Hopefully, your equipment exceeds the minimum speed for a Zoom meeting.
Below are my results in running Speedtest for Windows (Note that I greatly exceed the minimum):
Results in running SpeedTest on my browser
3. Test Your Audio and Video
You can also launch a test Zoom meeting anytime at zoom.us/test. This will launch a meeting where you are the only participant (you can invite others). This option lets you test your audio and video even if you don’t have the Zoom app installed.
See the article Joining A Test Meeting in the Zoom Help Center for more information about using the using the Zoom Test Meeting feature.
4. Mute Yourself When Not Speaking
When you’re in a video meeting with a lot of participants, it’s best to keep yourself muted. Only unmute yourself when you need to speak.
This eliminates any background noise on your end. Also, if anyone walks in the room and starts talking while you’re on a call, you won’t have to rush to find the mute button.
5. Never Use Your Personal Meeting ID
Each Zoom user has a personal meeting ID; think of it as your Zoom phone number. When creating a meeting, you can use your personal ID or generate a random one. You should always generate a random meeting ID.
If your personal meeting ID is leaked to the web, Zoom trolls are free to harass you with calls whenever they please.
6. Always Use a Meeting Password
For a video meeting other than a large classroom, town hall or lecture meeting, passwords should be turned on.
Make sure the password is kept safe. Zoom sends meeting passwords out to all invitees when invitations are sent. If you’re worried that someone unwanted may get the password, create the meeting without one set, update the meeting to add a password and send it out to invitees in a separate email or via another form of communication.
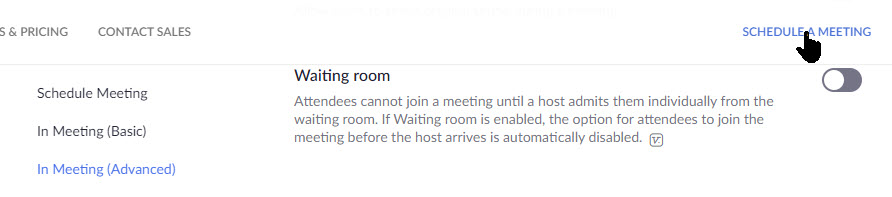
7. Set Join the Waiting Room Option
When you enable the waiting room for a Zoom meeting, each user who connects is put in a queue that the meeting host has to approve. If you don’t recognize someone in the waiting room, simply don’t let them in.
To enable this feature, navigate to Settings > In Meeting (Advanced), scroll down till you see the following option and toggle it to the On position. See below image:
Setting Join Waiting Room option
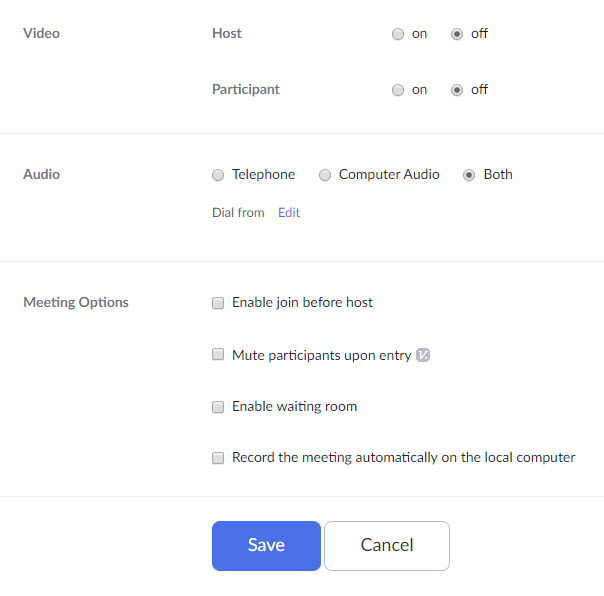
8. Set Meeting Options
Under Meetings > Schedule a Meeting, set the following options:
Video > Host to On
Video > Participant to Off especially if your participates are using older equipment
Audio set to Both
Meeting Options set Emable waiting room to On. Set Record the meeting automatically on the local computer should only be set to On for the host. You don’t want each particpant to be recording and viewing at the same time. If a participate wants a recording, the host can send the video via email or some other form of communication.
Always Save you changes. Refer to following image:
Setting other options
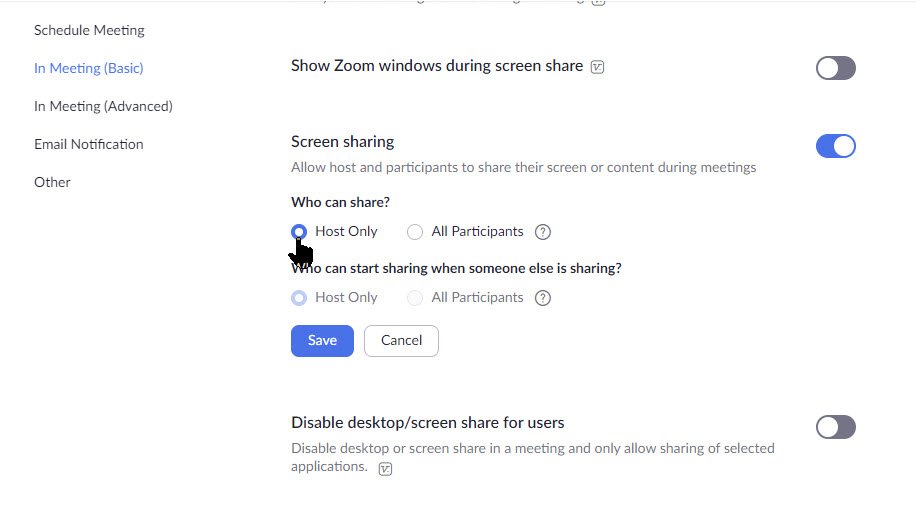
9.Turn Off Screen Sharing
Zoom trolls need to be able to visually take over a meeting to be effective. Preventing anyone from sharing their screen aside from the meeting host stops them from being able to go on the attack.
Under Settings > In Meeting (Basic), scroll down till you see the Show Zoom windows during screen share and set the following options:
Screen sharing, toggle to On
Who can share, toggle Host Only to On
Who can share when someone else is sharing, toggle Host Only to On
Always Save your changes. Refer to below image:
Setting screen share option
I Would Like to Hear from You
Please feel free to leave a comment. I would love hearing from you. Do you have a computer or smart device tech question? I will do my best to answer your inquiry. Please mention the device, app and version that you are using. To help us out, you can send screenshots of your data related to your question.
The author’s Vietnam eBook on the Battle for Tra Bong: Events and Aftermath