InserRAYMOND OGLESBY @RaymondOglesby2
March 4, 2025 – 4 minutes read time
Overview
Apple’s iOS 18 update brings powerful new search functions to the Photos app, allowing you to find specific images with unprecedented precision. Let’s explore the new Photos app.
Photos Searching
iOS 18, the key to effective searching in Photos is using natural language. Instead of simple keywords, try describing the photo you are looking for in detail. The app can now understand complex queries and find images based on specific elements within them.
The new search function is also pretty handy at finding objects and scenes. Try queries like “car next to lake” or “sunset over Tulsa.” You can combine multiple elements in your search, such as “blue flowers in vase by window.”
For food lovers, searches like “pizza with mushrooms” or “steak and chips on the table” can help you find culinary inspiration from your photo library. When searching for people, you can now include details about their appearance or actions. “Rachel in the green hat with a wine glass” or “Susan in a wedding dress” are examples of how specific you can get.
Videos Searching
The Photos app can even search within videos. If you remember a specific moment in a video but can not recall which one, try describing the scene. For instance, “baby crawling” or “fireworks over Grand Lake” can take you directly to that moment.
Note! For these advanced search features to work, the Photos app needs time to index your library. This process happens on your device to protect your privacy, so be patient if searches aren’t immediately accurate after updating to iOS 18.
Why You Will Like This Tip:
- Find Photos of nearly anything using the new search feature.
- Search for objects or text that appear in your photos.
System Requirements
This tip works on iPhones running iOS 18 or later. The screenshots are from iPhone 14 Pro running iOS 18.1
Click here to learn how to update your iPhone to the latest iOS version.
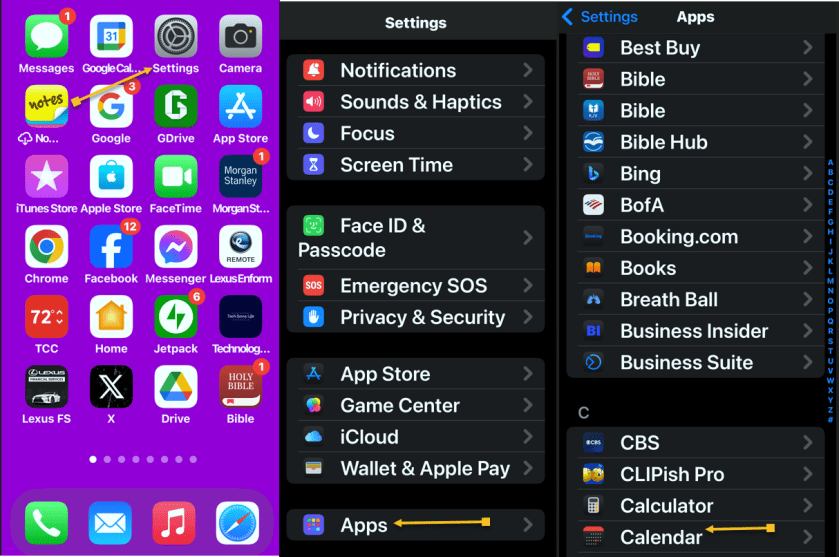
Using Photos Search
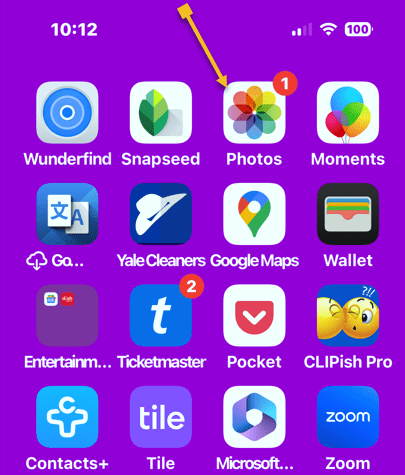
First, open the Photos app. Refer to the below image:
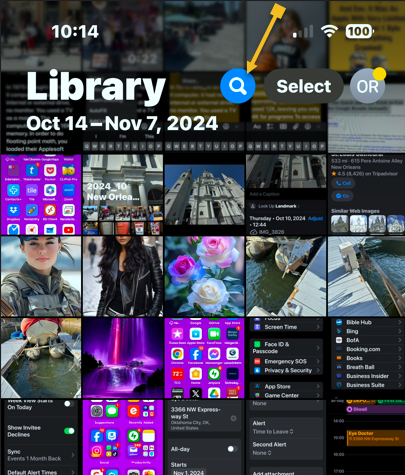
Next, tap the Search icon. See the below image:
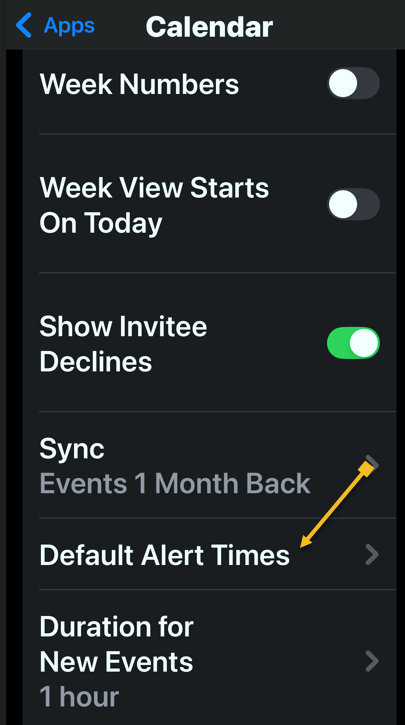
Now, you will see some personalized suggestions, which you can tap. Or you can tap the Search bar to type in your own search terms. See the following image:

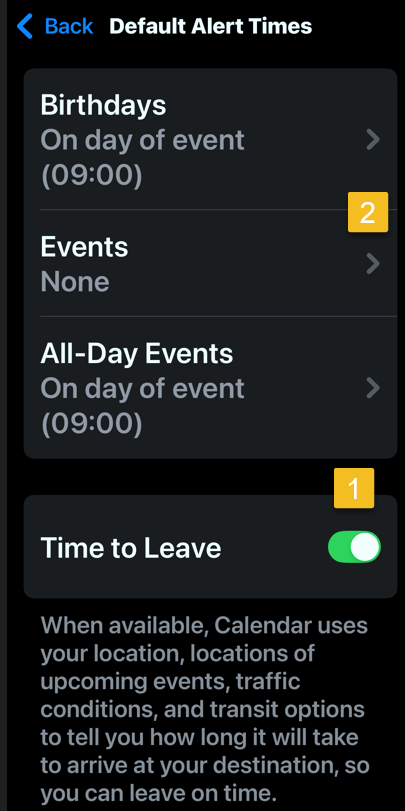
Next, once you enter a search term, you will see all the photos in your library that match. Refer to the below image:

For example, we are searching for “Aletha Niagara Falls”. Now, we can see all the photos related to “Aletha in Niagara Falls”. See the below image:

Related
Aletha, my wife, also has a blog at Watercress Words, exploring and sharing the HEART of health.
Summary
That’s how to search photos or videos on the iPhone. Try it out yourself! Put in a few search terms and see what you get! While iOS 18 made some controversial changes to the Photos app, this is one change that you will love. It’s super easy to find the exact photo you are looking for every time.
Disclaimer
Technology is constantly evolving, and smartphone and desktop tech rarely remains static. Therefore, the information in this post is only accurate as of the date it was written. Blog posts that are older than six months may contain instructions that are no longer compatible with your device or operating system. We hope that the content from previous posts continues to function as intended. Thank you for reading TechSavvy.Life, where technology works for you.
Quote For the Day
. “We are stuck with technology when what we really want is just stuff that works.”
― Douglas Adams
X (Twitter) Info
Pretty impressive Photos app? Please feel free to share this post! One way to share is via Twitter.
Just click the Tweet icon below. This will launch Twitter where you click its icon to post the Tweet.
Checkout TechSavvy.Life for blog posts on smartphones, PCs, and Macs! You may email us at contact@techsavvy.life for comments or questions.
Tweet
I Would Like to Hear From You
We value your feedback! Was this post helpful? Please share your comments with us. If you have a tech question related to your computer or smart device, feel free to reach out. Just send an email to contact@techsavvy.life, and be sure to include the device, app, and version you are using. To assist us further, you can also attach screenshots related to your inquiry.
The author’s Vietnam eBook on the “Battle for Tra Bong Vietnam: Events and Aftermath” can be accessed from a Kindle device or the Kindle App for a desktop or smartphone. The apps are free.