If you are big on security (or keeping a secret), you might not want the Edge browser to keep a permanent record of the sites you browse. If that’s the case, you can use a setting in Edge to automatically erase your data every time you quit the program.
If you are big on security (or keeping a secret), you might not want the Edge browser to keep a permanent record of the sites you browse. If that’s the case, you can use a setting in Edge to automatically erase your data every time you quit the program.
This is for PCs and Macs running Microsoft Edge. Screen shots are from Windows 10
Copyright Scott Adams, Inc./Distributed by Universal Uclick for UFS
It lets you delete everything at once on Windows 10 PCs and Macs. You get an almost fresh browser every time you open it to browse the internet. It is handy when you browse only internet banking sites and some other private sites to do something specific.
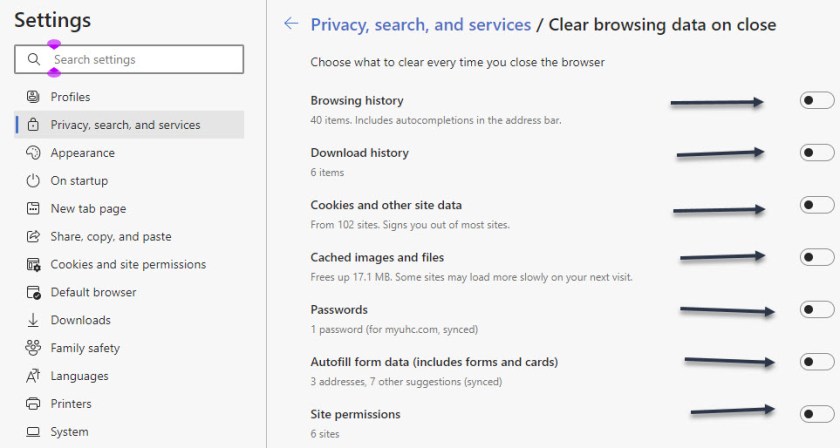
You can clear the following sets of data:
browsing history
download history
cookies and other site data
cached images and files
passwords
autofill form data
site permissions
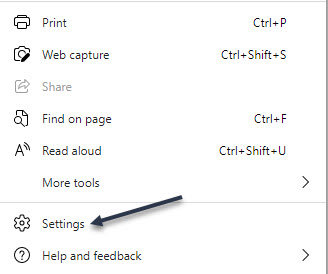
To setup this feature, first, open your Edge browser. Now, click the three-dot hamburger menu icon from the toolbar. Refer to below image:
Accessing the toolbar menu button
Next, from the drop-down menu, choose the Settings option. See below image:
Accessing Settings
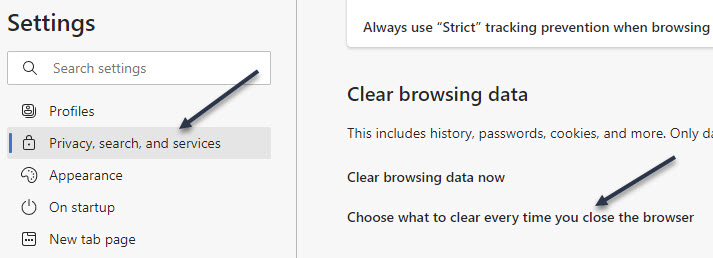
Now, locate the Privacy, search, and services section from the sidebar. Next, from the Clear browsing data section, click the Choose what to clear every time you close the browser option. See following image:
Accessing clear browsing data for Edge
Now, you will see a list of data that you can clear when closing your browser. Click the toggle next to each data type that you want to clear. Refer to below image:
Enabling or disabling what to clear when closing Edge
That’s it. You have set up and started the automatic clearing process. The next time you close the Microsoft Edge browser and start it up again, the designated data will be cleared.
Quote For the Day
“The Internet is so big, so powerful and pointless that for some people it is a complete substitute for life”.
Andrew Brown
Please feel free to share this post! One way to share is via Twitter.
Just click the Tweet icon below. This will launch Twitter where you click its icon to post the Tweet.
Check out TechSavvy.Life for blog posts on smartphones, PCs, and Macs! You may email us at contact@techsavvy.life for comments or questions.
Please feel free to leave a comment. I would love hearing from you. Do you have a computer or smart device tech question? I will do my best to answer your inquiry. Just send an email to contact@techsavvy.life. Please mention the device, app and version that you are using. To help us out, you can send screenshots of your data related to your question.
The author’s Vietnam eBook on the Battle for Tra Bong: Events and Aftermath
While changing your browser’s font may not be a pressing issue, sometimes it is fun to make a change. We going to explore how to change the default fonts in Google Chrome.
While changing your browser’s font may not be a pressing issue, sometimes it is fun to make a change. We going to explore how to change the default fonts in Google Chrome.
This is for devices running Google Chrome
Copyright Scott Adams, Inc./Distributed by Universal Uclick for UFS
Changing Chrome’s Fonts
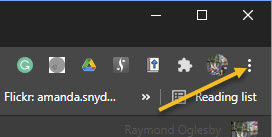
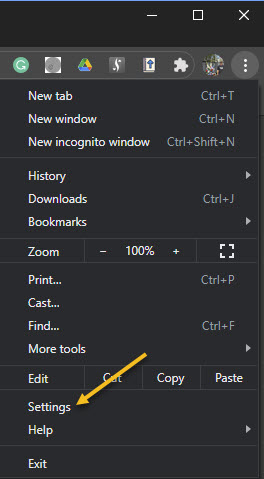
In order to change the fonts in Google Chrome, you will need to access your Customize Fonts section. First, open your Chrome browser. Next, click on the three 3-dot (hamburger icon) in the upper right-hand corner. Refer to below image:
Accessing your Chrome menu
Now, click on Settings. See below image:
Accessing Settings
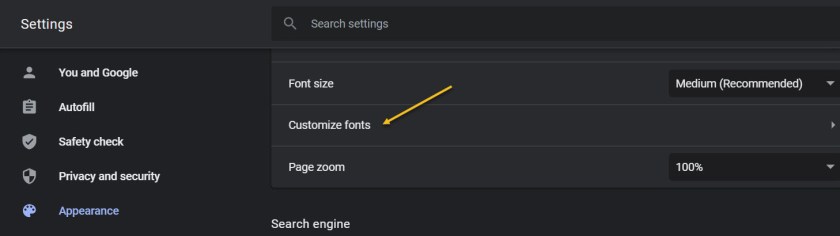
Next, click on the Appearance tab in the sidebar. Now, scroll down until you get to the Customize Fonts section and click on it. See following image:
Accessing your customize fonts section from the Appearance tab
Now, you can change all your font settings. Just click on each drop-down box and select a font from the listing. It is recommended you write down the default fonts in case you want to revert to the original ones. Refer to below image:
Accessing the drop-down boxes to change your fonts
When finished, exit Settings and restart your Chrome browser for the changes to take effect.
Quote for the Day
If future generations are to remember us more with gratitude than sorrow, we must achieve more than just the miracles of technology. We must also leave them a glimpse of the world as it was created, not just as it looked when we got through with it.
Lyndon B. Johnson, Former President of the United States of America
That’s it. Please feel free to share this post! One way to share is via Twitter.
Just click the Tweet icon below. This will launch Twitter where you click its icon to post the Tweet.
Check out TechSavvy.Life for blog posts on smartphones, PCs, and Macs! You may email us at contact@techsavvy.life for comments or questions.
Please feel free to leave a comment. I would love hearing from you. Do you have a computer or smart device tech question? I will do my best to answer your inquiry. Just send an email to contact@techsavvy.life. Please mention the device, app and version that you are using. To help us out, you can send screenshots of your data related to your question.
The author’s Vietnam eBook on the Battle for Tra Bong: Events and Aftermath
Have you ever noticed the message you see when you install a browser extension in Chrome, for example? For most browser extensions, a message appears stating that the extension can “Read and modify all of your information on the websites you visit.”
Have you ever noticed the message you see when you install a browser extension in Chrome, for example? For most browser extensions, a message appears stating that the extension can “Read and modify all of your information on the websites you visit.” Refer to below image where we are looking at DuckDuckGo Privacy Essentials extension, an Internet privacy company, on their permissions:
Viewing a Chrome extension for permissions
What! Does not look secure to me as it reads all data on your device. You want to remove this browser extension and similar extensions for privacy issues.
To review your Chrome browser extensions:
Open Chrome, and click the 3-dot hamburger icon in upper-right hand corner.
Click on More Tools, then Extensions. They will be listed alphabetically.
Find a browser Extension that is enabled. Click on its Details button. Now, scroll down to the Permissions and Site Access sections to view how it is accessing your data.
You may be surprised as to the information the Extension is collecting on you. Let’s explore what this is about.
This is for modern day browsers like Edge, Chrome, Firefox, and Safari. Screenshots are from Chrome desktop version
Copyright Scott Adams, Inc./Distributed by Universal Uclick for UFS
This means that the browser extension has full access to all web pages you visit. It can see which web pages you are browsing, read their content and look at everything you write. It can even modify the web pages; for example by inserting additional ads. If the extension is malicious, it can collect all your private information; from web activity and emails you write to your passwords and financial information; and send it to a remote server on the Internet.
I am tired of receiving fake emails, texts, tweets, posts, and so on. Recently I have been receiving media from Thank You, USPS, Wells Fargo, Cox Communications, and so on.
This is primarily due to my accounts being compromised and sold. Another reason is some browser extensions is watching my activity.
If a browser extension is completely reliable and trustworthy, that’s fine. The browser extension may behave responsibly and not capture any data or interfere with your banking information.
We do not say that you have to uninstall every browser extension you have. Instead, you just realize the enormous access you give to the browser extensions you install and act on accordingly.
See below image for a popular Chrome extension, Todolist, permissions allowing access to its web site:
Viewing a Chrome extension for permissions
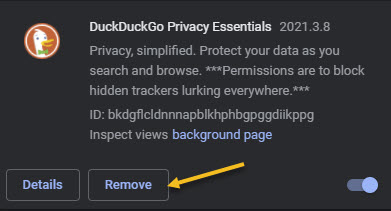
But keep this in mind; if you do not trust the add-on, you may not want to run it in the first place. We recommend you click the Remove button to delete any extension you do not trust. See following image:
Removing a Chrome extension
That’s it. Please feel free to share this post! One way to share is via Twitter.
Just click the Tweet icon below. This will launch Twitter where you click its icon to post the Tweet.
Check our TechSavvy.Life for blog posts on smartphones, PCs, and Macs! You may email us at contact@techsavvy.life for comments or questions.
Please feel free to leave a comment. I would love hearing from you. Do you have a computer or smart device tech question? I will do my best to answer your inquiry. Just send an email to contact@techsavvy.life. Please mention the device, app and version that you are using. To help us out, you can send screenshots of your data related to your question.
The author’s Vietnam eBook on the Battle for Tra Bong: Events and Aftermath
No matter who you are or what your profession is, the Calculator app is one of the most used applications. If you use the Calculator app extensively, here is how you can keep Calculator “always on top” in Windows 10.
No matter who you are or what your profession is, the Calculator app is one of the most used applications. If you use the Calculator app extensively, here is how you can keep Calculator “always on top” in Windows 10.
This is for devices running Windows 10
Copyright Scott Adams, Inc./Distributed by Universal Uclick for UFS
In the Windows 10 build 18956 (20H1), Microsoft added this new option to the Calculator app.
The Calculator has a number of different modes, including Standard, Scientific, Graphing, CurrencyConversation, and more. Note! This feature only works with the Standard mode, but it is still handy.
This feature is pretty useful when you use the Calculator in conjunction with some other app. If you are writing a document and need to do a couple of quick calculations, switching between applications each and every time is a bit annoying. So let us save some time and enable this feature.
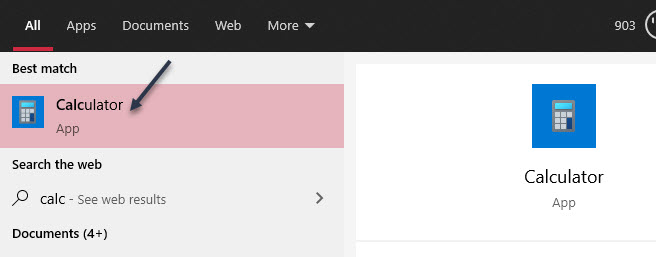
First, open the Calculator app from the Start Menu pinned apps or Tiles; or click the Cortana Search box in the taskbar, type calc then open Calculator from the search result. Refer to below image:
Accessing the Calculator app
Now, the Calculator will open in the last mode you used. If you are not already in Standard mode, click the hamburger icon in the top left and select it. See below image:
Accessing the drop-down menu to select Standard calculator
Next, tap the keep-on-top icon next to the Standard title. See following image:
Selecting the “always on top” icon
The Calculator will pop-out to a slightly smaller window that will always “stay on top”. You can drag it around by grabbing the top bar. To slightly resize it, grab the edges of the window. Refer to below image:
The Standard calculator
To close the window, just click the “X”. No more switching back and forth between windows to do simple math.
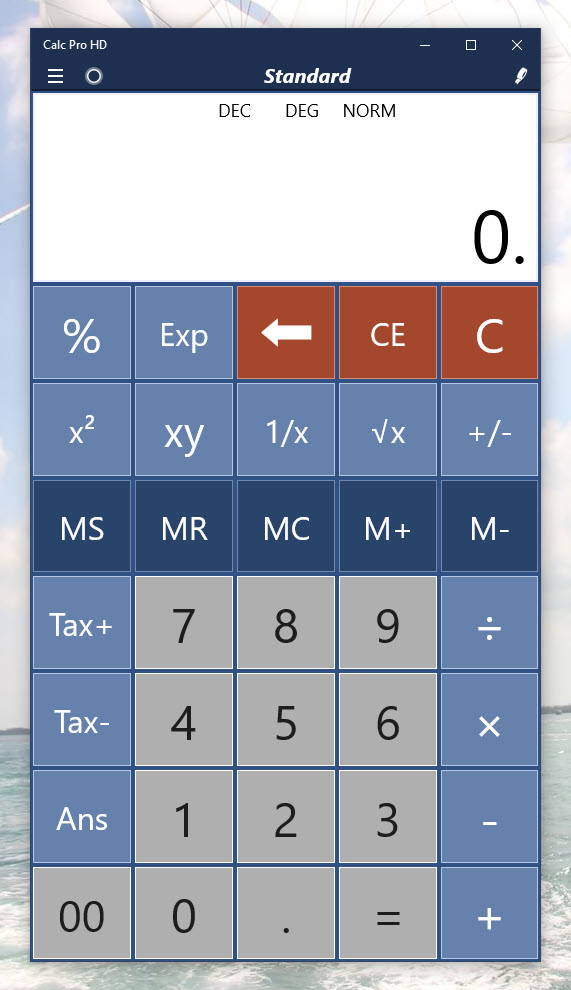
An alternative Calculator that I recommend is Calc Pro HD. There is a free and paid version. It offers a more attractive interface plus more features. The paid version offers 10 calculators to meet your needs.
Although “not always on top”, it is “always available” by allowing you to use voice commands to perform your calculations!
Please feel free to leave a comment. I would love hearing from you. Do you have a computer or smart device tech question? I will do my best to answer your inquiry. Just send an email to contact@techsavvy.life. Please mention the device, app and version that you are using. To help us out, you can send screenshots of your data related to your question.
The author’s Vietnam eBook on the Battle for Tra Bong: Events and Aftermath
Windows 10 has a hidden video editor that works a bit like Windows Movie Maker or Apple iMovie. You can use it to trim videos or create your own home movies and slideshows. You can even have it create videos automatically. Lets explore how to find and use the Video Editor.
Windows 10 has a hidden video editor that works a bit like Windows Movie Maker or Apple iMovie. You can use it to trim videos or create your own home movies and slideshows. You can even have it create videos automatically. Lets explore how to find and use the Video Editor.
This is for devices running Windows 10
Copyright Scott Adams, Inc./Distributed by Universal Uclick for UFS
Open Video Editor Inside of Photos App
You can get started with a custom video project by launching the Photos app from your Start menu. Enter “Photos” (without quotes) in the Cortana search box next to Start. Now, click the the New Video button and select an entry from the drop-down list. Also, you can switch to the Video Editor app. This is confusing; launching the Video Editor inside of Photos. Where to launch the Video Editor depends on what you are trying to do. (See section on DetermineWhere to Launch the Video Editor below). Refer to below image:
Selecting a new video inside the Photos app
Open Video Editor Outside of Photos app
Also, Windows 10 now lets you launch the Video Editor from the Start menu, too. First, click the Start menu. Next, in the Cortana search box next to Start, enter “Video Editor” (without quotes). Now, in the upper left-hand corner, click the Video Editor app shortcut. See below image:
Selecting the Video Editor app outside of the Photos app
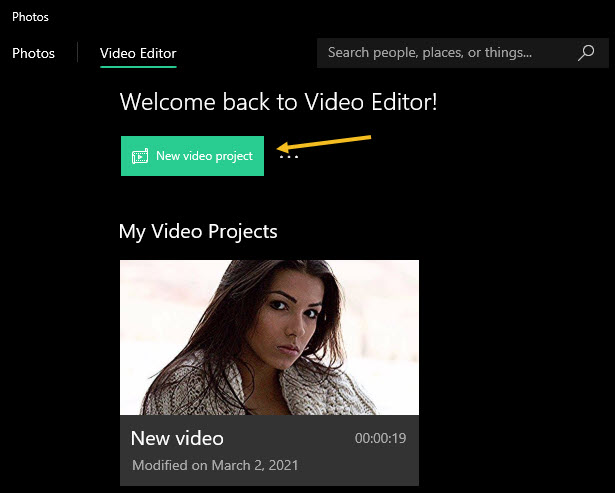
Now, launch the Newvideo project shortcut in the upper left-hand corner. If you have used the Video Editor, a Welcome Back message will be displayed. Note! You are now in the Photos app under the Video Editor tab. See following image:
Selecting a new video project
This shortcut opens the list of “Video Projects” in the Photos app. From here, you can create a new video using the New Video tab, then click the Add button and chose a location for your photos. Also, you may edit an existing video using the Pencil icon. Refer to below image:
Create or Edit a video
Determine Where to Launch the Video Editor
To quickly make smaller edits on individual videos—for example, to trim an individual video rather than combining multiple videos together; you must open those videos directly in the Photos app from File Explorer.
Using the File Explorer
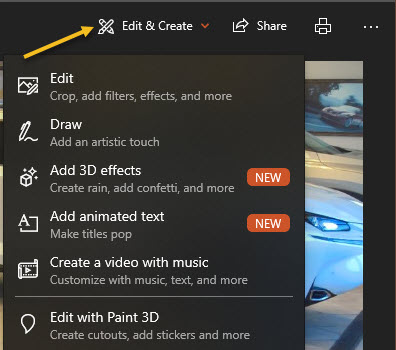
First, select an image from the File Explorer, open the image in the Photos app, Now, click on the Edit & Create button and select an entry from the drop-down list. See below image:
Create. add effects, or edit a video
From here, play around with the various tools and effects. Click Finish when done to export your video in mp4 format. Have fun in creating and editing your videos.
That’s it. Please feel free to share this post! One way to share is via Twitter.
Just click the Tweet icon below. This will launch Twitter where you click its icon to post the Tweet.
Check out TechSavvy.Life for blog posts on smartphones, PCs, and Macs! You may email us at contact@techsavvy.life for comments or questions.
Please feel free to leave a comment. I would love hearing from you. Do you have a computer or smart device tech question? I will do my best to answer your inquiry. Just send an email to contact@techsavvy.life. Please mention the device, app and version that you are using. To help us out, you can send screenshots of your data related to your question.
The author’s Vietnam eBook on the Battle for Tra Bong: Events and Aftermath
Has Windows been acting flaky? It could be a specific piece of software that’s wreaking havoc on your system. Maybe you have installed a new application or driver. Perhaps Windows is crashing or blue screening and you have no idea why. Do not worry because all is not lost if you have a system Restore Point waiting to roll your PC back to functionality.
Has Windows been acting flaky? It could be a specific piece of software that’s wreaking havoc on your system. Maybe you have installed a new application or driver. Perhaps Windows is crashing or blue screening and you have no idea why. Do not worry because all is not lost if you have a system Restore Point waiting to roll your PC back to functionality.
This is for devices running Windows 10. Also works for Windows 8 and 7. Screenshots are from Windows 10
Copyright Scott Adams, Inc./Distributed by Universal Uclick for UFS
A Restore Point is essentially a snapshot of Windows at any given time. You can create restore points on a regular basis, and if Windows ever breaks, you can bring it back to a point from before the problem occurred. The best part of using this method over a Recovery Drive is that only system files and settings will be affected, while all your documents and personal files will be left untouched.
Windows automatically creates a Restore Point, if enabled, at key moments, such as when you install certain software programs and drivers or apply Windows updates. However, you should manually create these points yourself on a regular basis, perhaps once a month, to ensure that your system can be restored to a recent state in the event of a mishap. You should also create one before you attempt any type of major change to Windows that could inadvertently lead to unstable behavior or other issues.
Create a Automatic Restore Point
First, locate the Restore Point utility by clicking Start and entering the text “restore” (without quotes) in the Cortana search box located next to Start. Refer to below image:
Entering the Restore search criteria in Cortana search boc
Next, click your search result, Create a restore point, in upper left-hand corner. See below image:
Selecting the Control Panel applet to Create a Restore Point
Now, you will be taken to the System Protection tab of the System Properties window.
If System Protection has not yet been enabled, the Create button is grayed out. In this case, select the drive you want to protect and then click the Configure button.
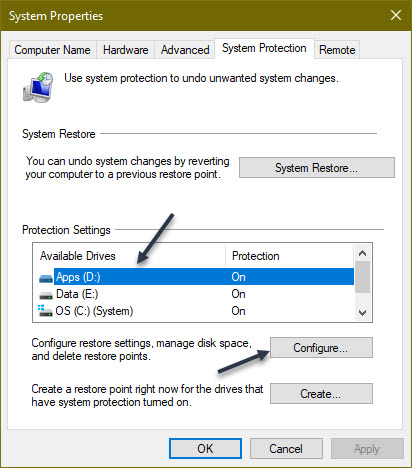
If System Protection is enabled for a drive, highlight the drive and click the Configure button. See following image:
Selecting a drive to Configure
Next, click the Turn on System Protection radio button if not enabled. You will now need to decide how much disk space you want to devote to all your restore points. If you run out of space, the oldest restore points will start getting deleted. If you have ample free space, then you may want to devote more storage for the restore points. Otherwise, you can stick with the suggested percentage, usually anywhere from 1% to 3% depending on the overall size of the drive or move the slider to the percentage you want. Once set, click OK. Refer to below image:
Configuring the drive and amount of storage space for a Restore Point
Your restore points will be created automatically at certain key moments. You can repeat these steps if you have other drives that you wish to protect. You can also return to this screen in the future to delete all existing system restore points if you are running low on disk space. To do this, click the Delete button and click Continue to confirm the deletion.
Create a Manual Restore Point
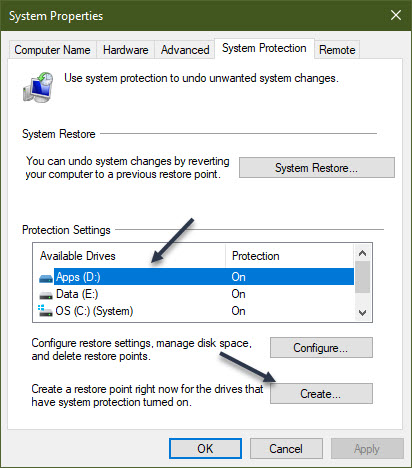
Head back to the Configure screen (second image above). This time, highlight an available drive and click the Create button. See below image:
Selecting to create a manual Restore Point
Next, type in a name for the restore point. Since the current date and time will automatically be added to the name, you might want to include a note about the action you are about to take or another reason for the restore point. If you have multiple drives, include the drive name or letter in the name. Now, click the Create button. See following image:
Assigning a name for the Restore Point
Windows will tell you if the restore point was created successfully. Now, click the Close button. Refer to below image:
Pop-up message indicating the success of creating a Restore Point
You can repeat the above steps if you want to create a restore point for your other drives. When done, click OK to shut down the System Protection window
Restore to a Previous State
If you have an issue, you can return to the System Protection window and click the System Restore button. See below image:
Selecting the System Restore button
At the Restore system files and settings screen, Windows explains what SystemRestore does. Click Next to continue. See following image:
Verbage screen about the Restore
Now, select a drive restore point, then click the Scan for affected programs button. Refer to below image:
Selecting Scan for affected programs button
Windows scans for any applications that were added since the last restore point in order to delete them and looks for any that were removed in order to restore them. It also scans for any programs and drivers that might be restored but may not work correctly and may need to be reinstalled. Note the results if Windows finds anything important. After the scan completes, click Close to return to the previous SystemRestore window. See below image:
Displaying the results (if any) of the scan. PAY CLOSE ATTENTION to this screen!
Make sure the restore point you want to use is selected. Now, click Next. See following image:
Continuing the Restore
Windows will display a Confirm your restore point window. Next, click the Finish button. Refer to below image:
Confirming your Restore. PAY CLOSE ATTENTION to this screen!
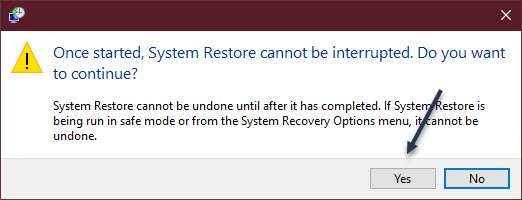
You will be told that the System Restore cannot be interrupted. Next, click Yes to continue. See below image:
One last chance to back out of the Restore. PAY CLOSE ATTENTION to this screen!
Windows will bring your system back to the restore point you selected and reboot, telling you that your files and settings are being restored. Once Windows is back up again, you can log back in.
Next, you should receive a pop-up screen regarding the success of the Restore. You may now need to reinstall any applications, drivers, or other software that were removed. You will also want to play around in Windows to see if the problem that prompted you to restore it has been eliminated.
You are now finished. Now you know how to create a system RestorePoint for all your hard drives and restore your system to a previous state. Please feel free to share this post! One way to share is via Twitter.
Just click the Tweet icon below. This will launch Twitter where you click its icon to post the Tweet.
Check out TechSavvy.Life for blog posts on smartphones, PCs, and Macs! You may email us at contact@techsavvy.life for comments or questions.
Please feel free to leave a comment. I would love hearing from you. Do you have a computer or smart device tech question? I will do my best to answer your inquiry. Just send an email to contact@techsavvy.life. Please mention the device, app and version that you are using. To help us out, you can send screenshots of your data related to your question.
CThe author’s Vietnam eBook on the Battle for Tra Bong: Events and Aftermath
Google has some built-in tools in Chrome that attempt to make browsing safer. Enhanced Safe Browsing is one such tool.
With Safe Browsing, you get alerts about malware, risky extensions, phishing, or sites on Google’s list of potentially unsafe sites.
Google has some built-in tools in Chrome that attempt to make browsing safer. Enhanced Safe Browsing is one such tool. Let’s explore how to turn on this feature.
This is for the desktop version of Chrome and Android. Screenshots are from Chrome on Windows 10.
Copyright Scott Adams, Inc./Distributed by Universal Uclick for UFS
Enhanced Safe Browsing Explained
Safe Browsing is a list of dangerous URLs that is maintained by Google and used to protect users from malicious sites. Enhanced Safe Browsing builds upon this feature with some additional tools.
With Enhanced Safe Browsing enabled, Chrome shares even more browsing data with Google. This allows for threat assessments to be more accurate and proactive, though it does present a privacy concern in itself. You are letting Google monitor your browsing.
Per Google’s description, Enhanced Safe Browsing enables the following:
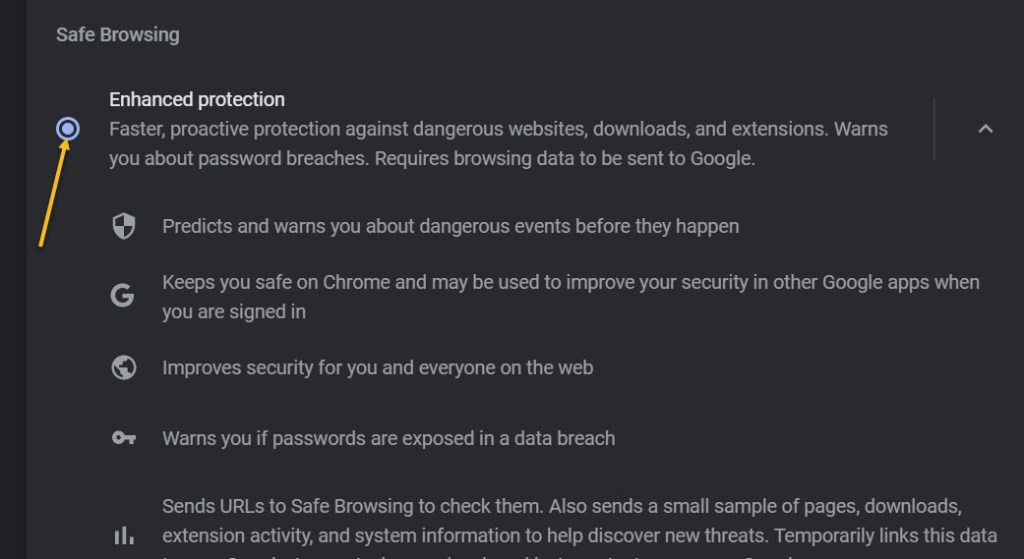
It predicts and warns you about dangerous events before they happen.
It keeps you safe on Chrome and may be used to improve your security in other Google apps when you are signed in.
It improves security for you and everyone on the web.
It warns you if passwords are exposed in a data breach.
Enable This Feature
The feature is available for Chrome on the desktop and Android. It is not available for iPhone and iPad. The process for enabling it is very similar on both platforms.
First, launch Chrome. Next, select the three-dot menu (the hamburger) icon in the top-right corner of Chrome. Now, choose Settings from the menu. Refer to below image:
Selecting Settings
Next, go to the Privacy and Security section. See below image:
Accessing Privacy and security option
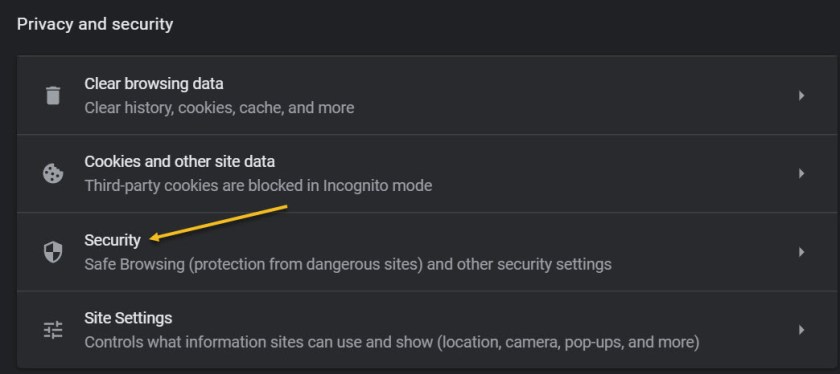
Now, on the desktop, click Security. On the Android, it is called Safe Browsing. See following image:
Accessing the Security option
Next, click or tap on the radio button to enable Enhanced protection. Refer to below image:
Enabling Enhanced protection
Now, exit Settings. You are finished. You will not notice anything different in your everyday browsing, but you will now have better protection. In the event that something is amiss, Google Chrome will give you a warning.
Please feel free to share this post! One way to share is via Twitter.
Just click the Tweet icon below. This will launch Twitter where you click its icon to post the Tweet.
Check out TechSavvy.Life for blog possts on smartphones, PCs, and Macs! You may email us at contact@techsavvy.life for comments or questions.
Please feel free to leave a comment. I would love hearing from you. Do you have a computer or smart device tech question? I will do my best to answer your inquiry. Just send an email to contact@techsavvy.life. Please mention the device, app and version that you are using. To help us out, you can send screenshots of your data related to your question.
The author’s Vietnam eBook on the Battle for Tra Bong: Events and Aftermath
A man has been jailed for two years after sabotaging a company by deleting 80% of their Microsoft 365 accounts; email, calendars, contact lists, docs, and so on. What did he do and what organizations should do to prevent a similar catastrophe.
Deepanshu Kher worked for an IT consultant firm and was deployed to work at Carlsbad Company who were migrating to Microsoft 365 hosting. Carlsbad were unhappy with Kher who eventually left both Carlsbad and the consultant firm.
He returned to India where he hacked into Carlsbad Company’s new Microsoft 365 system and deleted 1,200 of their 1,500 user accounts. That shut down the company for two days, unable to access email accounts, contacts, calendars, documents, directories plus Teams and video conferencing.
Customers and partners could not contact the company or vice-versa. There was no way to tell people what was happening and why.
It took three months and over half-a-million dollars for Carlsbad to get everything back into something like normal.
Lessons to be Learned
Details of the hack have not been disclosed but some reasonable guesses are possible with some preventative measures suggested. See end of this blog post for a link about the hack.
Revoke Accounts
When someone leaves an organization, especially admin level access, make sure their account privileges are suspended or revoked. It’s easily overlooked.
A former employee or contractor might have discovered other logins or know hacks into a system but most commonly they just login to their account.
Restoring Deleted Accounts
Microsoft’s default for deleting a mailbox or user account is a ‘soft’ deletion that’s held in a recycle bin for 30 days, with a Restore option, before full deletion. Unfortunately, there’s a second ‘hard’ option which immediately deletes the entire mailbox or user account. In some cases, hard deletion is necessary but perhaps Microsoft should make irreversible deletions a lot more difficult to access, even by administrators? Maybe require more than one admin to approve hard deletions?
Where is the Hacker Now?
Mr Kher did his nasty deed from India but that didn not stop the FBI from tracking him down and issuing an arrest warrant. When he tried to re-enter the US in January 2021 he was arrested, unaware of the outstanding warrant.
In US District Court he was found guilty of “Intentional Damage to a Protected Computer ” which carries a 10 year and $250,000 fine maximum. Kher was sentenced to two years jail, three years supervised release and ordered to pay restitution of $567,084 (the precise amount it cost Carlsbad to fix their systems).
I went to work thru a consultant agency for a manufacturing plant in the Port of Catoosa near Tulsa, Oklahoma. On my first day, around 9am, the admin person starting setting me up access to their system. Two hours later, he was still working; he did not know how to set my credentials. Also, a lady supervisor came by and gave me a foot high stack of paper and told me to go through it. I ask, “what am I looking for?”. She said, “just go through it.” Then she left. I did not do this; if she did not know what I was looking for, I sure did not know.
Around 11:am, the IT director came by and wanted to take me to lunch. His right-hand partner, he and I got into his vehicle. They did not ask me any questions on the ride to the restaurant or back to the company. During lunch, they did not even acknowledge my presence or ask me anything. They just talked to each other. So, I remained silent. I thought this was strange.
Back at the plant, he took me to several departments where I met a lot of people, names I could not remember. What I later realized, it was a “dog and pony” show. He was being pressured to do something about their IT “system”, so he talked to my consulting agency and they sent me. He expected me to fix their “system”. He knew this was an impossible task for one person; he set me up for failure.
Over the next two days, I was amazed at their “system”. Their plant was using Excel spreadsheets to run the company; I found thousands of them. I estimated 10,000 spreadsheets.
One department would enter info like name, supervisor, hours worked. Then that department would “pass” the spreadsheet to the next department where they added their own info and/or creating new Excel spreadsheets. And so it went to each department. It was a gigantic mess. I wrote him a letter saying he needed an enterprise system like SAP, IBM or Accenture. He ignored the letter. He had done his job by hiring me to be his savior.
I decided to start with the Time Keeping system. I create a database and the forms. At least, they could have something to visualize.
No one spoke to me. I tried to talk to the guys in IT, but they shut the door in my face. Very wierd.
After ten days, I came in on a Monday morning and starting working. Around 10:00am a supervisor comes by and says, “why are you hear, you were fired on Friday”. I said, “no one told me”. She left and I called my boss. They did not know either. I packed what work I had done and left.
After reading the main story above, I could have done major damage to the company by deleting thousands of Excel spreadsheets in a matter of minutes. I had full admin access. So, would I have been sentenced to jail? I do not think so because I was technically fired and no one told me or my boss. The company was to blame for their lack of communication and not revoking my credentials. So, pay attention to the above story, especially, if you are running a business.
That’s it. Please feel free to share this post! One way to share is via Twitter.
Just click the Tweet icon below. This will launch Twitter where you click its icon to post the Tweet.
Check out TechSavvy.Life for blog posts on smartphones, PCs, and Macs! You may email us at contact@techsavvy.life for comments or questions.
Please feel free to leave a comment. I would love hearing from you. Do you have a computer or smart device tech question? I will do my best to answer your inquiry. Just send an email to contact@techsavvy.life. Please mention the device, app and version that you are using. To help us out, you can send screenshots of your data related to your question.
The author’s Vietnam eBook on the Battle for Tra Bong: Events and Aftermath
Nobody wants their communications to have spelling errors left in, so let Microsoft Outlook help by automatically spell checking emails before they are sent.
Nobody wants their communications to have spelling errors left in, so let Microsoft Outlook help by automatically spell checking emails before they are sent. Of course you can manually check before sending by opening an Outlook email and head to:
Review > Spelling & Grammar
But who wants to do this for every email you send. Instead, the Microsoft Outlook desktop client has a setting that forces spell check to take place after you click the Send button. If no errors are found, the email is sent like normal. If a spelling error is found, Outlook gives you the option to correct it before the email is sent.
This is for PCs running Outlook
Copyright Scott Adams, Inc./Distributed by Universal Uclick for UFS
To enable this feature, open the Outlook desktop application and click:
File > Options
Refer to below image:
Accessing Options
Next. in the Mail > Compose Messages section, toggle on the Always check spelling before sending checkbox. See below image:
Enabling Spell Check
Now, click OK in the bottom-right corner to save and close the Options panel. See following image:
Saving your change
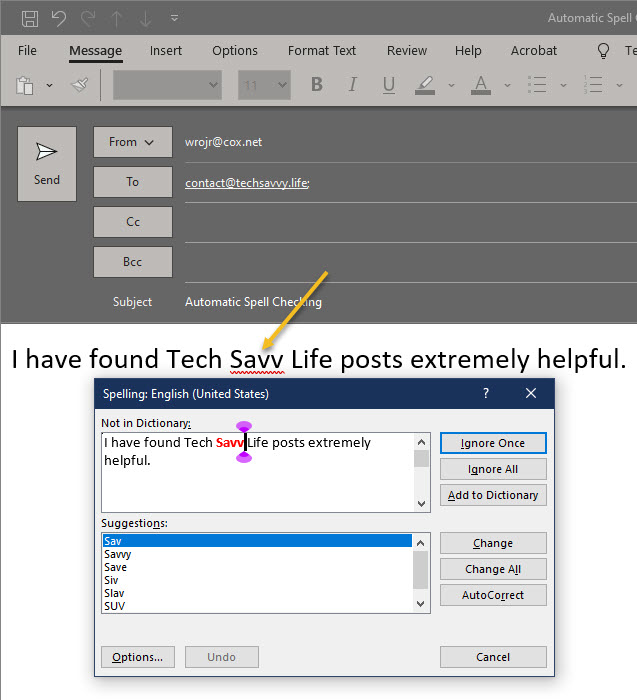
Now, when we click Send on an email with a spelling error, Microsoft Outlook will pick it up and give you the chance to change it. Refer to below image:
Spell Check in action
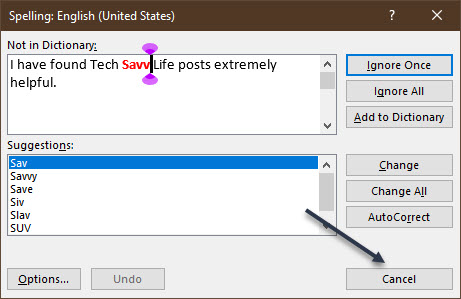
If the spell checker has found a misspelled word and you want to change it, click Cancel. Or, you could use one of its suggestions. See below image where “Savvy” is misspelled:
Cancel your email
If you choose to cancel, a dialog box will open that lets you quit sending the email. Click No to stop the email from being sent. See following image:
Cancel sending your email
Note! The spell checker will not pick up the wrong words, just words that are spelled incorrectly. So, if you meant to type in “Savvy” but instead typed “Savoy”, the spell checker will not pick that up because “Savoy” is a correctly spelled word.
You are finished. Please feel free to share this post! One way to share is via Twitter.
Just click the Tweet icon below. This will launch Twitter where you click its icon to post the Tweet.
Check out TechSavvy.Life for blog posts on smartphones, PCs, and Macs! You may email us at contact@techsavvy.life for comments or questions.
Please feel free to leave a comment. I would love hearing from you. Do you have a computer or smart device tech question? I will do my best to answer your inquiry. Just send an email to contact@techsavvy.life. Please mention the device, app and version that you are using. To help us out, you can send screenshots of your data related to your question.
The author’s Vietnam eBook on the Battle for Tra Bong: Events and Aftermath
Unfortunately, not all microphones are created equal. Baseline volume levels differ significantly between models, and while one may sound more than adequate, another may be vastly underpowered. The issue can be particularly pronounced when using microphones with communication applications such as Skype.
Unfortunately, not all microphones are created equal. Baseline volume levels differ significantly between models, and while one may sound more than adequate, another may be vastly underpowered. The issue can be particularly pronounced when using microphones with communication applications such as Skype. Let’s explore how to adjust your microphone volume.
This is for devices running Windows 10
Copyright Scott Adams, Inc./Distributed by Universal Uclick for UFS
All microphones, whether you are using an internal or external one, have different base volumes when transmitting your voice to other parties. If you find that people often complain of not being able to hear you during meetings, the most likely culprit is the out volume of your PC’s microphone.
Use Settings
First, click the Start menu, then select the gear icon on the bottom left to open Settings. You can also press Windows+i to open it. Refer to below image:
Accessing Settings
Now, click the System option. See below image:
Selecting the System option
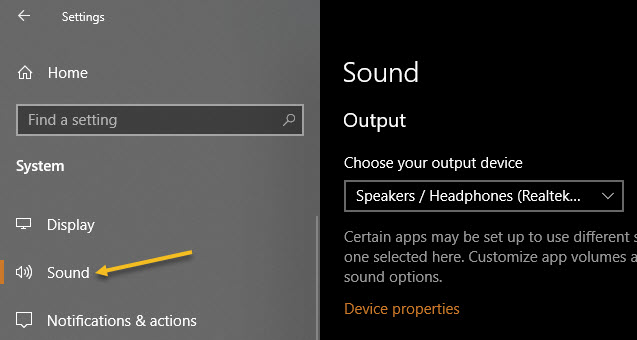
Next, select Sound in the sidebar. See following image:
Selecting the Sound option
Now, scroll down to the Input section and select the device you would like to configure using the Choose your output device drop-down list. Then click Device properties option. Refer to below image:
Accessing the selected device properties
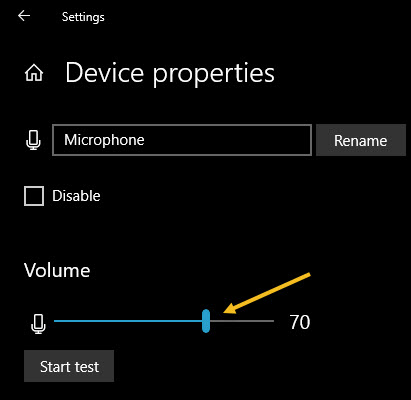
Next, use the Volume slider to adjust the output level of the microphone. See below image:
Adjusting the Sound volume
The louder the volume, the louder the output signal will be when you use the microphone. Louder is not always better, however, if the signal is too loud, your voice will be distorted. Try to find the ideal volume where your voice (or other sound source) is loud enough without having any kind of distortion.
If you need help, click the Start test button and speak into the microphone at a normal volume. See following image:
Running a sound test
When you click Stop test, you will see the highest percentage level registered by the test program. You can then adjust the volume slider accordingly. If you keep hitting 100% by talking at a normal volume, then the volume slider is adjusted too high. Reduce the volume and try again. Refer to below image where you will get a zero percent if no microphone is plugged in:
Results of your sound test
When you are satisfied, close Settings. If you ever need to adjust it again, revisit the above steps.
Use Control Panel
You can launch this tool from the speaker icon in your taskbar’s notification area, which is opposite the Start button. First, right-click the speaker icon and select Sounds from the menu that appears. See below image:
Accessing the Sounds option
Now, click the Recording tab. See following image:
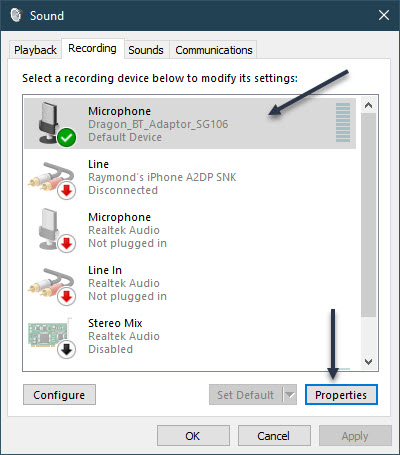
Selecting the Recording tab
You will see a list of microphones installed on your system. Select the one you would like to adjust, then click the Properties button. Refer to below image:
Accessing the selected Microphone properties
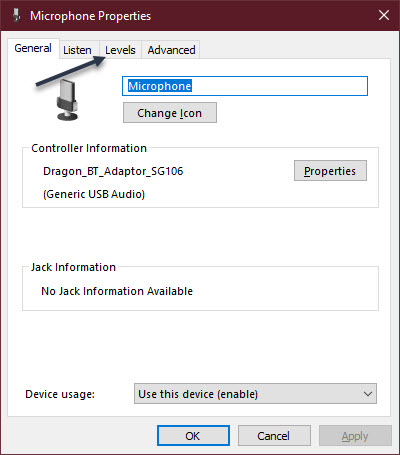
Next, click the Levels tab. See below image:
Selecting the Levels tab
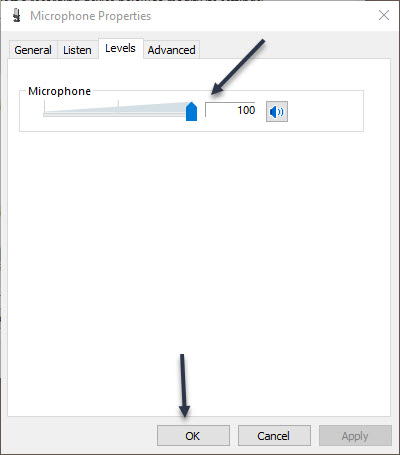
Now, use the Microphone slider to adjust the output level of the microphone. The higher the level, the louder your microphone signal will be while it is in use. That means your voice will come through louder. But a signal that is too loud will distort, so try to find the sweet spot where it is loud enough but not too loud to distort your voice. Next, click OK, then click OK again to close the Sound window. See following image:
Adjusting the Sound volume
If you need to adjust the level again, revisit the above steps.
That’s it. Please feel free to share this post! One way to share is via Twitter.
Just click the Tweet icon below. This will launch Twitter where you click its icon to post the Tweet.
Check out TechSavvy.Life for blog posts on smartphones, PCs, and Macs! You may email us at contact@techsavvy.life for comments or questions.
Please feel free to leave a comment. I would love hearing from you. Do you have a computer or smart device tech question? I will do my best to answer your inquiry. Just send an email to contact@techsavvy.life. Please mention the device, app and version that you are using. To help us out, you can send screenshots of your data related to your question.
The author’s Vietnam eBook on the Battle for Tra Bong: Events and Aftermath