Virtual Desktops, or Windows, are a handy way to juggle multiple workspaces in Windows 10. There are several ways to switch between virtual Desktops.
Virtual Desktops, or Windows, are a handy way to juggle multiple workspaces in Windows 10. There are several ways to switch between virtual Desktops. Let us explore how to do this.
This is for Windows 10 operating system
Copyright Scott Adams, Inc./Distributed by Universal Uclick for UFS
To Tweet about this post, click the Tweet icon below to launch Twitter, then click its Tweet icon to post.
Check out TechSavvy.Life for their blog posts on smartphone apps, PCs. and Macs!
Press Windows+Tab to see the virtual Desktops you have available. You will see a screen called “Task View,” which shows thumbnails of each.
Now, release the Windows key and press the Tab or Arrow keys to highlight a Desktop, then press Enter to view that Desktop. You may also switch Desktops by using the Alt+Tab keys.
Also, you can press Windows+Ctrl+Left Arrow to display a lower number Desktop or Right Arrow to a higher number Desktop.
While in “Task View”, click the Plus “+” Tile or press Windows+Ctrl+D to add a new Desktop. Click the “X” in the upper corner to remove a Desktop.
If you want to exit the “Task View”, just hit Escape to return to your Desktop.
Use the Taskbar
Right-click on an empty area of the Taskbar, then click Show Task View Button. Ensure the option is checkmarked. Refer to below image:
Setting the Show Task View option
Now, locate and click the Task View button in the Taskbar to view your Desktops. Next, click or tap the Desktop to which you want to switch. See below image:
Accessing the Task View button
You can click Task View at any time to manage your virtual Desktops.
That’s it. Please feel free to share this post! One way to share is via Twitter, as mentioned below.
To Tweet about this post, click the Tweet icon below to launch Twitter, then click its Tweet icon to post.
I have found TechSavvy.Life blog posts extremely helpful. Check them out for posts on smart phone apps, Macs and PCs!
Please feel free to leave a comment. I would love hearing from you. Do you have a computer or smart device tech question? I will do my best to answer your inquiry. Please mention the device, app and version that you are using. To help us out, you can send screenshots of your data related to your question.
The author’s Vietnam eBook on the Battle for Tra Bong: Events and Aftermath
One unique feature of Microsoft Word is the ability to insert a PDF file directly into Word, and it can be done in only a few steps. You can insert it as an embedded object, a linked object, or text only.
One unique feature of Microsoft Word is the ability to insert a PDF file directly into Word, and it can be done in only a few steps. You can insert it as an embedded object, a linked object, or text only. Let’s explore how to do this.
This is for devices supportingMicrosoft Word
Copyright Scott Adams, Inc./Distributed by Universal Uclick for UFS‘
To Tweet about this post, click the Tweet icon below to launch Twitter, then click its Tweet icon to post.
Check out TechSavvy.Life for their blog posts on smartphone apps, PCs. and Macs!
When you embed a PDF file in Word, the first page of your PDF appears in the document. Since an embedded object becomes part of the document after it is inserted, it’s no longer connected to the source file. Any changes made to the original PDF in the future will not be reflected in the Word document.
Linking Explained
Inserting a PDF file as a linked object means it appears as the first page of the PDF, but it is also linked to the original file. Changes made to the PDF will also be reflected in the Word document. You can opt to display an icon instead of a preview. Either option will open the PDF file when selected.
Text Only Explained
Inserting a PDF as text involves the use of copy and paste. Copying the text from the PDF file and pasting it into a document is a straightforward way to insert a bit of text into Word.
Embed or Link a PDF
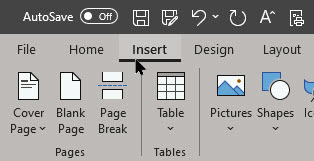
First, open a Word document, and place your cursor where you would like to insert the PDF file. Next, select the Insert tab. Refer to below image:
Selecting the Insert tab
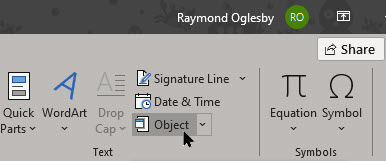
Now, click Object from the Text group. See below image:
Selecting the Object option
From the small drop-down menu, select Object. See following image:
Selecting the Object option from drop-down menu
From the Object window, click the Create from File tab. Next, select Browse. Refer to below image:
From the Create from file tab, selecting the Browse option
Navigate to the location of the PDF, select it, and then click Insert. See below image:
Selecting your PDF file to Insert into Word
Selecting Your Options
Now, it is time to decide if you want to (1) link directly to the source file, and/or (2) display the PDF as an icon. Link directly to the source file if you want to have the inserted file reflect any new changes made to the source file. To do so, just checkmark the Link to file option. You are linking to the PDF in your document.
While here, checkmark Display as icon if you don’t want to take up too much space on the page. If you do not enable any of these options, the PDF will be displayed in its entirety on the Word document and will not reflect any new changes made to the source file. You are embedding the PDF into your document.
To finish, select OK. Refer to below image:
Selecting ink your PDF file and display an icon
The PDF will now be inserted in the Word document. See below image:
Your linked PDF file displayed as an icon in Word
Copy and Paste
Copy
First, open your PDF file. Now, highlight some text you want to copy. Next, right-click your selection and select Copy.
Paste
Second, open your Word document. Now, place the cursor where you want to paste the text from the PDF file. Next, right-click and select a Paste option with or without formatting.
I hope you have found this post helpful. If so, click the Tweet icon below. This will launch Twitter where you click its icon to post the Tweet.
I have found TechSavvy.Life blog posts extremely helpful. Check them out for posts on smart phone apps, Macs and PCs!
Please feel free to leave a comment. I would love hearing from you. Do you have a computer or smart device tech question? I will do my best to answer your inquiry. Please mention the device, app and version that you are using. To help us out, you can send screenshots of your data related to your question.
The author’s Vietnam eBook on the Battle for Tra Bong: Events and Aftermath
At the end of 2020, Adobe will kill its Flash Player app for security reasons. Microsoft is taking a pre-emptive strike though by using an optional Windows Update to both uninstall and block Flash from being reinstalled.
At the end of 2020, Adobe will kill its Flash Player app for security reasons. Microsoft is taking a pre-emptive strike though by using an optional Windows Update to both uninstall and block Flash from being reinstalled.
It seems the update does not check to see if Flash has been installed using Adobe’s standalone installer, meaning if you have ever installed Flash Player manually, it remains available to use. Web browserscan also have a Flash Player component installed, and these also remain available after the update.
If you have no intention of using Flash again, the Windows Update to remove it is worthwhile simply to make your system a bit more secure. However, it’s worth checking if the Flash Player is installed as an app as well and removing it.
This is for the Windows 10 operating system
Copyright Scott Adams, Inc./Distributed by Universal Uclick for UFS
To Tweet about this post, click the Tweet icon below to launch Twitter, then click its Tweet icon to post.
Check out TechSavvy.Life for their blog posts on smartphone apps, PCs. and Macs!
If it is there, click on the app and select Uninstall to remove the app. In my example, the app has been removed and is no longer listed. See below image:
spacer
Your installed apps
Now, lets check your web browser. For Google Chrome:
Launch Chrome
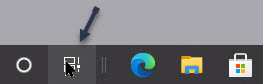
Click the Hamburger icon in upper right-hand corner (the one with 3 dots)
Click More tools
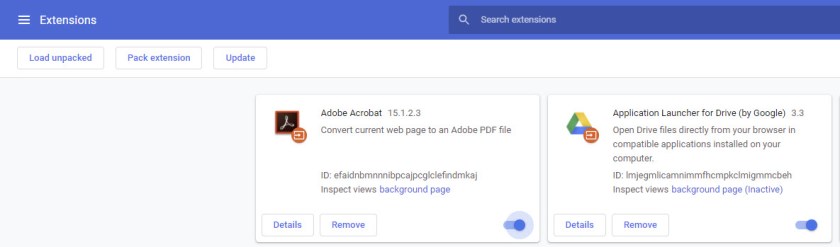
Click on Extensions
See following image:
Accessing Chrome extensions
If it is there, click on the slider to disable or the Remove option to delete the app (this is the recommended choice). In my example, the app has been removed and is no longer listed. Refer to below image:
Your Chrome extensions
That’s it. You have successfully removed the app and its Chrome extension. Be sure to run the Windows optional update when available.
I hope you have found this post helpful. If so, click the Tweet icon below. This will launch Twitter where you click its icon to post the Tweet.
I have found TechSavvy.Life blog posts extremely helpful. Check them out for posts on smart phone apps, Macs and PCs!
Please feel free to leave a comment. I would love hearing from you. Do you have a computer or smart device tech question? I will do my best to answer your inquiry. Please mention the device, app and version that you are using. To help us out, you can send screenshots of your data related to your question.
The author’s Vietnam eBook on the Battle for Tra Bong: Events and Aftermath
Locking your Windows 10 PC is the best way to secure your computer when you step away. This will not quit or interrupt any running applications. When you return, you have to enter your PIN or password to get past the lock screen.
Locking your Windows 10 PC is the best way to secure your computer when you step away. This will not quit or interrupt any running applications. When you return, you have to enter your PIN or password to get past the lock screen. Let’s explore these five methods.
This is for smartphones and devices using Windows 10
Copyright Scott Adams, Inc./Distributed by Universal Uclick for UFS
To Tweet about this post, click the Tweet icon below to launch Twitter, then click its Tweet icon to post.
Check out TechSavvy.Life for their blog posts on smartphone apps, PCs. and Macs!
First, click the Start button. Next, select your account name. Now, clickthe Lock option. Refer to below image:
Lock your device from the Start Menu
Method 2 – Use the Keyboard
The Lock Shortcut
Hit the Windows+L key on your keyboard to lock your device.
The Combination Key
Press Ctrl+Alt+Del keys. Next, click the Lock option in the menu that appears.
Method 3 – Use a Desktop Icon
If you’d rather lock your PC with just a click, you can create a desktop icon.
First, right-click on your desktop. Now, hover over the New option. Next, click the Shortcut option. See below image:
Create a desktop shortcut to lock your device
The Create Shortcut window will be displayed. Now, type the following command in the Type the location of the item text box. Once you have entered the command, click Next.
Rundll32.exe user32.dll,LockWorkStation
See following image:
Entering the Lock command
Now, enter an icon name like “Lock PC”. Next, click Finish. Refer to below image:
Naming your shortc ut
Your icon will appear on your desktop. Just double-click it any time to lock your device.
Method 4 – Use the Screen Saver
Another method is to set your PC to lock after the Screen Saver has been on for a certain length of time. First, type in screen saver in the Cortana search box. Next, click Change screen saver in the search results at upper left hand corner of your screen. See below image:
Accessing the Screen Saver
In the Screen Saver menu, checkmark the box labeled On Resume, display logon screen option. Now, use the arrow buttons in the Wait box to select how many minutes should pass before your device locks. Next, to save your change click Apply. See following image:
Setting your Screen Saver to lock your device
For security reasons, it is best to use another method to lock your device before you step away from it.
Method 5 – Use Dynamic Lock
DynamicLock is a feature that automatically locks your PC after you step away from it. It does this by detecting the strength of the Bluetooth signal. When the signal drops, Windows 10 assumes you have left the immediate area of your PC and locks it for you.
This is a nifty feature and my favorite. You just walk away from your PC with your smartphone in hand and let the Dynamic Lock feature lock your PC.
Setup the Smartphone
To use Dynamic Lock, you will first need to pair your smartphone with your PC.
To do this:
On your smartphone, go to Settings > Bluetooth and enable the toggle. Refer to below image:
Enabling Bluetooth on your smartphone
Setup the PC
On your PC, go to Settings (the gear icon) > Devices > Bluetooth and Other devices.
Now, click Add Bluetooth or other device. Next, select your phone, confirm the PIN, and they will be paired. See below image:
Accessing Add a Device
Next, close Settings and relaunch the app. Now, go to Accounts > Sign-in options. Scroll down to the Dynamic Lock section. Next, checkmark the box labeled Allow Windows to automatically lock Your device when you’re away option. See following image where Raymond’s Phone is paired:
Enabling Dynamic Lock
I hope you have found this post helpful. If so, click the Tweet icon below. This will launch Twitter where you click its icon to post the Tweet.
I have found TechSavvy.Life blog posts extremely helpful. Check them out for posts on smart phone apps, Macs and PCs!
Please feel free to leave a comment. I would love hearing from you. Do you have a computer or smart device tech question? I will do my best to answer your inquiry. Please mention the device, app and version that you are using. To help us out, you can send screenshots of your data related to your question.
The author’s Vietnam eBook on the Battle for Tra Bong: Events and Aftermath
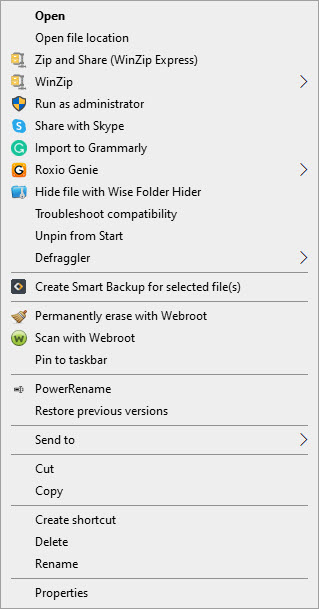
Windows 10’s context menu can slow down over time as you continue to install apps. Third-party programs often install context menu extensions, and badly coded ones can slow things down. Your context menus open slowly, freeze, or hang when you right-click on a menu option.
There is an app that will help us clean up our context menu.
Windows 10’s context menu can slow down over time as you continue to install apps. Third-party programs often install context menu extensions, and badly coded ones can slow things down. Your context menus open slowly, freeze, or hang when you right-click on a menu option.
See following image of my context menu. As you can see, I have a lot of menu items.
My context menu
Let us explore how to fix a slow context menu. There is an app that will help us clean up our context menu.
This is for Windows 10 operating system
Copyright Scott Adams, Inc./Distributed by Universal Uclick for UFS
To Tweet about this post, click the Tweet icon below to launch Twitter, then click its Tweet icon to post.
Check out TechSavvy.Life for their blog posts on smartphone apps, PCs. and Macs!<
We are going to do this the easy way without hacking the Windows Registry. That is a slow and error prone process. So, we are going to quickly pin down the problem.
We recommend you download and install ShellExView here, a free utility from NirSoft. The download links are near the end of the document below the Feedback section. Choose one that fits your operating system. Refer to below image:
The download links
It runs on Windows 10 and older versions of Windows, too. After the download, click on the executable file to launch ShellExView.
Setup ShellExView
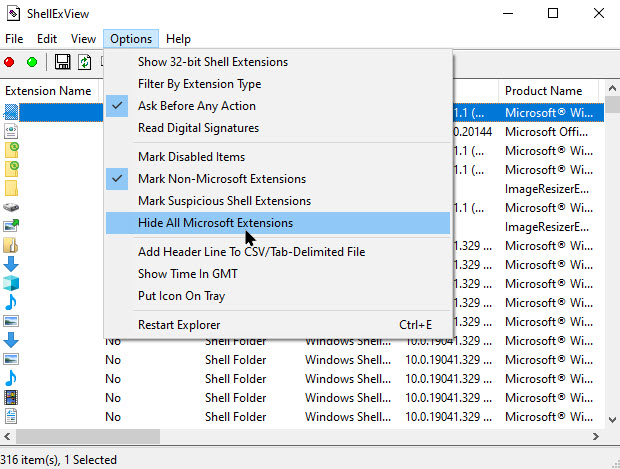
You will see a long list of Windows shell extensions. However, many of them are created by Microsoft and included with Windows. Those should not be slowing down your system. We want to hide all the Microsoft extensions. To do so, click Options then click on Hide All Microsoft Extensions. See below image:
Hiding Microsoft extensions
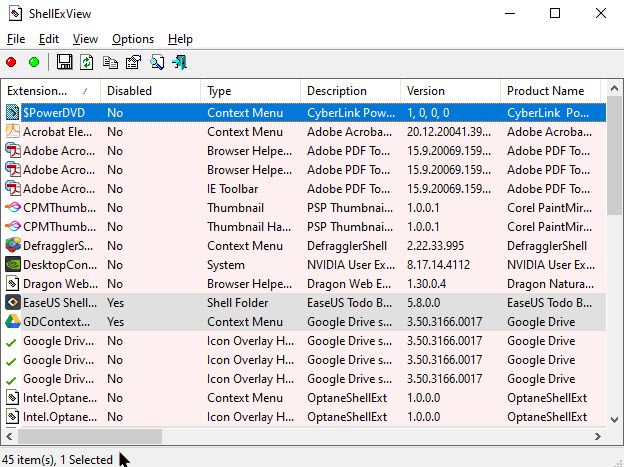
You will now see a more manageable list of the third-party shell extensions from the programs you installed. See following image:
Your context extensions
Disable Extensions
You will want to figure out which shell extension is causing the problem. This involves disabling one or more shell extensions, restarting Windows Explorer, and then seeing whether your problem is solved.
For example, you could do this in lseveral ways:
Disable all third-party extensions and add them one by one until the problem appears.
Disable shell extensions one by one until the problem is fixed.
Disable extensions in groups. For example, you could disable half the extensions at once. If your problem is solved, you know that one of the extensions you disabled caused it, and you could go from there. This is the fastest method.
We recommend you chose method number two. Thjs is the safest. More than likely, you have an idea on the culprit extension(s). However you choose to do it, here’s how to disable extensions.
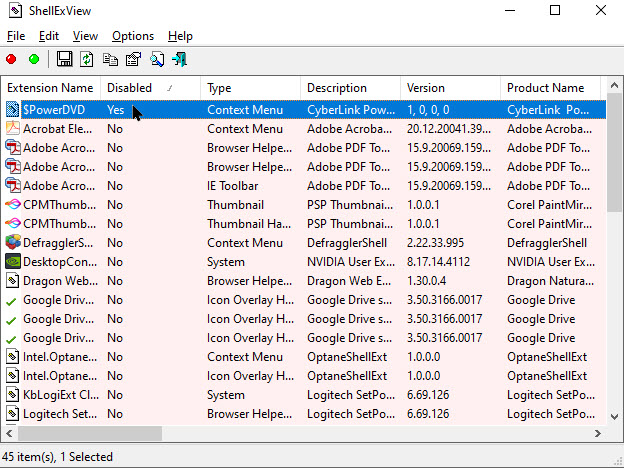
First, select the extension(s) you want to disable. Next, right-click them and select Disable Selected Items or click File > Disable Selected Items. (To re-enable them after, select Enable Selected Items.) Refer to below image:
Disable an extension
Disabled shell extensions will say Yes under the Disabled column. See below image:
The extension disabled
Use the Task Manager to Restart
Your change will not take effect until you restart Windows Explorer. It is recommended you use the Task Manager and not the buil-in app option to restart.
To open it, press Ctrl+Shift+Esc or right-click the taskbar and select Task Manager. See following image:
The Task Manager option
. You should open your Windows Explorer before proceeding. Now,find Windows Explorer under Apps on the Processes tab. (If you do not see this tab, click More Details.). Once you have found it, hightlight the entry and click Restart button in lower right of your screen. Refer to below image:
Restart Windows Explorer
Windows Explorer will now restart. Now, try right clicking a folder, file, or your desktop; whatever was slow before. Is it still slow? Then you need to try disabling one or more shell extensions. Is it faster than it used to be? Then you have disabled a shell extension that was slowing it down.
Repeat the Process
Repeat the above process to turn extensions on and off and determine which is causing your problem. By testing your context menus after every time you make a change (be sure to restart Windows Explorer first!), you can determine which one is causing the problem.
You can leave any extension disabled you do not want to use.You can always re-open ShellExView and re-enable them in the future.
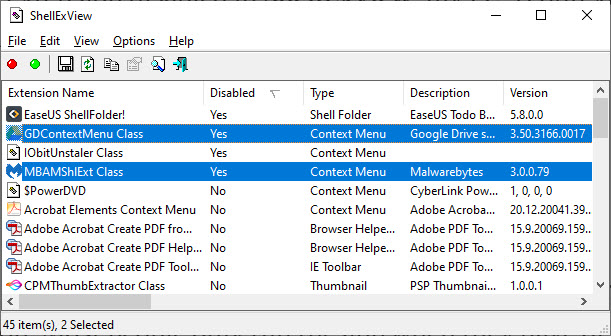
On my PC, one of the culprits slowing down my folder context menus was Google Drive’s “GDContextMenu Class” extension. This is a known problem.
Another culprit causing problems was Malwarebytes. Feel free to disable this extenstion. Most people only run the app when they have, or think they have, malware on their PC.The extension is unnecessary in the context menu. See below image:
Disabled extensions
With just these two extensions disabled in ShellExView, my PC’s context menus returned to it’s usual speed.
I hope you have found this post helpful. If so, click the Tweet icon below. This will launch Twitter where you click its icon to post the Tweet.
I have found TechSavvy.Life blog posts extremely helpful. Check them out for posts on smart phone apps, Macs and PCs!
Please feel free to leave a comment. I would love hearing from you. Do you have a computer or smart device tech question? I will do my best to answer your inquiry. Please mention the device, app and version that you are using. To help us out, you can send screenshots of your data related to your question.
The author’s Vietnam eBook on the Battle for Tra Bong: Events and Aftermath
Microsoft Word can warn you about the Oxford or “serial comma”, whether you prefer to use the extra comma or not. It is a feature in the latest Word 365 and Word 2019 and goes back to Word 2002. By default, the option is off.
Microsoft Wordcan warn you about the Oxford or “serial comma”, whether you prefer to use the extra comma or not. It is a feature in the latest Word 365 and Word 2019 and goes back to Word 2002. By default, the option is off.
The Oxford comma is one of those grammatical things that most people do not worry about. It is a question of whether to add a comma at the end of a list, for example:
Raymond is teaching on Word, Excel, Access and Outlook.
Or using the Oxford comma:
Raymond is teaching on Word, Excel, Access, and Outlook.
It is okay to ingnore the Oxford comma for personal documents, emails, tweets and your personal Facebook page. However for business purposes, especially legal documents, you should use the Oxford comma. Avoiding the use of the Oxford comma has resulted in various lawsuits forcing companies to pay employees millions; what was implied without the comma failed in the courts. Moral of the lawsuits; use the Oxford comma for clarity and to avoid lawsuits.
In our example, using the Oxford comma says Raymond is teaching each class separately. Without the comma denotes that Raymond is teaching Access and Outlook as a combined class.
The setting for the Oxford comma has changed in the various Word versions.
This is for Word 365, Word 2019, and Word 2016 for PCs and Macs
Copyright Scott Adams, Inc./Distributed by Universal Uclick for UFS
To Tweet about this post, click the Tweet icon below to launch Twitter, then click its Tweet icon to post.
Check out TechSavvy.Life for their blog posts on smartphone apps, PCs. and Macs!
Open a Word document. Next, click the File menu option. Now, navigate to
Options > Proofing > Writing Style > Settings
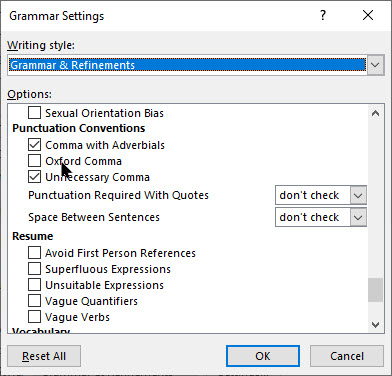
Now, scroll down the long list till you see the Oxford Comma checkbox in the Punctuation Conventions section. Refer to below image:
The Oxford Comma option
Setting the Oxford Comma
Checking the box will enforce the comma in lists. A missing Oxford comma will show a red dashed line with the suggestion “A comma before “and” or “or” could make this clearer.” See below image:
The Oxford Comma suggestion
Grammar checking in English is hard but the software does a remarkable job. This being said, the feature is not perfect and is no substitute for proof reading.
While discussing grammer, there is another similar situation. I see a lot of blog posts using words like “It’s” or Doesn”t”. The correct usage is to avoid using the apostrophe. In my examples, you would spell out the words to say “It is” and “Does not” for clarity.
I hope you have found this post helpful. If so, click the Tweet icon below. This will launch Twitter where you click its icon to post the Tweet.
I have found TechSavvy.Life blog posts extremely helpful. Check them out for posts on smart phone apps, PCs and Macs!
Please feel free to leave a comment. I would love hearing from you. Do you have a computer or smart device tech question? I will do my best to answer your inquiry. Please mention the device, app and version that you are using. To help us out, you can send screenshots of your data related to your question.
The author’s Vietnam eBook on the Battle for Tra Bong: Events and Aftermath
October is designated as National Cybersecurity Awareness Month with this event marking the 17th year that we in the cybersecurity community promote increased awareness on cybersecurity and privacy issues.
October is designated as National Cybersecurity Awareness Month with this event marking the 17th year that we in the cybersecurity community promote increased awareness on cybersecurity and privacy issues. After 17 years, you might think that we should be winding down; that we don’t have much left to say on this subject. The truth is the exact opposite. Every year more and more of our daily lives and services move to the digital world. Last year my family began doing most of our grocery shopping online and now this year due to the global events of 2020, most families, including ours, moved our children’s school online. Increased cybersecurity awareness it seems is needed now more than ever.
Password Security
For this month, I wanted to share with you some thoughts and advice about passwords. You have probably read a lot of advice on passwords in the past like “make them long and unguessable”, “use a password manager”, or “don’t use the same password on more than one website”. All this advice is great, and I still recommend you do all of these steps. Most browsers have a built-in password manager that’s pretty good, easy to setup, and will even sync your passwords between your phone and computer if you use the same browser. However, the truth is that passwords by themselves are not enough to keep you fully safe on the Internet. I view password like a VCR or 8-track player. Old technology for the past that can’t keep up with today’s 4K, blue ray, and streaming Internet. Passwords provide a very minimal level of protection, but they need some help.
Multi-Factor Security
The good news is that help is already here, you just have to setup it up or turn it on. We call this additional level of security, Multi-Factor or just MFA for short. You also may see it called “Two-Factor” Authentication. You have probably already been exposed to it at your job or place of business, but it simply means using an additional level of security beyond a password. This might be a text message with a one-time code, an automated phone call, or a smart phone application. There are many different types of MFA setups. Personally, I use the smart phone version anywhere I can as I always have my phone handy.
So the question is where should you be using MFA. The easy answer is everywhere! Any place or website you use a password to login you should look and see if that website has MFA. Its usually tucked away in the account setting. You might be surprised when you find out that almost every important website you use today have some form of MFA features. Facebook, Google, Microsoft, Twitter, Amazon, Paypal, Ebay, most email providers, any financial websites, etc. They all support MFA and I highly recommend you turn it on. Especially if the website has your credit card or gift cards stored or any place you make an online purchase.
Turing on MFA takes a little extra work but it makes a big difference in online safely. Criminals and hackers may be able to guess your password, but it’s much harder for them to also steal your phone.
A Big Thank You
Thanks to Michael for being our guest and creating this blog post.
I have found TechSavvy.Life blog posts extremely helpful. Check them out for posts on smart phone apps, Macs and PCs!
Please feel free to leave a comment. I would love hearing from you. Do you have a computer or smart device tech question? I will do my best to answer your inquiry. Please mention the device, app and version that you are using. To help us out, you can send screenshots of your data related to your question.
The author’s Vietnam eBook on the Battle for Tra Bong: Events and Aftermath
Want to see live-updating resource usage stats from your system’s CPU, memory, disk, network or GPU? Windows 10 has some built-in perfomance monitors that can help. You can even have Windows show these panels always on top of other open windows.
Want to see live-updating resource usage stats from your system’s CPU, memory, disk, network or GPU? Windows 10 has some built-in perfomance monitors that can help. You can even have Windows show these panels always on top of other open windows.
The best way is to use the Task Manager.. It has some easy-to-ise performance panels displaying real time stats of your machine. Let’s explore how to use this feature.
This is for Windows 10 operating system
Copyright Scott Adams, Inc./Distributed by Universal Uclick for UFS
Check out TechSavvy.Life for their blog posts on smartphone apps, PCs. and Macs!
Windows 10’s Task Manager comes with performance stats that were added back in Windows 8. This post relates to Windows 10.
First, open the Task Manager by pressing Ctrl-Alt-Del and choosing Task Manager or by right-clicking the Taskbar or the Start button and selecting Task Manager. Refer to below image:
Selecting the Task Manager
Floating Panels
Now, select the Task Manager Options and chose Always on Top if you want the tool’s panels to appear on top of other open windows. See below image:
Selecting Always on Too option
The Performance Tab
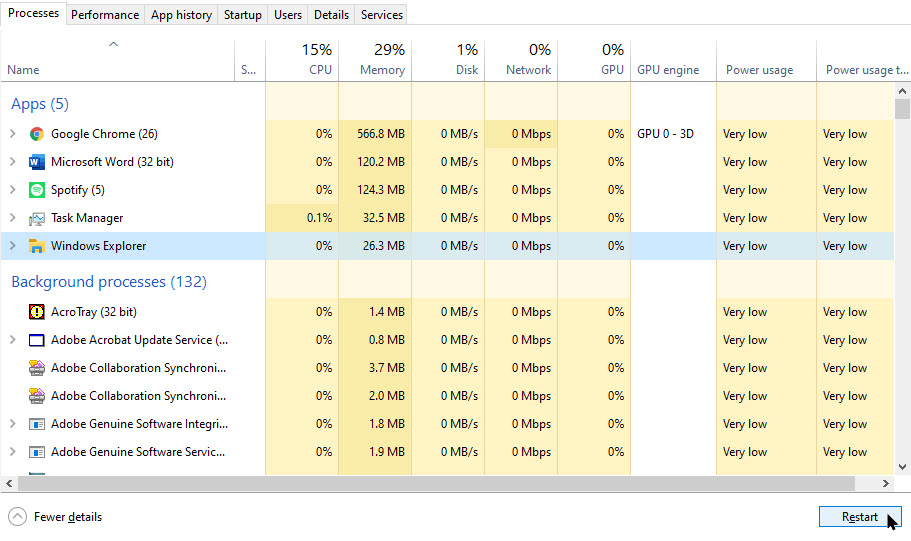
Next, click thePerformace tab. If you don’t see it, click More Details first, at the bottom of your screen. See following image:
The CPU performance panel
Now, choose the performance graph from the sidebar you want to see. You will see options for your computer’s CPUs, memory, storage devices (including SSDs, hard disks, and USB devices), network connections (wired Ethernet and Wi-Fi), and GPUs (graphics processors.)
To show just a performance graph, double-click anywhere on a graph in the right pane. You can also right-click a graph and select Graph Summary View. Refer to below image:
Selecting Grap Summary Virw option
The Performance Graphs
You can resize this smaller window and also click-and-drag anywhere inside it to position it wherever you like on your desktop. See below image:
The CPU Summary Graph
To enlarge or make the Task Manager window smaller, just double-click inside it,
If you want to change the graph to another one just right click in the graph, chose the View option and make your selection. See following image:
Selecting the Virw Option
Also, you can select a different graphfrom the sidebar. Refer to below image:
The C: drive view
That’s it. I hope you found this post helpful.
I have found TechSavvy.Life blog posts extremely helpful. Check them out for posts on smart phone apps, Macs and PCs!
Please feel free to leave a comment. I would love hearing from you. Do you have a computer or smart device tech question? I will do my best to answer your inquiry. Please mention the device, app and version that you are using. To help us out, you can send screenshots of your data related to your question.
The author’s Vietnam eBook on the Battle for Tra Bong: Events and Aftermath
Let’s say you need to know information about your Windows 10 file system, version, build number, product key and more. If you are looking into configuration or troubleshooting, this information would be essential to know.
Let’s say you need to know information about your Windows 10 file system, version, build number, product key and more. If you are looking into configuration or troubleshooting, this information would be essential to know. Let’s explore how to find this.
This is for the Windows 10 operating system
Copyright Scott Adams, Inc./Distributed by Universal Uclick for UFS
Check out TechSavvy.Life for their blog posts on smartphone apps, PCs. and Macs!
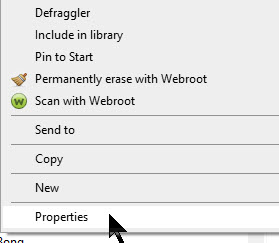
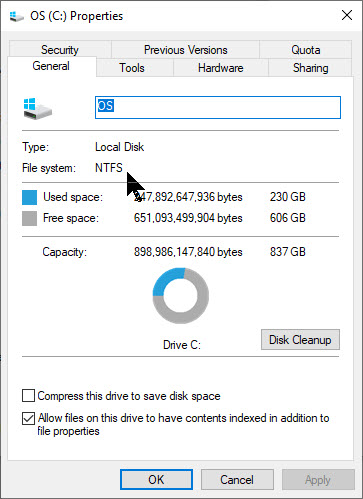
First, launch File Explorer. Next, locate a drive. ie, drive C; and right-click on it. Now, in the pop-up menu, select Properties. Refer to below image:
Selecting your drive’s Properties
In the Properties window, under the General tab you will see the File System label followed by the type of File System. See below image;
Determining your File System
Normally you will see NTFS, shorthand for New Technology File System, the default for Windows 10. On older versions of Windows, you may see the legacy file system of FAT32, shorthand for File Allocation Table 32.
If you have multiple drives, simply repeat the above for each drive.
Discover the Version, Build Number and More
First, launch the Settings app by pressing the Windows+I keys. Next, go to System. See following image:
Accessing Settings
On the left, scroll to the bottom and select About. On the right, you see information about your system. The amount of information you see differs depending on the Windows 10 version that you have installed. Now, scroll down to the Device specifications section. Here you find the data you are looking for. Refer to below image:
Determining your Device and Windows specifications
System Type – it tells you whether you use a 32-bit or 64-bit version of Windows 10
Edition – displays the edition of Windows 10 that you have: Pro, Home, Enterprise, Education, etc
Version – displays the version of Windows 10 that is installed
OS Build – displays the Windows 10 build number that you use
The latest Version as of this writing is
2004 – The ninth update to Windows 10, codenamed 20H1. It was named the May 2020 Update and released on May 27, 2020.
A number higher than a 2004 – The tenth major update for Windows 10 is codenamed 20H2. The update is expected to launch in October or November 2020.
The most recent update to Windows 10, launched in May 2020, has a OS Build of 19041.264. As you can see from my PC screenshot, I do not have the latest version installed.
The OS Build number changes with each update made by Microsoft to Windows 10. This information along with the Version is useful for troubleshooting purposes when you call tech support.
Discover Your Product Key and Much More
Finding your product key was featured in a previous post. You can find this, the above information and much more in one program. Simply click the link below on downloading, installing and running BelArc Advisor.
Please feel free to leave a comment. I would love hearing from you. Do you have a computer or smart device tech question? I will do my best to answer your inquiry. Please mention the device, app and version that you are using. To help us out, you can send screenshots of your data related to your question.
The author’s Vietnam eBook on the Battle for Tra Bong: Events and Aftermath
Windows 10 can automatically free up disk space by getting rid of files and content that you don’t need by the Storage Sense feature. Whenever you are low on disk space, if enabled, Storage Sense will intelligently run and delete temporary files and applications no longer needed.
Windows 10 can automatically free up disk space by getting rid of files and content that you don’t need by the Storage Sense feature. Whenever you are low on disk space, if enabled, Storage Sense will intelligently run and delete temporary files and applications no longer needed. Let’s explore how to do this.
This is for the Windows 10 operating system
Copyright Scott Adams, Inc./Distributed by Universal Uclick for UFS
Check out TechSavvy.Life for their blog posts on smartphone apps, PCs. and Macs!
First, launch Settings by clicking the Start button, then click the Gear icon on the left side of your screen. Also you can press the Windows+I keys to open Settings. Next, click the System icon, then click Storage. Refer to below image:
Accessing the Storage option
At the top of Storage options, click the toggle to the On position. Next, under the toggle, click Configure Storage Sense or run it now blue ink. See below image:
Enabling Storage Sense
In the Storage Sense options, let’s examine a few different settings. First, is the frequency of when Storage Sense runs You set this option from a drop-down menu labeled Run Storage Sense. You can set it to run Every day, week or month; or whenever disk space is low (the default). Just click the menu and select the option that works best for you. See following image:
Configure when Storage Sense runs
Set Options
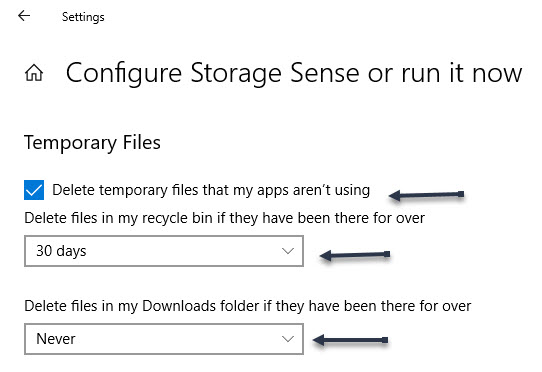
Under the Temporary Files section, the first option we want to enable is Delete temporary files that my apps aren’t using.
The second option is a drop-down menu labeled Delete files in my Recycle Bin if they have been there for over with selections of Never, 1 day, 14 days, 30 days, or 60 days. Select an option to your liking.
Finally, the third option is labeled Delete files in my downloads folder if they have been there for over and make your selection from the drop-down menu (default is Never). Automatically deleting files in your Downloads folder may not always be a great idea. However, if you don’t keep important files in the folder you can set a period of Never, 1 day, 14 days, 30 days or 60 days. In the example below we are enabling the first option, setting the second option to 30 days and the third option to Never. Refer to below image:
Setting Temporary Files options
Setting OneDrive
Another feature of Windows 10 is OneDrive which lets you access all the files saved in your OneDrive cloud, with File Explorer, regardless of whether they are downloaded or not on your PC. However, if you work with many of those files locally they can quickly add up and eat up space. If you want, you can configure Storage Sense to automatically mark the OneDrive files that you haven’t opened for a specified amount of time as online-only. That means that those files are still kept in your OneDrive cloud and are still accessible from File Explorer, but they no longer occupy space on your PC.
Under the Locally available cloud content heading there are two options. From the iCloud Drive option, chose an entry from thedrop-down menu. You can choose whethereContent will become online-only if not opened for more than Never, 1 day, 14 days, 30 days, or 60 days. Simply, repeat the above for the second option, iCloud Photos. However, note that this setting is available in Storage Sense only if the location of your OneDrive folder is on your C: drive, where Windows 10 is installed. See below image:
Setting iCloud Drive and Photos option
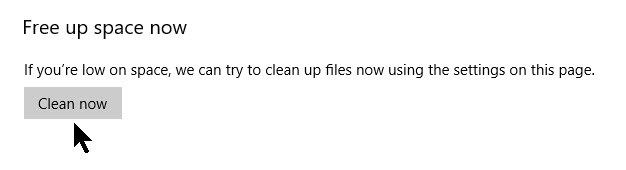
Clear Space Now
Finally, under the heading, Free up space now section is a Clear Now button. If you need to clean your Windows 10 C: drive urgently, click or tap this button. That runs Storage Sense immediately, without waiting for its schedule. See following image:
Once activated, Storage Sense will intelligently run whenever your device is low on storage space or according to your schedule.
Storage Sense looks for and removes files such as, but not limited to:
Temporary setup files
Old indexed content
System cache files
Internet cache files
Device driver packages
System downloaded program files
Dated system log files
System error memory dump files
System error minidump files
Temporary system files
Dated Windows update temporary files
If you have turned on the removal of old files in your Downloads folder, these will be removed as well according to your time interval setting.
The fact that Windows 10 includes an option to clean your disk and recover free space automatically is a good thing. It can prove quite useful, especially for users who struggle with limited space on their Windows 10 computers and devices. As a end note, remember that Storage Sence can be very aggressive in removing files.
That’s it. If you didn’t already use it, try Storage Sense and let us know what you think about this feature and/or TechSavvy.Life in the Comments or click to Tweet below.
I have found TechSavvy.Life blog posts extremely helpful. Check them out for posts on smart phone apps, Macs and PCs!
Please feel free to leave a comment. I would love hearing from you. Do you have a computer or smart device tech question? I will do my best to answer your inquiry. Please mention the device, app and version that you are using. To help us out, you can send screenshots of your data related to your question.
The author’s Vietnam eBook on the Battle for Tra Bong: Events and Aftermath