I am Raymond Oglesby, an Information Technology (IT) specialist with 30 years in the field. I have taught Microsoft Applications and troubleshot computers in 15 countries and many States. My career was focused on mainframes and desktops from application development to implementation. I have written hundreds of programs for various architectures. I decided to start a blog to share my knowledge and experiences with you. I plan on updating this blog at least twice a week about smart phone apps to Windows.
Please feel free to leave a Comment or Tweet. I would love to hear from you. Do you have a computer tech question? I will do my best to answer your inquiry. Please mention the app and version that you are using. To help me out, you can send screenshots of your data related to your question.
If you have downloaded images or videos to your Files app on your iPhone or iPad, you might be wondering if you can copy them to your Photos library. The answer is yes.
If you have downloaded images or videos to your Files app on your iPhone or iPad, you might be wondering if you can copy them to your Photos library. The answer is yes. Let’s explore how this is done.
This is for the iPhone and iPad
Copyright Scott Adams, Inc./Distributed by Universal Uclick for UFS
First, open the Files app. Refer to below image:
Accessing the Files app
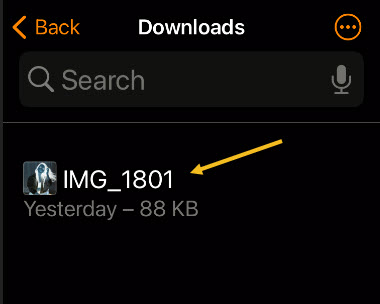
Now, navigate to the folder that contains the media files that you would like to copy to your Photos. In our example, we are using the Downloads folder on the iPhone, but the files could just as easily be copied from other folders in Files, such as Dropbox or your iCloud Drive. See below image:
Accessing the Downloads folder on my iPhone
If it’s a single photo or video, (like our example), tap on it to open up its detailed view.
If you want to select multiple files on an iPhone, tap the ellipsis button (three dots in a circle) in the upper-right corner of the screen and choose Select. (On an iPad, just tap Select). Then, place check marks on the items you want to copy to Photos. See following image:
Accessing a single image
Either way, once you have a single item opened or multiple items selected, tap the Share button. On the iPad, it’s in the upper-right corner of the screen. On the iPhone, it’s located in the lower left-hand corner. Refer to below image for the iPhone:
Accessing the Share button
On the Share pop-up list, tap Save Image or Save Video. If you selected multiple items, tap Save X Items, where X is the number of items you have selected. See below image:
Saving the single image to Photos
The next time you open your Photos app, you will see the images or videos you saved from Files.
This process works both ways. If you want to copy photos or images from Photos to Files, select them in the Photos app, tap Share, then select Save to Files.
Quote For the Day
Technology is a gift of God. After the gift of life it is perhaps the greatest of God’s gifts. It is the mother of civilizations, of arts and of sciences.
Freeman Dyson
That’s it. Please feel free to share this post! One way to share is via Twitter.
Just click the Tweet icon below. This will launch Twitter where you click its icon to post the Tweet.
Checkout TechSavvy.Life for blog posts on smartphones, PCs, and Macs! You may email us at contact@techsavvy.life for comments or questions.
Please feel free to leave a comment. I would love hearing from you. Do you have a computer or smart device tech question? I will do my best to answer your inquiry. Just send an email to contact@techsavvy.life. Please mention the device, app and version that you are using. To help us out, you can send screenshots of your data related to your question.
The author’s Vietnam eBook on the Battle for Tra Bong: Events and Aftermath
Some apps require you to run a certain Java version to properly function. You can check which version of Java you have installed using a graphical tool or via the command line.
Some apps require you to run a certain Java version to properly function. You can check which version of Java you have installed using a graphical tool or via the command line. Let’s explore how to do this.
This is for devices running Windows 10
Copyright Scott Adams, Inc./Distributed by Universal Uclick for UFS
Check Graphically
If you prefer to avoid the command line, you can use the About Java utility to find the installed Java version.
First, open the Start menu. Next, type in About Java in the Cortana search box in bottom left-hand corner. Now, click the first result in upper-left corner. Refer to below image:
Accessing your About Java app
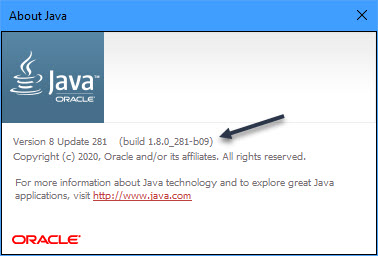
Next, you will see your current Java version listed in the first line. See below image:
Your Jave Version and Update number
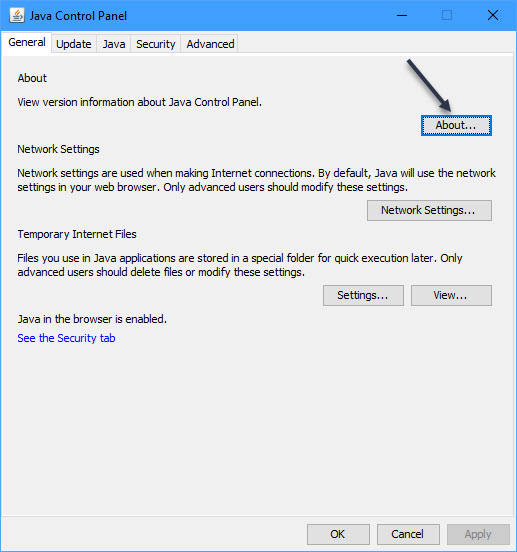
If you do not see About Java in the Start menu, search for Configure Java in the Cortana search box and click the result. Then click the About button to see your Java Version and Update number. See following image:
Accessing the Java Control Panel About button
Note: If you do not see either the About Java or Configure Java tools, you likely do not have Java installed. You can download it here from Oracle’s official website. This may take several minutes; just be patient.
Check Using the Command Prompt
You can check your Java version from the command line, too.
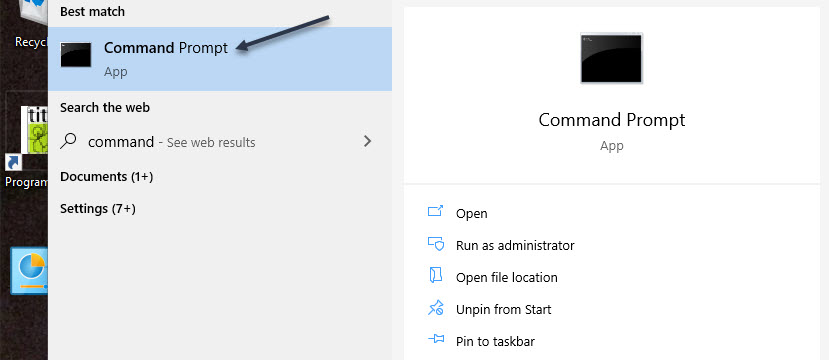
First, open the Start menu. Next, type in Command Prompt in the Cortana search box in bottom left-hand corner. Now, click the Command Prompt app in upper-left corner. Refer to below image:
Accessing the Command Prompt app
When the Command Prompt opens, type the following command at the prompt and press Enter.
java -version
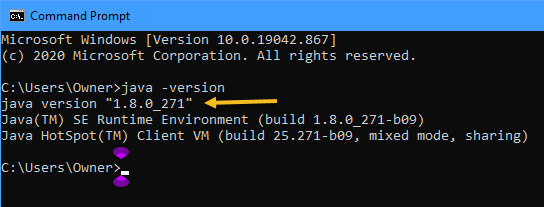
Now, you will see your Java version and some numbers next to it. These numbers are your Java version and Update number. See below image:
Your Java Version and Update number
If the Command Prompt says that Java is not recognized as an internal or external command, that’s probably because the system variables are not properly set; or perhaps because you do not have Java installed. Reinstall Java on your PC from the download it here link and this should fix the issue for you.
What is the Latest Java Version
To check this, open your browser and search for:
What is the Latest Version of Java for Windows 10
As of this writing , the latest version Update 281. I have Update 271, so I need to upgrade. You can download it here for the latest version from Oracle’s official website. This may take take several minutes; just be patient. You will be prompted to uninstall your older version, just click the uninstall button. When finished, close your Java dialog box. Now, go back to either method above on checking your Java version. See following image where I have updated to the latest version:
Your updated Java Update number
Check Your Version of Windows
You are finished. You can do the above for Windows 8 or 7, but in the download, you have to choose the Windows operating system, either 32-bit or 64-bit, download link. To check this in Windows 10 , first, open the Settings app by pressing Windows+i or click Start, then the Settings icon in lower left-hand corner. Next, scroll down to:
System > About
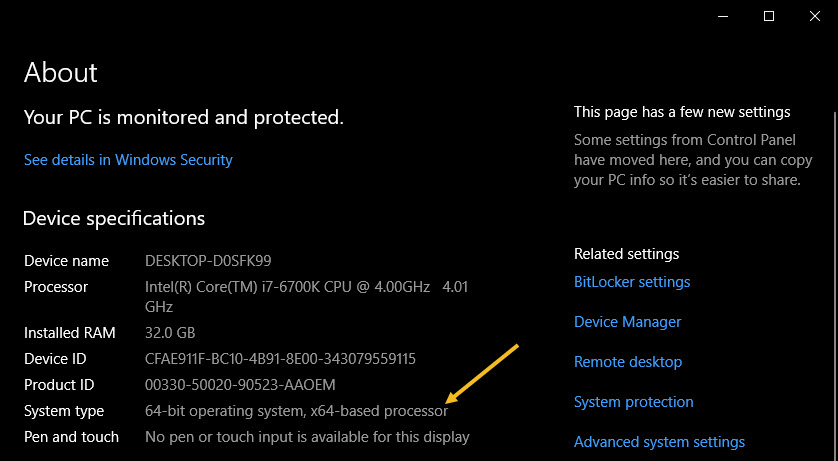
On the right side, look for the System type entry. You will be showned two pieces of information; whether you are using a 32-bit or 64-bit operating system and whether you have a 64-bit capable processor. Refer to below image:
Your operating system
For Windows 8, head to:
Control Panel > System
You can also hit Start and search for system. Look for the System type entry to see whether your operating system and processor are 32-bit or 64-bit.
For Windows 7, click on Start, right-click on Computer, and then choose Properties. On the System page, look for the System type entry to see whether your operating system is 32-bit or 64-bit.
Quote for the Day
The advance of technology is based on making it fit in so that you don’t really even notice it, so it’s part of everyday life.
Bill Gates, Microsoft
Please feel free to share this post! One way to share is via Twitter.
Just click the Tweet icon below. This will launch Twitter where you click its icon to post the Tweet.
Check out TechSavvy.life for blog posts on smartphones, PCs, and Macs! You may email us at contact@techsavvy.life for comments or questions.
Please feel free to leave a comment. I would love hearing from you. Do you have a computer or smart device tech question? I will do my best to answer your inquiry. Just send an email to contact@techsavvy.life. Please mention the device, app and version that you are using. To help us out, you can send screenshots of your data related to your question.
The author’s Vietnam eBook on the Battle for Tra Bong: Events and Aftermath
We have all been there; looking up a word on Google just to find out how it’s spelled. No matter the typos, Google usually knows what you want to type. Thankfully, Google allows you to use its spell-check feature everywhere in your Chrome web browser.
We have all been there; looking up a word on Google just to find out how it’s spelled. No matter the typos, Google usually knows what you want to type. Thankfully, Google allows you to use its spell-check feature everywhere in your Chrome web browser.
Called the Enhanced spell check, this setting allows you to access Google’s more advanced spell check whenever you type something on the Internet.
But as is the case with most Google services, there is a privacy cost to this. Turning on Enhanced spell check in Chrome also means agreeing to send everything you type on the web to Google’s server. So enable it at your own risk. But, you can also enable Basic spell check without sending data to Google. Lets explore how to do this.
This is for PCs, Macs, Chrome OS, or Linux running Chrome
dCopyright Scott Adams, Inc./Distributed by Universal Uclick for UFS
First, open your Google Chrome browser. Next, click the three-dot hamburger icon located in the top right-hand corner. Refer to below image:
Accessing the menu hamburger icon
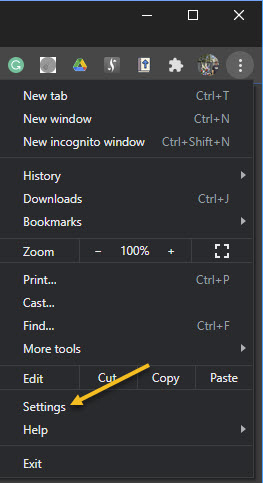
Now, from the drop-down menu that appears, select Settings. See below image:
Accessing Settings
Alternatively, you can press the Cmd+Comma keyboard shortcut on a Mac or Alt+E on a Windows PC to access the Settings option.
Next, in the sidebar, click Advanced to reveal the advanced menu. Now, choose Languages from the list. See following image:
Accessing Languages under the Advanced section
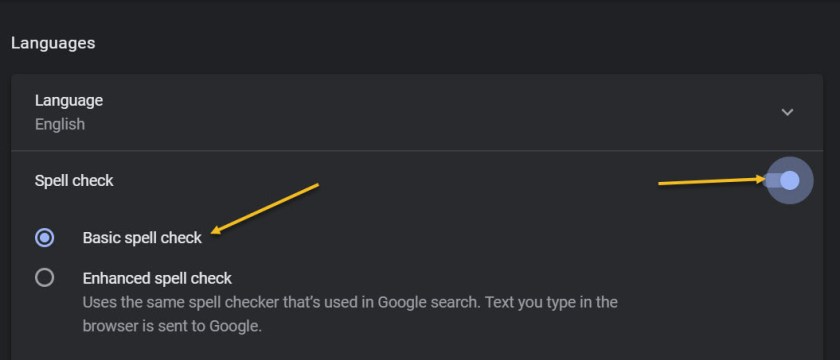
Under the Spell check section, toggle the radio button in front of the Basic spell check option to turn it On. If you want enhanced spell checking, toggle the radio button in front of the Enhanced spell check to turn it On. Keep in mind, the enhanced option means you are sending your browser activity to Google. Refer to below image:
Enabling Basic spell check option
At the time of writing, Enhanced spell check is not available for Google Chrome’s Android and iPhone clients.
The number one benefit of information technology is that it empowers people to do what they want to do. It lets people be creative. It lets people be productive. It lets people learn things they didn’t think they could learn before, and so in a sense it is all about potential.
Steve Ballmer, Microsoft
That’s it. Please feel free to share this post! One way to share is via Twitter.
Just click the Tweet icon below. This will launch Twitter where you click its icon to post the Tweet.
Check out TechSavvy.Life for blog posts on smartphones, PCs, and Macs! You may email us at contact@techsavvy.life for comments or questions.
Peeking at the URL of a link that you are about to open is a good way to make sure the URL is what you expect and not a trick by the website.
Peeking at the URL of a link that you are about to open is a good way to make sure the URL is what you expect and not a trick by the website. Let’s explore how to preview Safari links for iPhone, iPad and Mac.
This is for iPhone, iPad, and Mac using Safari
Copyright Scott Adams, Inc./Distributed by Universal Uclick for UFS
How to Preview Safari Links on a Mac
Popular desktop web browsers have featured URL status bars for decades. But Safari for Mac does not enable one by default. If you want to quickly check the URL of a link, you can do so by enabling the status bar.
First, open the Safari app on your Mac. Click the View section in the menu bar and choose the Show Status Bar option. Refer to below image:
Enabling Status Bar option
Now, with this enabled, when you hover over any link, you will see its full URL address in the status bar in the bottom-left corner of the page. See below image:
Displaying URL address
If you ever want to disable this link preview, click:
View > Hide Status Bar
in the menu bar at the top of the screen.
How to Preview Safari Links on iPhone and iPad
Unlike the Mac, Safari on iPhone and iPad does not have a status bar. But it does let you peek into the page that you want to open. You can tap and hold any link to load the page in a pop-up preview window. If you do not like the full preview, you can switch to only viewing the URL (Like Safari on Mac).
First, open a page in Safari on your iPhone or iPad. Next, tap and hold any link on the page. See following image:
Accessing a link
Note! For this feature to work, you need to be running iOS 13, iPadOS 13, or higher. You will see a thumbnail preview of the page pop-up. To preview the URL instead, tap the Hide Preview button located at the top of the pop-up window. Refer to below image:
Accessing Hide Preview option
The thumbnail will disappear and you will see the URL listed in the box. If it looks safe and you want to open the page from this pop-up, tap the Open button in the menu list. See below image:
Open the link
If you want to get the thumbnail peek back, just tap and hold a link again and select Tap to show preview at the top of the pop-up window.
Keeping an eye on URLs is one way that browsing with more knowledge will help you avoid web-based scams and keep you safer on the web.
Quote For the Day
Common sense and a sense of humor are the same thing, moving at different speeds. A sense of humor is just common sense, dancing.
Clive James
That’s it. Please feel free to share this post! One way to share is via Twitter.
Just click the Tweet icon below. This will launch Twitter where you click its icon to post the Tweet.
Check out TechSavvy.Life for blog posts on smartphones, PCs, and Macs! You may email us at contact@techsavvy.life for comments or questions.
Please feel free to leave a comment. I would love hearing from you. Do you have a computer or smart device tech question? I will do my best to answer your inquiry. Just send an email to contact@techsavvy.life. Please mention the device, app and version that you are using. To help us out, you can send screenshots of your data related to your question.
The author’s Vietnam eBook on the Battle for Tra Bong: Events and Aftermath
There might be times when it would be helpful to add a YouTube video to a Microsoft Word document. It can help you get your point across or help with training. Inserting the YouTube video directly into the document makes it easier to watch it. Word allows you to include the video right inside the document. Then the reader does not need to click a link to the video and launch a separate browser instance.
There might be times when it would be helpful to add a YouTube video to a Microsoft Word document. It can help you get your point across or help with training. Inserting the YouTube video directly into the document makes it easier to watch it. Word allows you to include the video right inside the document. Then the reader does not need to click a link to the video and launch a separate browser instance. Let’s explore how this is done.
This is for Word. Screenshots are from Word in Office 365 and Chrome using Windows 10
Copyright Scott Adams, Inc./Distributed by Universal Uclick for UFS
If you follow my example, I will be using a YouTube video from the 2008 Winner in a Poland ballroom dance competition on BBC One. I have been ballroom dancing for 15 years and this is one of the best ballroom dance videos I have found. As of this writing, the video has been viewed over 3.9 million times. I hope you enjoy the video and this post.
Copy YouTube Video URL
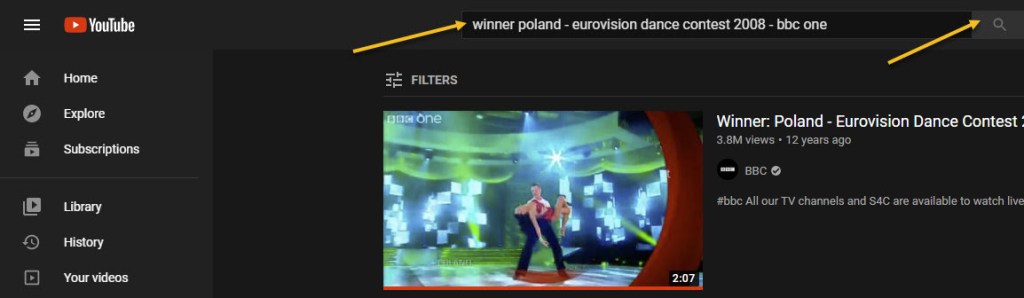
To insert a YouTube video into your Word document, open your browser of choice (I am using Chrome) and go to the YouTube website. Now, search for a YouTube video that you want to use by typing the name of the video in the search bar. Next, click the search button or simply press Enter. Refer to below image:
Entering your YouTube video name
Next, select the video from the search results by clicking it. See below image:
Accessing your YouTube video
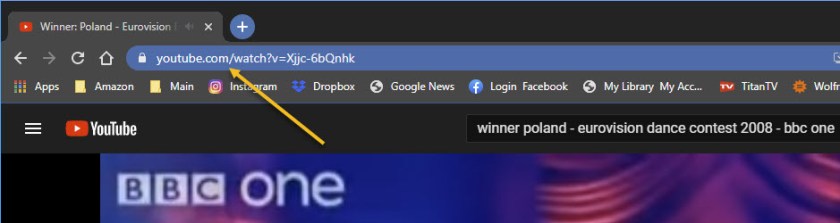
Now, highlight the video’s URL in the browser’s address bar. Right-click and then select Copy from the context menu. (This is the easiest option). See following image:
Copy the URL of your YouTube video
Copy YouTube Embed Code
Alternately, to get the embed code, click Share under the video. Refer to below image:
Accessing your YouTube video Share option
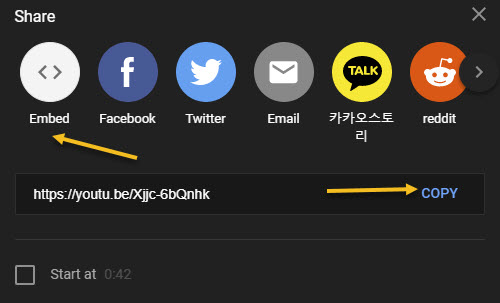
Next, in the Share window, select Embed. See below image:
Selecting your YouTube video Embed option
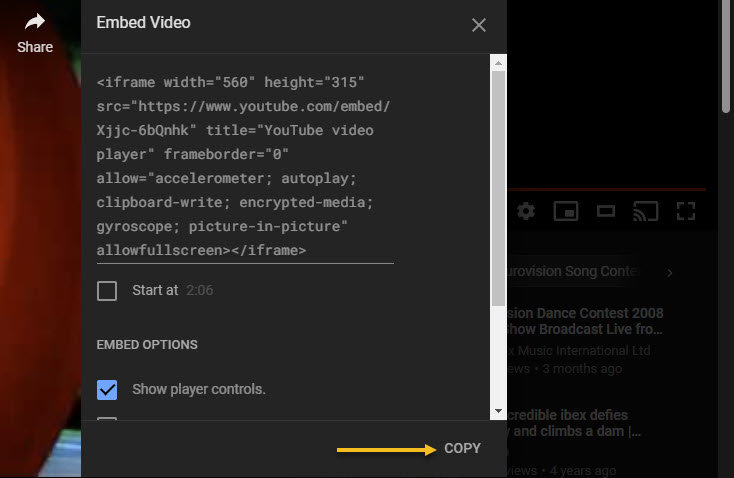
Now, the Embed Video window will appear. Click Copy to copy the code to your clipboard. Optionally, if you want to start the video from a specific time, check the box next to Start At and enter the desired time. See following image:
Copy your YouTube video Embed code
Insert URL or Embed Code
With the URL or embed code copied to your clipboard, open Word. Next, place your pointer where you want to insert your video.
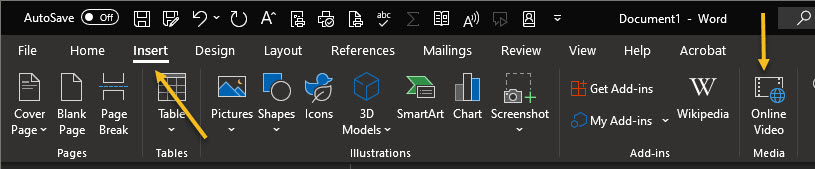
Now, from the top toolbar, click the Insert tab, then select Online Video in the Media group. Refer to below image:
Selecting the Inset option for Online Video
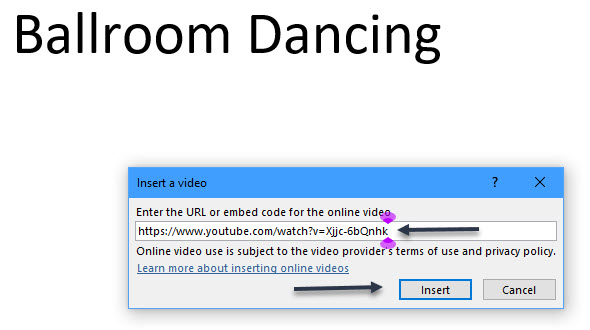
The Insert a Video dialog box will appear. Next, paste (Ctrl+V or right-click > Paste) the URL or embed code in the text box, then click Insert. See below image where I used the URL:
Copy/Paste the URL of your YouTube video
The video will now be inserted into the Word document. Clicking the play button will make the video pop out in the foreground while the background is dimmed. Press the Play button again to start. To pause, just click the video.
Your YouTube Video in Word
All of the normal video controls you would find on YouTube are also available for the video inserted into your Word document. See following image on how the video is displayed in Word:
Your YouTube video inside of a Word document
Quote For the Day
Everybody gets so much information all day long that they lose their common sense.”
Gertrude Stein
That’s it. Please feel free to share this post! One way to share is via Twitter.
Just click the Tweet icon below. This will launch Twitter where you click its icon to post the Tweet.
Check out TechSavvy.Life for blog posts on smartphones, PCs, and Macs! You may email us at contact@techsavvy.life for comments or questions.
Please feel free to leave a comment. I would love hearing from you. Do you have a computer or smart device tech question? I will do my best to answer your inquiry. Just send an email to contact@techsavvy.life. Please mention the device, app and version that you are using. To help us out, you can send screenshots of your data related to your question.
The author’s Vietnam eBook on the Battle for Tra Bong: Events and Aftermath
As tracking goes, Safari keeping your recent browsing history is less about privacy and more about just being useful. It’s your history that means Safari remembers where to go to when you choose forward and back within a site, for instance.
As tracking goes, Safari seeing your recent browsing history is less about privacy and more about just being useful. It’s your history that means Safari remembers where to go to when you choose forward and back within a site, for instance.
While it’s possible to completely wipe your History in Settings, you can also erase only more recent history if you would like. Let’s explore this feature.
This is for the iPhone and iPad. Screenshots are from iPhone
Copyright Scott Adams, Inc./Distributed by Universal Uclick for UFS
Clear Recent History
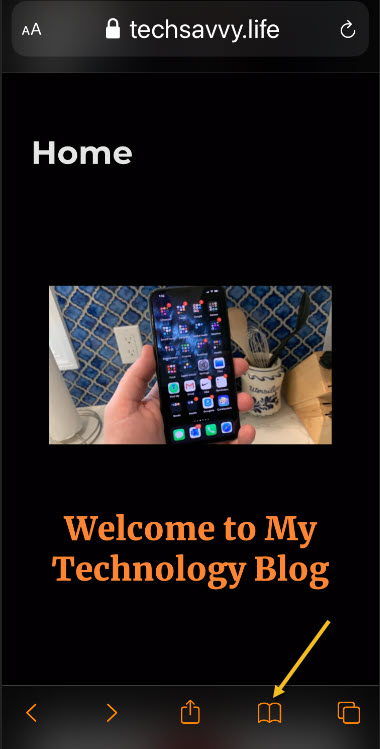
First, open Safari on your iPhone or iPad. Tap the Bookmarks button. On the iPad, you will find it in the upper-left corner of the screen beside the address bar. On an iPhone, it’s at the bottom of the screen. Refer to below image:
Accessing Bookmarks button
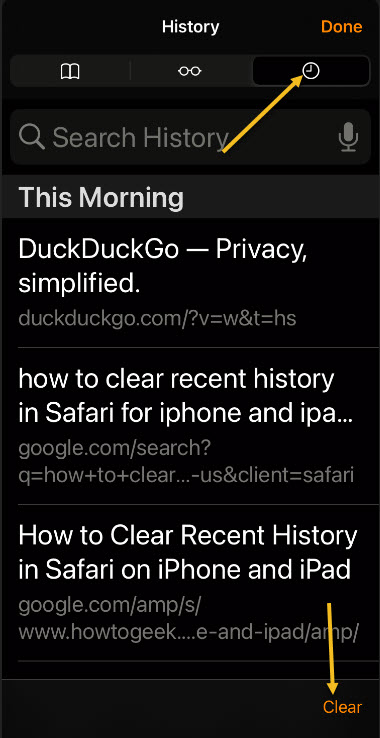
Next, in the pop-up that appears, tap the History tab (which looks like a clock face), and then tap the Clear button. See below image:
Accessing History tab
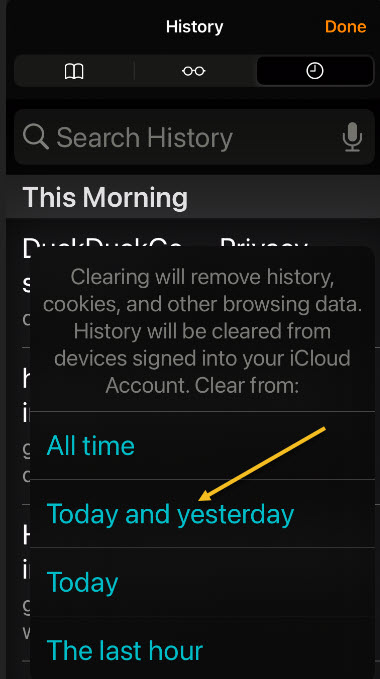
Now, after you tap Clear, another pop-up will give you another choice. You can select All time, Today and yesterday, Today, or The last hour.
Choosing one of these options will remove your browsing history, cookies, and other browsing data from the point you select until now. For example, if you click Today, all the browsing history from sites you visited today will disappear, but everything earlier than that will remain on the list.
Next, tap the option you would prefer (or you can tap outside the pop-up box to cancel). See following image:
Selecting an option for deletion of Recent history
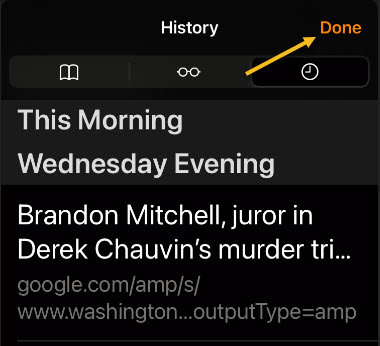
If you made a selection from the pop-up list, your browsing history will be cleared accordingly. Now, tap the Done button in upper right-hand corner to exit.
Erase a Single Entry
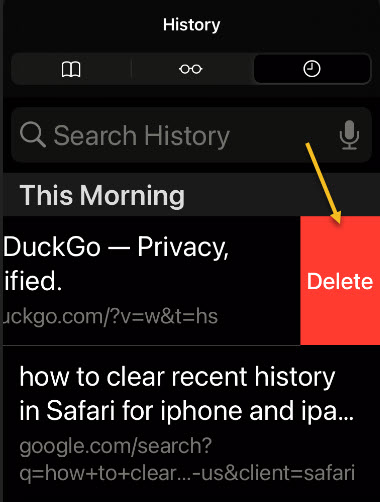
Also, you can delete individual entries by swiping to the left on them with your finger. When a red Delete button appears on the right, tap it. Refer to below image:
Selecting to delete a single Recent history item
When you are finished deleting single entries, tap the Done button in upper right-hand corner. See below image:
Exiting the History tab
Using this method, only the single entry you just swiped will be erased. This can be a easy way of erasing certain history items without having to clear everything at once.
Quote For the Day
Everybody gets so much information all day long that they lose their common sense.
Gertrude Stein
That’s it. Please feel free to share this post! One way to share is via Twitter.
Just click the Tweet icon below. This will launch Twitter where you click its icon to post the Tweet.
Check out TechSavvy.Life blog posts on smartphones, PCs, and Macs! You may email us at contact@techsavvy.life for comments or questions.
Please feel free to leave a comment. I would love hearing from you. Do you have a computer or smart device tech question? I will do my best to answer your inquiry. Just send an email to contact@techsavvy.life. Please mention the device, app and version that you are using. To help us out, you can send screenshots of your data related to your question.
The author’s Vietnam eBook on the Battle for Tra Bong: Events and Aftermath
The Privacy Checkup tool allows you to determine how much or how little information you reveal, and to whom.
Facebook has tons of privacy checks that it would take three or more blog posts to cover the topic. In this post we are going to tackle two topics. The Privacy Checkup is tedious and laborious, plus, there are way too many checks. In our opinion, Facebook is a giant bureaucracy, too big for its own good Regardless, you may be surprised at the kinds and amount of information you are sharing, I know I was. Just take the time to discover what you are sharing using Facebook’s Privacy Checkup tool.
The Privacy Checkup tool allows you to determine how much or how little information you reveal, and to whom. Let’s explore this Facebook tool.
This is for devices running Facebook. Screenshots are from Windows 10
Copyright Scott Adams, Inc./Distributed by Universal Uclick for UFS
Start Privacy Checkup
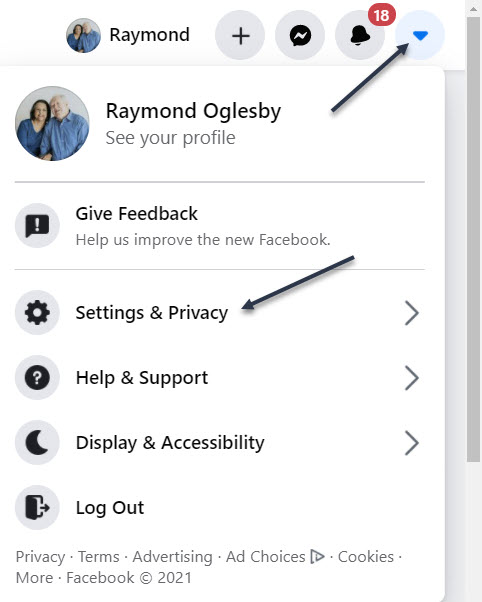
To run the latest version of Facebook’s Privacy Checkup tool, first, launch Facebook. Next, click the down arrow icon in the upper right-hand corner, then click on Settings& Privacy. Refer to below image:
Accessing Settings & Privacy
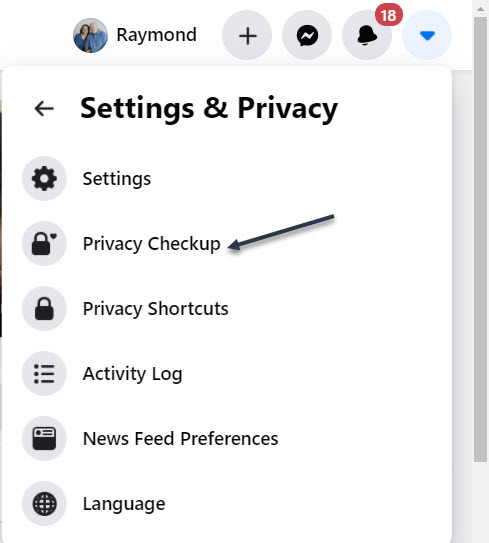
Now, select Privacy Checkup. See below image:
Accessing Privacy Checkup tool
Choose the First Topic
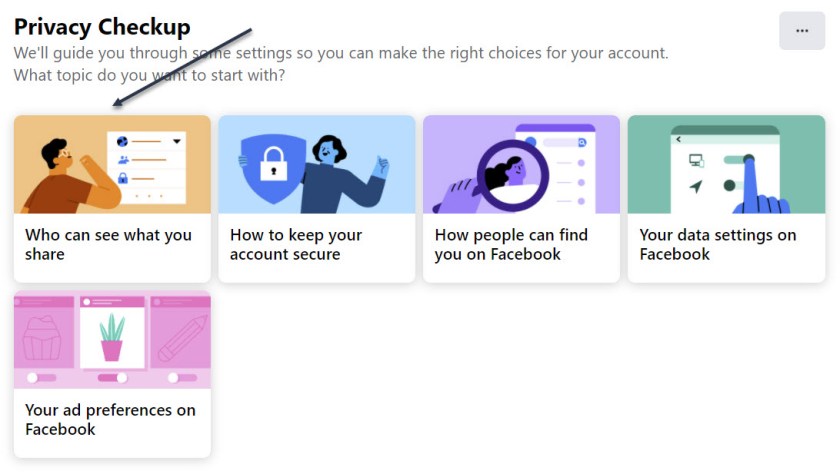
Next, in the Privacy Checkup window, click the first topic, Who can see what you share. See following image:
Selecting the first topic
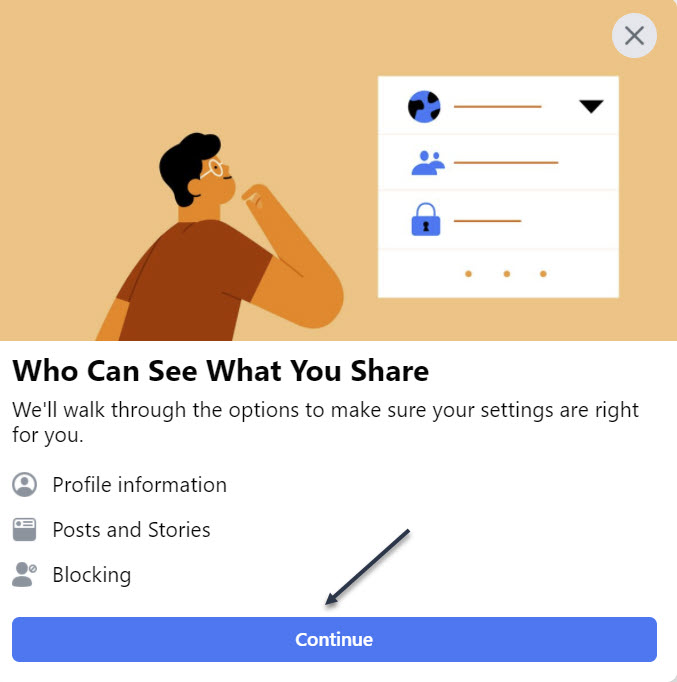
Now, click Continue. Refer to below image:
Verbiage about the topic, continue to next screen
Your Profile Information
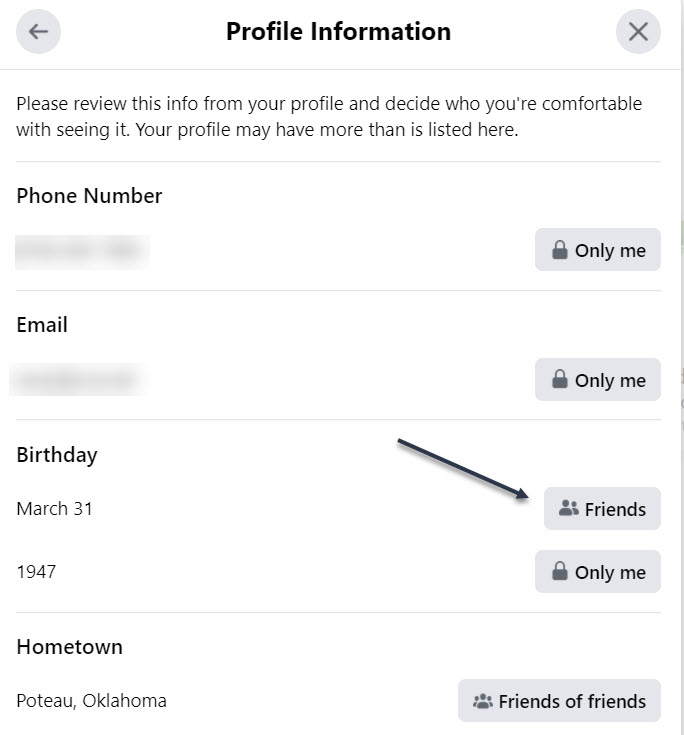
Next, at the Profile Information window, review the settings for your phone number, email addresses, and birthday. Click the button next to each one, and choose whether to change it to Public, Friends, Only Me, or a specific Facebook list. See below image:
What and who sees your Profile Information
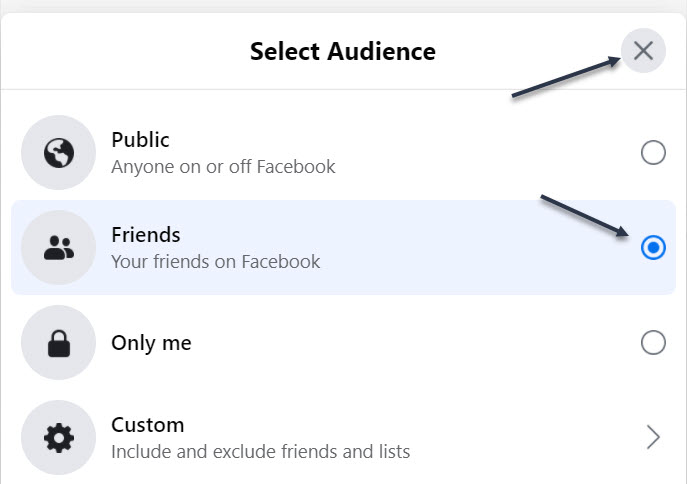
I changed my Birthday to Friends (it was already Friends, I kept it the same). To exit, click the “X” in upper right-hand corner. See following image:
Changing who sees your Birthday
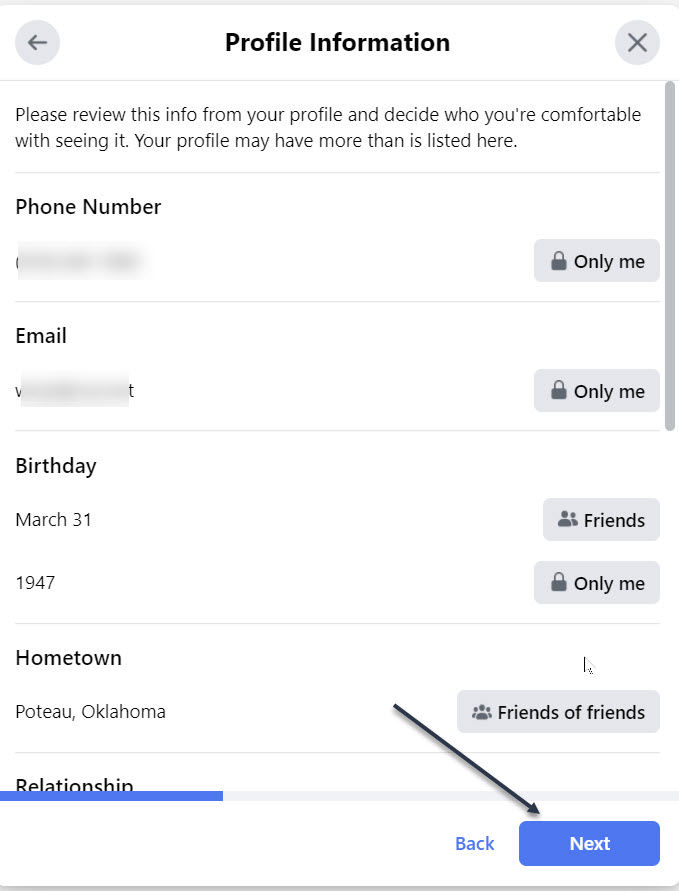
You probably want this information to remain private or only visible to friends or a specific group. When done, click Next. Refer to below image:
Continue to the next screen
Your Posts
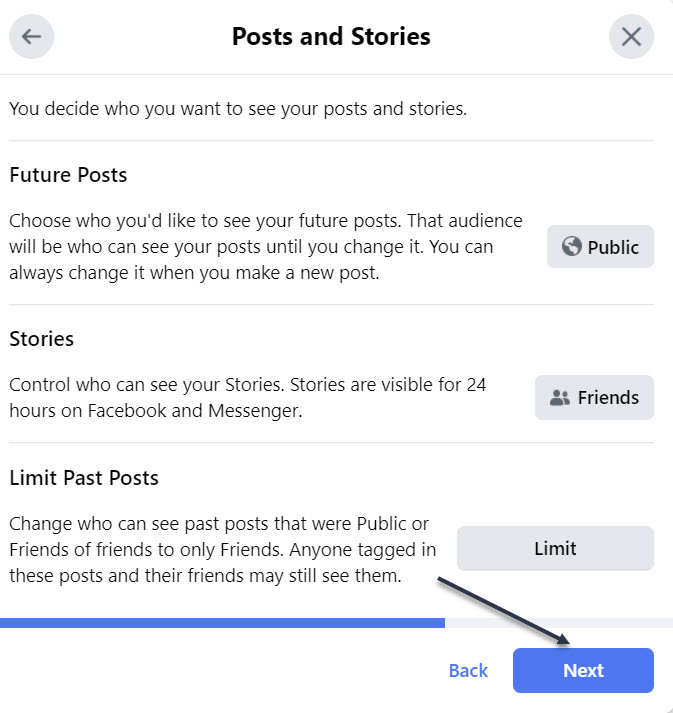
Now, at the Posts window, set the option for who should see future posts. You would likely want to set this to Friends. The Limit Past Posts option changes past posts that were seen by the Public or Friends of Friends to only Friends. Click Next to continue. See below image:
Who sees your Posts, continue to next screen
Your Blocked People
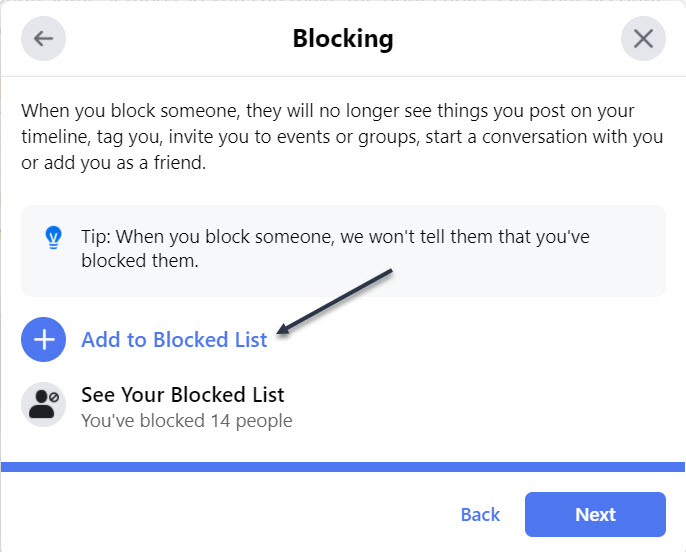
Next, at the Block screen, you can block specific people from seeing things you post, starting conversations with you, or trying to add you as a friend. To do this, click Add to Blocked list link. See following image:
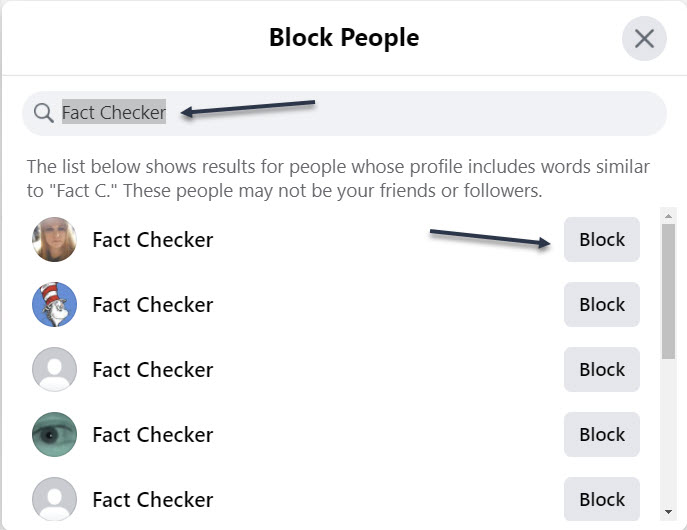
Now, type the name of the person or account you wish to block. From the list of suggestions, click the Block button for the correct person, then click Next. Refer to below image:
Entering a name to block
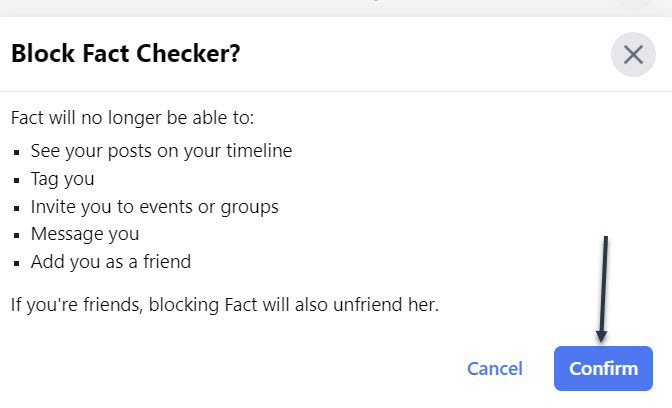
Next, click Confirm to block the person and continue. See below image:
Confirming a blocked person
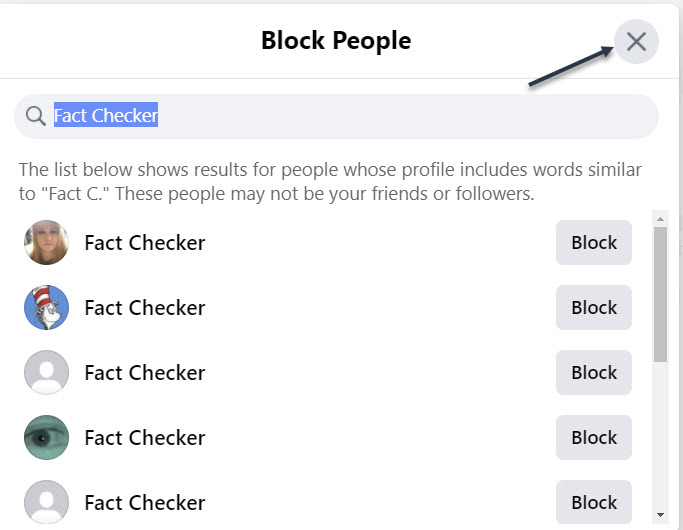
Now, you will be taken back to the Block screen. You may select another person to block. When finished, click the “X” in upper right-hand corner. See following image:
Exiting the blocked persons screen
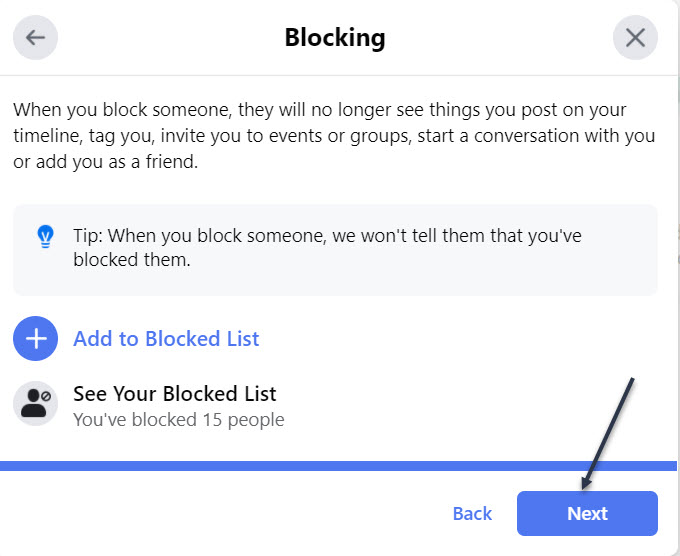
Next, to continue, click Next. Refer to below image:
Continue to the next screen
You Are Finished With First Topic
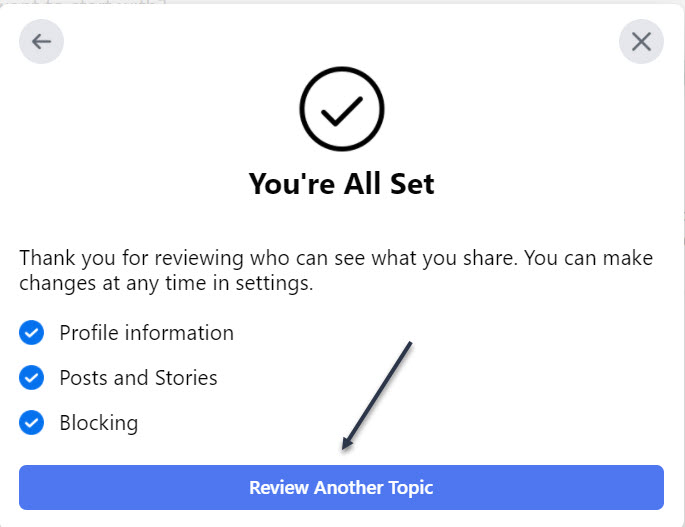
Now, the You’re All Set window will open indicating you are finished with the topic. To continue, click the Review Another Topic button. See below image:
You have finished this topic screen
Choose Your Second Topic
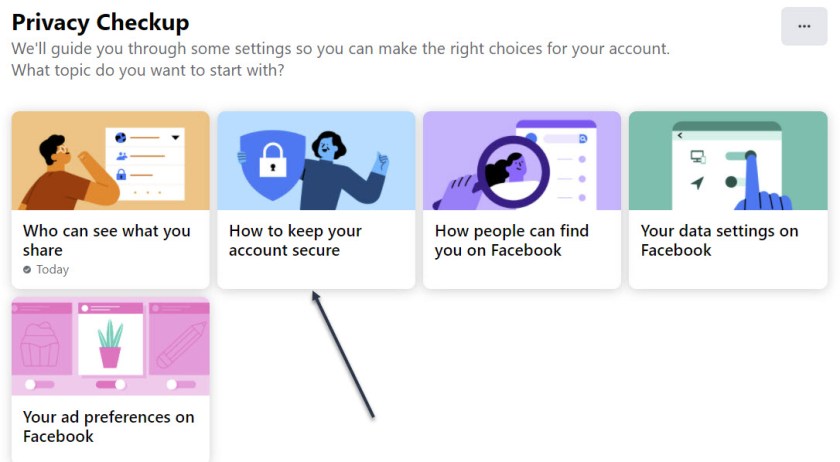
Next, select How to keep your account secure. See following image:
Select the second topic
Note! My Password is OK and Two-factor authentication is on. Now, click Continue. Refer to below image:
Verbiage about the topic, continue to next screen
Check Your Password
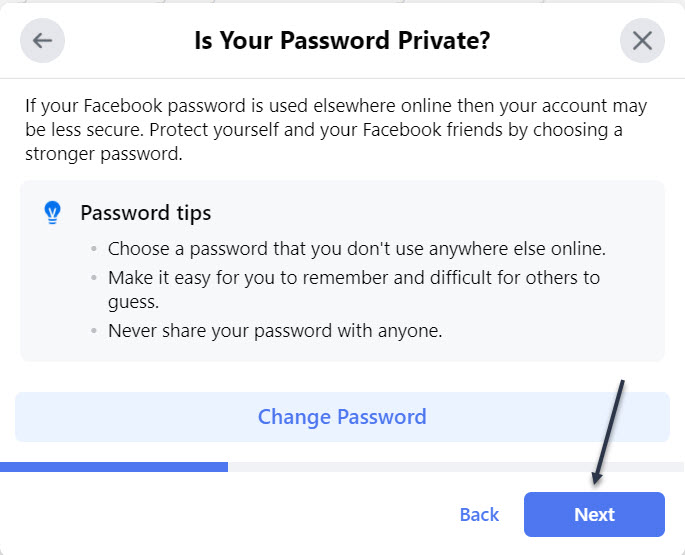
Next, at the window for Is Your Password Private, click Change Password if you are concerned that it was compromised or you want to change it to something more secure then click Next. See below image:
Manage your password, continue to next screen
Check Your Two-Factor Authentication
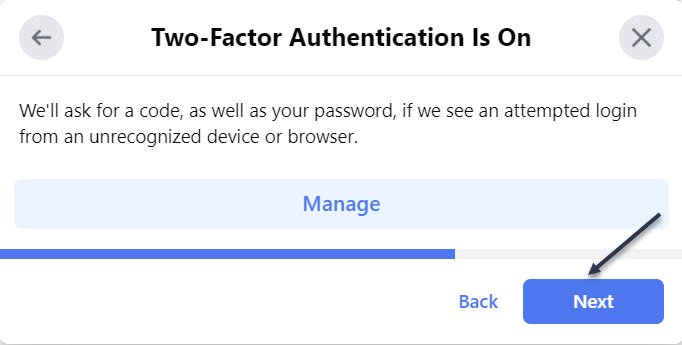
If Two-factor authentication is off, click the Get Started button to add Two-Factor authentication to protect your Facebook account. You want to do this. Just, follow the steps to set this up. Now, click Next to continue. See following image:
Manage Two-Factor Authentication, continue to next screen
Check Your Alerts
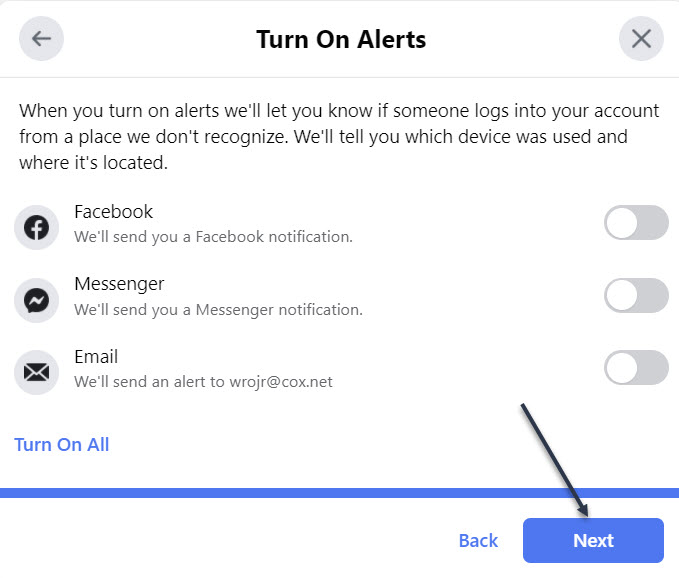
Next, at the window for Turn On Alerts, turn on the switch for any alerts you wish to receive if you or someone else signs into your Facebook account from a new or different location, then click Next. Refer to below image:
Enable/Disable Alerts, continue to next screen
You Are Finished With Second Topic
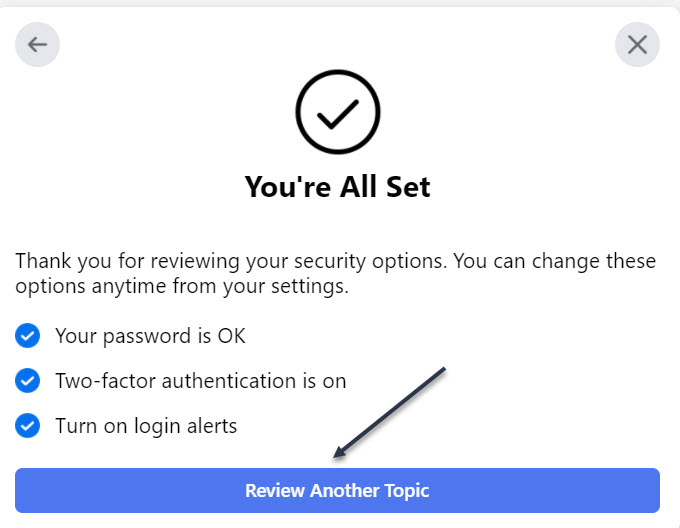
Now, the You’re All Set window will open indicating you are finished with the topic. To continue, click the Review Another Topic button. See below image:
You have finished this topic
You may continue to one or more of the next three topics and follow its directions.
Quote For the Day
“Technology is a useful servant but a dangerous master”.
Christian Lous Lange
That’s it. You now have controlled your Privacy settings in Facebook. Please feel free to share this post! One way to share is via Twitter.
Just click the Tweet icon below. This will launch Twitter where you click its icon to post the Tweet.
Check out TechSavvy.Life for blog posts on smartphones, PCs, and Macs! You may email us at contact@techsavvy.life for comments or questions.
Please feel free to leave a comment. I would love hearing from you. Do you have a computer or smart device tech question? I will do my best to answer your inquiry. Just send an email to contact@techsavvy.life. Please mention the device, app and version that you are using. To help us out, you can send screenshots of your data related to your question.
The author’s Vietnam eBook on the Battle for Tra Bong: Events and Aftermath
AssistiveTouch is an Accessibility option. This feature allows you a one tap access to “canned” shortcuts. You no longer have to swipe through pages or visit your first or last page for certain options.
AssistiveTouch is an Accessibility option. This feature allows you a one tap access to “canned” shortcuts. You no longer have to swipe through pages or visit your first or last page for certain options. Let’s explore how to enable and use this feature.
This is for the iPhone and iPad
Copyright Scott Adams, Inc./Distributed by Universal Uclick for UFS
To use AssistiveTouch you need to enable the feature. First, launch Settings. Refer to below image:
Accessing Settings
In Settings, locate and tap Accessibility. See below image:
Accessing Accessibility option
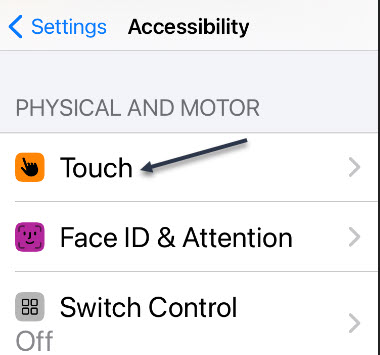
Now, in Accessibility, tap Touch. See following image:
Accessing Touch option
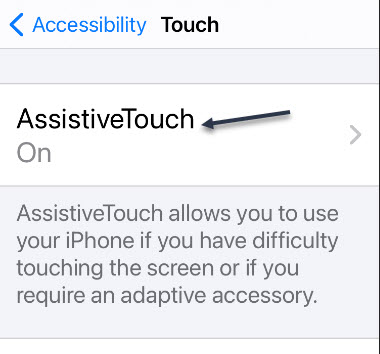
In Touch settings, tap AssistiveTouch. Refer to below image where the option is already turned On:
Accessing AssistiveTouch option
In AssistiveTouch, tap the toggle to turn it On. See below image:
Enabling AssistiveTouch option
When you flip the toggle beside AssistiveTouch, a special button (that resembles a rounded gray rectangle with a white circle in the middle) will appear near the edge of the screen. (This button does not appear in a screenshot). It will be translucent until pressed. You can drag it around the edge of the screen with your finger to reposition it. Next, exit Settings.
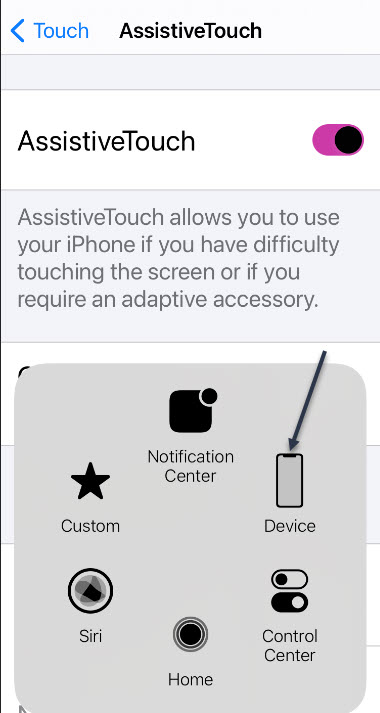
Now, locate and tap the button to preview the main AssistiveTouch screen. From here, lets tap the Device button. See following image:
Accessing Device button
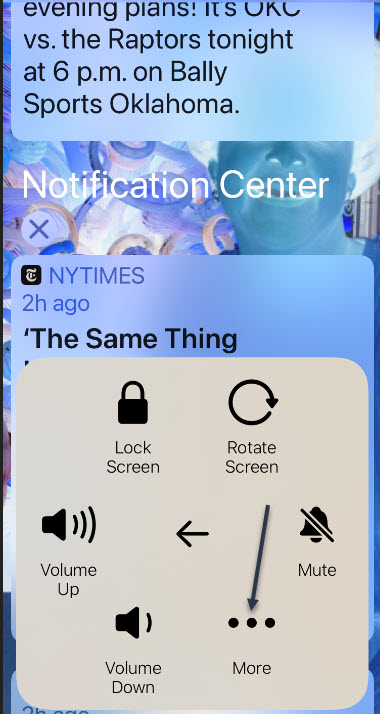
To access other shortcuts, tap the 3-dot menu button. Refer to below image:
First set of shortcuts under the Device option
Now, you will see the last screen under the Device button. See below image:
Second set of shortcuts under the Device option
Next, just tap an empty space in the shortcuts screen to go back, or tap the Back Arrow in the center until the AssistiveTouch screen disappears.
Quote For the Day
For a successful technology, reality must take precedence over public relations, for Nature cannot be fooled.
Richard P Feynman
You are finished. Please feel free to share this post! One way to share is via Twitter.
Just click the Tweet icon below. This will launch Twitter where you click its icon to post the Tweet.
Check out TechSavvy.Life for blog posts on smartphones, PCs, and Macs! You may email us at contact@techsavvy.life for comments or questions.
Please feel free to leave a comment. I would love hearing from you. Do you have a computer or smart device tech question? I will do my best to answer your inquiry. Just send an email to contact@techsavvy.life. Please mention the device, app and version that you are using. To help us out, you can send screenshots of your data related to your question.
The author’s Vietnam eBook on the Battle for Tra Bong: Events and Aftermath
Are you wondering how to create multiple folders in Windows 10 or even in Windows 7? That can be very useful if you’re a analyst, for instance. Say that you need to make a folder for each month of the year on your Windows PC. Sure, you can manually create a folder for each month, but that might take some time. Fortunately, there is a way to automate this.
Are you wondering how to create multiple folders in Windows 10 or even in Windows 7? That can be very useful if you are a analyst, for instance. Say that you need to make a folder for each month of the year on your Windows PC. Sure, you can manually create a folder for each month, but that might take some time. Fortunately, there is a way to automate this. Let’s see how to create multiple folders at once, using a simple Command Prompt.
This is for devices running Windows 10
Copyright Scott Adams, Inc./Distributed by Universal Uclick for UFS
Using the Command Prompt
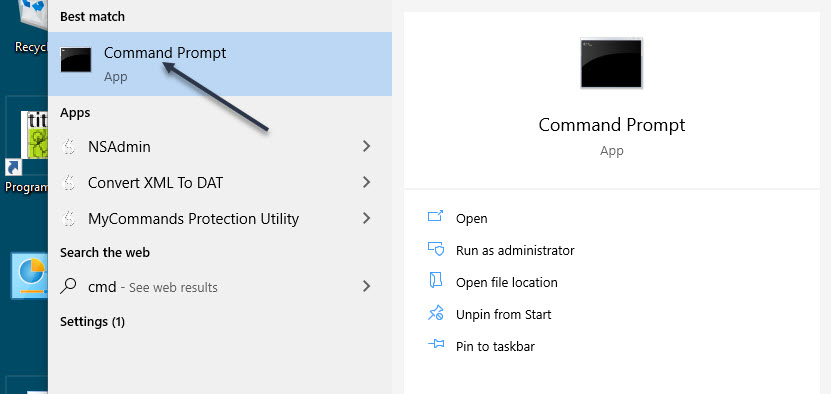
First, click the Start button from the Taskbar and type “cmd” (without quotes) in the Cortana Search bar (next to the Start button). Next, choose Command Prompt from the search results. Refer to below image:
Accessing the Command Prompt
Next, you can change directories in Command Prompt using the “cd” command (without quotes) and switch to the directory where you want to make your folders. See below image:
Changing the directory
Now. using the “md” command (without quotes) you can make a new directory for your folders. You want to create twelve folders, one for each month in a year with the following command:
md Jan Feb Mar Apr May Jun Jul Aug Sep Oct Nov Dec
See following image:
Making the Folders
If you want multiple words for a folder, just enclose the words in quotes, for example:
md “2021 Jan“ “2021 Feb” and so on.
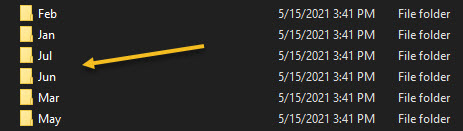
Next, you can close the Command Prompt and open the destination in Windows Explorer to check the newly made folders. Refer to below image for some of the created folders: (Due to Explorer sorting, we are only showing some consecutive ones.)
The created Folders
There are other ways to accomplish creating multiple folders at once, but this method is the easiest.
Quote For the Day
People who are really serious about software should make their own hardware.
Alan Kay
That’s it. Please feel free to share this post! One way to share is via Twitter.
Just click the Tweet icon below. This will launch Twitter where you click its icon to post the Tweet.
Check out TechSavvy.Life for blog posts on smartphones, PCs, and Macs! You may email us at techsavvy.life for comments or questions.
Please feel free to leave a comment. I would love hearing from you. Do you have a computer or smart device tech question? I will do my best to answer your inquiry. Just send an email to contact@techsavvy.life. Please mention the device, app and version that you are using. To help us out, you can send screenshots of your data related to your question.
The author’s Vietnam eBook on the Battle for Tra Bong: Events and Aftermath
You can use Google Chrome or Microsoft Edge to convert a website into an app. Although it works for Window 8 or 7, we are using Windows 10 for creating this blog post. This lets you use your sites as if they were normal apps.
You can use Google Chrome or Microsoft Edge to convert a website into an app. Although it works for Window 8 or 7, we are using Windows 10 for creating this blog post. This lets you use your sites as if they were normal apps.
This is for devices running Windows 10, and Google Chrome or Microsoft Edge
Copyright Scott Adams, Inc./Distributed by Universal Uclick for UFS
How Website Apps Work
Your website looks and works exactly the same in your app as it does in your web browser. The only difference you will see is that there will not be any browser elements in your app window, such as the bookmarks bar, address bar, and other toolbar elements.
If you use Chrome, the website app will be using Chrome in the background. If you use Edge, the browser app will use Microsoft Edge. However, normal browser elements are stripped off so that you get the actual app-like experience. These web apps get their own separate windows, taskbar icons, and desktop shortcuts.
Turn a Website Into an App Using Chrome
You can use Chrome’s main menu to turn any website into a Windows app.
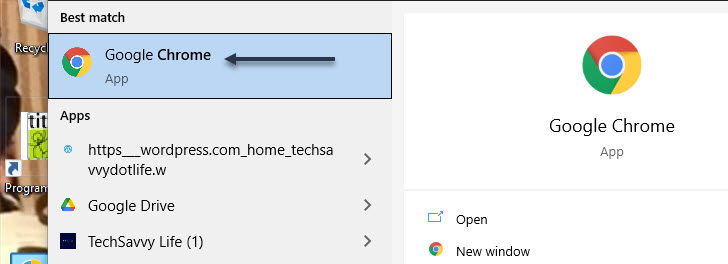
First, open the Start menu. Next, enter “Google Chrome” in the Cortana search box at bottom left-hand corner. Now, click the browser in the results at top left-hand corner. Refer to below image:
Selecting Chrome
Next, open any website that you want to turn into an app. Navigate to the specific web page that you want your app to start with.
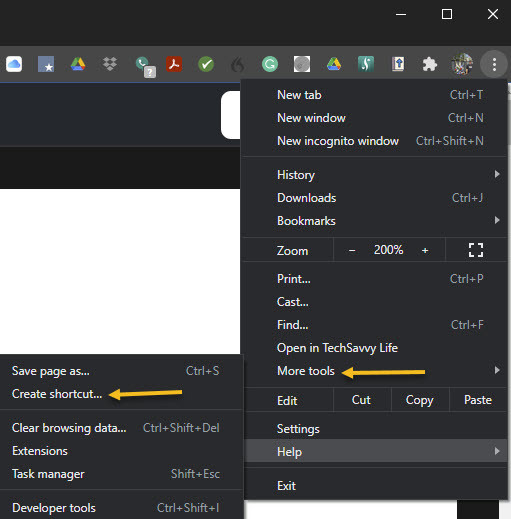
When the site has loaded, click its hamburger menu button (the three dots) in the top-right corner of the window and select:
More Tools > Create Shortcut
See below image:
Create a shortcut
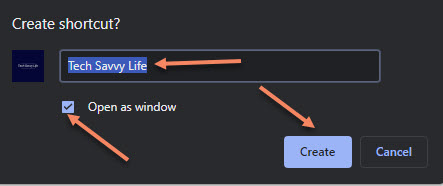
A prompt will appear asking for your new app name. Enter a name for your new app, enable the Open as window checkbox, and click Create. See following image:
Name the shortcut
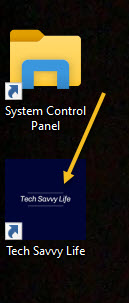
A shortcut will be placed on your desktop. You can launch your app from this desktop shortcut. Refer to below image:
Your desktop shortcut
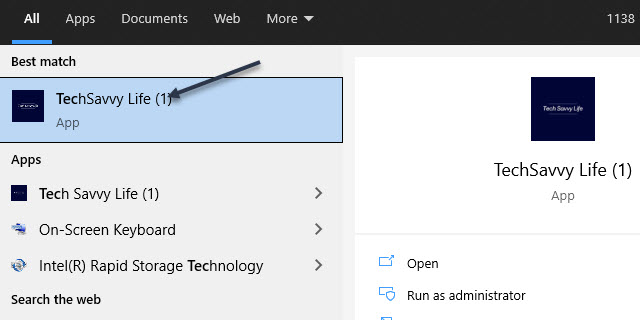
Also, Chrome will create the app for your site and add it to the Start menu. You can now search and launch your app using your PC’s Start menu. See below image:
Use the Start menu to launch your Chrome app
Turn a Website Into an App Using Edge
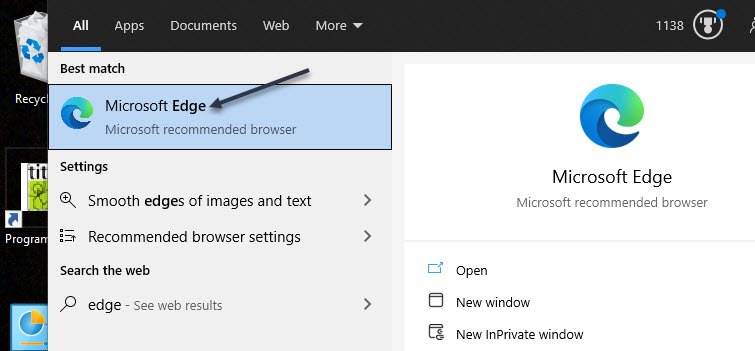
You can also use Microsoft Edge to make a website into an app. This creates the exact same kind of app that Chrome does. First, open the Start menu. Next, enter “Microsoft Edge” in the Cortana search box at bottom left-hand corner. Now, click the browser in the results at top left-hand corner. See following image:
Selecting Edge
Navigate to the website that you want to make an app for, then navigate to the specific page that you want to use for the app.
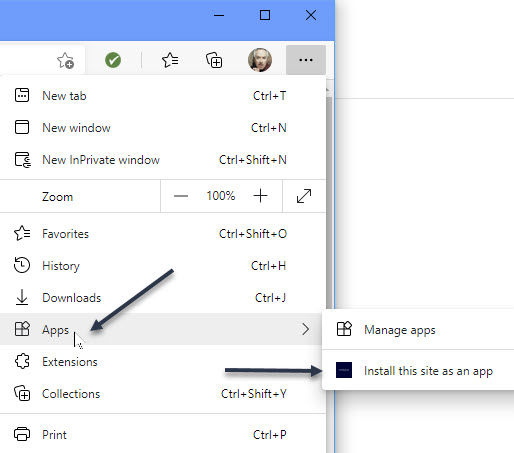
Now, click the menu hamburger button (the three dots) in the top-right corner of the window and select:
Apps > Install this site as an app
Refer to below image:
Select to install as an app
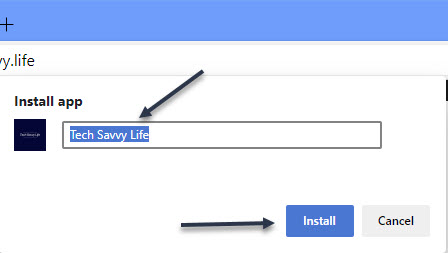
Type a name for your new app, then click Install. See below image:
Name the shortcut
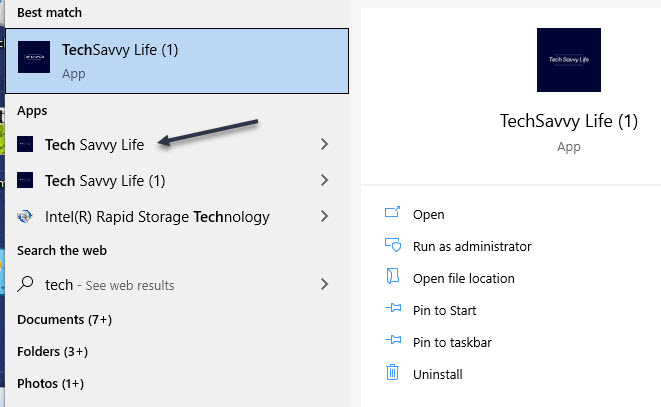
You can now launch your newly created app from the Start menu. See following image where TechSavvy.Life (1) is the Chrome version, TechSavvy.Life is the Edge version:
Use the Start menu to launch your Edge app
Create a Desktop Shortcut for Your Apps
Your website apps will have their own shortcuts in your Start menu’s All Apps list. You can also create a desktop shortcut for your apps in order to quickly access them on your PC’s desktop, if you like.
If you used Chrome to make your apps, your desktop shortcuts are already created. But if you used Microsoft Edge, you will need to manually add shortcuts to your desktop.
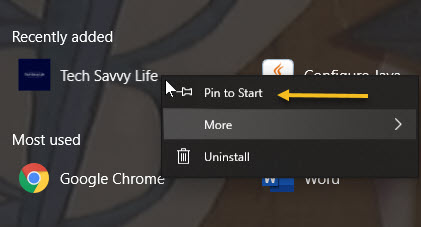
To do this, open the Start menu and search for your newly created app. Right-click your app and select Pin to Start.
You need to do this because Windows does not let you directly make a desktop shortcut for this kind of app in Edge. Refer to below image:
Pin to Start menu in Edge
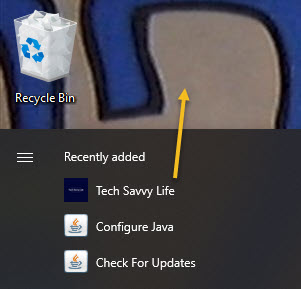
Open the Start menu again, and you will see your app on the right. Drag it over to your desktop and a desktop shortcut for it will be created. See below image:
Drag the Edge app to your desktop
Create a Taskbar Shortcut for Your Apps
You can also make a taskbar shortcut for your website apps.
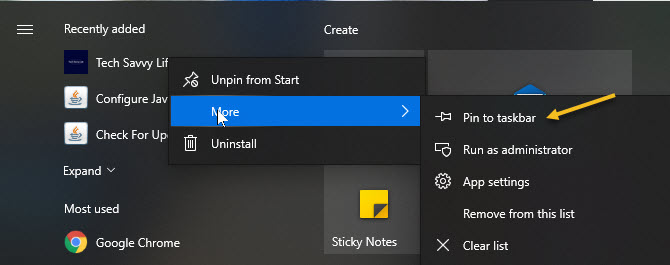
To do this, open the Start menu again, search for your app or find your desktop shortcut, right-click your app, click More, and select Pin to taskbar. See following image:
Pin to Taskbar
Assign an Icon
By default, Windows uses your website’s favicon as the icon for your app. You can change this icon if you want to give a little makeover to your new app.
You can use an icon file from your computer or one of Windows 10’s built-in icons for your new app.
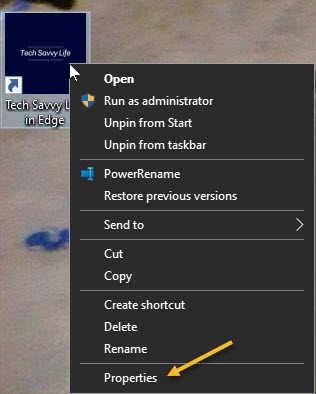
To change your app’s icon, right-click your app shortcut on your desktop and select Properties. Refer to below image:
Access Propetties
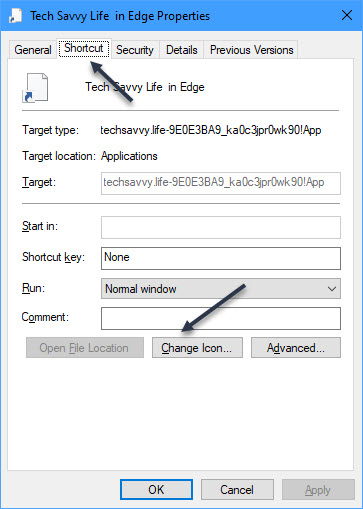
In the Properties box, click Shortcut at the top, and then click Change Icon. See below image:
Select change the icon button
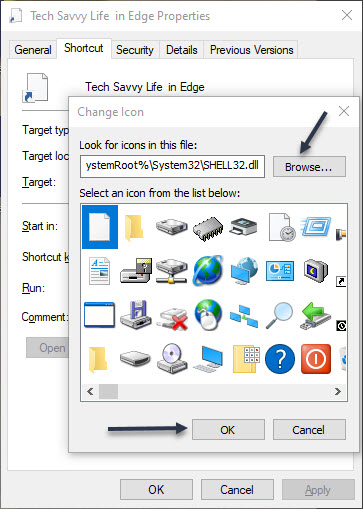
Click Browse in the window that opens and select the icon that you want to use for your app.
If you want to use one of Windows 10’s stock icons, browse to:
C:\Windows\System32 folder
and double-click the imageres.dll file in this folder.
You will see a list of Windows 10’s built-in icons. Select the one that you want to use and click OK. Even though this file is for 32-bit operating system, it will work on a 64-bit system. See following image:
Browse or use Windows 10 stock icons
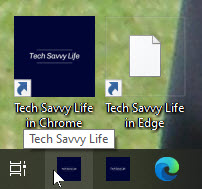
To save your settings, click Apply and then select OK. Refer to below image for my final desktop and taskbar shortcuts:
Your finished icons on desktop and taskbar
Quote For the Day
“The first rule of any technology used in a business is that automation applied to an efficient operation will magnify the efficiency. The second is that automation applied to an inefficient operation will magnify the inefficiency”.
Bill Gates
You are finished with turning a website into a Windows 10 app. Please feel free to share this post! One way to share is via Twitter.
Just click the Tweet icon below. This will launch Twitter where you click its icon to post the Tweet.
Check out TechSavvy.Life for blog posts on smartphones, PCs, and Macs! You may contact us at contact@techsavvy.life for comments or questions.
Please feel free to leave a comment. I would love hearing from you. Do you have a computer or smart device tech question? I will do my best to answer your inquiry. Just send an email to contact@techsavvy.life. Please mention the device, app and version that you are using. To help us out, you can send screenshots of your data related to your question.
The author’s Vietnam eBook on the Battle for Tra Bong: Events and Aftermath