I am Raymond Oglesby, an Information Technology (IT) specialist with 30 years in the field. I have taught Microsoft Applications and troubleshot computers in 15 countries and many States. My career was focused on mainframes and desktops from application development to implementation. I have written hundreds of programs for various architectures. I decided to start a blog to share my knowledge and experiences with you. I plan on updating this blog at least twice a week about smart phone apps to Windows.
Please feel free to leave a Comment or Tweet. I would love to hear from you. Do you have a computer tech question? I will do my best to answer your inquiry. Please mention the app and version that you are using. To help me out, you can send screenshots of your data related to your question.
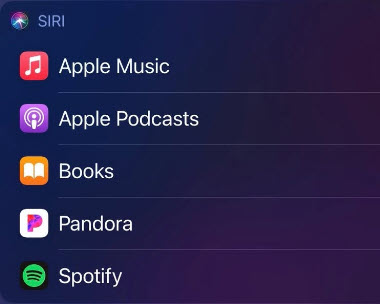
In iOS 14 and iPadOS 14 or higher you can train Siri to learn your go-to music app. Siri will ask you which audio app you would like to use and remembers your choice.
In iOS 14 and iPadOS 14 or higher you can train Siri to learn your go-to music app. Siri will ask you which audio app you would like to use and remembers your choice.
This if for the iPhone and iPad running iOS or iPadOS 14 or higher
Copyright Scott Adams, Inc./Distributed by Universal Uclick for UFS
First, update your iOS/iPadOS to 14 or higher. Next, launch Siri. On newer Apple devices, you can do this by saying “Hey Siri” (if you have it turned on) or long-press the Side/Top/Power button on your iPhone or iPad with Face ID. Refer to below image:
Accessing the Power button
On older iPhones or iPads with a Touch ID sensor, long-press the Home button.
Now, Siri will start listening for a voice command when you see its icon appear on-screen. Ask your phone or tablet to play a song, artist, podcast, or audiobook. For example, you can say “Play Carole King,” or “Play Horse With No Name,” or “Listen to the Vergecast.” See below image:
Siri enabled and listening
Next, your device will ask you which music or audio app you would like to listen to the song, artist, podcast, or audiobook on. Tap the app that you would like to use. See following image:
Select an audio app
Occasionally, Siri might ask for your permission to access an app’s data before it can control playback. Just grant the voice assistant permission by tapping the Yes button from the pop-up screen. Refer to below image:
Giving permission to access app
Now, Siri’s on-screen overlay will transform into an audio widget. You can control playback, volume, and more from this window. Tapping outside of the widget will make it disappear, but your music, audio, or podcast will continue playing in the background. See below image for the jazz song “Touching Peace.”
Siri audio widget
For the full playback screen from Apple Music, see following image:
Siri audio widget in full screen
From now on, if you ask Siri to play a song or audio program, your device will default to whichever app you selected. It will no longer automatically open the Apple Music app.
As mentioned, setting the default music app is not a setting “baked” into your device. On occasion, Siri might prompt you to reselect which audio app you would like to use to help train the Voice Assistant.
Also, you are not locked into only using the app you just chose. Instead, you can be specific in your command to Siri to open a song, artist, podcast, or audiobook in a particular app that you have installed on your device. For example, you can say, “Listen to 1984 by George Orwell in Audible.”
Quote For the Day
He who has a why to live can bear almost any how.
Friedrich Nietzsche
You are finished. Please feel free to share this post! One way to share is via Twitter.
Just click the Tweet icon below. This will launch Twitter where you click its icon to post the Tweet.
Check out TechSavvy.Life for blog posts on smartphones, PCs, and Macs! You may email us at contact@techsavvy.life for comments or questions.
Please feel free to leave a comment. I would love hearing from you. Do you have a computer or smart device tech question? I will do my best to answer your inquiry. Just send an email to contact@techsavvy.life. Please mention the device, app and version that you are using. To help us out, you can send screenshots of your data related to your question.
The author’s Vietnam eBook on the Battle for Tra Bong: Events and Aftermath
Just before Apple’s June 24th announcement, it’s not a long shot to know some of the features being moved onto Windows 11. Here are the major ones.
Courtesy of TechRadar
Just before Apple’s June 24th announcement, it’s not a long shot to know some of the features being moved onto Windows 11. Here are the major ones.
This is for 2021 Fall release of Windows 11
Copyright Scott Adams, Inc./Distributed by Universal Uclick for UFS
A New Look for Windows 11
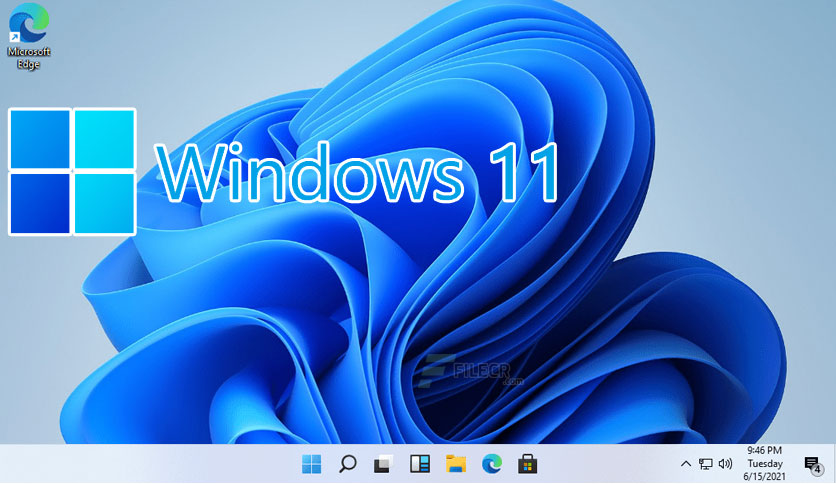
Windows 11 image courtesy of Windows Central
In the latest Insider dev channels, there are already countless icons that have seen a redesign, giving most of these the most dramatic changes in looks since Windows 7.
It’s been long rumored that the UI is currently being redesigned, with a new font, Segoe UI Variable, already enabled in dev versions as early as build 21376. However, Microsoft’s design team is also looking for a new font, asking users, to pick from five fonts to replace Calibri.
There’s been a recent job posting, that gives even more weight to a redesign coming. It described the role as “building new parts and modernizing existing parts of the Windows UX, conducting user research to understand users’ needs.”
While this could also mean a subtle refresh of Windows 10, it could mean a huge redesign for Windows 11, if it is confirmed at the June 24 event.
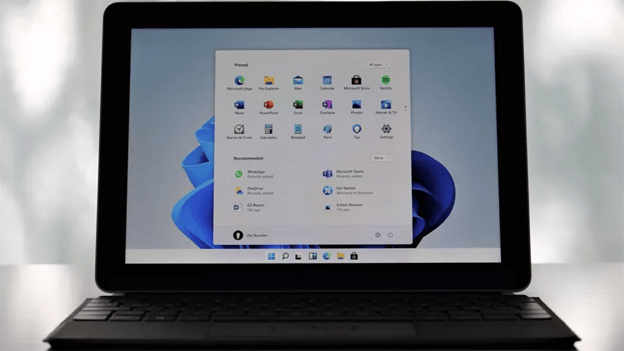
With the recent build of 21996 confirming the Windows 11 name, we can also see a refresh UI, with the start button and the icons on the taskbar moving to the middle, being reminiscent of the dock from macOS.
It’s not just the fonts and the icons that are seeing a refresh for Windows 11, it even goes to the corners across the whole of the operating system, which looks to set it apart even further from Windows 10.
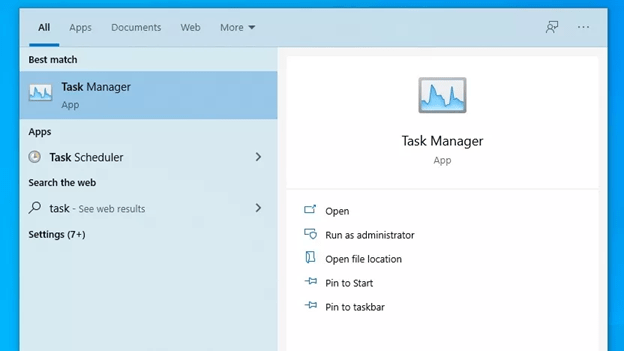
Task Manager courtesy of Windows Latest
Alongside the new look, there’s also the implementation of rounded corners coming up. This will remove the sharp edges across the whole of the user interface and bring a softer appearance to Windows 11.
The start menu is now apparently at the center of the taskbar, but there is a way to bring the classic menu back to the left.
From app windows to the Start Menu, to buttons, Live Tiles, and even the Action Center, there is a redesign. This redesign feature could have a dramatic effect on how Windows 11 looks, and help make it stand out to users if they are upgrading from Windows 10.
Windows 11 new OS features
A big update to Windows 11 will not just be to the look of the operating system, but in the useful features that it can bring to many situations.
It’s been reported that Microsoft will be including battery usage statistics to the Settings app. Smartphones have had this sort of feature for many years, but it’s been conspicuously absent in Windows.
Other rumored features that could be moved over to Windows 11 could include the ability to uninstall most of the pre-installed Microsoft apps, improvements to Snap Assist for external displays, and a dashboard for your Microsoft Account that lives in the taskbar.
Additionally, recent test builds have suggested that the Taskbar and File Explorer processes usually seen in Task Manager looks to be separated, at long last.
Alongside this, right clicking on the Taskbar for Task Manager is now absent, alongside the keyboard shortcut of Win + X to switch to PowerShell is also gone. Personally, I want the right-click back for the Task Manager.
Windows 11 tablet improvements
Tablet mode has been one of Windows’ weaker points ever since Windows 8.
However the most important feature currently rumored is a new gesture layer that would sit above the user interface and allow trackpad-like gestures on a touchscreen.
Pen and voice inputs are both expected to receive further refinement as well, with a new UI for voice and context menu for pen are both planned. These tablet features could be a showcase for Windows 11, especially with future Surface products in the pipeline from Microsoft. To have a new, numbered operating system for its upcoming tablets could be a big selling point for new users.
Quote For the Day
Absence of evidence is not evidence of absence.
Carl Sagan
That’s it for now on Windows 11 features. There will be more to come. Please feel free to share this post! One way to share is via Twitter.
Just click the Tweet icon below. This will launch Twitter where you click its icon to post the Tweet.
Check out TechSavvy.Life for blog posts on smartphones, PCs, and Macs! You may email us at contact@techsavvy.life for comments or questions.
Please feel free to leave a comment. I would love hearing from you. Do you have a computer or smart device tech question? I will do my best to answer your inquiry. Just send an email to contact@techsavvy.life. Please mention the device, app and version that you are using. To help us out, you can send screenshots of your data related to your question.
The author’s Vietnam eBook on the Battle for Tra Bong: Events and Aftermath
Chances are good you will never seen malware up close and personal. Even if you threw caution to the winds and visited a dangerous site or clicked a treacherous link, your antivirus software probably wiped out any offending program before the latter could say boo. So, you might wonder, just what does malware look like? Would I even recognize a malware program if I saw it?
Chances are good you will never seen malware up close and personal. Even if you threw caution to the winds and visited a dangerous site or clicked a treacherous link, your antivirus software probably wiped out any offending program before the latter could say boo. So, you might wonder, just what does malware look like? Would I even recognize a malware program if I saw it?
To be fair, a lot of malicious programs do not look like anything at all. A virus, for example, tries its best to hide from view while infecting other files and computers. A bot sits quietly on your computer until it gets orders from the command and control center to spew some spam or participate in a DDoS attack on a major website. Trojans, by contrast, appear to be useful, legitimate programs, putting up a pretty façade to hide background activities like stealing your personal data. And when ransomware hollers for your attention, it’s bad news.
This is for all devices
Copyright Scott Adams, Inc./Distributed by Universal Uclick for UFS
The Horror of Ransomware
If a ransomware attack hits your computer, you will not know it at first. The ransomware stays out of sight, quietly encrypting your important files. Once the dirty work is done, the malware totally demands your attention with its ransom note. The perpetrators promise that if you pay the specified ransom (usually in Bitcoin or some other cryptocurrency) you will get your files back, but if they take your money and run, you do not have any recourse. You really do not want a direct encounter with ransomware.
Malware Bundled
Sometimes the problem with an installation is notthe program itself, but the software that’s bundled with it. You may find completely legitimate software—even antivirus programs; bundled with adware, spyware, or other unwanted trash. In a case like that, the security vendor is not to blame. A third party created the deceptive bundle. AppEsteem is a young company with a mission to expose these deceptors and to warn legitimate companies when they stray too far toward the dark side of bundling.
The installer shown here offers a free player for FLV video files. Along with the player you are privileged to receive a shady Adware program masquerading as a coupon browser. There’s a checkbox that says you agree to its terms; uncheck the box and you can not proceed. No video player for you! The best thing that can happen with this kind of bundling is that you’re forced to install a program you did not want. Mostly it’s worse than that, because the bundled bonus is malware. Refer to below image:
Bundled Malware
Now here’s something handy; a multi-utility install program. If you read Russian, you know it’s “the fastest and most convenient way to install programs.” Just check the boxes for the ones you want and turn the installer loose. The list includes browsers, messenger programs, video players, even antivirus utilities. But when you install them, you also get a dose of malware. See below image:
Utility Pack Malware
Trojan Horses
Here, we have a sharp-looking utility designed, apparently, to ensure that your PC does not limp along with old, outdated drivers. However, if you try to update any drivers, or back up your existing drivers, you must pay. This is a model used both by some legitimate programs and by rogue antivirus scareware utilities. Lucky you, though: there’s a promotional price that ends today. Its overt activities are just a wee bit suspicious. See following image:
Driver Malware
Want to get into smartphone repair? This set of tools and manuals looks like it might be a big help. Alas, you ca not see just what you’re getting until you pay for your registration. While you are perusing schematics, it collects personal information behind the scenes and takes orders for further unwanted activity from a remote command and control server. Refer to below image:
Smartphone Malware
You probably do not know this, but the EXE files that represent programs on your Windows computer are also called PE files, short for Portable Executable. Every PE file starts with an extensive header that contains a ton of information telling Windows about the program. Malware researchers learn a lot by digging into that header. See below image:
Portable Executable Malware
Lets Hope You Don’t See These
As you can see, malicious programs, like legitimate programs, run the gamut from sad-looking attempts to totally professional ones. With any luck, and with powerful, up-to-date antivirus protection, these images are the only malware you will ever see. Malware is just one of many threats to your devices and private information.
A few reminders to keep the bad guys away in your emails and phone calls:
Do not click that link. Instead hover your mouse over each element of the email and look for anything suspicious. If suspicious, do not click that link – per my son, VP at True Digital Security.
Do not open emails from FedX, USPS, Wells Fargo, Walmart, Cox Communications, Thank You, SSA, or VA if you have no dealings with them. They will contact you by mail not by phone.
Do not give out personal informati0n over the phone. If you need to contact someone, you initiate the call.
Never buy gift cards or give out their serial number.
If your Userid or Password has been leaked in a data breech, change them as soon as possible.
Quote For the Day
I don’t pretend we have all the answers. But the questions are certainly worth thinking about.
Arthur C Clarke
That’s it. Please feel free to share this post! One way to share is via Twitter.
Just click the Tweet icon below. This will launch Twitter where you click its icon to post the Tweet.
Check out TechSavvy.Life for blog posts on smartphones, PCs, and Macs! You may email us at contact@techsavvy.life for comments or questions.
Please feel free to leave a comment. I would love hearing from you. Do you have a computer or smart device tech question? I will do my best to answer your inquiry. Just send an email to contact@techsavvy.life. Please mention the device, app and version that you are using. To help us out, you can send screenshots of your data related to your question.
The author’s Vietnam eBook on the Battle for Tra Bong: Events and Aftermath
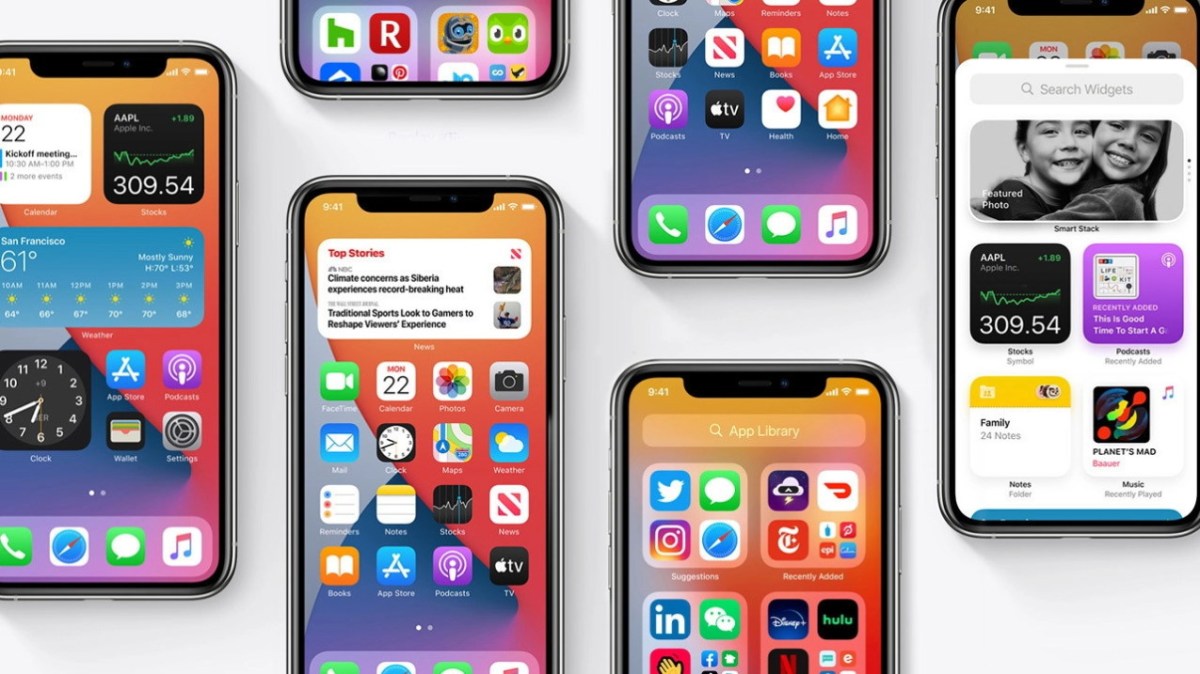
If you lose your Apple device or an object tagged with an AirTag, you can utilize a network of hundreds of millions of Apple devices with Bluetooth to help get it back.
If you lose your Apple device or an object tagged with an AirTag, you can utilize a network of hundreds of millions of Apple devices with Bluetooth to help get it back. Let’s explore this feature.
This is for Apple devices. Screenshots are from Apple and iPhone XR
Copyright Scott Adams, Inc./Distributed by Universal Uclick for UFS
What is Find My Network
Apple’s Find My network is a crowdsourced method of locating your lost iPhone, iPad, iPod Touch, AirPods, Apple Watch, or Mac. You can also use it to locate lost items that have AirTags attached to them. It’s available as a free service to Apple device owners.
The Find My network utilizes Bluetooth sensors on hundreds of millions of Apple products to report the location of missing Apple devices around them. When an Apple device on the network detects a missing Apple device nearby, it reports the lost item’s approximate location back to the device’s owner through the Internet.
What About Privacy
You might think that with a network of almost a billion Apple devices reporting back on the location of lost items, there might be some privacy issues. However, Apple has taken privacy into account when designing this network.
Apple has worked to avoid privacy issues whenever possible, engineering a system that utilizes end-to-end encryption while also transmitting anonymized data to keep your device’s location known only to you while also keeping your identity and location private when using a device that’s active in the Find My network. According to Apple, neither it nor third parties can access the location of your devices on the Find My network. Only the person seeking the lost device can see the item’s location. Hey, if you don’t trust Apple, who can you trust? I am pessimistic on this feature.
Apple’s AirTags do pose more of a privacy risk, but Apple has taken steps to make it harder to track people who use AirTags without their knowledge. Time will tell if those measures are sufficient.
Setup the Feature
To do so on an iPhone, iPad, or iPod Touch, navigate to:
Settings > Apple ID > Find My > Find My iPhone/iPad/iPod Touch
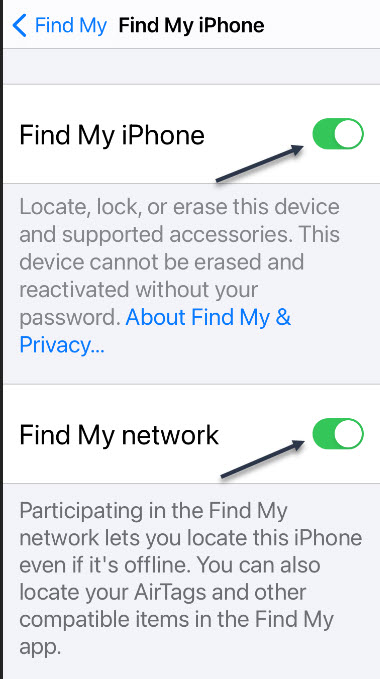
and tap to turn the Find My network switch On. While here, turn On the Find My <device>, for example, Find My iPhone as shown below. Now, exit Settings. Refer to below image:
Enabling the feature
How to Use the Feature
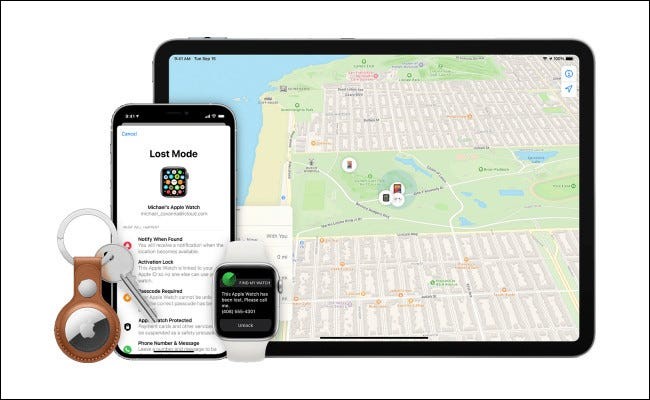
For you to use the Find My network your lost item or AirTag must first have Find My enabled and also be registered to your Apple ID. To locate the item, open the Find My app on your iPhone, iPad, iPod Touch, or Mac. Choose the devices tab, tap the device’s name, and you will see its location on a map. If you can’t see it, you can mark the device as lost and hope that someone finds it later and returns it to you. See below image from Apple:
Map of lost device – per Apple
Can I Opt Out
Even though the Find My network does not represent a privacy issue for most people (unless you work in a sensitive, high-security field, werecommend that you keep it enabled), you can still turn it off (and opt out) if you would like.
To do so on an iPhone, iPad, or iPod Touch, navigate to:
Settings > Apple ID > Find My > Find My iPhone/iPad/iPod Touch
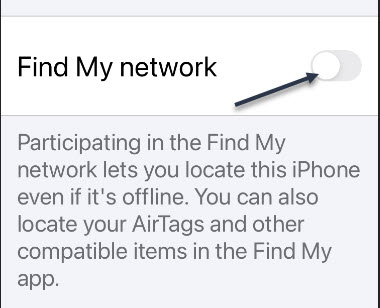
and tap to turn the Find My network switch to Off. Now, exit Settings. See following image:
Disabling the feature
To opt out of Find My network on a Mac, open:
System Preferences > Apple ID > iCloud
and then click the Options button beside Find My Mac. In the pop-up window, click the Turn Off button beside Find My network.
Keep in mind that if you turn off the Find My network feature not only will your device’s Bluetooth sensors stop assisting others in locating lost devices, but also, you will not be able to take advantage of its benefits if you lose your device.
Throttled Back
Although not a part of this feature, Apple has been noted in recent lab tests to have “throttled back” (reduced speed) in iOS 14.5.1 on iPhone models 10, 11,and 12. You have to wait for the next iOS update for Apple to fix this issue.
Quote For the Day
Opportunity is missed by most people because it is dressed in overalls and looks like work.
Thomas A. Edison
You are finished. Please feel free to share this post! One way to share is via Twitter.
Just click the Tweet icon below. This will launch Twitter where you click its icon to post the Tweet.
Check out Techsavvy.Life for blog posts on smartphones, PCs, and Macs! You may email us at contact@techsavvy.life for comments or questions.
Please feel free to leave a comment. I would love hearing from you. Do you have a computer or smart device tech question? I will do my best to answer your inquiry. Just send an email to contact@techsavvy.life. Please mention the device, app and version that you are using. To help us out, you can send screenshots of your data related to your question.
The author’s Vietnam eBook on the Battle for Tra Bong: Events and Aftermath
If you often lose your Windows 10 pointer in your super-size high-resolution display, there is a simple way to locate the pointer quickly.
If you often lose your Windows 10 pointer in your super-size high-resolution display, there is a simple way to locate the pointer quickly. Let’s explore how to turn it on and add visibility to the pointer.
This is for devices running Windows 10
Copyright Scott Adams, Inc./Distributed by Universal Uclick for UFS
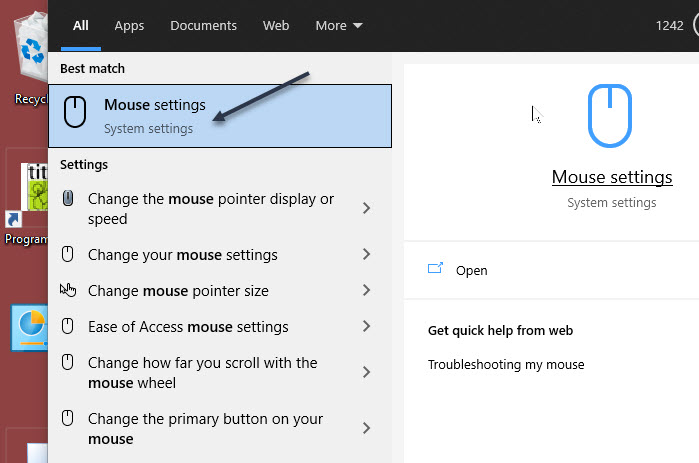
First, open the Start menu and type “mouse” (without the quotes) in the Cortana search box. Next, click the Mouse settings shortcut that appears in upper left-hand corner. Refer to below image:
Accessing mouse settings
Now, in Mouse settings, locate the Related settings section and click the Additional mouse options link. See below image:
Additional mouse settings
Next, when the Mouse Properties window opens, click the Pointer Options tab and checkmark the option Show location of pointer when I press the CTRL key. See following image:
Turing on location of pointer
Now, select the Pointers tab. Depending on your display scheme, for example, if you use Dark Mode, you may want to use a white pointer, conversely, for a white or light background, a black cursor is your best option. Now, click OK. Refer to below image:
Setting your pointer
Your Mouse Properties window will close. Next, exit Settings.
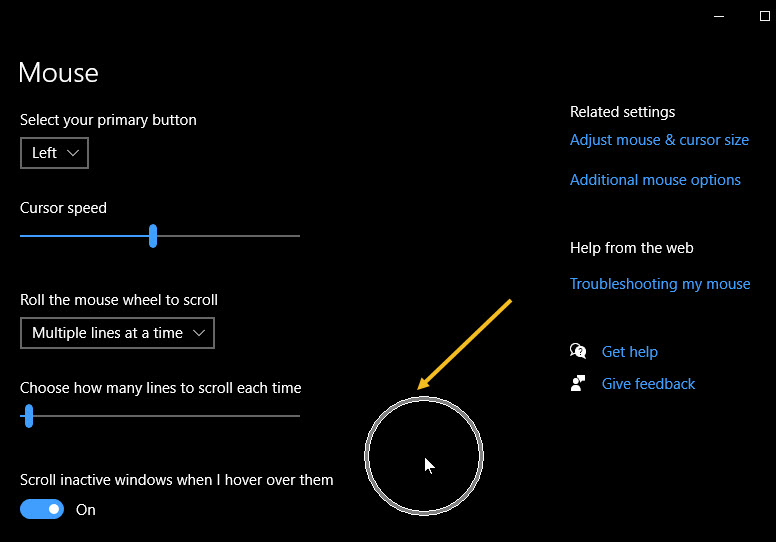
Your pointer will change to your selection. Also, anytime you press the Ctrl key, an animated shrinking circle will appear around the cursor to locate it. See below image:
Using the Ctrl key
Quote For the Day
How inappropriate to call this planet Earth when it is quite clearly Ocean.
Arthur C Clarke
You are finished. Please feel free to share this post! One way to share is via Twitter.
Just click the Tweet icon below. This will launch Twitter where you click its icon to post the Tweet.
Check out TechSavvy.Life for blog posts on smartphones, PCs, and Macs! You may email us at contact@techsavvy.life for comments or questions.
Please feel free to leave a comment. I would love hearing from you. Do you have a computer or smart device tech question? I will do my best to answer your inquiry. Just send an email to contact@techsavvy.life. Please mention the device, app and version that you are using. To help us out, you can send screenshots of your data related to your question.
The author’s Vietnam eBook on the Battle for Tra Bong: Events and Aftermath
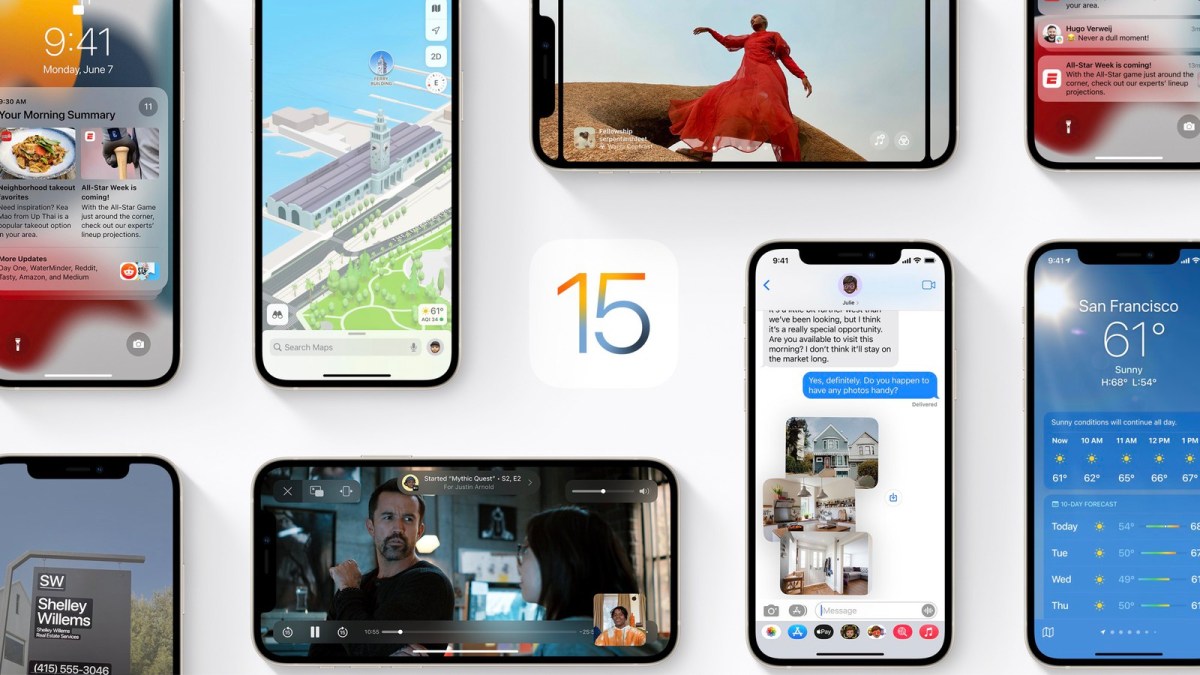
Apple in June 2021 introduced the latest version of its iOS operating system, iOS 15, which is set to be released in the fall. iOS 15 introduces new features for FaceTime calls, tools to reduce distractions, a new notifications experience, added privacy features, complete redesigns for Safari, Weather, and Maps, and more.
In June 2021 Apple introduced the latest version of its iOS operating system, iOS 15, which is set to be released in the fall. iOS 15 introduces new features for FaceTime calls, tools to reduce distractions, a new notifications experience, added privacy features, complete redesigns for Safari, Weather, and Maps, and more.
This is for devices running iOS and iPadOS 15
Copyright Scott Adams, Inc./Distributed by Universal Uclick for UFS
Notifications have been redesigned in iOS 15, adding contact photos for people and larger icons for apps. To reduce distraction, a notification summary collects notifications together for delivery at an appropriate time and arranges notifications by priority.
Focus is a new feature that can filter notifications and apps based on what a user wishes to focus on at a certain time. When a user’s Focus is blocking incoming notifications, their status will be displayed to others in Messages. iOS will suggest a Focus for different occasions, such as work hours or winding down for bed, using on-device intelligence, but users can also create a custom Focus. When a Focus is set on one Apple device, it automatically applies to other Apple devices.
Safari features a completely new design. Controls are now easier to reach with one hand and give more focus to a webpage’s content. There is a new, compact tab bar that floats at the bottom of the screen so users can easily swipe between tabs. Tab Groups allow users to save tabs and easily access them at any time across devices. There is also a customizable start page and web extensions for the first time.
The Maps app now offers a new 3D view in cities with significantly enhanced details, showing buildings, pedestrian crosswalks, bike lanes, and more. There is a new city-driving experience with added road details and improved Transit features, such as pinned favorite lines, notifications to disembark, and walking directions.
iOS 15 brings voice isolation and Spatial Audio to FaceTime calls so that voices appear to sound as if they are coming from where the person is located on the screen.
FaceTime also supports Portrait mode and offers a new grid view to see more faces at the same time. SharePlay is a new feature that allows users to share media together in sync during a FaceTime call. Users can also generate shareable links to a scheduled FaceTime call, which can also be opened in Android and Windows devices.
The Weather app has been redesigned in iOS 15, showing more graphical displays of weather data, full-screen maps, and dynamic layouts that change based on weather conditions. Totally new animated backgrounds can now more accurately reflect the sun’s position and current precipitation, and there are notifications to highlight when rain or snow starts and stops.
The Wallet app adds support for new key types in iOS 15, such as homes, offices, or hotel rooms. Later this year, customers in participating U.S. states will be able to add a driver’s license or state ID to the Wallet app.
The Photos app features a major update to Memories with a new design and an interactive interface. Memories how supports integration with Apple Music, using on-device intelligence to offer song suggestions for personalized Memories.
Live Text is a new feature that uses on-device intelligence to recognize text in a photo that users can search for, highlight, and copy it. Spotlight can now search for photos by location, people, scenes, objects, and text. Spotlight now offers web image search and richer results for actors, musicians, TV shows, and movies. Enhanced results for contacts show recent conversations, shared photos, and even their location if shared through Find My.
iOS 15 also introduces new privacy measures, such as processing Siri requests directly on the iPhone, which has the added benefit of better responsiveness, Mail Privacy Protection to stop senders knowing if an email has been opened and detecting a recipient’s IP address, and an App Privacy Report view to show how often apps use the permissions they have been granted.
There are dozens of tweaks and changes for other apps, such as user-created tags, mentions, and an Activity view in the Notes app, Trends, Walking Steadiness, and a new sharing tab in the Health app, a systemwide Shared with You feature for highlighting content that has been shared in Messages conversations, and a new For All of You row in the TV app to suggest entertainment for the whole household.
iOS 15 is compatible with the iPhone 6s and later, which means it runs on all devices able to run iOS 14, and will be released this fall, 2021.
As you have read, lots of new features. Look forward to learning about iOS 15 in upcoming TechSavvy.Life blog posts.
Quote For the Day
I am just a child who has never grown up. I still keep asking these ‘how’ and ‘why’ questions. Occasionally, I find an answer.
Stephen Hawking
That’s it. Please feel free to share this post! One way to share is via Twitter.
Just click the Tweet icon below. This will launch Twitter where you click its icon to post the Tweet.
Check out TechSavvy.Life for blog posts on smartphones, PCs, and Macs! You may email us at contact@techsavvy.life for comments oar questions.
Please feel free to leave a comment. I would love hearing from you. Do you have a computer or smart device tech question? I will do my best to answer your inquiry. Just send an email to contact@techsavvy.life. Please mention the device, app and version that you are using. To help us out, you can send screenshots of your data related to your question.
The author’s Vietnam eBook on the Battle for Tra Bong: Events and Aftermath
The Taskbar in Windows 10 comes with a lot of customizations. One of those customizations allows you to show/hide texts beside icons in opened windows in the Taskbar. You can show the icon and the name of the window at the same time.
The Taskbar in Windows 10 comes with a lot of customizations. One of those customizations allows you to show/hide texts beside icons in opened windows in the Taskbar. You can show the icon and the name of the window at the same time.
This used to be the Taskbar default behavior way back in Windows 95. Let’s explore how to get this feature back.
This is for devices running Windows 10
Copyright Scott Adams, Inc./Distributed by Universal Uclick for UFS
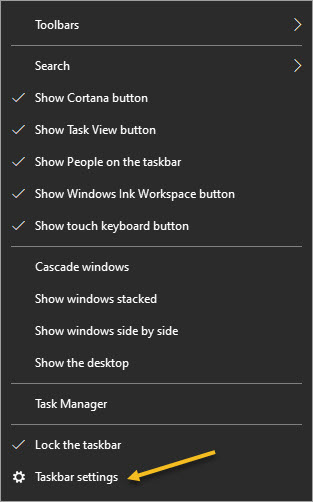
First, open some Taskbar apps then right-click the Taskbar and select Taskbar settings. (You can also find this same screen by heading to:
Settings > Personalization > Taskbar
Refer to below image:
Accessing Taskbar settings
By default, Windows 10 hides open application windows under a single Taskbar button that looks like the app’s icon. Lets change this.
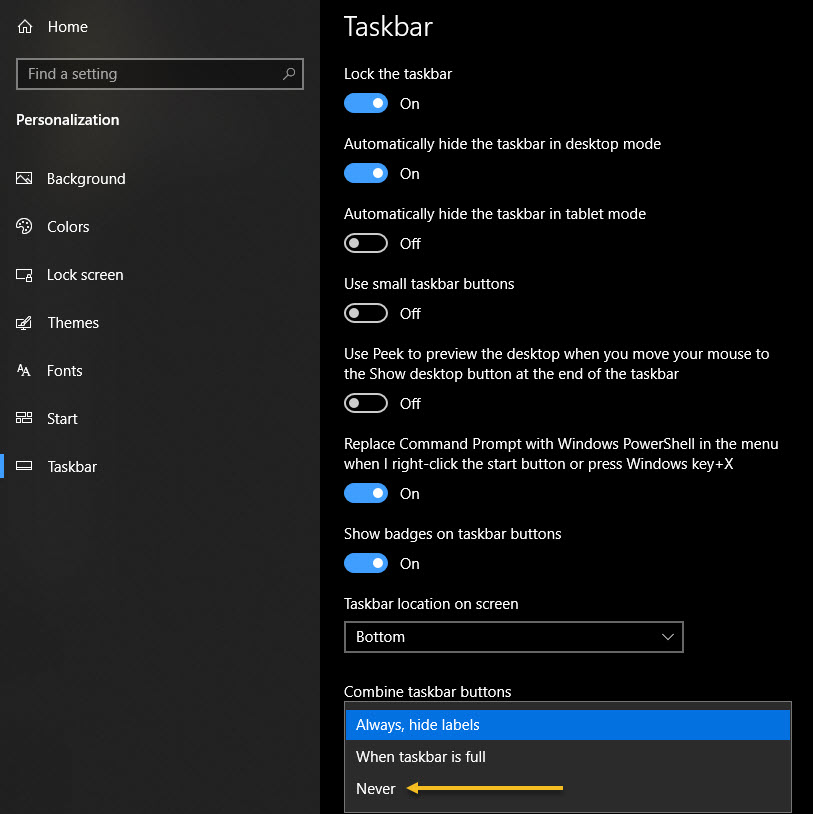
Next, in Taskbar settings, click the menu labeled Combine taskbar buttons. See below image:
Accessing Combine Taskbar buttons
Now, in the pop-up list that appears, select Never. See following image:
Selecting the Never option
Next, you will notice that any open windows listed on your Taskbar now show labels as well as the app icon. Refer to below image:
Your opened icons with labels
Here is another example of labels beside its icon. Although its hard to see, the Settings icon is gray indicating it is the top window. Depending on your color scheme, it may be a different color. Also, notice that each opened window is underlined. See below image:
Your opened icons with primary window icon and label highlighted
If you are satisfied with that, close Settings, and you are all set. It’s like Windows 95 all over again as to labels beside its icon!
If you change your mind, you can always undo it by selecting Always hide labels in the Combine taskbar buttons menu.
Quote For the Day
People who are really serious about software should make their own hardware.
Alan Kay
You are finished. I like this feature, hope you do likewise. Please feel free to share this post! One way to share is via Twitter.
Just click the Tweet icon below. This will launch Twitter where you click its icon to post the Tweet.
Check out TechSavvy.Life for blog posts on smartphones, PCs, and Macs! Please email us at contact@techsavvy.life for comments or questions.
Please feel free to leave a comment. I would love hearing from you. Do you have a computer or smart device tech question? I will do my best to answer your inquiry. Just send an email to contact@techsavvy.life. Please mention the device, app and version that you are using. To help us out, you can send screenshots of your data related to your question.
The author’s Vietnam eBook on the Battle for Tra Bong: Events and Aftermath
If you need to quickly take a photo or video on your iPhone, you can swipe into the Camera app quickly without unlocking your phone. Let’s explore how this is done.
If you need to quickly take a photo or video on your iPhone, you can swipe into the Camera app quickly without unlocking your phone. Let’s explore how this is done.
This is for the iPhone
Copyright Scott Adams, Inc./Distributed by Universal Uclick for UFS
First, wake up your iPhone. Place your finger anywhere on the lock screen and swipe it to the left until the Camera app appears. If you try to swipe on a notification that will reveal options for the notification rather than opening the Camera app. Refer to below image:
Swipe left to open the Camera
Next, with the Camera app open, you can take photos or videos as you normally would, and they will be saved automatically to your Photos library. You can even use the volume buttons to trigger the shutter if you like. See below image that will be saved to Photos library:
Your photo
Now, to exit Camera mode, press the top button (for iPhones with home buttons) or the side button (for iPhones without home buttons) to turn off your screen. The photos you took will still be saved.
iPhones Without Home Button
If you have an iPhone without a home button (one that uses Face ID) you might notice a tiny camera icon in the lower-right corner of your lock screen. See following image:
Access Camera by the photo icon
You can use this button to launch the Camera app with a long-press. Just place your finger on the camera icon for a moment. When you lift your finger, the Camera app will launch.
When you are done, press the side button, and the photos and videos you have taken will be saved automatically.
Quote For the Day
The beginning is the most important part of the work.
Plato
You are finished. Please feel free to share this post! One way to share is via Twitter.
Just click the Tweet icon below. This will launch Twitter where you click its icon to post the Tweet.
Check out TechSavvy.Life for blog posts on smartphones, PCs, and Macs! You may email us at contact@techsavvy.life for comments or questions.
Please feel free to leave a comment. I would love hearing from you. Do you have a computer or smart device tech question? I will do my best to answer your inquiry. Just send an email to contact@techsavvy.life. Please mention the device, app and version that you are using. To help us out, you can send screenshots of your data related to your question.
The author’s Vietnam eBook on the Battle for Tra Bong: Events and Aftermath
Two-Factor authentication (2FA) adds an extra security layer to your accounts across the internet. 2FA means your accounts require information beyond user name and password to confirm you are who you say you are before you can get into the accounts. Let’s explore how to access 2FA.
Two-Factor authentication (2FA) adds an extra security layer to your accounts across the internet. 2FA means your accounts require information beyond user name and password to confirm you are who you say you are before you can get into the accounts. Let’s explore how to access 2FA.
This is for iPhone, iPad, PCs and Macs. Screenshots are from Windows 10 and iPhone XR
Copyright Scott Adams, Inc./Distributed by Universal Uclick for UFS
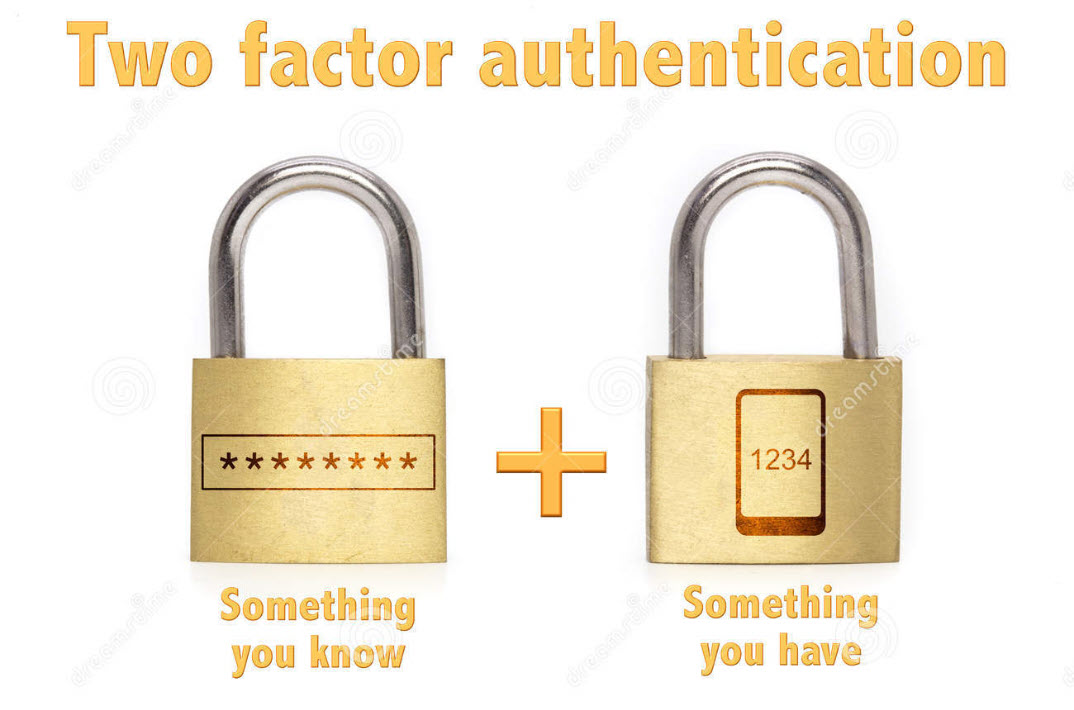
The “second factor” comes in after you enter your username and password, which are considered to be the “first factor.” 2FA can be used to confirm your identity by asking for an extra piece of information. The additional information can be:
Something you know, like an additional passcode.
Something you have, like your phone to receive a one time authorization code.
Something you are, like a fingerprint or voice print. This is also called biometric security.
The idea is to provide another piece of information a hacker would not have, making it harder for the bad guy to break into your account.
The following is not an exhaustive list of services with 2FA ability, but we cover the major services everyone tends to use, and walk you through how to access. We will cover Amazon, Apple, Facebook, Google, Instagram, LinkedIn, Microsoft, and Twitter. Activate 2FA on all of these and you will be more secure. Once you have found their 2FA screens you can can set it up for each app.
Amazon
First, launch Amazon.com on the desktop and login in to your account. Next, click the Menu icon in upper left-hand corner. Now, scroll down the drop-down menu to Your Account option.
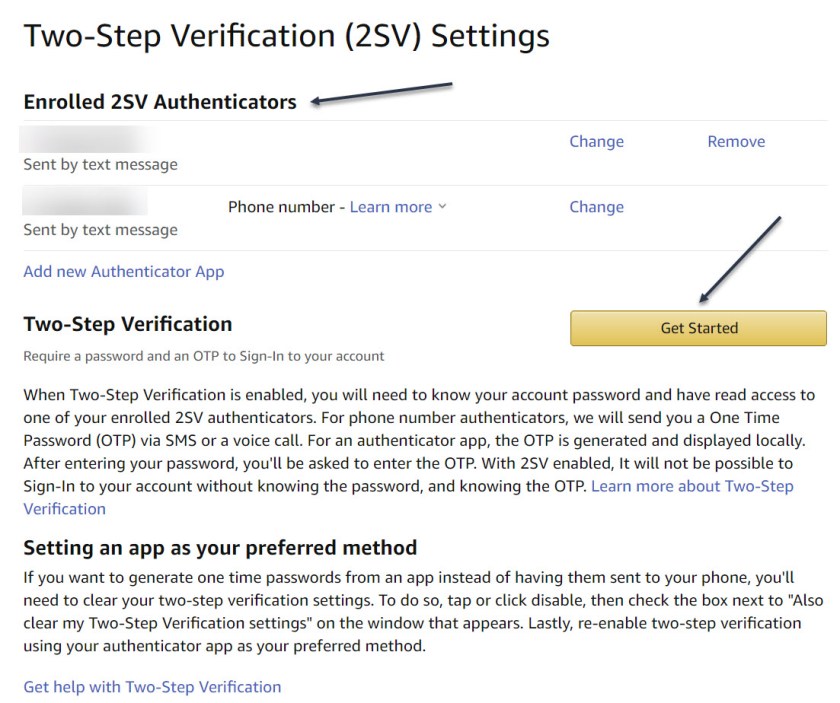
Next, click on the Login & Security big button. Now, on the next page, click Edit next to Two-Step Verification (2SV) Settings. The preferred method is an authentication app (scan the QR code); phone number(s) are the backup method. Refer to below image where I already have 2SV based on my phone number (which is dimmed out):
Amazon 2SV
If you think your account has been comprised, go back to Login & Security and click the Edit button next to Secure Your Account.
Apple
Following are the steps on how to access 2FA for Apple using either iOS or macOS.
On iOS go to:
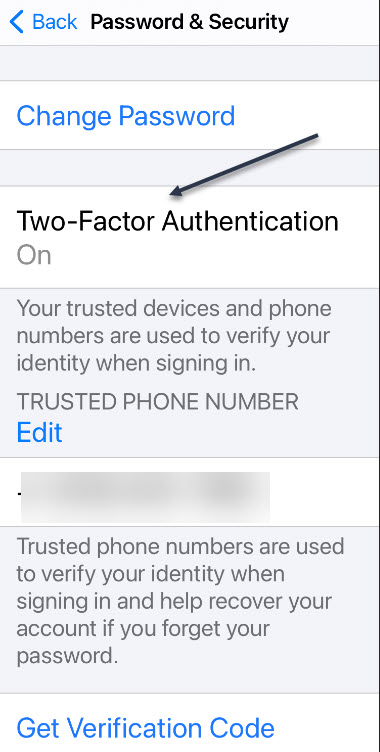
Settings > [your name at the top] > Password & Security > Turn on Two-Factor Authentication.
On macOS go to:
System Preferences > iCloud, then sign in, click Account Details > Security > Turn on Two-Factor Authentication.
Note! once Apple 2FA is activated for two weeks, you can not turn it off. “Certain features in the latest versions of iOS and macOS require this extra level of security, which is designed to protect your information,” according to Apple. See below image for iOS:
Apple 2FA
Facebook
First, login to Facebook on your desktop. Next, click the Down arrow in upper right-hand corner. Now, from the drop-down menu that appears, click on the Settings & Privacy option. On the next screen, click the Privacy & Checkup option. From there, click on the topic How to keep your account secure. Under this topic, you can access 2FA for Facebook. See following image where 2FA is On with a backup method of sending a text message to a phone number.
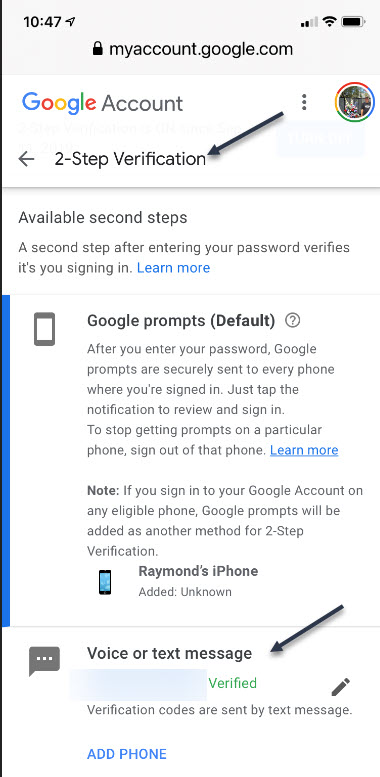
First, sign in to your Google account on your smart device. Next, at the top of the screen, locate the Security tab and tap it. Now, scroll down and tap the 2- Step Verification option. You can continuing scrolling to see more ways to verify you. Refer to below image where my 2SV is already turned On and I am using the backup method of Voice or text message:
Google 2SV
Google calls its system 2SV . It’s all about identifying you via phone. When you enter a password to access your Google account for almost any service, if 2SV is on, there are multiple options to get that second step. First among them now: the Google Prompt. You simply add your smartphone to your account, make sure the Google search app is on the phone, and at login, you can go to the phone and simply acknowledge with a tap that you are the one signing in.
Instagram
First, launch Instagram on your smart device. Next, go to your Profile in lower right-hand corner, then tap the menu (the hamburger icon) on the top-right. Tap Settings > Security > Two-Factor Authentication. There you can choose how you would like to get your authentication code by tapping the Get Started button. See below image:
Instagram 2FA
Linkedin
Business social network Linkedin makes it easy to set up verification, either by SMS texts or authentication app.
First, launch Linkedin on you smart device, then go to your Profile at upper left-hand screen. Next, go to Settings > Sign in & Security > Account > Two-step verification to activate it or deactivate. See following image:
Linkedin 2SV
Microsoft
First sign into your Microsoft account on your smart device. Now, tap your Profile. Next, scroll down and tap Security. 2FA is the second option, tap on it. Once again, tap Two -step verification > Manage. Microsoft will suggest you get app passwords as needed for older service or devices (like Xbox 360); go in later to generate one as needed. Refer to below image:
Microsoft 2SV
Twitter
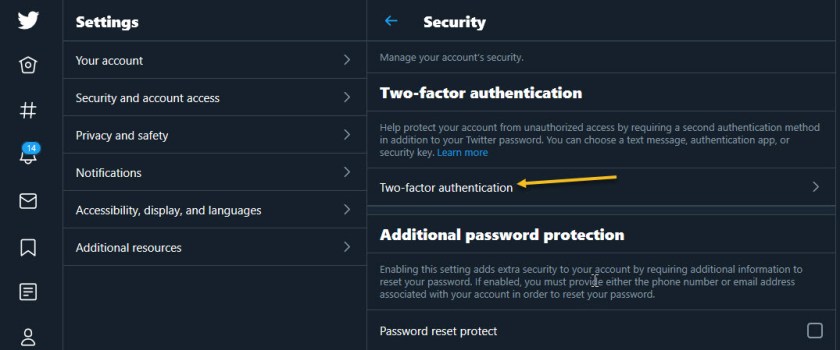
First, to activate Login Verification on Twitter.com on the desktop, login to Twitter, Click the More menu on the left (the three dots) and select Security & Account Access > Security > Two-Factor Authentication. See following image:
Twitter 2FA
Quote For the Day
Technology is a useful servant but a dangerous master.
Christian Louis Lange
That’s it. With 2FA activated on these apps you are more secure. Please feel free to share this post! One way to share is via Twitter.
Just click the Tweet icon below. This will launch Twitter where you click its icon to post the Tweet.
Check out TechSavvy.Life for blog posts on smartphones, PCs, and Macs! You may email us at contact@techsavvy.life for comments or questions.
Please feel free to leave a comment. I would love hearing from you. Do you have a computer or smart device tech question? I will do my best to answer your inquiry. Just send an email to contact@techsavvy.life. Please mention the device, app and version that you are using. To help us out, you can send screenshots of your data related to your question.
The author’s Vietnam eBook on the Battle for Tra Bong: Events and Aftermath
Adding an animated GIF GIF to your Word document is useful if you want to convey a message, demonstrate an activity, capture the audience’s attention, or just add some flair.
Adding an animated GIF to your Word document is useful if you want to convey a message, demonstrate an activity, capture the audience’s attention, or just add some flair. Let’s explore how this is done.
This is for devices running Windows 10 and Word. Screenshots are from Word in Office 365
Copyright Scott Adams, Inc./Distributed by Universal Uclick for UFS
Microsoft Word lets you insert animated GIFs stored on your computer’s hard drive. The process for inserting a GIF in a Word document is no different than inserting a photo. Unfortunately, this only works in Microsoft Word for Windows 10. If you are a Mac user, you can still insert a GIF, but it will not be animated.
First, launch Word and place the cursor in the document’s location where you want the GIF to appear. Now, in the Illustrations group of the Insert tab, click Pictures. Next, choose This Device from the drop-down menu. Refer to below image:
Selecting where to find a GIF
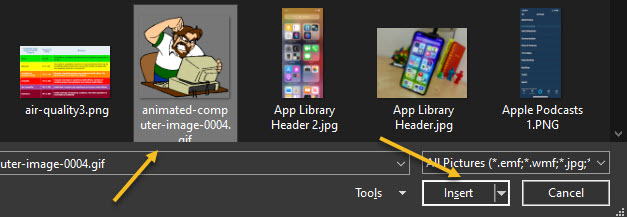
Now, the File Explorer will open. Next, locate and select the GIF you want to insert, then click Insert. See below image:
Selecting a GiF to insert
The GiF will appear in your Word document. If you want to pause the Animation, click the pause icon in the bottom-left corner of the image. See following image:
Your GIF inserted into Word
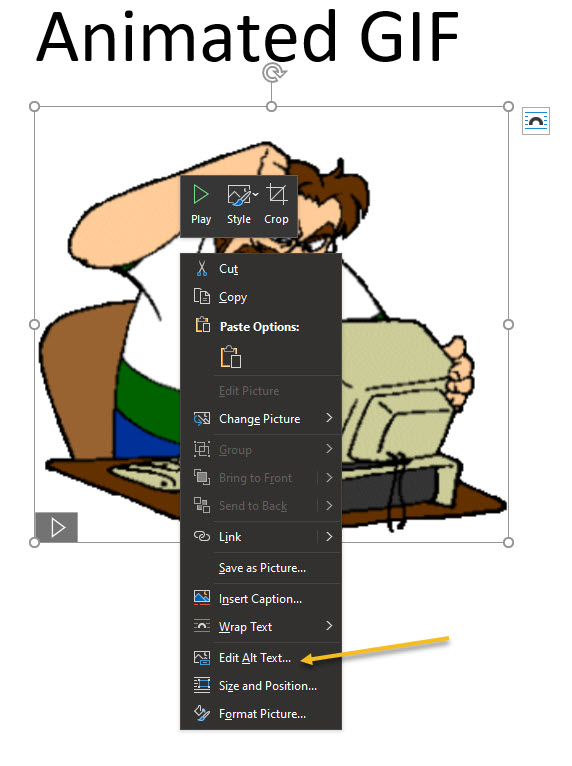
To add alt text, right-click the GIF and then select Edit Alt Text from the context menu. Refer to below image:
Selecting the Edit Alt Text option
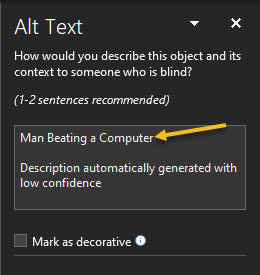
The Alt Text pane will appear to the right of the window. Type the desired alt text in the text box. See below image:
Entering your Alt Text
You have now learned how to insert an animated GIF into your Microsoft Word document. Congratulations!
Quote For the Day
If you are not sitting at the table, you are on the menu.
Jenny Boyer, MD, President of Tulsa County Medical Association
That’s it. Please feel free to share this post! One way to share is via Twitter.
Just click the Tweet icon below. This will launch Twitter where you click its icon to post the Tweet.
Check out TechSavvy.Life for blog posts on smartphones, PCs, and Macs! You may email us at contact@techsavvy.life for comments or questions.
Please feel free to leave a comment. I would love hearing from you. Do you have a computer or smart device tech question? I will do my best to answer your inquiry. Just send an email to contact@techsavvy.life. Please mention the device, app and version that you are using. To help us out, you can send screenshots of your data related to your question.
The author’s Vietnam eBook on the Battle for Tra Bong: Events and Aftermath