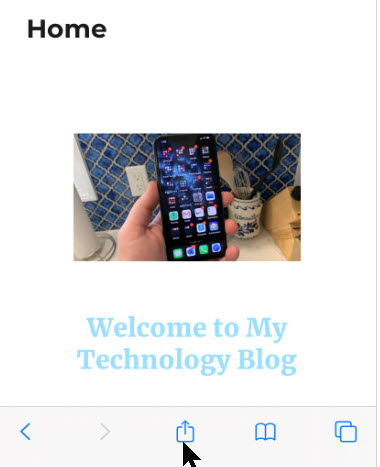
I am Raymond Oglesby, an Information Technology (IT) specialist with 30 years in the field. I have taught Microsoft Applications and troubleshot computers in 15 countries and many States. My career was focused on mainframes and desktops from application development to implementation. I have written hundreds of programs for various architectures. I decided to start a blog to share my knowledge and experiences with you. I plan on updating this blog at least twice a week about smart phone apps to Windows.
Please feel free to leave a Comment or Tweet. I would love to hear from you. Do you have a computer tech question? I will do my best to answer your inquiry. Please mention the app and version that you are using. To help me out, you can send screenshots of your data related to your question.
The decision to listen to Autoplay videos should be in your control. Fortunately, with iOS 13+ you are able to control Autoplay. Whether you want to enjoy Autoplay videos as you browse or you want to shut them down until you’re ready, here is a way you can finally control the noise.
The decision to listen to Autoplay videos should be in your control. Fortunately, with iOS 13+ you are able to control Autoplay. Whether you want to enjoy Autoplay videos as you browse or you want to shut them down until you’re ready, here is a way you can finally control the noise.
By default, Apple mutes your personal photos and videos in iOS 13+. What’s particularly annoying about this feature is that your iPhone will still Autoplay videos, but it won’t enable the volume by default.
The bad news is that there doesn’t currently seem to be a way to Autoplay with volume via your phone’s settings. The good news is that there is a way to get around this feature. Let’s explore how to do this.
This is for the iPhone and iPad running iOS 13 and above
Copyright Scott Adams, Inc./Distributed by Universal Uclick for UFS
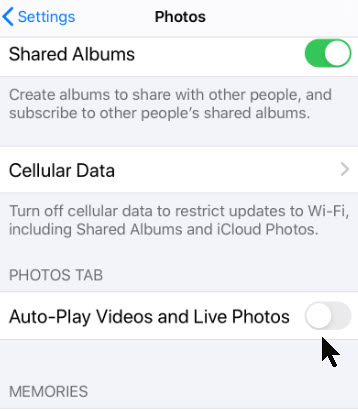
On your IPhone or iPad, open Settings. Next, scroll down to the Photos tab. Refer to below image:
Accessing the Photos option
Now, toggle off Auto-Play Videos and Live Photos.
Turning off Autoplay
It’s important to understand what this actually does. Basically, your personal collection of live photos and videos will no longer play automatically when you load them. The good news is that when you do choose to play them, the volume will be enabled. This is the best way to enjoy audio from the start without having to manually toggle it each time.
That’s it. I hope you like this post. If so, please let us know by leaving a comment.
I have found TechSavvy.Life blog posts extremely helpful. Check them out for posts on smart phone apps, Macs and PCs!
Please feel free to leave a comment. I would love hearing from you. Do you have a computer or smart device tech question? I will do my best to answer your inquiry. Please mention the device, app and version that you are using. To help us out, you can send screenshots of your data related to your question.
The author’s Vietnam eBook on the Battle for Tra Bong: Events and Aftermath
Whether you’re underground between subway stops, caught in a dead zone, or your internet is out, the most reliable way to catch up on your digital reading is to make sure it’s downloaded and accessible offline.
Whether you’re underground between subway stops, caught in a dead zone, or your internet is out, the most reliable way to catch up on your digital reading is to make sure it’s downloaded and accessible offline.
If you have an iPhone or iPad linked to an iCloud account, you can save articles to your Reading List for later reading offline using a feature buried in Settings. Let’s explore how to do this.
This is for iPhone and iPad using Safari browser
Copyright Scott Adams, Inc./Distributed by Universal Uclick for UFS
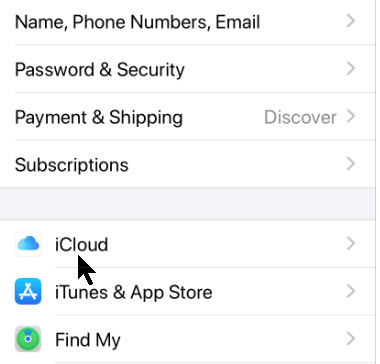
First we need to make sure iCloud is set up to save your Safari bookmarks and Reading List. To do that, open Settings and tap on your name at the very top. Refer to below image:
Accessing Settings
Next, tap iCloud. See below image:
Accessing iCloud
In iCloud settings, scroll down until you see Safari. Tap the toggle (it will turn green) to enable if it’s not already on. See following image:
Accerssing Safari for iCloud
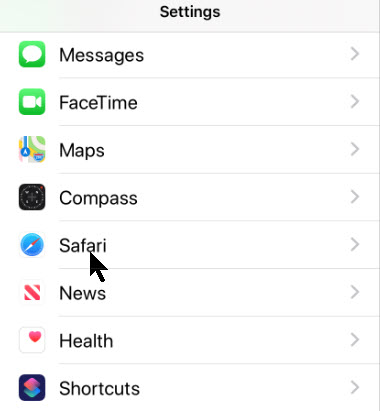
Return back to the Settings main screen. Scroll down to the Safari option and tap to open. Note! This is a different setting than the one mentioned above. Refer to below image:
Accessing Safari from Settings
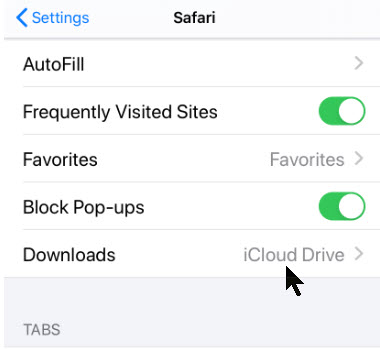
Now, scroll down to the Downloads option and ensure that iCloud Drive option is selected. In my example, the option is selected. See below image:
Accessing Downloads
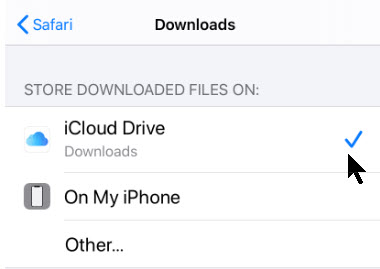
If not selected, tap the Downloads option and select iCloud Drive from the two available options. See following image:
Accessing Downloads options
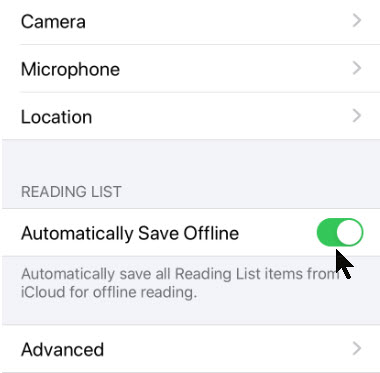
Continue to scroll down until you find the Reading List section. There you will see the toggle for Automatically Save Offline. Simply enable this toggle. When enabled, the toggle color will turn green. Refer to below image:
Enabling offline reading
Save to the Reading List
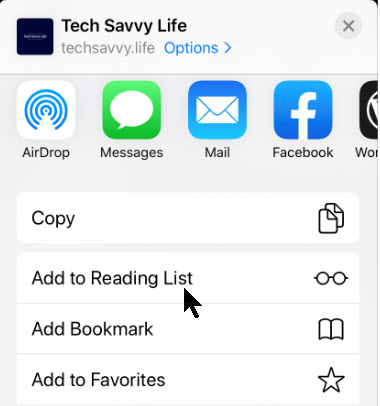
Now exit Settings and launch Safari. Whenever you’d like to save a web page to your Reading List for offline viewing, tap on the Share button at the bottom of your screen. See below image:
Accessing the Share button
A pop-up menu will appearr. Select the Add To Reading List option. See following image:
The Add to Reading List option
View Your Reading List
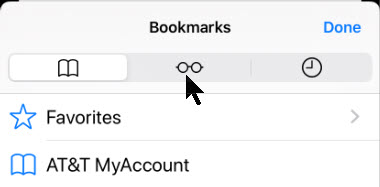
To view your Reading List later, tap the Bookmarks button at the bottom of your screen. Refer to below image:
Accessing the Bookmarks button
Now, tap on the tab that looks like a pair of glasses in the uipper center of your screen. See below image:
Accessing your offline Reading List
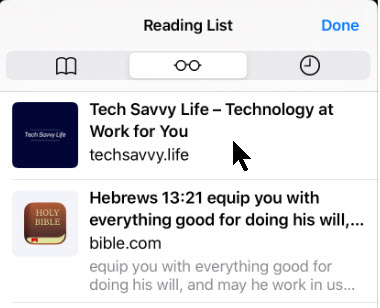
From here, you can tap on any one of the items you’ve saved and it should load even if no internet connection is available. See following image for my offline reading list:
Previewing your offline Reading List
I hope you found this post helpful. If so, please leave a comment and or a tweet.
I have found TechSavvy.Life blog posts extremely helpful. Check them out for posts on smart phone apps, Macs and PCs!
Please feel free to leave a comment. I would love hearing from you. Do you have a computer or smart device tech question? I will do my best to answer your inquiry. Please mention the device, app and version that you are using. To help us out, you can send screenshots of your data related to your question.
The author’s Vietnam eBook on the Battle for Tra Bong: Events and Aftermath
If you’re having trouble comfortably reading text that is either too small or too big on a website in Google Chrome, there’s a quick way to change it.
If you’re having trouble comfortably reading text that is either too small or too big on a website in Google Chrome, there’s a quick way to change it. Let’s explore how to do this.
Chrome includes a feature called Zoom that allows you to quickly make text and images bigger or smaller on any website. You can zoom a web page from anywhere between 25% and 500% of its usual size.
When you navigate away from a page, Chrome will remember your zoom level for that website when you come back to it.
This is for devices using Google Chrome
Copyright Scott Adams, Inc./Distributed by Universal Uclick for UFS
Press Ctrl and 0 (zero) to return to the default size, normally 100%
Method 2: Using the Mouse
Press and hold the Ctrl key and rotate the scroll wheel on your mouse. Depending on which direction you spin the wheel, the text will become larger or smaller.
Method 3: Using the Menu
Select the Hamburger icon (the one with 3 dots) in the top-right of the Chrome web browser. Refer to below image:
The Hamburger icon
In the Zoom section, select the + (plus) button to increase the size of text and images. Select the – (minus) button to decrease the size of text and images. See below image:
Selecting a Zoom level
Press the Esc key to hide the menu.
Reset Zoom
One way is to use any of the zoom methods listed above to set the zoom level to 100%.
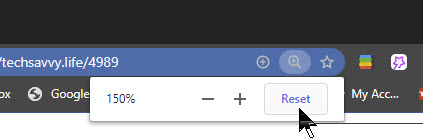
Another way is to select the magnifying glass icon in the address bar (this will only appear if you are zoomed to a level other than 100%), then select Reset. If you dont see the magnifying glass (normally due to numerous icons), just press and hold the Ctrl key while pressing the + (plus) or – (minus) key or mouse scroll. See following image;
Resetting the Zoom
Set a Custom Default
You can customise the default zoom level used by the Google Chrome browser. This way, text and images will always appear larger or smaller whenever you use the browser. To do so:
Select the Hamburger icon (the one with 3 dots) in the top-right of the Chrome web browser. Refer to below image:
The Hamburger icon
Select Settings from the menu. See below image;
Accessing the Settings
In the search box at the top of the Settings page, type “page zoom”. See following image:
Using the Settings search box
Under the Appearance options, select the drop-down menu for Page zoom and choose a new default zoom level. Refer to below image:
Selecting a custome Zoom level
That’s it. Now you can make your Chrome browsing easier on your eyes.
I have found TechSavvy.Life blog posts extremely helpful. Check them out for posts on smart phone apps, Macs and PCs!
Please feel free to leave a comment. I would love hearing from you. Do you have a computer or smart device tech question? I will do my best to answer your inquiry. Please mention the device, app and version that you are using. To help us out, you can send screenshots of your data related to your question.
The author’s Vietnam eBook on the Battle for Tra Bong: Events and Aftermath
The Apple iPhone has a built in browser called Safari. The icon for Safari is usually located in the bottom right of the Home screen. Starting with iOS 9 through the current version, iOS 13, you can have up to 500 tabs open in Safari.
This is a repost on Apple iPhone and its open tabs in Safari web browser
The Apple iPhone has a built in browser called Safari. The icon for Safari is usually located in the bottom right of the Home screen. Starting with iOS 9 through the current version, iOS 13, you can have up to 500 tabs open in Safari.
This is for iPhone, iPad and Mac or similar devices
To chose all your tabs or the current one is not obvious. Here’s how to close these open tabs in Safari.
Tap on the Safari icon to open
In the lower right hand corner you will see an icon represented by two rectangles.
Press down on the icon and hold
You will see several options. Tap “Close All xxx Tabs” where xxx is a number
Confirm you want to close the tabs
Your tabs will now be closed. That it’s.
I Would Like to Hear from You
Please feel free to leave a comment. I would love hearing from you. Do you have a computer tech question? I will do my best to answer your inquiry. Please mention the app and version that you are using. To help me out, you can send screenshots of your data related to your question.
The author’s Vietnam eBook on the Battle for Tra Bong: Events and Aftermath
Microsoft Word for Windows has a “text to speech” or Speak feature to read back a document. It’s hiding away behind the Ribbon but works fine once you’ve found it. We are going to add the icon to the Quick Access Toolbar (QAT) for easy accessiblity.
Microsoft Word for Windows has a “text to speech” or Speak feature to read back a document. It’s hiding away behind the Ribbon but works fine once you’ve found it. We are going to add the icon to the Quick Access Toolbar (QAT) for easy accessiblity. Lets explore how to do this.
This is for Microsoft Word 2010 through latest version
Copyright Scott Adams, Inc./Distributed by Universal Uclick for UFS
Speak button can be put on the Quick Access Toolbar (QAT) or Ribbon. Refer to below image for the Speak icon on QAT:
The Speak icon on Quick Access Toolbar
While in Word, select some text or Ctrl + A for the whole document, then click the Speak icon. If there’s no selection, clicking Speak will say the current word at the cursor.
Add the Speak Icon
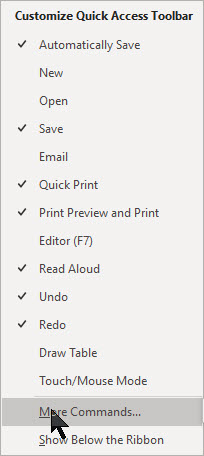
You’ll find Speak on the Commands not on the Ribbon list. The easiest choice is adding it to the Quick Access Toolbar. Just click on the Down Arrow in the Menu Bar and select More Commands. See below image:
More Commands option
The Quick Access Toolbar will be displayed. Select Commands Not in the Ribbon from the drop down box and locate the Speak command. Next, click the Add button to add the command to the Quick Access Toolbar. Click OK when finished. Refer to below image:
Adding the Speak option to the Quick Access Toolbar
Now it’s on the Quick Access Toolbar. Just select some text and click the Speak icon.
Change the Voice
To access the controls for Speak or Read Aloud:
Access the Control Panel via the Cortana search bar. Just enter Control Panel, then click the button in upper left hand corner.
Click Speech Recognition
Click Text to Speech
Word Speak is making use of a little-appreciated Text to Speech part of Windows. See following image:
Text to Speech dialog
That means the Speech options available depend somewhat on the version of Windows, not Office. Some of the options are:
Voice Selection – the English language options are “David” or “Zira” – male or female.
Preview Voice – click to hear the current voice.
Voice speed – faster or slower than the Normal setting.
To start the Speech at Windows startup, click the Speech Recognition tab and checkmark Run Speech Recognition at startup. When finished, click OK. See below image:
Selecting Text to Speech at Windows startup
I have found TechSavvy.Life blog posts extremely helpful. Check them out for posts on smart phone apps, Macs and PCs!
Please feel free to leave a comment. I would love hearing from you. Do you have a computer or smart device tech question? I will do my best to answer your inquiry. Please mention the device, app and version that you are using. To help us out, you can send screenshots of your data related to your question.
The author’s Vietnam eBook on the Battle for Tra Bong: Events and Aftermath
Recently, Microsoft has changed how the Search works. It is now more robust with many new options. The Search box is now located at the top of the screen in the title bar. This is called Microsoft Search and is available in both client and web apps.
Recently, Microsoft has changed how the Search works. It is now more robust with many new options. The Search box is now located at the top of the screen in the title bar. This is called Microsoft Search and is available in both client and web apps.
This is for devices running Outlook. Screenshots are from Office 365
Copyright Scott Adams, Inc./Distributed by Universal Uclick for UFS
First, you will notice the Search box is bigger and longer. Also, Microsoft has added two keyboard shortcuts; CNTL+E and ALT+Q for those people who favor the keyboard over a mouse.
Now when you click inside the Search box or use a keyboard shortcut, a menu appears that shows recent searches, people and actions. See following image:
The Search box menu
The menu is in a fixed position and covers up a lot of tools found on the Search tab ribbon. If you want to access these tools you have click on a blank space outside the Search results. See below image:
Click off the Search box
Using the Search Box
As you type in the Search box, the menu will filter down search terms, people, and actions to match what you type. This is the biggest change in Microsoft Search: it no longer just searches through email. The new feature searches everything in Outlook, including Outlook functionality.
If you want to know how to edit emails, type “edit” in the Search box and, below any emails that match the word, the menu will display relevant commands. Refer to below image:
The Search box actions
Filter Your Search
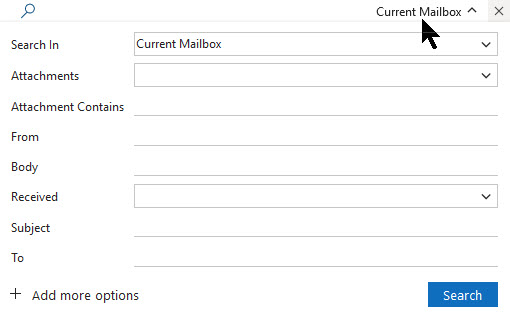
Unlike the old Search, Outlook now has a much better and easier user interface for filtering your search. Click the drop-down arrow next to the Search box and a simple search menu appears. See following image:
The Search box filters
Type into these filters and Outlook will automatically add the correct syntax to the Search box (as noted below). You no longer need to remember the right commands to type. Refer to below image:
Setting up a filter
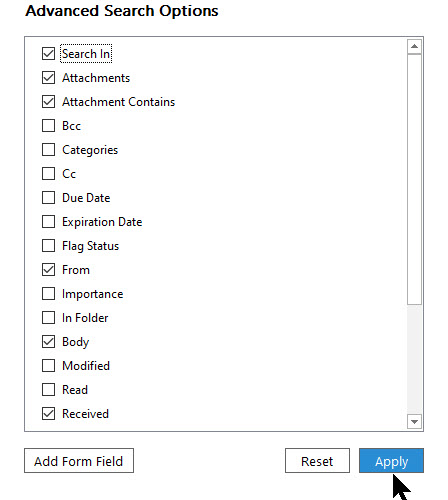
You are not limited to the default search fields, now you can change the default search fields as well. Just click Add More Options. This will bring up additional options you can turn on or off. Click Apply when you’re done.See below image:
More Search options
The Search Command
If you’re not a fan of the new dropdown, the Search tab on the ribbon is still there, although now it only appears when you click into the Search box, then click on a blank space in the ribbon. See following image:
The Search command
The new Search has more power and functionality than the old Search box and provides more screen space for your actual emails. It’s a definite improvement. Enjoy the new Search feature.
I have found TechSavvy.Life blog posts extremely helpful. Check them out for posts on smart phone apps, Macs and PCs!
Please feel free to leave a comment. I would love hearing from you. Do you have a computer or smart device tech question? I will do my best to answer your inquiry. Please mention the device, app and version that you are using. To help us out, you can send screenshots of your data related to your question.
The author’s Vietnam eBook on the Battle for Tra Bong: Events and Aftermath
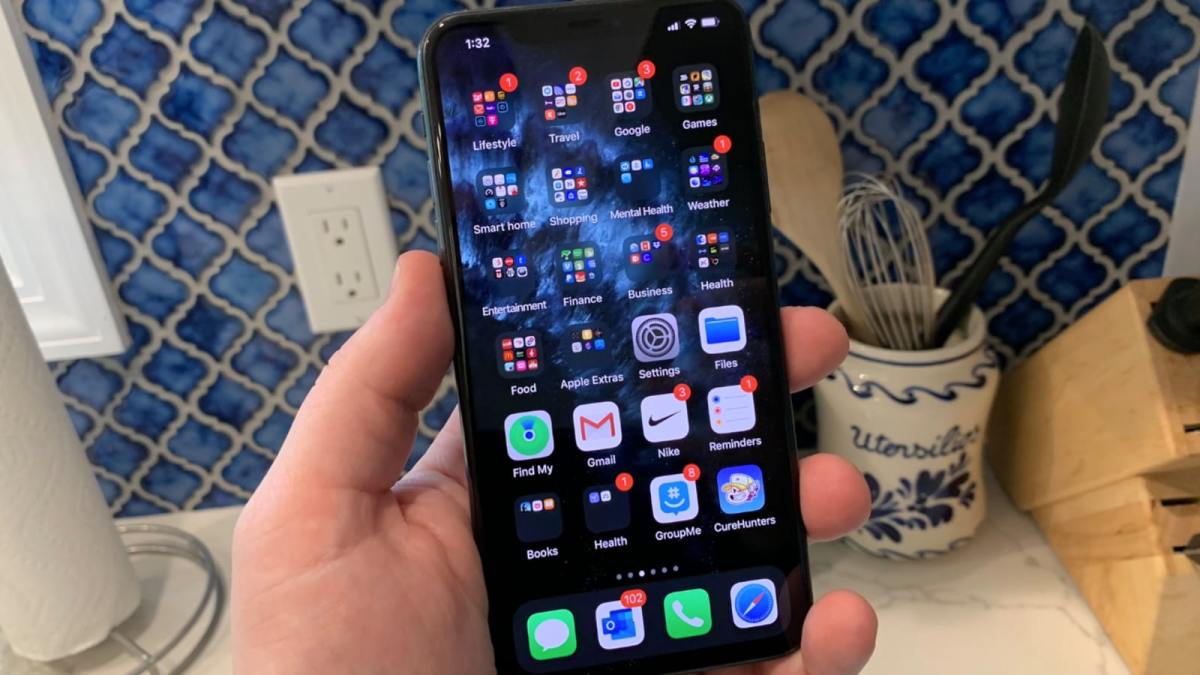
There’s a hidden feature to view the weather report on your iPhone lock screen. This feature is built-in on an Android device.
There’s a hidden feature to view the weather report on your iPhone lock screen. This feature is built-in on an Android device. Let’s explore how to enable this on your iPhone.
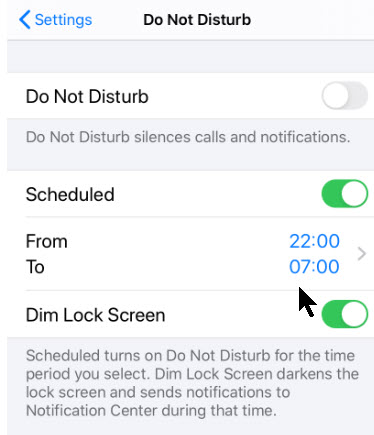
We are going to use the Do Not Disturb Scheduled option available in iOS 12 and later. When enabled, you will see the weather report on the first tap of the lock screen after the Do Not Disturb time has passed. The Do Not Disturb feature automatically mutes all incoming notifications.
This is for the iPhone with iOS 12+
Copyright Scott Adams, Inc./Distributed by Universal Uclick for UFS
Open the Settings app, go to Do Not Disturb section. Next, toggle the Scheduled option. Set the From and To time. Important! You want to set the “To” time frame to 10-15 minutes before you wake up. Finally, toggle the Dim Lock Screen. Refer to below image:
Setting the Do Not Disturb time frame
We are dimming the lock screen and sending all new notifications to the Notifications Center until the Do Not Disturb schedule is over.
Let’s go back to Settings and tap the Privacy option. Now, tap the Location Services option. Next, scroll down to the Weather app. See below image:
The Weather app
Now, tap the While Using the App button to enable. This gives the Weather app permission to see your location, so it show you the weather report. See following image:
Setting permission for the Weather app
The next morning, after the Do Not Disturb time has passed, you will see the day’s weather report on your lock screen. Refer to below image:
The Weather screenshot
I have found TechSavvy.Life blog posts extremely helpful. Check them out for posts on smart phone apps, Macs and PCs!
Please feel free to leave a comment. I would love hearing from you. Do you have a computer or smart device tech question? I will do my best to answer your inquiry. Please mention the device, app and version that you are using. To help us out, you can send screenshots of your data related to your question.
The author’s Vietnam eBook on the Battle for Tra Bong: Events and Aftermath
Victims of accidental erasures have long relied on either old shareware programs or more comprehensive professional tools like Recuva, EaseUS Data Recovery, Disk Drill Data Recovery, Wise Data Recovery, among others, to recover deleted data.
Victims of accidental erasures have long relied on either old shareware programs or more comprehensive professional tools like Recuva, EaseUS Data Recovery, Disk Drill Data Recovery, Wise Data Recovery, among others, to recover deleted data.
This is for Windows 10 operating system
To Tweet about this post, click the Tweet icon below to launch Twitter, then click its Tweet icon to post.
Check out TechSavvy.Life for their blog posts on smartphone apps, PCs. and Macs!
Curiously, Windows never offered users its own version of an undelete utility. Until now. Why now? Who knows.
Microsoft is offering its new Windows 10 File Recovery Tool for free, online from the Microsoft App Store here.
Note! Make sure you sign in to your Microsoft Account FIRST before downloading.
Refer to below image:
Windows File Recovery app
It’s a command-line only tool, which means it doesn’t sport the attractive interface like most popular undelete utilities.
But it relies on the same principle more sophisticated shareware and professional undelete utilities have long used; deleted files are not actually immediately erased. Instead, the computer merely removes pointers to the locations of the “erased” data, notifying the system that the containers holding those data are available for use should they be needed to store newer files.
The new Windows File Recovery Tool offers three modes of recovery. The default setting is used mainly for NTFS file systems and is ideal for resurrecting recently deleted files.
A more aggressive Segment mode may do a better job retrieving older deleted files, though it will likely take longer.
The third mode, Signature. is the preferred option for retrieving files stored on external devices using FAT, exFAT and ReFS file systems.
The File Recovery Tool has only limited usefulness on solid state drives (SSDs). That is because those drives, unlike traditional hard disk drives, immediately wipe out deleted files.
Although it is not listed as such, the new tool appears to be a beta offering given its low version number or build. Users must have the Windows 10 update (May 2020) or later..
As always, users who need to retrieve an accidentally deleted file should act quickly. File segments remaining on a hard drive with address pointers removed will be overridden as new files are continually created. For the same reason, it is best to have the Windows File Recovery Tool already loaded before an emergency arises. Installing the program after a file is accidentally deleted increases the odds that deleted file fragments will be overridden by the new program.
That’s it. Please feel free to share this post! One way to share is via Twitter, as mentioned below.
I have found TechSavvy.Life blog posts extremely helpful. Check them out for posts on smart phone apps, Macs and PCs!
Please feel free to leave a comment. I would love hearing from you. Do you have a computer or smart device tech question? I will do my best to answer your inquiry. Please mention the device, app and version that you are using. To help us out, you can send screenshots of your data related to your question.
The author’s Vietnam eBook on the Battle for Tra Bong: Events and Aftermath
Yes, it is coming for your iPhone and Android smartphones. As a matter of fact, some of the features have already been available in iOS 13.5 and above for the iPhone that was released in May 2020. Google and Apple are working with public health organizations on contact-tracing apps.
Yes, it is coming for your iPhone and Android smartphones. As a matter of fact, some of the features have already been available in iOS 13.5 and above for the iPhone that was released in May 2020. Google and Apple are working with public health organizations on contact-tracing apps.
The piece that is missing, for now, is authorized apps from your health authorities. This is where you’ll report any sickness. Apple and Google are not releasing apps; they are collaborating to allow these apps to work across iOS and Android to collect data and send out alerts.
The following guidelines are for the iPhone. Android devices will be similar.
This is for iPhone and Android smartphones. Screenshots are from the iPhone
Copyright Scott Adams, Inc./Distributed by Universal Uclick for UFS
Conventional contact tracing is a technique used by public health authorities to measure and slow the spread of infectious diseases. It requires manually gathering information from infected individuals about the people they have previously been in contact with. These people can then be notified by public health authorities to take appropriate safety measures, such as undertaking self-quarantine and getting tested to break the chain of transmission. While this process will continue to be important to contact tracing efforts, systems that are being developed can alleviate some of the challenges with this process.
First there is a significant organizational burden from a manual process, as many public health workers are needed to perform these tasks. Second, the process can be slow as it requires finding and interviewing infected individuals and then reaching out and talking to their high risk contacts; all of whom may not be able to remember or know all of the people that they came in contact with in the past days to weeks.
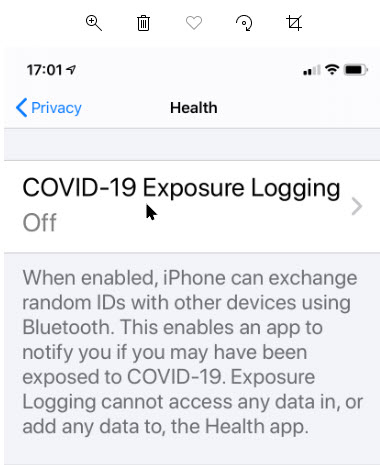
The contact tracing is called “COVID-19 Exposure Logging” and is automatically turned off. When contact tracing apps are installed, you can enable the feature.
Setting Up On iPhone
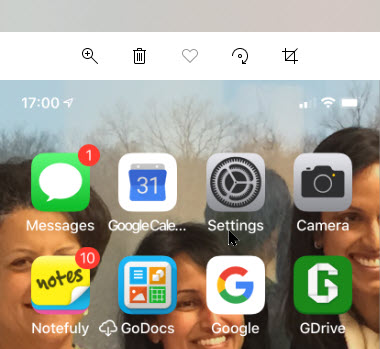
First, launch Settings. Refer to below image:
The Settings icon
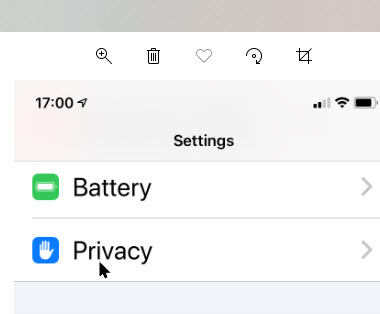
Next, scroll down to the Privacy option and tap it. See below image:
The Privacy option
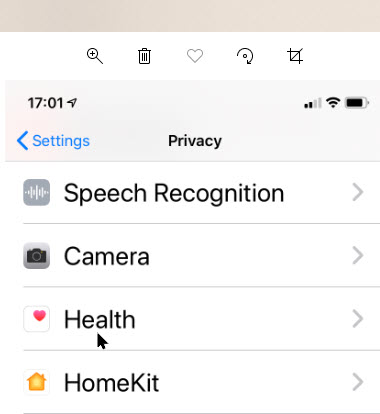
Now, tap the Health option. See following image:
The Health option
You wil see the COVID-19 Exposure Logging option; just tap it. Refer to below image:
COVID-19 Exposure Logging option
How It Works
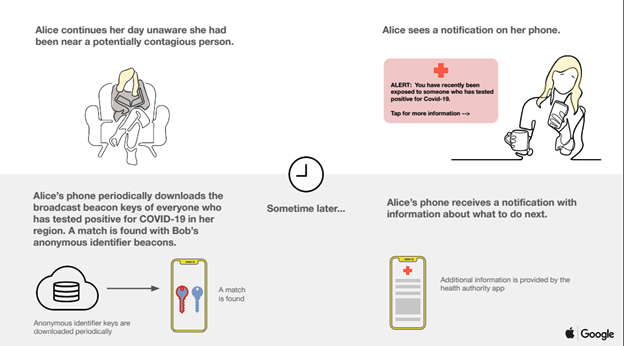
Once enabled, users’ devices will regularly send out a beacon via Bluetooth that includes a random Bluetooth identifier; basically, a string of random numbers (IDs) that are not tied to a user’s identity and change every 10-20 minutes for additional protection. Other phones will be listening for these beacons and broadcasting theirs as well. When each phone receives another beacon, it will record and securely store that beacon on the device. Refer to below diagram:
Contact Tracing Diagram
At least once per day, the system will download a list of the keys for the beacons that have been verified as belonging to people confirmed as positive for COVID-19. Each device will check the list of beacons it has recorded against the list downloaded from the server. If there is a match between the beacons stored on the device and the positive diagnosis list, the user may be notified and advised on steps to take next. See below diagram:
Contact Tracing Diagram
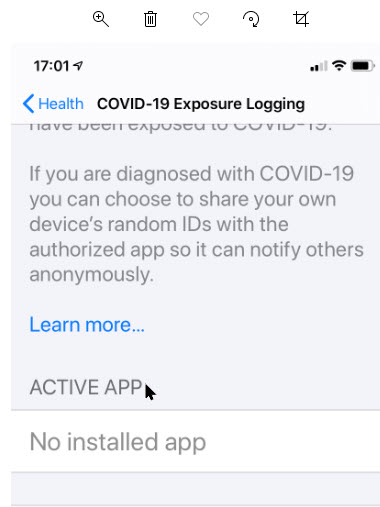
Active Apps
Now, scroll down to the Active App section. Here you will find your installed apps that works with contact tracing. Once available from local, state or federal authorities, you will need to install the apps then they will appear here. (As of this writing, there is one app available from Center for Disease Control; for a list of States that will participate or have an app available, click here . See below image:
Active Apps for contact tracing that are installed
For these apps to work, you will need your phone’s Bluetooth and location tracking features turned on, though your actual physical location is not tracked; the apps will not know where in the world you are or how many times you have left the house today. They’ll only know which random IDs your phone has come into contact with.
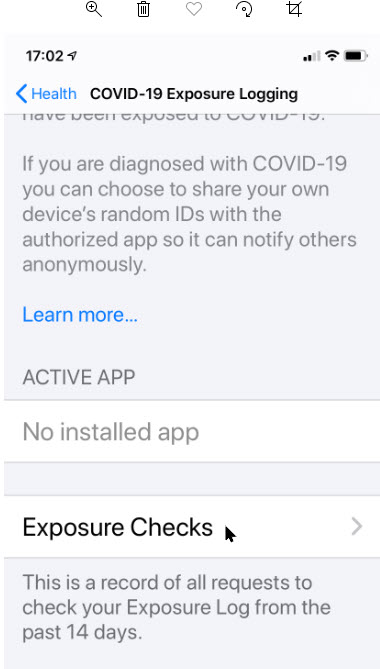
Check for Exposure
To see if the option is working, tap on Exposure Checks. See following image:
Accessing Exposure Checks option
Now, you will see the following image about any exposure within the last 14 days. Refer to below image:
Checking to see if you have been exposed
The Fine Print
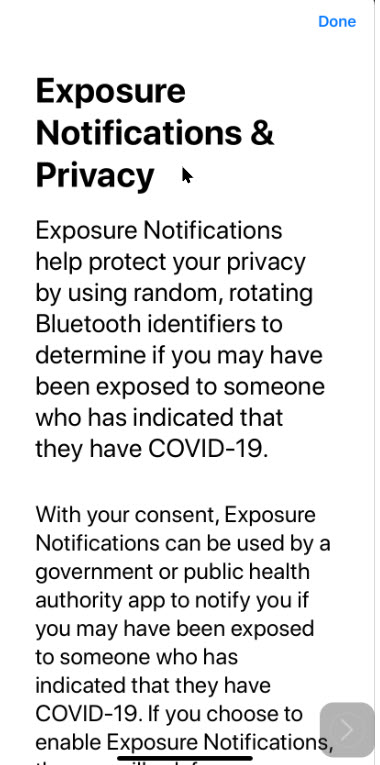
Now, tap the Back button then tap on the Learn More blue link. See below image:
Accessing the Terms andConditions
Information on Exposure Notifications & Privacy terms and conditions will be displayed. See following image:
The Terms and Conditions for contact tracing and exposure
I have found TechSavvy.Life blog posts extremely helpful. Check them out for posts on smart phone apps, Macs and PCs!<
Please feel free to leave a comment. I would love hearing from you. Do you have a computer or smart device tech question? I will do my best to answer your inquiry. Please mention the device, app and version that you are using. To help us out, you can send screenshots of your data related to your question.
The author’s Vietnam eBook on the Battle for Tra Bong: Events and Aftermath
At times you would like to “grab” a copy of a web page in Microsoft Edge without printing it out on paper. This is not obvious but easily to do on various devices.
At times you would like to “grab” a copy of a web page in Microsoft Edge without printing it out on paper. This is not obvious but easily to do on various devices.
This is for Windows 10 PCs, Macs and other devices that support Microsoft Edge
Copyright Scott Adams, Inc./Distributed by Universal Uclick for UFS
First, open Edge and navigate to a web page you would like to save as a PDF. In the upper right hand corner, click on the hamburger icon (the one with three dots). Refer to below image:
The Hamburger icon
In the pop-up menu, select Print. See below image:
The Edge Print option
The Print window will open that contains a preview of what the page will look like saved as a PDF file. Select Printer from the drop-down menu, then select Save as PDF. See following image:
Edge’s Save as PDF option
Use the Pages option to save certain pages (for example, only the first page like in my example or a range of pages). If you would like to change the orientation of the PDF file from portrait (the default) to landscape, click on the Layout option.
When you are done with your options, click on the Save button at the bottom of the page. Refer to below image:
Edge’s Save your changes option
The Save As dialog box will open. Enter the path where you want to save your PDF file and rename the file, if necessary. Click Save to save your file. See following image:
Edge’s Save the PDF file
Your web page(s) will be saved as a PDF file in the location you have chosen.
It’s possible to save documents to PDF files other than Edge. Whether its a Window 10 or a Mac computer, print-to-PDF functionally will be similar.
Please feel free to leave a comment. I would love hearing from you. Do you have a computer or smart device tech question? I will do my best to answer your inquiry. Please mention the device, app and version that you are using. To help us out, you can send screenshots of your data related to your question.
The author’s Vietnam eBook on the Battle for Tra Bong: Events and Aftermath


:no_upscale()/cdn.vox-cdn.com/uploads/chorus_asset/file/20058248/windowsfilerecovery.jpg)