How to Understand Windows 10 Names and Numbers

Windows 10 has a lot of overlapping version numbers and names. For example, the October 2020 Update is also called 20H2, version 2009, and build 19042. It often seems like different teams at Microsoft are speaking different languages. Here’s how to understand Microsoft’s jargon.

Windows 10 has a lot of overlapping version numbers and names. For example, the October 2020 Update is also called 20H2, version 2009, and build 19042. It often seems like different teams at Microsoft are speaking different languages. Here’s how to understand Microsoft’s jargon.

This is for the Windows 10 operating system

Dilbert and Fake
Copyright Scott Adams, Inc./Distributed by Universal Uclick for UFS

To Tweet about this post, click the Tweet icon below to launch Twitter, then click its Tweet icon to post.

Check out TechSavvy.Life for their blog posts on smartphone apps, PCs. and Macs!

The Development Codename

Each Windows 10 Update starts with a development codename. In recent years, Microsoft has simplified these.

For example, Windows 10 20H2 became the October 2020 Update. It was named “20H2” because it was planned for release in the second half of 2020.

In theory, these development codenames are just that; for the Windows development process. In practice. Microsoft has a lot of documentation that uses them, referring to “20H2” and “20H1.” These modern development codenames are easy to understand.

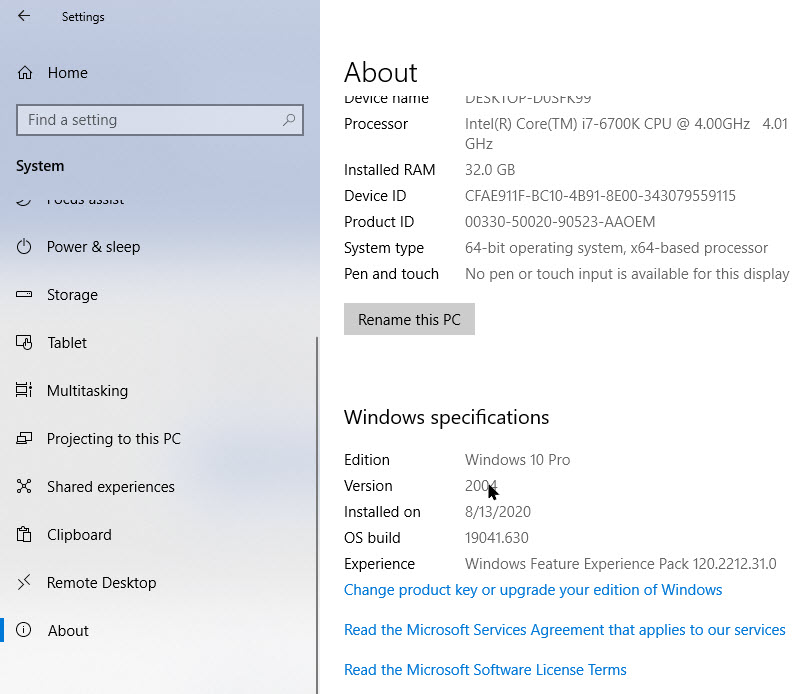
These development codenames appear to be replacing the version numbers in Windows 10’s interface. To view your codename, go to:

Settings > System > About

Here you willl see the development codename presented as the “version” under Windows Specifications. Refer to below image:

Win Version 1
The About option

Here is a list of Windows 10’s development codenames for 2020 and 2019 updates:

  • 20H2 became the October 2020 update
  • 20H1 became the May 2020 update
  • 19H2 became the November 2019 update
  • 19H1 became th May 2019 update

Prior to this, Microsoft named these updates “Redstone” and “Threshold”. Threshold 1″ was the original codename for Windows 10.

The Marketing Name

To make things “simpler” for us, Microsoft created official names for each update, designed to make them human-readable. When an update is near release, it gets one of these names.

In recent years, these names have been pretty self-explanatory. “October 2020 Update” and “May 2019 Update” are easy terms to understand. That’s the month and year the update was released. It’s more precise than “20H2” and “19H1.”

We call them “marketing names” because that’s what they originally were. Despite Microsoft presenting names like “October 2020 Update” as the official ones, many Microsoft documents use terms like “20H2” or “version 2009” instead. Even Windows 10 itself doesn’t use this name; perhaps because it’s created by the engineers and not the marketing department.

The Version Number

Windows 10 has version numbers which are different from the development codename. The Windows 10 October 2020 Update is technically Windows 10 version 2009. The first two digits represent the year and the last two digits represent the month.

Microsoft is confusing us. The version number seems to refer to the month the update was “finalized” (and perhaps released to Insiders), while the marketing name refers to the update the month was released.

Here’s a list of 2020 and 2019 version numbers for Windows 10 updates:

  • The October 2020 Update is version 2009, which refers to September 2020
  • The May 2020 Update is version 2004, which refers to April 2020
  • The November 2019 Update is version 1909, which refers to September 2019
  • The May 2019 Update is version 1903, which refers to March 2019

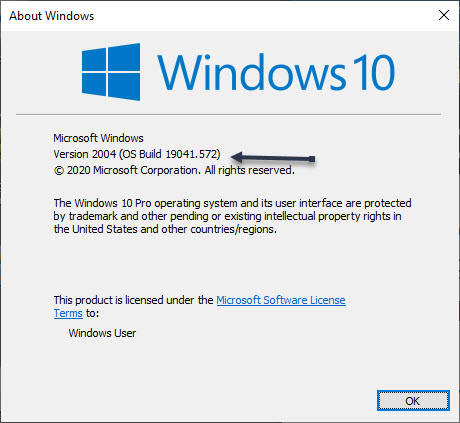
Microsoft is getting away from these numbers, with development names like “20H2” now shown in the System panel. Another way to view your version number is to launch the winver dialog:

  • Press Windows+R
  • Enter winver in the dialog box
  • Press Enter or OK

See below image:

Win Version 2
The Windows version and OS Build number

In older versions of Windows 10, these screens showed the version number instead.

The OS Build Number

Windows 10 also has operating system (OS) build numbers. During the Windows development process, each “build” of Windows 10 released has its own build number.

After much testing and bug-fixing, Microsoft settles on a final build that will be the stable version of the update. When the stable update is released, it still has this OS build number.

The October 2020 Update has the OS build number “19042.” Technically, the full build number is “10.0.19042,” to indicate that it’s a Windows 10 build. Only the last five digits change.

Also, there are minor build numbers; the stable version of 20H2 is initially “19042.572”, but the “572” number will increase as Microsoft issues minor patches for the update. Here is a list of 2020 and 2019 OS build numbers:

  • 20H2 is build number 19042.
  • 20H1 is build number 19041.
  • 19H2 is build number 18363.
  • 19H1 is build number 18362.

What Does All This Mean?

At times, it seems like different teams at Microsoft are speaking different languages. One document talks about 20H2, another talks about version 2009, a technical document refers to build 19042, and the marketing team talks up the October 2020 Update. They’re all talking about the same thing.

Now that you understand this, it’s easier to make sense of the mess of version numbers you see across Microsoft’s websites and within Windows 10 itself.

I hope you have found this post helpful. If so, click the Tweet icon below. This will launch Twitter where you click its icon to post the Tweet.

I have found TechSavvy.Life blog posts extremely helpful. Check them out for posts on smart phone apps, Macs and PCs!

The following is a previous Twitter feed so you can view how a Tweet will be displayed.

I Would Like to Hear From You

Please feel free to leave a comment. I would love hearing from you. Do you have a computer or smart device tech question? I will do my best to answer your inquiry. Please mention the device, app and version that you are using. To help us out, you can send screenshots of your data related to your question.

The author’s Vietnam eBook on the Battle for Tra Bong: Events and Aftermath

How to Disable Auto-Correct on iPhone or iPad in iOS 14

f you use a lot of terms, proper names, acronyms, or places, you may want to turn off Auto-Correct that is enabled by default.

If you use a lot of terms, proper names, acronyms, or places, you may want to turn off Auto-Correct that is enabled by default.

When your iPhone or iPad corrects a word automatically, it’s drawing on both a dictionary and a predictive text algorithm that learns from how you type. The dictionary may not include every proper name, acronym, or new term as it appears on the screen, so it can be frustrating when Auto-Correct changes what you know is correct. Also, if you misspell a certain word frequently enough, the predictive text algorithm will learn that typo, and it may begin “fixing” correct instances of a word or term when you do not want it to.

The easiest way to deal with Auto-Correct is to turn it off completely. (Note! IFfyou use an everyday language, it is recommended not to disable this feature to avoid typos). If you need to turn it off, here’s how to disable Auto-Correct.

This is for the iPhone or iPad running iOS 14

Dilbert and Sign
Copyright Scott Adams, Inc./Distributed by Universal Uclick for UFS

To Tweet about this post, click the Tweet icon below to launch Twitter, then click its Tweet icon to post.

Check out TechSavvy.Life for their blog posts on smartphone apps, PCs. and Macs!

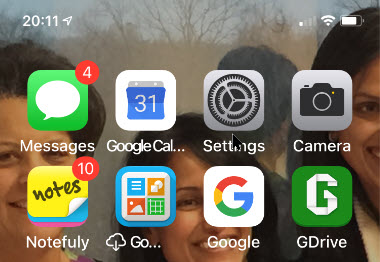
First, launch Settings (the gear icon). Refer to below image:

Keyboard 1
Accessing Settings

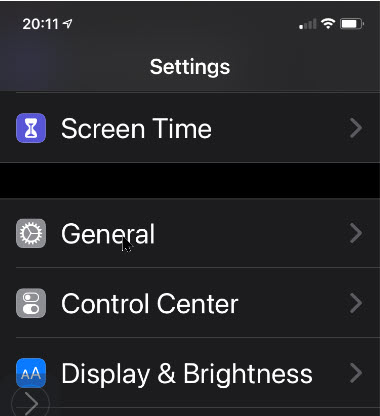
Now, scroll down and launch General. See below image:

Keyboard 2
Accessing General option

Next, scroll down to Keyboard and tap it. See following image:

Keyboard 3
Accessing Keyboard option

In the Keyboard settings, scroll down to the All Keyboards sections. Tap the toggle beside Auto-Correction to disable it. Refer to below image:

Keyboard 4
Disabling Auto-Correction

Next, let’s go back one screen to make sure the change registers. You may now exit Settings.

You can always turn Auto-Correct back on by following the above steps.

That’s it. Please feel free to share this post! One way to share is via Twitter, as mentioned below.

I hope you have found this post helpful. If so, click the Tweet icon below. This will launch Twitter where you click its icon to post the Tweet.

I have found TechSavvy.Life blog posts extremely helpful. Check them out for posts on smart phone apps, Macs and PCs!

The following is a previous Twitter feed so you can view how a Tweet will be displayed.

Disaply of your Tweet

I Would Like to Hear From You

Please feel free to leave a comment. I would love hearing from you. Do you have a computer or smart device tech question? I will do my best to answer your inquiry. Please mention the device, app and version that you are using. To help us out, you can send screenshots of your data related to your question.

The author’s Vietnam eBook on the Battle for Tra Bong: Events and Aftermath

How to Switch Virtual Desktops in Windows 10

Virtual Desktops, or Windows, are a handy way to juggle multiple workspaces in Windows 10. There are several ways to switch between virtual Desktops.

Virtual Desktops, or Windows, are a handy way to juggle multiple workspaces in Windows 10. There are several ways to switch between virtual Desktops. Let us explore how to do this.

This is for Windows 10 operating system

Dilbert and Sod
Copyright Scott Adams, Inc./Distributed by Universal Uclick for UFS

To Tweet about this post, click the Tweet icon below to launch Twitter, then click its Tweet icon to post.

Check out TechSavvy.Life for their blog posts on smartphone apps, PCs. and Macs!

Use Keyboard Shortcuts

Press Windows+Tab to see the virtual Desktops you have available. You will see a screen called “Task View,” which shows thumbnails of each.

Now, release the Windows key and press the Tab or Arrow keys to highlight a Desktop, then press Enter to view that Desktop. You may also switch Desktops by using the Alt+Tab keys.

Also, you can press Windows+Ctrl+Left Arrow to display a lower number Desktop or Right Arrow to a higher number Desktop.

While in “Task View”, click the Plus “+” Tile or press Windows+Ctrl+D to add a new Desktop. Click the “X” in the upper corner to remove a Desktop.

If you want to exit the “Task View”, just hit Escape to return to your Desktop.

Use the Taskbar

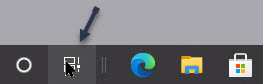
Right-click on an empty area of the Taskbar, then click Show Task View Button. Ensure the option is checkmarked. Refer to below image:

TaskView 1
Setting the Show Task View option

Now, locate and click the Task View button in the Taskbar to view your Desktops. Next, click or tap the Desktop to which you want to switch. See below image:

Task View 2
Accessing the Task View button

You can click Task View at any time to manage your virtual Desktops.

That’s it. Please feel free to share this post! One way to share is via Twitter, as mentioned below.

To Tweet about this post, click the Tweet icon below to launch Twitter, then click its Tweet icon to post.

I have found TechSavvy.Life blog posts extremely helpful. Check them out for posts on smart phone apps, Macs and PCs!

The following is a previous Twitter feed so you can view how a Tweet will be displayed.

Display of your Tweet

I Would Like to Hear From From You

Please feel free to leave a comment. I would love hearing from you. Do you have a computer or smart device tech question? I will do my best to answer your inquiry. Please mention the device, app and version that you are using. To help us out, you can send screenshots of your data related to your question.

The author’s Vietnam eBook on the Battle for Tra Bong: Events and Aftermath

How to Place New iPhone Apps in iOS 14

Starting with iOS 14, you can choose whether to place downloaded apps either on the Home Screen or in the App Library on your iPhone. The latter option can help you keep the Home Screen uncluttered.

Starting with iOS 14, you can choose whether to place downloaded apps either on the Home Screen or in the App Library on your iPhone. The latter option can help you keep the Home Screen uncluttered. Let’s explore how this is done.

This is for the iPhone running iOS 14

Dilbert and Page
Copyright Scott Adams, Inc./Distributed by Universal Uclick for UFS

To Tweet about this post, click the Tweet icon below to launch Twitter, then click its Tweet icon to post.

Check out TechSavvy.Life for their blog posts on smartphone apps, PCs. and Macs!

First, launch Settings (the gear icon). Refer to below image:

Place 1
Accessing Settings

Now, scroll down to the Home Screen option and tap it. See below image;

Place 2
Accessing the Home Screen option

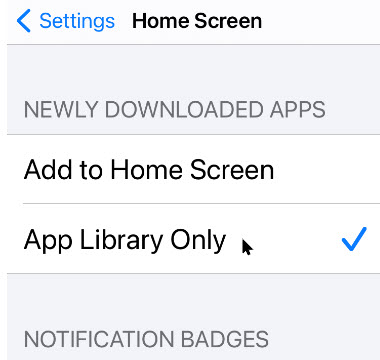
Locate the Newly Downloaded Apps section. There, you will find the two choices:

Add to Home Screen – If you want new apps you download to appear on the Home Screen (the default behavior prior to iOS 14). Apps will also appear in the App Library.

App Library Only – If you want new apps to appear only in the App Library. You can get to the App Library by swiping right through all of your Home Screen pages or swiping on the Dots Bar at bottom of your screen.

Regardless of what method you chose, your new app will appear in the App Library.

It appears that Apple is wanting to move away from the outdated Home Screen page(s) to the new App Library feature.

See following image:

Place 3
Your Home Screen options

After you have made your selection, a checkmark will appear beside your choice.

Tap Settings and make sure your change has been saved. From now on, whenever you download a new app, it will appear in the location you have chosen.

If you have chosen App Library Only, you can find your new apps in the Recently Added section of the App Library. Refer to below image:

Place 4
Recently Added app library

To move an app from the App Library to the Home Screen, simply hold and press down its icon, then tap Add to Home Screen in the menu that appears.

If you have chosen Add to Home Screen, newly downloaded apps will appear in the first blank spot on one of your Home Screen pages.

Related

How to Move iPhone Apps From App Library to Home Screen in iOS 14

You can also move apps from the Home Screen to the App Library. To do so, just tap and hold a blank area of the Home Screen until the icons start to jiggle. Next, tap the app you want to move. Next, tap Remove App, then tap Move to App Library.

Related

How to Move iPhone Apps From Home Screen to App Lonrary in iOS 14

That’s it. I find the new App Library feature clunky and cumbersome to use. For now, you are unable to create new groupings or move apps between groupings. Apple has more work to do to make the App Library an easy to use feature.

I hope you have found this post helpful. If so, click the Tweet icon below. This will launch Twitter where you click its icon to post the Tweet.

I have found TechSavvy.Life blog posts extremely helpful. Check them out for posts on smart phone apps, Macs and PCs!

The following is a previous Twitter feed so you can view how a Tweet will be displayed.

I Would Like to Hear From You

Please feel free to leave a comment. I would love hearing from you. Do you have a computer or smart device tech question? I will do my best to answer your inquiry. Please mention the device, app and version that you are using. To help us out, you can send screenshots of your data related to your question.

The author’s Vietnam eBook on the Battle for Tra Bong: Events and Aftermath

How to Set a Do Not Disturb Message on iPhone

Do Mot Disturb is a helpful iPhone setting when you do not want to be interrupted, such as at meetings, formal events, driving, or at night.

Do Mot Disturb is a helpful iPhone setting when you do not want to be interrupted, such as at meetings, formal events, driving, or at night.

This option stops notifications, alerts, and calls from making any noise, vibration, or lighting up the iPhone when the screen is locked.

In this post, we are exploring how to send an “Auto-Reply” message when you receive a text message and who can receive that message once you have Do Not Disturb enabled.

This is for the iPhone

Dilbert and Glasses
Copyright Scott Adams, Inc./Distributed by Universal Uclick for UFS

To Tweet about this post, click the Tweet icon below to launch Twitter, then click its Tweet icon to post.

Check out TechSavvy.Life for their blog posts on smartphone apps, PCs. and Macs!ds

First, open Settings by tapping the gear icon. Refer to below image:

Do Not Disturb 1
Accessing Settings

Setup for Do Not Disturb

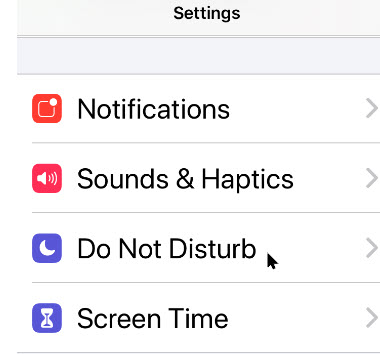
Now, locate and tap the Do Not Disturb option. See below image:

Do Not Disturb 2
Accessing Do Not Disturb option

Next, enable the Do Not Disturb option. See following image;

Do Not Disturb 3
Enabling Do Not Disturb toggle

Setup for “Auto-Reply” Message

Now, scroll down until you see the “Auto-Reply” options. Tap Auto-Reply .Refer to below image:

Do Not Disturb 4
Accessing “auto-reply” option

On the next screen, tap the text input area, and type any message you would like. Or, you can chose one of the canned messages. The message will be automatically texted to people you select that send you a message while your Do Not Disturb is enabled.

When you are done entering your message, or choosing one, tap the blue link Back button. See below image:

Do Not Disturb 6
Choosing an “auto-reply” message

Setup Your Audience

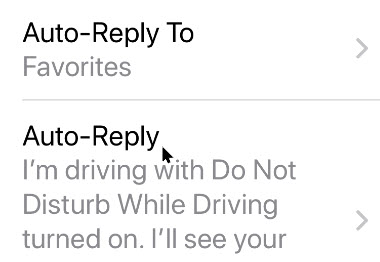
Now, tap Auto-Reply To in the Do Not Disturb options.

You will see a list of options, including No One, which turns off “Auto-Reply”. Tap an option to select it. See following image:

Do Not Disturb 6
Selecting your audience for the Do Not Disturb message

In my example, I am choosing the “I am driving…” canned message sent to my Contacts Favorities list.

When yo are done, tap the blue link Back button, then exit Settings.

That its. You have now set a Do Not Disturb “Auto-Reply” message.

I hope you have found this post helpful. If so, click the Tweet icon below. This will launch Twitter where you click its icon to post the Tweet.

I have found TechSavvy.Life blog posts extremely helpful. Check them out for posts on smart phone apps, Macs and PCs!

The following is a previous Twitter feed so you can view how a Tweet will be displayed.

I Would Like to Hear From You

Please feel free to leave a comment. I would love hearing from you. Do you have a computer or smart device tech question? I will do my best to answer your inquiry. Please mention the device, app and version that you are using. To help us out, you can send screenshots of your data related to your question.

The author’s Vietnam eBook on the Battle for Tra Bong: Events and Aftermath

How to Insert a PDF into Word

One unique feature of Microsoft Word is the ability to insert a PDF file directly into Word, and it can be done in only a few steps. You can insert it as an embedded object, a linked object, or text only.

One unique feature of Microsoft Word is the ability to insert a PDF file directly into Word, and it can be done in only a few steps. You can insert it as an embedded object, a linked object, or text only. Let’s explore how to do this.

This is for devices supporting Microsoft Word

Dilbert and Dumb
Copyright Scott Adams, Inc./Distributed by Universal Uclick for UFS‘

To Tweet about this post, click the Tweet icon below to launch Twitter, then click its Tweet icon to post.

Check out TechSavvy.Life for their blog posts on smartphone apps, PCs. and Macs!

Embedding Explained

When you embed a PDF file in Word, the first page of your PDF appears in the document. Since an embedded object becomes part of the document after it is inserted, it’s no longer connected to the source file. Any changes made to the original PDF in the future will not be reflected in the Word document.

Linking Explained

Inserting a PDF file as a linked object means it appears as the first page of the PDF, but it is also linked to the original file. Changes made to the PDF will also be reflected in the Word document. You can opt to display an icon instead of a preview. Either option will open the PDF file when selected.

Text Only Explained

Inserting a PDF as text involves the use of copy and paste. Copying the text from the PDF file and pasting it into a document is a straightforward way to insert a bit of text into Word.

Embed or Link a PDF

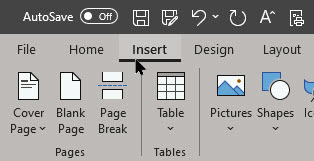
First, open a Word document, and place your cursor where you would like to insert the PDF file. Next, select the Insert tab. Refer to below image:

Insert PDF 1
Selecting the Insert tab

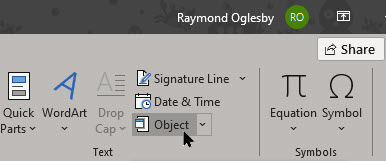
Now, click Object from the Text group. See below image:

Insert PDF 2
Selecting the Object option

From the small drop-down menu, select Object. See following image:

Insert PDF 3
Selecting the Object option from drop-down menu

From the Object window, click the Create from File tab. Next, select Browse. Refer to below image:

Insert PDF 4
From the Create from file tab, selecting the Browse option

Navigate to the location of the PDF, select it, and then click Insert. See below image:

Insert PDF 5
Selecting your PDF file to Insert into Word

Selecting Your Options

Now, it is time to decide if you want to (1) link directly to the source file, and/or (2) display the PDF as an icon. Link directly to the source file if you want to have the inserted file reflect any new changes made to the source file. To do so, just checkmark the Link to file option. You are linking to the PDF in your document.

While here, checkmark Display as icon if you don’t want to take up too much space on the page. If you do not enable any of these options, the PDF will be displayed in its entirety on the Word document and will not reflect any new changes made to the source file. You are embedding the PDF into your document.

To finish, select OK. Refer to below image:

Insert PDF 6
Selecting ink your PDF file and display an icon

The PDF will now be inserted in the Word document. See below image:

Insert PDF 7
Your linked PDF file displayed as an icon in Word

Copy and Paste

Copy

First, open your PDF file. Now, highlight some text you want to copy. Next, right-click your selection and select Copy.

Paste

Second, open your Word document. Now, place the cursor where you want to paste the text from the PDF file. Next, right-click and select a Paste option with or without formatting.

I hope you have found this post helpful. If so, click the Tweet icon below. This will launch Twitter where you click its icon to post the Tweet.

I have found TechSavvy.Life blog posts extremely helpful. Check them out for posts on smart phone apps, Macs and PCs!

The following is a previous Twitter feed so you can view how a Tweet will be displayed.

I Would Like to Hear From You

Please feel free to leave a comment. I would love hearing from you. Do you have a computer or smart device tech question? I will do my best to answer your inquiry. Please mention the device, app and version that you are using. To help us out, you can send screenshots of your data related to your question.
The author’s Vietnam eBook on the Battle for Tra Bong: Events and Aftermath

How To Close Safari Tabs Automatically on iPhone or iPad

IOS 13 or higher allows you to automatically close tabs in Safari after a specified period of time, which helps to keep your iPhone running smoothly.

IOS 13 or higher allows you to automatically close tabs in Safari after a specified period of time, which helps to keep your iPhone running smoothly.

You can have up to 500 open tabs. This number of active browser tabs can quickly get out of hand. It gets to be kind of a pain to go swiping through all your open tabs every few weeks to clean out the ones you no longer use.

Fortunately, in the Safari settings on your iPhone or iPad, you can set how long your tabs stay open before they automatically close; after one day, after one week or after one month. Let’s explore how to set this feature.

This is for the iPhone and iPad

Dilbert and App
Copyright Scott Adams, Inc./Distributed by Universal Uclick for UFS

To Tweet about this post, click the Tweet icon below to launch Twitter, then click its Tweet icon to post.

Check out TechSavvy.Life for their blog posts on smartphone apps, PCs. and Macs!

Close All Tabs Solution

One solution is using the Close All Tabs option revealed by a long press on Done. But it’ is no good if you have a handful of newer tabs that are still useful to have open. Refer to below image:

Close Safari Tabs 1
Close All Tabs option

The Settings Solution

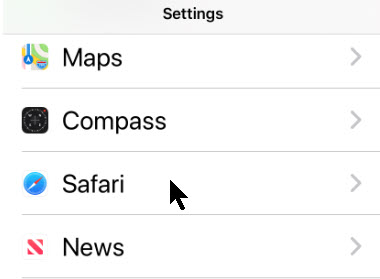
First, open Settings. Next, scroll down until you see the Safari option and tap it. See below image:

Close Safari Tabs 2
Safari option under Settings

Now, swipe down to the Tabs section, then tap Close Tabs. See following image:

Close Safari Tabs 3
Close Tabs option under Safari

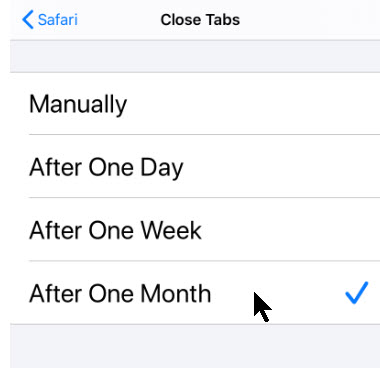
On this screen, you have the option to set the duration of open Safari browser tabs. When set, Safari will close tabs that have not been viewed within the period of time you set. The options are Manually, After One Day, After One Week or After One Month. This setting applies to Private tabs as well.

Checkmark an option that suits you. Refer to below image:

Close Safari Tabs 4
Select an option to automatically close Safari tabs

Now, you can exit Settings.

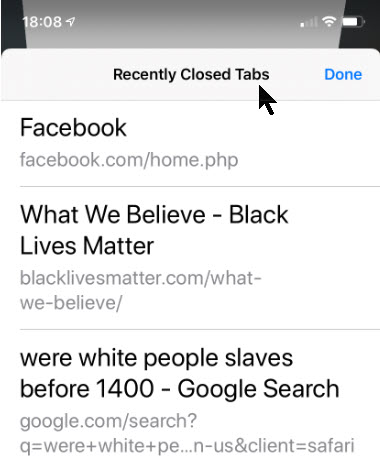
However, you can still find the automatically closed tabs as well as Private tabs in the Recently Closed Tabs menu by holding down the + (plus) button on the tab management screen in Safari. See below image:

Close Safari Tabs 5
Viewing Recently Closed Tabs

This is a potential downfall in using this feature. If you want to fully conceal recent browsing activity, it may be best to manually close the tabs.

I hope you have found this post helpful. If so, click the Tweet icon below. This will launch Twitter where you click its icon to post the Tweet.

I have found TechSavvy.Life blog posts extremely helpful. Check them out for posts on smart phone apps, Macs and PCs!

The following is a previous Twitter feed so you can view how a Tweet will be displayed.

I Would Like to Hear From You

Please feel free to leave a comment. I would love hearing from you. Do you have a computer or smart device tech question? I will do my best to answer your inquiry. Please mention the device, app and version that you are using. To help us out, you can send screenshots of your data related to your question.
The author’s Vietnam eBook on the Battle for Tra Bong: Events and Aftermath

How to Techniques in Presenting a WordPress Blog Post

After blogging using WordPress for over a year, I would like to share with you some techniques. I have learned a lot about smart devices and their associated apps. My other area of blogging has been about PCs, software, and the Windows 10 operating system.

After blogging using WordPress for over a year, I would like to share with you some techniques. I have learned a lot about smart devices and their associated apps. My other area of blogging has been about PCs, software, and the Windows 10 operating system. Although this has been a no profit adventure, I hope it has been a help to you. I can make a “profit” by your donation of any amount; just access my Donate page.

I have a template that I follow for each post in regards to placement of text, images, and WordPress features. I use lots of “white space”, via the WordPress Spacer feature as well as color coded headings and sub headings.

This is for blogs using WordPress

Dilbert and Zoom
Copyright Scott Adams, Inc./Distributed by Universal Uclick for UFS

To Tweet about this post, click the Tweet icon below to launch Twitter, then click its Tweet icon to post.

Check out TechSavvy.Life for their blog posts on smartphone apps, PCs. and Macs!

The Blog Style and Introduction

To engage the reader, you, I write in conversational style so you are reading, say, a book. I use personal pronouns like “you” or “your”. To grab your interest, the title of the post provides a summary of the blog. Instead of a title like “Add a Widget”, I would use a title “How to Add a Widget On iPhone in iOS 14”, a more descriptive title to engage you to read the post.

After developing the main introductory paragraph, I copy the paragraph to the Post Excerpt block.

Use of Tweet

At the beginning and ending of the post, I use the Click to Tweet feature of WordPress. I add the Twitter feature at the end so you can see how your Tweet will be displayed. If you find the post helpful, I am wanting you to share about the post.

Using Images and Sotware Tools

For images or screen-grabs, from an iPhone, I use the PC based WinX MediaTrans (click here) software to export photos to its directory. Refer to below image:

Blog 1
WinX main screen

Then, I move or copy the images to the Techsmith Snagit (click here) directory; another application I use to resize, stack, annotate, capture the cursor, or blur an image. (Techsmith also has create/edit video software called Camtasia). See below image:

Blog 2
Snagit toolset

For Windows images, I only need the Snagit software. Both applications are feature rich and well worth the investment for blogging or other purposes..

Finally, I upload the images to WordPress Media library. To aid you, I caption each screenshot. I always refer you to the following image after describing the screen-grab. I have found it annoying on other blog posts not knowing what descriptive text goes with an image.

Using Copy and Paste for Resuable Blocks

Instead of using WordPress Reusable Block feature, I use the built-in “copy and paste” feature of Windows 10. I have each reusable block of text “pinned” to easily paste using Windows+V command to my blog without using WordPress; it’s faster and more efficient. You can have up to 25 entries “pinned” (or unpinned) in the “copy and paste” function of Windows 10. See following image:

Blog 3
Using “copy and paste” in Windows 10

A caveat, if you use special characters (such as emphasized letters or words) in a “pinned” item, you have to manually edit these out using WordPress Edit as HTML feature.

The Wrapup

In closing, I usually have a one sentence summary of the post.

At the very end of a post, I use the WordPress Embed feature to promote my Kindle formatted e-book available on Amazon about a Vietnam war battle I was in.

That’s it. I am sure some of these WordPress techniques can be of benefit on your next blog post. Happy blogging!

I hope you have found this post helpful. If so, click the Tweet icon below. This will launch Twitter where you click its icon to post the Tweet.

I have found TechSavvy.Life blog posts extremely helpful. Check them out for posts on smart phone apps, Macs and PCs!

The following is a previous Twitter feed so you can view how a Tweet will be displayed.

I Would Like to Hear From You

Please feel free to leave a comment. I would love hearing from you. Do you have a computer or smart device tech question? I will do my best to answer your inquiry. Please mention the device, app and version that you are using. To help us out, you can send screenshots of your data related to your question.
The author’s Vietnam eBook on the Battle for Tra Bong: Events and Aftermath

How to Add Widgets on iPhone in iOS 14

In addition to the App Library feature, another prominent change in iOS 14, is the addition of Widgets that can be added to any page.

In addition to the App Library feature, another prominent change in iOS 14, is the addition of Widgets that can be added to any page.

We have had Widgets on the Today View (the screen to the left of your first Home Screen) for years, but not a lot of people use that screen. And what’s the point of glanceable info if you have to swipe around to see it?

With iOS 14, Apple is replacing the old Widgets with all new ones that are more dynamic, can pull in more information, come in three sizes, and most importantly, can be placed anywhere on the Home Screen. Let’s explore how this is done.

This is for the iPhone running iOS 14

Dilbert and Accomplish
Copyright Scott Adams, Inc./Distributed by Universal Uclick for UFS

To Tweet about this post, click the Tweet icon below to launch Twitter, then click its Tweet icon to post.

Check out TechSavvy.Life for their blog posts on smartphone apps, PCs. and Macs!

Add a Widget

To add a Widget:

Touch and hold an empty area on your screen until your apps jiggle and show minus (-) symbols. or tap Edit Home Screen. Refer to below image:

Widgets 1
The Jiggle screen

Tap the plus /+) sign in the upper-left corner. See below image:

Widgets 2
Selecting to add a Widget

You will bring up a menu of existing Widgets. See following image:

Widgets 3
Existing Widgets to chose from

Tap on the Widget you want to add, or use the search bar to find one. Swipe left and right to choose the Widget’s size and shape.

Widgets can come in three sizes. Small Widgets are the same size as a 2 by 2 block of app icons. Medium Widgets are two icons high, but four icons wide (taking up the entire width of your Home Screen). Large Widgets are four icons wide and four icons tall.

Tap Add Widget. Refer to below image:

Widgets 4
Adding a Widget

Once you have added the Widget, tap anywhere on the Home Screen to go out of edit (jiggle) mode.

Note! The first time you tap the new Widget, you may be asked to adjust its features (for example, to tell a weather Widget in what you want it to report).

You can even place multiple copies of the same Widget!

Move or Delete a Widget

To move the Widget around the screen or to another screen, just long-press it until it starts to shake and then move it where you want it.

If you want to get rid of the Widget, long-press to bring up a remove option or tap the little (-) button in the upper left corner of the Widget. See below image:

Widgets 5
Remove a Widget

Create a Widget Stack

You can create a stack of Widgets if you want to save space or if there’s one Widget you will only want to use occasionally.

To create a stack:

Select a Widget for your Home Screen as described above and place it where you want it. Select the next Widget you want to stack (you can stack as many as 10) and save it to your Home Screen. See following image:

Widgets 6
Selecting Widgets to create a stack

Long press the Widget so that you can move it around the screen, and place it on top of the first. Note that the Widget must be the same size and shape; you can not, say, place a small Widget on a medium-sized one. Refer to below image:

Widgets 7
Creating the stack

To see each Widget in your stack, swipe up or down on the top Widget and the next one will be revealed. In my example, I have stacked OneDrive on top of Google Search.

Tap Done when finished. See below image:

Widgets 8
The finished stack consisting of OneDrive and Google Drive

Move or Delete a Widget Stack

If you want to change the position of or remove any of the apps in the stack:

Long press the stack and select Edit Stack. See following image:

Widgets 9
Edit a stack

Press the three lines to the side of each app to change its position in the stack. Refer to below image:

Widgets 10
Change an app position in the stack

In my example, I have stacked Google Drive on top, previously it was OneDrive. See below image :

Widgets 11
Positioned Google Drive to be on top of OneDrive

To remove a Widget, swipe it to the left and tap Delete.

The Smart Rotate option, if On, will automatically rotate the Widget you use the most to the top. If Off, the Widgets are fixed.

Use the Smart Stack

Apple has also created a feature it calls a Smart Stack, which will automatically choose which Widget should be on top depending on your location, what time it is, or what you most often look at. It takes into account your usual app use, the time of day, and your location, and does all of this locally on your iPhone so no data is sent to Apple or anyone else.

iOS 14 comes with a pre-built Smart Stack made up of a group of selected apps. You add that stack the same way you would add any widget:

Long press on your Home Screen and tap the plus (+) icon in the upper-left corner.

Scroll down until you see the Widget called Smart Stack. See following image:

Widgets 12
The Smart Stack option

As with the other Widgets, scroll sideways to choose the size you want, and then tap Add Widget.

Note! There is no way to determine at a glance if apps are stacked. You have to swipe or chose Edit Stack.

Create a Smart Stack

You can make your own Smart Stack by simply dragging Widgets on top of each other.

Just place Widgets how you normally would. Drag any two Widgets of the same size on top of each other, and you have got a new stack! It works just like making a folder with app icons.

Move or Delete Smart Stack

You can edit your stack the same way you do the Smart Stack. Turn Smart Rotate on or off, reorder the Widgets or remove the ones you no longer want.

Just long-press any stack you have created and select Edit Stack.

That’s it for the basics. There is much more on Widgets to explore, like third-party and the most popular ones.

I hope you have found this post helpful. If so, click the Tweet icon below. This will launch Twitter where you click its icon to post the Tweet.

I have found TechSavvy.Life blog posts extremely helpful. Check them out for posts on smart phone apps, Macs and PCs!

The following is a previous Twitter feed so you can view how a Tweet will be displayed.

I Would Like to Hear From You

Please feel free to leave a comment. I would love hearing from you. Do you have a computer or smart device tech question? I will do my best to answer your inquiry. Please mention the device, app and version that you are using. To help us out, you can send screenshots of your data related to your question.

The author’s Vietnam eBook on the Battle for Tra Bong: Events and Aftermath

How to Remove Adobe Flash Player in Windows 10

At the end of 2020, Adobe will kill its Flash Player app for security reasons. Microsoft is taking a pre-emptive strike though by using an optional Windows Update to both uninstall and block Flash from being reinstalled.

At the end of 2020, Adobe will kill its Flash Player app for security reasons. Microsoft is taking a pre-emptive strike though by using an optional Windows Update to both uninstall and block Flash from being reinstalled.

It seems the update does not check to see if Flash has been installed using Adobe’s standalone installer, meaning if you have ever installed Flash Player manually, it remains available to use. Web browserscan also have a Flash Player component installed, and these also remain available after the update.

If you have no intention of using Flash again, the Windows Update to remove it is worthwhile simply to make your system a bit more secure. However, it’s worth checking if the Flash Player is installed as an app as well and removing it.

This is for the Windows 10 operating system

Dilbert and Deck
Copyright Scott Adams, Inc./Distributed by Universal Uclick for UFS

To Tweet about this post, click the Tweet icon below to launch Twitter, then click its Tweet icon to post.

Check out TechSavvy.Life for their blog posts on smartphone apps, PCs. and Macs!

To check this:

  • Launch Settings (the gear icon)
  • Click the Apps option

Refer to below image:

Flash 2
Accessing the Apps option

If it is there, click on the app and select Uninstall to remove the app. In my example, the app has been removed and is no longer listed. See below image:

spacer

Flash 1
Your installed apps


Now, lets check your web browser. For Google Chrome:

  • Launch Chrome
  • Click the Hamburger icon in upper right-hand corner (the one with 3 dots)
  • Click More tools
  • Click on Extensions

See following image:

Flash 3
Accessing Chrome extensions


If it is there, click on the slider to disable or the Remove option to delete the app (this is the recommended choice). In my example, the app has been removed and is no longer listed. Refer to below image:

Flash 4
Your Chrome extensions

That’s it. You have successfully removed the app and its Chrome extension. Be sure to run the Windows optional update when available.

I hope you have found this post helpful. If so, click the Tweet icon below. This will launch Twitter where you click its icon to post the Tweet.

I have found TechSavvy.Life blog posts extremely helpful. Check them out for posts on smart phone apps, Macs and PCs!

The following is a previous Twitter feed so you can view how a Tweet will be displayed.

I Would Like to Hear From You

Please feel free to leave a comment. I would love hearing from you. Do you have a computer or smart device tech question? I will do my best to answer your inquiry. Please mention the device, app and version that you are using. To help us out, you can send screenshots of your data related to your question.
The author’s Vietnam eBook on the Battle for Tra Bong: Events and Aftermath