The App Library is an iPhone-only feature in iOS 14 and above bringing, among other things, an overview of all the apps installed on the iPhone, that can be sorted alphabetically for quick and effortless browsing,
The App Library is an iPhone-only feature in iOS 14 and above bringing, among other things, an overview of all the apps installed on the iPhone, that can be sorted alphabetically for quick and effortless browsing,
This is for the iPhone
Copyright Scott Adams, Inc./Distributed by Universal Uclick for UFS
Find Your App Library Page
To find the App Library, visit your iPhone’s Home Screen and swipe left as many times as it takes to reach the App Library screen or tap, hold, and swipe right on the Dots Bar to move quickly through your pages. Refer to below image:
The Dots Bar to swipe through pages quickly
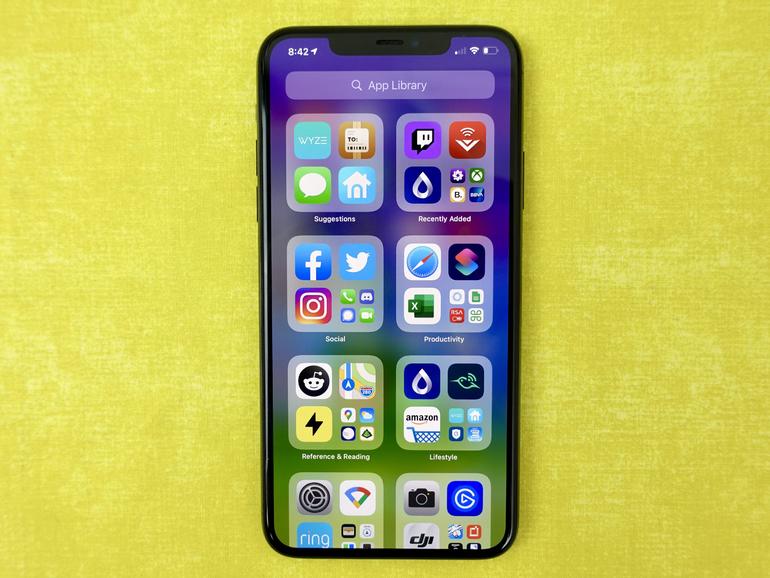
This is always the last page after your Home Screen icons. Once you are there, you will see groups of app icons sorted automatically by category. See below image:
The App Library page
Note! If you do not see it, you have yet to update to the latest version of iOS.
Using Your Alphabetical List
To see an alphabetical list of apps, swipe downward from the middle of the App Library screen or tap the Search bar at the top. See following image:
Accessing the App Library
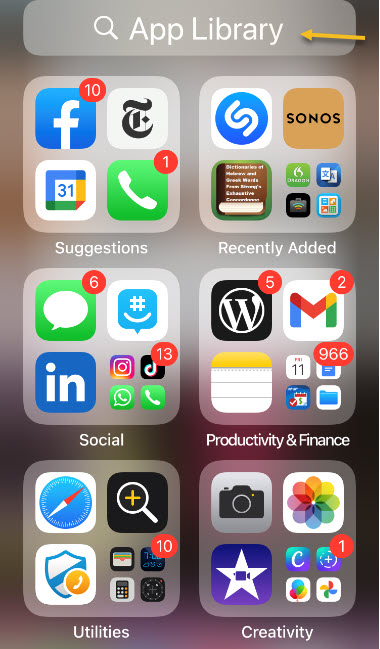
A new screen will appear that lists your apps sorted by the first letter of each app’s name. Refer to below image:
Alphabetical listing of the App Library
You can swipe your finger up and down to browse through the list. To launch an app, just tap it.
If you would like to quickly scroll through the list of apps, slide your finger along the vertical letter index on the far right side of the screen (on your iPhone it’s very small letters) and the list will quickly navigate to that position. See below image:
Alphabetical listing using the list on right side of your screen
You can also type a search in the Search bar at the top of the screen, and the results will immediately appear below. Once again, tap an app to launch it. See following image:
Alphabetical listing using the Search bar at the top of your screen
Cancel Your Alphabetical List
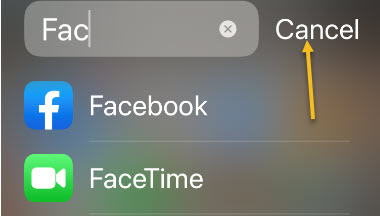
If you would like to return to the App Library screen, tap Cancel just to the right of the Search bar. Refer to below image:
Return back to your App Library screen
You are finished. Please feel free to share this post! One way to share is via Twitter, as mentioned below.
I hope you have found this post helpful. If so, click the Tweet icon below. This will launch Twitter where you click its icon to post the Tweet.
Check them out for blog posts on smartphones, Macs and PCs! You may email us at techsavvy.life for comments or questions.
Please feel free to leave a comment. I would love hearing from you. Do you have a computer or smart device tech question? I will do my best to answer your inquiry. Just send an email to contact@techsavvy.life. Please mention the device, app and version that you are using. To help us out, you can send screenshots of your data related to your question.
The author’s Vietnam eBook on the Battle for Tra Bong: Events and Aftermat
If you have a large number of unread text messages on your iPhone or iPad, dealing with them one-by-one can be a hassle. Thanks to Apple, it’s easy to mark every one of your unread messages as read but the feature is not well known. Let’s explore how to mark all text messages as read.
If you have a large number of unread text messages on your iPhone or iPad, dealing with them one-by-one can be a hassle. Thanks to Apple, it’s easy to mark every one of your unread messages as read but the feature is not well known. Let’s explore how to mark all text messages as read.
This is for iPhone and iPad
Copyright Scott Adams, Inc./Distributed by Universal Uclick for UFS
First, open your Messages app. Now, on an iPhone, look in the upper-right corner of the screen and tap the ellipses button, which looks like three dots in a circle. Refer to below image:
The Messages app
For the iPad, tap the Edit button in upper left-hand corner.
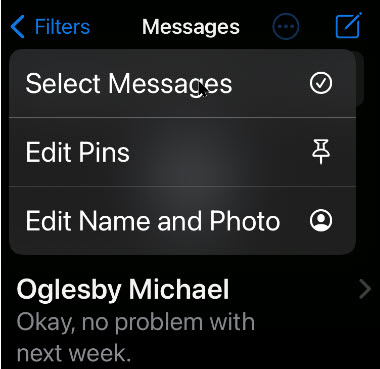
A pop-up menu will be displayed. Next, tap the Select Messages option. See below image:
Select Messages option
Now, your messages will enter “Edit” mode. But you don’t need to deal with individual messages. On both iPhone and iPad, look for the Read All button in the lower left- hand corner of your screen and tap it. See following image:
Select Read All option
At first glance, you may be thinking that the Read All means “I am going to read all my messages”. Actually, it means “I have read all my messages”. Apple should have put in a clarification note as to what Read All means.
After that, all unread messages will be marked as read. You will receive no notification that they all read but they will be. Cool feature!
That’s it. Please feel free to share this post! One way to share is via Twitter, as mentioned below.
I hope you have found this post helpful. If so, click the Tweet icon below. This will launch Twitter where you click its icon to post the Tweet.
I have found TechSavvy.Life blog posts extremely helpful. Check them out for blog posts on smartphones, Macs, and PCs! You may email us at contact@techsavvy.life for comments or questions.
Please feel free to leave a comment. I would love hearing from you. Do you have a computer or smart device tech question? I will do my best to answer your inquiry. Just send an email to contact@techsavvy.life. Please mention the device, app and version that you are using. To help us out, you can send screenshots of your data related to your question.
The author’s Vietnam eBook on the Battle for Tra Bong: Events and Aftermath
You can change your time zone and create events with certain time zones. This helps if you will be traveling when the event happens, or if you are creating events for people in different time zones.
You can change your time zone and create events with certain time zones. This helps if you will be traveling when the event happens, or if you are creating events for people in different time zones.
Time might be constant, but your time zone does not have to be. You can set a one-off time zone to an event, or set primary and secondary (desktop version only) time zones for an entire calendar or account.
This is for Android, iPhone, and iPad running Google Calendar
Copyright Scott Adams, Inc./Distributed by Universal Uclick for UFS
How Your Calendar Uses Time Zones
According to Google:
For Events; When you create an event, you will see it in your local time zone. It will also show up in the local time zones for anyone you invite, even if they are in a different time zone.
For Reminders: Reminders always show up at the same hour regardless of time zone. For example, a daily 9 AM MT reminder becomes a 9 AM ET reminder if you travel from Denver to New York.
For Tasks: Tasks adapt to the new time zone if the Calendar’s time zone is changed after a task is created. For example, a 9 AM MT task changes to an 11 AM ET task if you travel from Denver to New York.
Confused, I am. Why not make all these options the same? I do not know why Google treats each option differently. Lets explore how to set a Google Calendar time zone.
Change Your Time Zone for One Event
You can change the time zone for a new or existing event in the Google Calendar app on Android, iPhone, and iPad.
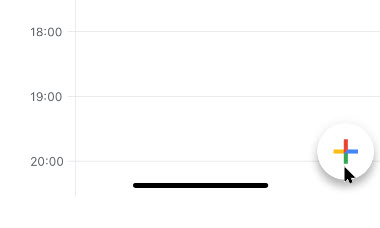
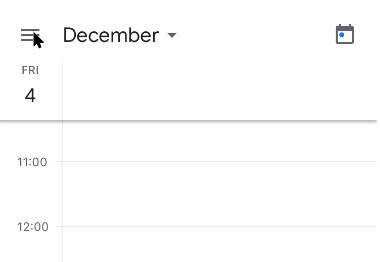
To create a new event, click the Add button in the bottom-right corner and select the type of event you wish to create. Refer to below image:
Add an Event
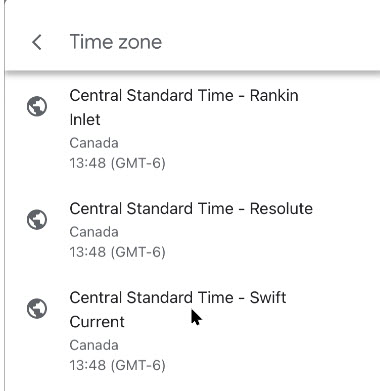
To edit an existing event, tap on that event in your calendar view and then tap the Edit Event button. See below image:
Edit an Event
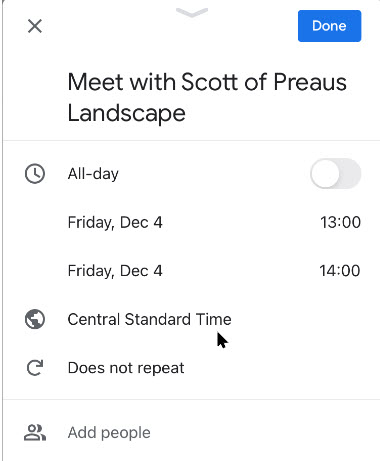
Next, in the event details menu, tap the current time zone. (Note!. You may have to tap More options to see the time zone). See following image:
The current time zone for the Event
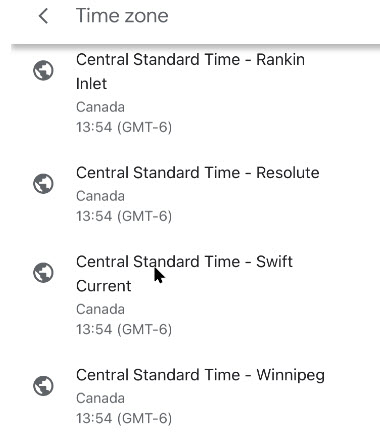
In the next menu, search for a country or specific time zone. Next, tap one of the results to select it as the new time zone. (Note! I kept the Event in CST). Refer to below image:
Selecting a time zone for the Event
The time zone for the event will be added immediately after selecting it from the Search menu.
Confirm the rest of the event details are correct. Now, tap the Save button in the top-right corner to save the Event with the new time zone details. See below image:
Save your changes
Change Your Time Zone Settings for All Events
When you travel to a different time zone, you can see your calendar in the local time. This can be confusing. The time zone is updated depending on if you are creating an event, reminder, or task. To keep your event times in your local time, I recommend not to create events, reminders, or tasks while in a different time zone, espicially if you are only going to be away from home a short while; wait till you get back to your local time zone to create them.
To change this setting:
Launch the Google Calendar app.
Next, tap the Menu hamburger icon in top left of your screen. See following image:
Acccess the Menu
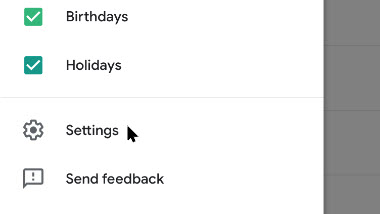
Now, swipe down and tap the Settings option. Refer to below image:
Access Settings
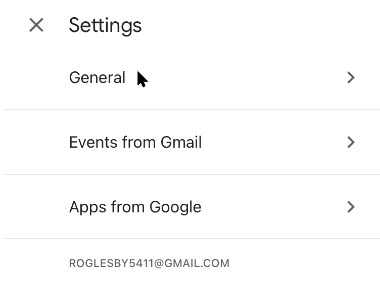
Next, tap the General option. See below image:
Access the General option
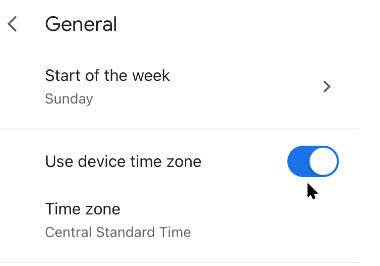
Now, tap Use device time zone on or off. If On, your device will update automatically as you travel. See following image:
Selecting Use device time zone toggle
If Off, you can select a new time zone from the drop down menu. (Note! I kept the Events in CST). Refer to below image:
=Select a time zone for all Events
The new time zone for Google Calendar on your device will be applied automatically. Any entries in your Google Calendar will now be displayed in this new time zone on your mobile device. As I mentioned previously, this can be confusing, at least to me it is, so make sure what time zone you want to create events, teminders, or tasks. Now, tap back and exit Settings.
You are finished. Now you know how to see time zones in Google Calendar for events, remindars, or tasks. Please feel free to share this post! One way to share is via Twitter, as mentioned below.
Just click the Tweet icon below. This will launch Twitter where you click its icon to post the Tweet.
Check out TechSavvy.Life for blog posts on smartphones, PCs, and Macs! You may email us at contact@techsavvy.life for comments or questions.
Please feel free to leave a comment. I would love hearing from you. Do you have a computer or smart device tech question? I will do my best to answer your inquiry. Just send an email to contact@techsavvy.life. Please mention the device, app and version that you are using. To help us out, you can send screenshots of your data related to your question.
The author’s Vietnam eBook on the Battle for Tra Bong: Events and Aftermath
If you do not want Google Chrome to remember your activity, you can browse the web privately in Incognito mode.
If you do not want Google Chrome to remember your activity, you can browse the web privately in Incognito mode.
It is easy to quickly open an Incognito window using a keyboard shortcut. Lets explore how to do this.
This is devices running Google Chrome
Copyright Scott Adams, Inc./Distributed by Universal Uclick for UFS
First, open Chrome. Next, with any Chrome browser window open, press the following keyboard combination to open a new Incognito window:
Windows, Linux, or Chrome OS: Press Ctrl + Shift + N.
Mac: Press ⌘ + Shift + N.
After pressing the keyboard shortcut, a special Incognito window will open. If you want to block third-party cookies, just toggle the switch to On, the default setting. Refer to below image:
The Incognito window
Whenever you are in Incognito mode, you will be able to tell because the Chrome browser window’s toolbar will have a darker color scheme and there will be a small Incognito icon beside the address bar in the toolbar. See below image:
The icon and text telling you are in Incognito mode
You can switch between Incognito windows and regular Chrome windows. You will only browse in private when you are using an Incognito window.
While browsing within an Incognito window, Chrome will not locally store your browsing history, site data, cookies, or saved form data once you close the Incognito window. However, downloaded files and bookmarks will be saved unless you manually remove them.
At any time, you can press Ctrl+T (or ⌘ + T on Mac) to open a new tab within the Incognito window, and browsing activity within that tab will be locally private as well.
Remember that Incognito mode is not perfect, and it does not protect you from those who might view your activity on the web remotely, such as your employer, school, ISP, or the websites you visit. It is only to prevent local snooping of your browsing history.
If you see a number next to the Incognito text at the top right, you have more than one Incognito window open. See following image:
The number of Incognito windows open
When you are ready to stop private browsing, you will need to close the Incognito window(s). To do so using a keyboard shortcut:
Windows, Linux, or Chrome OS: Press Alt + F4
Mac: Press ⌘ + Shift + W
Or you can just click the “X” in the corner of the window with your mouse.
That’s it. Please feel free to share this post! One way to share is via Twitter, as mentioned below.
I hope you have found this post helpful. If so, click the Tweet icon below. This will launch Twitter where you click its icon to post the Tweet.
Check out TechSavvy.Life for blog posts on smartphones, PCs, and Macs! You may email us at contact@techsavvy.life for comments or questions.
Please feel free to leave a comment. I would love hearing from you. Do you have a computer or smart device tech question? I will do my best to answer your inquiry. Just send an email to contact@techsavvy.life. Please mention the device, app and version that you are using. To help us out, you can send screenshots of your data related to your question.
The author’s Vietnam eBook on the Battle for Tra Bong: Events and Aftermath
Apple released a software update for iPhones and iPads in their operating system that includes a built-in music recognition icon that can help you quickly identify a song that is playing.
Apple released a software update for iPhones and iPads in their operating system that includes a built-in music recognition app that can help you quickly identify a song that is playing.
It is one way Apple is using Shazam, which it acquired in 2018. Since it is built-in, you don’t need to have the Shazam app installed for this to work. All you do is add a button to the Control Center menu and then, when you hear a song you like and want to know who the artist is, you just tap the button.
This is for iPhone and iPad
Copyright Scott Adams, Inc./Distributed by Universal Uclick for UFS
Setting Up Music Recognition
We need to check your software updates, enable Siri, and download/install the Shamaz app.
First, let’s check your software updates. Head to
Settings > General > SoftwareUpdate
for the iOS or iPadOS 14.2 update (or higher) and update if necessary.
Next, head to the Apple Store to download/install the Shazam app.
Here.is how the feature works. When you tell your iPhone to listen for a song, it uses its microphone to record the audio around you. That audio data is uploaded to a server and analyzed, matching it to a known song in a database.
Listen by Siri
Let’s examine another built-in feature that does not require the lastest software update; Siri. To enable Siri, go to
Settings > Siri & Search
and toggle on Listen for Hey Siri. You may also want to enable Press Side Button for Siri. Refer to below image:
Enabling Siri
You can ask Siri what song is playing by saying something like “What’s that song?” or “What’s playing?”.
To activate Siri, long-press the Power button. Say “What’s that song?”. If you have Hey Siri set up, you can also say “Hey Siri, what’s that song?” without pressing any buttons.
Siri will pop up and say something like “Let me listen” or “Naming that tune.” Be sure your iPhone can hear the music properly. If you are in a noisy location or someone is talking loudly over the music, it might not hear the song well enough. If you have a problem, try moving your iPhone closer to the sound source playing the music, reducing noise in the area, or turning the volume up on the speaker playing the song. See below image where Siri is listening for a song:
Listening by Siri
If your device hears the song well enough, it will show you the song. If not, you will receive a message like “I can’t seem to recognize this song”.
Listen by Shazam in Control Center
As of the iOS and iPadOS 14.2 update, there is now a quick Control Center button you can use to start identifying a song. However, it is not enabled by default. Why; I do not know. Why does Apple want to hide this feature? But that is the reason for this post; to show you how to setup and use the Shazam built-in app.
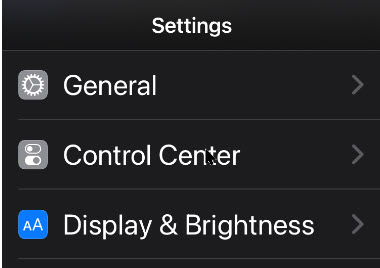
First, head to Settings (the gear icon). See following image:
Accessing Settings
Next, scroll down to Control Center. Refer to below image:
Accessing Control Center option
Now, scroll down and tap the plus (+) sign to the left of the Music Recognition button to add the feature to the Control Center. If you do not see this option on the Settings screen, you have not updated your iPhone or iPad to 14.2 or higher yet. See below image:
Enabling Music Recognition in Control Center
You can then drag it up or down in the list to rearrange the Control Center layout.
With the button added, you can now swipe down from the top-right corner of your device screen to open the Control Center. (On an older iPhone without a notch, you will have to swipe up from the bottom of the screen instead.)
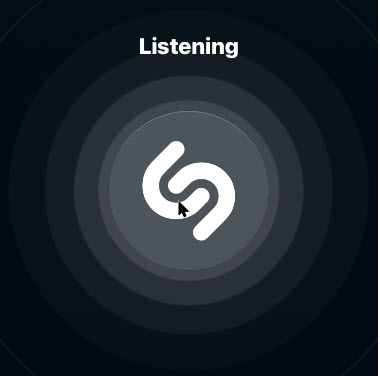
Now, tap the button with the Shazam logo. The button will light up and pulse while it listens to the audio around you. Ensure your iPhone can hear the audio source properly. See following image:
Listening by Shazam in Control Center
When the process is complete (it can take 10-15 seconds), you will see a “Music Recognition” notification banner showing you what song is playing. This notification appears along with all your other apps’ notifications in your notification center. If it can not identify a song in that period of time, you will see a notification saying a song was not detected.
Listen by the Shazam App
If you want more features, you will need a separate music recognition app on your device. The integrated music recognition features rely on Shazam, the music recognition app Apple purchased.
Shazam still has an app for your device that you can install, and it has more features. For example, the Shazam app supports Autp Shazam. In this mode, Shazma will stay in the background on your iPhone or iPad, listen to everything around you, and store a history of songs it’s heard. For example, let’s say you are at a party or ballroom dance competition and you love the playlist. You can enable Auto Shazma mode and your phone or tablet will automatically remember all the songs that was played. You can even keep using other apps on your device while Shazma listens.
To use this feature, install the Shazma app as mentioned in the beginning of this post. Now, launch it, and long-press the big Shazma button, to enable Auto Shazma mode. Refer to below image:
Listening by Shazam app
Listen by Google
Although, not an Apple product, here is another music recognition method.
If a song you are trying to identify is trapped in your head and all you can remember is the song’s melody, there is still something you can do. With the Google app, you can hum or whistle a song’s tune to identify it.
Launch Google Search
Tap the microphone icon
Tap the Search A Song button
Now, start humming or whistling the song you are trying to identify. If Google can find similar matches, the results will appear labeled with match percentages. Tap More Results to see more possible matches. If Google does not find a match, you will receive a message saying so.
That’s it. Please feel free to share this post! One way to share is via Twitter, as mentioned below.
Just click the Tweet icon below to launch Twitter where you click its icon to post the Tweet.
Check out TechSavvy.Life for blog posts on smartphones, PCs, and Macs! You may email us at contact@techsavvy.life for comments or questions.
Please feel free to leave a comment. I would love hearing from you. Do you have a computer or smart device tech question? I will do my best to answer your inquiry. Just send an email to contact@techsavvy.life. Please mention the device, app and version that you are using. To help us out, you can send screenshots of your data related to your question.
The author’s Vietnam eBook on the Battle for Tra Bong: Events and Aftermath
Connecting to lightning fast 5G networks, requires a sacrifice: battery life. But Apple baked a Smart Data Mode setting into new iPhones to give you more control over using 5G.
Connecting to lightning fast 5G networks, requires a sacrifice: battery life. But Apple baked a Smart Data Mode setting into new iPhones to give you more control over using 5G.
Apple gives you three options: You can keep 5G on all the time, switch over to LTE and never use 5G, or allow your iPhone to make that decision for you with an auto mode. There is no reason to upgrade to an iPhone 12 just for the 5G feature because the network carriers are behind the iPhone hardware. 6G is already in the works and Apple is planning on using it in its iPhone 13 lineup.
But, if you have an iPhone 12, here is how to easily turn off 5G to save your battery life.
This is for iPhone 12 lineup
Copyright Scott Adams, Inc./Distributed by Universal Uclick for UFS
First, open Settings (the gear icon) on your iPhone. Refer to below image:
Accessing Settings
Next, tap the Cellular option. See below image:
Accessing the Cellular option
Next. tap the Cellular Data Options. See following image:
Accessing the Cellular Data Options
Now, tap the Voice & Data option. Refer to below image:
Accessing Voice & Data option
Next, select LTE from the list to disable 5G completely. Not shown in the below image are the options 5GOn and 5G Auto because the screenshot is from an iPhone XR. See below image:
Selecting the LTE option to save draining the battery
The option, 5G Auto, allows the iPhone to automatically deactivate 5G to save battery life when it is not needed.
Now, exit Settings. 5G is now disabled on your iPhone. If you ever need to turn it back on, just revisit the above steps and select 5G On or 5G Auto.
That’s it. Please feel free to share this post! One way to share is via Twitter.
Just click the Tweet icon below. This will launch Twitter where you click its icon to post the Tweet.
Check out TechSavvy.Life for blog posts on smartphones, PCs, and Macs! You may email us at contact@techsavvy.life for comments on questions.
Please feel free to leave a comment. I would love hearing from you. Do you have a computer or smart device tech question? I will do my best to answer your inquiry. Just send an email to contact@techsavvy.life. Please mention the device, app and version that you are using. To help us out, you can send screenshots of your data related to your question.
The author’s Vietnam eBook on the Battle for Tra Bong: Events and Aftermath
Need to clear your Google Chrome browsing data? Your browsing data is stored in a “cache” and at times, may cause a problem with the actual data stored on a website. By clearing your browsing data, you are starting with a “fresh cache” to avoid inconsistencies.
Need to clear your Google Chrome browsing data? Your browsing data is stored in a “cache” and at times, may cause a problem with the actual data stored on a website. By clearing your browsing data, you are starting with a “fresh cache” to avoid inconsistencies.
This is for PCs, Macs, iPhone and iPad
Copyright Scott Adams, Inc./Distributed by Universal Uclick for UFS
FIRST, before doing any of the following, launch your Google Chrome app. For the iPhone or iPad
Open an article or your account and tap the the hamburger icon (the 3 dots) in lower right-hand corner.
Tap History. (It may be labeled MoreHistory). Also, you can view more of your history at historygoogle.com
At the bottom, tap Clear Browsing Data.
Check Browsing history. It may be checked by default.
Uncheck any other items you don’t want to delete.
Tap Clear Browsing Data. Tap Clear Browsing Data again or Cancel if you do not want to proceed.
At the top right, tap Done, then tap Done again.
Refer to below image:
Clearing Chrome browsing data on an iPhone or iPad
For Windows, Mac, or Linux
Press Cntl+Shift+Delete keys for Windows or Linux. Press Command+Shift+Backspace for a Mac. The backspace key is labeled “Delete”.
Uncheck any items you don’t want to delete.
Press Clear data button in lower right.
Hit Enter or Return key.
See below image:
Clearing Chrome browsing data for Windows, Mac, or Linux
IMPORTANT: Be sure and close/quit your browser and restart it after clearing your browsing data.
Your browsing history will be cleared to the level you have chosen. You may repeat the above process to clear any unchecked items.
That’s it. Please feel free to share this post! One way to share is via Twitter, as mentioned below.
I hope you have found this post helpful. If so, click the Tweet icon below. This will launch Twitter where you click its icon to post the Tweet.
Check out TechSavvy.Life for blog posts on smartphones, PCs, and Macs! You may email us at contact@techsavvy.life for comments or questions.
Please feel free to leave a comment. I would love hearing from you. Do you have a computer or smart device tech question? I will do my best to answer your inquiry. Just send an email to contact@techsavvy.life. Please mention the device, app and version that you are using. To help us out, you can send screenshots of your data related to your question.
The author’s Vietnam eBook on the Battle for Tra Bong: Events and Aftermath
By now you familiar with notifications and how they can be overwhelming. It’s like having another Inbox to wade through. I have way too many notifications because of way too many apps on this iPhone. Luckily, Apple provides a single location where you can view and manage them called the Notification Center.
By now you familiar with notifications and how they can be overwhelming. It’s like having another Inbox to wade through. I have way too many notifications because of way too many apps on this iPhone. Luckily, Apple provides a single location where you can view and manage them called the Notification Center.
Ii is a centralized interface for reviewing notifications on your device that have been received from apps or the operating system itself.
This is for the iPhone and iPad
Copyright Scott Adams, Inc./Distributed by Universal Uclick for UFS
View From Unlocked Screen
To view the Notification Center while your iPhone or iPad is unlocked, swipe downward from the center of the upper edge of the screen. If you have iOS 14 or above you may also swipe down from upper left of your screen.
As a side note, swiping down from upper right will bring up the Control Center. Swiping down from the center will launch the Search screen.
View From Locked Screen
To view NotificationCenter on the Lock screen, swipe upward from the middle of the screen until it appears.
You can enable or disable Notification Center on the Lock screen by going to
Settings > Touch ID & Passcode or Face ID & Passcode
Then enter your Passcode and scroll down till you see the toggle for NotificationCenter.
Your Notifications
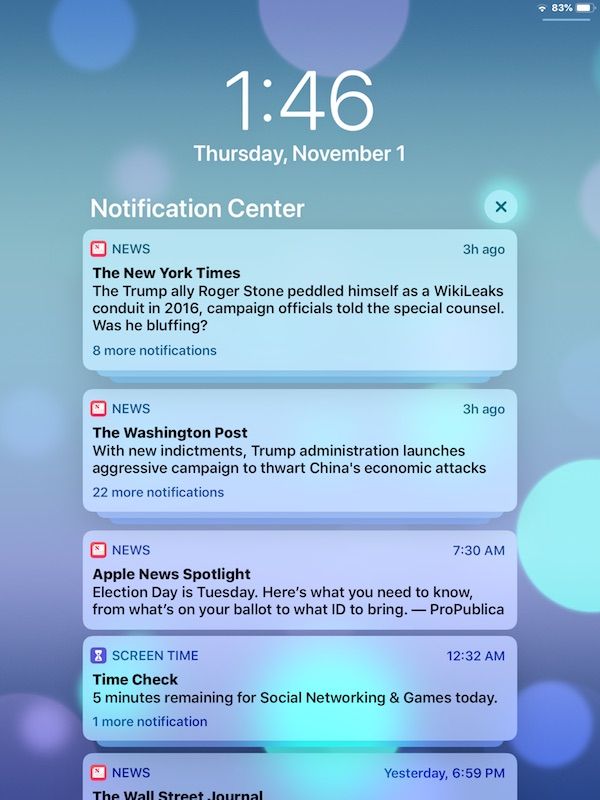
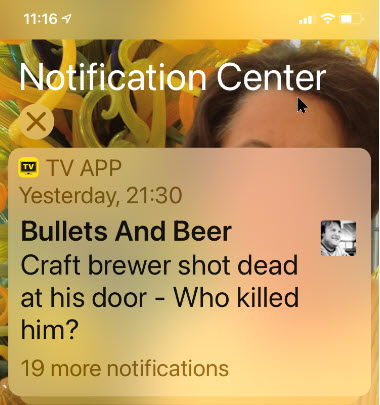
Once launched, you will see a special screen titled Notification Center that lists your recent notifications. If an app has sent more than one notification, the notifications may be stacked (there will be a number in the notification). Tap the stack to see all of the notifications expanded. Refer to below image where I have 19 stacked notifications :
Your Notification Center
Now, you can swipe to the right on a particular notification to open it in the originating app. If you swipe quickly to the left, you can clear that notification away. Or if you want to clear all notifications at once, this is a two step process. First, tap the small “X” button beside the Notification Center heading. See below image:
About to Clear all notifications
Second, tap the Clear text button (where the “X” was) to clear all notifications. See following image:
Accessing to Clear all notifications
You can also turn off certain notifications from this screen by slowing swiping your finger to the left of a notification. Next, tap Manage in the options that appear. Refer to below image:
Manage a notification
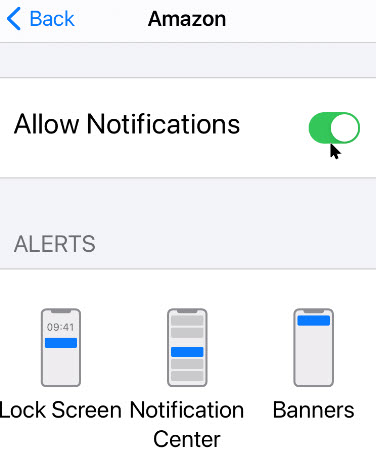
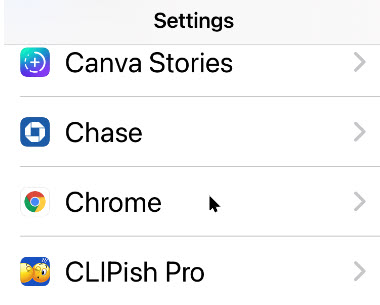
If notifications continue to get on your nerves, you can disable them on a per app basis in Settings. Head to
Settings > Notifications
then tap an app you would like to manage. There, you can select the type notifications you would like to receive or disable them completely. For your apps, enable or disable the Allow Notifications toggle as you wish. When finished, tap the Back text button and exit Settings. See below image:
Toggle for Allow Notifications on per app basis
That’s it. Please feel free to share this post! One way to share is via Twitter, as mentioned below.
I hope you have found this post helpful. If so, click the Tweet icon below. This will launch Twitter where you click its icon to post the Tweet.
Check out TechSavvy.Life for blog posts on smartphones, PCs, and Macs! You may email us at contact@techsavvy.life for comments or questions.
Please feel free to leave a comment. I would love hearing from you. Do you have a computer or smart device tech question? I will do my best to answer your inquiry. Just send an email to contact@techsavvy.life. Please mention the device, app and version that you are using. To help us out, you can send screenshots of your data related to your question.
The author’s Vietnam eBook on the Battle for Tra Bong: Events and Aftermath
The iPhone has been out for over a decade, and for most of that time, Apple has only allowed one browser to be the default. Safari, the one they built; till iOS 14 and higher, has been the only supported browser.
The iPhone has been out for over a decade, and for most of that time, Apple has only allowed one browser to be the default. Safari, the one they built; till iOS 14 and higher, has been the only supported browser.
This means that Google Chrome fans can finally set the app as their default, and use it for all their browsing.
As long as your device is running the latest version of the operating system, this setting should be available to you.
You can change the default browser in the Settings app. First, though, make sure you have downloaded the latest version of Chrome from the App Store and opened it at least once.
This is for iPhone and iPad
Copyright Scott Adams, Inc./Distributed by Universal Uclick for UFS
First, launch your Settings app (the gear icon). Refer to below image:
Accessing Settings
Next, scroll way down to the Chrome section and tap on it. See below image:
Selecting Chrome app settings
Now, tap the Default Browser App option. See following image:
Selecting Default Browser App option
You will see a list of installed browsers. Tap the Chrome app to place a checkmark by it. Refer to below image:
Selecting Chrome as the default browser
To ensure your setting, tap the Back text button. You may now exit Settings.
That’s all you need to do! Chrome is now your default browser on your iPhone and/or iPad.
You may still see Safari if an app uses this browser by default. If this happens, you can simply tap the associated browser icon to reopen the page in Chrome.
If you want to revert back to Safari or choose another browser, navigate back to the Default Browser App section in the Chrome or Safari settings.
You are done. Please feel free to share this post! One way to share is via Twitter, as mentioned below.
I hope you have found this post helpful. If so, click the Tweet icon below. This will launch Twitter where you click its icon to post the Tweet.
Check out TechSavvy.Life for blog posts on smartphones, PCs, and Macs! You may email us at contact@techsavvy.life for comments or questions
Please feel free to leave a comment. I would love hearing from you. Do you have a computer or smart device tech question? I will do my best to answer your inquiry. Just send an email to contact@techsavvy.life. Please mention the device, app and version that you are using. To help us out, you can send screenshots of your data related to your question.
The author’s Vietnam eBook on the Battle for Tra Bong: Events and Aftermath
A privacy policy update that subtly points out data can be shared with Facebook prompted a user exodus, so WhatsApp is now giving them until May 15 to agree to the changes.
A privacy policy update that subtly points out data can be shared with Facebook prompted a user exodus, so WhatsApp is now giving them until May 15, 2021 to agree to the changes.
This is for WhatsApp users
Copyright Scott Adams, Inc./Distributed by Universal Uclick for UFS
WhatsApp is hitting the brakes on a privacy policy update that has prompted users to flee the Facebook-owned platform for rival messaging apps like Signal.
Background
WhatsApp’s original plan required people to agree to the new privacy policy on February 8, 2021. If they did not, the app implied it would shut down their accounts. To make things more confusing, the update also said WhatsApp partnered with Facebook on new “integrations,” without specifically saying how the data sharing works.
But on Friday, WhatsApp said it was postponing the plan amid an apparent user exodus. “We’re now moving back the date on which people will be asked to review and accept the terms. No one will have their account suspended or deleted on February 8. We are also going to do a lot more to clear up the misinformation around how privacy and security works on WhatsApp,” the service said in a blog post.
The Problem
The heart of the problem is trust (or the lack of it). WhatsApp is owned by Facebook, which has a notorious tecord on digital privacy. The social network has repeatedly tried to clarify that the updated WhatsApp policy will not result in real changes for users when talking with friends or family. But many refuse to give Facebook the benefit of the doubt.
Users Fleeing
This became apparent last week when Telsa CEO Elon Musk urged his followers on Twitter to use competing messaging app Signal. Since then, Signal has seen a massive influx of new users, numbering in the tens of millions.
Company Response
On Friday, WhatsApp reiterated that it will continue to use end-to-end encryption, meaning no one—not even Facebook—will be able to read your messages. “We also can not see your shared location and we don’t share your contacts with Facebook,” the app added.
The company went on to say the policy update itself deals primarily with businesses using WhatsApp to send and store messages with consumers. “This update does not expand our ability to share data with Facebook,” it added.
Doubt Remains
Nevertheless, the updated privacy policy is still a reminder that WhatsApp does share some user data with Facebook. A FAQ outlines how the data from businesses messaging with you can be used for ad targeting over Facebook.
At the same time, the updated privacy policy itself uses broad, but abstract language concerning the data sharing, making it unclear what Facebook can collect from your WhatsApp usage and why.
We will have to wait and see if WhatsApp can clear up the confusion and win back users. In the meantime, the company is indicating it will not begin asking users to opt into the privacy policy until May 15. “We are going to do more over the coming weeks to make sure everyone knows how WhatsApp secures your messages,” added Will Cathcart, the head of WhatsApp.
This blog post is courtesy of PCMag.com updated January 15, 2021.
I hope you have found this post helpful. If so, click the Tweet icon below. This will launch Twitter where you click its icon to post the Tweet.
Check out TechSavvy.Life for blog posts on smartphones, PCs, and Macs! You may email us at contact@techsavvy.life for comments or questions.
Please feel free to leave a comment. I would love hearing from you. Do you have a computer or smart device tech question? I will do my best to answer your inquiry. Just send an email to contact@techsavvy.life. Please mention the device, app and version that you are using. To help us out, you can send screenshots of your data related to your question.
The author’s Vietnam eBook on the Battle for Tra Bong: Events and Aftermath