This post will show you how to allow easy access to your favorite websites. We will discuss adding a desktop shortcut for any website to your Windows 10 Taskbar or Start Menu.
This is for Windows 10 devices
Using Google Chrome
Navigate to the website you want to pin
Click the Menu icon (the one with the 3 dots) in upper right hand corner
Hover your mouse over More Tools
Click Create Shortcut
In the popup menu, change the name of the shortcut, if desired
Click Create. See below image:
Creating Desktop shortcut for pinning
This will create a desktop shortcut. Refer to below image for my techsavve.life shortcut at the bottom:
If you select the option Open in window, Chrome will open the page in its own window.
Right click on the shortcut and either click Pin to Start or Pin to taskbar. Once you have pinned the website for one or both ways, you can delete the desktop shortcut.
Using the new Microsoft Edge
The new Microsoft Chromium based browser works similar to Google Chrome. Yes, Microsoft has embraced the Chrome browser, even the version number is the same.
Navigate to the website you want to pin
Click the Settings and more icon (the one with the 3 dots) in upper right hand corner
Hover your mouse over More Tools
Click Pin to taskbar
The new Edge has a new feature called Launch taskbar pinning wizard. It is located just below Pin to taskbar in the menu dialog box.
Click the wizard. Edge will guide you through a short menu that lets you pin the most popular websites and Microsoft web apps to your taskbar. See below image for the first of the three screen wizard:
The Pin to to the taskbar wizard, one of three screens
Note! The new Edge does not have the feature Pin to Start
The Classic Edge
The classic version of Edge came with the original version of Windows 10. If you have yet to update to the new Edge, then use the following for pinning:
To pin the website to the Taskbar:
Navigate to the website you want to pin
Click the Menu icon (the one with the 3 dots) in upper right hand corner
Click Pin this page to the taskbar
To pin the website to the Start menu:
Navigate to the website you want to pin
Click the Menu icon (the one with the 3 dots) in upper right hand corner
Hover your mouse over More Tools
Click Pin this page to Start
You can now delete any created desktop shortcut(s).
I Would Like to Hear from You
Please feel free to leave a comment. I would love hearing from you. Do you have a computer or smart device tech question? I will do my best to answer your inquiry. Please mention the device, app and version that you are using. To help me out, you can send screenshots of your data related to your question.
The author’s Vietnam eBook on the Battle for Tra Bong: Events and Aftermath
If you forget your Windows 10 login PIN, you won’t be able to retrieve it. However, you can change it. If you don’t use a PIN, normally you would signin using a Password. There are other signin options, but the PIN and Password are the most commonuly used.
Using the PIN makes it much easier and faster to login. Before resetting you PIN, I advise you to create a Password Reset Disk.
I was using the guidelines in this post to reset my PIN. I canceled out of the process. That prompted Windows 10 to delete my PIN. I attempted to login with my PIN, but it was gone. Then, I tried using my Password, but I had the wrong Password. After spending an hour or so trying to login and reading help guidelines on my iPhone, I finally entered the correct Password and got past the Windows 10 login screen. In resetting your PIN, DO NOT CANCEL the process.
Even though this post is about resetting your PIN, you should create a Password Reset Disk to avoid the above nightmare.
Windows has a built-in application called Forgotten Password Wizard. This Password recovery tool is what you would use to create your Password reset disk.
This is for Windows 10 devices. To follow this blog post, you will need your Microsoft account Password and Windows 10 login Password.
Creating a Password Reset Disk
In the Cortona search box, type in Control Panel
Open the Control Panel
Click User Accounts
Click User Accounts. Refer to below image:
The Settings User Accounts screen
Insert a flash drive
Click the link Create a password reset disk. This will open the Forgotten Password Wizard. See below image:
Starting the Forgotten Password Wizard
To start, click Next. The wizard will walk you through the process. You will be asked to select the flash drive from a drop down menu where you want to store the reset disk. Click Next to proceed.
Then you will be asked to enter your current Windows Password. Enter your Password and click Next. See following image:
Entering your current Windows Password
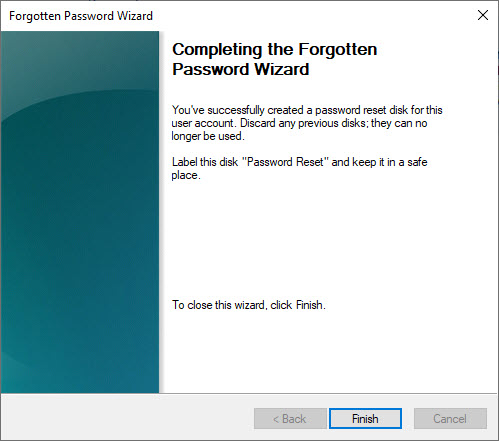
You will be presented with a progress bar; once it reaches 100%, click Next, then click Finish. Refer to below image:
Finishing the Forgotten Password Wizard
At this point, you can check for a file called userkey.psw on your designated flash drive. See below image:
Locating your new Password Reset file
You can now remove the flash drive, label it and store in a safe place.
Using the Password Reset Disk
The next time you are locked out of your PC, plug in your USB flash drive and click Reset Password link. You may have to attempt your login a few times before you see the link. Select your disk from the drop down menu and click Next. You will be prompted to type your new Password and a Password hint. When you are done, click Finish.
You should now be able to sign into Windows with your new Password.
Reseting Your Windows 10 PIN When Not Signed In
This assumes you already have a PIN for your Windows 10 login. If not, refer to the section below about adding a PIN. Its best to change your PIN while you are logged on. If you are locked out of your PC and you have a PIN, you should see I Forgot My PIN link on the login screen. If so, click the link. You will be asked to enter your Microsoft account Password and how to send a new code. Once you have the code, input it and click Verify. Enter your new PIN twice and now you can use the new PIN when logging into your device.
Resetting Your Windows 10 PIN When Signed In
Click the Start button
Click the Settings tile (the one with the gear icon)
Click Accounts
Click Sign-in options. Refer to below screen:
The User Accounts sign=in options screen
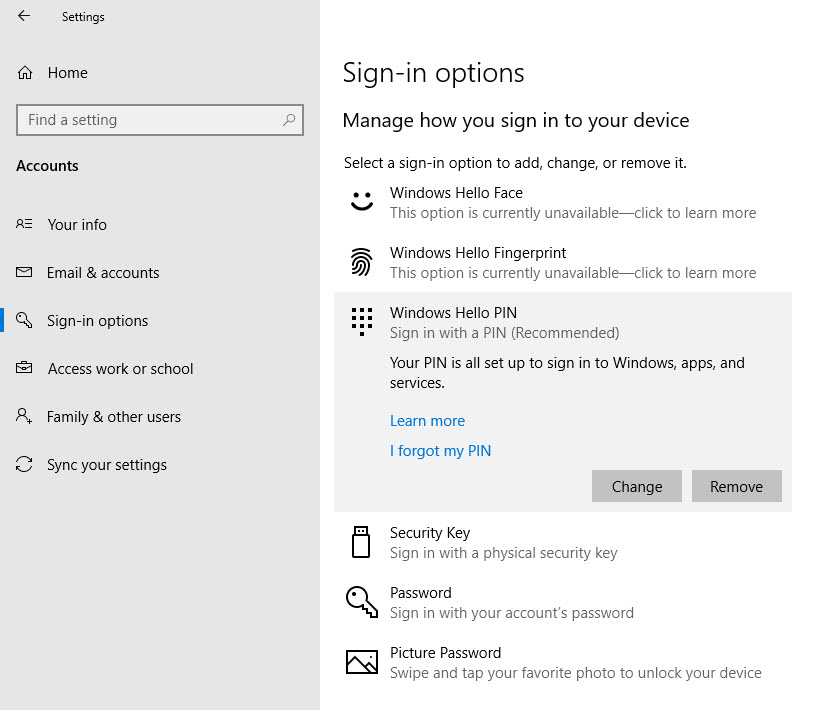
Click Windows Hello PIN. See following image:
The Windows Hello PIN screen
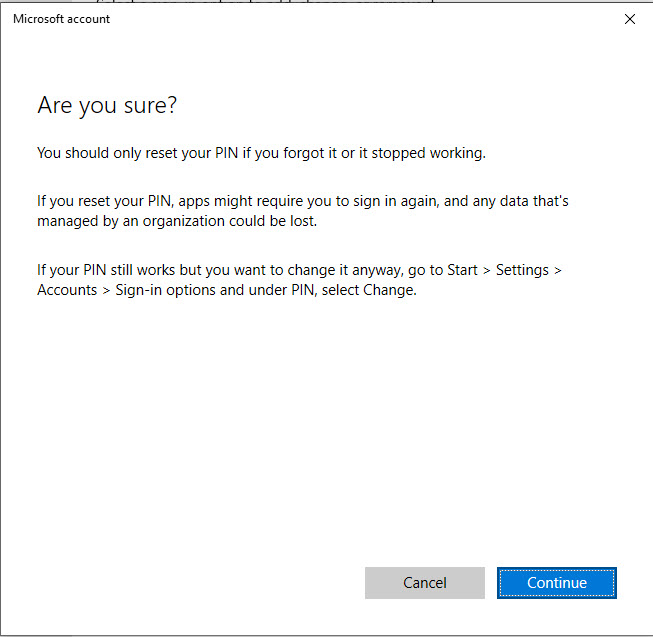
Click I forgot my PIN link
You will be presented with an Are You Sure screen. Please read the info about resetting you PIN. If you are sure about doing this, click Continue. Refer to following image:
Are you sure you want to do this screen
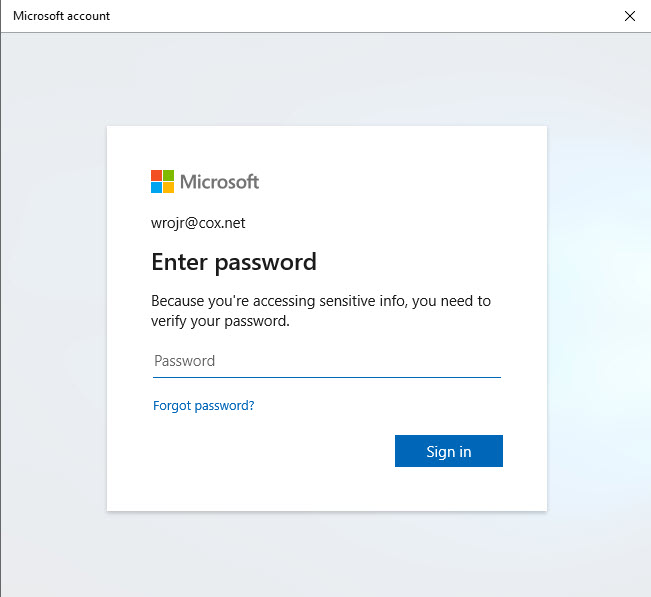
At this point, DO NOT CANCEL the process. Next, you will be asked to enter your Microsoft account Password. Enter your Password and click Sign in. See following image:
Entering your Microsoft account Password
Now you will be asked to enter your new PIN twice. then click OK. Refer to below image:
Verifying your new PIN
You now have successfully changed your PIN. Simply use it the next time you login into Windows 10 on your device.
Adding a Windows 10 PIN When Signed In
Remember my nightmare story about losing my PIN. I finally got back into Windows through my Password. Adding a PIN is similar to resetting your PIN while signed in. Follow the steps preceeding the first screenshot above, then:
Click Windows Hello PIN. See following image:
The Windows Hello Pin screen
Click the Add button
Enter your Windows 10 login Password and click OK. Refer to below image:
Entering your Windows Password
Now you will be asked to enter your new PIN twice. then click OK. See following image:
Verify your new PIN
You now have successfully added a PIN. Simply use it the next time you login into Windows 10 on your device.
I Would Like to Hear from You
Please feel free to leave a comment. I would love hearing from you. Do you have a computer or smart device tech question? I will do my best to answer your inquiry. Please mention the device, app and version that you are using. To help us out, you can send screenshots of your data related to your question.
The author’s Vietnam eBook on the Battle for Tra Bong: Events and Aftermath
In this Coronavirus pandemic, many people are working from home. Our local TV news and weather people have live audio and video streaming from their homes for the daily news broadcast. Working from home has become the new norm.
This will continue after the crisis is over. Instead of going to an office or to a clients location, you will collaborate through an audio and video service.
I researched some web sites for the top call services. They have a similar mix of apps, just in a different order. Some of the web sites have organizations I never heard of. So, I like the ranking from Office Watch. Click here to read their review.
This is for modern web browsers and apps on Apple, Android and Microsoft platforms
Their top seven online call services are as follows:
FaceTime – handles up to 32 people
Skype – up to 50 people
WhatsApp – handles 4 people
Signal – one-on-one calls only
Zoom and Meetings – up to 100 people for the free version; 1000 for their enterprise paid version
Microsoft Teams and Live Events – can handle 4 participates, up to 10,000 for the paid version
Google Hangouts – up to 150 people
I recommend Facetime or Skype for a small busines; Zoom for a medium business; and Zoom Meetings for a large enterprise. Facetime and basic Zoom are free. Click here to read the review of their rankings.
I Would Like to Hear From You
Please feel free to leave a comment. I would love hearing from you. Do you have a computer or smart device tech question? I will do my best to answer your inquiry. Please mention the device, app and version that you are using. To help us out, you can send screenshots of your data related to your question.
The author’s Vietnam eBook on the Battle for Tra Bong: Events and Aftermath
Sounds Almighty? God Mode is a special option long available in Windows that gives you quick access to most of the applets and commands from Control Panel. As such, God Mode is a useful time-saver that can spare you from having to hunt through different windows and screens to find the Control Panel command you want.
Since Microsoft no longer offers a convenient shortcut for Control Panel in Windows 10, God Mode can be a fast and easy way to access all of its core commands.
First, lets make sure you’re signed in to your Windows 10 computer with an account that has administrative privileges. By default, your own account should have the necessary rights.
This is for Windows 10 operating system
Checking Administrator Rights
To double-check:
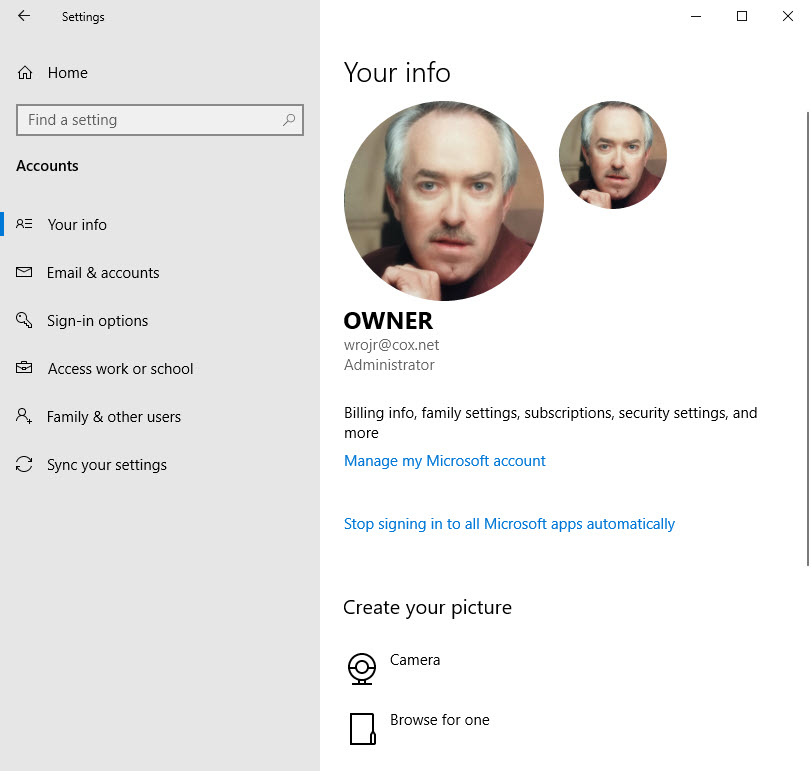
Type Settings in the Cortana search bar
Click on Settings at the top of screen
Select Accounts
Select Your Info to make sure your account is designated as Administrator. See the below example:
Administrator rights
Setup Folder Shortcut
Right click on an empty area of your Desktop/Laptop
Select New
Select Folder
Right click on the New folder and rename it to “GodMode.{ED7BA470-8E54-465E-825C-99712043E01C}” without the quotes. Its best to copy and past this key into the Rename field. Note! There is a period after the word GodMode. See below image for an example:
God Mode folder name
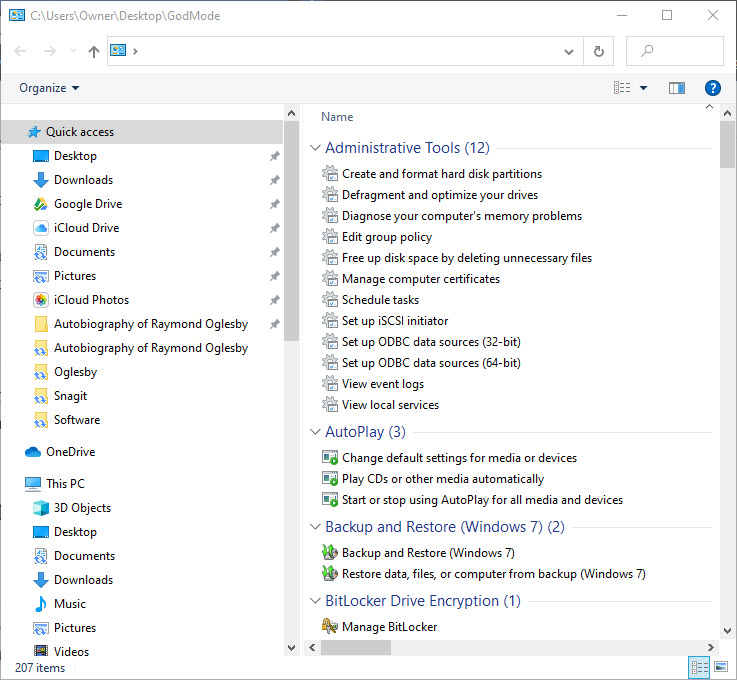
Click or double click the icon to run
A window will open with all the accessible commands. The commands are organized by the Control Panel applet. You will see such commands as Administrative Tools, AutoPlay, Backup and Restore, and many more. See below screenshot for an example:
God Mode results
Some Tips
You can also Search for keywords using the Search box. Once you have located a command, double click to launch it. If you accidentally click the “X”next to the Search box, the Search will no longer be available.
Its best to leave the icon on the desktop. If you try to rename it, the God Mode may no longer work, especially in Windows 10.
You can click the More options drop down box to present a different view of the listing. In the following example, I have chosen to list the commands with a small icon in front of the command description.
Displaying God Mode with small icons
I Would Like to Hear from You
Please feel free to leave a comment. I would love hearing from you. Do you have a computer or smart device tech question? I will do my best to answer your inquiry. Please mention the device, app and version that you are using. To help us out, you can send screenshots of your data related to your question.
The author’s Vietnam eBook on the Battle for Tra Bong: Events and Aftermath
Is your business using Zoom for collaboration during the Coronavirus outbreak? Zoom has become a key tool for working at home and a top choice for vittual meetings. Zoom is free for one-on-one calls that last as long as you like. For three or more people, your calls are limited to 40 minutes. Zoom also has a paid version for an enterprise; it can handle 1000 people.There’s also a plan for small and medium businesses that supports up to 300 participates per call..
Zoom Meeting’s free account is generous. You can host up to 100 people on a call for free and you can see as many as 49 people on an active call in a gallery-style view. There’s no limit on how many meetings you can host.
So, how do we setup our contacts with coworkers using Zoom? In this post we offer insight on how to do this.
This post is for Windows 7 or greater, iPhone or iPad with iOS 7 or later, Android 4 or greater, Web browsers, Macs and the Zoom app or program
Copyright Scott Adams, Inc./Distributed by Universal Uclick for UFS
Before you Begin
Of course, you have already setup the app. Linking to other people in Zoom is necessary before you can call them. A person has to be added to your Zoom contacts list and they have to add you before a call is made.
Zoom contacts are separate from Outlook and other contacts list.
Zoom links people by matching email addresses. Some people have multiple email addresses; for example, personal and work or different ones for different purposes or multiple old email addresses.
Which Email Address to Use?
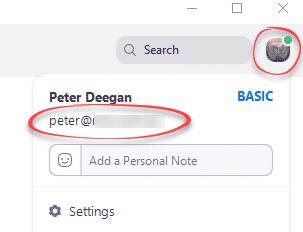
Before adding a person to your contacts list it’s a good idea to check with them on which email address they use to login to Zoom.
To check, they can click on their Zoom Profile in the top right where their name and address is displayed. Refer to below image:
Locate the correct email address
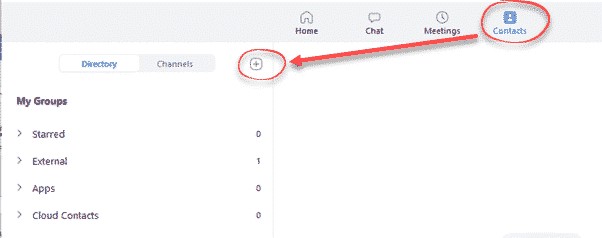
Invite a Contact
To link with someone, in the Zoom app, go to the Contacts section, then click the plus “+ “symbol. See following image:
Linking a Zoom contact
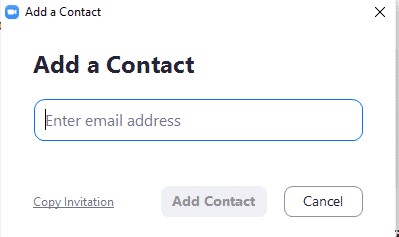
Enter the email address of the contact you want to add to Zoom. See below image:
Adding a Zoom contact
Then you have two options:
Add Contact – sends a contact request to that person’s Zoom account.
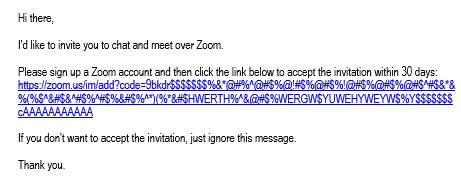
Copy Invitation – copies to your clipboard with web link. Paste that into an email or instant message.
Refer to below image:
Web address for the Zoom contact
There is no need to paste the entire text, change it to suit you. The web link is the important part to pass along. Make sure you include the whole web link; it’s a long link using multiple lines.
Accept a Contact Request
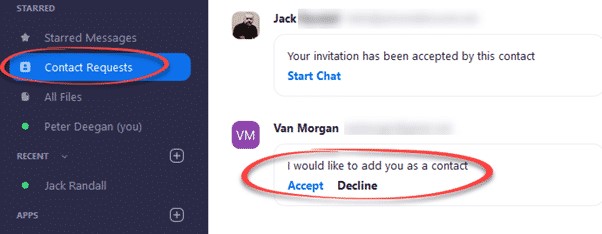
If a participate adds you to their Zoom contact list, you’ll see a pop-up alert. See following image:
Pop-up box for a contact request
Or open your Zoom app/web page. Under Contacts look at Contact Requests. The request will be displayed with options to Accept or Decline. Refer to below image:
Accept or Decline a contact request
As you can see above, the Contact Requests you’ve made will also appear with their current status.
What to Do Next?
Now that you’ve linked with someone on Zoom, you can call them (voice, video, text, etc). If someone wants to invite you into a Zoom meeting, give them you Zoom linked email address.
That’s it on setting up your Zoom contacts. Try it out.
I Would Like to Hear from You
Please feel free to leave a comment. I would love hearing from you. Do you have a computer or smart device tech question? I will do my best to answer your inquiry. Please mention the device, app and version that you are using. To help me out, you can send screenshots of your data related to your question.
The author’s Vietnam eBook on the Battle for Tra Bong: Events and Aftermath
For many users, we just expect the operating system to work as advertised. But what if you need to know or just curious about what happens in the background upon boot/restart or shutdown of your PC. Microsoft Windows 10 hides this from users by default, they assume you don’t need to see it. But for technical users or those troubleshooting problems, it would be helpful to know what is happening as the machine boots or restarts. With a tweak to the Windows 10 Registry we can see its boot/restart or shutdown behavior. To do this we are going to turn on Verbose Boot Mode.
This post involves editing the Windows 10 Registry. It is recommended that you backup the Registry before making any changes. Below are the steps to backup the Registry using a free software program called RegBak. The RegBak program was covered in an earlier post. I am posting about RegBak again in case you missed it or you may click here to view the previous post.
This is for Windows 10 operating system
Copyright Scott Adams, Inc./Distributed by Universal Uclick for UFS
The RegBak Software Utility
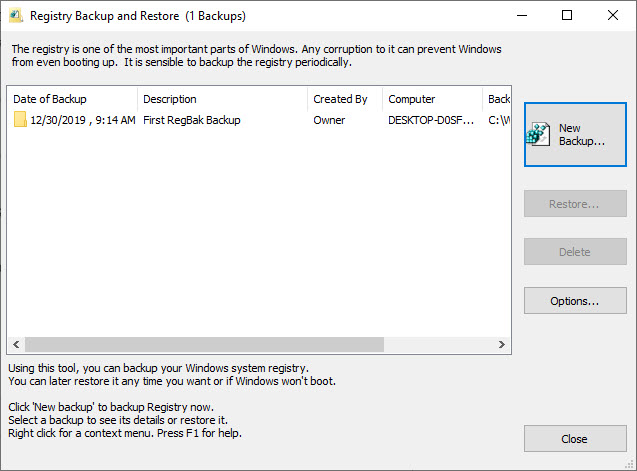
The program I recommend is called RegBak, a freeware program. You can download the program here. Click the Download button for RegBak then click the regbak.exe file at the bottom of the screen and follow the install instructions. Once installed, you should see a screen like the one below:
After installing RegBak
To backup your Windows registry:
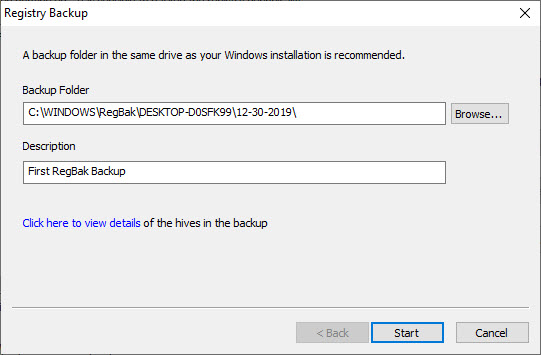
Click the New Backup button
Enter a Description (this is optional)
Click Start
Below is a screenshot:
Starting to run RegBak
Click Close
Your screen will look like the below image:
Results of running RegBak
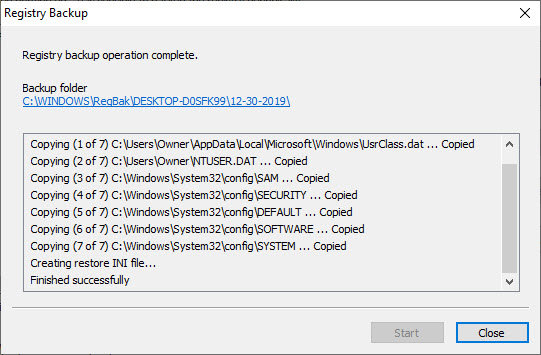
Click Close to exit
Your screen should look like the below image:
Registry backup complete
To Restore from a backup: Note! only do this if your Registry is corrupt.
Highlight a backup entry
Click the Restore button
Click Close
You can also delete a backup by highlighting an entry and clicking on Delete. Feel free to check out the Options button. I would just leave the default options as is.
Changing the Registry
After you have backup up the Registry, type “regedit.exe” (without quotes) in the Cortana search box. You will see a similar screen like below:
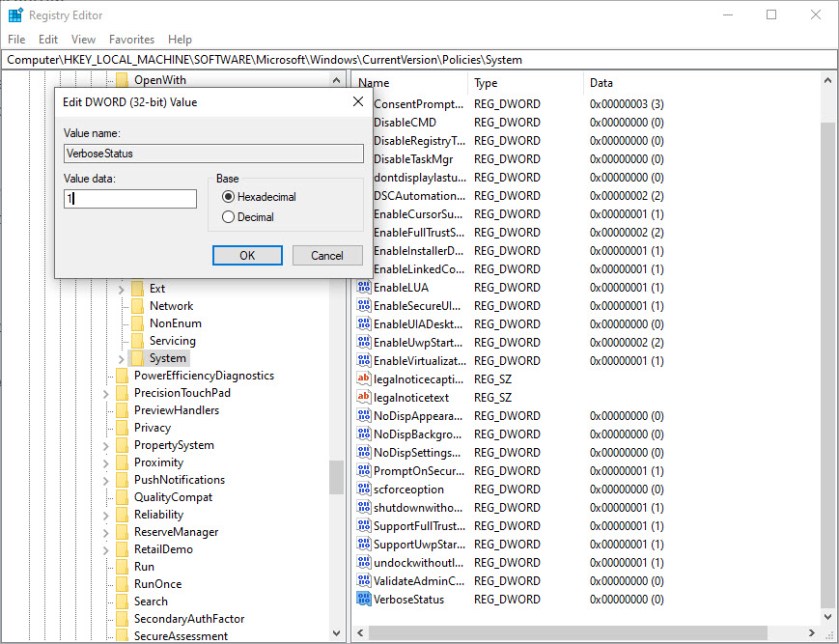
Right click the System folder Select New Select DWORD (32 bit) Value Name the new DWORD to VerboseStatus Change its current value of 0 to a 1. See following image:
Registry Editor key change for turn on Verbose Mode screen
Click OK to accept the change Click File>Exit to quit your edit of the Registry
The next time you boot/restart or shutdown your PC you should see a list of your boot/restart or shutdown activity. As mentioned earlier, the information is helpful in resolving computer problems. In my testing, this is not what I expected; I wanted to see a lot more detail than what was provided. It did help me resolve a shutdown problem. Its worth a try to see if it helps you.
When you need to, you can change the VerboseStatus value back to a 0 to turn the feature off.
I Would Like to Hear from You
Please feel free to leave a comment. I would love hearing from you. Do you have a computer tech or smart device question? I will do my best to answer your inquiry. Please mention the device, app and version that you are using. To help us out, you can send screenshots of your data related to your question.
The author’s Vietnam eBook on the Battle for Tra Bong: Events and Aftermath
It is quite common that one user owns both a laptop and a desktop or two or more PCs. Each device has its merits.
If you have both a laptop and a desktop or two or more computers, you may want to sync the two or more devices for following reasons:
Use the same Windows 10 settings on two or more computers without spending time manually entering theme customizations, browser options, etc.
Keep frequently-used files up to date on two PCs without the repetitive work of copy and paste.
Choose from Settings such as Language preferences, Passwords, and color Theme. If you turn on Other Windows settings, Windows also syncs some device settings (for things like printers and mouse options), File Explorer settings and notification preferences.
Since it’s beneficial to sync a laptop and a desktop or two or more PCs, how is this done? First, you’ll need to use the same Microsoft account to log into each Windows 10 device that you wish to sync.
This is for Windows 10 devices
Sync Your Windows 10 Devices
In your Cortana search box, type in Settings
Select Accounts
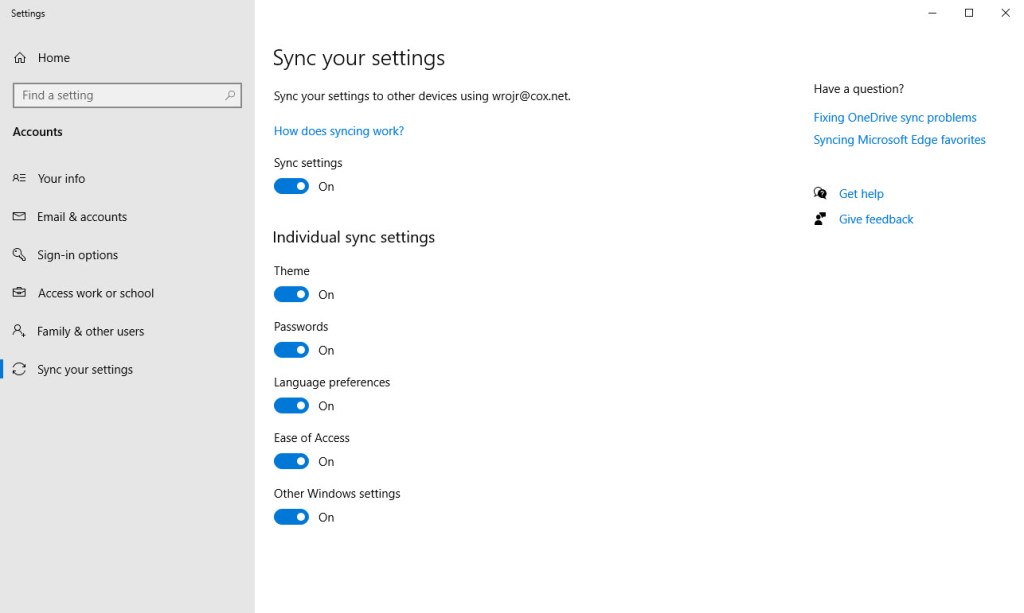
Select Sync your settings. You will be required to sign into your Microsoft account, especially, if you are syncing your Passwords which requires a verification. Refer to below image:
Sync your Windows 10 Settings screen
Turn off or on your syncing preferences
Repeat the above steps for each Windows 10 device
Once the feature is on, the synchronization will take place across all your devices that are running on Windows 10 and where you’re logged in with the same Microsoft Account.
I Would Like to Hear from You
Please feel free to leave a comment. I would love hearing from you. Do you have a computer tech or smart device question? I will do my best to answer your inquiry. Please mention the device, app and version that you are using. To help me out, you can send screenshots of your data related to your question.
This feature is for a Desktop or Laptop running Windows 10 Operating System. Your family, coworkers or friends may be in different time zones. Lets say you have friends residing in Arizona which does not observe Daylight Savings Time. How many hours are they ahead or behind your current time zone? We are going to find an easy way to do this beside searching for “time in <city>”.
This is for Windows 10 operating system
Setup Additional Time Zones
To find these settings:
Right click on the clock in the Windows 10 Taskbar (lower right)
Select Adjust date/time
Select Add clocks for different time zones under Related Settings section
See below screenshot:
Date and Time settings screenshot
Adding Two Time Zones
To add other clock(s):
Check Show this clock box
Chose a time zone
Enter a display name
Repeat above for a second time zone, its up to you
Your can add two times zones besides your current one
Click OK
See below screenshot for adding two time zones:
Adding time zone for Dhaka, Bangladesh and DaNang, Vietnam
Now when you hover your mouse over the date and time in the Taskbar you will see your time zone settings.
I Would Like to Hear from You
Please feel free to leave a comment. I would love hearing from you. Do you have a computer or smart device tech question? I will do my best to answer your inquiry. Please mention the device, app and version that you are using. To help me out, you can send screenshots of your data related to your question.
Do you want to save electricity? Shutting down your Windows 10 Desktop or Laptop at a specific date and time is one answer. Normally, we walk away from our computer at the end of the day. At some point, your PC will slip into hibernation or sleep mode, which saves power consumption but we are going to save even more electricity plus reduce heat buildup.
The Windows operating system has a Task Scheduler which allows us to setup a shutdown at a specific date and time. This Scheduler has been around since Windows XP. By setting up a scheduled task, we are going to shut down your PC at a specific time. I am going to walk you through the setup process screen by screen.
The steps are for Windows 10 operating system. The Task Scheduler is for Windows XP through Windows 10
In the Cortana search box, type in “task scheduler“ (without the quotes)
Open the Task Scheduler. See following image:
Opening the Task Scheduler
Create the Auto Shutdown Task
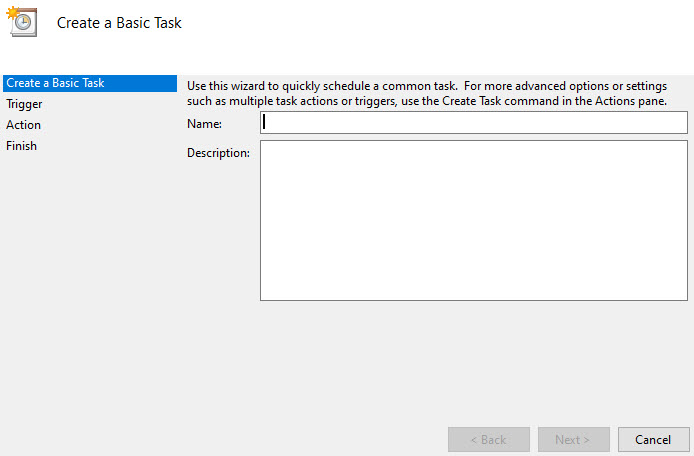
Select Create Basic Task. See following image:
Creating a Basic Task
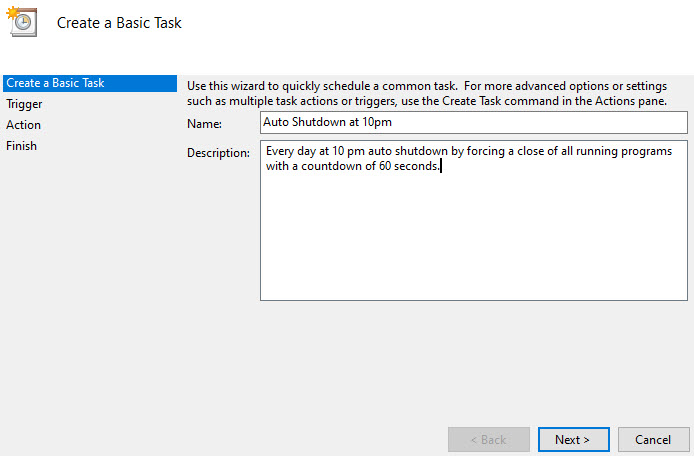
Give the Task a name and a description. I am using Auto Shutdown at 10 pm as the name. See following image:
Assigning a Name and Description to our scheduled task
Set the Task Triggers
Click Next at the bottom of the screen to open the Task Trigger screen
Select Daily (the default). See the following image:
Selecting the Task Trigger
Select Next
Select a Start: date and time
Set Recur every: 1 day (the default). See below image:
Setting the start date, time and the recurrence of the scheduled task
Set the Task Action
Select Next. You will see the Action screen
Select Start a program (the default). See below image:
Selecting the Action we want to perform
Set the Task Arguments
Click Next
In the Program/script box, enter “shutdown” (without the quotes)
Enter -s -f -t 60 in the Add arguments box. See following screen:
Entering the program name and arguments for the scheduled task
These arguments are part of the shutdown.exe program. The -s tells Windows to shutdown, you could enter -r for a shutdown and Restart. The -f forces all running programs to close and is implied if the -t argument is greater than 0. The -t 60 adds a 60 seconds countdown, if you want an immediate shutdown, change to -t 0. See following image:
Setting the program name and arguments
View Your Task Summary
Click Next and you will see your Summary screen. See below image:
A Summary of the scheduled task
Click Finish
Close the Task Scheduler. For our example, we are initiating a daily shutdown starting on 2/5/2020 at 10pm by closing all running applications with a 60 seconds countdown.
View, Edit or Delete Your Scheduled Task
Open Task Scheduler
Click on Task Scheduler Library
Find your task under the Name column and highlight it. You can view your Triggers and Actions under the appropriate tab. See following image:
Viewing your scheduled task
To Edit your task, highlight the task and select Properties. I recommend you go through each tab and make any necessary change(s). Click OK to apply your change(s).
To Delete the task, highlight the task and select Delete. Click Yes to complete the deletion.
Close the Task Scheduler
You are finished. At the designated date and time, watch your computer automatically shutdown. In our example, the auto shutdown occurs every day at 10 pm..
I Would Like to Hear from You
Please feel free to leave a comment. I would love hearing from you. Do you have a computer tech question? I will do my best to answer your inquiry. Please mention the app and version that you are using. To help me out, you can send screenshots of your data related to your question.
This post is for a PC Windows 10 Operating System having multiple users or several PCs in a small business environment. We are going to change the Windows Registry to provide a Legal Message at login. I am using a lot of screenshots to ensure you are successful.
First and foremost, lets backup your PC Registry. This is extremely important in case you update the wrong key or your registry has problems. I want you to have a safe experience. Changing the Registry is tricky and not for the “faint of heart”.
Starting in Windows 10 Version 1803, the Windows Registry is no longer automatically backed up. You can change this behavior by following these instructions. This requires editing the Registry. Instead, I recommend using a software program to backup the Registry.
This is for Windows based operating systems
The RegBak Software Utility
The program I recommend is called RegBak, a freeware program. You can download the program here. Click the Download button for RegBak then click the regbak.exe file at the bottom of the screen and follow the install instructions. Once installed, you should see a screen like the one below:
After installing RegBak
To backup your Windows registry:
Click the New Backup button
Enter a Description (this is optional)
Click Start
Below is a screenshot:
Starting to run RegBak
Click Close
Your screen will look like the below image:
Results of running RegBak
Click Close to exit
Your screen should look like the below image:
Registry backup complete
To Restore from a backup: Note! only do this if your Registry is corrupt.
Highlight a backup entry
Click the Restore button
Click Close
You can also delete a backup by highlighting an entry and clicking on Delete. Feel free to check out the Options button. I would just leave the default options as is.
Setting up the Legal Message
Now lets edit the Registry for our Legal Message at Windows login:
Type “regedit” (without quotes) into the Cortana search box to open the Registry Editor
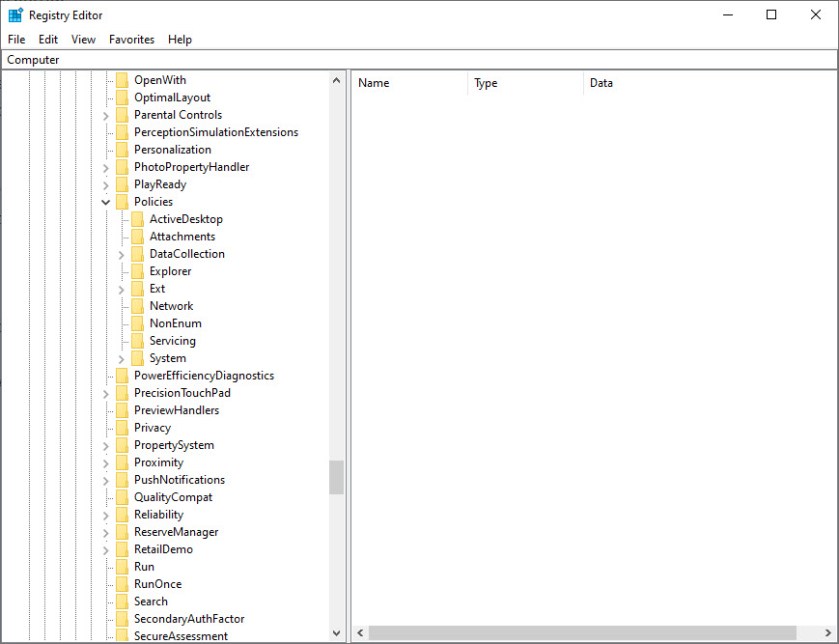
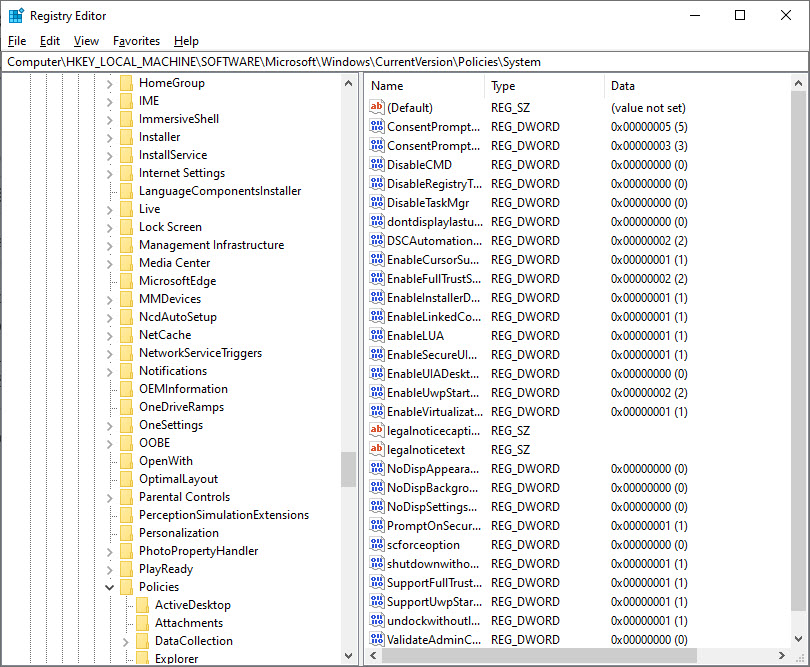
Expand the HKEY_LOCAL_MACHINE and keep expanding until you reach HKEY_LOCAL_MACHINE_SOFTWARE\Microsoft\Windows\CurrentVersion\Policies\System
Your screen should look like the below image:
Registry screenshot for editing legal caption and legal text
In the right hand pane, find these two listings: legalnoticecaption and legalnoticetext.
The value of legalnoticecaption acts as the heading of your legal message.
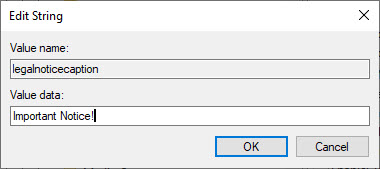
Double click on legalnoticecaption and change its value to something like “Important Notice!” (without quotes).
Your screen should look like the below image:
Adding a legal message caption
Click OK
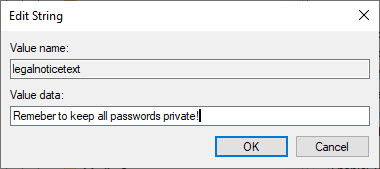
Now we will do the same for the Legal Message text.
Double click on legalnoticetext and enter something like “Remember to keep all passwords private!” (without quotes).
Your screen should look like the image below:
Adding a legal message text
Click OK
What if you wanted more than one line of text for your Legal Message? This requires hexadecimal editing and is not recommended. However, if you need this:
Complete the text field first
Right click the legalnoticetext key
Select Modify binary data
Your screen should look like the below image:
Before modifying the binary data for the legal message
Find the appropriate spot for a paragraph break. Click the space just after the last character in the message where you want to put the carriage return.
Enter this four digit code for a carriage return, 0D00. Finding the right spot to insert a carriage return can be tricky.
In my example I am entering a carriage return just after the word “passwords”.
Below is a screen shot:
After modifying the binary data for legal message
When the changes are complete click File>Exit to save your work and close the Registry. The next time a user logs into the Windows 10 PC they will have to acknowledge the Legal Message by clicking the OK button before they can move on to the normal login screen.
If you applied a carriage return in the binary data and it doesn’t work, try entering the 0D00 in a different spot for the Legal Message text. To do this, remove your text message and reenter, then insert the carriage return key.
Important Note
Its important to understand, that the Legal Message will appear each and every time the Windows 10 PC is booted. At some point, you may wish to cancel the Legal Message. In that case, repeat the above steps for editing the Registry and remove the text in legalnoticecaption and legalnoticetext keys to cancel the message. This will resume the typical login sequence.
I Would Like to Hear from You
Please feel free to leave a comment. I would love hearing from you. Do you have a computer tech question? I will do my best to answer your inquiry. Please mention the app and version that you are using. To help me out, you can send screenshots of your data related to your question.