Windows 10 has a lot of overlapping version numbers and names. For example, the October 2020 Update is also called 20H2, version 2009, and build 19042. It often seems like different teams at Microsoft are speaking different languages. Here’s how to understand Microsoft’s jargon.
This is for the Windows 10 operating system

To Tweet about this post, click the Tweet icon below to launch Twitter, then click its Tweet icon to post.
Check out TechSavvy.Life for their blog posts on smartphone apps, PCs. and Macs!
Tweet
The Development Codename
Each Windows 10 Update starts with a development codename. In recent years, Microsoft has simplified these.
For example, Windows 10 20H2 became the October 2020 Update. It was named “20H2” because it was planned for release in the second half of 2020.
In theory, these development codenames are just that; for the Windows development process. In practice. Microsoft has a lot of documentation that uses them, referring to “20H2” and “20H1.” These modern development codenames are easy to understand.
These development codenames appear to be replacing the version numbers in Windows 10’s interface. To view your codename, go to:
Settings > System > About
Here you willl see the development codename presented as the “version” under Windows Specifications. Refer to below image:

Here is a list of Windows 10’s development codenames for 2020 and 2019 updates:
- 20H2 became the October 2020 update
- 20H1 became the May 2020 update
- 19H2 became the November 2019 update
- 19H1 became th May 2019 update
Prior to this, Microsoft named these updates “Redstone” and “Threshold”. Threshold 1″ was the original codename for Windows 10.
The Marketing Name
To make things “simpler” for us, Microsoft created official names for each update, designed to make them human-readable. When an update is near release, it gets one of these names.
In recent years, these names have been pretty self-explanatory. “October 2020 Update” and “May 2019 Update” are easy terms to understand. That’s the month and year the update was released. It’s more precise than “20H2” and “19H1.”
We call them “marketing names” because that’s what they originally were. Despite Microsoft presenting names like “October 2020 Update” as the official ones, many Microsoft documents use terms like “20H2” or “version 2009” instead. Even Windows 10 itself doesn’t use this name; perhaps because it’s created by the engineers and not the marketing department.
The Version Number
Windows 10 has version numbers which are different from the development codename. The Windows 10 October 2020 Update is technically Windows 10 version 2009. The first two digits represent the year and the last two digits represent the month.
Microsoft is confusing us. The version number seems to refer to the month the update was “finalized” (and perhaps released to Insiders), while the marketing name refers to the update the month was released.
Here’s a list of 2020 and 2019 version numbers for Windows 10 updates:
- The October 2020 Update is version 2009, which refers to September 2020
- The May 2020 Update is version 2004, which refers to April 2020
- The November 2019 Update is version 1909, which refers to September 2019
- The May 2019 Update is version 1903, which refers to March 2019
Microsoft is getting away from these numbers, with development names like “20H2” now shown in the System panel. Another way to view your version number is to launch the winver dialog:
- Press Windows+R
- Enter winver in the dialog box
- Press Enter or OK
See below image:
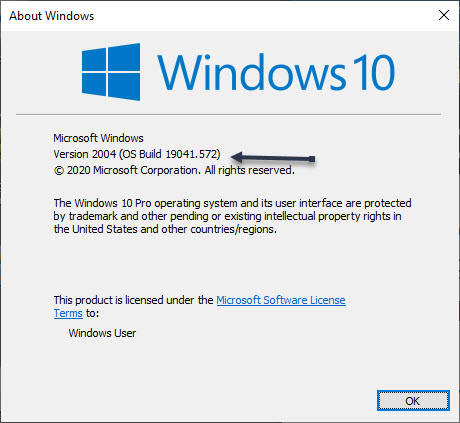
In older versions of Windows 10, these screens showed the version number instead.
The OS Build Number
Windows 10 also has operating system (OS) build numbers. During the Windows development process, each “build” of Windows 10 released has its own build number.
After much testing and bug-fixing, Microsoft settles on a final build that will be the stable version of the update. When the stable update is released, it still has this OS build number.
The October 2020 Update has the OS build number “19042.” Technically, the full build number is “10.0.19042,” to indicate that it’s a Windows 10 build. Only the last five digits change.
Also, there are minor build numbers; the stable version of 20H2 is initially “19042.572”, but the “572” number will increase as Microsoft issues minor patches for the update. Here is a list of 2020 and 2019 OS build numbers:
- 20H2 is build number 19042.
- 20H1 is build number 19041.
- 19H2 is build number 18363.
- 19H1 is build number 18362.
What Does All This Mean?
At times, it seems like different teams at Microsoft are speaking different languages. One document talks about 20H2, another talks about version 2009, a technical document refers to build 19042, and the marketing team talks up the October 2020 Update. They’re all talking about the same thing.
Now that you understand this, it’s easier to make sense of the mess of version numbers you see across Microsoft’s websites and within Windows 10 itself.
I hope you have found this post helpful. If so, click the Tweet icon below. This will launch Twitter where you click its icon to post the Tweet.
I have found TechSavvy.Life blog posts extremely helpful. Check them out for posts on smart phone apps, Macs and PCs!
Tweet
The following is a previous Twitter feed so you can view how a Tweet will be displayed.
I Would Like to Hear From You
Please feel free to leave a comment. I would love hearing from you. Do you have a computer or smart device tech question? I will do my best to answer your inquiry. Please mention the device, app and version that you are using. To help us out, you can send screenshots of your data related to your question.