By using Google Maps you can find the location of a restaurant, store or some other company. How about asking the business a question? In some cases, you can do so through Google Maps. If the entity supports Google Maps messaging feature, you can send a message to that company. If the company responds, you can carry on a back-and-forth conversation; like texting, but instead you are using Google Maps.
To date, this is the most unusual post I have written. Its relatively unknown to the business community. I recommend you try out my example before searching for a business in your area that uses Google Maps for messaging.
This feature is for your iOS (iPhone/iPad) or Android device or whatever smart device supports Google Maps
If you haven’t already done so, download and install Google Maps to your device.
Copyright Scott Adams, Inc./Distributed by Universal Uclick for UFS
Search for a Business
Launch Google Maps
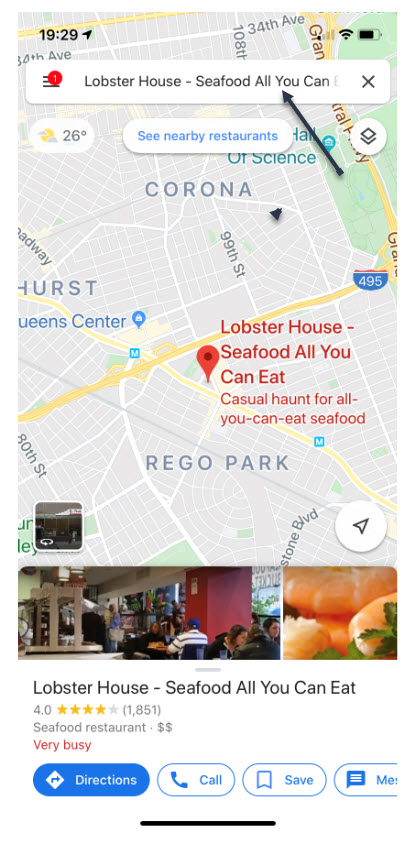
Search for a business you want to use or visit. In my example, I am searching for “Lobster House”. Refer to following image:
Search for Lobster House
If using my example, select the first entry. Refer to following screenshot:
Selecting First Entry for Lobster House
View the Overview Tab
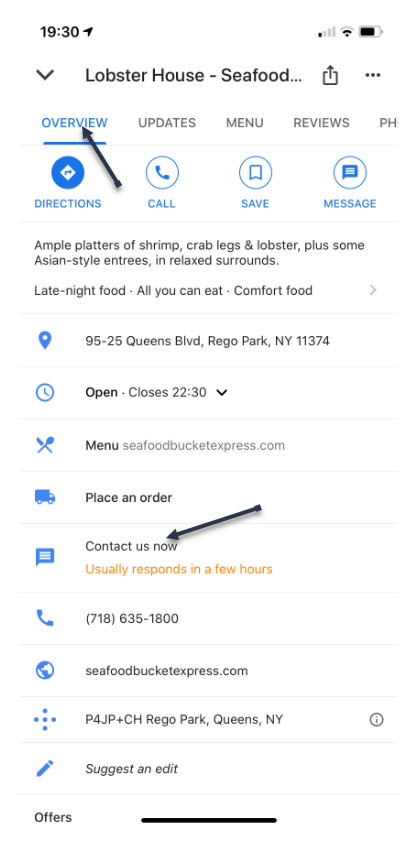
Swipe Up below the map till you see the Overview tab, like the following image:
Overview Tab for Lobster House
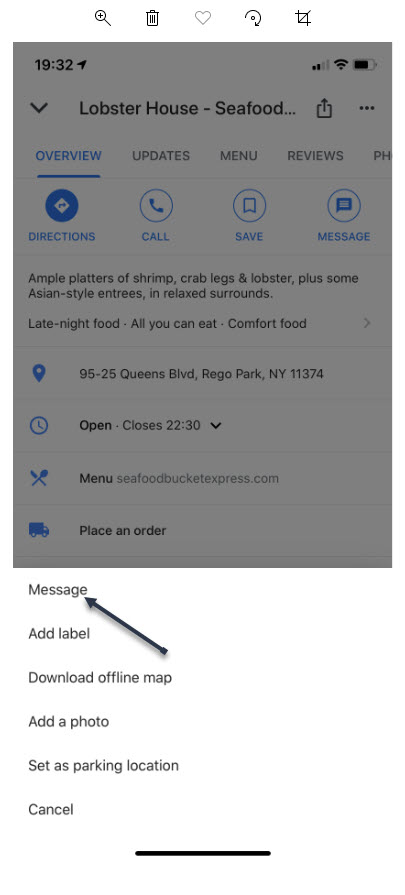
If the company supports Google Maps messaging, in the center of the screen you will see a link that says “Contact us now“
Type in Your Message
Tap on this link
Type in your message and tap the Send icon. A pertinent question might be reserving a table at a certain time instead of my example. Refer to following screen:
Messaging Lobster House
In my example of the “Lobster House”, they usually respond within a few hours. So, revisit the “Lobster House” for their reply by:
Search for Messages
Searching for the business
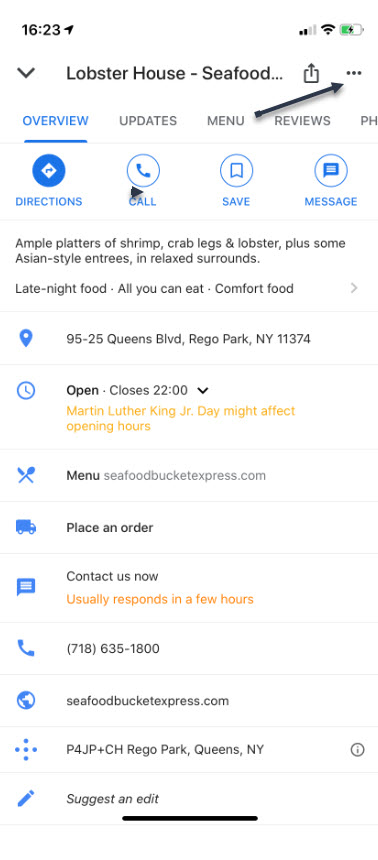
Swipe Up to view the Overview Tab
Tap the 3 dots in upper right hand corner. Refer to following image:
Check for a Response
Reply to Messages
You will see the following screen. Tap on Message to view their reply. You can then reply back to the business if you need to.
The Message Screen
Whats challenging about this feature is finding a business that supports Google Maps messaging. Unfortunately, many do not. But, if a business of interest does offer messaging, you can use this feature to obtain more information about the company or perhaps, setup a reservation.
I Would Like to Hear from You
Please feel free to leave a comment. I would love hearing from you. Do you have a computer or smart device tech question? I will do my best to answer your inquiry. Please mention the device, app and version that you are using. To help us out, you can send screenshots of your data related to your question.
The author’s Vietnam eBook on the Battle for Tra Bong: Events and Aftermath
Word’s Caption feature allows you to insert captions after figures, tables or equations in your document. You can choose to have Word insert them automatically or do it yourself manually. Lets learn how to add and edit captions to set apart elements in your document.
You are not limited to figures, tables or equations; you can create a new label like Picture or Photo. If you are using Chapters in your document, you can add the Chapter number to your caption. Almost any object or inserted item in Word can be captioned.
This is for PCs, Macs and similar platforms that support Microsoft Word
Copyright Scott Adams, Inc./Distributed by Universal Uclick for UFS
Add a Caption
There are two ways to add a caption:
Select the figure/table/equation, right click and select Insert Caption. (Note! This method works only for figures and tables, not equations.)
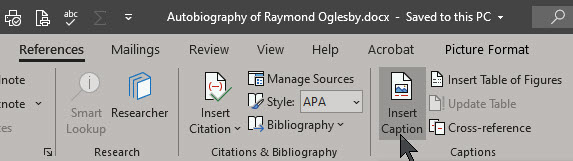
Select the figure/table/equation, go to the References tab on the ribbon and select Insert Caption. See below image:
If you don’t select the object and choose References > Insert Caption the caption will be inserted where the cursor is placed.
Your Caption Options
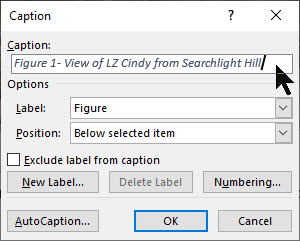
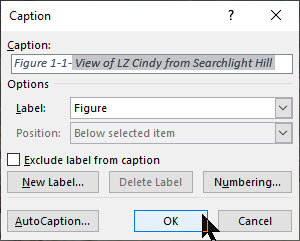
The Caption dialog box will now open, with a number of options for you to set. Refer to below image;
Below are the options to chose from:
Captions – type in the label you want
Label – or more correctly caption prefix. Choose table, equation or figure. This will automatically add that label to the caption.
New Label – If you want your captions to have a label other than the ones provided, you can add a new one from the New Label option. (For example, Word provides the options Equation, Figure and Table, but if you are including photos in your document, you may prefer to label them Picture or Photo.)
Exclude Label from Captions – check this box and no label/prefix will be included. The caption will just contain the number and the text that you enter.
Position – caption to appear above or below the object. Only works if the object is selected before Insert Caption. Otherwise this field will be disabled and the caption placed where you have set your cursor.
AutoCaption certain types of objects can be automatically captioned when they are included in a document.
The caption will now appear in the specified location, with its number automatically allocated. See following image:
Figure 1- View of LZ Cindy from Searchlight Hill
Numbering Options for Your Captions
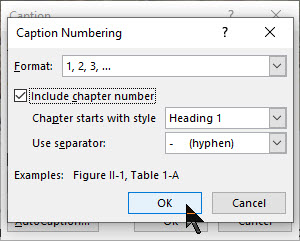
If you want to change the format of the numbering system on your captions, do this by clicking the Numbering button in the Caption dialog box. Refer to below image:
The Caption Numbering dialog box will open. See below image:
Format: Choose the numbering format you want to use:
Numerals (1, 2, 3, 4…)
Lowercase letters (a, b, c, d…)
Uppercase letters (A, B, C, D…)
Lowercase Roman numerals (i, ii, iii, iv…)
Uppercase Roman numerals (I, II, III, IV…)
And others depending on the installed language packs.
Include Chapter Number: If your document contains chapters, you can choose to have the numbering restart for each chapter and have the chapter number included in the caption numbering system.
First select the Caption in your Word document. Then you need to link the Style (e.g. Heading 1) with a multi-level list at Home > Paragraph > Multi-Level List > Define Multi-Level List > More. This adds automatic numbering to each style so the captions have a number to show. See following image;
Chapter Starts with Style: Select what level of heading you would like to signify a new chapter.
Use Separator: Choose the separator that you would like to use between the chapter number and the caption number (hyphen, period, colon or em-dash).
Change Your Caption Settings
Changing the caption settings isn’t obvious because right-clicking doesn’t show an option to open the Caption dialog.
The trick is to select the whole caption then References > Captions > Insert Caption. Refer to below image:
This opens the Caption dialog with the current settings.
Updating Your Caption Numbering
At the core of captions are field codes. Updating the caption numbering is the same as any other field code updates.
Select the whole document with Ctrl+A then update fields with F9 (or right-click to choose Update Field).
Change Your Caption Text
The text after the caption label can be edited in the document. Just click in the caption text and type as usual. See following image;
I Would Like to Hear From You
Please feel free to leave a comment. I would love hearing from you. Do you have a computer or smart device tech question? I will do my best to answer your inquiry. Please mention the device, app and version that you are using. To help us out, you can send screenshots of your data related to your question.
The author’s Vietnam eBook on the Battle for Tra Bong: Events and Aftermath
The Insert Key was needed in early versions of Windows. In our modern day of Windows, the key is no longer needed. Now, we just place our cursor where we want to insert text and start typing. If we use the Insert Key, our text is overwritten. This can be frustrating as we find ourselves clicking Undo and starting over.
Every key has a corresponding key scan code that tells Windows how to handle the keystroke. We can find this code and change it to a null character in the Windows Registry, which disables the key.
Instead of editing the Registry directly, we are going to use a free software utility to perform this task.
This is for desktop/laptop using Windows 10. SharpKeys will run on Vista through Windows 10.
Copyright Scott Adams, Inc./Distributed by Universal Uclick for UFS
Running Regbak Software
First, open and run the program. Next, click on the New Backup button to create a Registry backup. Refer to below image:
Selecting a new backup
A backup dialog box will appear. Here you can chose a Backup Folder. It is recommended you use the default. Next, give the backup a Description of your choice, then click Start. See below image:
Chosing the backup location and entering a description
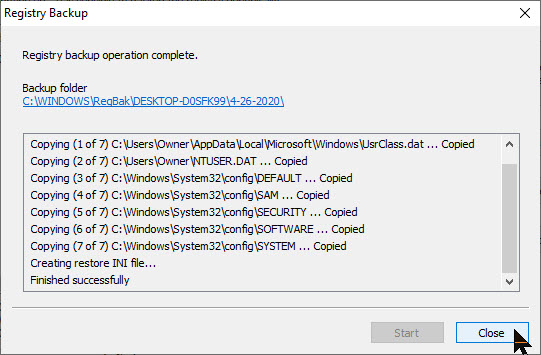
When the program has finished, you will receive a message at the top of the screen that the backup operation has completed. At the bottom of the dialog box, check for the mesage that the operation finished successfully. Now, click Close. See following image:
Completing the process
A final dialog box will appear showing your newly created Registry backup entry. Additionally, by highlighting an entry you can either Restore or Delete a Registry backup. Click Close to end the program. Refer to below image:
Exit the program
SharpKeys Overview
SharpKeys is free software for you to edit specific Registry entries. It uses a Graphical User Interface (GUI) to remap keys on your keyboard. This software makes it easy to edit the Registry without using the built-in Registry Editor. Using the Editor is time consuming and error prone.
Note! This program requires Administrative Privileges to run. Please open the program as an Administrator by right-clicking on the program under Start, and click on More > Run as Administrator.
Once the program is running, click the Add button. See below image:
Opening the program
Scroll through the list on the left and click on Special: Insert (E0_52). Next, click on Turn Key Off (00_00) from the list on the right. To remap the Insert Key, click OK. Refer to below image:
Selecting the Insert Key to be remapped
The value in parentheses is the key scan code associated with it. We are replacing the Insert Key code of E0_52 to a non-existence code of 00_00, which will disable the key.
Next, click the Write to Registry button. The software will add the new code for the Insert Key to the Registry for you. See following image:
Write the null key scan code to the Registry
To complete the process, click OK. Refer to below image:
Restart message
To exit the program, click Close. See below image:
Exit the program
For the changes to take effect, you will need to log out or restart your computer.
You can use SharpKeys to remap a host of other keyboard characters.
Undoing Your Change
If you have made no other changes, you can use Wise Registry Cleaner or Regbak to restore the Registry depending on which software you used to create a Registry backup. If you have made other changes and wish to restore the Insert Key function, those changes will be lost.
Another method is using the Registry Editor to reenable the Insert Key function. This method is very technical, frustrating and error prone; so I don’t recommend doing this.
I Would Like to Hear From You
Please feel free to leave a comment. I would love hearing from you. Do you have a computer or smart device tech question? I will do my best to answer your inquiry. Please mention the device, app and version that you are using. To help us out, you can send screenshots of your data related to your question.
The author’s Vietnam eBook on the Battle for Tra Bong: Events and Aftermath
If your Windows computer is being redirected to unwanted sites, advertisements are popping up while you browse the Internet, or a message saying a virus was detected, then it is possible that you have malware installed on your computer.
This is for Windows 7 through 10, also applies to Macs and mobile devices. The wording in this post is for Windows 10
Copyright Scott Adams, Inc./Distributed by Universal Uclick for UFS
Malware refers to any type of malicious software that tries to infect a computer or mobile device. Hackers use malware for any number of reasons such as, extracting personal information or passwords, stealing money or preventing owners from accessing their device.
Malware includes computer viruses, ransomware, worms, trojan horses, rootkits, keyloggers, dialers, spyware, adware, malicious BHOs, rogue security software and other malicious programs. The majority of malware threats are usually worms or trojans rather than viruses.
Following are some examples of an infected PC:
Your web browser (e.g., Microsoft Internet Explorer, Mozilla Firefox, Google Chrome) freezes, hangs or is unresponsive
You get redirected to web pages other than the one you intended to go to
You receive numerous web-browser popup messages
Strange or unexpected toolbars appear at the top of your web browser
Your computer runs slower than usual
Your computer freezes, hangs or is unresponsive
Your computer restarts by itself (but not a restart caused by Windows Updates)
You see unusual error messages (e.g., messages saying there are missing or corrupt files folders)
For several months, I had malware that crashed my PC on a daily basis. I read lots of help articles and followed its advice. I soon came to realize that no one piece of software will remove the malware. In my case, the virus would attach itself to a Dell executable (exe) file. I located the suspected file and renamed it, no luck here. So, I deleted the file; the suspected file would recreate itself with the virus attached. I did a scan of the Registry to find the infected file, it was not found. What the heck is going on? Then I came across an in-depth article on removing malware. In summary, to remove the malware, perform the following:
Restart your machine and stop all running programs
Download, install and run the following programs one at a time in order as shown below. There is a free or trial version for each software. Do not install any third-party tools associated with the installs. The softare title and links are as follows:
Now, restart your machine. The malware should be eliminated. Since this is a one-time removal, uninstall each program. If left installed and active, they will interfere with each other and cause other problems.
I Would Like to Hear From You
Please feel free to leave a comment. I would love hearing from you. Do you have a computer or smart device tech question? I will do my best to answer your inquiry. Please mention the device, app and version that you are using. To help us out, you can send screenshots of your data related to your question.
The author’s Vietnam eBook on the Battle for Tra Bong: Events and Aftermath
Whenever you log-in to Windows 10, your name appears above the password entry. What if you want to change your name? This post addresses this issue.
Whether you use a local account or a Microsoft Account, it’s relative easy to change your display name.
This is for Windows 10 devices
Copyright Scott Adams, Inc./Distributed by Universal Uclick for UFS
Changing Your Display Name for a Microsoft Account
To change you name for a Microsoft Account, you need to open your account preferences on the Microsoft website.
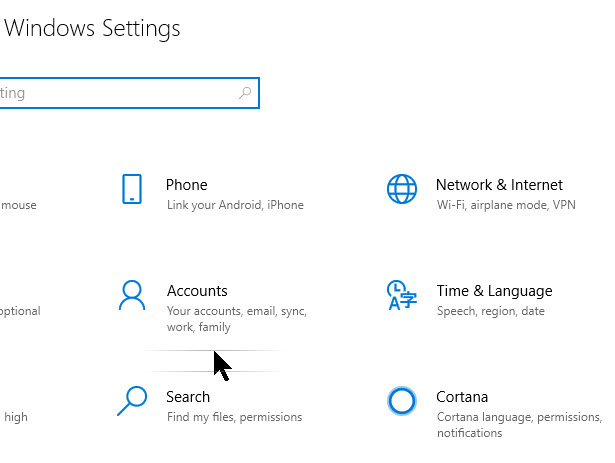
Opens the Settings app by pressing the Windows key+I or type in Settings in the Cortana search field, then click the Settings app at top of the screen. Then click on the Accounts option. Refer to below image:
Selecting your Accounts option
Below your name and photo, click on Manage my Microsoft account. See following image:
Selecting Manange my Microsoft account
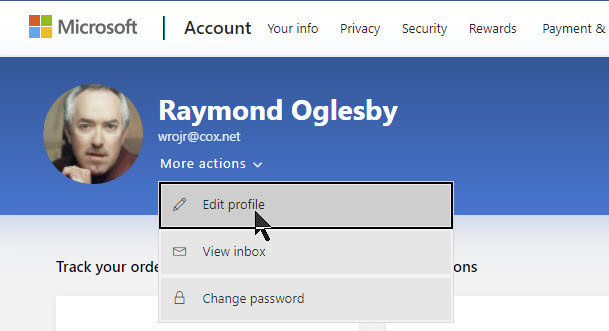
Signin to your Microsoft Account if not already signed. This will open your account preferences in your browser. After your browser opens, click the More Actions drop-down box, then click on Edit Profile from the options list. See below image:
Selecting Edit Profile
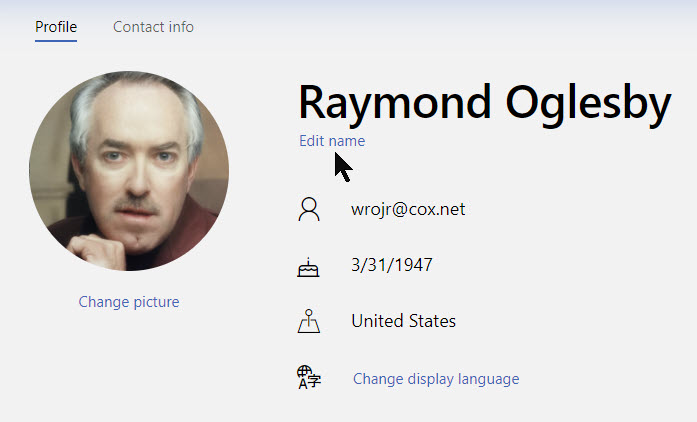
Below your name, click Edit Name. Refer to below image:
Selecting Edit your name
Enter your first and last name, solve the CAPTCHA challenge, then click Save to update your name. See following image:
Changing your firsr and/or last name and entering the CAPTCHA letters
When your Profile page reloads, it will update with the name change.
Note! When you change your Microsoft Account name, it changes on all devices that you use to log-in with this account.
For your new name to show on your Windows 10 log-in screen, you will have to log out of Windows 10. Be sure to save any unsaved work or applications before signing out.
Changing Your Display Name for a Local Account
A local account is a basic approach in using Windows 10. Local accounts don’t have the added features like syncing files, settings, browser history, etc. across multiple devices.
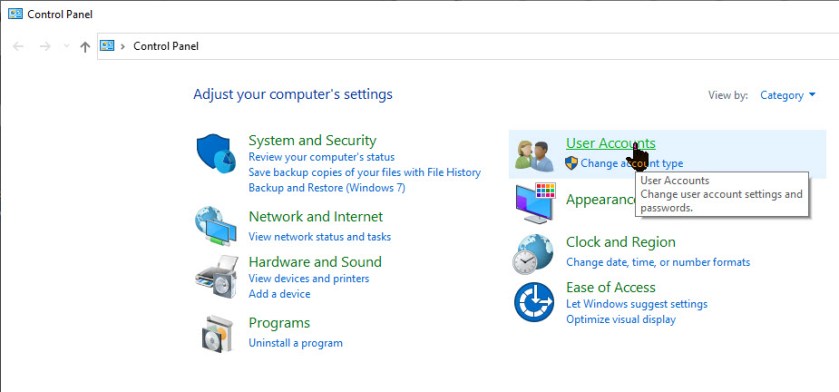
If you want to change your local account name, fire up the Control Panel. In the Cortana search box, type in Control Panel then click on the Control Panel app at the top of the screen.
Next click on the User Accounts option. Refer to below image:
Selecting User Accounts from the Control Panel
Now click on User Accounts one more time. See below image:
Selecting User Accounts again
Now, select Change your account name option to change your log-in name. See following image:
Selection for changing your account name
Note:If an organization manages your device or you don’t have administrator privileges, you won’t be able to change your name.
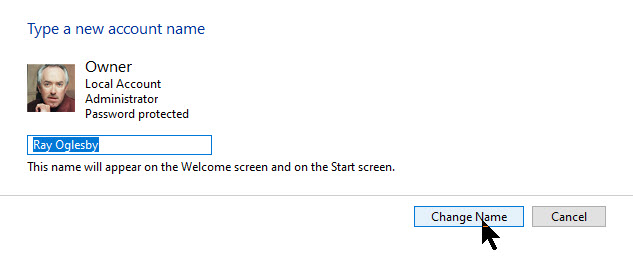
Enter the new log-in name into the text field, then click the Change Name button to save your changes. Refer to below image:
Changing your log-in name
You are done and may now close the Control Panel window. For your new name to show on your Windows 10 log-in screen, you will have to log out of Windows 10. Be sure to save any unsaved work or applications before signing out.
I Would Like to Hear From You
Please feel free to leave a comment. I would love hearing from you. Do you have a computer or smart device tech question? I will do my best to answer your inquiry. Please mention the device, app and version that you are using. To help me out, you can send screenshots of your data related to your question.
The author’s Vietnam eBook on the Battle for Tra Bong: Events and Aftermath
Your hard drive has been acting strange. It’s making clicking or screeching sounds, it’s unable to find files, crashes on boot, slow transfer speed or seems to be moving slowly. Your hard drive is dying.
Since it is a mechanical device it has moving parts unlike a Solid State Device (SSD) which has none. But even a SSD will eventually fail.
Even if your hard drive is healthy, over time, it will die. You should keep an eye on it’s health once in a while for your peace of mind. Let’s see how to do this.
This is for Windows 10 devices and Macs
Copyright Scott Adams, Inc./Distributed by Universal Uclick for UFS
To Tweet about this post, click the Tweet icon below to launch Twitter, then click its Tweet icon to post.
Check out TechSavvy.Life for their blog posts on smartphone apps, PCs. and Macs!
Most modern drives have a feature called S.M.A.R. T. (Self-Monitoring, Analysis and Reporting Technology) that monitors different drive attributes in an attempt to detect a failing disk. That way, your computer will automatically notify you before data loss occurs and the drive can be replaced while it still remains functional.
Check in Windows
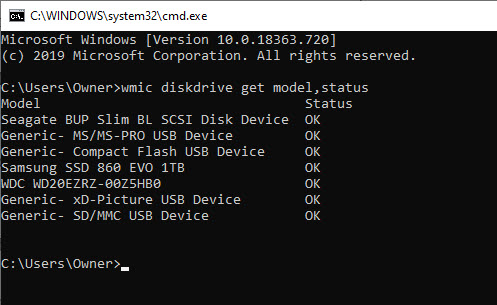
In Windows 10, you can manually check the S.M.A.R.T. status of your drives from the Command Prompt. Just right-click the Start button, select Run, and type “cmd“, then click OK or type “cmd” into the Cortana search bar, then click OK. In the Command Prompt pop-up box, type:
wmic diskdrive get model,status
It will return “Pred Fail” if your drive’s death is imminent; “Bad”, “Unknown” or “Caution” if its time to take care of a drive or “OK” if it thinks a drive is doing fine. Refer to below image:
Checking your hard drives health
Check on a Mac
On a Mac, you can check S.M.A.R.T. status by opening the Disk Utility program, clicking on the drive and looking at “S.M.A.R.T. Status” in the bottom left, which will either read “Verified” or “Failing”.
SMART Status can be Misleading
However, this basic S.M.A.R.T. information can be misleading. You only know when your drive is near death, but you can start to experience problems even if the basic S.M.A.R.T. status is okay.
You can also use Defraggler program I discussed in a previous post. When you use the Analyze feature of the program, it will show your disk health. Click here for the post on using Defraggler.
Manufacture Check
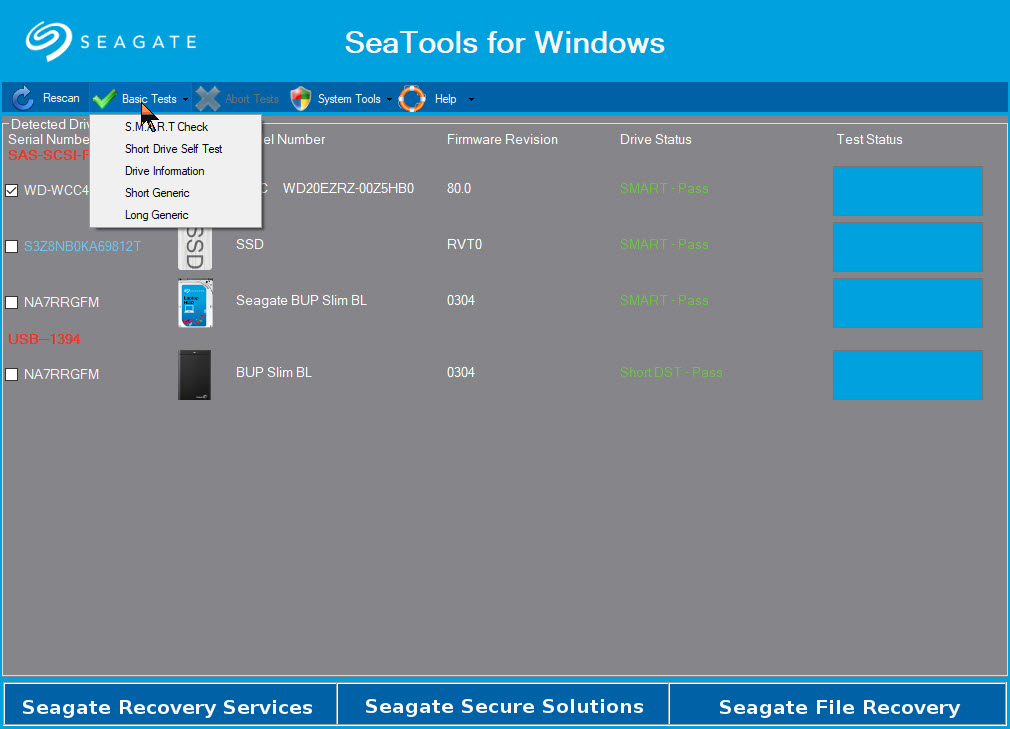
If you want an even deeper, more accurate picture into your drive’s health, check its manufacturer’s website for a dedicated tool; for example, Seagate has SeaTools for its drives, Western Digital has Data Lifeguard Diagnostic for its drives and Samsung has Samsung Magician for its SSDs. These tools can sometimes take into account certain technologies specific to their hard drives and SSDs.
Note! You may find that the SeaTools (Seagate) utility is the only software you will need. In the below image, it can diagnose Samsung, Western Digital as well as Seagate using several methods:
SeaTools for Windows options
Is Your Drive Almost Dead
Drives with the “Pred Fail” status won’t necessarily fail tomorrow. They could chug along for a year or be dead as a doornail in a few days if not hours.
If you’re getting warnings, it’s time to back up your files before your drive fails. Failure to act may cost you serious money to recover your data.
Now is not the time for a full backup, however: you don’t want to stress the drive with too many reads or it could fail while you’re backing up. Instead, plug in an external drive and copy your most important files onto it; family photos, work documents and anything else that can’t easily be replaced. Then, once you know those are safe, you can try doing a full drive clone with something like EaseUS Todo Backup Free.
I got a S.M.A.R.T. status of “Pred Fail” on my main hard drive. I quickly backed up my important files to an external drive. I never finished before it died. I tried the trick off turning my desktop on its side, then upside down. I got a little more life from the hard drive. Then I removed the hard drive and gently shook the device. I could hear the spindle sliding; then I knew if was totally dead. But it’s worth trying this trick.
Is Your Drive Dead
If your hard drive has already stopped working, things get a lot tougher and you’ll probably need a professional data recovery service which can cost $1,000 or more. But if you have pricelrss data on the drive, it may be worth it to you.
Prepare for Hard Drive Failure
It’s not a matter of “if” your hard drive will fail; it’s a matter of “when”. All hard drives fail eventually and if you want to avoid losing all your important files, you absolutely have to back up your computer regularly; including when the drive is healthy.
Take some time to set up an automatic, cloud based backup like Google Backup and Sync using Google Drive. It is one of the best things you can do to protect yourself from heartache later on. Or at least back up to an external drive using Windows 10 built-in File History Tool.
If your drive failed catastrophically with no warning, you can get back up and running in no time by having an up-to-date backup.
That’s it. Please feel free to share this post! One way to share is via Twitter, as mentioned below.
I hope you have found this post helpful. If so, click the Tweet icon below. This will launch Twitter where you click its icon to post the Tweet.
I have found TechSavvy.Life blog posts extremely helpful. Check them out for posts on smart phone apps, Macs and PCs!
Please feel free to leave a comment. I would love hearing from you. Do you have a computer or smart device tech question? I will do my best to answer your inquiry. Please mention the device, app and version that you are using. To help me out, you can send screenshots of your data related to your question.
The author’s Vietnam eBook on the Battle for Tra Bong: Events and Aftermath
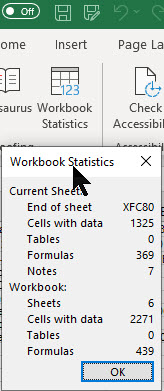
Microsoft Excel is getting a quick summary view of workbook statistics. This simple dialog box includes the boundaries of the sheets, tables, links, formulas and notes.
In a couple of clicks you can now view the workbook statistics.
This is for Excel in Office 365 on PCs and Macs
Copyright Scott Adams, Inc./Distributed by Universal Uclick for UFS
First, open an existing Excel workbook. Navigate to the Review tab and click on it. In the menu bar, head to the Proofing group. You will see the icon Workbook Statistics, just click on it to view. Refer to below image:
There are details for current sheet and the entire workbook. It is similar to Microsoft Word’s Word Count feature.
I Would Like to Hear From You
Please feel free to leave a comment. I would love hearing from you. Do you have a computer or smart device tech question? I will do my best to answer your inquiry. Please mention the device, app and version that you are using. To help us out, you can send screenshots of your data related to your question.
The author’s Vietnam eBook on the Battle for Tra Bong: Events and Aftermath
Every once in a while you should delete Chrome’s data for faster load times and to correct erratic behavior. If this is your first time to do this, be patient, it may take a minute or so.
If you’re trying to fix loading or formatting issues to improve your browsing experience on Google Chrome, clearing your data is an excellent place to start.
For example, if Chrome is slow or unresponsive or you change a document like deleting a sentence but the sentence is still there after saving the document, its time to clear your Chrome browser data. Before doing this, log out or exit your running applications. If an application’s behavior is erratic, its recommended you log out instead of just exiting the program.
This is for Google Chrome on multiple platforms
Copyright Scott Adams, Inc./Distributed by Universal Uclick for UFS
What Happens When your Data is Deleted?
When you visit a website, it will save (or remember) certain information on your hard or SSD drive. Cookies save a user’s browsing data and cache (stored information) helps webpages load more quickly by remembering images, videos, text and other parts of the webpage from your last visit instead of reloading everything with each visit.
When you clear your data, all information gets deleted. You control how much data is deleted. The load time of previously visited sites will increase because Chrome needs to load the content of the webpage again.
Clearing Chrome’s Data
To clear your data in Chrome, you’ll need to access the browser’s Settings menu. There are three different ways to do this.
The first way is to click the three vertical dots icon (the hamburger icon) in the top-right corner of the screen, hovering over the More Tools option and then selecting Clear Browsing Data. Refer to below image:
Clear your browing data option
In the above image, you may notice the shortcut key. To go straight to the page to clear your data, hold and press down on the Ctrl + Shift + Delete keys.
The third way is to enter chrome://settings/clearBrowserData in the address bar. See following image:
Alternate way to clear your browsing data
Now, the Clear Browsing Data window will be displayed.
The first thing you’ll do here is select the Time range for deleting the data. Click the drop down arrow next to Time range to expand the menu, then select the desired Time range; the default is All Time. It is recommended you use the default Time range. See below image:
Selecting your time range for clearing your data
Next, check the four boxes next to Browsing history, Download history, Cookies and 0ther site data and Cached images and files. If you want to clear passwords (not recommended), then checkmark Passwords and other sign-in data. Checking this box will force you to re-enter passwords you have setup before entering a website(s). Refer to below image:
Selecting your options for clearing data
Now click the Clear Data button to clear your data. See following image:
The last option for clearing your data
The process of clearing your data will take a litte while. If this is the first time, it may take several minutes, just be patient.
I Would Like to Hear from You
Please feel free to leave a comment. I would love hearing from you. Do you have a computer or smart device tech question? I will do my best to answer your inquiry. Please mention the device, app and version that you are using. To help us out, you can send screenshots of your data related to your question.
The author’s Vietnam eBook on the Battle for Tra Bong: Events and Aftermath
Over the past few months, I have researched on how to do this, create a footer that I can use repeatly without doing a manual insert of footer elements. I finally found an article on how to partly do this. In my example, we are going in inset a document footer with the latest date on the left, the document name in the middle and the page number on the right. Yes, it will take a little time but it’s worth the one-time investment. You will save time and effort in using this feature.
If you’ve got a favorite document footer like mine, you can save that using the Quick Parts feature of Microsoft Word. What a lot of users don’t know is that Quick Parts can be saved under different categories to be accessible under different menus.
Let’s use my favorite footer as an example. I’ve constructed one in a blank document using a three column table: the left column has the current Date, the middle column contains the File Name and the right column shows “Page X of Y“. Also, I’ve turned off the borders in the table; those lines you see are simply the grid lines that display in Word.
This is for Word for Office 365 PCs and Macs that support Quick Parts. Other versions of Word will be similar.
Copyright Scott Adams, Inc./Distributed by Universal Uclick for UFS
Lets get started.
Navigate to the the Insert tab, then to the Header option. Head to the bottom of the options and select Edit Footer. Your footer will be activated with the pointer in the left hand column.
Once again, go to the Insert tab, then select the Table option. Highlight the first 3 columns with your pointer. You will see 3 x 1 table description at top of your screen. Now, just click on the third grid element in the first row and the table will be inserted into your footer. See following image:
Selecting the table to be inserted for the custom footer
Inserting Current Date
In the first column of the footer table, type in the text Date: (there is one space after the text) then navigate to the Insert tab and click on the Date & Time option in the Text group. Select your date format and click OK. See below image:
Selecting the current Date format to be inserted into your custom footer
Inserting File Name
Now, hit the Tab key once, or move your pointer to the middle column. Again, go to the the Insert tab, then to the Footer option. Navigate to the bottom of the options and select Edit Footer. In the Insert group, select Document Info, then select File Name.
UPDATE: If you do not see Document Info, in the Search box type in “Add document info” and follow its steps.
Refet to below image:
Selecting the File Name to be inserted
Note! For demo purposes, I named this example document as &Filename. See below image:
Showing the inserteed Date and File Name for your custom footer
Inserting Page Number
Now, tab once more or position your pointer in the right column. Once again, from the Insert tab, select Page Number from the Header & Footer group. Next, hoover your pointer over Current Position and select Bold Numbers under the Page X of Y group. Refer to below image:
Inserting the Page Number as bold text for Page X of Y into your custom footer
Your footer elements will look similar to the following image:
Showing all elements for your custom footer
Formatting the Custom Footer
Now, you may want to align your footer elements. In my example, I am aligning the File Name to be centered. For the Page Number, I am choosing right justified. The Date is already left justified. At this point, you can change the font and/or font size and other formatting options. You may want to change font size for File Name to allow for long document names. Refer to below image:
Aligning the footer elements for your custom footer
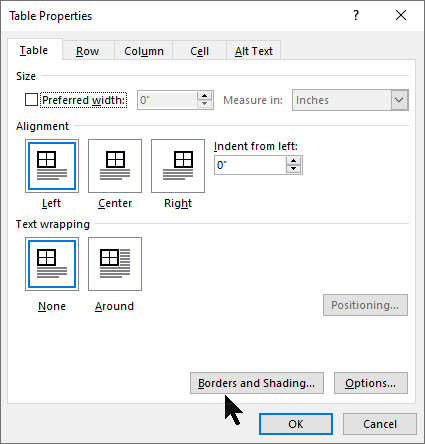
Next, lets remove the borders for our footer table. Right click on the “+” sign located to the left of the table, then select Table Properties. See below image:
Accessing the Table Properties for your custom footer
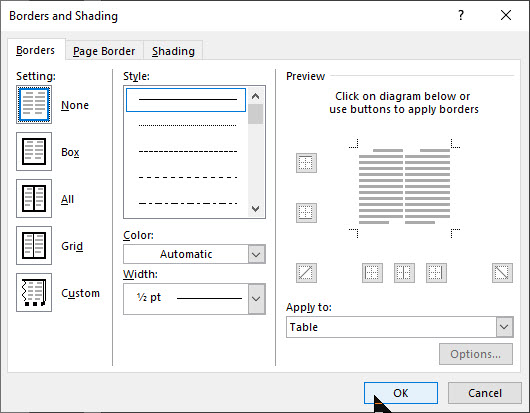
Now, select Borders and Shadings option. Under the Borders tab, select the None option, then click OK, then click OK again to remove the borders. Refer to below image:
Removing the borders for your custom footer
Your final footer result will be similar to the following image:
The final result of your custom footer
If you make a mistake, start from the miscue or start from stratch. As you can see, there are a lot of manual steps. So, instead of repeating all of the above just to insert a footer, we can easily access our favorite footer by using the Quick Parts feature.
Setting Up the Quick Part Feature
Highlight the footer with your pointer or click on the “+“sign located to the left of the table. Next, navigate back to the Insert tab. Select the Quick Parts option in the Text group. Then choose Save Selection to Quick Park Gallery. See below image:
Saving your custom footer to Quick Parts
Give the Footer a unique name, mine is My Best Footer. In the Gallery drop-down box, select Footers. In the Category drop-down box, select General. Now, give the footer a Description. When you are finished, click OK. Refer to below image:
Setting up the custom footer building block
Now your favorite footer will be an available selection whenever you click Footer on the Insert tab. Refer to following image:
Displaying your custom footer entry
Using Your Custom Footer
To try out your custom footer, open a blank document. Navigate to the Insert tab (click one), select the Footer option (click two). Locate your recent entry and click on it (click three). Your footer selection will be inserted. And you only used three clicks! See below image:
Inserting your custom footer into a document
There are a whole bunch of other Quick Parts Galleries available for you to save your favorite snippets in. For example, you could have a Quick Parts that inserts your “ Initials _____” on the last page of a draft. Another Quick Parts would be creating and inserting your favorite Watermark.
Edit Your Custom Footer Properties
Navigate to the Insert tab. Select the Quick Parts option in the Text group. Then choose the Building Blocks Organizer option. Next, locate and click on your custom footer entry. Then, click on the Edit Prolerties tab. Here you can change the custom Name, the Gallery, the Category, etc. Its best to leave the Gallery set to Footers and Category set to General.
UPDATE: To make your custom footer float to the top, select enter a new Category, and label it Alpha instead of selecting General.
Once you are finished, click OK. Refer to below image:
Editing your custom footer properties
Delete Your Custom Footer
Navigate back to the Insert tab. Select the Quick Parts option in the Text group. Then choose Building Blocks Organizer option. Next, locate and click on your custom footer entry. Then, click on the Delete tab. To complete the deletion process, click OK. See following image:
Deleting your custom footer
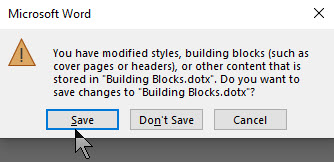
When you Exit Microsoft Word, you will see the following screen. Make sure you click Save to save your custom footer in the Building Blocks.dotx file, where your custom footer is stored. This is easy to overlook. If you don’t Save, you will lose your custom footer or any other snippet you created during your Word session.
Your final dialog box upon exiting Word. You must click Save to save your work.
You have successfully created, inserted, edited and deleted a custom footer.
I Would Like to Hear From You
Please feel free to leave a comment. I would love hearing from you. Do you have a computer or smart device tech question? I will do my best to answer your inquiry. Please mention the device, app and version that you are using. To help us out, you can send screenshots of your data related to your question.
The author’s Vietnam eBook on the Battle for Tra Bong: Events and Aftermath
This is a summary of Zoom posts I have blogged about over the past few weeks. During the COVID-19 pandemic, many of us are working from home using Zoom for video/audio conferencing. If you take some time, you can make the video meeting a smooth experience for all participants. The host of the Zoom meeting has the responsiblity to setup and run the meeting. By exploring the following blog posts, you can achieve your goal of hosting a successful meeting, making it easy for the participants to join the video conference and keeping the Zoom troll attacks at a minimum.
This if for a PCs and Macs browsers and smartdevices that support Zoom
Copyright Scott Adams, Inc./Distributed by Universal Uclick for UFS
Following are my blog links for a Zoom video/audio meeting:
Please feel free to leave a comment. I would love hearing from you. Do you have a computer or smart device tech question? I will do my best to answer your inquiry. Please mention the device, app and version that you are using. To help us out, you can send screenshots of your data related to your question.
The author’s Vietnam eBook on the Battle for Tra Bong: Events and Aftermath