The latest iOS updates enhance the Messages app by allowing users to use bold, italics, and animated text effects in iMessage on iOS 18 or later. These features add flair and emphasis to messages, but recipients must also have iOS 18 to view them properly.
The Messages app is much livelier thanks to the latest updates to iOS. With these updates, you can express yourself in more ways than ever with special effects. You can now bold text, italicize it, and even apply some of these effects to emojis! Let’s find out how to add the impact to iMessage in iOS 18.
What’s to Like About This Feature
Add some extra flair to every text you send.
Emphasize parts of a message to make it stand out.
System Requirements
This tip is for iPhones running iOS 18 or later.
Click here to learn how to update your iPhone to the latest iOS version.
Adding Effects to a Message
First, open an iMessage conversation, and tap the Text Effects button to the lower right. Refer to the below image:
Selecting the Text Effects button
Next, there is a wide variety of text effects to choose from. Just highlight the text to which you want to apply an effect. The top row is simply for formatting the text. You can choose between Bold, Italics, Underline, Strikethrough, or all at once. See the below image:
Selecting text formatting options
Now, you can also apply some animation texts to give your texts some extra flair.
Thankfully, a preview of each animation effect will play on a loop so you can see how they look to your recipient(s).
See the following image for the Big and Small effects:
Selecting Big and Small text effects
Next, you can try the other six effects by tapping its button. To turn off an effect, tap the button again.
Note! Your recipient(s) must be running iOS 18 to see the effects. If they are using iOS 17 or below, the message will be in plain text.
Disclaimer
Technology is always changing. Rarely is there static tech for smartphones and desktops. Thus, the contents of this post are only valid at the time of writing. Blog posts older than six months may have directions incompatible with your device or OS. Hopefully, older post content will continue to work as advertised. Thank you for reading TechSavvy.Life for Technology at Work For You.
Quote For the Day
“Real eyes, realize, real lies…”
Tupac Shakur
X (Twitter) Info
That’s it. Please feel free to share this post! One way to share is via Twitter.
Just click the Tweet icon below. This will launch Twitter where you click its icon to post the Tweet.
Checkout TechSavvy.Life for blog posts on smartphones, PCs, and Macs! You may email us at contact@techsavvy.life for comments or questions.
Was this post helpful? We would love to hear your comments. Do you have a computer or smart device tech question? I will do my best to answer your inquiry. Just send an email to contact@techsavvy.life. Please mention the device, app, and version you are using. To help us, you can send screenshots of the data related to your question.
The author’s Vietnam eBook on the “Battle for Tra Bong Vietnam: Events and Aftermath” can be accessed from a Kindle device or the Kindle App for a desktop or smartphone. The apps are free.
The author’s Vietnam eBook on the Battle for Tra Bong Vietnam: Events and Aftermath
The Visual Look Up feature in the Photos app allows iOS users to identify landmarks in their images using AI. This tool enhances travel experiences by providing information about locations, helping users remember where photos were taken.
RAYMOND OGLESBY @RaymondOglesby2 July 23, 2024 – 2 minutes read time
Overview
If you are familiar with the Photos app, you might be familiar with a feature called Visual Look Up, which uses AI to identify objects in your photos. Most people have heard about its ability to recognize specific faces and identify plants. But, did you know that you can also use Visual Look Up to identify locations and important landmarks?
It’s so cool to know at a glance exactly where a photo was taken, especially if you have recently been traveling and have been to numerous historical sights or landmarks. It can be difficult to keep track of what photo was taken where. Now with the AI of the Visual Look Up feature, you no longer have to remember!
Why You Will Like This Tip:
Get the most out of the Visual Look Up feature by learning to use it to identify locations.
Quickly and easily obtain additional info about the landmarks and locations you have visited.
Not sure what that cool landmark in front of you is? Use Visual Look Up to find out!
System Requirements
This is for iPhones running iOS 16 or later. Screenshots are from iPhone 14 Pro running iOS 18+
Click here to learn how to update your iPhone to the latest iOS version.
Identifying Landmarks
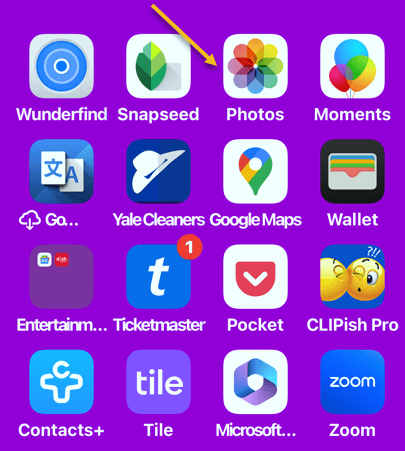
First, open the Photos app. Refer to the below image:
Accessing the Photos app
Next, select a photo that features a famous location or landmark. (This will not work if the photo is of your shoes at the statue of Andrew Jackson. It needs to be a photo of Andrew Jackson himself, otherwise, the AI will not be able to identify it.) See the below image:
Select a photo
Now, tap the info button at the bottom. If the AI works on this photo, the Info button will be decorated with sparkles. See the following image:
Selecting the Info button
Next, tap the Look Up Landmark. Refer to the below image:
Selecting the Look Up Landmark option
Now, you can select various options for further inquiry, like getting directions, placing a call to the location, or looking up further information about the location via the Internet. See the below image:
Options for your landmark photo
Summary
Now you can use Visual Look Up which uses AI to identify locations and important landmarks in your photos.
It can be difficult to keep track of what photo was taken where. But now with this feature. you no longer have to remember the landmark photo location.
Disclaimer
Technology is always changing. Rarely is there static tech for smartphones and desktops. Thus, the contents of this post are only valid at the time of writing. Blog posts older than six months may have directions incompatible with your device or OS. Hopefully, older post content will continue to work as advertised. Thank you for reading TechSavvy.Life for Technology at Work For You.
Quote For the Day
“The great myth of our times is that technology is communication.”
Libby Larsen
X (Twitter) Info
A very nice feature for iOS. Please feel free to share this post! One way to share is via Twitter.
Just click the Tweet icon below. This will launch Twitter where you click its icon to post the Tweet.
Checkout TechSavvy.Life for blog posts on smartphones, PCs, and Macs! You may email us at contact@techsavvy.life for comments or questions.
Was this post helpful? We would love to hear your comments. Do you have a computer or smart device tech question? I will do my best to answer your inquiry. Just send an email to contact@techsavvy.life. Please mention the device, app, and version you are using. To help us, you can send screenshots of the data related to your question.
The author’s Vietnam eBook on the “Battle for Tra Bong Vietnam: Events and Aftermath” can be accessed from a Kindle device or the Kindle App for a desktop or smartphone. The apps are free.
The author’s Vietnam eBook on the Battle for Tra Bong Vietnam: Events and Aftermath
This post provides tips for handling AI-generated summaries in Google search results. It explains how to disable these overviews using specific search modifiers.
RAYMOND OGLESBY @RaymondOglesby2 July 23, 2024 – 3 minutes read time
This is for devices running Google or Bing. Screenshots are from Windows 10 desktop
Get the Latest Desktop Google Update
Open Google, click the 3-dot menu icon (upper right corner), then click the Settings option. If Google is outdated, it will automatically update.
Why You Will Like This Tip
View your Google or Bing search results without an AI-generated summary.
Narrow your search results to what you just want to preview.
Overview
We rely on Google every day to provide us information. But what happens when our source of knowledge becomes messy and unreliable? AI Overviews utilize Google’s Gemini AI to provide an answer to your query right on the search page; no need to click.
Using the AI Modifier
Still in its infancy, this feature occasionally surfaces incorrect information, so some web surfers look to disable it entirely. There are a few ways to make an AI Overview go away, but no method is as simple as tricking Google itself into getting rid of it. Google uses search modifiers, named operators, which help narrow search results. Here are a few examples:
Use quotations (” “) to search for the exact phrase
Add site: to search a single website
Search for a certain type of file with filetype:
Exclude terms with a minus (-) symbol. The minus symbol stands for NOT.
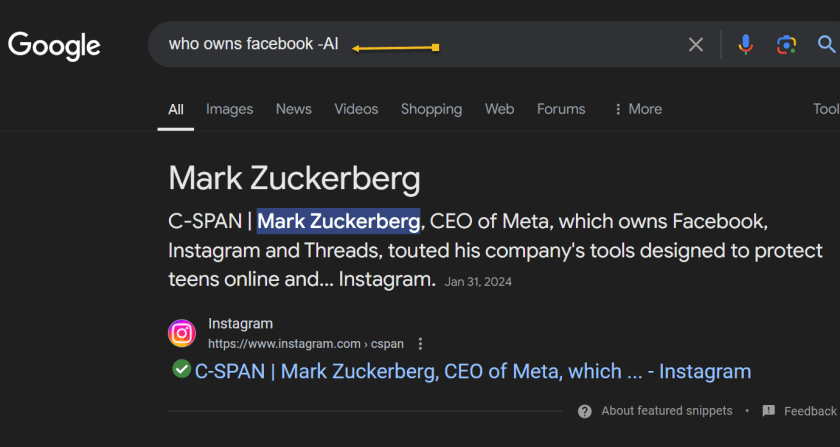
If we ask “who owns Facebook” an AI-generated summary will be displayed. Refer to the below image:
With AI-generated summary
And if you add the term -AI at the end of the query, an overview is not generated. It’s a very simple solution to the AI Overview problem that can be quickly repeated on subsequent queries without needing multiple steps. See the below image:
Without AI-generated summary
However, it’s worth noting that this does not work because of the -AI modifier. On subsequent tests, we found that putting pretty much anything in there (Ex: -i, –sports, -farm) also did the same thing.
Summary
So, no, Google did not add a secret AI kill switch to its search engine. Instead, AI Overviews are likely only available under certain conditions, and by using a search modifier, you circumvent those parameters. Still, it’s an easy way to game the system until we get an easier way to disable these overlays.
Disclaimer
Technology is always changing. Rarely is there static tech for smartphones and desktops. Thus, the contents of this post are only valid at the time of writing. Blog posts older than six months may have directions incompatible with your device or OS. Hopefully, older post content will continue to work as advertised. Thank you for reading TechSavvy.Life for Technology at Work For You.
Quote For the Day
“Real gs move in silence like lasagna.”
Lil Wayne
X (Twitter) Info
That was easy. Please feel free to share this post! One way to share is via Twitter.
Just click the Tweet icon below. This will launch Twitter where you click its icon to post the Tweet.
Checkout TechSavvy.Life for blog posts on smartphones, PCs, and Macs! You may email us at contact@techsavvy.life for comments or questions.
Was this post helpful? We would love to hear your comments. Do you have a computer or smart device tech question? I will do my best to answer your inquiry. Just send an email to contact@techsavvy.life. Please mention the device, app, and version you are using. To help us, you can send screenshots of the data related to your question.
The author’s Vietnam eBook on the “Battle for Tra Bong Vietnam: Events and Aftermath” can be accessed from a Kindle device or the Kindle App for a desktop or smartphone. The apps are free.
The author’s Vietnam eBook on the Battle for Tra Bong Vietnam: Events and Aftermath
This post provides instructions for protecting your privacy on Yahoo Mail for iPhone and PC. It explains how to prevent Yahoo from selling your information and control personalized ads.
RAYMOND OGLESBY @RaymondOglesby2 October 1, 2024 – 4 minutes read time
This is for the iPhone and PC running Yahoo Mail. Screenshots are from iPhone 14 Pro running iOS 17.7
Overview
Most companies today are selling your information in some way or form. Luckily, most companies allow you to opt out of having your data sold; if you know how to ask for it.
While you would think the “do not sell my personal information” setting would be on the Yahoo security page, you will find it under a different menu. Let’s explore telling Yahoo, “Do not sell my personal information” and control personalized ads.
System Requirements
Yahoo Mail
iOS 16 or later
Browser
Windows 11/10
iPhone
Click here to learn how to update your iPhone to the latest iOS version.
Why Apply This Post
Protect your privacy by stopping Yahoo from selling your information.
Make sure your data stays out of the hands of third parties.
Opening Settings
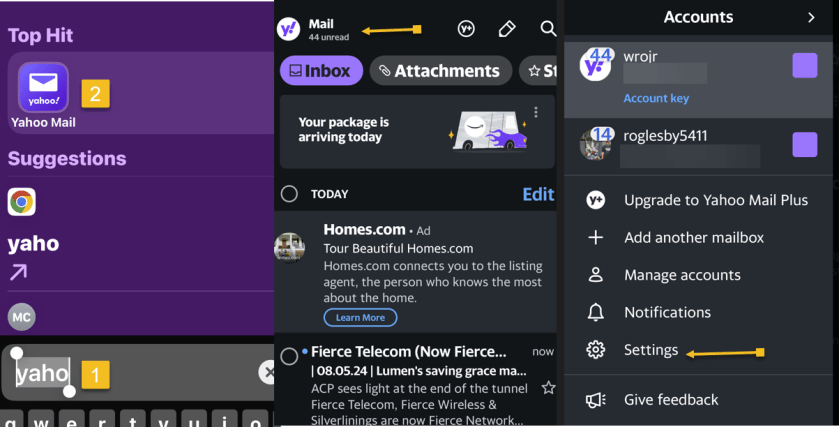
First, open the Yahoo Mail app. Next, tap your profile icon in the upper left. Now, tap Settings. Refer to the below image:
Accessing Settings
Accessing Privacy
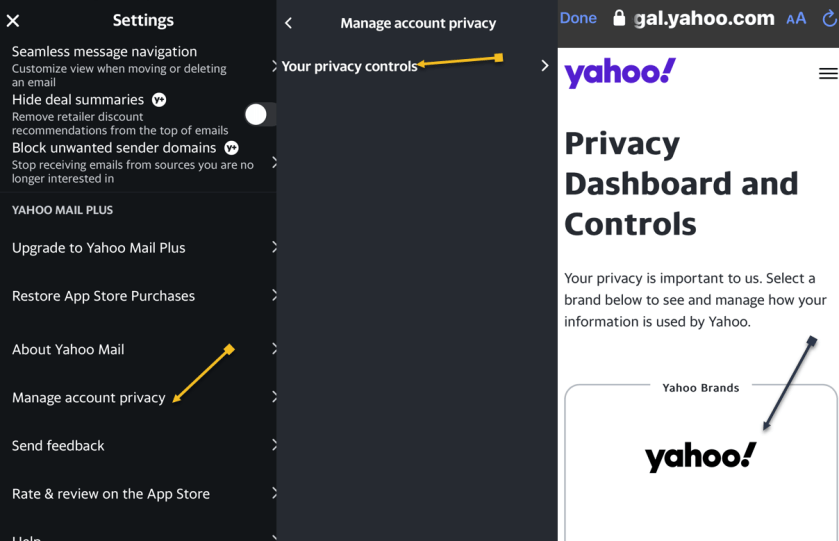
First, scroll down and tap Manage account privacy. Next, tap Your Privacy controls. Now, tap the Yahoo logo. See the below image:
Accessing Privacy
Setting the Do Not Sell Option
First, you will be prompted to log into your Yahoo mail account. Enter your username/email address, tap Next, and follow the on-screen prompts to log in. Next, After logging in, scroll down to the Sale and sharing of personal information and tap the link. See the following image:
Accessing the Sale and Share link
Disable the Do Not Sell Option
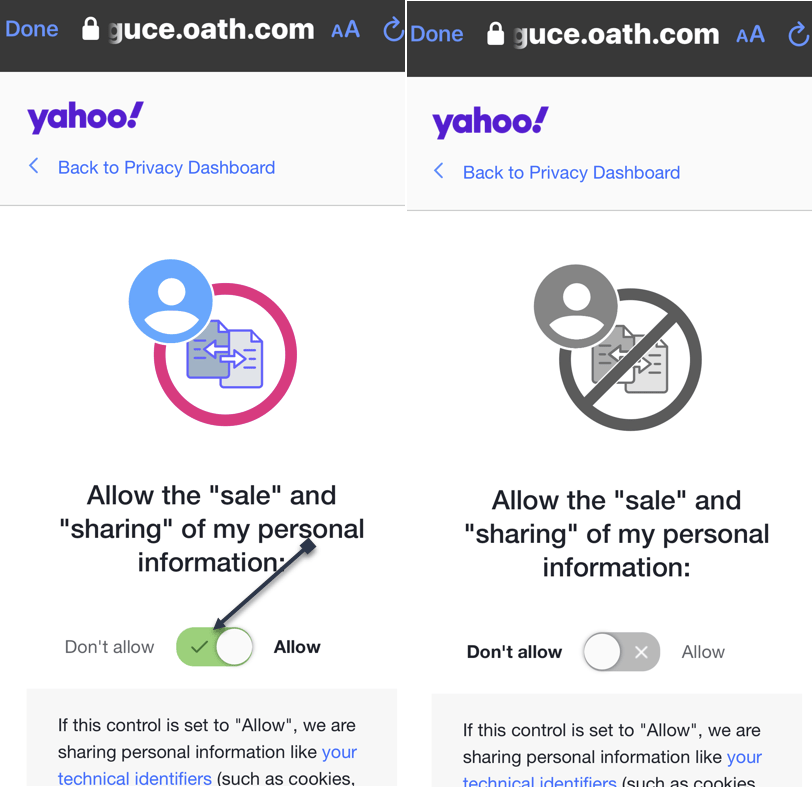
First, tap the toggle. The default is set to AllowYahoo to sell your data. Next, the page and its toggle will turn gray, indicating that the setting has been disabled. Refer to the below image:
Setting the Do Not Sale option
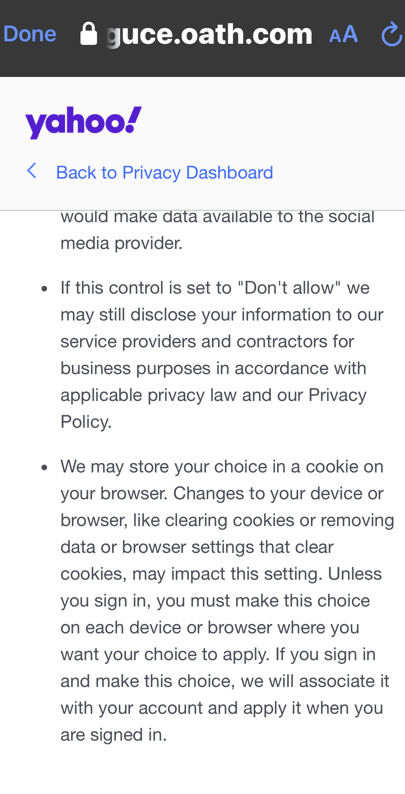
You may want to read the “fine print” about setting the option to Don’t Allow. If you clear cookies for your browser, the option is reset to Allow. See the below image:
The fine print
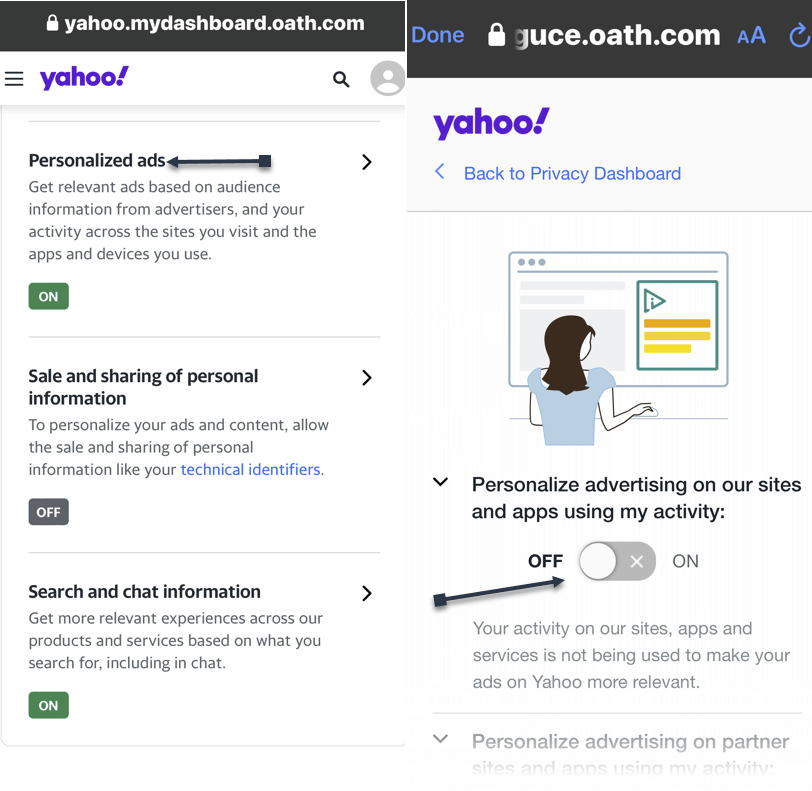
While here, go back to the Sale and sharing of personal information screen to control ads. Tap the Personalized ads link and turn off any option on delivering ads. See the following image on the first of four options:
Turning off Personalized ads
Using a PC Desktop/Laptop Running Windows 10/11
Open Yahoo Mail
Click the Gear icon in the upper left below the Home icon
Click the More settings link
Click About our Ads menu option. You would think of accessing the Security and Privacy menu option, but Yahoo wants to hide selling your data.
Under What choices do I have section, click View our other Privacy Controls
click the Yahoologo, and sign in
Click the Sale and sharing personal information link
Click the toggle. The default is set to AllowYahoo to sell your data. Next, the page and its toggle will turn gray, indicating that the setting has been disabled. If you have set the toggle to Don’t Allow on your iPhone first, the toggle will already be disabled.
Disclaimer
Technology is always changing. Rarely is there static tech for smartphones and desktops. Thus, the contents of this post are only valid at the time of writing. Blog posts older than six months may have directions incompatible with your device or OS. Hopefully, older post content will continue to work as advertised. Thank you for reading TechSavvy.Life for Technology at Work For You.
Quote For the Day
“I play to win, whether during practice or a real game.”
– Michael Jordan
X (Twitter) Info
That’s it. Please feel free to share this post! One way to share is via Twitter.
Just click the Tweet icon below. This will launch Twitter where you click its icon to post the Tweet.
Checkout TechSavvy.Life for blog posts on smartphones, PCs, and Macs! You may email us at contact@techsavvy.life for comments or questions.
Was this post helpful? We would love to hear your comments. Do you have a computer or smart device tech question? I will do my best to answer your inquiry. Just send an email to contact@techsavvy.life. Please mention the device, app, and version you are using. To help us out, you can send screenshots of the data related to your question.
The author’s Vietnam eBook on the “Battle for Tra Bong Vietnam: Events and Aftermath” can be accessed from a Kindle device or the Kindle App for a desktop or smartphone. The apps are free.
The author’s Vietnam eBook on the Battle for Tra Bong Vietnam: Events and Aftermath
This post provides a guide on turning on flash notifications for iPhone, especially beneficial for the deaf or hard of hearing. It includes system requirements, and step-by-step instructions.
RAYMOND OGLESBY @RaymondOglesby2 September 24, 2024 – 3 minutes read time
Overview
How do you turn on the flash notification on your iPhone? Sometimes we might need an extra alert if an important message or phone call is expected.
This feature is intended to be used by the deaf or hard of hearing, but it can be helpful for anyone who would rather receive visual alerts. Be aware that turning on this feature could deplete your battery life rather quickly, depending on how many notifications you get throughout the day. Let’s explore how to turn on flashlight notifications on iPhones.
System Requirements
This post works on iPhones running iOS 16 or later. Screenshots are from iPhone 14 Pro running iOS 17.6.1
Click here to learn how to update your iPhone to the latest iOS version.
Reasons For This Tip
Get an extra visual alert any time you receive notifications.
Make sure you never miss an important text or phone call.
Turn on Flash Notifications
Open the Settings app, and tap Accessibility. Refer to the below image:
Selecting Accessibility option
Tap Audio & Visual. See the below image:
Selecting the Audio & Visual option
Select LED Flash for Alerts. See the following image:
Selecting LED Flash for Alerts option
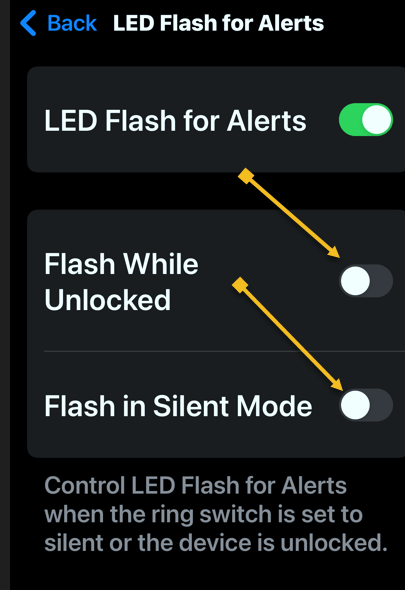
Tap the toggle next to LED Flash for Alerts to enable this feature. Refer to the below image:
Toggle to enable LED Flash for Alerts
By default, the LED will only flash if your iPhone is locked and the ringer is on. However, two toggles allow you to make it so that the flash will still go off when your device is unlocked or if Silent mode is enabled. See the below image:
Other options for flash alerts
That’s how to use your iPhone flashlight for notifications. Since the flash is on the back of your phone, placing your phone face down when you set it down is best. Just make sure you have a good scratch-protectant cover on the screen.
Disclaimer
Technology is always changing. Rarely is there static tech for smartphones and desktops. Thus, the contents of this post are only valid at the time of writing. Blog posts older than six months may have directions incompatible with your device or OS. Hopefully, older post content will continue to work as advertised. Thank you for reading TechSavvy.Life for Technology at Work For You.
Quote For the Day
When times are bad is when the real entrepreneurs emerge.
Robert T Kiyosaki
X (Twitter) Info
You are finished. Please feel free to share this post! One way to share is via Twitter.
Just click the Tweet icon below. This will launch Twitter where you click its icon to post the Tweet.
Checkout TechSavvy.Life for blog posts on smartphones, PCs, and Macs! You may email us at contact@techsavvy.life for comments or questions.
Was this post helpful? We would love to hear your comments. Do you have a computer or smart device tech question? I will do my best to answer your inquiry. Just send an email to contact@techsavvy.life. Please mention the device, app, and version you are using. To help us, you can send screenshots of the data related to your question.
The author’s Vietnam eBook on the “Battle for Tra Bong Vietnam: Events and Aftermath” can be accessed from a Kindle device or the Kindle App for a desktop or smartphone. The apps are free.
The author’s Vietnam eBook on the Battle for Tra Bong Vietnam: Events and Aftermath
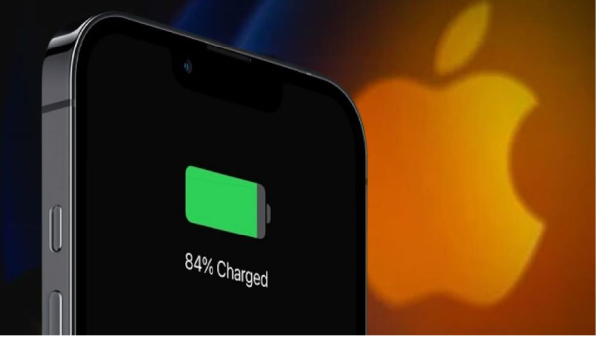
Apple faced backlash for slowing down older iPhone models to preserve battery life. Users can now monitor battery health and enable optimized battery charging to prolong battery lifespan. Additionally, they can track battery usage by app and learn to conserve battery and prevent overheating.
RAYMOND OGLESBY @RaymondOglesby2 September 17, 2024 – 4 minutes read time
Overview
Apple landed in hot water with customers several years ago when a feature designed to slow the processors of older iPhone models to keep them from suddenly shutting down came to light. Critics maintained that Apple was throttling the speed of earlier iPhone models to push customers toward newer devices. At the same time, Apple insisted that the feature was necessary to cope with aging batteries. Now, Apple lets users monitor the health of their iPhones’ battery. Let’s explore this feature.
System Requirements
This post works on iPhones running iOS 15 or later
Click here to learn how to update your iPhone to the latest iOS version.
Check Battery Health
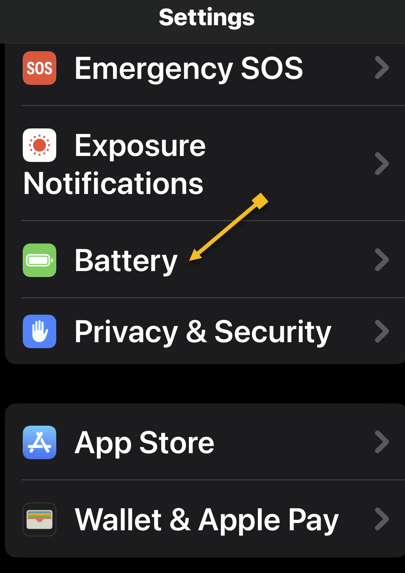
First, open the Settings app, and tap on Battery. Refer to the below image:
Accessing the Battery option
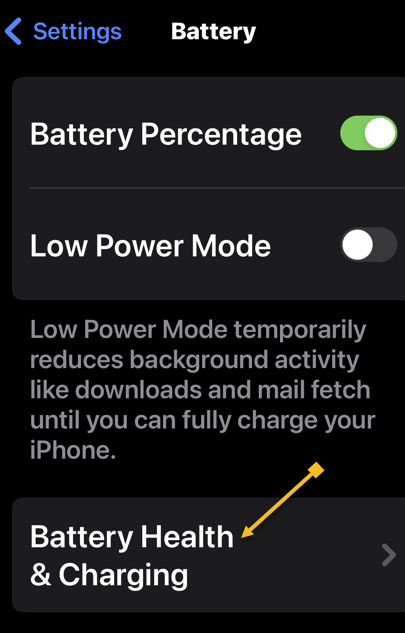
Next, tap on Battery Health & Charging. See the below image:
Accessing the Battery Health option
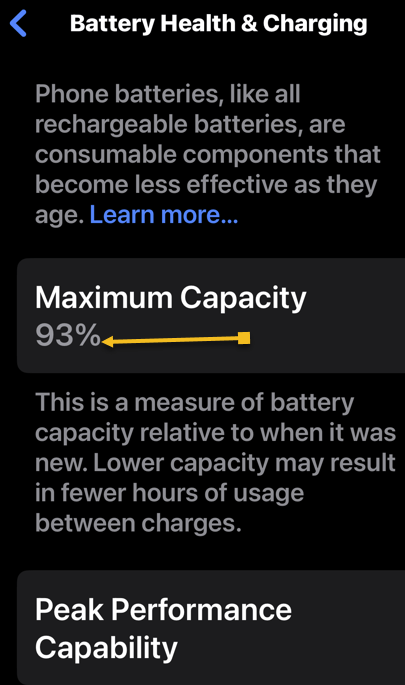
Now, you will see your battery capacity next to Maximum Capacity. See the following image:
Viewing the Maximum Capacity of the battery
The Maximum Capacity tells you your iPhone battery’s capacity compared to its capacity when it was brand new. For example, if your Maximum Capacity is 85%, that is all your battery can charge. On this screen, you can also enable Optimized Battery Charging, which reduces aging by optimizing how your battery behaves when charging. Refer to the below image:
Enabling Optimized Battery Charging
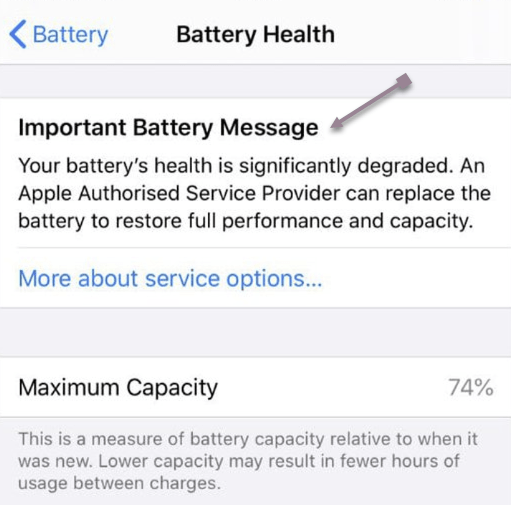
If your battery’s Maximum Capacity has dropped below 80%, a message like this will pop up on your screen if you experience an unexpected shutdown. See the below image:
Viewing Battery Health degradation warning message
You can tap Disable to turn off battery throttling on your iPhone or you may want to consider replacing your battery to improve your iPhone’s performance and the amount of time it can operate between charges.
Track Battery Usage by App
To view your battery usage by app, go back to:
Settings > Battery
Swipe down on the Battery settings screen and you will discover battery usage by app, starting with the biggest battery hogs. By default, the tool shows you the percentage of battery charge by each app. Tap Show Activity or a specific app, and the information changes to display the time the app has used the battery, both in the foreground and background. See the following image:
Viewing Battery Usage
Conserve Battery
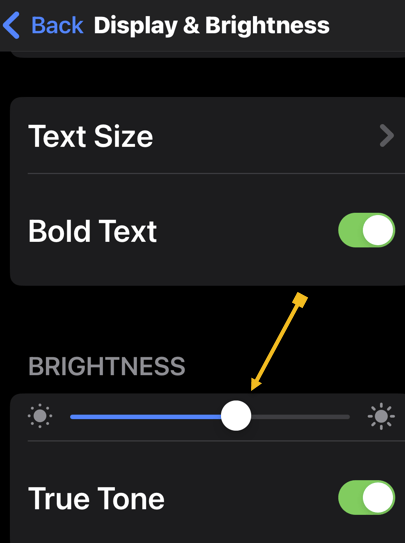
Besides Optimized Battery Charging you can conserve your battery, turning down the brightness of your screen will increase battery health. To adjust the screen brightness, head to:
Settings > Display & Brightness
and moving the slider. Refer to the below image:
Turning down Brightness to conserve battery usage
Keep Your iPhone Cool
Using your iPhone in hot conditions can permanently shorten battery life. Store your device where the temperature is between -20º and 45º C (-4º to 113º F). Do not leave your device in your car, because temperatures in parked cars can exceed this range.
If your device gets too warm or too cold, certain features might become temporarily disabled. In extreme conditions, your device might become temporarily disabled. A temperature warning screen will be displayed. See the below image:
iPhone is too hot warning message
Disclaimer
Technology is always changing. Rarely is there static tech for smartphones and desktops. Thus, the contents of this post are only valid at the time of writing. Blog posts older than six months may have directions incompatible with your device or OS. Hopefully, older post content will continue to work as advertised. Thank you for reading TechSavvy.Life for Technology at Work For You.
Quote For the Day
The real secret to a life of abundance is to stop spending your days searching for security and to start spending your time pursuing opportunity.
Robin S. Charma
X (Twitter) Info
That’s it. Please feel free to share this post! One way to share is via Twitter.
Just click the Tweet icon below. This will launch Twitter where you click its icon to post the Tweet.
Checkout TechSavvy.Life for blog posts on smartphones, PCs, and Macs! You may email us at contact@techsavvy.life for comments or questions.
Was this post helpful? We would love to hear your comments. Do you have a computer or smart device tech question? I will do my best to answer your inquiry. Just send an email to contact@techsavvy.life. Please mention the device, app, and version you are using. To help us, you can send screenshots of the data related to your question.
The author’s Vietnam eBook on the “Battle for Tra Bong Vietnam: Events and Aftermath” can be accessed from a Kindle device or the Kindle App for a desktop or smartphone. The apps are free.
The author’s Vietnam eBook on the Battle for Tra Bong Vietnam: Events and Aftermath
The post provides instructions for blocking contacts and numbers. It covers blocking contacts in the phone app and blocking numbers from recent calls.
RAYMOND OGLESBY @RaymondOglesby2 September 10, 2024 – 3 minutes read time
Overview
You can easily block any number if you receive texts and calls from a saved contact or a random number. Let’s explore how this is accomplished.
System Requirements
This post works on iPhones running iOS 15 or later. Screenshots are from iPhone 14 Pro running iOS 17.6.1
Click here to learn how to update your iPhone to the latest iOS version.
Block a Person in Your Contacts
If the person you want to block is already saved in your iPhone’s contact list, you can block them via the contacts tab in the Phone app.
First, open your Phone app. Refer to the below image:
Accessing your Phone app
Next, tap the Contacts icon. See the below image:
Selecting your Contacts icon
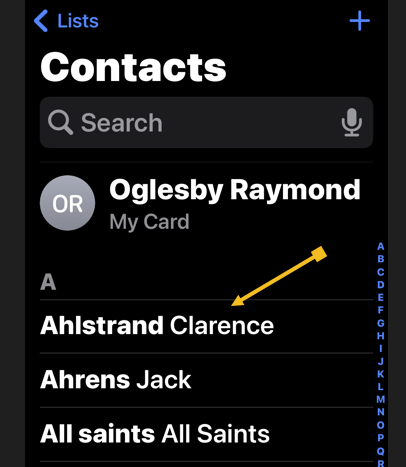
Now, tap the contact you want to block. See the following image:
Selecting a Contact to block
Next, tap the Block Caller option. Refer to the below image:
Selecting the Block Caller option
Now, tap the Block Contact menu option. See the below image:
Selecting the Block Contact option
Block a Number
If the number you want to block is not saved in your iPhone contact list, you can still block it in the Phone app.
First, open the Phone app. Refer to the below image:
Accessing your Phone app
Next, tap the Recents icon. See below image:
Selecting your Recents icon
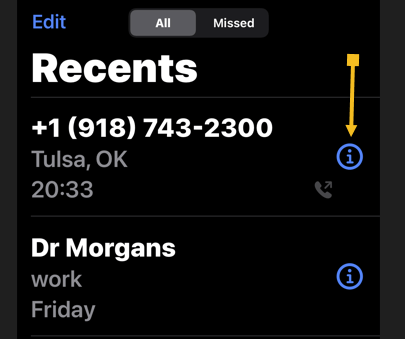
Now, fund the number you want to block and tap the Info button. See the following image:
Selecting the Info button of the number to block
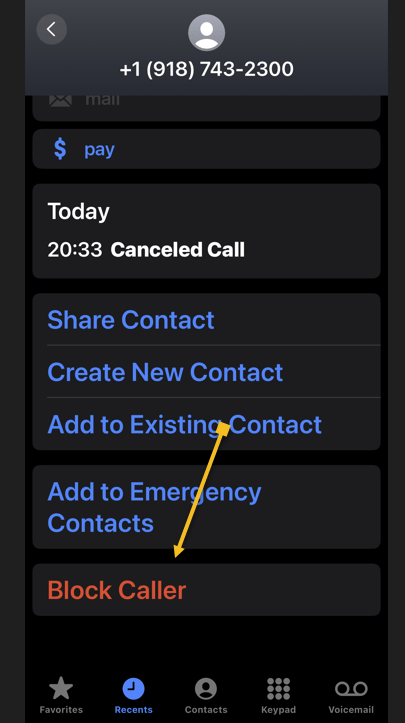
Next, tap the Block Caller option. Refer to the below image:
Selecting the Block Caller option
Now, tap the Block Contact menu option. See the below image:
Selecting the Block Contact option
And that’s how you block a number or a contact on your iPhone. You can always unblock a caller by the above steps and tapping the Unblock Caller option.
Disclaimer
Technology is always changing. Rarely is there static tech for smartphones and desktops. Thus, the contents of this post are only valid at the time of writing. Blog posts older than six months may have directions incompatible with your device or OS. Hopefully, older post content will continue to work as advertised. Thank you for reading TechSavvy.Life for Technology at Work For You.
Quote For the Day
“Success is not achieved by winning all the time. Real success comes when we rise after we fall. Some mountains are higher than others. Some roads steeper than the next. There are hardships and setbacks but you cannot let them stop you. Even on the steepest road you must not turn back.”
Muhammad Ali
X (Twitter Info
Yea, you are finished. Please feel free to share this post! One way to share is via Twitter.
Just click the Tweet icon below. This will launch Twitter where you click its icon to post the Tweet.
Checkout TechSavvy.Life for blog posts on smartphones, PCs, and Macs! You may email us at contact@techsavvy.life for comments or questions.
Was this post helpful? We would love to hear your comments. Do you have a computer or smart device tech question? I will do my best to answer your inquiry. Just send an email to contact@techsavvy.life. Please mention the device, app, and version you are using. To help us, you can send screenshots of the data related to your question.
The author’s Vietnam eBook on the “Battle for Tra Bong Vietnam: Events and Aftermath” can be accessed from a Kindle device or the Kindle App for a desktop or smartphone. The apps are free.
The author’s Vietnam eBook on the Battle for Tra Bong Vietnam: Events and Aftermath
The content discusses how to play music on Amazon Echo using various services and how to set default music and podcast services. It also covers connecting and streaming music via Bluetooth.
RAYMOND OGLESBY @RaymondOglesby2 August 27, 2024– 7 minutes read time
This is for devices using Amazon Echo device. Screenshots are from iPhone 14 Pro running iOS 17.6.1
Alexa is a jack of all trades, but Amazon’s digital assistant can also help you listen to music via Pandora, Spotify, and other streaming services on your Echo device. Let’s explore listening to music on your Echo.
Your Amazon Echo possesses various skills, but its ability to play music is most useful and enjoyable. You can listen to music in various ways, though the process differs depending on whether you want to hear your own media library or stream songs from a specific service.
Amazon does not make it easy if you are looking to listen to music that you own, though it’s still doable. Your best bet is to stream music from your phone to your Echo over Bluetooth.
The simplest way to play music on your Echo device is to listen through a music streaming service. By default, your Echo will link to Amazon Music, or Amazon Music Prime if you are a Prime member. You can also connect to other popular music services and wirelessly stream songs directly from your mobile device.
Link to Streaming Services
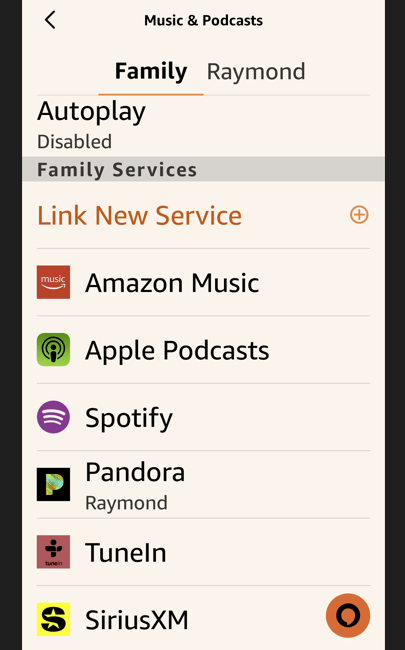
After you set up your Amazon Echo, you can link your favorite music services, including Amazon Music, Apple Music, Deezer, iHeartRadio, Pandora, SiriusXM, Spotify, Tidal, TuneIn, Vevo, and Global Player. They all need an account with each one before accessing it through your Echo.
While most of these services have premium subscription options, you do not need to pay to play music through your Echo device. If the service offers a free tier, you can still listen (in a limited capacity). Refer to the below image:
Available Echo services
First, open the Alexa app on your mobile device to start playing music through your service of choice.
Next, tap More > Music & More, then swipe down the screen to the Link New Service section
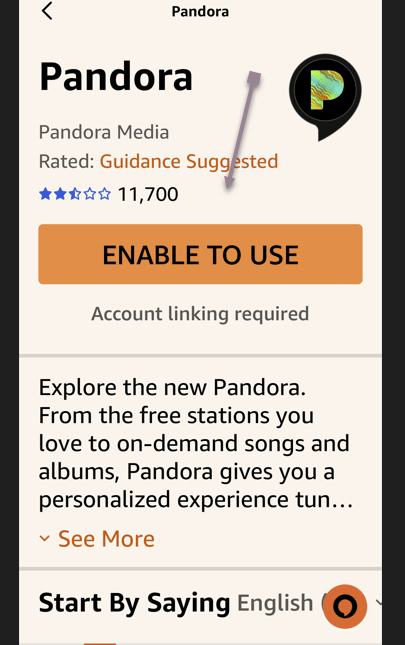
Now, tap the service name (we are selecting (Pandora), you want to add and choose Enable to Use. See the below image:
Enabling a service (Pandora)
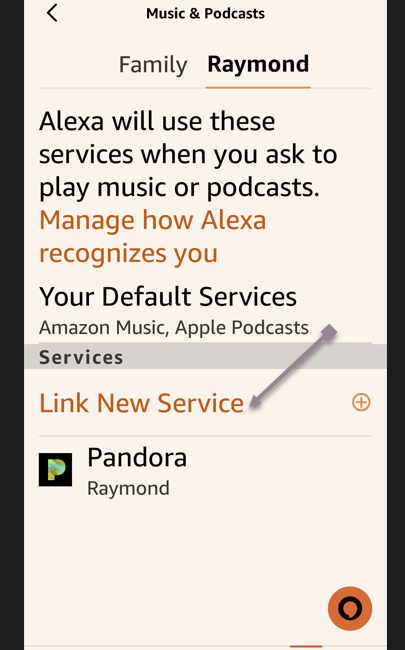
Alternatively, tap the settings gear at the top right of the Music & More screen and tap Link New Service to see all the available services you can add. See the following image:
Selecting to link a new service (Pandora)
Next, sign in to that service and agree to let Alexa access your data. Refer to the below image:
Successful linking a new service (Pandora)
Now, after you finish adding your services, scroll to the bottom of the Music page in the Alexa app. You should see all the new services you previously added. To start playing music, you can open a streaming app and select your Echo as the destination to begin listening.
You can also ask your Echo to play music by specifying the name of the service. For example, you could say something like “Alexa, play the Rolling Stones from Apple Music,” or “Alexa, play country music from Pandora“.
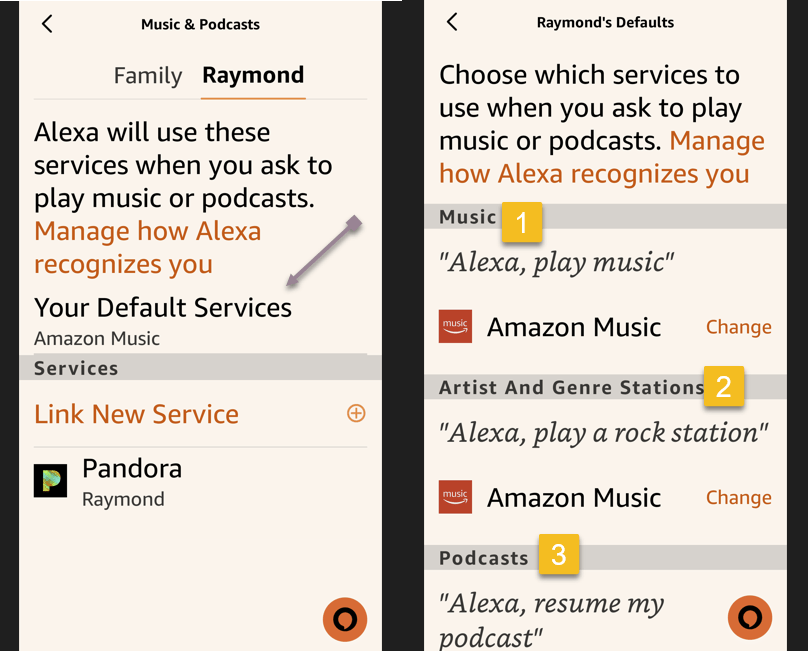
Selecting Default Services
You must set one as the default to avoid specifying a service in your command. You can do this for both music and podcasts. First, head back to the Music & More screen in the Alexa app, tap the Settings icon at the top, and then select Default Services.
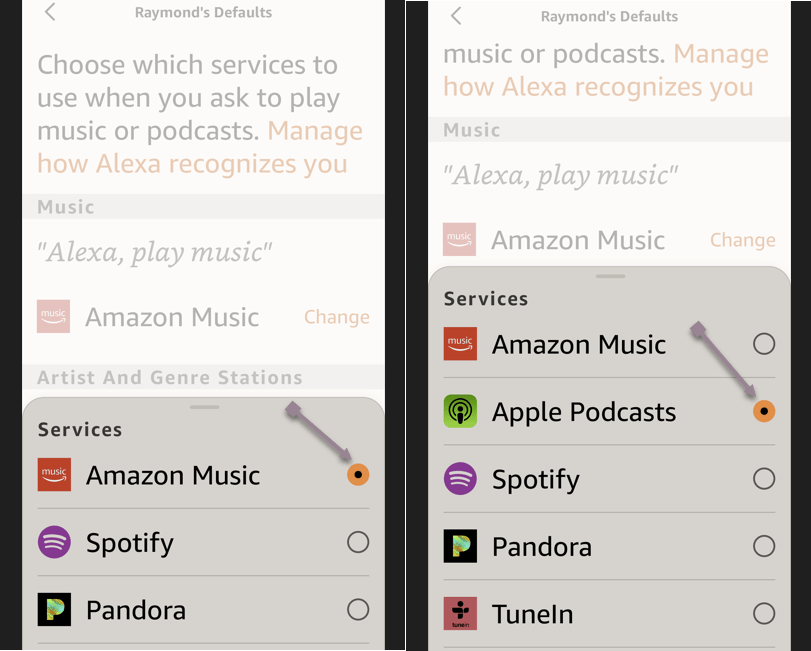
Next, tap Change next to Music and select the service you wish to set as the default for playing music. Tap Change next to Artist and Genre Stations to set default stations for a specific artist and genre. You can then tell Alexa to play music from an artist or genre, and it will play it from your default. service. See the below image:
Selecting to change your default services
Now, tap Change next to Music to set your music default service. Then tap Change next to Podcasts to set your default podcast service. See the following image:
Changing your default services
When you ask Alexa to play a song, album, artist, genre, or station, you can simply tell it what you want to play, and it will pull the music from the appropriate place without you needing to specify the name of the service. Refer to the below image:
Playing your selection
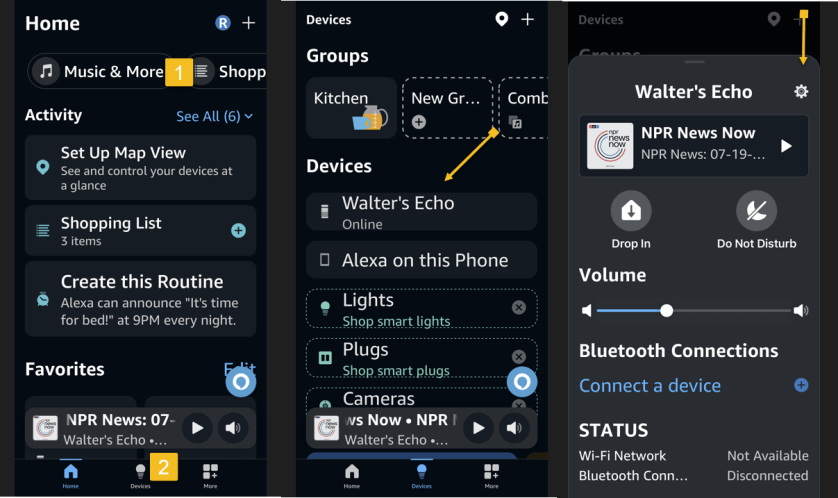
You may need to change the default speaker if you do not hear sound from your Echo device.
First, head to Music & More and tap the Groups icon in the bottom middle of the screen.
Next, tap your Echo device, then tap its Settings gear icon. See the below image:
Accessing Settings for your Echo device
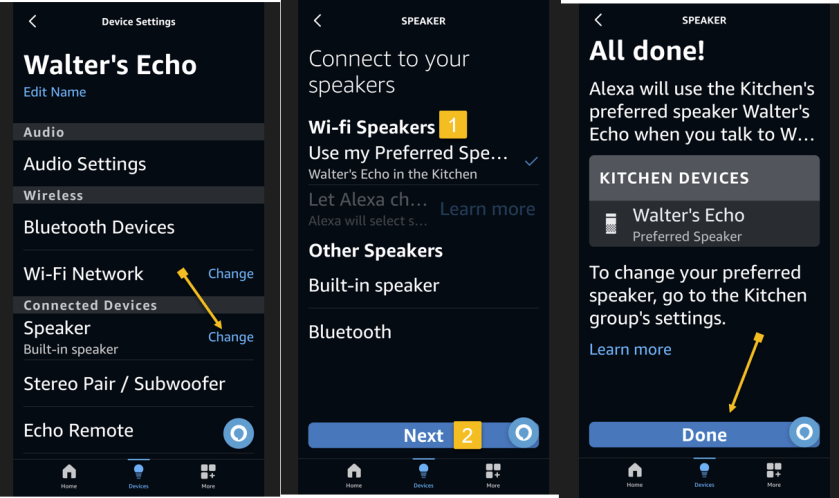
Now, tap the Change link and select your preferred speaker.
Next, tap the Next button. You will receive a message that your preferred speaker has been set. Simply tap Done to close the message. See the following image:
Changing your default speaker
Stream Music Over Bluetooth
Instead of listening to music directly from your Amazon Echo device, you can stream songs from your mobile device or computer to the speaker through Bluetooth.
Stream From a Mobile Device
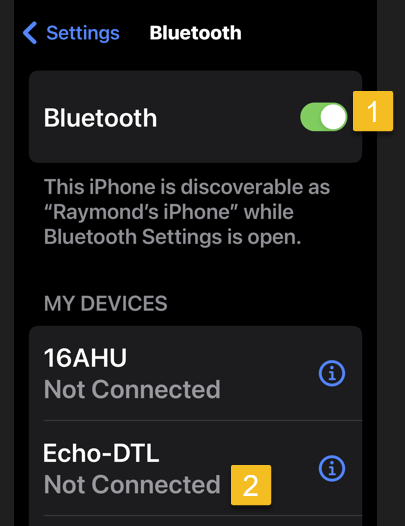
With your phone or tablet nearby, say “Alexa, pair,” and your Echo will enter pairing mode. Open the Bluetooth settings screen on your device and tap your Echo (it should appear as Echo-XXX) when it shows up. Alexa then announces the connection. Refer to the below image:
Choosing to connect your Echo device
Alternatively, you can pair the Echo to your mobile device through the Alexa app. Head to Devices and select the Echo you want to pair with your phone or tablet.
Connect to Echo
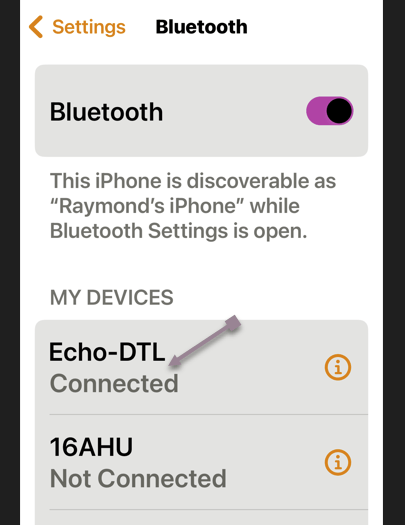
First, under Bluetooth Connections for that device, tap Connect a device. Choose your device, and your Echo is connected. See the below image:
Your Echo device is connected
Now, the audio will go through your Echo device when you play music from your phone or tablet. You can then control playback from your mobile device or Alexa.
Disconnect/reConnect From/To Echo
To disconnect your Echo from your mobile device, say, “Alexa, disconnect from [name of device].”
You can always reconnect the device by saying “Alexa, connect to [name of device]”.
Disclaimer
Technology is always changing. Rarely is there static tech for smartphones and desktops. Thus, the contents of this post are only valid at the time of writing. Blog posts older than six months may have directions incompatible with your device or OS. Hopefully, older post content will continue to work as advertised. Thank you for reading TechSavvy.Life for Technology at Work For You.
Quote For the Day
“In the real world, the smartest people are people who make mistakes and learn. In school, the smartest people don’t make mistakes.”
Robert T Kiyosaki
X (Twitter) Info
That’s it. Please feel free to share this post! One way to share is via Twitter.
Just click the Tweet icon below. This will launch Twitter where you click its icon to post the Tweet.
Checkout TechSavvy.Life for blog posts on smartphones, PCs, and Macs! You may email us at contact@techsavvy.life for comments or questions.
Was this post helpful? We would love to hear your comments. Do you have a computer or smart device tech question? I will do my best to answer your inquiry. Just send an email to contact@techsavvy.life. Please mention the device, app, and version you are using. To help us out, you can send screenshots of your data related to your question.
The post discusses the accessibility features on iPhone and iPad, emphasizing their importance for users with visual or audio impairments. It provides a detailed guide on enabling Accessibility Shortcut and Back Tap gestures, highlighting various options such as AssistiveTouch, Color Filters, and Voice Control.
RAYMOND OGLESBY @RaymondOglesby2 August 20, 2024 – 7 minutes read time
This is for iPhone and iPad. Screenshots are from iPhone 14 Pro running iOS 17+
Accessibility is always important since it makes devices easier for those with visual or audio impairments. Apple always does a great job with accessibility, and you will find plenty of accessibility options on your iPhone or iPad to make life easier. Perhaps you need to have more sound on one side of your favorite headphones, or you just need to make text easier to read. No matter what you need, iOS 17 and iPadOS 17 are very inclusive, so you will not feel left behind. And to make it even easier to access your favorite accessibility tools, there is the Accessibility Shortcut on your favorite iPhone or iPad.
How to Enable
Launch the Settings app on your iPhone or iPad.
Tap on Accessibility.
Tap on Accessibility Shortcut; it’s all the way to the bottom. Refer to the below image:
Selecting Accessibility Shortcut option
Tap the action you would like to perform when you triple-click the Home or Side button so that a blue checkmark appears next to it. You can assign multiple functions to the shortcut.
If you want to reorder the options, just drag and drop. Tap and hold the handle on the right side of each option to move it.
Triple-click your Home button (Touch ID devices) or Side button (Face ID devices) to perform the action you have assigned to the shortcut.
If you have assigned multiple options, simply choose the action you want to perform from the menu. See the below image:
Assigning multiple shortcuts and reordering them
Here’s a brief description of the options you have and what they are:
AssistiveTouch: Adds the ability to access many common hardware buttons and gesture controls with single taps; a useful feature for those with motor impairments.
Background Sounds: A new feature in iOS 15, Background Sounds lets you play soothing white noise to help you concentrate. Using the Accessibility Shortcut toggles your selected sound. First, you need to set up your Background Sounds.
Classic Invert Colors: A great option for anyone with a visual impairment such as color blindness. All colors across iOS will be inverted.
Color Filters: Changes the color layout of the screen for those with color blindness.
Full Keyboard Access: This allows you to navigate the iOS interface without using touch input. A physical keyboard is required to use this feature.
Increase Contrast: This will increase the contrast of visual elements on the screen, making it easier to see and read text.
Left/Right Balance: This turns on your custom audio balance setting if you have one set up. For example, if you want more sound on the left or right side of your earbuds or headphones, you will want to adjust that audio balance. Turning this off will go back to the default setting.
Magnifier: Triggers a camera-style viewfinder with sharp zoom controls so you can see small text. You will need the Magnifier enabled to have this option available.
People Detection: With People Detection, your iPhone 12 or iPhone 13 uses Machine Learning with the LiDAR scanner to determine if an object in the camera is a person. You will receive audio feedback to help you determine how far away or close a person is to you.
Reduce Motion: This turns on the Reduce Motion setting, which reduces motion in the user interface, including the parallax with app icons. This can also help conserve some battery power.
Reduce Transparency: This reduces the transparency used in apps and websites, including blurred backgrounds. Having this on improves the legibility of text.
Reduce White Point: Reduces the intensity of bright colors for those with sensitivities or color blindness.
Smart Invert Colors: Same as Classic Invert Colors, except it does not change photos, media, and some apps.
Switch Control: This lets you use external switches, or the screen itself, as a switch for motor accessibility.
Voice Control: This lets you speak commands to your iPhone or iPad.
VoiceOver: Allows your iPhone or iPad to speak to you when enabled. Commonly used by folks with visual impairments.
Zoom: Allows you to zoom your content for better visibility. You can then use two and three-finger gestures to tap and pan around.
Guided Access: This keeps the iPhone in a single app and allows you to control which features are available. You need the Guided Access feature enabled before it is available as an Accessibility Shortcut option.
Once you have made your selection for the Accessibility Shortcut on iPhone and iPad, you can simply triple-click the Home button or the Side button on iPhones and iPads with Face ID from anywhere, not just from Settings, and your iPhone or iPad will enable the function you have selected. To disable it, just triple-click the button again. If multiple functions are assigned, tap the option you want to use.
Back Tap
iOS 14 added a new Back Tap gesture. With the Back Tap, you can double-tap or even triple-tap the back of your iPhone for quicker access to some commonly used actions, such as accessing the Notification Center or Control Center. You can also use the Back Tap gesture to launch Shortcuts that you have created, opening up a whole new world of possibilities.
Launch Settings on your iPhone or iPad.
Tap Accessibility.
Tap Touch. See the following image
Selecting the Touch option
Tap Back Tap at the bottom.
Tap Double Tap or Triple Tap to choose an action. Refer to the below image:
Selecting Back Tap options
Select an action for your chosen Back Tap. Options include the Accessibility Shortcut that we just created, or you can choose from System, Accessibility, Scroll Gestures, or your own Shortcuts actions. See the below image:
Selecting Double and TripleTtap functions.
Quick Access
As you can see, having an Accessibility Shortcut and Back Tap gestures can make your life easier. It adds another layer of customization to your device, and you do not need to fiddle around in the settings every time to get to certain accessibility actions. Even if you are not visually or hearing impaired, these accessibility features are handy for everyone.
Disclaimer
Technology is always changing. Rarely is there static tech for smartphones and desktops. Thus, the contents of this post are only valid at the time of writing. Blog posts older than six months may have directions incompatible with your device or OS. Hopefully, older post content will continue to work as advertised. Thank you for reading TechSavvy.Life for Technology at Work For You.
Quote For the Day
“Real work is completed in silence and strikes a chord in the minds of only a very few.”
CG Jung
X (Tweeter) Info
That’s it. Please feel free to share this post! One way to share is via Twitter.
Just click the Tweet icon below. This will launch Twitter where you click its icon to post the Tweet.
Checkout TechSavvy.Life for blog posts on smartphones, PCs, and Macs! You may email us at contact@techsavvy.life for comments or questions.
Was this post helpful? We would love to hear your comments. Do you have a computer or smart device tech question? I will do my best to answer your inquiry. Just send an email to contact@techsavvy.life. Please mention the device, app, and version you are using. To help us out, you can send screenshots of the data related to your question.
The author’s Vietnam eBook on the “Battle for Tra Bong Vietnam: Events and Aftermath” can be accessed from a Kindle device or the Kindle App for a desktop or smartphone. The apps are free.
The author’s Vietnam eBook on the Battle for Tra Bong Vietnam: Events and Aftermath
This post emphasizes the importance of strong, unique passwords and the use of password managers to enhance security. It highlights the risks of using common or personal information-based passwords and provides tips for creating and managing secure passwords.
RAYMOND OGLESBY @RaymondOglesby2 August 13, 2024 -9 minutes read time
This is for devices using passwords. Screenshots are from iPhone 14 Pro running iOS 17.5.1+
If you are still using “qwerty” or “starwars” as a password, you should stop doing this. Let’s find out what makes a bad password, why you should care, and how to make a good one.
The Case For Strong Passwords
Don’t have the password to get into your bank account? You are out of luck unless you can trick the bouncer into telling you the password is “kangaroo.” A simple password like that would be a terrible choice to protect your access to a bank site. And yet, chances are good you are using something just as bad, because stronger passwords are too hard to remember.
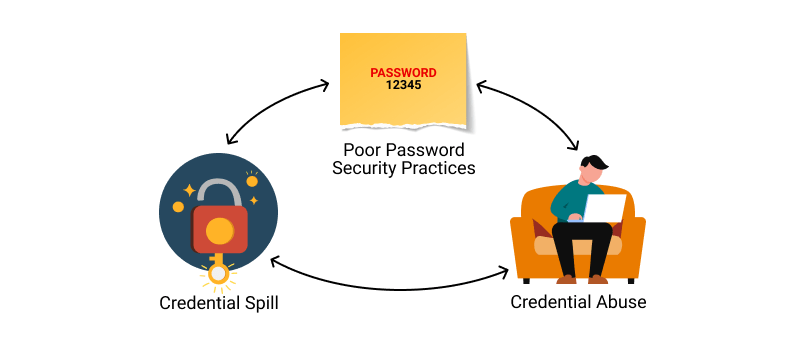
The only safe way to store proper passwords is in a password manager. If you are not using one, you probably rely on a highly crackable password like “baseball” or “12345”, or you have memorized one complex password, like “Jazz2day4Me!” and use it everywhere. Password security is no small matter. Given the enormous risk, you need to keep your passwords safe.
Even the best password manager does not guarantee the safety of your accounts; not if you use it to store the same old, tired passwords. You have to switch out your old and weak passwords for new and stronger ones.
Once you have replaced all your lame passwords with strong, unique ones, you can relax, at least until a data breach forces a change. The National Institute of Standards and Technology (NST) no longer recommends changing passwords every 90 days. NIST now recommends using long phrases like “Correct-Horse-Battery-Staple” and changing them only when necessary. If you have terrible passwords, “when necessary” means right now.
Bad passwords
Just what makes a bad password? Let’s look at some of the attributes of terrible passwords, and then some pointers on improving them.
Ditch the Dictionary
Every few months a news outlet posts a list of the worst passwords. We see a lot of easy-to-type options, like“12345” and “qwerty”. Easy for you to type? Sure. But also easy for hackers to crack. Other common (and poor) passwords consist of simple dictionary words, like “baseball”, “monkey”, and “starwars” in the list of worst passwords. These, too, are easy to crack.
A few of the best password managers (tap or click a button to view):
Some secure websites lock down after a given number of wrong password attempts, but many do not. For those with no bad guess lockout, hackers can cross a list of email addresses with a list of popular passwords and set up an automated process to keep trying combinations until they get in.
A properly secured website does not store your password anywhere. Instead, it runs the password through a hashing algorithm, a one-way encryption. The same input always produces the same output, but there’s no way to return to the original password from the resulting hash. If the password you type hashes to the same one that’s stored, you gain access. Even if hackers capture the site’s user data, they do not get passwords, just hashes.
But smart hackers can crack weak passwords if they know the site’s hashing function. They start by running a huge dictionary of common passwords through the hashing function. Then they look for the resulting hashes in the captured data. Each match is a cracked password. Sites with the best security enhance the hash function with password salting, which makes table-based cracking impossible, but why take the risk? Just stay out of the dictionary.
Think Differently
What about this perfect password: 1qaz2wsx3edc4rfv. You just “type” it by sliding a finger down four slanted columns of the keyboard. You think it’s so perfect, that you use it everywhere. And that is a big mistake.
Hardly a week goes by without news of a breach at some company or website, exposing thousands or millions of usernames and passwords. Smart victims change their passwords immediately. Those who ignore the problem may find themselves locked out of their accounts after the hackers have reset your passwords.
Those hackers know that all too many people recycle their passwords. Once they find a working username and password pair, they try the same credentials on other sites. You may not be so worried about losing access to your old Dropbox account, but if you used the same login on your bank’s website, you are in big trouble.
Using the same credentials on websites
It gets worse. If someone else takes control of your email account, they can lock you out by changing the password. Then they can break into your other accounts by having a password reset link emailed to that account. Worried yet? You should be!!!!
Stay Away From Being Personal
Using personal information as the basis for your passwords is awfully tempting, but it’s a bad idea. Whether your dog’s name is Fifi or Khaleesi, that name probably appears in the dictionaries hackers use for brute-force attacks. Other possibilities such as the initials and birthdate of a family member probably will not fall to a brute-force attack. If someone wants to hack your account specifically, that personal data can fuel a trial-and-error guessing attack.
Do not think for a minute that your personal details are private. There are dozens of sites people can use to find details about anybody: address, birthdate, marital status, and more. Your social media posts can be another source of personal info, especially if you have not properly secured your accounts. A determined hacker (or a nosy neighbor) can probably guess any password you build based on your data.
Shut the Back Door
If you are not using a password manager, you have surely experienced forgetting the password for a site. It’s all too common. That is why virtually every login page includes a “Forgot your password?” link. Some sites send a reset link to your email address, while others let you reset the password after answering your security questions. And that opens a back door to anyone wanting to hack your account.
Most sites offer abysmal options for security questions like:
What is your mother’s maiden name?
Where did you go to high school?
What was your first job?
As noted, your personal life is an open book to anyone with internet searching skills. When possible, ignore the preset questions. Create your own question, with a unique answer you will always remember but nobody else could guess.
It’s harder when the site does not let you define your own questions. In that case, your best bet is to use a memorable answer that’s a total LIE like:
My mother’s maiden name is Fauci.
I went to school at More Science High School.
For my first job, I was a linotype operator.
There is an element of risk since you might forget which lie you chose. We suggest storing these oddball answers in the iPhone Notes app or onGoogle Drive.
What To Do Now
We hope we have convinced you that using common passwords is a rotten idea, as is building passwords from personal information. Even the best strong, random password becomes a liability if you use it everywhere. If you are ready to spring into action, here are some starting points:
Use a password manager
Switch to a better password manager
Remember an extremely secure master password for your password manager and keep it on another app. Better yet, just remember the master password.
Take advantage of a random password generator to upgrade your old, bad passwords
You could even create your own random password generator in Excel
Enable multi-factor authentication wherever available
If a secure site does not take care of security, you could still lose that site’s credentials to a data breach, but by making all your passwords long, strong, and unique, you can rest assured that you have done everything you can to protect your online accounts from password-based attacks.
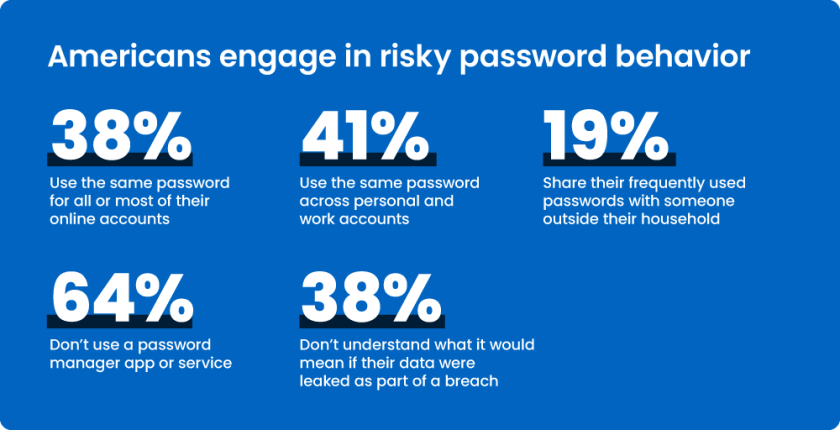
Risky password behavior
You may want to switch to using Passkeys or Passphrases.
Source: PC Mag
Disclaimer
Technology is always changing. Rarely is there static tech for smartphones and desktops. Thus, the contents of this post are only valid at the time of writing. Blog posts older than six months may have directions incompatible with your device or OS. Hopefully, older post content will continue to work as advertised. Thank you for reading TechSavvy.Life for Technology at Work For You.
Quote For the Day
“Try and keep on trying until that which seems difficult becomes possible and that which seems only possible becomes habit and a real part of you.”
Dieter F Uchtdorf
X (Twitter) Info
That’s it. Please feel free to share this post! One way to share is via Twitter.
Just click the Tweet icon below. This will launch Twitter where you click its icon to post the Tweet.
Checkout TechSavvy.Life for blog posts on smartphones, PCs, and Macs! You may email us at contact@techsavvy.life for comments or questions.
Was this post helpful? We would love to hear your comments. Do you have a computer or smart device tech question? I will do my best to answer your inquiry. Just send an email to contact@techsavvy.life. Please mention the device, app, and version you are using. To help us, you can send screenshots of the data related to your question.