I am Raymond Oglesby, an Information Technology (IT) specialist with 30 years in the field. I have taught Microsoft Applications and troubleshot computers in 15 countries and many States. My career was focused on mainframes and desktops from application development to implementation. I have written hundreds of programs for various architectures. I decided to start a blog to share my knowledge and experiences with you. I plan on updating this blog at least twice a week about smart phone apps to Windows.
Please feel free to leave a Comment or Tweet. I would love to hear from you. Do you have a computer tech question? I will do my best to answer your inquiry. Please mention the app and version that you are using. To help me out, you can send screenshots of your data related to your question.
Yes, the weather is warmer and the sun is out more. Unfortunately, that also means it’s bug bite season. While, of course, there are bug sprays and other deterrents, you can not ward them all off. But if you get bit, there’s a solution to all that itching.
Yes, the weather is warmer and the sun is out more. Unfortunately, that also means it’s bug bite season. While, of course, there are bug sprays and other deterrents, you can not ward them all off. But if you get bit, there’s a solution to all that itching.
This is for anyone using a Bite Away device
As it turns out, heat can help relieve bug bite itchings, and there’s a handy, portable tool that does just that. The Bite Away from Amazon offers relief from stings and bites from insects (particularly mosquitos and biting gnats) by applying heat to a specific area. The small, pen-shaped tool features a ceramic head that heats up to 124 degrees Fahrenheit and is applied for 3-5 seconds. While those seconds are not going to be the most comfortable moments of your life, they will alleviate the itch for several hours. Refer to the below image:
Bite Away device
This device can be purchased from Amazon or Target at 29.98, or Walmart at $19.98 (limited price).
Bite Away is appropriate for all ages (just be sure to be delicate with small children as this does have some sting to it) and is approved by the FDA. Plus, unlike traditional treatments such as creams, it makes zero mess and has no medicinal smell.
So how does it work? According to Bite Away, an insect’s bite triggers an immune reaction and our bodies produce histamine which binds to nerve cells and can cause itching. Bite Away works by using heat as a “counter-irritant” that stops the signal to itch from traveling to your brain. The pen also works via heat shock which could slow the release of histamine and other inflammatory responses that cause itching.
Whether you plan to be camping with the family, lounging by the lake, or just generally being outdoors during bug season, Bite Away could help with some pretty much inevitable itching.
Disclaimer
Technology is always changing and rarely is their static tech for smartphones and desktops. Thus, the contents of this post are only valid at the time of writing. Blog posts older than six months may have directions incompatible with your device or OS. Hopefully, older post content will continue to work as advertised. Thank you for reading TechSavvy.Life for Technology at Work For You.
Quote For the Day
We are stuck with technology when what we really want is just stuff that works.
Douglas Adams
Tweet Info
That’s it. Please feel free to share this post! One way to share is via Twitter.
Just click the Tweet icon below. This will launch Twitter where you click its icon to post the Tweet.
Checkout TechSavvy.Life for blog posts on smartphones, PCs, and Macs! You may email us at contact@techsavvy.life for comments or questions.
Please feel free to leave a comment. I would love to hear from you. Do you have a computer or smart device tech question? I will do my best to answer your inquiry. Just send an email to contact@techsavvy.life. Please mention the device, app, and version you are using. To help us out, you can send screenshots of your data related to your question.
Author’s E=Book
You can access the e-book from a Kindle device, the Kindle App for the desktop or smartphone, which is a free app.
The author’s Vietnam eBook on the Battle for Tra Bong Vietnam: Events and Aftermath
One of the best features of Amazon Kindle eReaders is the ability to borrow library books. However, just like physical books from a library, they come with return dates.
One of the best features of Amazon KindleeReaders is the ability to borrow library books. However, just like physical books from a library, they come with return dates. Let’s explore a nifty trick to “keep” a book after its return date.
This is for the Amazon Kindle. Screenshots are from Kindle Paperwhite (11 generation)
It may seem strange, but digital eBooks from the library are treated the same as physical books. That means there are a limited number of eBooks to check out, and you typically only get them for 14 days. When those 14 days are up, you can check it out again, but there’s usually a waitlist of people who you will have to wait behind.
There’s a very simple “trick” that will allow you to read a library book on your Kindle for an indefinite length of time. All you have to do is put your Kindle in Airplane mode before the due date and never close out of the book. Wait, are we suggesting you steal from the library?
The best part about this trick is it’s a victimless “crime”. You are not preventing the next person on the waitlist from getting the book. The eBook has still technically been “returned,” but your Kindle does not know that.
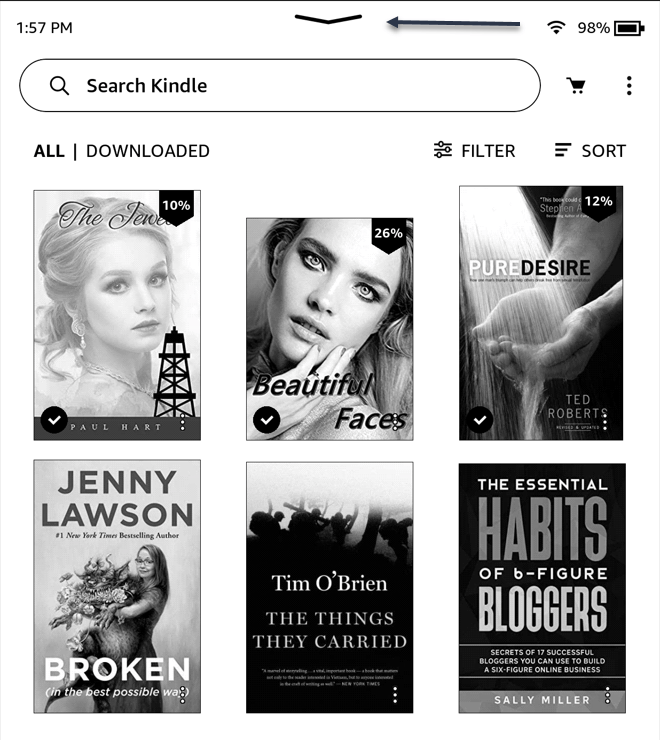
To enable Airplane mode on your Kindle, tap the down arrow at the top of the Home screen. If you are in a book, tap toward the top of the screen to reveal the down arrow. Refer to the below image:
Taping the down arrow at top of the screen
Next, tap the Airplane icon to turn it ON. See the below image:
Enable Airplane Mode
That’s it! Now just open the book and do not leave it until you are done. That also includes if the eReader powers off due to a low battery. Theoretically, you should be able to read the book for as long as you need. Your Kindle can hold a lot of books, but sometimes one takes a while, and that’s okay.
Disclaimer
Technology is always changing and rarely is there static tech for smartphones and desktops. Thus, the contents of this post are only valid at the time of writing. Blog posts older than six months may have directions incompatible with your device or OS. Hopefully, older post content will continue to work as advertised. Thank you for reading TechSavvy.Life for Technology at Work For You.
Quote for the Day
It’s not information overload. It’s filter failure.
Clay Shirky
Tweet Info
That’s it. Please feel free to share this post! One way to share is via Twitter.
Just click the Tweet icon below. This will launch Twitter where you click its icon to post the Tweet.
Checkout TechSavvy.Life for blog posts on smartphones, PCs, and Macs! You may email us at contact@techsavvy.life for comments or questions.
Please feel free to leave a comment. I would love to hear from you. Do you have a computer or smart device tech question? I will do my best to answer your inquiry. Just send an email to contact@techsavvy.life. Please mention the device, app, and version you are using. To help us out, you can send screenshots of your data related to your question.
Author’s E-Book
You can access the e-book from a Kindle device, the Kindle App for the desktop or smartphone, which is a free app.
The author’s Vietnam eBook on the Battle for Tra Bong Vietnam: Events and Aftermath
You do not actually need a sleep machine or sound apps if you have an iPhone. There’s a hidden feature to play sleep sounds from your iPhone that includes rain sounds, white noise, and others. This feature was first introduced in iOS 15.
You do not actually need a sleep machine or sound apps if you have an iPhone. There’s a hidden feature to play sleep sounds from your iPhone that includes rain sounds, white noise, and others. This feature was first introduced in iOS 15. Let’s explore this feature.
This is for the iPhone. Screenshots are from iPhone 14 Pro running iOS 16+
While not technically a “secret,” the sleep sounds built into iOS are not easy to find. Apple has them labeled as Background Sounds, and they are four levels deep in the Accessibility settings. Siri can not start the sleep sounds, so you are stuck navigating the Settings just to turn it on or off.
The good news is you can make a Shortcut to drastically improve the experience. The benefit is you do not need to rely on a third-party app that could have annoying ads or stream over the Internet all night.
Playing the Sleep Background Sounds
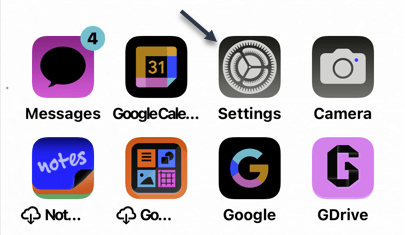
You will find these sounds in your iPhone’s Accessibility settings. First, open the Settings app on your iPhone or iPad. Refer to the below image:
Accessing Settings
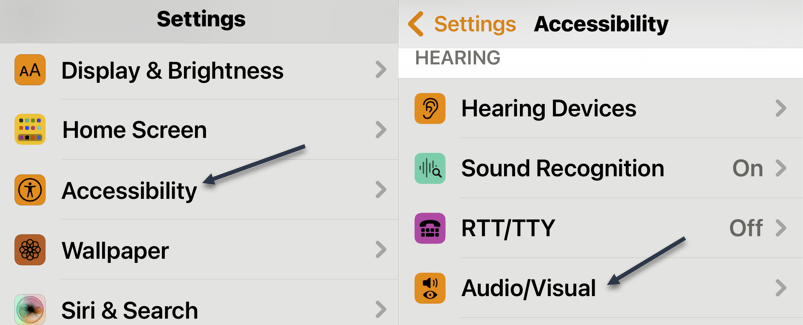
Next, scroll down and select Accessibility and then tap Audio/Visual. See the below image:
Accessing Audio/Visual
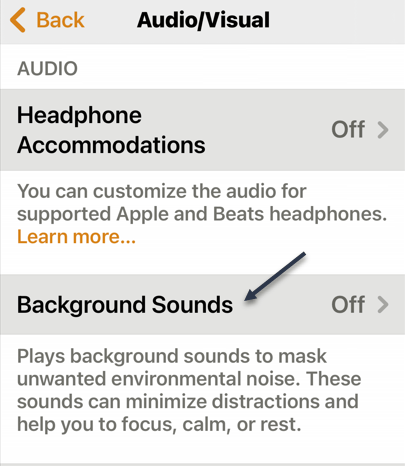
Now. you can select Background Sounds. See the following image:
Selecting Background Sounds
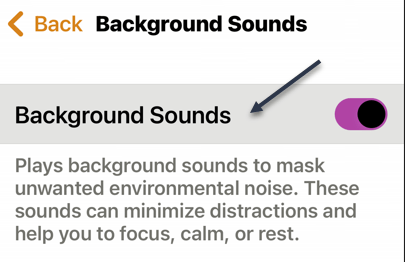
Next, to turn on the sounds, simply toggle the switch to ON at the top of the screen. See the below image:
Toggle ON Background Sounds
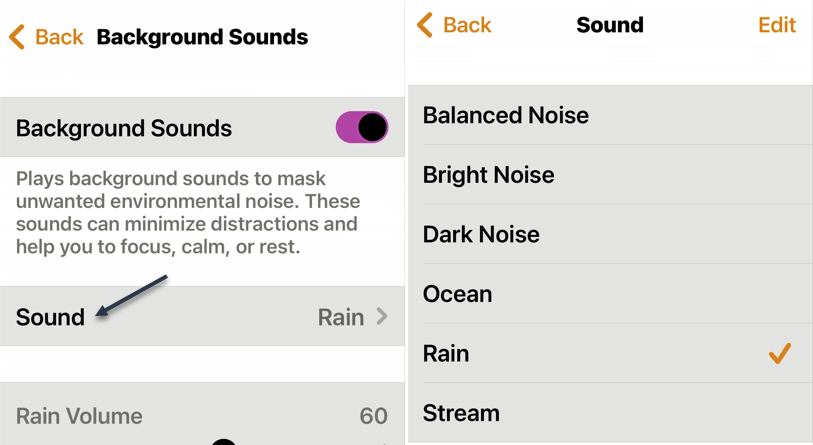
There are a few things to tweak on this page as well. Now, you can tap Sound to choose between a few white noise levels, ocean, rain, or stream. See the following image:
Selecting a sound
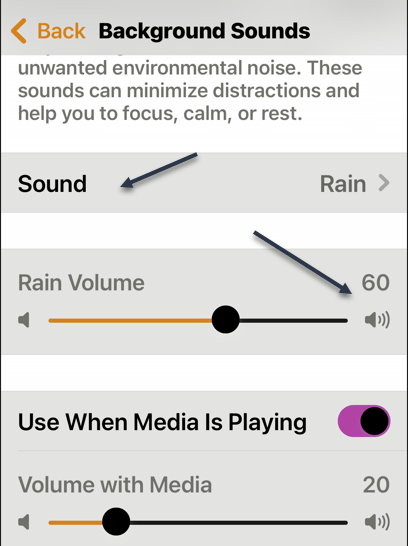
Next, you can adjust the volume level, choose if you want it to play while other media is playing, and adjust the volume level for that as well. The volume level defaults to 60% of the master volume you have set on your iPhone. See the following image:
Adjusting the volume
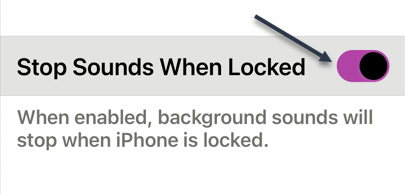
Lastly, decide if you want the sounds to stop when the device is locked. Refer to the below image:
Toggle ON to stop Sounds on the Lock screen
That’s all there is to it. This is a nice feature, but it’s not easy to get to. Keep reading to fix this.
Create a Background Sounds Shortcut
We will be utilizing the iPhone’s Shortcuts app to create a shortcut that can toggle the Background Sounds on and off directly from the Home screen.
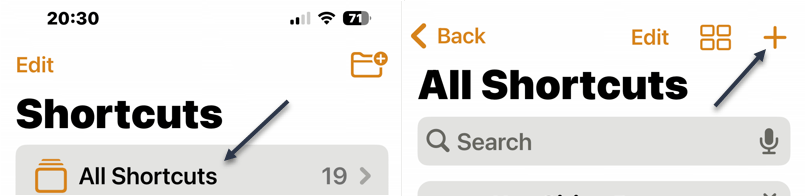
First, open the Shortcuts app. (You may have to Search for the app.). See the below image:
Opening Shortcuts app
Next, tap the plus (+) icon in the top right to create a new shortcut. See the following image:
Selecting to Add a Shortcut
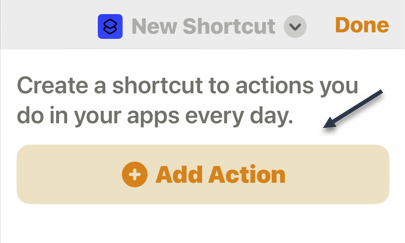
Now, tap Add Action. Refer to the below image:
Selecting to Add an Action
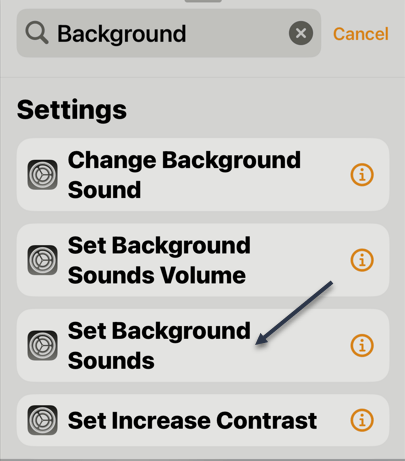
Next, use the search bar to find Set Background Sounds. See the below image:
Selecting Set Background Sounds
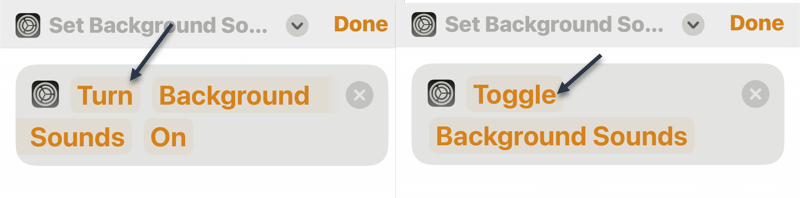
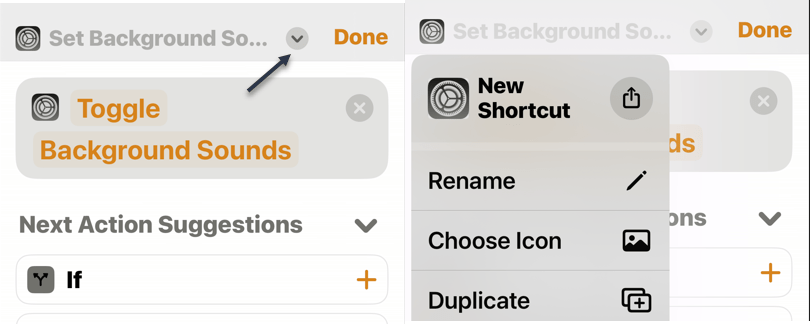
Now, tap Turn in the text box and switch it to tap Toggle. This can be tricky. See the below image:
Your actions
Next, you can rename the Shortcut and customize the color and icon. To do so, tap the drop-down arrow at the top of the screen. See the following image:
Setting Background Sounds options
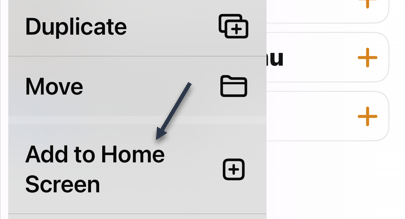
Now, select Add to Home Screen from the drop-down menu. Refer to the below image:
Selecting Add to the Home screen
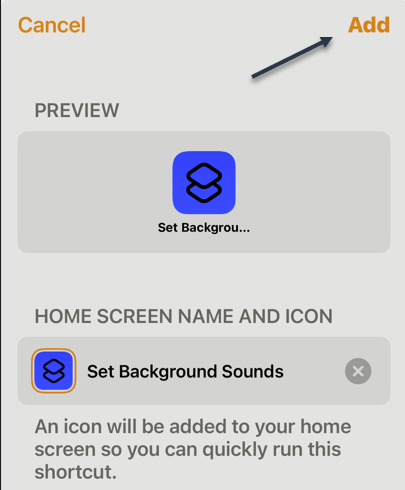
Next, tap Add on the next screen. See the below image:
Adding to the Home screen
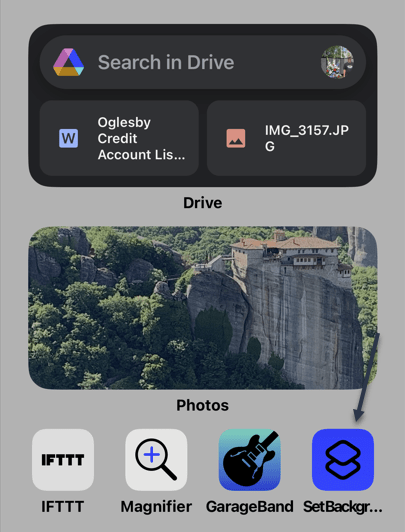
Now, when you tap the Shortcut on the Homepage screen, it will toggle the sleep sounds on or off. Note! The Shortcut volume is set to 100%. See the following image:
Tapping to play the Shortcut
This is a much, much easier way to turn the sleep sounds on at night. It’s strange that Apple has this feature buried so deep in Settings. The fact that Siri can not even play them; when Google Assistant has the ability; is even more odd.
Disclaimer
Technology is always changing and rarely is their static tech for smartphones and desktops. Thus, the contents of this post are only valid at the time of writing. Blog posts older than six months may have directions incompatible with your device or OS. Hopefully, older post content will continue to work as advertised. Thank you for reading TechSavvy.Life for Technology at Work For You.
Quote for the Day
Not finance. Not strategy. Not technology. It is teamwork that remains the ultimate competitive advantage, both because it is so powerful and so rare.
Patrick Lencioni
Tweet Info
Yea! You are finished. Please feel free to share this post! One way to share is via Twitter.
Just click the Tweet icon below. This will launch Twitter where you click its icon to post the Tweet.
Checkout TechSavvy.Life for blog posts on smartphones, PCs, and Macs! You may email us at contact@techsavvy.life for comments or questions.
Please feel free to leave a comment. I would love to hear from you. Do you have a computer or smart device tech question? I will do my best to answer your inquiry. Just send an email to contact@techsavvy.life. Please mention the device, app, and version you are using. To help us out, you can send screenshots of your data related to your question.
Author’s E-Book
You can access the e-book from a Kindle device, the Kindle App for the desktop or smartphone, which is a free app.
The author’s Vietnam eBook on the Battle for Tra Bong Vietnam: Events and Aftermath
Amazon Kindle devices are among the best eReaders you can buy. They are easy to use, but to get the most out of your Kindle, there are some features you may not know about.
Amazon Kindle devices are among the best eReaders you can buy. They are easy to use, but to get the most out of your Kindle, there are some features you may not know about. Let’s explore the best ones.
This is for the Amazon Kindle. Screenshots are from Kindle Paperwhite (11 generation)
Let’s start with something everyone really needs to know about. One of the advantages of using an eReader over a physical book is you can customize the size and look of the text. It’s a simple feature but can make a world of difference.
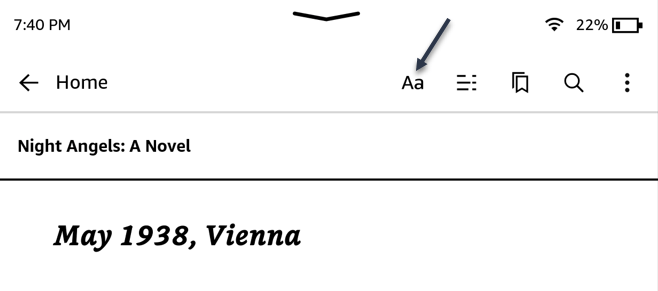
First, open a book and tap anywhere near the top of the screen to bring up the menu, then tap the Aa icon to see the text options. Refer to the below image:
Selecting Text icon
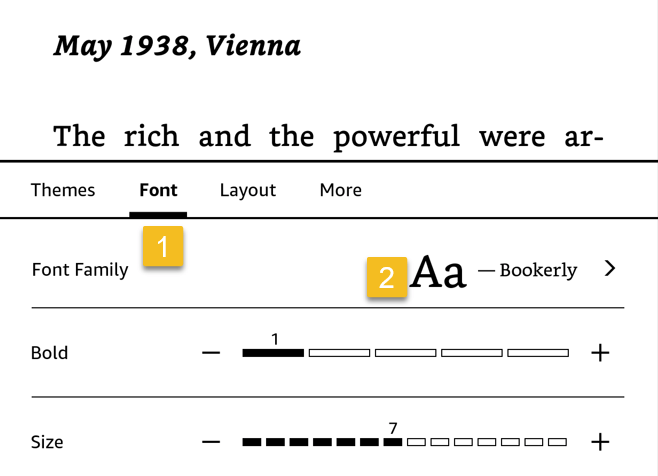
Next, tap the Font tab and select your font for reading. See the below image:
Selecting your Font
Using Dark Mode
Dark Mode is everything. If that’s your mantra, you will be happy to know KindleeReaders have Dark Mode too. It’s super easy to toggle on and off.
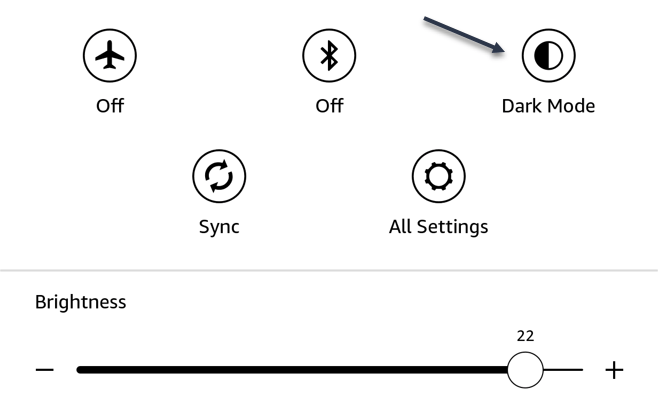
First, swipe down from the top of the screen and tap the Dark Mode icon. See the following image:
Enabling Dark Mode
Hide Audiobooks
Modern Kindle readers can download and play audiobooks as well as ebooks. However, if you do not want your Kindle to be your audiobook-listening device, it can be annoying on the Home screen.
Thankfully, it’s possible to hide audiobooks from your library. That way you will only see ebooks on the Home screen. The option can be found in the Home & Library section of the Device Options settings.
Use Collections
First, tap the three-dot menu in the top right of the Home screen and select Create Collections. You will be asked to enter a name for the collection, then select all the books you want to add to it. The collection will be in the Library tab. Refer to the below image:
Create a Collection
Use Landscape Mode for Reading
The default orientation for KindleeReaders is vertical, the Portrait Mode. This matches the orientation of most physical books, so it makes sense. However, you can switch to horizontal Landscape Mode as well. You can swap the orientation by going to the Layout tab in the Text options while reading a book. See the below image:
Select a Layout
Turn Off Highlights
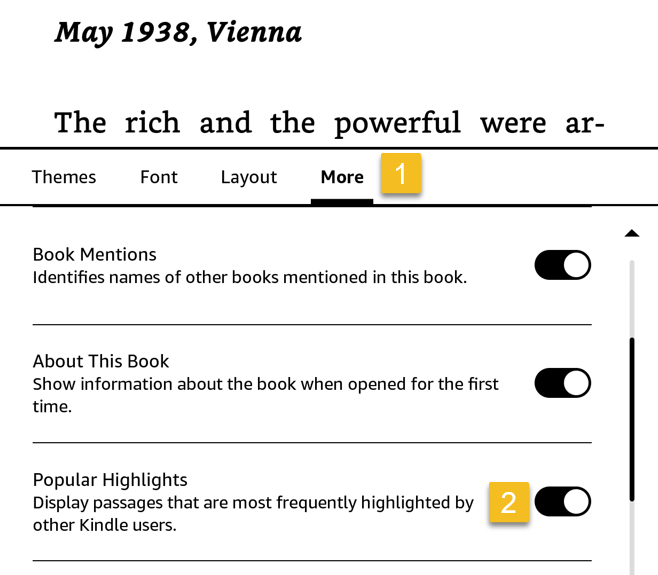
Kindle’sPopular Highlights feature underlines text in ebooks when more than ten people have highlighted the passage. It sounds like a cool idea, but it can get annoying.
First, open the book you want to turn off Popular Highlights on. Next, tap the screen to bring up the menu and select the Aa button. Switch over to the More tab and toggle the Popular Highlights switch to OFF. See the following image:
Disable Popular Highlights
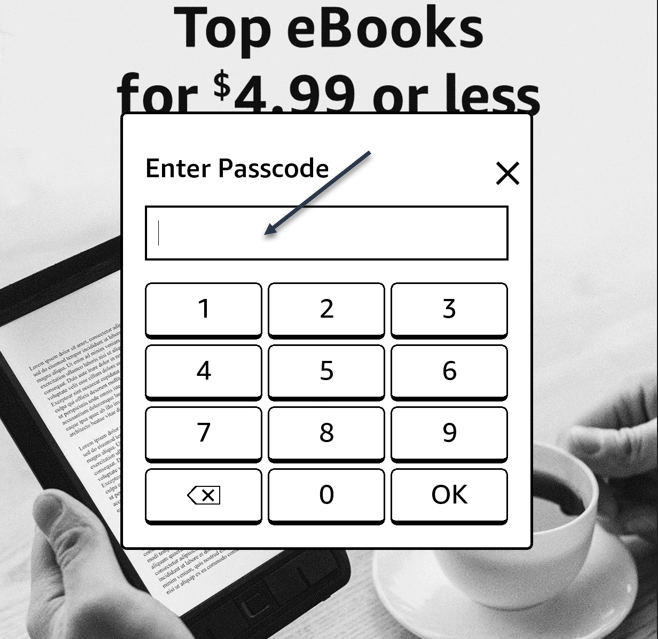
Use Passcode
You might not think of your Kindle as a device containing a lot of personal information that you might want to add some privacy. The Passcode feature is an easy way to add a layer of security between another person and your library. Refer to the below image:
Using a Passcode
Transfer EPUB Books
While Amazon is heavily integrated into the KindleeReader experience, you are not limited to books from the Amazon Store. EPUB is a common format you will find outside of the store, and it can be transferred to a Kindle.
Amazon started supporting EPUB on Kindle devices in August 2022. Now it’s very easy to send EPUB files to a Kindle eReader with the Kindle app on Android, iPhone, or iPad.
Borrow Books
This might be the best feature of Kindle devices. You can get free eBooks from your local library right on your Kindle, and all you need is a library card. This works with a service called OverDrive.
Since it’s a library, there are typical library limitations. There is not an infinite number of ebooks to rent, so you may have to wait your turn. Also, you will have to “return” the book after a certain time.
Use Less Storage Space
Kindles have enough storage space for hundreds or thousands of ebooks, but you may still run into storage issues, especially if you download a lot of audiobooks, which take up more space.
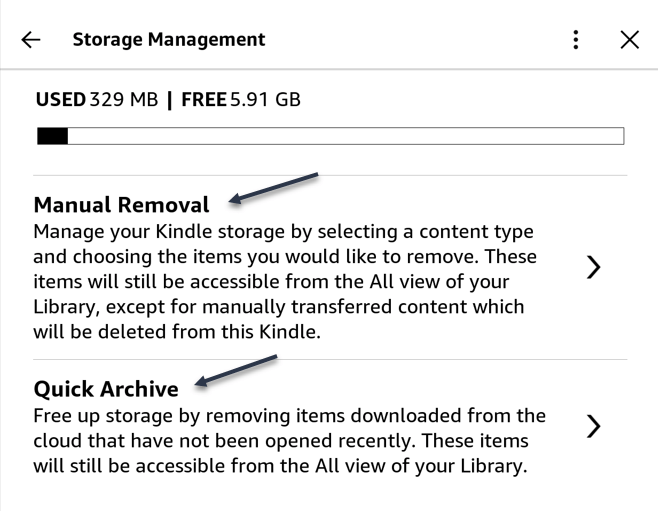
Kindle devices have a couple handy ways to clear out some extra room. It’s somewhat difficult to find your storage screen. To view and/or clean your Kindle storage space, head to:
There’s a manual option and a Quick Archive feature, which will automatically remove items that have been downloaded from the cloud and not opened yet. See the below image:
Your Kindle Storage Space
Disclaimer
Technology is always changing and rarely is their static tech for smartphones and desktops. Thus, the contents of this post are only valid at the time of writing. Blog posts older than six months may have directions incompatible with your device or OS. Hopefully, older post content will continue to work as advertised. Thank you for reading TechSavvy.Life for Technology at Work For You.
Quote for The Day
Technology alone is not enough.
Steve Jobs
Tweet Info
You are finished. Please feel free to share this post! One way to share is via Twitter.
Just click the Tweet icon below. This will launch Twitter where you click its icon to post the Tweet.
Checkout TechSavvy.Life for blog posts on smartphones, PCs, and Macs! You may email us at contact@techsavvy.life for comments or questions.
Please feel free to leave a comment. I would love to hear from you. Do you have a computer or smart device tech question? I will do my best to answer your inquiry. Just send an email to contact@techsavvy.life. Please mention the device, app, and version you are using. To help us out, you can send screenshots of your data related to your question.
Author’s E-Book
You can access the e-book from a Kindle device, the Kindle App for the desktop or smartphone, which is a free app.
The author’s Vietnam eBook on the Battle for Tra Bong Vietnam: Events and Aftermath
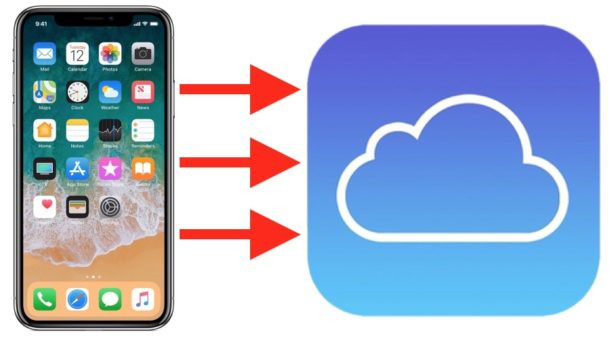
Backing up your iPhone is just as important as backing up your computer. You have items stored on your device that you do not want to lose if your iPhone becomes lost, stolen, or inoperable. Fortunately, backing up to iCloud is easy.
Backing up your iPhone is just as important as backing up your computer. You have items stored on your device that you do not want to lose if your iPhone becomes lost, stolen, or inoperable. Fortunately, backing up to iCloud is easy. Let’s explore how this is done.
This is for the iPhone. Screenshots are from iPhone 14 Pro running iOS 16+
Reasons to Backup
Having backups of your data is a good idea no matter where you store it. In fact, we recommend keeping multiple copies of anything you backup so that if one method fails for some reason you still have another. There is no such thing as having too many backups.
Even if you already have backups on multiple physical hard drives, backing up to iCloud gives you an all-important offsite backup. That makes backups one of the best uses of spare iCloud storage.
It’s also smart to make sure your data is all backed up when it’s time to upgrade phones so you can set it up in a snap from the data in iCloud. The same applies to upgrading to a new version of iOS, just in case something goes wrong.
Of course, you will have to make sure you have enough storage in your iCloud account. How much you need will depend on how much data you have stored on your iPhone, but you will get a notification if your storage is not big enough when you initiate the backup. There are a few things you can do to free up space, and if you can not make the room you do have a few options for saving money on an iCloud storage upgrade. Be prepared for some frustration, though, because iCloud’s tier scheme is in need of an update.
Your Backup Includes
Whether you perform a manual backup to iCloud or set up automatic backups that run each day, the same items normally stored on your physical device will back up to iCloud. These items are included in the backup:
App data
iPhone settings
Home screen and app layout
iMessage, SMS, and MMS messages
Photos and videos
Purchase history from the App Store, Books Store, and iTunes
Ringtones
Visual Voicemail
Additionally, if you use iOS 11 or earlier, voice memos are included. And, if you own an Apple Watch, those backups are also included unless you use Family Setup for your Watch.
Many other items on your iPhone already get backed up to iCloud by default, and they include contacts, calendars, notes, reminders, voice memos, bookmarks, iCloud messages, and iCloud photos.
Sync Your iPhone Backup to iCloud
You can perform a one-time, manual backup of your iPhone to iCloud. This is a good option if you just purchased a new iPhone or are preparing to update your version of iOS but do not want to have your data backed up every day. Even if you have already set up automatic updates, this will force iCloud to update.
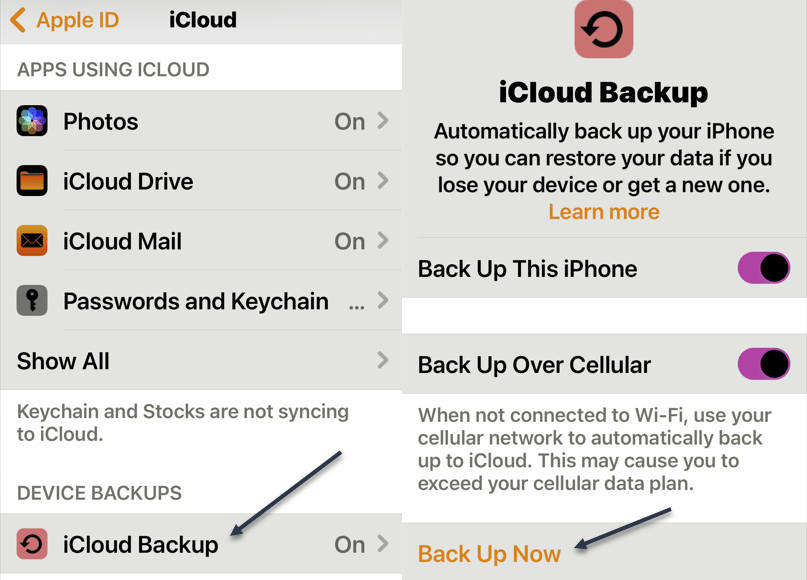
First, ensure you are connected to Wi-Fi and then open the Settings on your iPhone. Select your name at the top and then tap iCloud. Refer to the below image:
Accessing iCloud
Next, select iCloud Backup and tap Back Up Now. See the below image:
Selecting Back Up Now
You may receive an alert before the backup begins. This can be from one of the following:
If you do not have enough iCloud storage space available for your backup, you will see a notification. You can then follow the prompts to upgrade your iCloud storage plan.
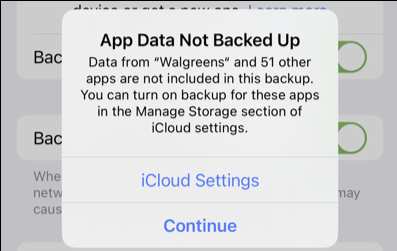
If you have iCloud backups turned off for any of your apps, you will see a notification. You can select iCloud Settings to turn on backups for those apps or Continue to back up without that app data.
See the following image:
Notification Message
It can take up to several minutes for the backup process to run, depending on the amount of data on your device. So be sure you stay connected to your Wi-Fi network during the process.
Once complete, you will see the date and time of the last successful backup below Back Up Now. Refer to the below image:
Backing up your iPhone
Automatically Backup Your iPhone
Performing regular backups of your iPhone is essential so that you do not lose any important items. You can set iCloud to automatically sync your data, purchases, and other items on a regular schedule. Go to the same spot in your Settings as above:
Your Name > iCloud > iCloud Backup
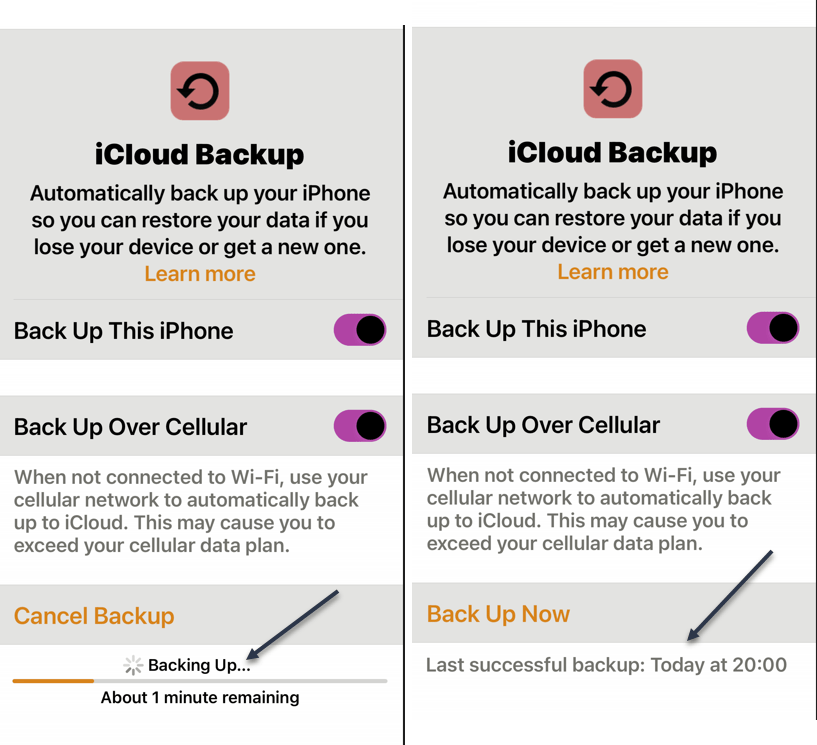
Then, turn ON the toggle at the top for Back Up This iPhone. See the below image:
Enable Back Up your iPhone
Optionally, you can enable the toggle to Back Up Over Cellular if you lose your Wi-Fi connection. Just note that it may affect your cellular data plan usage.
To ensure your device is ready for automatic backup, simply make sure you are on Wi-Fi, connect your iPhone to its power source, and enable the Lock screen. Your device will then automatically back up to iCloud. The ideal time for this is during your standard charging time, like when you are asleep.
Just like backing up your iPhone manually, you can then see the date and time for your last successful backup on the iCloud Backup screen. See the following image:
Backup success
View Backup Details
To see more than the date and time of the last backup update, such as the size and data from which apps were included, head back to the iCloudBackup screen. In Settings:
Your Name > iCloud > iCloud Backup
select your device at the bottom. You will then see a summary of details at the top and the app data backed up directly beneath. Refer to the below image:
Your backup details
You can also see the size of your next backup. This is a good time to confirm that you have enough iCloud storage space available and upgrade if necessary. Remember, you receive 5GB of free iCloud storage but can upgrade to obtain more directly from your device.
Disclaimer
Technology is always changing and rarely is their static tech for smartphones and desktops. Thus, the contents of this post are only valid at the time of writing. Blog posts older than six months may have directions incompatible with your device or OS. Hopefully, older post content will continue to work as advertised. Thank you for reading TechSavvy.Life for Technology at Work For You.
Quote For the Day
It’s not information overload. It’s filter failure.
Clay Shirky
Tweet Info
That’s it. Please feel free to share this post! One way to share is via Twitter.
Just click the Tweet icon below. This will launch Twitter where you click its icon to post the Tweet.
C
Checkout TechSavvy.Life for blog posts on smartphones, PCs, and Macs! You may email us at contact@techsavvy.life for comments or questions.
Please feel free to leave a comment. I would love to hear from you. Do you have a computer or smart device tech question? I will do my best to answer your inquiry. Just send an email to contact@techsavvy.life. Please mention the device, app, and version you are using. To help us out, you can send screenshots of your data related to your question.
Author’s E-Book
You can access the e-book from a Kindle device, the Kindle App for the desktop or smartphone, which is a free app.
The author’s Vietnam eBook on the Battle for Tra Bong Vietnam: Events and Aftermath
Logitech makes some of the best keyboards and mice around, and you might be familiar with the company’s RGB-packed gaming products. These new peripherals are packed with color, but we are not talking about lights.
We have used Logitech products for years and they work as advertised. We love the backlit K800 keyboard as well as the MX Master 3 mouse.
Logitech has announced a range of new colors for a bunch of its products, including the K580/K585 Slim Multi-Device Wireless Keyboard, MK470 Slim Combo, POP Keys, and POP Mouse. These products have been out for some time, but you can now buy them in Mist, a grayish color with a hint of sand, and Cosmos, a combination of lavender and mystic purples. Refer to the below images:
K585 Keyboard with iPhone holderK470 Keyboard
Logitech says they are a perfect addition to any Gen Z or Millennial desk, although we would argue they are a great choice for anyone looking to add a splash of color to their desk. The K585 is a multi-device Bluetooth keyboard with a slot for a phone or tablet, and the MK470 is a combo package of a slim Bluetooth keyboard and mouse. The POP Keys is a bright and fun keyboard with rounded keys and customizable emoji keys, while the matching POP Mouse is a normal Bluetooth mouse but with unique color designs. See the below image:
POP Keys in many colorsPOP Mouse in many colors
You can now buy these new keyboards, in addition to all previous keyboards (which are already pretty neat in their own right) on Logitech’s website.
Disclaimer
Technology is always changing, and rarely is there static tech for smartphones and desktops. Thus, the contents of this post are only valid at the time of writing. Blog posts older than six months may incompatible with your device or OS. Hopefully, older post content will continue to work as advertised. Thank you for reading TechSavvy.Life for Technology at Work For You.
Quote For the Day
Technology alone is not enough
Steve Jobs
Tweet Info
That’s it. Please feel free to share this post! One way to share is via Twitter.
Just click the Tweet icon below. This will launch Twitter where you click its icon to post the Tweet.
Checkout TechSavvy.Life for blog posts on smartphones, PCs, and Macs! You may email us at contact@techsavvy.life for comments or questions.
Please feel free to leave a comment. I would love to hear from you. Do you have a computer or smart device tech question? I will do my best to answer your inquiry. Just send an email to contact@techsavvy.life. Please mention the device, app, and version you are using. To help us out, you can send screenshots of your data related to your question.
Author’s E-Book
You can access the e-book from a Kindle device, the Kindle App for the desktop or smartphone, which is a free app.
The author’s Vietnam eBook on the Battle for Tra Bong Vietnam: Events and Aftermath
You do not always need the greatest, shiniest device for smartphones. After all, a new phone is often a very expensive purchase. More people are realizing that, as new numbers show used phones are more popular than ever.
Sales of used smartphones are higher than ever now, as over 282 million used phones were reportedly sold through 2022, according to data from the IDC. This represents an 11.5% year-on-year increase, and while new phones are still selling like hotcakes, it does show a growing trend of people buying second-hand instead. The second-hand market is full of great deals, letting you get old phones for really cheap or even knocking a few hundred bucks off a current, slightly used model.
The reason for this is not particularly hard to guess. Economic inflation was a problem for most of 2022 (and has not gone away), and buying a brand-new smartphone is probably not a priority for people with other bills to pay. The iPhone 14 Pro Max can start at $1,100, while you can get used iPhone 12 or 13 devices for as low as $300.
It’s considered good practice to buy a used, older flagship model than going for a new smartphone
Courtesy of: The Register
Disclaimer
Technology is always changing, and rarely is there static tech for smartphones and desktops. Thus, the contents of this post are only valid at the time of writing. Blog posts older than six months may have directions incompatible with your device or OS. Hopefully, older post content will continue to work as advertised. Thank you for reading TechSavvy.Life for Technology at Work For You.
Quote For the Day
What did people do when they went to the bathroom before smartphones?
Aaron Cobra
Tweet Info
That’s it. Please feel free to share this post! One way to share is via Twitter.
Just click the Tweet icon below. This will launch Twitter where you click its icon to post the Tweet.
Checkout TechSavvy.Life for blog posts on smartphones, PCs, and Macs! You may email us at contact@techsavvy.life for comments or questions.
Please feel free to leave a comment. I would love to hear from you. Do you have a computer or smart device tech question? I will do my best to answer your inquiry. Just send an email to contact@techsavvy.life. Please mention the device, app, and version you are using. To help us out, you can send screenshots of your data related to your question.
Author’s E-Book
You can access the e-book from a Kindle device, the Kindle App for the desktop or smartphone, which is a free app.
The author’s Vietnam eBook on the Battle for Tra Bong Vietnam: Events and Aftermath
For troubleshooting, testing, or other similar purposes, you may need to turn off your Windows 11 or Windows 10’s firewall. It’s easy to disable this feature on your PC.
For troubleshooting, testing, or other similar purposes, you may need to turn off your Windows 11 or Windows 10’s firewall. It’s easy to disable this feature on your PC. Let’s explore this feature.
This is for Windows 11/10. Screenshots are from Windows 10
Note! The Dilbert comic will be suspended until further notice. Due to racists remarks by the creater of Dilbert, Scott Adams on a talk show, Dilbert has been removed from the Internet and newspapers. We have been following Dilbert for three decades and we thought the comic titted in with the theme of these posts.
Disable Your Firewall Only If You Have To
Turning off Windows’ firewall allows unauthorized network access on your PC. So unless you have a strong reason to disable the feature, you must keep the firewall turned on at all times.
The only times you may need to disable your firewall are when you are troubleshooting an issue, testing an app, or using a third-party firewall on your computer. Even then, if you are disabling the firewall to let an app through your network, add that app to the Firewall Exception list instead of turning the entire feature off.
When you are finished with your task, remember to turn the firewall back on to stay secure.
Turn Off Firewall
On both Windows 11 and 10, you will use the built-in Windows Security app to disable and enable the firewall.
First, launch Windows Security on your PC. Do this by opening the Start menu, searching for Windows Security, then click the app in the search results. Refer to the below image:
Launch Windows Security
Next, in the window that opens, click Firewall & network protection. See the below image:
Launch Firewall & Network Protection option
Now, on the Firewall & network protection page, select your network profile. To disable the firewall for your current profile, you will see Active next to that profile, so click that option. See the following image:
Launch the Private Network (Active) option
Next, in the Microsoft Defender Firewall section, toggle OFF the option. Later, to re-enable the firewall, toggle ON the option. Refer to the below image:
Disable Firewall
Now, select Yes in the User Account Control prompt, and your Windows firewall is now disabled. You may now continue your troubleshooting, testing, or other similar tasks.
Remember to turn the firewall back on when you are finished.
Disclaimer
Technology is always changing and rarely is static for smartphones and desktops. Thus, the contents of this post are only valid at the time of writing. Blog posts older than six months may have directions incompatible with your device or OS. Hopefully, older post content will continue to work as advertised. Thank you for reading TechSavvy.Life for Technology at Work For You.
Quote For the Day
Communication tools don’t get socially interesting until they get technologically boring.
Clay Shirky
Tweet Info
That’s it. Please feel free to share this post! One way to share is via Twitter.
Just click the Tweet icon below. This will launch Twitter where you click its icon to post the Tweet.
Checkout TechSavvy.Life for blog posts on smartphones, PCs, and Macs! You may email us at contact@techsavvy.life for comments or questions.
Please feel free to leave a comment. I would love to hear from you. Do you have a computer or smart device tech question? I will do my best to answer your inquiry. Just send an email to contact@techsavvy.life. Please mention the device, app, and version you are using. To help us out, you can send screenshots of your data related to your question.
Author’s E-Book
You can access the e-book from a Kindle device, the Kindle App for the desktop or smartphone, which is a free app.
The author’s Vietnam eBook on the Battle for Tra Bong Vietnam: Events and Aftermath
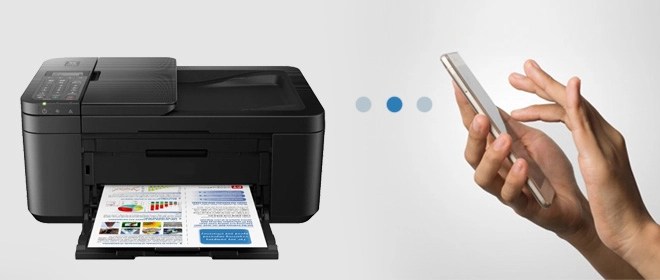
To print from your iPhone or iPad, find the print button in the app you are using and select your printer’s name in the print options. If your printer does not appear automatically, it probably does not support AirPrint, in which case you can usually connect using your printer manufacturer’s app instead. Let’s check this out.
Note! The Dilbert comic will be suspended until further notice. Due to racists remarks by the creater of Dilbert, Scott Adams on a talk show, Dilbert has been removed from the Internet and newspapers. We have been following Dilbert for three decades and we thought the comic titted in with the theme of these posts.
Print Using AirPrint
AirPrint is Apple’s easy-to-use wireless printing protocol. It requires next to no setup, provided your printer is powered on and connected to the same wireless network as your iPhone or iPad.
Many printers now come with AirPrint as standard, especially since we increasingly use our mobile devices for all manner of tasks. If you are not sure if your printer has AirPrint, you can try printing anyway and see what happens. The printer should just show up if you satisfy the requirements.
Our HP Inkjet network printer is over 5 years old and it supports AirPrint.
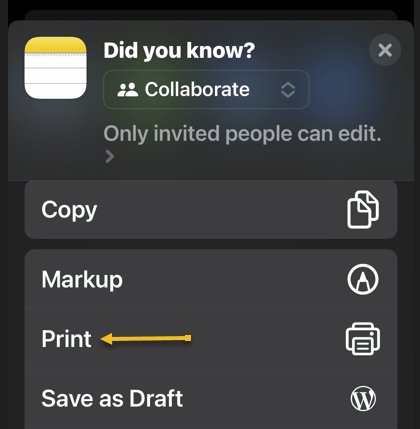
First, to print from your iPhone or iPad using AirPrint, select Print in whatever app you are using. Refer to the below image for selecting to print from the Notes app:
Selecting the Print option
This is often hidden under the Share menu, as is the case in apps like Safari and Notes. Just tap the Share icon. See the below image on printing from the Notes app:
Selecting the Share option
This is not the case for all apps. For example, in Reminders, you will need to tap the “…” icon.
Next, tap on Printer to show a list of nearby printers you can use. If your printer supports AirPrint and has been set up correctly, it should show under this menu. Tap on a printer to select it. See the following image:
Selecting your printer
Now, you may see a notice about the app you are using wanting permission to search for devices on your local network. Allow this when prompted. (And if you are having trouble, head to the app preferences under Settings and make sure the Local Network toggle is ON).
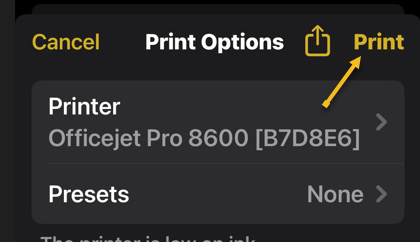
Next, with your printer selected, you can change print preferences by choosing how many copies, whether to print in black and white or color, whether to use double-sided printing if available, plus specify the paper size currently loaded in the printer. You may also get additional settings for Media & Quality and Layout depending on your model. Refer to the below image:
Selecting your print options
Now, hit Print in the top right-hand corner of the screen to send your job to your printer. You can also use the Share button next to it to save to Files or to a PDF version of your file locally if you would like. See the below image:
Selecting to print your file
Print Without AirPrint
Just because your printer does not have AirPrint does not mean you can not print wirelessly. Many printers include wireless functionality but lack support for Apple’s AirPrint protocol.
Print Using the Manufacturer’s App
If you have a printer that’s Wi-Fi enabled but lacks AirPrint, there’s a good chance that wireless printing is supported using an app. You can usually search the web for your printer’s model to see whether this feature is supported.
Then it’s simply a case of downloading an app like HP Smart, Canon PRINT, Epson iPrint, Brother iPrint&Scan on your device and following the instructions. Some of these apps have the added benefit of remote printing over the internet, which allows you to send a job to your printer at home regardless of where you are.
Purchase a Printer That Supports AirPrint
If you still need a printer, particularly one you can use with your iPhone or iPad, it’s worth investing in something that makes your life a little easier. For the most part, AirPrint “just works” over the local wireless network and allows you (and your guests to print wirelessly whenever you are within range.
When choosing a printer do not only consider the price of the unit itself but also the cost of the refills over the life of the product. You may find that refills cost more than a printer.
Disclaimer
Technology is always changing, and rarely is there static tech for smartphones and desktops. Thus, the contents of this post are only valid at the time of writing. Blog posts older than six months may have directions incompatible with your device or OS. Hopefully, older post content will continue to work as advertised. Thank you for reading TechSavvy.Life for Technology at Work For You.
Quote For the Day
Don’t become a slave to technology – manage your phone, don’t let it manage you.
Richard Branson
Tweet Info
That’s it. Please feel free to share this post! One way to share is via Twitter.
Just click the Tweet icon below. This will launch Twitter where you click its icon to post the Tweet.
Checkout TechSavvy.Life for blog posts on smartphones, PCs, and Macs! You may email us at contact@techsavvy.life for comments or questions.
Please feel free to leave a comment. I would love to hear from you. Do you have a computer or smart device tech question? I will do my best to answer your inquiry. Just send an email to contact@techsavvy.life. Please mention the device, app, and version you are using. To help us out, you can send screenshots of your data related to your question.
Author’s E-Book
You can access the e-book from a Kindle device, the Kindle App for the desktop or smartphone, which is a free app.
The author’s Vietnam eBook on the Battle for Tra Bong Vietnam: Events and Aftermath
Microsoft continues to double down on its most annoying feature by keeping advertisements inside Windows 10 (and adding even more to Windows 11). Let’s explore how to remove
Microsoft continues to double down on its most annoying feature by keeping advertisements inside Windows 10 (and adding even more to Windows 11). Let’s explore how to remove these ads.
Thankfully, most of these ads have a Settings menu. (The same goes for the ads in Windows 11).
This is for devices running Windows 10. Screenshots are from Windows 10
Copyright Scott Adams, Inc./Distributed by Universal Uclick for UFS
You may have to check Settings from time to time to ensure everything is still how you want it as Windows updates add more ads. The steps below may not remove everything but should tone things down to some extent.
Remove Ads from Start Menu
First, you can turn these ads off if you head to the:
Settings > Personalization > Start
and toggle OFF the Show suggestions occasionally in the Start option. Refer to the below image:
Remove Start Menu ads
Next, if you have a problem with any of the Live Tiles on your Start screen, some of which are pre-installed junk or trials, you can right-click on the one that’s bugging you, Just hover over the More option, and choose turn Live Tile to OFF. That way, it will merely act as a shortcut to the app. Or you can right-click on it to choose Uninstall to remove the app entirely.
Block Tips and suggestions From Lock Screen
First, to remove these tips and suggestions, head to
Settings > Personalization > Lock Screen
and set your background to Picture or Slideshow. Here, you can then toggle OFF for Get fun facts, tips, and more… See the below image:
Remove Tips and Suggestions ads
Remove Ads From Taskbar and Action Center
First, you can get rid of these ads by going to
Settings > System > Notifications & Actions
and unchecking Get tips, tricks, and suggestions as you use Windows.
Next, you may also want to untick the Show me the Windows welcome experience… option here, which shows those annoying tours after you update Windows, as well as the Suggest ways I can finish setting up my device…
Now, toggle OFF any manufacturer-installed apps that may be sending them, such as Lenovo Vantage on Lenovo ThinkPads. (You could also uninstall them entirely; just make sure they do not provide some useful features you want, (like updating certain drivers.) See the following image:
Remove Taskbar and Action Center ads
Remove Ads From File Explorer
First, you can get rid of these space-wasting suggestions by clicking
View> Options in File Explorer, then click the View tab in the window that appears.
Next, scroll. down to Show sync provider notifications and uncheck that box. That should prevent ads from showing up in File Explorer again. Refer to the below image:
Remove File Explorer ads
Remove Targeted Advertising
Windows gives you an Advertising ID that it uses to track your interests and serve you more relevant ads within apps. While you are turning OFF all of Windows’ built-in ads, you may want to turn this setting OFF as well.
First, head to
Settings > Privacy > General
and toggle OFF the Let apps use advertising ID…, if you would rather have non-targeted ads. See the below image:
Remove Targeted ads
Disclaimer
Technology is always changing and rarely is static for smartphones and desktops. Thus, the contents of this post are only valid at the time of writing. Blog posts older than six months may have directions incompatible with your device or OS. Hopefully, older post content will continue to work as advertised. Thank you for reading TechSavvy.Life for Technology at Work For You.
Quote For the Day
People who are really serious about software should make their own hardware.
Alan Kay
Tweet Info
That’s it. Please feel free to share this post! One way to share is via Twitter.
Just click the Tweet icon below. This will launch Twitter where you click its icon to post the Tweet.
Checkout TechSavvy.Life for blog posts on smartphones, PCs, and Macs! You may email us at contact@techsavvy.life for comments or questions.
Please feel free to leave a comment. I would love to hear from you. Do you have a computer or smart device tech question? I will do my best to answer your inquiry. Just send an email to contact@techsavvy.life. Please mention the device, app, and version you are using. To help us out, you can send screenshots of your data related to your question.
Author’s E-Book
You can access the e-book from a Kindle device, the Kindle App for the desktop or smartphone, which is a free app.
The author’s Vietnam eBook on the Battle for Tra Bong Vietnam: Events and Aftermath