I am Raymond Oglesby, an Information Technology (IT) specialist with 30 years in the field. I have taught Microsoft Applications and troubleshot computers in 15 countries and many States. My career was focused on mainframes and desktops from application development to implementation. I have written hundreds of programs for various architectures. I decided to start a blog to share my knowledge and experiences with you. I plan on updating this blog at least twice a week about smart phone apps to Windows.
Please feel free to leave a Comment or Tweet. I would love to hear from you. Do you have a computer tech question? I will do my best to answer your inquiry. Please mention the app and version that you are using. To help me out, you can send screenshots of your data related to your question.
You do not always need the greatest, shiniest device for smartphones. After all, a new phone is often a very expensive purchase. More people are realizing that, as new numbers show used phones are more popular than ever.
Sales of used smartphones are higher than ever now, as over 282 million used phones were reportedly sold through 2022, according to data from the IDC. This represents an 11.5% year-on-year increase, and while new phones are still selling like hotcakes, it does show a growing trend of people buying second-hand instead. The second-hand market is full of great deals, letting you get old phones for really cheap or even knocking a few hundred bucks off a current, slightly used model.
The reason for this is not particularly hard to guess. Economic inflation was a problem for most of 2022 (and has not gone away), and buying a brand-new smartphone is probably not a priority for people with other bills to pay. The iPhone 14 Pro Max can start at $1,100, while you can get used iPhone 12 or 13 devices for as low as $300.
It’s considered good practice to buy a used, older flagship model than going for a new smartphone
Courtesy of: The Register
Disclaimer
Technology is always changing, and rarely is there static tech for smartphones and desktops. Thus, the contents of this post are only valid at the time of writing. Blog posts older than six months may have directions incompatible with your device or OS. Hopefully, older post content will continue to work as advertised. Thank you for reading TechSavvy.Life for Technology at Work For You.
Quote For the Day
What did people do when they went to the bathroom before smartphones?
Aaron Cobra
Tweet Info
That’s it. Please feel free to share this post! One way to share is via Twitter.
Just click the Tweet icon below. This will launch Twitter where you click its icon to post the Tweet.
Checkout TechSavvy.Life for blog posts on smartphones, PCs, and Macs! You may email us at contact@techsavvy.life for comments or questions.
Please feel free to leave a comment. I would love to hear from you. Do you have a computer or smart device tech question? I will do my best to answer your inquiry. Just send an email to contact@techsavvy.life. Please mention the device, app, and version you are using. To help us out, you can send screenshots of your data related to your question.
Author’s E-Book
You can access the e-book from a Kindle device, the Kindle App for the desktop or smartphone, which is a free app.
The author’s Vietnam eBook on the Battle for Tra Bong Vietnam: Events and Aftermath
For troubleshooting, testing, or other similar purposes, you may need to turn off your Windows 11 or Windows 10’s firewall. It’s easy to disable this feature on your PC.
For troubleshooting, testing, or other similar purposes, you may need to turn off your Windows 11 or Windows 10’s firewall. It’s easy to disable this feature on your PC. Let’s explore this feature.
This is for Windows 11/10. Screenshots are from Windows 10
Note! The Dilbert comic will be suspended until further notice. Due to racists remarks by the creater of Dilbert, Scott Adams on a talk show, Dilbert has been removed from the Internet and newspapers. We have been following Dilbert for three decades and we thought the comic titted in with the theme of these posts.
Disable Your Firewall Only If You Have To
Turning off Windows’ firewall allows unauthorized network access on your PC. So unless you have a strong reason to disable the feature, you must keep the firewall turned on at all times.
The only times you may need to disable your firewall are when you are troubleshooting an issue, testing an app, or using a third-party firewall on your computer. Even then, if you are disabling the firewall to let an app through your network, add that app to the Firewall Exception list instead of turning the entire feature off.
When you are finished with your task, remember to turn the firewall back on to stay secure.
Turn Off Firewall
On both Windows 11 and 10, you will use the built-in Windows Security app to disable and enable the firewall.
First, launch Windows Security on your PC. Do this by opening the Start menu, searching for Windows Security, then click the app in the search results. Refer to the below image:
Launch Windows Security
Next, in the window that opens, click Firewall & network protection. See the below image:
Launch Firewall & Network Protection option
Now, on the Firewall & network protection page, select your network profile. To disable the firewall for your current profile, you will see Active next to that profile, so click that option. See the following image:
Launch the Private Network (Active) option
Next, in the Microsoft Defender Firewall section, toggle OFF the option. Later, to re-enable the firewall, toggle ON the option. Refer to the below image:
Disable Firewall
Now, select Yes in the User Account Control prompt, and your Windows firewall is now disabled. You may now continue your troubleshooting, testing, or other similar tasks.
Remember to turn the firewall back on when you are finished.
Disclaimer
Technology is always changing and rarely is static for smartphones and desktops. Thus, the contents of this post are only valid at the time of writing. Blog posts older than six months may have directions incompatible with your device or OS. Hopefully, older post content will continue to work as advertised. Thank you for reading TechSavvy.Life for Technology at Work For You.
Quote For the Day
Communication tools don’t get socially interesting until they get technologically boring.
Clay Shirky
Tweet Info
That’s it. Please feel free to share this post! One way to share is via Twitter.
Just click the Tweet icon below. This will launch Twitter where you click its icon to post the Tweet.
Checkout TechSavvy.Life for blog posts on smartphones, PCs, and Macs! You may email us at contact@techsavvy.life for comments or questions.
Please feel free to leave a comment. I would love to hear from you. Do you have a computer or smart device tech question? I will do my best to answer your inquiry. Just send an email to contact@techsavvy.life. Please mention the device, app, and version you are using. To help us out, you can send screenshots of your data related to your question.
Author’s E-Book
You can access the e-book from a Kindle device, the Kindle App for the desktop or smartphone, which is a free app.
The author’s Vietnam eBook on the Battle for Tra Bong Vietnam: Events and Aftermath
To print from your iPhone or iPad, find the print button in the app you are using and select your printer’s name in the print options. If your printer does not appear automatically, it probably does not support AirPrint, in which case you can usually connect using your printer manufacturer’s app instead. Let’s check this out.
Note! The Dilbert comic will be suspended until further notice. Due to racists remarks by the creater of Dilbert, Scott Adams on a talk show, Dilbert has been removed from the Internet and newspapers. We have been following Dilbert for three decades and we thought the comic titted in with the theme of these posts.
Print Using AirPrint
AirPrint is Apple’s easy-to-use wireless printing protocol. It requires next to no setup, provided your printer is powered on and connected to the same wireless network as your iPhone or iPad.
Many printers now come with AirPrint as standard, especially since we increasingly use our mobile devices for all manner of tasks. If you are not sure if your printer has AirPrint, you can try printing anyway and see what happens. The printer should just show up if you satisfy the requirements.
Our HP Inkjet network printer is over 5 years old and it supports AirPrint.
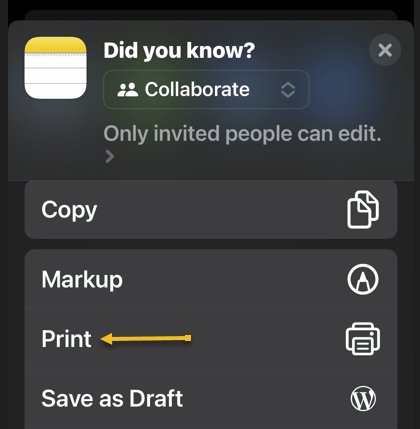
First, to print from your iPhone or iPad using AirPrint, select Print in whatever app you are using. Refer to the below image for selecting to print from the Notes app:
Selecting the Print option
This is often hidden under the Share menu, as is the case in apps like Safari and Notes. Just tap the Share icon. See the below image on printing from the Notes app:
Selecting the Share option
This is not the case for all apps. For example, in Reminders, you will need to tap the “…” icon.
Next, tap on Printer to show a list of nearby printers you can use. If your printer supports AirPrint and has been set up correctly, it should show under this menu. Tap on a printer to select it. See the following image:
Selecting your printer
Now, you may see a notice about the app you are using wanting permission to search for devices on your local network. Allow this when prompted. (And if you are having trouble, head to the app preferences under Settings and make sure the Local Network toggle is ON).
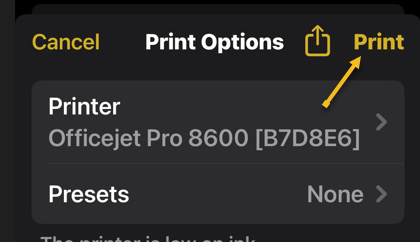
Next, with your printer selected, you can change print preferences by choosing how many copies, whether to print in black and white or color, whether to use double-sided printing if available, plus specify the paper size currently loaded in the printer. You may also get additional settings for Media & Quality and Layout depending on your model. Refer to the below image:
Selecting your print options
Now, hit Print in the top right-hand corner of the screen to send your job to your printer. You can also use the Share button next to it to save to Files or to a PDF version of your file locally if you would like. See the below image:
Selecting to print your file
Print Without AirPrint
Just because your printer does not have AirPrint does not mean you can not print wirelessly. Many printers include wireless functionality but lack support for Apple’s AirPrint protocol.
Print Using the Manufacturer’s App
If you have a printer that’s Wi-Fi enabled but lacks AirPrint, there’s a good chance that wireless printing is supported using an app. You can usually search the web for your printer’s model to see whether this feature is supported.
Then it’s simply a case of downloading an app like HP Smart, Canon PRINT, Epson iPrint, Brother iPrint&Scan on your device and following the instructions. Some of these apps have the added benefit of remote printing over the internet, which allows you to send a job to your printer at home regardless of where you are.
Purchase a Printer That Supports AirPrint
If you still need a printer, particularly one you can use with your iPhone or iPad, it’s worth investing in something that makes your life a little easier. For the most part, AirPrint “just works” over the local wireless network and allows you (and your guests to print wirelessly whenever you are within range.
When choosing a printer do not only consider the price of the unit itself but also the cost of the refills over the life of the product. You may find that refills cost more than a printer.
Disclaimer
Technology is always changing, and rarely is there static tech for smartphones and desktops. Thus, the contents of this post are only valid at the time of writing. Blog posts older than six months may have directions incompatible with your device or OS. Hopefully, older post content will continue to work as advertised. Thank you for reading TechSavvy.Life for Technology at Work For You.
Quote For the Day
Don’t become a slave to technology – manage your phone, don’t let it manage you.
Richard Branson
Tweet Info
That’s it. Please feel free to share this post! One way to share is via Twitter.
Just click the Tweet icon below. This will launch Twitter where you click its icon to post the Tweet.
Checkout TechSavvy.Life for blog posts on smartphones, PCs, and Macs! You may email us at contact@techsavvy.life for comments or questions.
Please feel free to leave a comment. I would love to hear from you. Do you have a computer or smart device tech question? I will do my best to answer your inquiry. Just send an email to contact@techsavvy.life. Please mention the device, app, and version you are using. To help us out, you can send screenshots of your data related to your question.
Author’s E-Book
You can access the e-book from a Kindle device, the Kindle App for the desktop or smartphone, which is a free app.
The author’s Vietnam eBook on the Battle for Tra Bong Vietnam: Events and Aftermath
Microsoft continues to double down on its most annoying feature by keeping advertisements inside Windows 10 (and adding even more to Windows 11). Let’s explore how to remove
Microsoft continues to double down on its most annoying feature by keeping advertisements inside Windows 10 (and adding even more to Windows 11). Let’s explore how to remove these ads.
Thankfully, most of these ads have a Settings menu. (The same goes for the ads in Windows 11).
This is for devices running Windows 10. Screenshots are from Windows 10
Copyright Scott Adams, Inc./Distributed by Universal Uclick for UFS
You may have to check Settings from time to time to ensure everything is still how you want it as Windows updates add more ads. The steps below may not remove everything but should tone things down to some extent.
Remove Ads from Start Menu
First, you can turn these ads off if you head to the:
Settings > Personalization > Start
and toggle OFF the Show suggestions occasionally in the Start option. Refer to the below image:
Remove Start Menu ads
Next, if you have a problem with any of the Live Tiles on your Start screen, some of which are pre-installed junk or trials, you can right-click on the one that’s bugging you, Just hover over the More option, and choose turn Live Tile to OFF. That way, it will merely act as a shortcut to the app. Or you can right-click on it to choose Uninstall to remove the app entirely.
Block Tips and suggestions From Lock Screen
First, to remove these tips and suggestions, head to
Settings > Personalization > Lock Screen
and set your background to Picture or Slideshow. Here, you can then toggle OFF for Get fun facts, tips, and more… See the below image:
Remove Tips and Suggestions ads
Remove Ads From Taskbar and Action Center
First, you can get rid of these ads by going to
Settings > System > Notifications & Actions
and unchecking Get tips, tricks, and suggestions as you use Windows.
Next, you may also want to untick the Show me the Windows welcome experience… option here, which shows those annoying tours after you update Windows, as well as the Suggest ways I can finish setting up my device…
Now, toggle OFF any manufacturer-installed apps that may be sending them, such as Lenovo Vantage on Lenovo ThinkPads. (You could also uninstall them entirely; just make sure they do not provide some useful features you want, (like updating certain drivers.) See the following image:
Remove Taskbar and Action Center ads
Remove Ads From File Explorer
First, you can get rid of these space-wasting suggestions by clicking
View> Options in File Explorer, then click the View tab in the window that appears.
Next, scroll. down to Show sync provider notifications and uncheck that box. That should prevent ads from showing up in File Explorer again. Refer to the below image:
Remove File Explorer ads
Remove Targeted Advertising
Windows gives you an Advertising ID that it uses to track your interests and serve you more relevant ads within apps. While you are turning OFF all of Windows’ built-in ads, you may want to turn this setting OFF as well.
First, head to
Settings > Privacy > General
and toggle OFF the Let apps use advertising ID…, if you would rather have non-targeted ads. See the below image:
Remove Targeted ads
Disclaimer
Technology is always changing and rarely is static for smartphones and desktops. Thus, the contents of this post are only valid at the time of writing. Blog posts older than six months may have directions incompatible with your device or OS. Hopefully, older post content will continue to work as advertised. Thank you for reading TechSavvy.Life for Technology at Work For You.
Quote For the Day
People who are really serious about software should make their own hardware.
Alan Kay
Tweet Info
That’s it. Please feel free to share this post! One way to share is via Twitter.
Just click the Tweet icon below. This will launch Twitter where you click its icon to post the Tweet.
Checkout TechSavvy.Life for blog posts on smartphones, PCs, and Macs! You may email us at contact@techsavvy.life for comments or questions.
Please feel free to leave a comment. I would love to hear from you. Do you have a computer or smart device tech question? I will do my best to answer your inquiry. Just send an email to contact@techsavvy.life. Please mention the device, app, and version you are using. To help us out, you can send screenshots of your data related to your question.
Author’s E-Book
You can access the e-book from a Kindle device, the Kindle App for the desktop or smartphone, which is a free app.
The author’s Vietnam eBook on the Battle for Tra Bong Vietnam: Events and Aftermath
System Restore lets you restore key Windows system files and Registry settings to a known-good state. Windows automatically creates them in certain situations, but you may want to manually create them before installing hardware drivers or making other major system changes. Let’s explore how to create a System Restore Point.
System Restore lets you restore key Windows system files and Registry settings to a known-good state. Windows automatically creates them in certain situations, but you may want to manually create them before installing hardware drivers or making other major system changes. Let’s explore how to create a System Restore Point.
This is for devices running Windows 11 or 10. Screenshots are from Windows 10
Copyright Scott Adams, Inc./Distributed by Universal Uclick for UFS
System Restore Point Explained
Windows 11 and 10 include a utility app called System Restore that can repair malfunctioning Windows installations by reverting certain system files and Windows Registry settings to a prior state. It does this by using restore points, which are snapshots of system files and the registry made either automatically or manually before problems arise.
Restore points are stored in a hidden folder called System Volume Information which is located at the root of each drive. Creating a restore point does not make any changes to your system, but restoring it later does. The instructions are the same in each Windows version.
Note: Windows will automatically create System Restore points in certain situations, so you may be able to restore to a previous system state even if you have never manually created one. However, you may want to manually create System Restore points before making major changes to your computer’s settings, installing drives, or installing large applications.
Manually Create a System Restore Point
First, open the Start Menu and type “Restore Point”. In the results that appear, select Create a Restore Point. Refer to the below image:
Accessing the option to Create a Restore Point
Next, the System Properties window will open with the System Protection tab selected. This is the main interface for managing restore points within Windows. Click the Create button toward the bottom of the window. See the below image:
Selecting to Create a Restore Point
Now, type in the name of the restore point. A good rule of thumb is to use a name that identifies why you are making the restore point, such as before a major installation or upgrade. For example “Before Drivers Update”, or “Before OneDrive Installation.”. When you are ready, click Create. See the following image:
Naming your Restore Point
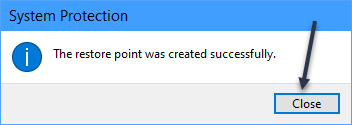
Next, you will see a progress bar, then if all goes well, a message that says The restore point was created successfully. Just click Close. Refer to the below image:
Close the window
After that, you are finished creating the restore point.
Automatically Create a System Restore Point
First, use the same System Protection tab in System Properties. Select the drive you would like to protect, then click Configure. In the window that opens, select Turn on System Protection, then click OK. See the below image:
Enabling Create a Restore Point
When you are done, click OK or close the System Properties window.
Restore a System Restore Point
To restore a System Restore point in Windows 111/10, we will use the same System Protection tab in the instructions above. First, open the Start Menu and type “Restore Point”, then click Create a Restore Point in the results. See the following image:
Accessing the option to Create a Restore Point
Now, in the System Restore window that opens, click Next when you see the introductory information. On the following screen, you will see a list of system restore points available on your PC. Select the one you want to restore and click Next. Refer to the below image:
Note: On this same screen, you can select a restore point and click “Scan For Affected Programs” to see a list of installed apps that will be affected by the restore process. This might help you make a decision about which restore point to choose.
Selecting a Restore Point to restore
Next, you will see a summary screen. Click Finish. See the below image:
Finish creating a Restore Point
Warning: By clicking “Yes” in the next step, you are about to make a permanent change to your system that could make your apps not work properly. System restore replaces your system files with older versions, and that can potentially break things. Only use it if you are recovering from a serious error. Also, you will not be able to use your PC while the system restore process is taking place.
If you are ready to begin the system restore, click Yes on the final warning screen. See the following image:
Confirm the restore
Your system will restart and the restore process will begin. After it’s complete, if everything went well, you will be able to log into Windows and use your PC as normal.
Disclaimer
Technology is always changing and rarely is static for smartphones and desktops. Thus, the contents of this post are only valid at the time of writing. Blog posts older than six months may have directions incompatible with your device or OS. Hopefully, older post content will continue to work as advertised. Thank you for reading TechSavvy.Life for Technology at Work For You.
Quote For the Day
Communication tools don’t get socially interesting until they get technologically boring.
Clay Shirky
Tweet Info
You are finished. Please feel free to share this post! One way to share is via Twitter.
Just click the Tweet icon below. This will launch Twitter where you click its icon to post the Tweet.
Checkout TechSavvy.Life for blog posts on smartphones, PCs, and Macs! You may email us at contact@techsavvy.life for comments or questions.
Please feel free to leave a comment. I would love to hear from you. Do you have a computer or smart device tech question? I will do my best to answer your inquiry. Just send an email to contact@techsavvy.life. Please mention the device, app, and version you are using. To help us out, you can send screenshots of your data related to your question.
Author’s E-Book
You can access the e-book from a Kindle device, the Kindle App for the desktop or smartphone, which is a free app.
The author’s Vietnam eBook on the Battle for Tra Bong Vietnam: Events and Aftermath
Open the Settings app, tap Safari, and toggle Block Pop-ups to OFF. This allows pop-ups in Safari on your iPhone. You can also allow pop-ups in other browsers like Google Chrome. Open your browser app’s Settings to find this option.
Summary: Open the Settings app, tap Safari, and toggle Block Pop-ups to OFF. This allows pop-ups in Safari on your iPhone. You can also allow pop-ups in other browsers like Google Chrome. Open your browser app’s Settings to find this option.
This is for the Safari and Chrome. Screenshots are from iPhone 14 Pro running iOS 16+
Copyright Scott Adams, Inc./Distributed by Universal Uclick for UFS
Allow Pop-Ups in Safari
To allow sites to open pop-up windows in your Safari browser, first, open the Settings app on your iPhone.
Next, in Settings, scroll down and tap Safari. Refer to the below image:
Accessing Safari
Now, on the Safari page, scroll down and toggle Block Pop-Ups to OFF.
Tip: To turn on Safari’s pop-up blocker in the future, re-enable the Block Pop-Ups option.
See the below image:
Toggle OFF to disable pop-ups
Allow Pop-Ups in Chrome
To enable pop-up windows in Chrome, first, launch the browser on your iPhone.
Next, when Chrome launches, in the bottom right-hand corner, tap the three-dot Menu and choose Settings. See the following image:
Accessing Chrome Settings
Now, in Settings, scroll down and tap Content Settings. Refer to the below image:
Accessing Content Settings
Next, tap Block Pop-Ups. See the below image:
Accessing Block Pop-ups
Now, toggle Block Pop-Ups to OFF. Then, in the top right-hand corner, tap Done.
Tip: To re-enable pop-ups in Google Chrome in the future, activate the Block Pop-Ups option.
See the following image:
Toggle OFF to disable pop-ups and tap Done
Disclaimer
Technology is always changing, and rarely is their static tech for smartphones and desktops. Thus, the contents of this post are only valid at the time of writing. Blog posts older than six months may have directions incompatible with your device or OS. Hopefully, older post content will continue to work as advertised. Thank you for reading TechSavvy.Life for Technology at Work For You.
Quote For the Day
We refuse to turn off our computers, turn off our phone, log off Facebook, and just sit in silence because in those moments we might actually have to face up to who we really are.
Jefferson Bethke
Tweet Info
That’s it. Please feel free to share this post! One way to share is via Twitter.
Just click the Tweet icon below. This will launch Twitter where you click its icon to post the Tweet.
Checkout TechSavvy.Life for blog posts on smartphones, PCs, and Macs! You may email us at contact@techsavvy.life for comments or questions.
Please feel free to leave a comment. I would love to hear from you. Do you have a computer or smart device tech question? I will do my best to answer your inquiry. Just send an email to contact@techsavvy.life. Please mention the device, app, and version you are using. To help us out, you can send screenshots of your data related to your question.
Author’s E-Book
You can access the e-book from a Kindle device, the Kindle App for the desktop or smartphone, which is a free app.
The author’s Vietnam eBook on the Battle for Tra Bong Vietnam: Events and Aftermath
Google’s Image Search results are sometimes so impressive that you want to save some of those images to your device. If you have found yourself in this situation, let’s explore how to download those images from your search results.
This is for mobile and desktop devices. Screenshots are from Windows 10 and iPhone 14 Pro running iOS 16+
Copyright Scott Adams, Inc./Distributed by Universal Uclick for UFS
Save Images On Desktop
To download an image on a desktop, you just pick your image, click an option, and your image is saved to your computer.
First, launch your favorite web browser on your computer and open Google Image Search. There, find the image you want to save to your machine. Refer to the below image:
Search Google Images
Next, on the search results page, access the image that you want to download. See the below image:
Find an image
Now, right-click your image, and from the menu that opens, choose to Save image as. See the following image:
Check the option to save your image
Next, your browser will open your computer’s standard Save As window. Here, select a folder to save your image in, type your image name in the File Name field, then click Save. Refer to the below image:
Save your image
Now, you have successfully downloaded your favorite image from your Image Search results. If you are not sure exactly where the image file went, check your Downloads folder from File Explorer.
If your downloaded file is of low resolution, then try downloading that image directly from the source site. To do that, on the Image Search results page, click the link, beneath the image, and not the image, to be taken to the image site. There, right-click the image and choose Save image as.
Download Images On Mobile
On your mobile phone, you can download images from Google’s Image Search results using Google Chrome, Apple Safari, or Microsoft Edge. Mozilla Firefox does not offer the option to save images.
To start, first, open your web browser (we are using Safari) and launch Google Image Search or type into the search box “images.google.com”. Find the image you would like to save to your phone.
Next, on the search results page, tap the image to download. See the below image:
Tap an image you want to download
Now, on your image full-screen page, tap and hold the image. See the following image:
Press and hold your image
Next, on iPhone or iPad, from the menu that opens in Safari, tap Save to Photos. Refer to the below image:
Select the option to save your image
Your iPhone will download and save the image on your local storage or in our example using Safari, your Photos app. See the below image:
Your saved image
Disclaimer
Technology is always changing and rarely is static for smartphones and desktops. Thus, the contents of this post are only valid at the time of writing. Blog posts older than six months may have directions incompatible with your device or OS. Hopefully, older post content will continue to work as advertised. Thank you for reading TechSavvy.Life for Technology at Work For You.
Quote For the Day
The technology you use impresses no one. The experience you create with it is everything.
Sean Cerety
Tweet Info
You are finished. Please feel free to share this post! One way to share is via Twitter.
Just click the Tweet icon below. This will launch Twitter where you click its icon to post the Tweet.
Checkout TechSavvy.Life for blog posts on smartphones, PCs, and Macs! You may email us at contact@techsavvy.life for comments or questions.
Please feel free to leave a comment. I would love to hear from you. Do you have a computer or smart device tech question? I will do my best to answer your inquiry. Just send an email to contact@techsavvy.life. Please mention the device, app, and version you are using. To help us out, you can send screenshots of your data related to your question.
Author’s E-Book
You can access the e-book from a Kindle device, the Kindle App for the desktop or smartphone, which is a free app.
The author’s Vietnam eBook on the Battle for Tra Bong Vietnam: Events and Aftermath
The simplest way to search your Photos library is to use the Search tab at the top. However, you can also find specific photos and videos by filtering images by app name, camera or device, and even location.
Summary: The simplest way to search your Photos library is to use the Search tab at the top. However, you can also find specific photos and videos by filtering images by app name, camera or device, and even location. Using iPhone’s Live Text feature, you can also search for text within images.
This is for the iPhone. Screenshots are from iPhone 14 Pro running iOS 16+
Copyright Scott Adams, Inc./Distributed by Universal Uclick for UFS. This is one of my favorites
Finding that favorite photo you took can be frustrating when you have thousands to sift through. Fortunately, there are plenty of useful tips for searching and filtering your media, including photos, videos, imports, and more. Let’s discover some of these tips.
Find Specific People and Objects
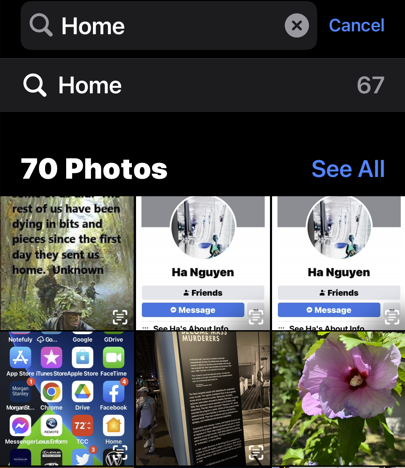
Using the Search tab, you can search for people, animals, and objects in the Photos app. The Search function works well for finding animals like cats and dogs, objects like cars and boats, clothing like hats and sunglasses, or natural features like rivers and mountains.
First, launch Photos and select Search from the Toolbar at the bottom. Then type your criteria into the Search bar. Refer to the below image:
Search for flowers
Next, you can get as descriptive as you like. For example, you can look for food items like steak or rooms in your house like the bedroom. Start typing “at the concert” and see what you find.
Now, for the search to work with people, you will need to link their likeness to a contact. Tap on the Albums tab. Scroll down to People and Places and tap on the selection of faces that Photos have generated. See the below image:
Search for faces
Next, you can tap on individual people, then tap Add Name at the top to link the likeness to a contact. See the following image:
Add a person’s name
Now, tap Next in the upper right-hand corner to see the tagged person, then click Done in the upper right-hand corner. Refer to the below image:
The person’s name has been added
Next, to train Photos to recognize people better, click each photo and look for the Review button. You can then confirm or deny likenesses. You may find some people have multiple entries due to changes in appearance, like a new haircut. Just tag them with the same name. See the below image:
Review your photos
Now, return to your Albums tab and tap on People. Here, you will see your tagged entries. See the following image:
Your named people’s photos
Find Text and Captions
Next, thanks to the iPhone’s Live Text feature, you can search for text within images. For example, you can search for words on a page, titles of books, road signs, or notices. You may even be able to pick up handwriting if it’s legible enough for the iPhone to recognize. Refer to the below image:
Find text in your photos
Now, you can give yourself a chance at finding something specific later by attaching a caption to it. To do so, find the photo in your library, then swipe up to reveal more information about it. Then tap the Add a Caption field and type your description.
Find Old Objects
Your iPhone can surface images from this time last year, three years ago, or even ten years ago if your media files go back that far. These sometimes appear on the For You tab or as Memories Notifications, but you can also search for them manually.
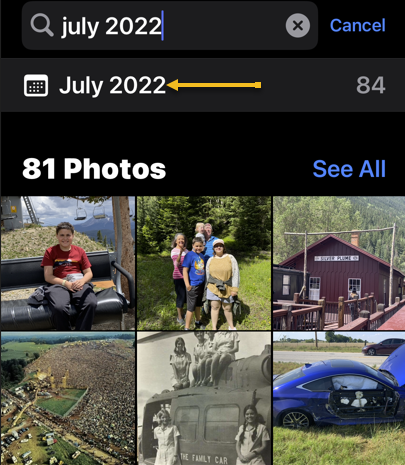
Next, the key is to type the phrase exactly to see the relevant entry. For example, you can type Three Years Ago and then tap on the event that shows up. Also, you can do this for Last Month or Last Week. Head to the Albums tab and tap on Search at the bottom of the Toolbar. See the below image:
Find photos from last month
Now, you can even filter by images taken in a particular month and year by searching for it, like July 2022. Also, you could search by scrolling down to the date range in your Library tab and selecting a date, but doing the above is much quicker. See the following image:
Find photos with a specific date
Find Hidden or Deleted
Next, in iOS 16, the Hidden and Recently Deleted albums are protected by Face ID or Touch ID. You can still find them in the usual place on the Albums tab by scrolling down to the bottom of the page and tapping on the Hidden or Recently Deleted album label in the Utility section.
Note:Recently Deleted photos will be removed after 30 days.
Refer to the below image:
Find Hidden or Recently Deleted photos
Find Duplicates and Delete Them
Now, the Photos app can also find and merge duplicate photos and videos to save space. Scroll to the bottom of your Albums tab and tap Duplicates in the Utility section to see a list of duplicate photos or videos. See the below image:
Find Duplicate photos
Next, you can review each entry and then tap Merge. Your iPhone will then keep the highest quality version of any duplicates. See the following image:
Merge Duplicate photos
You can also merge all of your duplicates at once by tapping:
Select > Select All > Merge (###)
Where “###” is the number of duplicates you are going to merge shown at the bottom of your screen. Refer to the below image:
Merge all Duplicate photos
The iPhone Photos app is both useful and powerful. These tips are just some of what you can do.
Disclaimer
Technology is always changing, and rarely is their static tech for smartphones and desktops. Thus, the contents of this post are only valid at the time of writing. Blog posts older than six months may have directions incompatible with your device or OS. Hopefully, older post content will continue to work as advertised. Thank you for reading TechSavvy.Life for Technology at Work For You.
Quote For the Day
We refuse to turn off our computers, turn off our phone, log off Facebook, and just sit in silence because in those moments we might actually have to face up to who we really are.
Jefferson Bethke
Tweet Info
That’s it. Please feel free to share this post! One way to share is via Twitter.
Just click the Tweet icon below. This will launch Twitter where you click its icon to post the Tweet.
Checkout TechSavvy.Life for blog posts on smartphones, PCs, and Macs! You may email us at contact@techsavvy.life for comments or questions.
Please feel free to leave a comment. I would love to hear from you. Do you have a computer or smart device tech question? I will do my best to answer your inquiry. Just send an email to contact@techsavvy.life. Please mention the device, app, and version you are using. To help us out, you can send screenshots of your data related to your question.
Author’s E-Book
You can access the e-book from a Kindle device, the Kindle App for the desktop or smartphone, which is a free app.
The author’s Vietnam eBook on the Battle for Tra Bong Vietnam: Events and Aftermath
Google Chrome has had a built-in dark theme like Mozilla Firefox and Microsoft Edge since Chrome 74. You can even apply a dark theme to every web page you visit using third-party themes or an extension.
Google Chrome has had a built-in dark theme like Mozilla Firefox and Microsoft Edge since Chrome 74. You can even apply a dark theme to every web page you visit using third-party themes or an extension. Let’s explore this dark mode feature.
This is for devices running Windows 11 or 10. Screenshots are from Windows 10
Copyright Scott Adams, Inc./Distributed by Universal Uclick for UFS
Chrome offers a built-in dark mode on Windows 11 and Windows 10. It even makes all of Chrome’s context menus dark, too.
Dark Mode for Windows 11
First, open the Settings app and navigate to:
Personalization > Color
Next, click the drop-down menu to the right of Choose Your Mode and select Dark. Refer to the below image:
Setting Dark Mode for Windows 11
Next, close out the Settings app and launch Google Chrome. Unless you have manually set Chrome’s theme, it will match your system.
Dark Mode for Windows 10
First, head to:
Settings > Personalization > Colors
and select Dark under Choose your default app mode. See the below image:
Setting Dark Mode for Windows 10
Apply a Dark Theme
Chrome supports user-created themes, which you can download from the Chrome Web Store. To give Chrome a dark interface, all you have to do is install a dark theme. Google even provides a helpful collection of editor-selected dark themes. This will give your Chrome browser a dark mode on Windows 7, Linux, Chrome OS, and any operating system without a native dark theme.
Note! Google now offers some official Chrome browser themes, including a “Just Black” dark mode theme. You may want to give that a try.
We recommend Morpheon Dark, which is the most popular dark theme in the Store. Unlike some other dark themes, it provides a decent amount of contrast between your active tab, which is a bit lighter, and your inactive tabs, which are darker.
This theme turns darkens the Tab Bar, Title Bar, Toolbar, and New Tab page. That’s all you can theme in Chrome. You can not make Chrome’sContext Menus or Settings page dark, for example. See the following image:
Apply Morpheon Dark Mode
If you ever want to switch back to Chrome’s default theme you can. Head to:
Menu > Settings
Look for the Themes option under Appearance and then click Reset to Default. Refer to the below image:
Reset to the default theme
Disclaimer
Technology is always changing, and rarely is their static tech for smartphones and desktops. Thus, the contents of this post are only valid at the time of writing. Blog posts older than six months may have directions incompatible with your device or OS. Hopefully, older post content will continue to work as advertised. Thank you for reading TechSavvy.Life for Technology at Work For You.
Quote For the Day
Even the technology that promises to unite us, divides us. Each of us is now electronically connected to the globe, and yet we feel utterly alone.
Dan Brown
Tweet Info
You are finished. Please feel free to share this post! One way to share is via Twitter.
Just click the Tweet icon below. This will launch Twitter where you click its icon to post the Tweet.
Checkout TechSavvy.Life for blog posts on smartphones, PCs, and Macs! You may email us at contact@techsavvy.life for comments or questions.
Please feel free to leave a comment. I would love to hear from you. Do you have a computer or smart device tech question? I will do my best to answer your inquiry. Just send an email to contact@techsavvy.life. Please mention the device, app, and version you are using. To help us out, you can send screenshots of your data related to your question.
Author’s E-Book
You can access the e-book from a Kindle device, the Kindle App for the desktop or smartphone, which is a free app.
The author’s Vietnam eBook on the Battle for Tra Bong Vietnam: Events and Aftermath
Do you feel bombarded by iPhone notifications? If so, there’s a way to silence all of your notifications. Or, you can pick and choose the notifications you want to see and those you want to ignore.
Do you feel bombarded by iPhone notifications? If so, there’s a way to silence all of your notifications. Or, you can pick and choose the notifications you want to see and those you want to ignore. Let’s examine how to gain control over your notifications.
This is for the iPhone. Screenshots are from iPhone 14 Pro running iOS 16+
Copyright Scott Adams, Inc./Distributed by Universal Uclick for UFS
Using Do Not Disturb Mode
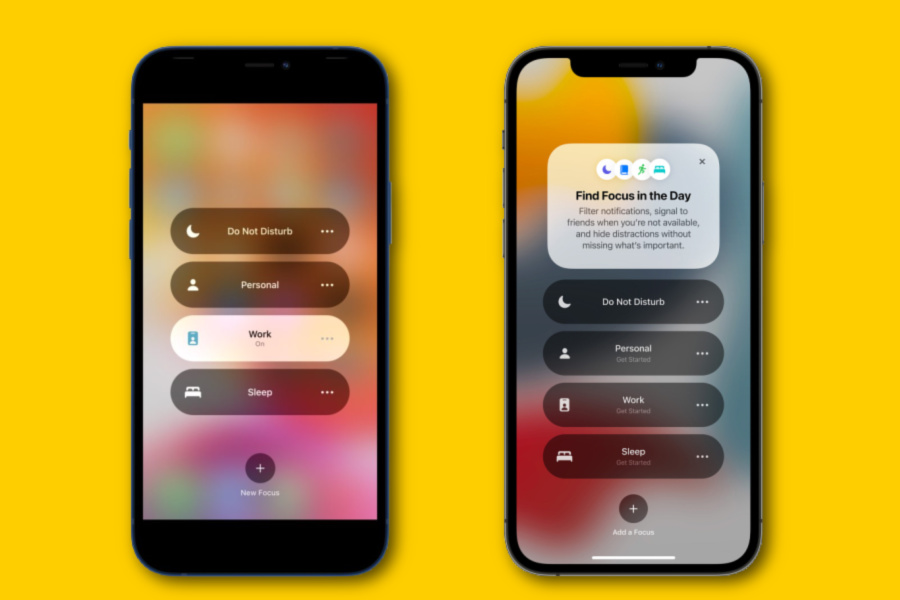
The easiest way to silence your notifications is to turn on Do Not Disturb mode from the Control Center. Swipe down from the very top-right of your screen. Then, select:
Focus > Do Not Disturb
Refer to the below image:
Accessing the Do Not Disturb button
Using Focus
If you want to schedule Do Not Disturb mode for a specific time, you can use Focus too.
First, launch the Settings app on your iPhone. In Settings, tap:
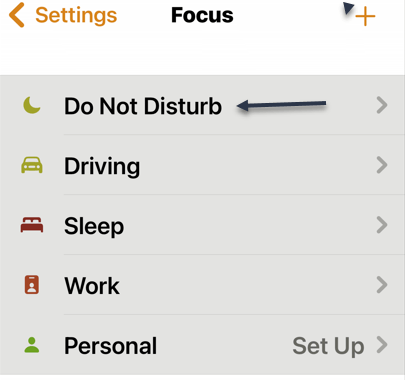
Focus > Do Not Disturb
See the below image:
Accessing the Do Not Disturb option from Focus
Next, you can set which notifications you allow (if any) and choose a custom Home or Lock screen to use in Do Not Disturb mode. See the following image:
Choosing Lock or Home screen
Now, under Set a Schedule, tap Add Schedule to set when you would like to enable Do Not Disturb mode. Refer to the below image:
About to Set a Schedule
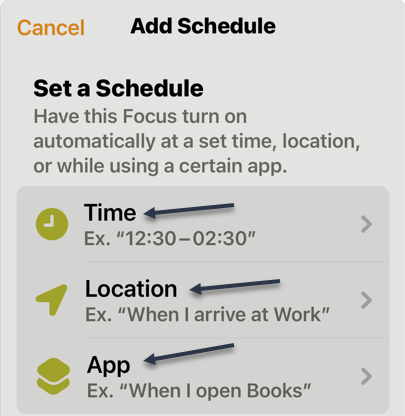
Next, you have three options for setting a schedule. see the below image:
Set a Schedule via three options
Next, you can set a Time, Location, and App to silence notifications. See the following image:
Your three options
Quiet App-Specific
If you want to disable notifications for a specific app, you can manage the notification settings for each app on your iPhone.
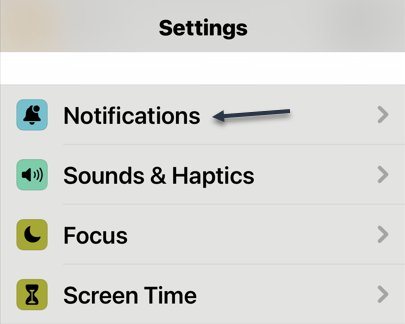
First, open Settings on your device. Then, tap Notifications. Refer to the below image:
Accessing Notifications
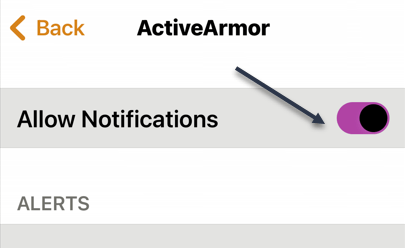
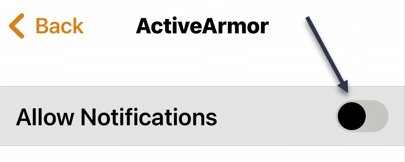
Next, on the Notifications page, in the Notification Style section, tap the app for which you want to disable notifications.See the below image where we are choosing the ActiveArmor app:
Selecting an App
Now, on the app page, at the top, toggle OFF the Allow Notifications option. See the following image:
Toggle Notifications to OFF
Next, a screen will open showing the Allow Notifications option is OFF. Refer to the below image:
Notifications are OFF for the App
Now, tap the Back icon and notice that notifications for ActiveArmor are OFF. See the below image:
Showing Notifications is OFF for the App
Your iPhone will not send you notifications from your chosen app.
Disclaimer
Technology is always changing, and rarely is their static tech for smartphones and desktops. Thus, the contents of this post are only valid at the time of writing. Blog posts older than six months may have directions incompatible with your device or OS. Hopefully, older post content will continue to work as advertised. Thank you for reading TechSavvy.Life for Technology at Work For You.
Quote For the Day
As technology advances in complexity and scope, fear becomes more primitive.
Don DeLillo
Tweet Info
That’s it. Please feel free to share this post! One way to share is via Twitter.
Just click the Tweet icon below. This will launch Twitter where you click its icon to post the Tweet.
Checkout TechSavvy.Life for blog posts on smartphones, PCs, and Macs! You may email us at contact@techsavvy.life for comments or questions.
Please feel free to leave a comment. I would love to hear from you. Do you have a computer or smart device tech question? I will do my best to answer your inquiry. Just send an email to contact@techsavvy.life. Please mention the device, app, and version you are using. To help us out, you can send screenshots of your data related to your question.
Author’s E-Book
You can access the e-book from a Kindle device, the Kindle App for the desktop or smartphone, which is a free app.
The author’s Vietnam eBook on the Battle for Tra Bong Vietnam: Events and Aftermath