How to Check for New Books on Kindle

When you buy books on Amazon, your Kindle should automatically add them to your Library. Sometimes, though, books do not show up straight away.

RAYMOND OGLESBY @RaymondOglesby2
April 21, 2022

When you buy books on Amazon, your Kindle should automatically add them to your Library. Sometimes, though, books do not show up straight away. Let’s find out what to do when that happens.

This is for Kindle

Dilbert and Promotion
Copyright Scott Adams, Inc./Distributed by Universal Uclick for UFS

Ensure Your Kindle is Connected to WiFi or Cellular

When your Kindle is connected to your Wi-Fi network you will see a little Wi-Fi symbol in the top-right of your screen. For Kindles with Cellular data, there’s also a 3G or 4G symbol. Refer to the below image:
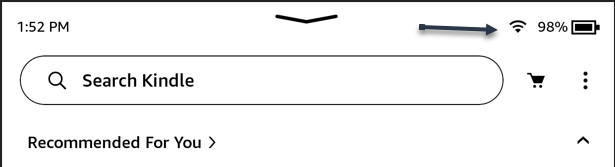
Kindle 1
Checking if Wi-Fi enabled

If you do not see one, or you see an Airplane symbol instead, your Kindle is not connected to the internet. Seeing the Airplane symbol it means your Kindle is in Airplane mode.

Tap the arrow at the top of the screen to open the menu. Then, tap the Airplane icon to turn it OFF. This will allow your Kindle to connect to your Wi-Fi network.

Otherwise, first, tap the arrow at the top of the screen to open the Menu, then tap All Settings icon to open the Settings menu. See the below image:
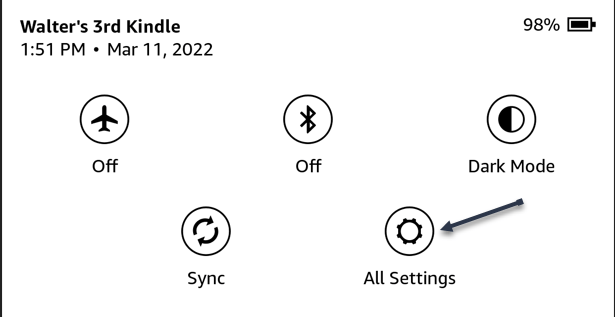
Kindle 2
Selecting the All Settings icon

Next, tap Wi-Fi & Bluetooth, then tap Wi-Fi Networks to see a list of all your available Wi-Fi networks. See the following image:
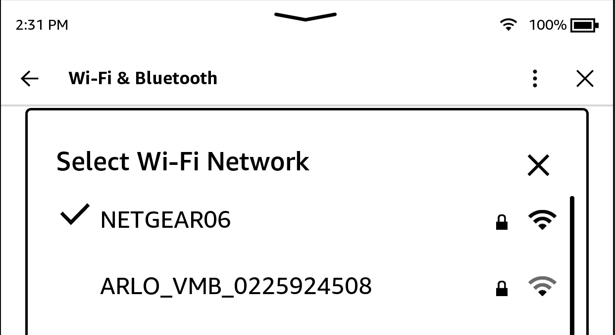
Kindle 3
Your available networks

If you do not see your Wi-Fi network, restart your router. Otherwise, select the network you want to connect to and, if you need to, enter the Wi-Fi password.

Force Yout Kindle to Sync

First, from your Home screen, tap the Arrow at the top of the screen to open the Menu. Refer to the below image:
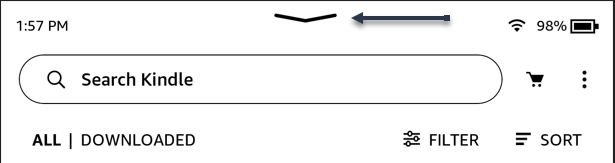
Kindle 4
Opening the Menu

Next, tap the Sync icon. This will force your Kindle to check in with Amazon’s servers. See the below image:
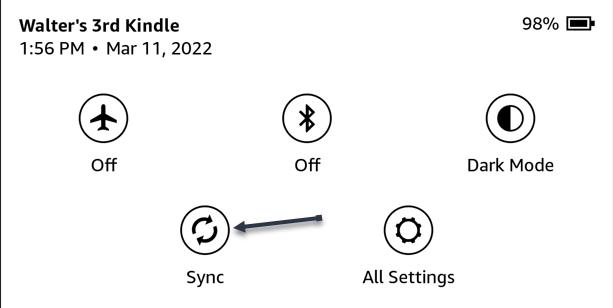
Kindle 5
Selecting the Sync icon

Now, tap the Library button in the bottom toolbar. See the following image:
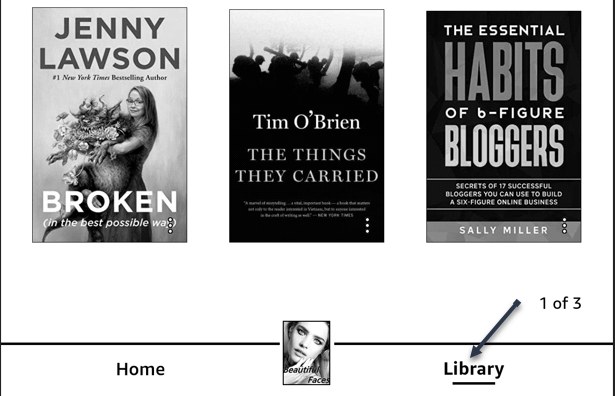
Kindle 6
Selecting the Library button

Next, tap ALL at the top of your screen. Notice at the bottom right-hand corner, that we show 1 of 3 pages. Tap the one you want to read. If it’s not already on your device, it will download straight away. Refer to the below image:
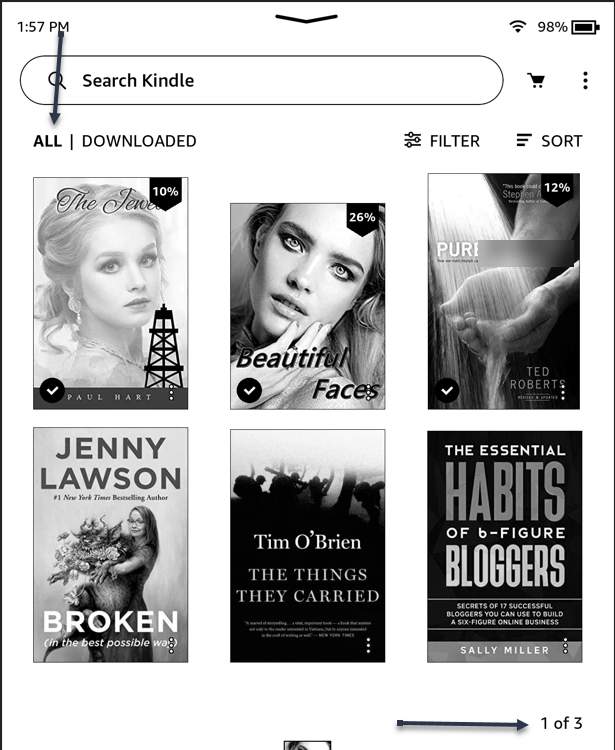
Kindle 7
Selecting to show ALL Kindle books

Now, this will show you all the Kindle books in your Amazon account, not just the ones downloaded to your Kindle. Any new books should show up first.

To see your downloaded books, tap DOWNLOADED at the top of your screen. Notice at the bottom right-hand corner, that we show 1 of 1 page. See the below image:
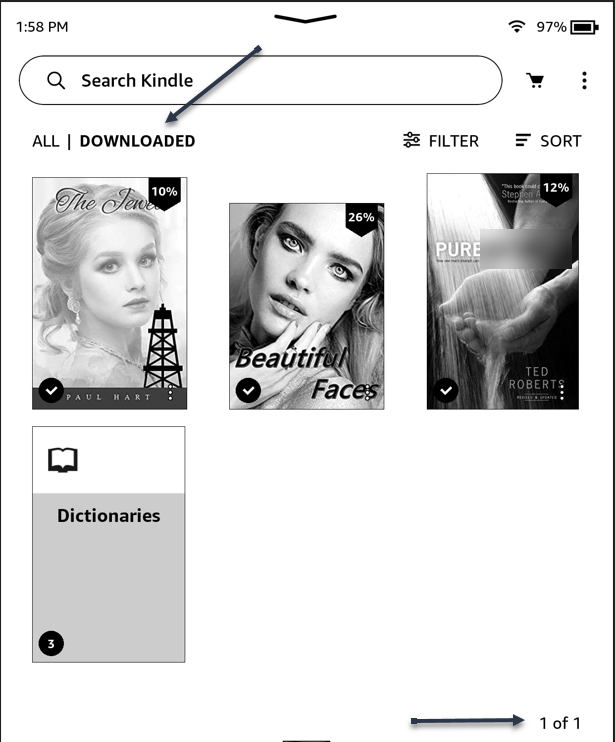
Kindle 8
Selecting to show DOWNLOADED books

Need Some Help

If you still can not find the new book you’re looking for after forcing your Kindle to sync, there are a couple of things you can do:

  • Restart your Kindle. Turning things off and on again really can work.
  • Update your Kindle to the latest software version.
  • Check your Amazon orders to see if your purchase went through.

Quote For the Day

The only way to make sense out of change is to plunge into it, move with it, and join the dance.

Alan Watts

That’s it. Please feel free to share this post! One way to share is via Twitter.

Just click the Tweet icon below. This will launch Twitter where you click its icon to post the Tweet.

Check out TechSavvy.Life for blog posts on smartphones, PCs, and Macs! You may email us at contact@techsavvy.life for comments or questions.

I Would Like to Hear From You

Please feel free to leave a comment. I would love to hear from you. Do you have a computer or smart device tech question? I will do my best to answer your inquiry. Just send an email to contact@techsavvy.life. Please mention the device, app, and version you are using. To help us out, you can send screenshots of your data related to your question.

‘Author’s E-book

You can access the e-book from a Kindle device, the Kindle App for the desktop or smartphone, which is a free app.


The author’s Vietnam eBook on the Battle for Tra Bong Vietnam: Events and Aftermath

How to Remove Twitter Followers

If you do not like someone following you on Twitter but do not want to block them, you can remove them from your follower list. This only takes a few clicks.

RAYMOND OGLESBY @RaymondOglesby2
April 20, 2022

If you do not like someone following you on Twitter but do not want to block them, you can remove them from your follower list. This only takes a few clicks. Let’s explore how to do it on Twitter’s desktop and mobile site.

This is for the devices using Twitter

Dilbert and Spy
Copyright Scott Adams, Inc./Distributed by Universal Uclick for UFS

Note: As of the writing, the option to remove a follower is only available on Twitter’s desktop and mobile site. The option is not yet available on Twitter for Android or iOS.

The Old and New Methods

Twitter has launched the ability to remove followers at the end of 2021. Earlier, if you wanted to remove a follower, you had to block them. Doing so basically removed that user from your follower’s list, prevented them from following you again, and also hid your tweets from them.

In the new method of removing followers, you can remove someone from your follower’s list without blocking them. Twitter does not notify a user when you remove them from your follower’s list. However, they may notice they are not following you anymore, and they can then choose to follow you again. You will need to block them if you do not want them capable of following you, or choose the nuclear option and delete your Twitter account as a last resort.

Remove Followers Using Desktop

To delete a follower from your Twitter profile on a Windows, Mac, Linux, or Chromebook computer, use the Twitter desktop website.

First, open a web browser on your computer and launch the desktop Twitter site. Log in to your account if you have not already done so.

Next, in Twitter’s left sidebar, click the Profile option (the person icon). Refer to the below image:

Twitter 1
Selecting your Profile

Now, your profile page will open. Here, beneath your profile information, click the Followers link to see your followers list. See the below image:

Twitter 2
Selecting your Followers link

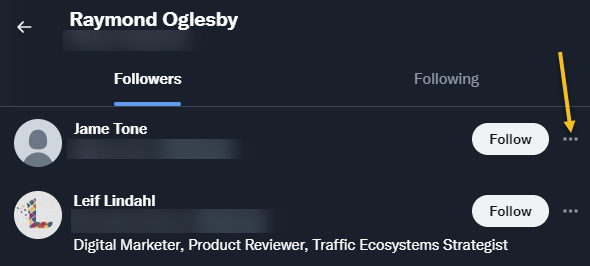
Next, on the follower’s page, find the follower you want to remove. Then, next to that user’s name, click the Menu icon (the three dots). See the following image:

Twitter 3
Selecting the Menu for a follower

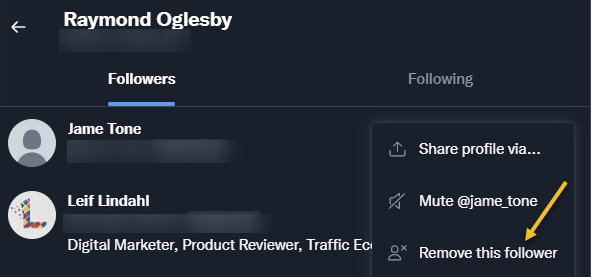
Now, in the three-dots Menu, click Remove this follower. Refer to the below image:

Twitter 4
Selecting to Remove this follower

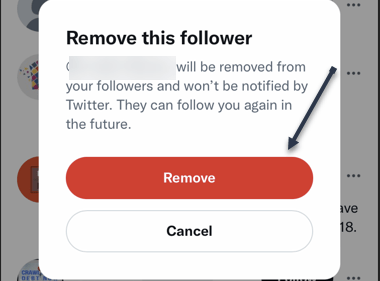
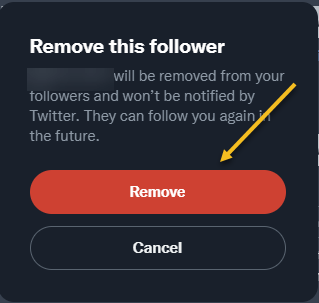
Next, you will see a Remove this follower prompt. Just click the Remove button. See the below image:

Warning: Make sure you really want to remove that follower before clicking “Remove.” Twitter will not show any further prompts and will immediately remove that user from your followers list.

Twitter 5
Remove the follower

Now, you are all set. Your selected follower is now removed from your Twitter followers list.

Remove Followers Using Mobile

If you are on an iPhone, iPad, or Android phone, you can use Twitter’s mobile site to remove a follower from your account.

First, open a web browser on your phone and launch the mobile Twitter site (mobile.twitter.com/home). If you launch Twitter.com (as you do on the desktop), the removal process will not work. Sign in to your Twitter account if not already done so.

Next, in Twitter’s top left-hand corner, tap your Profile icon. See the following image:

Twitter 6
Selecting your Profile

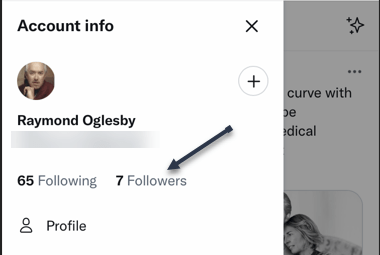
Now, an Account info menu will open. Here, tap the Followers link. Refer to the below image:

Twitter 7
Selecting your Followers link

Next, on the follower’s page, find the follower you want to remove. Then, next to that user’s name, tap the Menu icon (the three dots). See the below image:

Twitter 8
Selecting the Menu for a follower

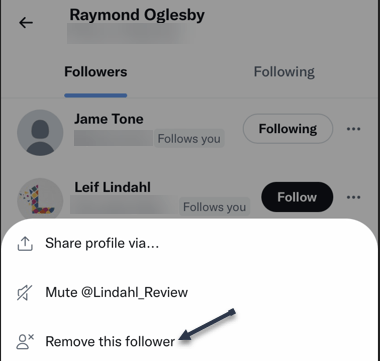
Now, in the three-dots Menu, tap Remove this follower. See the following image:

Twitter 9
Selecting to Remove this follower

Next, you will see a Remove this follower prompt. Just tap the Remove button. Refer to the below image:

Warning: Make sure you really want to remove that follower before clicking “Remove.” Twitter will not show any further prompts and will immediately remove that user from your followers list.

Twitter 10
Remove the follower

Now, you are all set. Your selected follower is now removed from your Twitter followers list.

Quote For the Day

I have not failed. I’ve just found 10,000 ways that won’t work.

Thomas Edison

That’s it. Please feel free to share this post! One way to share is via Twitter.

Just click the Tweet icon below. This will launch Twitter where you click its icon to post the Tweet.

Check out TechSavvy.Life for blog posts on smartphones, PCs, and Macs! You may email us at contact@techsavvy.life for comments or questions.

I Would Like to Hear From You

Please feel free to leave a comment. I would love to hear from you. Do you have a computer or smart device tech question? I will do my best to answer your inquiry. Just send an email to contact@techsavvy.life. Please mention the device, app, and version you are using. To help us out, you can send screenshots of your data related to your question.

Author’s E-book

You can access the e-book from a Kindle device, the Kindle App for the desktop or smartphone, which is a free app.

The author’s Vietnam eBook on the Battle for Tra Bong Vietnam: Events and Aftermath

How to Really Shut Down Windows

Sometimes you need to shut down your Windows 10 or 11 PC, but thanks to something called Fast Startup, you might not be shutting it down all the way, with a fresh OS reload on the next power-up.

RAYMOND OGLESBY @RaymondOglesby2
April 19, 2022

Sometimes you need to shut down your Windows 10 or 11 PC, but thanks to something called Fast Startup, you might not be shutting it down all the way, with a fresh OS reload on the next power-up. Let’s explore how to really shut down your desktop completely.

This is for Windows 10 and 11. Screenshots are from Windows 10

Dilbert and Manager
Copyright Scott Adams, Inc./Distributed by Universal Uclick for UFS

Fast Startup

Usually, you do not need to shut down your PC. Sleep Mode can place your PC into a low-power state that is quick to resume whenever you need to use your PC again.

But there are times when you might want to shut down your PC in a way that forces Windows 10 or 11 to reload completely when you boot it back up.

With a feature called Fast Startup, many PCs that support hibernation mode actually “shut down” to a state similar to hibernation, which saves the state of the operating system (in RAM) to a file called hiberfil.sys. This lets Windows load quickly when you power up your PC again.

So if Fast Startup is enabled on your PC and you select Shut Down in the Start menu, you are not getting a clean restart when you power it back up again.

Disable Fast Startup

It’s important to know that not all PCs support Fast Startup mode. So your PC might already be shutting down completely. (Restarting bypasses Fast Startup, as shown in the last section of this post). You will see another way to tell in the steps ahead.

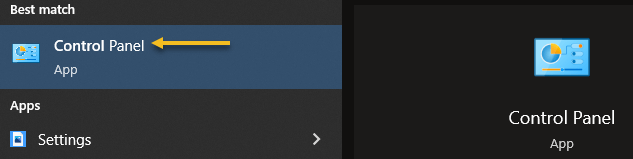
To disable Fast Startup, first, open the Control Panel in Windows 10 or 11. For Windows 10, type “control panel” in the Cortana search box, then click the Control Panel app in the search results. For Windows 11, open the Start menu and type “control panel,” then click the Control Panel icon when it appears. Refer to the below image:

Windows Shutdown 1
Accessing the Control Panel in Windows 10

Next, when the Control Panel opens, click Hardware and Sound section. See the below image:

Windows Shutdown 2
Selecting the Hardware and Sound section

Now, under the Power Options section, click Change what the power buttons do link. See the following image:

Windows Shutdown 2
Selecting Change what the power buttons do link

Next, on the Define power buttons and turn on password protection page, first, click the Change settings that are currently unavailable link near the top of the page.

Now, look under the Shutdown Settings section near the bottom. If you see Turn on fast startup (recommended), remove the checkmark beside it. Refer to the below image:

Windows Shutdown 4
Turn off Fast Start

Note: If you do not see the Fast Startup option, it means your PC does not support Fast Startup and is already shutting down completely, so no changes are necessary.

Next, click Save Changes and exit the Control Panel.

The next time you shut down your Windows PC, it will shut down completely without any hibernation. And the next time you start it up, you will get a clean boot with a full reload of Windows.

Just Restart

It’s important to note that if you need a completely clean Windows boot, you can also achieve it by using the “Restart” feature built into Windows; no disabling Fast Startup is necessary. Restarting this way bypasses Fast Startup if you have it enabled. Microsoft implemented it this way because people often restart their computers to fix problems, and a full shutdown and restart might refresh the Windows system kernel or your computer’s hardware drivers if either is stuck in a bad state.

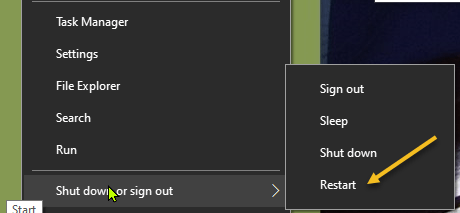
To restart your PC, first, click the Start menu, then select the Power icon (located on the left side in Windows 10 and on the right side in Windows 11). In the menu that pops up, select Restart. See the below image:

Windows Shutdown 5
Selecting Restart in Windows 10

Your PC will restart completely with a fresh reload of Windows, which will hopefully solve any temporary problems that you have been troubleshooting.

Quote For the Day

The person who dumps garbage into your mind will do you considerably more harm than the person who dumps garbage on your floor, because each load of mind garbage negatively impacts your possibilities and lowers your expectations.

Zig Ziglar

That’s it. Please feel free to share this post! One way to share is via Twitter.

Just click the Tweet icon below. This will launch Twitter where you click its icon to post the Tweet.

Check out TechSavvy.Life for blog posts on smartphones, PCs, and Macs! You may email us at contact@techsavvy.life for comments or questions.

I Would Like to Hear From You

Please feel free to leave a comment. I would love to hear from you. Do you have a computer or smart device tech question? I will do my best to answer your inquiry. Just send an email to contact@techsavvy.life. Please mention the device, app, and version you are using. To help us out, you can send screenshots of your data related to your question.

Author’s E-book

You can access the e-book from a Kindle device, the Kindle App for the desktop or smartphone, which is a free app.

The author’s Vietnam eBook on the Battle for Tra Bong Vietnam: Events and Aftermath

How to Use Copy and Paste on iPhone

It’s easy to copy and paste various items, including text, web links, photos, and messages, on your iPhone.

RAYMOND OGLESBY @RaymondOglesby2
April 14, 2022

It’s easy to copy and paste various items, including text, web links, photos, and messages, on your iPhone. Let’s explore how to copy and paste these items between various apps on your Apple smartphone.

This is for the iPhone. Screenshots are from iPhone XR

Dilbert and Sales
Copyright Scott Adams, Inc./Distributed by Universal Uclick for UFS

Copying and pasting regular text is the easiest thing to do on your iPhone. You basically select the text to copy and choose the copy option.

First, find the text you want to copy on your iPhone. This text could be on a website, in a note, or anywhere on your phone.

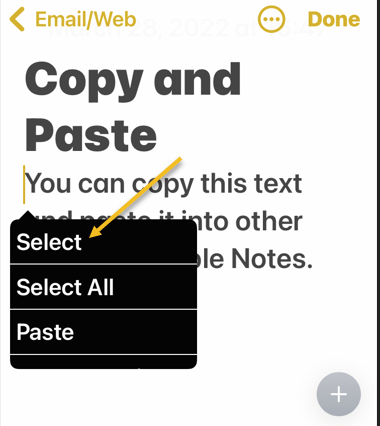
Next, tap and hold on to the text to copy. Then, in the menu that opens, tap Select. Refer to the below image:

CopyPaste 1
Accessing the Select option

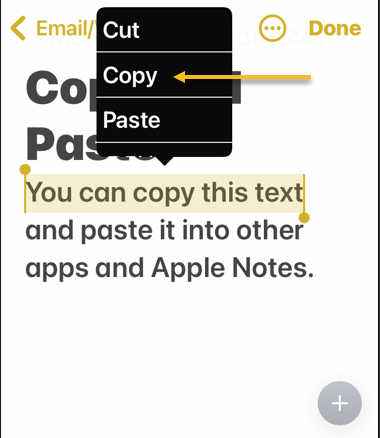
Now, two handlers will appear around your text. Use these handles to adjust the selection of words, lines, or paragraphs to copy. Then tap Copy to copy your selected text. See the below image:

CopyPaste 2
Accessing the Copy option

Next, your selected text is now available in your iPhone’s virtual clipboard. You can now paste this text anywhere on your phone. To do that, simply tap and hold on to a text field, and from the menu that opens, choose Paste. See the following image:

CopyPaste 3
Accessing the Paste option

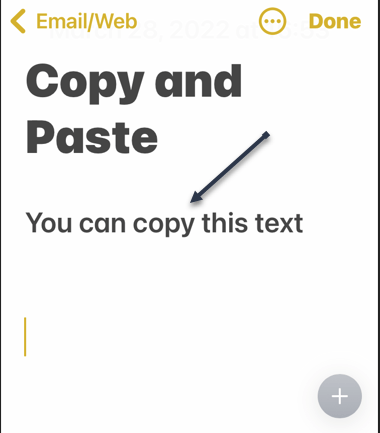
Now, your copy and paste text will be displayed. Refer to the below image:

CopyPaste 4
Your Copy and Paste text

You can use copy and paste for links, photos, and messages. All it takes to copy an item on your iPhone is to tap and hold on to that item and choose Copy. In certain apps, you open the Share menu and then tap Copy to copy your item.

For example, I write notes, comments, and other texts in Apple Notes, then Paste the text to social media. Notes are easier to read, have some formatting capability, are iCloud based, which allows for easy sharing.

The universal copy system works across many file types on your phone. That means you can use it to copy and paste on most anything on your device.

Quote For the Day

One must be a god to be able to tell successes from failures without making a mistake.

Anton Chekhov

Tweet Info

That was easy. Please feel free to share this post! One way to share is via Twitter.

Just click the Tweet icon below. This will launch Twitter where you click its icon to post the Tweet.

Check out TechSavvy.Life for blog posts on smartphones, PCs, and Macs! You may email us at contact@techsavvy.life for comments or questions.

I Would Like to Hear From You

Please feel free to leave a comment. I would love to hear from you. Do you have a computer or smart device tech question? I will do my best to answer your inquiry. Just send an email to contact@techsavvy.life. Please mention the device, app, and version you are using. To help us out, you can send screenshots of your data related to your question.

Author’s E-book

You can access the e-book from a Kindle device, the Kindle App for the desktop or smartphone, which is a free app.
The author’s Vietnam eBook on the Battle for Tra Bong Vietnam: Events and Aftermath

How to Save Google Chrome Passwords

Google Chrome can save your website passwords and help you automatically fill them the next time you visit your sites.

RAYMOND OGLESBY @RaymondOglesby2
April 13, 2022

Google Chrome can save your website passwords and help you automatically fill them the next time you visit your sites.

There are several ways to turn on the password saving feature in Chrome. Note that Chrome syncs your passwords with your Google account, which means if you enable Chrome to save passwords on one device, that change automatically applies to all your signed-in devices. Let’s explore this feature on both desktop and mobile devices.

This is for desktop and mobile running Chrome. Screenshots are from Windows 10 and iPhone XR

Dilbert and Bonus
Copyright Scott Adams, Inc./Distributed by Universal Uclick for UFS

Save Passwords on Desktop

To enable Chrome’s password manager on your Windows, Mac, Linux, or Chromebook computer, first, open Chrome on your computer.

Next, in Chrome’s top right-hand corner, click the three dots (the Menu icon). Refer to the below image:

Passwords 1
Selecting the Menu icon

Now, from the three-dots Menu icon, select the Settings option. See the below image:

Passwords 1
Accessing the Settings option

Next, on the left sidebar of the Settings page, click the Autofill option. See the following image:

Passwords 3
Accessing the Autofill option

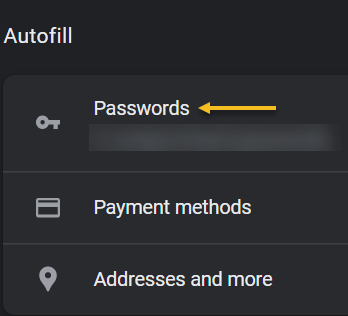
Now, on the right of the Autofill section, click the Passwords option. Refer to the below image:

Passwords 4
Selecting the Passwords option

Next, toggle the Offer to save passwords option to ON at the top of the Passwords page. See the below image:

Passwords 5
Enable Offer to save passwords

Note! If you decide you do not want password prompts, just toggle the Offer to save passwords to OFF.

From now on, when you log in to a site in Chrome on any of your devices, the browser will ask you to save your password for that site. 

Save Passwords on Mobile

First, open Chrome on your iPhone, iPad, or Android device.

Next, tap the three dots (the Menu icon) in Chrome on your device. If you are on Android, these dots are in Chrome’s top right-hand corner. If you are on an iPhone or iPad, you will find the Menu icon in the bottom right-hand corner. See the following image:

Passwords 6
Accessing the Menu icon

Now, in the menu that opens, tap the Settings option. Refer to the below image:

Passwords 7
Accessing the Settings option

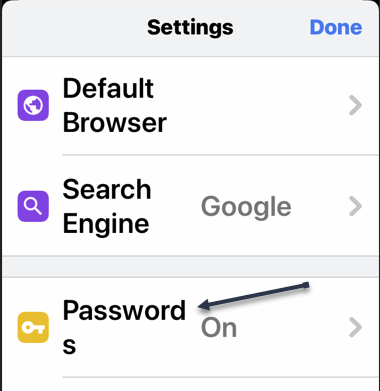
Next, in the Basics section of the Settings page, tap the Passwords option. See the below image:

Passwords 8
Accessing the Passwords option

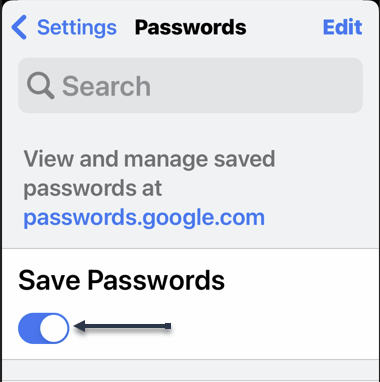
Now, on the Passwords page, toggle the Save Passwords option to ON. See the following image:

Passwords 9
Enable Save Passwords

Save Passwords Using Password Manager Site

To use this method, first, open a web browser on your device and access the Google Password Manager site. Log in to the site with the same Google account that you use in Chrome.

Now, when the Password Manager site opens, in the top right-hand corner, click the password options (the gear icon). Refer to the below image:

Passwords 10
Accessing Password options

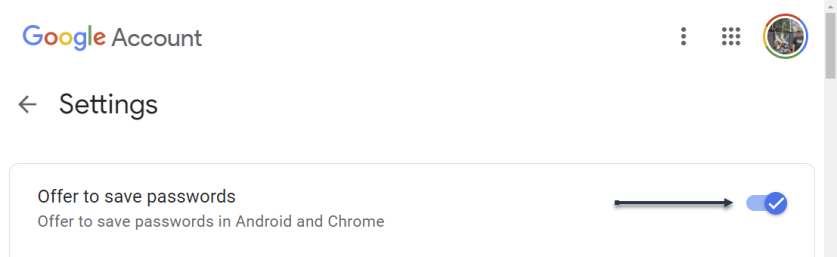
Next, the Settings page will open. Here, at the top, toggle the Offer to save passwords option to ON. See the below image:

Passwords 11
Enable Offer to sasve passwords

From now on, no matter what method you used above, Chrome will start prompting you to save passwords on all your signed-in devices. 

Quote For the Day

If people like you, they’ll listen to you, but if they trust you, they’ll do business with you.

Zig Ziglar

You are finished. Please feel free to share this post! One way to share is via Twitter.

Just click the Tweet icon below. This will launch Twitter where you click its icon to post the Tweet.


Check out TechSavvy.Life blog posts on smartphones, PCs, and Macs! You may email us at contact@techsavvy.life for comments or questions.

I Would Like to Hear From You

Please feel free to leave a comment. I would love to hear from you. Do you have a computer or smart device tech question? I will do my best to answer your inquiry. Just send an email to contact@techsavvy.life. Please mention the device, app, and version you are using. To help us out, you can send screenshots of your data related to your question.

Author’s E-book

You can access the e-book from a Kindle device, the Kindle App for the desktop or smartphone, which is a free app.
The author’s Vietnam eBook on the Battle for Tra Bong Vietnam: Events and Aftermath

How to Use Sound Check on iPhone

Using your iPhone’s Sound Check feature, you can prevent your phone from blasting loud music in your ears.

RAYMOND OGLESBY @RaymondOglesby2
April 12, 2022

Using your iPhone’s Sound Check feature, you can prevent your phone from blasting loud music in your ears. Let’s explore how this feature works.

This is for the iPhone

Dilbert and Questions
Copyright Scott Adams, Inc./Distributed by Universal Uclick for UFS

Explanation of Sound Check

The Sound Check feature on your iPhone basically tries to keep your music’s volume consistent. For example, if you move from a quiet music track to a louder one, your iPhone ensures that that louder track’s volume is not any higher than the quiet one.

It does so by scanning your songs and finding each song’s loudness. This information is saved in each song’s metadata, which basically means your actual and original songs are not modified.

Note! the Sound Check feature is only available in Apple’s stock Music app. This feature does not work in other apps, like Spotify.

Enable Sound Check

First, launch the Settings app on your phone. In Settings, tap the Music option. Refer to the below image:

Sound 1
Selecting Music option

On the Music page, scroll all the way down. Then, toggle ON the Sound Check option. See the below image:

Sound 2
Enabling Sound Check

Sound Check is now enabled. To use it, launch the Music app on your phone and start playing a music track. As you move from one song to another, the feature will ensure you get a consistent volume level.

This is how to keep your ears safe by preventing extremely loud music from playing on your iPhone!

Quote For the Day

Knowledge is of no value unless you put it into practice.

Anton Chekhov

That’s it. Please feel free to share this post! One way to share is via Twitter.

Just click the Tweet icon below. This will launch Twitter where you click its icon to post the Tweet.

Check out TechSavvy.Life for blog posts on smartphones, PCs, and Macs! You may email us at contact@techsavvy.life for comments or questions.

I Would Like to Hear From You

Please feel free to leave a comment. I would love to hear from you. Do you have a computer or smart device tech question? I will do my best to answer your inquiry. Just send an email to contact@techsavvy.life. Please mention the device, app, and version you are using. To help us out, you can send screenshots of your data related to your question.

Author’s E-book

You can access the e-book from a Kindle device, the Kindle App for the desktop or smartphone, which is a free app.
The author’s Vietnam eBook on the Battle for Tra Bong Vietnam: Events and Aftermath

How to Turn Off the Prompt “Sign In With Google”

Some websites show you a “Sign in with Google” prompt to help you quickly sign in to that website. If you would like to avoid this prompt, there’s an easy way to disable it from your Google account’s Settings menu

RAYMOND OGLESBY @RaymondOglesby2
April 7, 2022

Some websites show you a “Sign in with Google” prompt to help you quickly sign in to that website. If you would like to avoid this prompt, there’s an easy way to disable it from your Google account’s Settings menu. Let’s see how this is done.

This is for devices using Google. Screenshots are from Windows 10

Dilbert and Experiment
Copyright Scott Adams, Inc./Distributed by Universal Uclick for UFS

The “Sign in with Google” prompt is tied to your Google account and not to a particular web browser. This means that you will need to disable the prompt in your account to prevent it from appearing across all your web browsers, including both desktop and mobile browsers.

First, open your Google My Account site in a web browser on your Windows, Mac, or Linux computer. Then, log in to your Google account if you have not already done so.

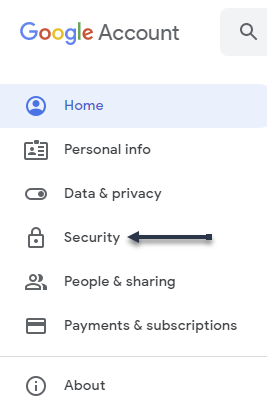
Next, when the site loads, first, select Security in the left sidebar. Refer to the below image:

Signin Google 1
Selecting Security option

Now, on the Security page, scroll down to the Signing in to other sites section. Here, click the Signing in with Google option. See the below image:

Signin Google 2
Selecting Google sign in

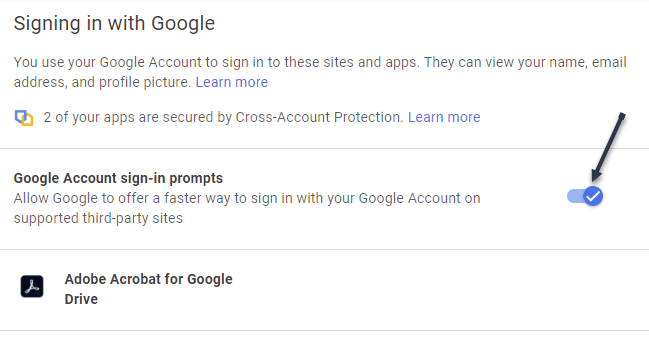
On the next page, under the Signing in with Google section, toggle OFF the Google Account sign-in prompts. See the following image:

Signin Google 3
Disable Google sign in

Now, you will see an Updated message in the lower left-hand corner of your browser telling you that your settings are saved. Refer to the below image:

Signin Google 4
Your updated change notification

Note: If you are logged in to multiple Google accounts in your web browser, repeat the above process for each account to get rid of the Sign in with Google prompt.

If you want to reverse this action, simply repeat the above steps and toggle ON the Google Account sign-in prompts.

From now on, you will not see the Sign in with Google prompt on any website.

Quote For The Day

Time can be an ally or an enemy. What it becomes depends entirely upon you, your goals, and your determination to use every available minute.

Zig Ziglar

That’s it. Please feel free to share this post! One way to share is via Twitter.

Just click the Tweet icon below. This will launch Twitter where you click its icon to post the Tweet.

Check out TechSavvy.Life for blog posts on smartphones, PCs, and Macs! You may email us at contact@techsavvy.life for comments or questions.

I Would Like to Hear From You

Please feel free to leave a comment. I would love to hear from you. Do you have a computer or smart device tech question? I will do my best to answer your inquiry. Just send an email to contact@techsavvy.life. Please mention the device, app, and version you are using. To help us out, you can send screenshots of your data related to your question.

Author’s E-book

You can access the e-book from a Kindle device, the Kindle App for the desktop or smartphone, which is a free app.

The author’s Vietnam eBook on the Battle for Tra Bong Vietnam: Events and Aftermath

How to Use Safari Tab Groups on iPhone and iPad

Are you overwhelming yourself with the number of tabs you have open in Safari? Using the Tab Groups that arrived with iOS 15 and iPadOS 15, you can organize them so your browser stays orderly.

RAYMOND OGLESBY @RaymondOglesby2
April 6, 2022

Are you overwhelming yourself with the number of tabs you have open in Safari? Using the Tab Groups that arrived with iOS 15 and iPadOS 15, you can organize them so your browser stays orderly. Let’s explore how this is done.

This is for iPhone and iPad using Safari and running iOS15 or iPadOS 15 or higher

Dilbert and Weather
Copyright Scott Adams, Inc./Distributed by Universal Uclick for UFS

Similar to how tab groups work in Google Chrome and Microsoft Edge, you can group several tabs together and give them a label. This allows you to easily find and pull up your tabs again when you need them without cluttering up your view.

First, you will need to open a few tabs in Safari to use the Tabs Groups feature. After that, tap the Tabs button in the bottom left-hand corner. Refer to the below image:

Tab Groups 1
Accessing the Tabs button

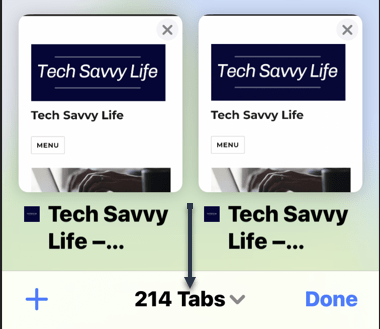
Next, the tab count of open tabs will appear on the bottom bar. Tap on the tab count to open the Tab Groups menu. See the below image:

Tab Groups 2
Accessing the Tabs count

Now, in the Tab Groups menu, you will get two options. The New Empty Tab Group means you will get to make a tab group first and then add the tabs to it. If you want to create a group from your open tabs, you will need to choose the New Tab Group from X Tabs option. See the following image:

Tab Groups 3
Create a new tab group

Next, enter a name for your new tab group and hit the Save button. Refer to the below image:

Tab Groups 4
Label the new tab group

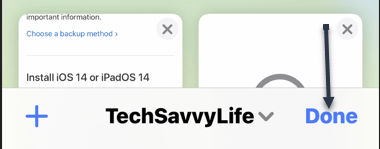
Now, Safari will switch you to a new tab group and show you the grid of open tabs. The name of the tab group will appear on the bottom bar. Tap Done to save the changes. See the below image:

Tab Groups 5
Save your change

Next, after creating a tab group in Safari, there are a few things you can do.

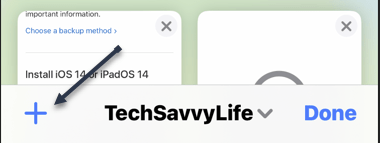
  • Tap the “+” (plus) button to add a new tab to a tab group. See the following image:
Tab Groups 6
Add a new tab
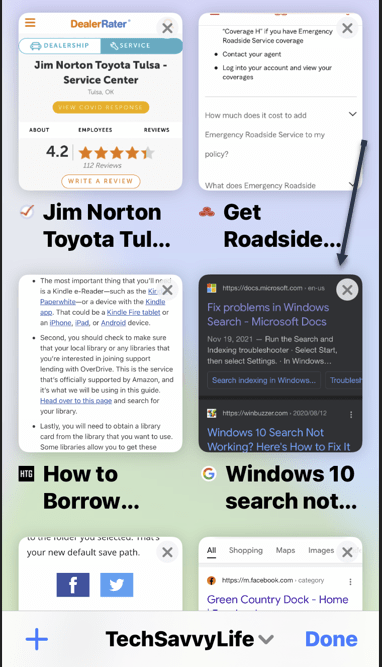
  • Hit the “x” cross sign in the top right-hand corner of the tab preview card to remove it from the group. Refer to the below image:
Tab Groups 7
Remove a tab
  • Tap on an open tab and drag it around to reorder it. Notice that the upper right-hand corner preview on the previous screen has been moved to the middle left. See the below image:
Tab Groups 8
Move your tabs

Now, hard-press on a tab, select Arrange Tabs By from the long-press menu and choose to Arrange Tabs By Title or Arrange Tabs By Websites. See the following image:

Tab Groups 9
Arrange your tabs

You can copy the links from the open tabs in a tab group to save them before closing all the tabs at once.

Quote For the Day

Take time to be kind and to say ‘thank you.’

Zig Ziglar

That’s it. Please feel free to share this post! One way to share is via Twitter.

Just click the Tweet icon below. This will launch Twitter where you click its icon to post the Tweet.

Check out TechSavvy.Life for blog posts on smartphones, PCs, and Macs! You may email us at contact@techsavvy.life for comments or questions.

I Would Like to Hear From You

Please feel free to leave a comment. I would love to hear from you. Do you have a computer or smart device tech question? I will do my best to answer your inquiry. Just send an email to contact@techsavvy.life. Please mention the device, app, and version you are using. To help us out, you can send screenshots of your data related to your question.

Author’s E-book

You can access the e-book from a Kindle device, the Kindle App for the desktop or smartphone, which is a free app.
The author’s Vietnam eBook on the Battle for Tra Bong Vietnam: Events and Aftermath

How to Change the Mouse Pointer snd Text Indicator on Windows 10

Windows 10 lets you increase the mouse cursor’s size and change its color as well as changed the text indicator.. Want a black mouse cursor instead? You can choose that. Want a huge yellow inverted cursor that’s easier to see? You can choose that, too. Want the cursor indicator that you can see? In our example, we will create a Scheme of yellow inverted size three cursor and a blue text indicator with a thickness of three.

RAYMOND OGLESBY @RaymondOglesby2
April 5, 2022

Windows 10 lets you increase the mouse cursor’s size and change its color as well as changed the text indicator. Want a black mouse cursor instead? You can choose that. Want a huge yellow inverted cursor that’s easier to see? You can choose that, too. Want the cursor indicator that you can see? In our example, we will create a Scheme of yellow inverted size three cursor and a blue text indicator with a thickness of three. Let’s explore how this is done.

This is for devices running Windows 10

Dilbert and Problem
Copyright Scott Adams, Inc./Distributed by Universal Uclick for UFS

Change the Mouse Settings

First, open Mouse Settings. In the Cortana search box at the lower left-hand corner, type in “mouse settings“. From the results, in the upper left-hand corner, click the Mouse settings result. The Mouse window will then open.

Next, in this window, you can adjust:

  • Cursor speed – move the slider from slow to fast
  • Mouse wheel scroll – select Multiple lines at a time
  • Lines to scroll – as you move the slider, hover on it to see the number to scroll
  • Scroll inactive windows – to enable, switch the toggle to ON

Refer to the below image:

Adjust the mouse options

When finished, click Adjust mouse & cursor size in the upper right-hand corner. Now, on the window that opens, you can adjust:

  • Pointer size – change the size from small to large
  • Pointer color – change the color by clicking the second and fourth tile. A color picker will appear for you to choose a color
  • Set touch feedback – change touch feedback toggle to ON

See the below image:

Cursor 3
Adjust the mouse pointer options

Change the Text Indicator

Next, in the pane on the left, select the Text cursor option. See the following image:

Cursor 4
Select the Text cursor option

Now, on the menu that opens, you can adjust:

  • Text cursor indicator – toggle the switch to ON
  • Text cursor size – from small to large
  • Text cursor indicator color – select a color from the tiles
  • Text cursor thickness – as you move the slider, hover on it to see the number for thickness

When finished, navigate back to the Mouse settings window. In the find a setting box in the upper left-hand corner, type in “mouse” and choose Mouse settings option.

Next, on the window that opens, select Additional mouse options in the upper right-hand corner. Refer to the below image:

Cursor 6
Select Additional mouse options

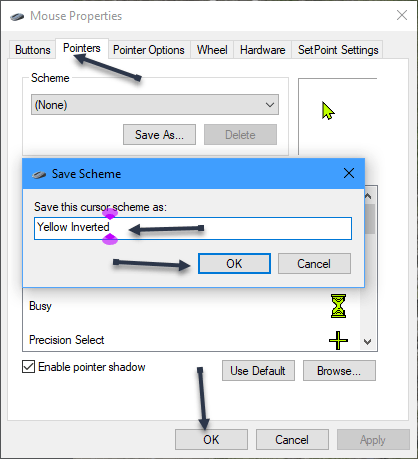
Now, the Mouse Properties window will open. Select the Pointers tab. Then label the Scheme by clicking the drop-down box and type in a name, click OK. When finished, click OK at the bottom. See the below image:

Cursor 7
Adjust the Mouse properties

In our example, we have created a Scheme of yellow inverted size three cursor and a blue text indicator with a thickness of three.

Quote For the Day

Yesterday ended last night. Today is a brand-new day.

Zig Ziglar

That’s it. If you ever want to tweak your mouse cursor again, just come back here. Please feel free to share this post! One way to share is via Twitter.

I hope you have found this post helpful. If so, click the Tweet icon below. This will launch Twitter where you click its icon to post the Tweet.

Check out TechSavvy.Life for blog posts on smartphones, PCs, and Macs! You may email us at contact@techsavvy.life for comments or questions.

I Would Like to Hear From You

Please feel free to leave a comment. I would love to hear from you. Do you have a computer or smart device tech question? I will do my best to answer your inquiry. Just send an email to contact@techsavvy.life. Please mention the device, app, and version you are using. To help us out, you can send screenshots of your data related to your question.

Author’s E-book

You can access the e-book from a Kindle device, the Kindle App for the desktop or smartphone, which is a free app.

The author’s Vietnam eBook on the Battle for Tra Bong Vietnam: Events and Aftermath

Need to Change Your PayPal Password?

You should change your PayPal password as you have done with other sensitive accounts. PayPal makes it easy to change your current password to a stronger password in your account. This is accomplished from PayPal’s website and not the mobile app.

RAYMOND OGLESBY @RaymondOglesby2
March 31, 2022

You should change your PayPal password as you have done with other sensitive accounts. PayPal makes it easy to change your current password to a stronger password in your account. This is accomplished from PayPal’s website and not the mobile app. Let’s get started.

This is for the desktop using PayPal. Screenshots are from Windows 10

Dilbert and Team
Copyright Scott Adams, Inc./Distributed by Universal Uclick for UFS

First, start the password change process by opening a web browser on your device and launching the PayPal website. Log in to your account with your current password.

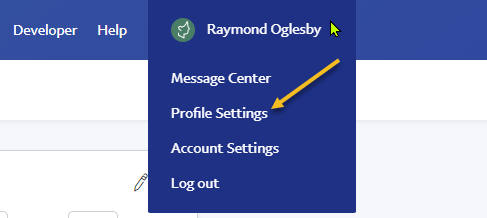
Next, once you have logged in, at PayPal’s top right-hand corner, below your name, select Profile Settings. Refer to the below image:

PayPal 1
Accessing your Profile Settings

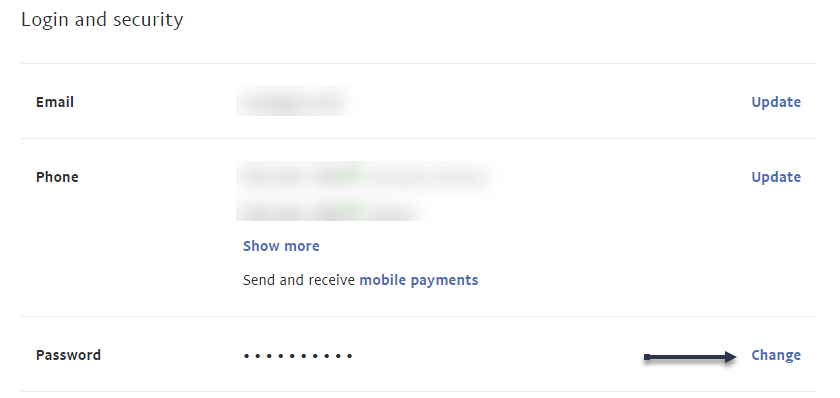
Now, the Login and security window will open. On the Password option, click on Change. See the below image:

PayPal 2
Selecting to Change your Password

Next, a Change Your Password window will open. In this window, click the Current Password field and type your current PayPal password. Then click the New Password field and type the new password you want to use with your account.

Now, click the Confirm New Password field and re-enter your new password. Then save your changes by clicking Change Password at the bottom. See the following image:

PayPal 3
Change your Password and confirm the change

And that’s it. Your PayPal account password is now changed. Going forward, you will use this new password to sign in to your account on all your devices.

Quote For the Day

If you aim at nothing, you’ll hit it every time.

Zig Ziglar

That was easy. Please feel free to share this post! One way to share is via Twitter.

Just click the Tweet icon below. This will launch Twitter where you click its icon to post the Tweet.

Check out TechSavvy.Life for blog posts on smartphones, PCs, and Macs! You may email us at contact@techsavvy.life for comments or questions.

I Would Like to Hear From You

Please feel free to leave a comment. I would love to hear from you. Do you have a computer or smart device tech question? I will do my best to answer your inquiry. Just send an email to contact@techsavvy.life. Please mention the device, app, and version you are using. To help us out, you can send screenshots of your data related to your question.

Author’s E-book

You can access the e-book from a Kindle device, the Kindle App for the desktop or smartphone, which is a free app.
The author’s Vietnam eBook on the Battle for Tra Bong Vietnam: Events and Aftermath