I am Raymond Oglesby, an Information Technology (IT) specialist with 30 years in the field. I have taught Microsoft Applications and troubleshot computers in 15 countries and many States. My career was focused on mainframes and desktops from application development to implementation. I have written hundreds of programs for various architectures. I decided to start a blog to share my knowledge and experiences with you. I plan on updating this blog at least twice a week about smart phone apps to Windows.
Please feel free to leave a Comment or Tweet. I would love to hear from you. Do you have a computer tech question? I will do my best to answer your inquiry. Please mention the app and version that you are using. To help me out, you can send screenshots of your data related to your question.
We are giving away one (1) $50.00 Amazon Gift Card to one of our followers in celebration of 300 blog posts. Its simple to enter. Just send an email to:
We are giving away one (1) $50.00 Amazon Gift Card to one of our followers in celebration of 300 blog posts. It’s simple to enter. Just send an email to:
wrojr@cox.net
with a Subject line of:
300 Posts Giveaway
and in the body text, enter:
I would like to enter the 300 blog posts giveaway.
My follower name is __________. (Optional)
Your email must be received by midnight September 23, 2021. The winner will be announced and notified in a random drawing on September 24, 2021. Only one entry per follower. Tell your friends and relatives to start following TechSavvy.Life.
That’s it. Thank you for being a follower and hope you enjoy the blog posts.
We are giving away one (1) $50.00 Amazon Gift Card to one of our followers in celebration of 300 blog posts. Its simple to enter. Just send an email to:
We are giving away one (1) $50.00 Amazon Gift Card to one of our followers in celebration of 300 blog posts. It’s simple to enter. Just send an email to:
wrojr@cox.net
with a Subject line of:
300 Posts Giveaway
and in the body text, enter:
I would like to enter the 300 blog posts giveaway.
My follower name is __________. (Optional)
Your email must be received by midnight September 23, 2021. The winner will be announced and notified in a random drawing on September 24, 2021. Only one entry per follower. Tell your friends and relatives to start following TechSavvy.Life.
That’s it. Thank you for being a follower and hope you enjoy the blog posts.
If you take advantage of Excel’s charts for helpful visual displays of your data, check out the People Graph option to create a simple depiction of the number of people or items you have logged in your spreadsheet.
If you take advantage of Excel’s charts for helpful visual displays of your data, check out the People Graph option to create a simple depiction of the number of people or items you have logged in your spreadsheet.
This is for devices running Excel. Screenshots are from Excel for Office 365 and Windows 10.
Copyright Scott Adams, Inc./Distributed by Universal Uclick for UFS
You can display things like the number of visitors to your website, downloads of your app, sign-ups for your event, calls to your support center, and much more.
Add People Graph Add-In
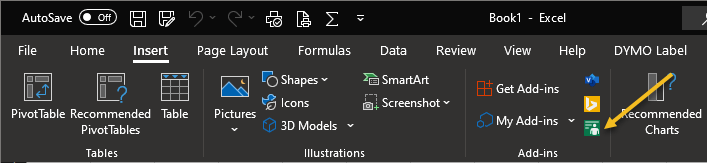
People Graph is an Add-In developed by Microsoft, and there’s already a button for it in your Excel ribbon. But before you can use it, you will have to trust the add-in to install it. First, open the Insert tab in Excel and look for the Add-ins group. Click the button for People Graph. Refer to below image:
Select the Add-In
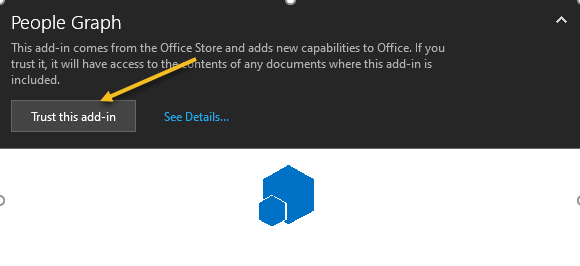
Next, You will see a pop-up window with a link to See Details. This takes you to the Add-In on the Office Store, where you can read an overview, reviews, and other details. Click Trust this add-in to get started. See below image:
Trust the Add-In option
Now, once the add-in is installed in Excel, you can click the button on the Insert tab to use the feature.
Insert a People Graph
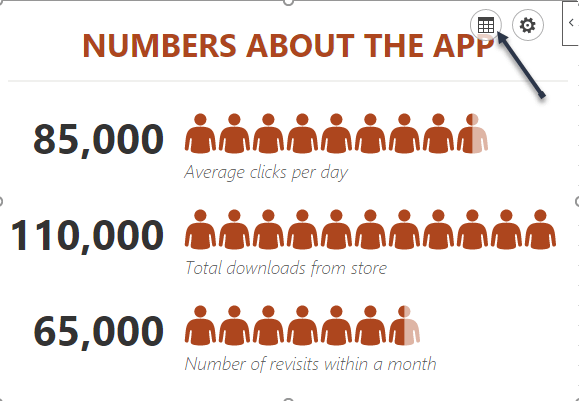
Whenever you hit the People Graph button in the ribbon, you will see a sample graph. First. click the Data icon that looks like a small grid. See following image:
Select the People Graph button
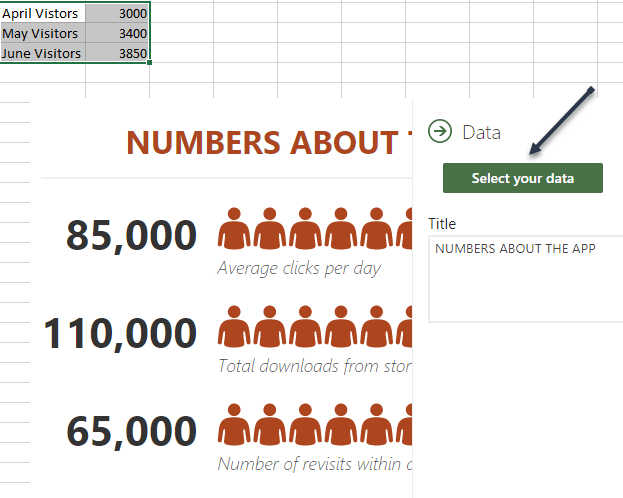
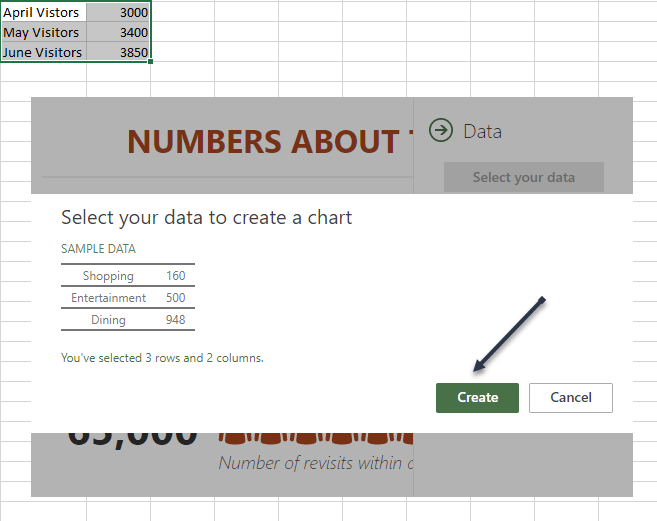
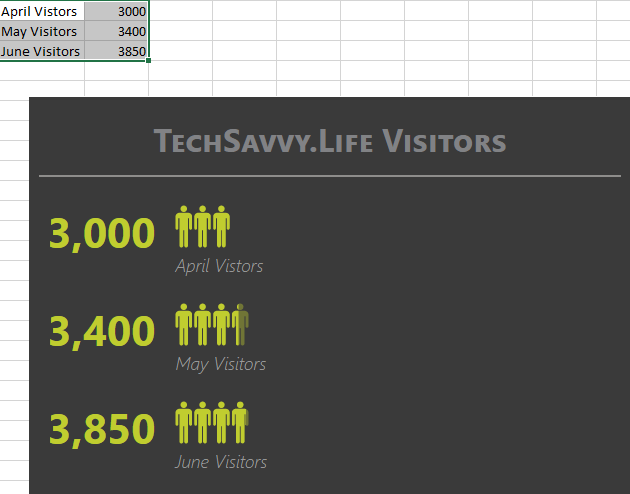
Optionally, you can enter your graph Title before selecting your data, or you can just head back to this spot to add the title later. Next, click Select your data, and then drag through the cells that you want to use. Currently, you must use two columns of data, but you can have multiple rows. Refer to below image:
Select your data
Now, click Create on the People Graph screen. See below image:
Create the People Graph
Customize Your PeopleGraph
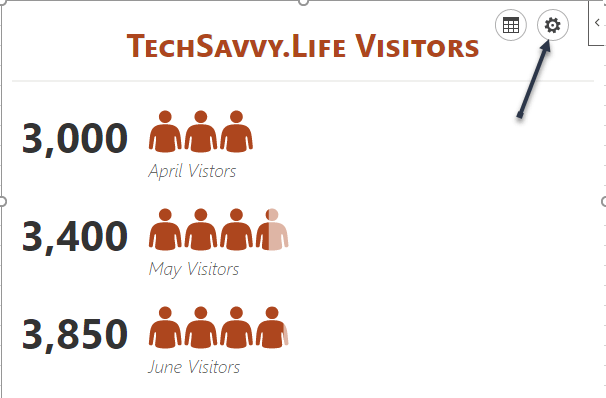
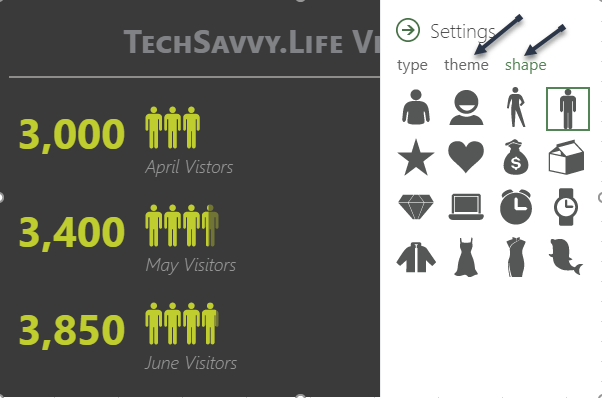
First, click the gear icon to open the Settings. You can then move through the three settings for type, theme, and shape. See following image;
Select the Settings gear icon
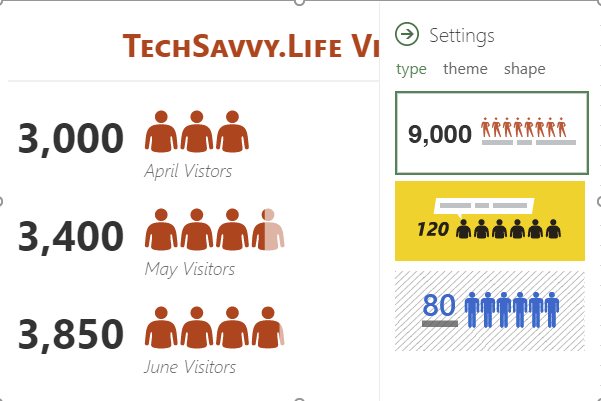
You can currently pick from three graph types. Each has a slightly different layout and appearance. Now, click Type, and then choose one on the right side. Refer to below image:
Select your Type of graph
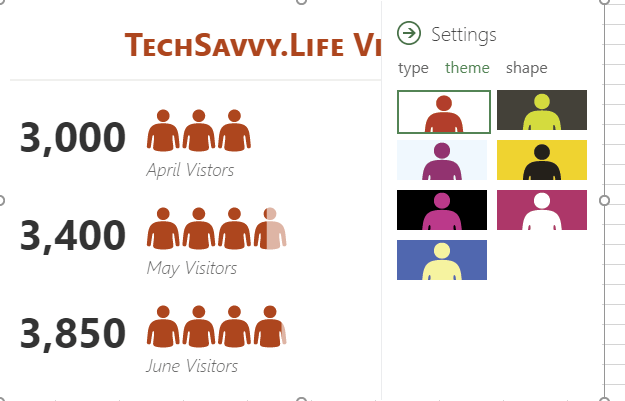
Next, you can select a Theme that changes the background and colors of your graph. Click Theme, and choose one of the seven options. See below image:
Select your theme for the graph
Finally, you can use a different Shape. So if your data is better represented by a Shape other than people, you can choose the best fit. Now, click Shape and pick from the 16 options. See following image:
Select the Shape of your graph
Next, you can select and drag your People Graph wherever you want it on your spreadsheet. And if you edit the data on which the graph is based, Excel will update the graph automatically. Refer to below image:
Your final result
Other Options
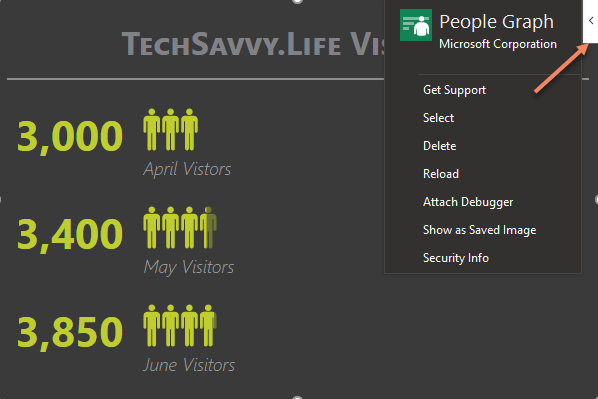
On the top right of your People Graph, you will see an arrow (Windows) or an Info icon (Mac). When you click, you will see several actions .Choose Reload to refresh the graph, Delete to remove it, and Select to select the graph if you want to move it. You also have options to Get Support, Attach Debugger, and view the Security info. See below image:
Select Other Options
If you are looking for a simple way to visually display data, especially if it includes a number of people like customers, clients, or contacts, try out the People Graph in Microsoft Excel.
Quote For the Day
If you don’t like what you’re doing, then don’t do it
Ray Bradbury
That’s it. Please feel free to share this post! One way to share is via Twitter.
Just click the Tweet icon below. This will launch Twitter where you click its icon to post the Tweet.
Check out TechSavvy.Life for blog posts on smartphones, PCs, and Macs! You may email us at contact@techsavvy.life for comments or questions.
Please feel free to leave a comment. I would love hearing from you. Do you have a computer or smart device tech question? I will do my best to answer your inquiry. Just send an email to contact@techsavvy.life. Please mention the device, app and version that you are using. To help us out, you can send screenshots of your data related to your question.
The author’s Vietnam eBook on the Battle for Tra Bong Vietnam: Events and Aftermath
iPhones are awesome communication devices. So it makes sense that you would want to put the people you talk to the front and center.
Surprisingly, Apple does not make it clear that it’s even possible to do this. The functionality is buried in the powerful Shortcuts app. Let’s explore how this is done.
This is for the iPhone and iPad
Copyright Scott Adams, Inc./Distributed by Universal Uclick for UFS
There are basically two different actions that can be associated with contact Shortcuts. You can have the Shortcut give you the option of how you want to contact the person; Message, Call, FaceTime; or it can jump straight into one of those. We will be covering the first option.
Create the Shortcut
First, open the Shortcuts app on your iPhone or iPad. Refer to below image:
Accessing your Shortcuts app
Next, go to All Shortcuts See below image:
Find All Shortcuts
Now, switch to the Gallery tab in the bottom bar. See following image:
Open the Gallery of Shortcuts
Add the Contact
Next, do a search for Contact, and select the Contact on Home Screen shortcut. Refer to below image:
Search for a contact
Now, tap the Add Shortcut button. See below image:
Add contact Shortcut
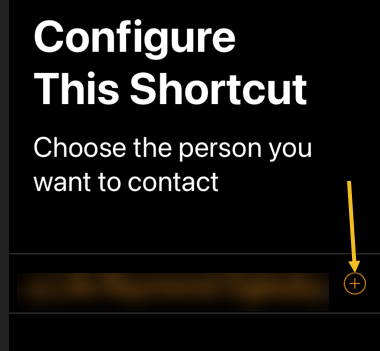
On the next screen is where you will select a person for the Shortcut. Tap the “+” button. See following image.
Selecting to add a contact
Now, find the person you want to use for the Shortcut in your contacts list. Refer to below image:
Locate a contact
Next, tap Done to finish. See below image:
Finish the setup
View the Newly Added Shortcut
Now, go back to the My Shortcuts tab, and you will see the newly added Shortcut. Touch and hold to bring up some options. See following image:
View your Shortcut
Next, select Details from the menu. Refer to below image:
Accessing Details for the Shortcut
Add to Home Screen and Customize
Now, select Add to Home Screen. See below image:
Add contact Shortcut to your Home screend
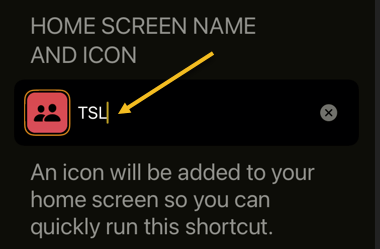
Next, tap the text to enter the name that you would see under the icon on the Home screen. See following image:
Label the Shortcut icon
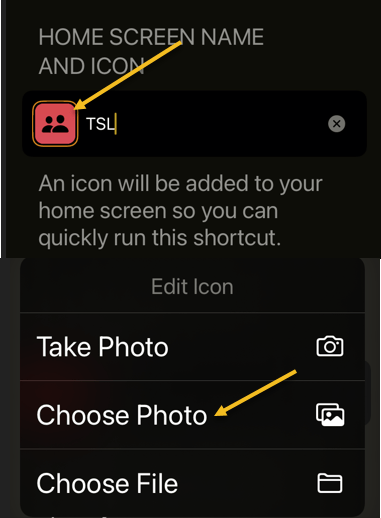
Now, select the icon to choose a photo for it or the other two options. Refer to below image:
Select a photo for the contact
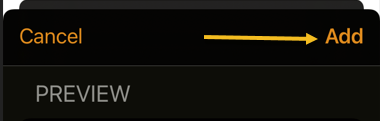
Next, once you are done customizing the icon, tap Add in the top right-hand corner. See below image:
Finish customizing
Now, the icon will be added to your Home screen. When you tap it, a menu with communication choices will appear. Simply do this for all of your favorite people! See following image:
Your Shortcut in action
Quote For the Day
It doesn’t matter how beautiful your theory is, it doesn’t matter how smart you are. If it doesn’t agree with experiment, it’s wrong.
Richard P Feynman
Pretty nifty feature. It’s like having a person on speed dial. Please feel free to share this post! One way to share is via Twitter.
Just click the Tweet icon below. This will launch Twitter where you click its icon to post the Tweet.
Check out TechSavvy.Life for blog posts on smartphones, PCs, and Macs! You may email us at contact@techsavvy.life for comments or questions.
Please feel free to leave a comment. I would love hearing from you. Do you have a computer or smart device tech question? I will do my best to answer your inquiry. Just send an email to contact@techsavvy.life. Please mention the device, app and version that you are using. To help us out, you can send screenshots of your data related to your question.
The author’s Vietnam eBook on the Battle for Tra Bong Vietnam: Events and Aftermath
It is possible to add videos to a PowerPoint Kiosk or self-running presentation. You have been able to do this for years but it’s become a lot easier in recent versions of Office. Making the video work within a self-running presentation takes a little extra trickery. L
It is possible to add videos to a PowerPoint Kiosk or self-running presentation. You have been able to do this for years but it’s become a lot easier in recent versions of Office. Making the video work within a self-running presentation takes a little extra trickery. Let’s explore how to do this.
This is for devices running PowerPoint
Copyright Scott Adams, Inc./Distributed by Universal Uclick for UFS
Here are the steps:
Go to the presentation and add a blank slide where you want the video to go.
Insert the video onto the slide from Insert | Video.
Make any changes you want to the video; trimming, effects, fades , and so on.
Ensure that Video Tools | Playback | Video Options | Start is set to Automatically. Refer to below image:
Set the Playback to automatically
Using the slider below the video, note the running time of the video.
Switch to the Transitions tab. Under Timing | Advance Slide | After set the duration to the same (our video is 41 seconds) or a little more than the video playback time. See below image:
Set the timing for the video
With those settings the video will automatically play when the slide appears and will advance to the next slide when the video ends. If the video slide gets ‘stuck’ set the Advance Slide duration to match the video playing time.
Quote For The Day
The saddest aspect of life right now is that science gathers knowledge faster than society gathers wisdom
Isaac Asimov
That was easy. Please feel free to share this post! One way to share is via Twitter.
Just click the Tweet icon below. This will launch Twitter where you click its icon to post the Tweet.
Check out TechSavvy.Life for blog posts on smartphones, PCs, and Macs! You may email us at contact@techsavvy.life for comments or questions.
Please feel free to leave a comment. I would love hearing from you. Do you have a computer or smart device tech question? I will do my best to answer your inquiry. Just send an email to contact@techsavvy.life. Please mention the device, app and version that you are using. To help us out, you can send screenshots of your data related to your question.
The author’s Vietnam eBook on the Battle for Tra Bong: Events and Aftermath
We are giving away one (1) $50.00 Amazon Gift Card to one of our followers in celebration of 300 blog posts. Its simple to enter. Just send an email to:
We are giving away one (1) $50.00 Amazon Gift Card to one of our followers in celebration of 300 blog posts. It’s simple to enter. Just send an email to:
wrojr@cox.net
with a Subject line of:
300 Posts Giveaway
and in the body text, enter:
I would like to enter the 300 blog posts giveaway.
My follower name is __________. (Optional)
Your email must be received by midnight September 23, 2021. The winner will be announced and notified in a random drawing on September 24, 2021. Only one entry per follower. Tell your friends and relatives to start following TechSavvy.Life.
That’s it. Thank you for being a follower and hope you enjoy the blog posts.
We are giving away one (1) $50.00 Amazon Gift Card to one of our followers in celebration of 300 blog posts. Its simple to enter. Just send an email to:
We are giving away one (1) $50.00 Amazon Gift Card to one of our followers in celebration of 300 blog posts. It’s simple to enter. Just send an email to:
wrojr@cox.net
with a Subject line of:
300 Posts Giveaway
and in the body text, enter:
I would like to enter the 300 blog posts giveaway.
My follower name is __________. (Optional)
Your email must be received by midnight September 23, 2021. The winner will be announced and notified in a random drawing on September 24, 2021. Only one entry per follower. Tell your friends and relatives to start following TechSavvy.Life.
That’s it. Thank you for being a follower and hope you enjoy the blog posts.
Saving documents from the Microsoft 365 suite is a simple process. As you do, your Word, Excel, and PowerPoint files are saved to the default location of your choosing. If you wish to change this location, you can do so.
Saving documents from the Microsoft 365 suite is a simple process. As you do, your Word, Excel, and PowerPoint files are saved to the default location of your choosing. If you wish to change this location, you can do so. Let’s explore how this is done.
This is for Windows and Office 365
Copyright Scott Adams, Inc./Distributed by Universal Uclick for UFS
Microsoft’s recommendation is to save files to your OneDrive location. However, you might want to save all of your Microsoft 365 files to your local drive. By default, Office will use your Documents folder when you save files on your PC.
Thankfully, you do not have to change the saved location every time manually. Instead, you can set a new default. Better still, if you make the change in one Microsoft 365 app, the change carries over to every other one.
Make Your PC the Default Save Location
First, open an Office application, like Word, and click File > Options. (The Options is found in lower left-hand pane). Refer to below image:
Selecting Options
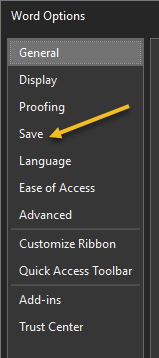
Next, the Word Options window will appear. Click the Save tab in the left-hand pane. See below image:
Selecting Save option
Now, under the Save Documents section, check the box next to Save to computer by default and click Browse. This will launch File Explorer for you to choose a location. See following image:
Set default location
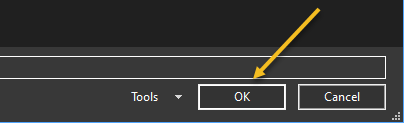
Next. click the OK button in the bottom-right corner of the window to apply the change. Refer to below image:
Apply your change
Now, check your default save file location and click OK. Your Word option screen will close. The next time you save an Office file, your computer will be the default save location to the drive or folder you have chosen. (Note! I did not change the default location. This is for demonstration purposes only). See below image:
Check default location and save
Quote For the Day
People who think they know everything are a great annoyance to those of us who do.
Isaac Asimov
That’s it. Please feel free to share this post! One way to share is via Twitter.
Just click the Tweet icon below. This will launch Twitter where you click its icon to post the Tweet.
Check out TechSavvy.Life for blog posts on smartphones, PCs, and Macs! You may email us at contact@techsavvy.life for comments or questions.
Please feel free to leave a comment. I would love hearing from you. Do you have a computer or smart device tech question? I will do my best to answer your inquiry. Just send an email to contact@techsavvy.life. Please mention the device, app and version that you are using. To help us out, you can send screenshots of your data related to your question.
The author’s Vietnam eBook on the Battle for Tra Bong: Events and Aftermath
One of the upgrades to Accessibility in iOS and iPadOS 15 is a new Background Sounds feature that plays relaxing audio tracks to help you stay calm and focused, and to block out background distractions.
One of the upgrades to Accessibility in iOS and iPadOS 15 is a new Background Sounds feature that plays relaxing audio tracks to help you stay calm and focused, and to block out background distractions.
This is for iPhone and iPad
Copyright Scott Adams, Inc./Distributed by Universal Uclick for UFS
What Are Background Sounds
Background Sounds are like having a sound machine from your bedroom in your iPhone and iPad. The sounds can also be played over Bluetooth to external devices.
With thenew Background Sounds feature, you can play balanced, bright, and dark noise, as well as ocean, rain, and stream sounds to help you concentrate and relax when using your iPhone or iPad.
The feature may negate the need to purchase or subscribe to third-party background noise apps. Its not a dedicated app, but rather hidden away inside your device’s Accessibility settings.
It’s worth noting that at the current time, there is no way to load your own background sound. Note as well that they do not have a time limit. They will only turn off when you disable them. This is a glaring omission by Microsoft. I would like to turn on sound at night as I fall asleep and have it automatically turn off at a certain time. Anyway. let’s explore how to use this feature.
Background Sounds in Accessibility
Apple sees Background Sounds as a way to diversify its array of accessibility features by being more inclusive.
The company says in its official announcement of the feature that it targets “support of neurodiversity” and aims to mitigate “distracting, discomforting, or overwhelming” everyday noises. In other words, the feature can help you focus and relax during the day and mitigate distracting sounds that are bothering you.
That being said, the feature has the ability to appeal to many different people, so it’s interesting that Apple decided to stick with the accessibility angle instead of a more generalized approach.
Enable Background Sounds
First, open the Settings app. Refer to below image:
Accessing Settings app
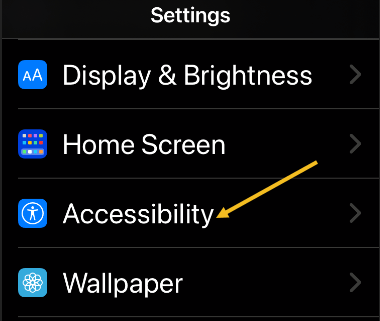
Next, scroll down and tap Accessibility. See below image:
Accessing Accessibility option
Now, under the Hearing section, tap Audio/Visual. See following image:
Accessing Audio/Visual option
Next, tap Background Sounds. Refer to below image:
Accessing Background Sounds option
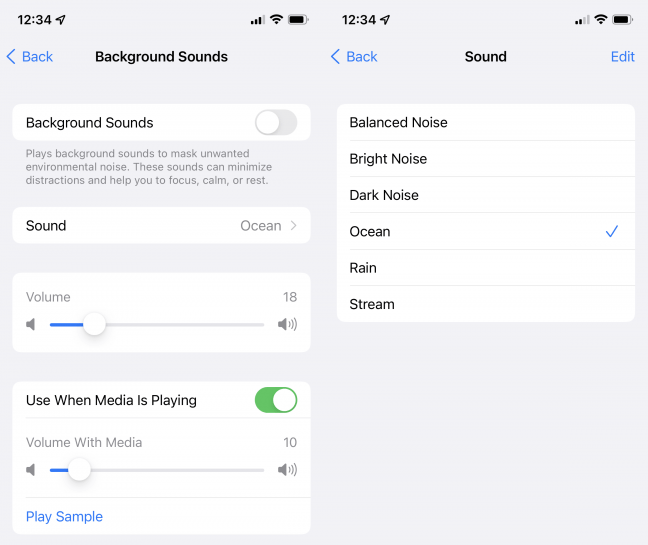
Now, you can toggle Background Sounds On and Off and choose which sound you would like. You can also adjust the volume of the sound as it plays over other media. If you do not want the background sound to play while, for example, listening to music, uncheck Use When Media Is Playing. See below image.
Selecting your sound
You are ready to listen to relaxing, distraction-free sound from your iPhone or iPad. If you want other particular sounds, consider trying out a third-party white noise app.
Quote For the Day
It’s not going to do any good to land on Mars if we’re stupid.
Ray Bradbury
That’s it. Please feel free to share this post! One way to share is via Twitter.
Just click the Tweet icon below. This will launch Twitter where you click its icon to post the Tweet.
Check out TechSavvy.Life for blog posts on smartphones, PCs, and Macs. You may email us at contact@techsavvy.life for comments or questions.
Please feel free to leave a comment. I would love hearing from you. Do you have a computer or smart device tech question? I will do my best to answer your inquiry. Just send an email to contact@techsavvy.life. Please mention the device, app and version that you are using. To help us out, you can send screenshots of your data related to your question.
The author’s Vietnam eBook on the Battle for Tra Bong Vietnam: Events and Aftermath
Over the past 14 years, Amazon has released a lot of slightly different Kindles. If you are wondering whether you have a Paperwhite 3, a Paperwhite 4, an original Kindle, or something else, we will show you how to fine the model.
Over the past 14 years, Amazon has released a lot of slightly different Kindles. If you are wondering whether you have a Paperwhite 3, a Paperwhite 4, an original Kindle, or something else, we will show you how to fine the model. Let’s explore how this is done in two different ways; on the Kindle, and by your Amazon account.
This is for the Kindle
Copyright Scott Adams, Inc./Distributed by Universal Uclick for UFS
Use Your Amazon Account
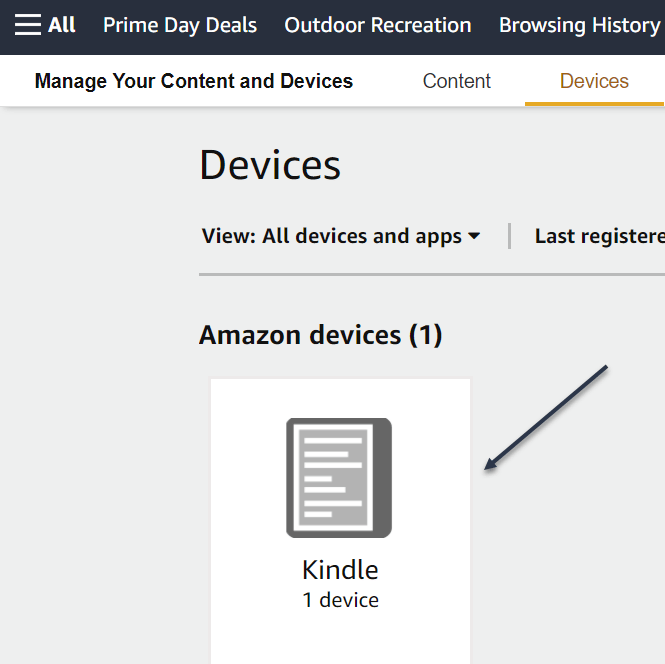
:First, log in to your Amazon account through a web browser and click here to your Manage Devices page. You can also use the Amazon menu system to get there. Go to
Account & Lists > Content & Devices > Devices
Refer to below image:
Your Kindle Device(s)
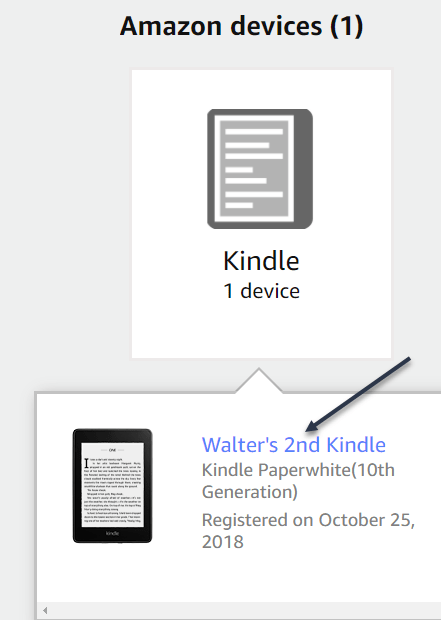
Next, click on a Kindle. Now, click the blue link of your Kindle that you want to find the serial number of. See below image
Your Kindle Device name
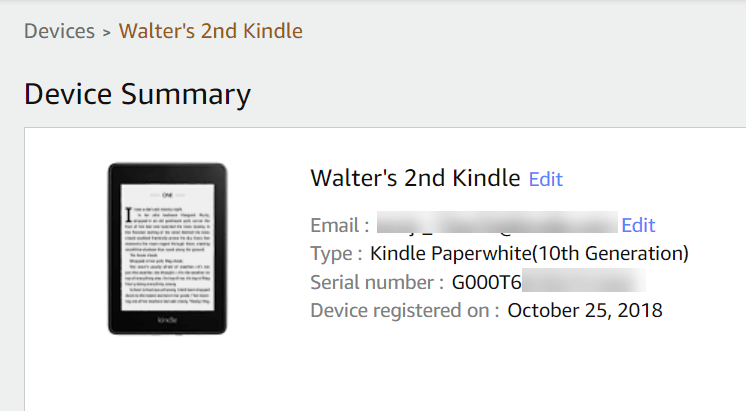
In the Device Summary screen, you will see it next to Serial Number. Each model has its own unique set of prefixes. (The prefix is the set of letters at the beginning of the serial number.). See following image:
Your Kindle Device Summary
You are looking for the first block of characters. You can see G000T6 in our example, which corresponds to a Kindle Paperwhite 4 (You will be able to compare your prefix in the table at the end).
Note! While the Type is listed as Kindle Paperwhite (10th Generation), we still need the serial number prefix in order to tell which specific model it is.
Use Your Kindle Device
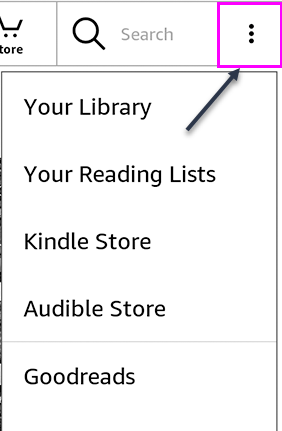
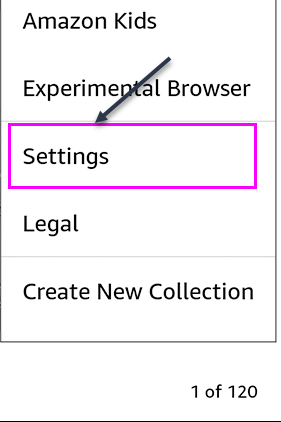
First, to check the serial number on the device itself, go to your Kindle’s home page and tap the three dots hamburger icon in the top right to open the menu. Refer to below image:
Accessing your Kindle menu
Next, tap Settings in the menu. See below image:
Accessing your Kindle Settings
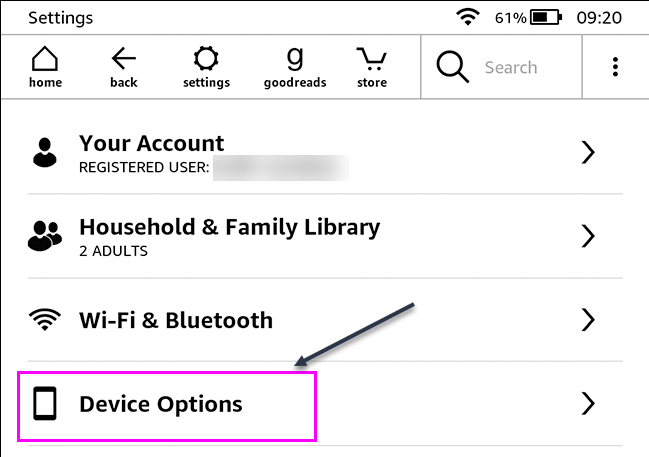
Now, on the Settings screen, tap Device Options. See following image:
Accessing your Kindle Device Options
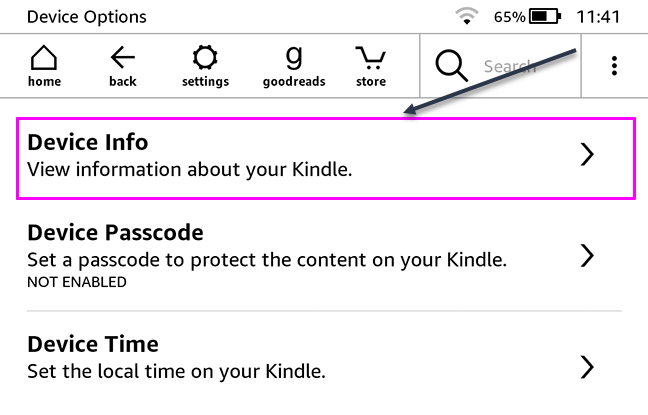
Next, tap Device Info. Refer to below image:
Accessing your Kindle Device Info
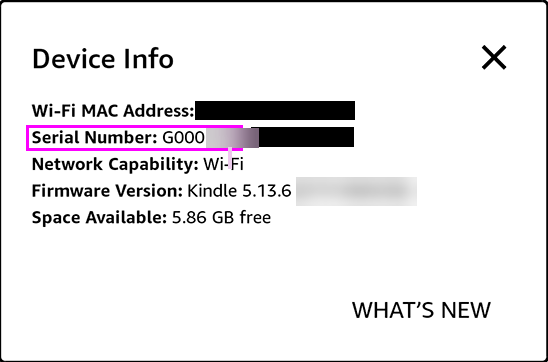
Now, next to Serial Number, you will see the serial number of the Kindle. See below image:
Your Kindle Device Info
Note! If you have an older Kindle (or are using an old version of the Kindle software), the menus might look a little different. You are still looking for Device Info.
How to Tell Which Kindle You Have
Once you have your serial number, you can compare its prefix to the options below. This will tell you exactly which device you have. Here’s a table summarizing the various models.
Please feel free to leave a comment. I would love hearing from you. Do you have a computer or smart device tech question? I will do my best to answer your inquiry. Just send an email to contact@techsavvy.life. Please mention the device, app and version that you are using. To help us out, you can send screenshots of your data related to your question.
The author’s Vietnam eBook on the Battle for Tra Bong: Events and Aftermath