With the release of iOS 13.4 and above, you can now share files and folders using your favorite share connection. This feature is built into the Files app.
Apple engineers took a long time in releasing this feature. It’s about time. Let’s see how this is done.
This is for iPhone and iPad running iOS 13.4 or higher
Copyright Scott Adams, Inc./Distributed by Universal Uclick for UFS
Sharing a Folder
First, launch the Files app. Navigate to the iCloud folder you would like to share. Next, press and hold the folder until a menu appears. Now, select Share. See below image:
Selecting the Share option for a folder
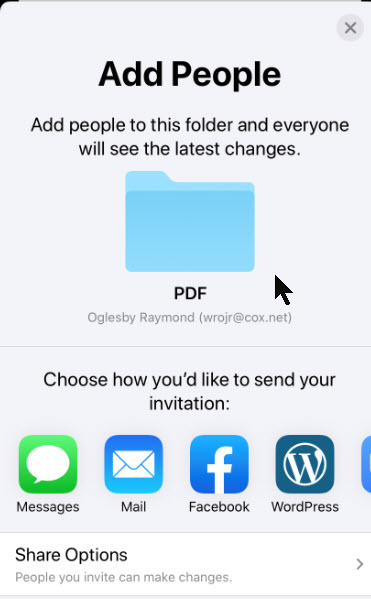
Next, select Add People. Refer to below image:
Selecting the Add People option for the folder to be shared
Now, select a share method from the options like Mail, Messages, Messenger and so on. See following image:
Selecting the share connection for the folder
Type in your subject and message, if necessary, then select your audience. When finished, Send your message. See below image:
Selecting the recipient(s) for sharing the folder
Change Access Rights
First, launch the Files app. Navigate to the shared iCloud folder. Next, press and hold the folder until a menu appears. Select Share then select Show People. Refer to below image:
Accessing the Show People option
Tap a person in the list. Refer below to my list:
Selecting the recipient(s) to change access rights
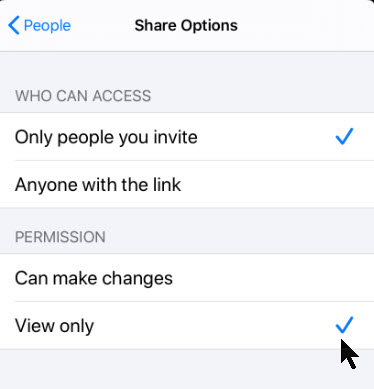
You are given two options for Permission: Can make changes and View only. You can also change Who Can Access options for the folder by selecting Only people you invite and Anyone with the link. See below image:
Setting the access rights
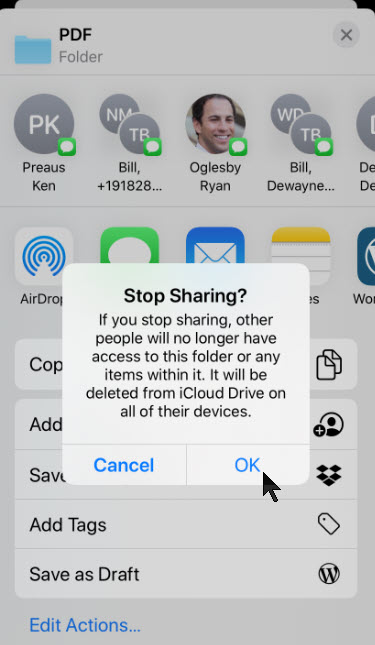
There is the option to remove the user’s access, just tap Stop Sharing and tap OK. See following image:
Cancelling the sharing
I Would Like to Hear From You
Please feel free to leave a comment. I would love hearing from you. Do you have a computer or smart device tech question? I will do my best to answer your inquiry. Please mention the device, app and version that you are using. To help us out, you can send screenshots of your data related to your question.
The author’s Vietnam eBook on the Battle for Tra Bong: Events and Aftermath
By using Google Maps you can find the location of a restaurant, store or some other company. How about asking the business a question? In some cases, you can do so through Google Maps. If the entity supports Google Maps messaging feature, you can send a message to that company. If the company responds, you can carry on a back-and-forth conversation; like texting, but instead you are using Google Maps.
To date, this is the most unusual post I have written. Its relatively unknown to the business community. I recommend you try out my example before searching for a business in your area that uses Google Maps for messaging.
This feature is for your iOS (iPhone/iPad) or Android device or whatever smart device supports Google Maps
If you haven’t already done so, download and install Google Maps to your device.
Copyright Scott Adams, Inc./Distributed by Universal Uclick for UFS
Search for a Business
Launch Google Maps
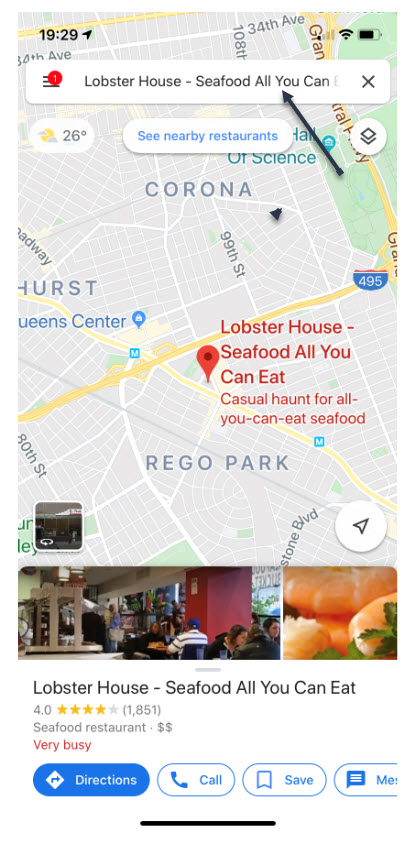
Search for a business you want to use or visit. In my example, I am searching for “Lobster House”. Refer to following image:
Search for Lobster House
If using my example, select the first entry. Refer to following screenshot:
Selecting First Entry for Lobster House
View the Overview Tab
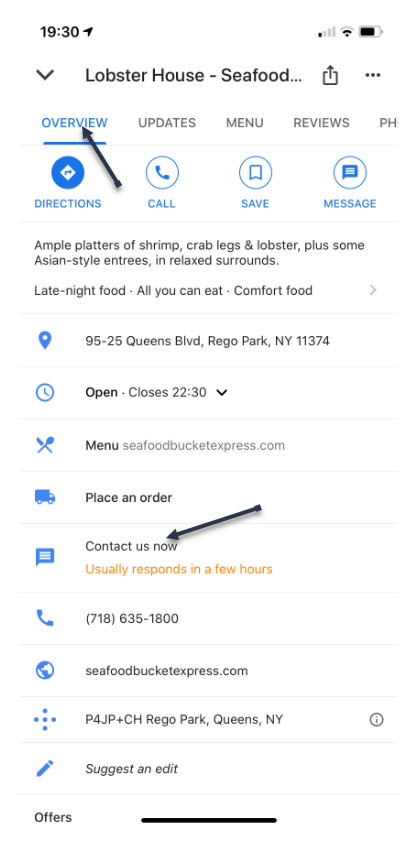
Swipe Up below the map till you see the Overview tab, like the following image:
Overview Tab for Lobster House
If the company supports Google Maps messaging, in the center of the screen you will see a link that says “Contact us now“
Type in Your Message
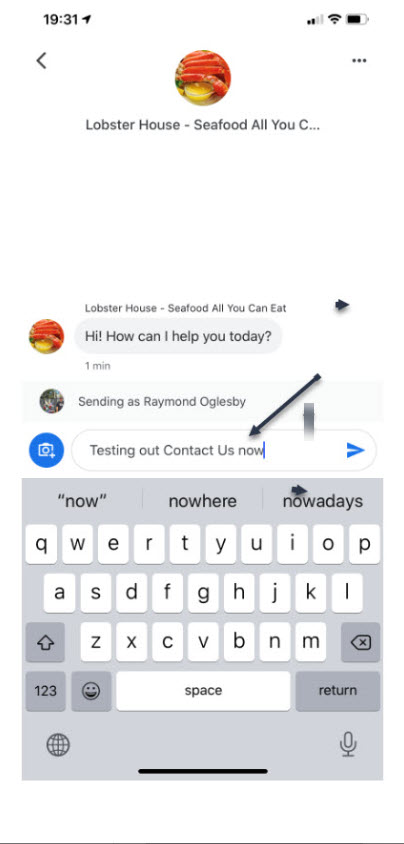
Tap on this link
Type in your message and tap the Send icon. A pertinent question might be reserving a table at a certain time instead of my example. Refer to following screen:
Messaging Lobster House
In my example of the “Lobster House”, they usually respond within a few hours. So, revisit the “Lobster House” for their reply by:
Search for Messages
Searching for the business
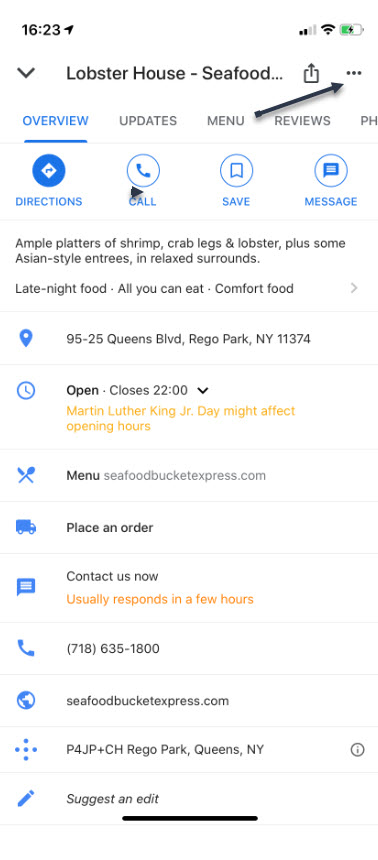
Swipe Up to view the Overview Tab
Tap the 3 dots in upper right hand corner. Refer to following image:
Check for a Response
Reply to Messages
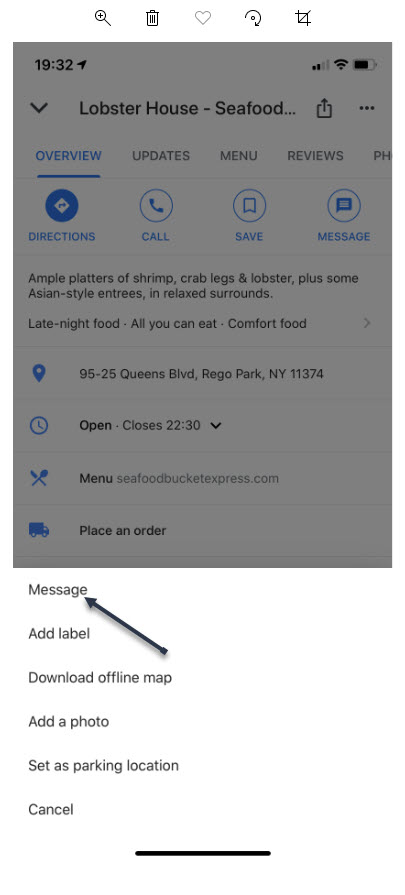
You will see the following screen. Tap on Message to view their reply. You can then reply back to the business if you need to.
The Message Screen
Whats challenging about this feature is finding a business that supports Google Maps messaging. Unfortunately, many do not. But, if a business of interest does offer messaging, you can use this feature to obtain more information about the company or perhaps, setup a reservation.
I Would Like to Hear from You
Please feel free to leave a comment. I would love hearing from you. Do you have a computer or smart device tech question? I will do my best to answer your inquiry. Please mention the device, app and version that you are using. To help us out, you can send screenshots of your data related to your question.
The author’s Vietnam eBook on the Battle for Tra Bong: Events and Aftermath
Word’s Caption feature allows you to insert captions after figures, tables or equations in your document. You can choose to have Word insert them automatically or do it yourself manually. Lets learn how to add and edit captions to set apart elements in your document.
You are not limited to figures, tables or equations; you can create a new label like Picture or Photo. If you are using Chapters in your document, you can add the Chapter number to your caption. Almost any object or inserted item in Word can be captioned.
This is for PCs, Macs and similar platforms that support Microsoft Word
Copyright Scott Adams, Inc./Distributed by Universal Uclick for UFS
Add a Caption
There are two ways to add a caption:
Select the figure/table/equation, right click and select Insert Caption. (Note! This method works only for figures and tables, not equations.)
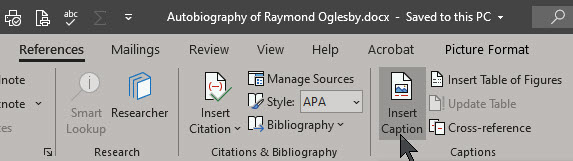
Select the figure/table/equation, go to the References tab on the ribbon and select Insert Caption. See below image:
If you don’t select the object and choose References > Insert Caption the caption will be inserted where the cursor is placed.
Your Caption Options
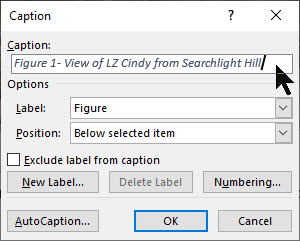
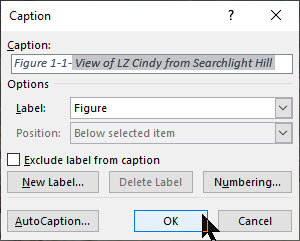
The Caption dialog box will now open, with a number of options for you to set. Refer to below image;
Below are the options to chose from:
Captions – type in the label you want
Label – or more correctly caption prefix. Choose table, equation or figure. This will automatically add that label to the caption.
New Label – If you want your captions to have a label other than the ones provided, you can add a new one from the New Label option. (For example, Word provides the options Equation, Figure and Table, but if you are including photos in your document, you may prefer to label them Picture or Photo.)
Exclude Label from Captions – check this box and no label/prefix will be included. The caption will just contain the number and the text that you enter.
Position – caption to appear above or below the object. Only works if the object is selected before Insert Caption. Otherwise this field will be disabled and the caption placed where you have set your cursor.
AutoCaption certain types of objects can be automatically captioned when they are included in a document.
The caption will now appear in the specified location, with its number automatically allocated. See following image:
Figure 1- View of LZ Cindy from Searchlight Hill
Numbering Options for Your Captions
If you want to change the format of the numbering system on your captions, do this by clicking the Numbering button in the Caption dialog box. Refer to below image:
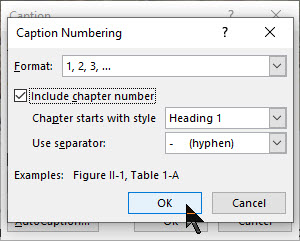
The Caption Numbering dialog box will open. See below image:
Format: Choose the numbering format you want to use:
Numerals (1, 2, 3, 4…)
Lowercase letters (a, b, c, d…)
Uppercase letters (A, B, C, D…)
Lowercase Roman numerals (i, ii, iii, iv…)
Uppercase Roman numerals (I, II, III, IV…)
And others depending on the installed language packs.
Include Chapter Number: If your document contains chapters, you can choose to have the numbering restart for each chapter and have the chapter number included in the caption numbering system.
First select the Caption in your Word document. Then you need to link the Style (e.g. Heading 1) with a multi-level list at Home > Paragraph > Multi-Level List > Define Multi-Level List > More. This adds automatic numbering to each style so the captions have a number to show. See following image;
Chapter Starts with Style: Select what level of heading you would like to signify a new chapter.
Use Separator: Choose the separator that you would like to use between the chapter number and the caption number (hyphen, period, colon or em-dash).
Change Your Caption Settings
Changing the caption settings isn’t obvious because right-clicking doesn’t show an option to open the Caption dialog.
The trick is to select the whole caption then References > Captions > Insert Caption. Refer to below image:
This opens the Caption dialog with the current settings.
Updating Your Caption Numbering
At the core of captions are field codes. Updating the caption numbering is the same as any other field code updates.
Select the whole document with Ctrl+A then update fields with F9 (or right-click to choose Update Field).
Change Your Caption Text
The text after the caption label can be edited in the document. Just click in the caption text and type as usual. See following image;
I Would Like to Hear From You
Please feel free to leave a comment. I would love hearing from you. Do you have a computer or smart device tech question? I will do my best to answer your inquiry. Please mention the device, app and version that you are using. To help us out, you can send screenshots of your data related to your question.
The author’s Vietnam eBook on the Battle for Tra Bong: Events and Aftermath
If you would like to access your favorite website from your iPhone or iPad Home screen (the first page), it’s easy to do. Using Safari, we can create a shortcut icon that allows you to just tap it to launch the site. It’s a handy way to speed up your iPhone or iPad experience. Note! The following guide is for an iPhone, but the steps are similar for an iPad.
This is for iPhone/iPad
Copyright Scott Adams, Inc./Distributed by Universal Uclick for UFS
Four Easy Steps
First, open Safari and navigate to the website you would like to appear on your Home screen. After the site has loaded, tap near the bottom of your screen. Now, make sure you can see the navigation toolbar at the bottom, then tap the Share icon (the rectangle with an up arrow). Refer to below image:
Selecting the Share icon
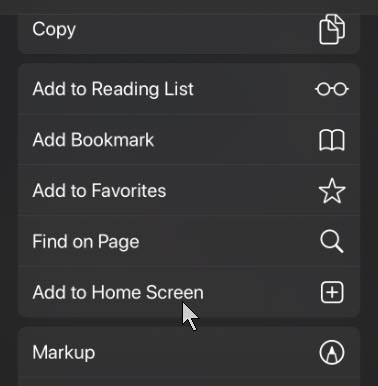
The Share menu will appear. Swipe down thru the list, then tap Add to Home Screen. See below image:
Chosing the option to add to Home screen
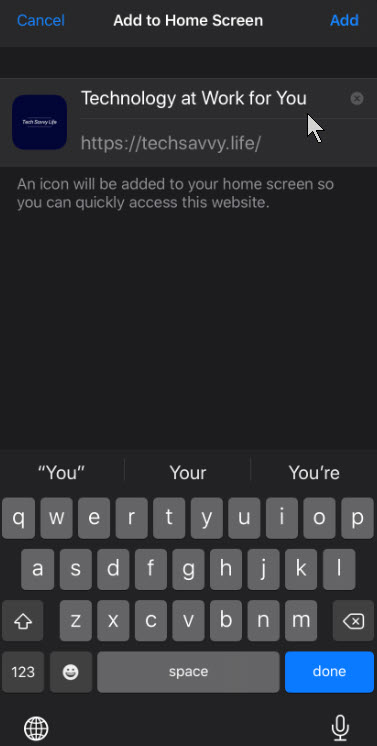
The menu for Add to Home Screen will appear. From this menu, give a name to the web icon using the on-screen keyboard. Next, tap Add in upper right hand corner. See following image:
Assigning a name to the icon
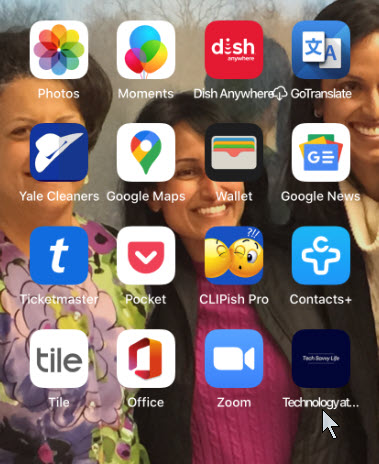
The icon for the website will appear on your Home screen. If the first page of your Home screen is full of icons, your newly created icon will be placed in the first available page. Now, when you tap on the shortcut icon, Safari will open and load the website. Refer to below image:
Your website icon on your Home screen or first available page
About the Web Shortcut Icon
The website icon we created with Safari looks and behaves like a regular app icon on the iPhone’s or iPad’s Home screen. You can rearrange it along with other apps, add it to a folder or drag it to the Dock.
You might notice that some websites have Home screen icons that seem perfectly tailored to the iPhone or iPad interface. That’s because these sites specifically created an image for this purpose. Your iPhone or iPad will generate a tiny thumbnail of the website to use as its icon.
I Would Like to Hear From You
Please feel free to leave a comment. I would love hearing from you. Do you have a computer or smart device tech question? I will do my best to answer your inquiry. Please mention the device, app and version that you are using. To help us out, you can send screenshots of your data related to your question.
The author’s Vietnam eBook on the Battle for Tra Bong: Events and Aftermath
You have searched for a favorite photo or video on Facebook but are unable to locate it. Facebook has an option to backup most anything saved through its app. This would allow for easier searching instead of scrolling endlessly through Facebook posts.
You may have decided to deactivate your account for health reasons or you just want a backup. There is no such thing as “too many backups”. In my IT career, I have been “burned” by not having adequate backups resulting in lost time in recreating them.
Depending on how long you have been a Facebook user, the backup file can be quite large. If you have limited storage or on a free storage plan for your mobile device, you might consider backing up to a PC or Mac.
Using this post as a guide, I am backing up thirteen years of Facebook photos and videos on a Windows 10 PC. My backup file, in Zip format, was a 1.4 GB file.
This is for PCs, Mac, mobile devices and similar platforms using Facebook
Copyright Scott Adams, Inc./Distributed by Universal Uclick for UFS
Accessing Facebook Settings
Launch Facebook. in the upper right hand corner, click on the Account icon. Next, click the Settings & Privacy option. See below image
The Settings and Privacy option
Next, click on the Settings option. Refer to below image:
The Settings option
Downloading Your Facebook Information
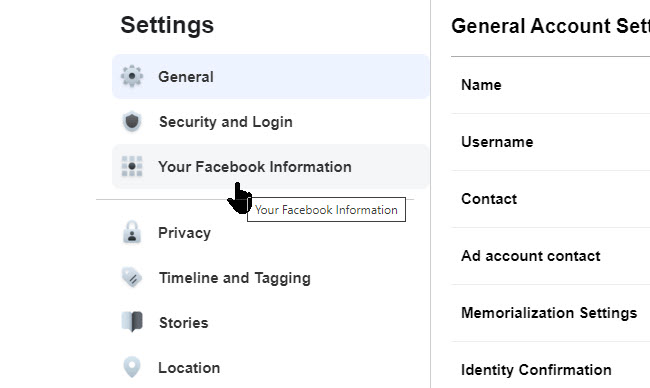
Then click on Your Facebook Information. See following image:
The Facebook Information option
Next, click on Download Your Information. See below image:
Download your information option
Selecting ONLY Photos and Videos
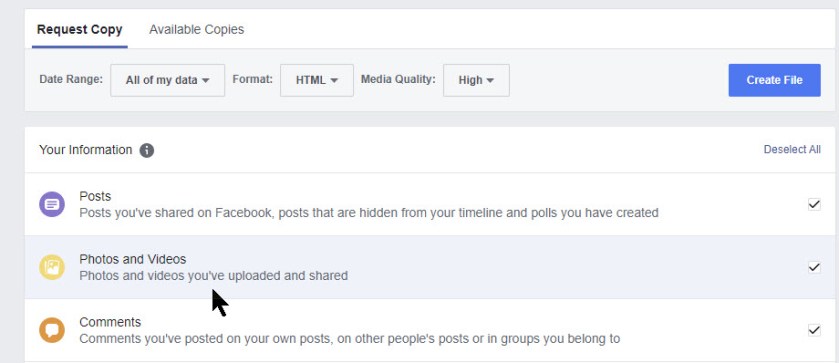
From here, click on Deselect All link. Then select only Photos and Videos option. From this screen there are many options on what to backup. For our purposes, we only want photos and videos. Refer to below image:
Deselecting all, then selecting only photos and videos option
Once photos and videos have been selected and all other option are unselected, click the Create File button. See below image:
Clicking the Create File option
Messages and Emails From Facebook
You will receive a pop-up message regarding the creation of your Facebook backup for photos and videos. Refer to below image:
Facebook response to iyour request
Check your email that is associated with your Facebook account for the file request. See below image:
Email from Facebook about your request
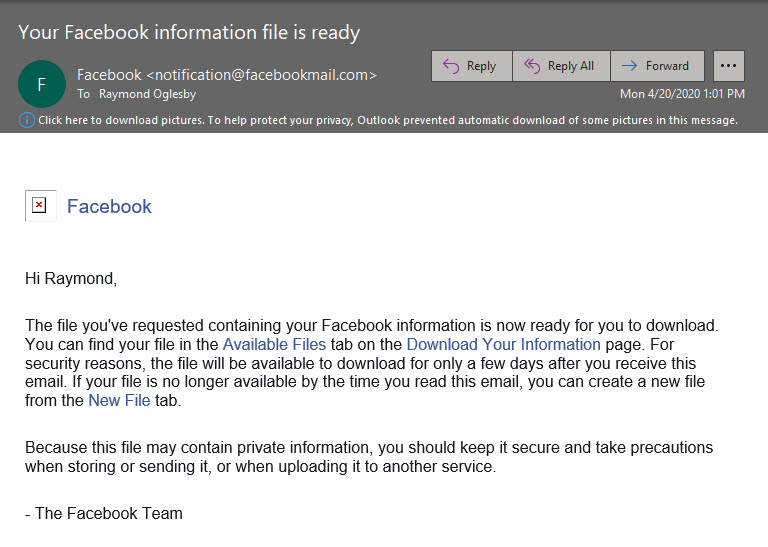
It may take several hours for Facebook to process your request. When the file is ready, you will receive an email that your file is ready. Follow the directions in the message. Refer to below image:
Email from Facebook that your backup file is ready
Downloading Your Photos and Videos Backup
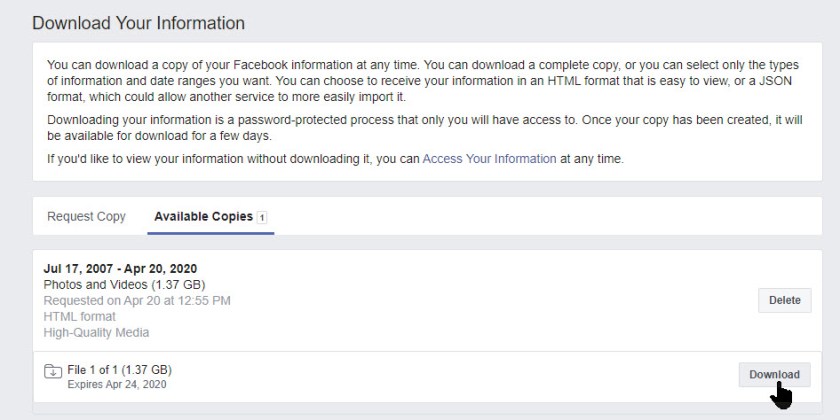
Click on the link for Download Your Information. Then, click the Available Copies tab. You should see information about your download file. Now, click the Download button. See following image:
Download option to your Downloads folder
Facebook will ask you to enter your Password, then click Submit. See below image:
Submitting your password
Viewing Your Downloaded Zip File via File Explorer
Your photos and videos backup file will be in your Downloads folder in Zip format. Below is a screenshot of my backup file. Notice it contains over 3000 files. Your backuped file number will depend on how often you post photos and videos and how many years on Facebook. Refer to below image:
An example of your downloaded Facebook photos and videos file
What I would like to see is an option to select a date range for the backup instead of everything.
I Would Like to Hear From You
Please feel free to leave a comment. I would love hearing from you. Do you have a computer or smart device tech question? I will do my best to answer your inquiry. Please mention the device, app and version that you are using. To help us out, you can send screenshots of your data related to your question.
The author’s Vietnam eBook on the Battle for Tra Bong: Events and Aftermath
If your Windows computer is being redirected to unwanted sites, advertisements are popping up while you browse the Internet, or a message saying a virus was detected, then it is possible that you have malware installed on your computer.
This is for Windows 7 through 10, also applies to Macs and mobile devices. The wording in this post is for Windows 10
Copyright Scott Adams, Inc./Distributed by Universal Uclick for UFS
Malware refers to any type of malicious software that tries to infect a computer or mobile device. Hackers use malware for any number of reasons such as, extracting personal information or passwords, stealing money or preventing owners from accessing their device.
Malware includes computer viruses, ransomware, worms, trojan horses, rootkits, keyloggers, dialers, spyware, adware, malicious BHOs, rogue security software and other malicious programs. The majority of malware threats are usually worms or trojans rather than viruses.
Following are some examples of an infected PC:
Your web browser (e.g., Microsoft Internet Explorer, Mozilla Firefox, Google Chrome) freezes, hangs or is unresponsive
You get redirected to web pages other than the one you intended to go to
You receive numerous web-browser popup messages
Strange or unexpected toolbars appear at the top of your web browser
Your computer runs slower than usual
Your computer freezes, hangs or is unresponsive
Your computer restarts by itself (but not a restart caused by Windows Updates)
You see unusual error messages (e.g., messages saying there are missing or corrupt files folders)
For several months, I had malware that crashed my PC on a daily basis. I read lots of help articles and followed its advice. I soon came to realize that no one piece of software will remove the malware. In my case, the virus would attach itself to a Dell executable (exe) file. I located the suspected file and renamed it, no luck here. So, I deleted the file; the suspected file would recreate itself with the virus attached. I did a scan of the Registry to find the infected file, it was not found. What the heck is going on? Then I came across an in-depth article on removing malware. In summary, to remove the malware, perform the following:
Restart your machine and stop all running programs
Download, install and run the following programs one at a time in order as shown below. There is a free or trial version for each software. Do not install any third-party tools associated with the installs. The softare title and links are as follows:
Now, restart your machine. The malware should be eliminated. Since this is a one-time removal, uninstall each program. If left installed and active, they will interfere with each other and cause other problems.
I Would Like to Hear From You
Please feel free to leave a comment. I would love hearing from you. Do you have a computer or smart device tech question? I will do my best to answer your inquiry. Please mention the device, app and version that you are using. To help us out, you can send screenshots of your data related to your question.
The author’s Vietnam eBook on the Battle for Tra Bong: Events and Aftermath
Storing important and or sensitive documents in Google Drive isn’t the most secure way to protect your data, but if you are, your iPhone and iPad can help keep everything safe. Let’s see how to protect this cloud storage mobile app using Face ID or Touch ID.
Your mobile device may already be setup to use Face ID or Touch ID. You may ask, why set this up for a particular app, the Google Drive? A friend may ask to see your device. What if they accessed your documents via Google Drive without your knowledge? There is nothing to stop them because you already unlocked your device. So, we are going to add another layer of protection. Of course, enabling two factor authentication for your Google account is the best way to keep prying eyes out of your cloud files.
Note! To follow this guide, you will need the Passcode for your device. The screenshots are for an iPhone.
This is for iPhone and iPad devices
Copyright Scott Adams, Inc./Distributed by Universal Uclick for UFS
Open Google Drive
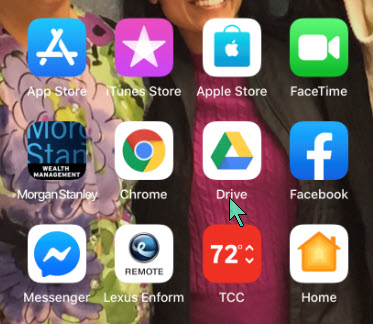
Start by opening the Google Drive app. Use Apple’s built-in Spotlight Search if you can’t find it on your Home screen. Refer to below image:
Locating Google Drive app
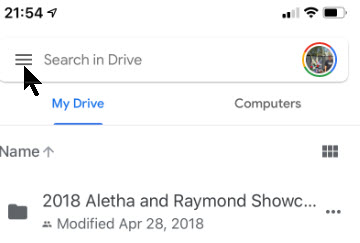
Next, tap the Hamburger icon in upper left of the screen. See following image:
The Hamburger icon
Open the Settings
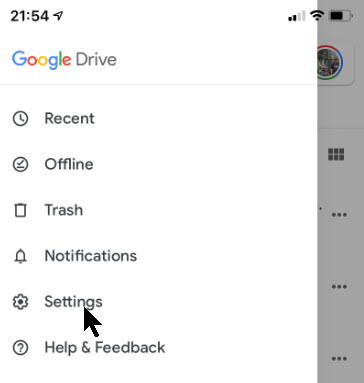
From the slide out menu that appears, select the Settings option. See below image:
Opening Settings
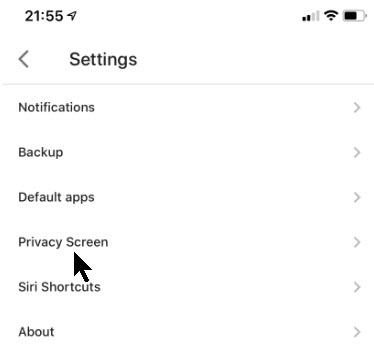
Next, tap on the Privacy Screen option. Refer to below image:
Opening the Privacy Screen option
Set the Privacy Option
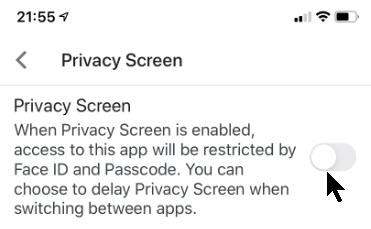
From here, toggle on the Privacy Screen option. See following image:
Turning on the Privacy Screen option
Allow Permission
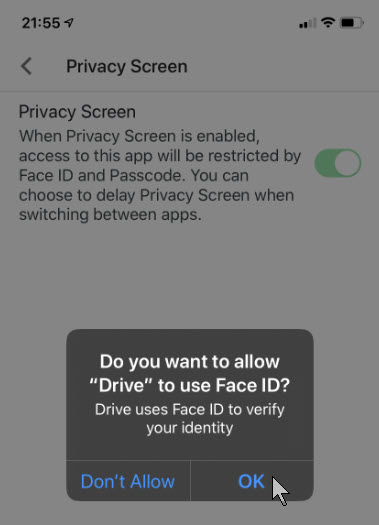
Now, your iPhone or iPad will display a pop-up box asking for permission to access Face ID or Touch ID. Tap the OK button to allow permission. Refer to below image:
Allowing permission for Google Drive by Face ID
The next time you exit and reopen Google Drive, you will be presented a screen for your face or fingerprint to access your cloud storage.
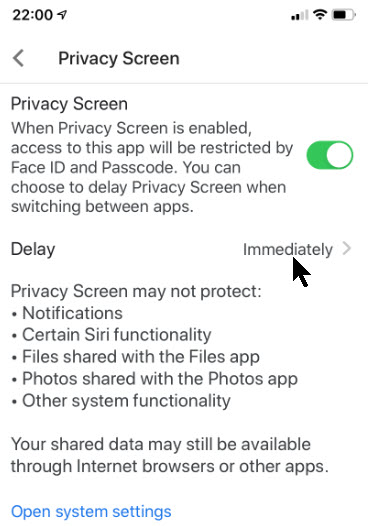
Now that the Privacy Screen setting is enabled, you will see several new options to customize the feature further.
Set Privacy Screen Delay
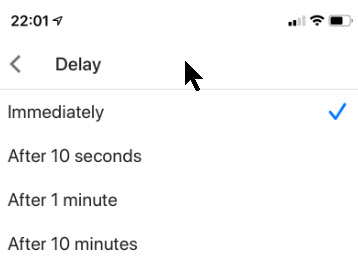
By default, the Privacy Screen feature locks the Drive app the moment you lock your iPhone’s or iPad’s display or leave the app. If you want to add a time delay, tap on the option that corresponds to the Delay listing. See below image:
Accessing Privacy Screen Delay options
You have four options to choose from:
Immediately (the default)
After 10 seconds
After 1 minute
After 10 minutes
Once you have checkmarked your selection, tap the Back arrow. By default, the Immediately option is selected and is the recommended setting. Refer to below image:
Setting the Privacy Screen Delay option
Using the Passcode Method
You have the option of using your Passcode to protect your files instead of your Face ID or Touch ID. This feature offers a more secure method of accessing Google Drive.
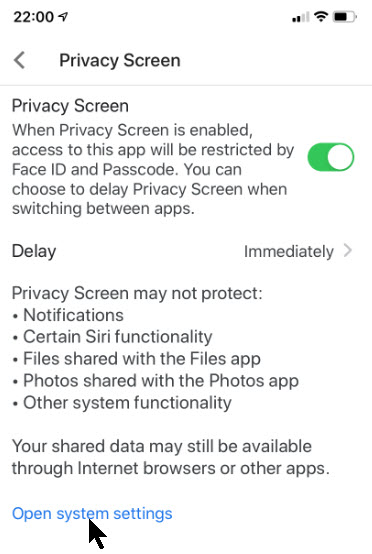
To do this, let’s go back to the Privacy Screen settings menu, then tap the Open System Settings blue link. See following image:
Opening System Settings to change access method
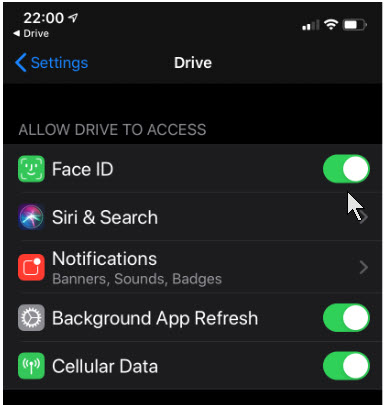
You are taken to the Drive’s section for your iPhone or iPad Settings menu. Here, just toggle off permission to use Face ID or Touch ID. See below image:
Turning off Face ID permission
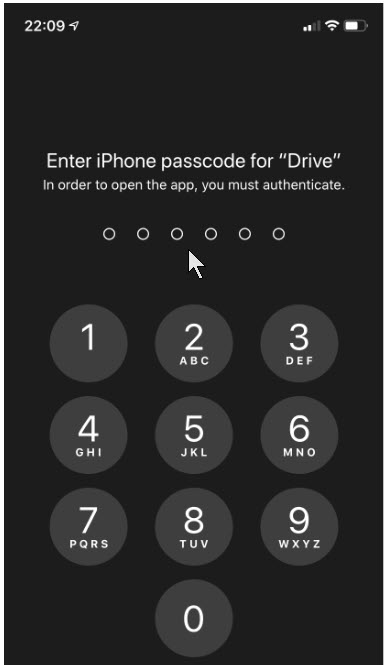
Now, the next time you open the Google Drive app,you will be required to enter your device’s lock screen Passcode. Refer to below image:
Entering your Passcode to access Google Drive
You have successfully locked your Google Drive app either using your Face ID/Touch ID or your Passcode. That’s it.
I Would Like to Hear From You
Please feel free to leave a comment. I would love hearing from you. Do you have a computer or smart device tech question? I will do my best to answer your inquiry. Please mention the device, app and version that you are using. To help us out, you can send screenshots of your data related to your question.
The author’s Vietnam eBook on the Battle for Tra Bong: Events and Aftermath
You’ve received or need to send a PDF through email that must be signed and sent to the other party. If you’re working with the email on your iPhone or iPad, you can sign the document directly from your mobile device. This handy capability is possible due to the Markup feature. With iOS 13, you can use a variety of tools. In this post, we will look at the SignatureMarkup tool.
This is for iPhone/iPad or similar devices using iOS 13 or above
Copyright Scott Adams, Inc./Distributed by Universal Uclick for UFS
How to Add a Signature
Follow these steps when you want to email someone a PDF from your iPhone or iPad but need to sign it before sending it.
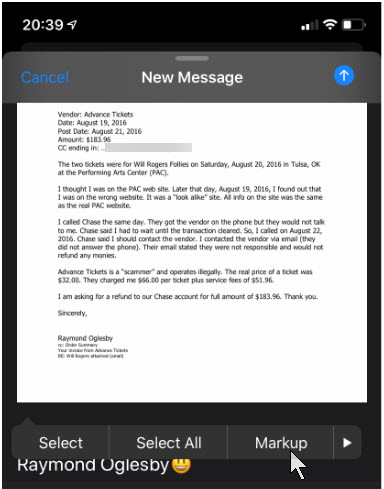
1. Make sure the PDF is stored in a convenient location, such as OneDrive, iCloud Drive or other online service accessible from your iPhone or iPad 2. Attach the file to your email 3. Tap the attachment and select Markup from the toolbar. Refer to below image:
Selecting the Markup option
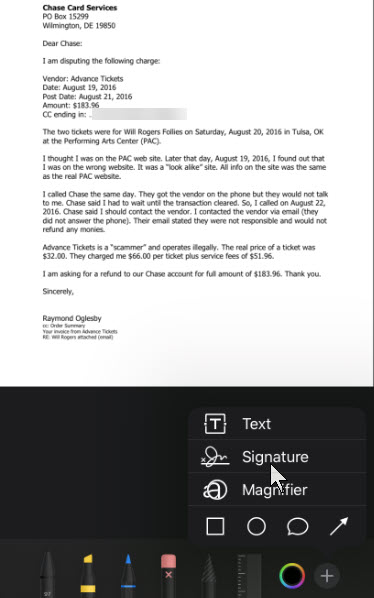
4. Swipe down to the area where you need to sign. If not, the Signature will be placed in the middle. 5. On the Markup toolbar at the bottom, tap the “+” icon and select Signature. See below image:
Selecting the Signature option
Drawing Your Signature
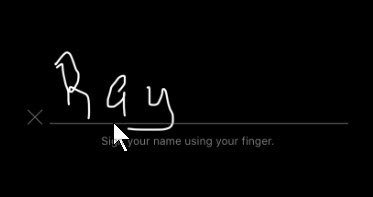
6. If you’re doing this for the first time, write your Signature via your finger tip or a stylus 7. Tap Clear if you wish to start over. See following image:
Writing your Signature
8. When you’re satisfied with your Signature, tap Done. See below image:
Your Signature in the document
Position Your Signature
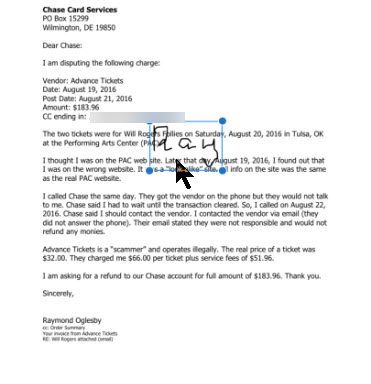
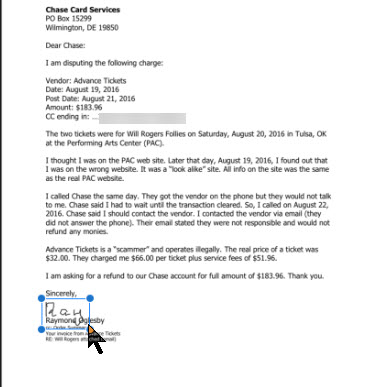
9. Move the text box for your Signature to the right spot. You can also resize the box by dragging any of the corners. Refer to below image:
Positioning your Signature
Email Your Signed Document
10. When the Signature is sized and positioned correctly, tap Done at the upper left corner for the new Signature. Now you are ready to send your email by tapping on the Up Arrow icon. See following image:
Email your signed document
How to Reply With Your Signature
If you receive an attachment that you need to sign and send back to the sender, the process is similar.
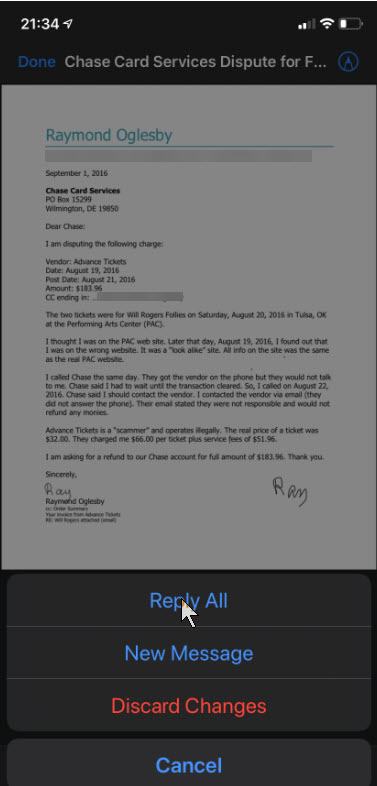
1. Tap the PDF to open it and swipe down to the area that requires your Signature 2. Tap the Markup icon in the upper right (the one that resumbles a pen tip) 3. Tap the “+” icon on the Markup toolbar at bottom righ hand corner and select Signature. Your Signature will automatically appear if you already created it via Markup. 4. Tap your Signature, position and resize it accordingly 5. When finished, tap Done 6, Tap New Message or Reply All and send the signed document back to the sender. For demonstration purposes, I just placed my Signature again, this time in lower right hand corner. Refer to below image:
Selecting the Reply All option
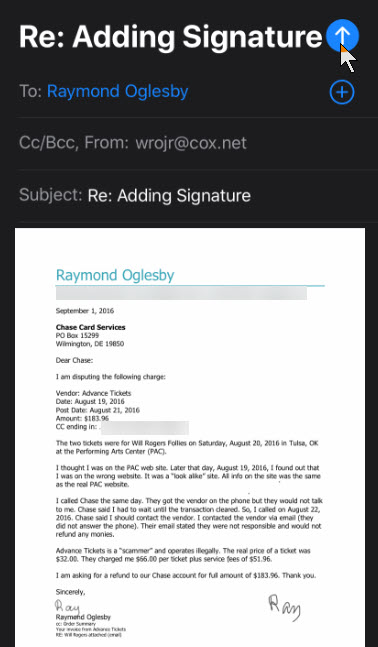
7. Tap the Up Arrow icon to send your return message. See below image:
Returing your signed document back to the sender
You have successfully adding your Signature to a PDF file, emailed the attachment and replied to the other party with your Signature.
I Would Like to Hear From You
Please feel free to leave a comment. I would love hearing from you. Do you have a computer or smart device tech question? I will do my best to answer your inquiry. Please mention the device, app and version that you are using. To help us out, you can send screenshots of your data related to your question.
The author’s Vietnam eBook on the Battle for Tra Bong: Events and Aftermath
Creating and using custom AutoText entries for frequently used phrases is a great way to speed up your content creation in Microsoft Word. By default, Word has very few entries so you may want to add your own. The good news is you can set up these time-savers in just a few clicks!
The software does come with lots of AutoText Document fields, like Author, Company Info, Status and other built-in entries such as Headers, Footers, Tables, Watermarks, etc., that you can choose for your document. You can use these entries in addition to your own AutoText entries for your documents.
Note! Your AutoText entries maintain its formatting when inserted into a document.
This is for PCs, Macs and other platforms that support Word
Copyright Scott Adams, Inc./Distributed by Universal Uclick for UFS
Creating an AutoText Entry
To begin, highlight the text in your Word document that you’d like to use to create your new AutoText entry. Refer to below image:
Selecting the text for your AutoText entry
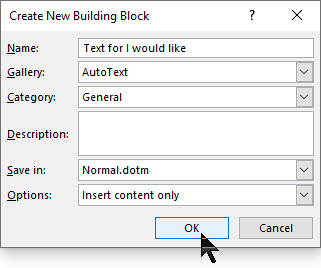
Press Alt+F3 to open the Create New Building Block window. Then, type in a name (within the 32-character limit) for your AutoText entry. Next, click OK. See following image:
Saving your AutoText entry
Your AutoText entry will be saved. Now that was easy.
Using an AutoText Entry
To use your AutoText entry, place your cursor where you want to insert the text in your Word document. Navigate to the Insert tab and click the Explore Quick Parts icon in the Text group. See below image:
Accessing your AutoText
A drop-down menu will be displayed. Hover your pointer over AutoText. Refer to below image:
Selecting the AutoText feature
A list of AutoText entries will appear. Select the one you want to use. See below image:
Inserting your custom AutoText entry
The entry you selected will be inserted into your document.
Deleting an AutoText Entry
If your AutoText list is getting crowded, or you made a mistake when you created a custom entry, you can delete them.
To do so, go back to the Insert tab and select the Text group. Then click the Explore Quick Parts icon, and then hover your pointer over AutoText.
From here, right-click the AutoText entry you want to delete. In the context pop-up menu that appears, click the option Organize and Delete. Refer to following image:
Accessing the Delete option
The Building Blocks Organizer window will be displayed with your AutoText entry highlighted. At the bottom of this dialog box, click on Delete. See below image:
The delete button at the end of the AutoText entries
A message box will appear asking you to confirm the deletion of your entry. To delete this entry, click Yes. Refer to below image:
Confirming your custom AutoText deletion
Now your entry will be deleted. You have successfully adding, inserted and deleted an AutoText entry. That’s it.
I Would Like to Hear from You
Please feel free to leave a comment. I would love hearing from you. Do you have a computer or smart device tech question? I will do my best to answer your inquiry. Please mention the device, app and version that you are using. To help us out, you can send screenshots of your data related to your question.
The author’s Vietnam eBook on the Battle for Tra Bong: Events and Aftermath
Your hard drive has been acting strange. It’s making clicking or screeching sounds, it’s unable to find files, crashes on boot, slow transfer speed or seems to be moving slowly. Your hard drive is dying.
Since it is a mechanical device it has moving parts unlike a Solid State Device (SSD) which has none. But even a SSD will eventually fail.
Even if your hard drive is healthy, over time, it will die. You should keep an eye on it’s health once in a while for your peace of mind. Let’s see how to do this.
This is for Windows 10 devices and Macs
Copyright Scott Adams, Inc./Distributed by Universal Uclick for UFS
To Tweet about this post, click the Tweet icon below to launch Twitter, then click its Tweet icon to post.
Check out TechSavvy.Life for their blog posts on smartphone apps, PCs. and Macs!
Most modern drives have a feature called S.M.A.R. T. (Self-Monitoring, Analysis and Reporting Technology) that monitors different drive attributes in an attempt to detect a failing disk. That way, your computer will automatically notify you before data loss occurs and the drive can be replaced while it still remains functional.
Check in Windows
In Windows 10, you can manually check the S.M.A.R.T. status of your drives from the Command Prompt. Just right-click the Start button, select Run, and type “cmd“, then click OK or type “cmd” into the Cortana search bar, then click OK. In the Command Prompt pop-up box, type:
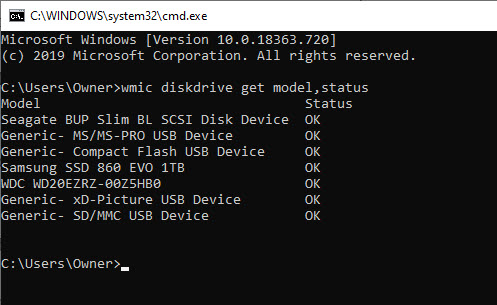
wmic diskdrive get model,status
It will return “Pred Fail” if your drive’s death is imminent; “Bad”, “Unknown” or “Caution” if its time to take care of a drive or “OK” if it thinks a drive is doing fine. Refer to below image:
Checking your hard drives health
Check on a Mac
On a Mac, you can check S.M.A.R.T. status by opening the Disk Utility program, clicking on the drive and looking at “S.M.A.R.T. Status” in the bottom left, which will either read “Verified” or “Failing”.
SMART Status can be Misleading
However, this basic S.M.A.R.T. information can be misleading. You only know when your drive is near death, but you can start to experience problems even if the basic S.M.A.R.T. status is okay.
You can also use Defraggler program I discussed in a previous post. When you use the Analyze feature of the program, it will show your disk health. Click here for the post on using Defraggler.
Manufacture Check
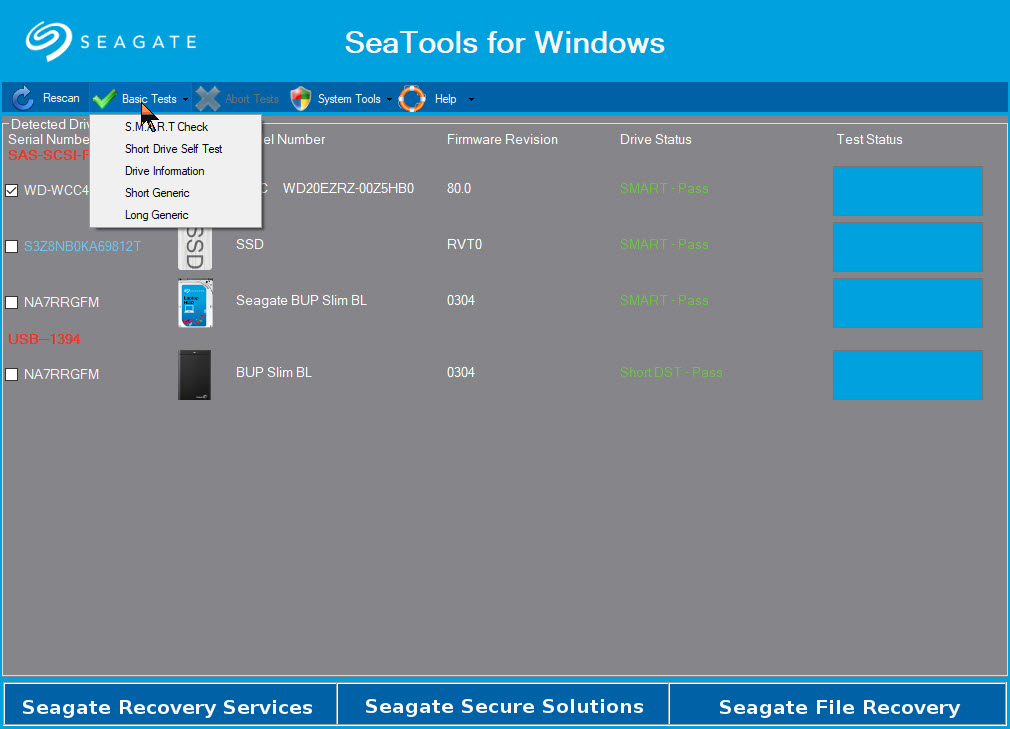
If you want an even deeper, more accurate picture into your drive’s health, check its manufacturer’s website for a dedicated tool; for example, Seagate has SeaTools for its drives, Western Digital has Data Lifeguard Diagnostic for its drives and Samsung has Samsung Magician for its SSDs. These tools can sometimes take into account certain technologies specific to their hard drives and SSDs.
Note! You may find that the SeaTools (Seagate) utility is the only software you will need. In the below image, it can diagnose Samsung, Western Digital as well as Seagate using several methods:
SeaTools for Windows options
Is Your Drive Almost Dead
Drives with the “Pred Fail” status won’t necessarily fail tomorrow. They could chug along for a year or be dead as a doornail in a few days if not hours.
If you’re getting warnings, it’s time to back up your files before your drive fails. Failure to act may cost you serious money to recover your data.
Now is not the time for a full backup, however: you don’t want to stress the drive with too many reads or it could fail while you’re backing up. Instead, plug in an external drive and copy your most important files onto it; family photos, work documents and anything else that can’t easily be replaced. Then, once you know those are safe, you can try doing a full drive clone with something like EaseUS Todo Backup Free.
I got a S.M.A.R.T. status of “Pred Fail” on my main hard drive. I quickly backed up my important files to an external drive. I never finished before it died. I tried the trick off turning my desktop on its side, then upside down. I got a little more life from the hard drive. Then I removed the hard drive and gently shook the device. I could hear the spindle sliding; then I knew if was totally dead. But it’s worth trying this trick.
Is Your Drive Dead
If your hard drive has already stopped working, things get a lot tougher and you’ll probably need a professional data recovery service which can cost $1,000 or more. But if you have pricelrss data on the drive, it may be worth it to you.
Prepare for Hard Drive Failure
It’s not a matter of “if” your hard drive will fail; it’s a matter of “when”. All hard drives fail eventually and if you want to avoid losing all your important files, you absolutely have to back up your computer regularly; including when the drive is healthy.
Take some time to set up an automatic, cloud based backup like Google Backup and Sync using Google Drive. It is one of the best things you can do to protect yourself from heartache later on. Or at least back up to an external drive using Windows 10 built-in File History Tool.
If your drive failed catastrophically with no warning, you can get back up and running in no time by having an up-to-date backup.
That’s it. Please feel free to share this post! One way to share is via Twitter, as mentioned below.
I hope you have found this post helpful. If so, click the Tweet icon below. This will launch Twitter where you click its icon to post the Tweet.
I have found TechSavvy.Life blog posts extremely helpful. Check them out for posts on smart phone apps, Macs and PCs!
Please feel free to leave a comment. I would love hearing from you. Do you have a computer or smart device tech question? I will do my best to answer your inquiry. Please mention the device, app and version that you are using. To help me out, you can send screenshots of your data related to your question.
The author’s Vietnam eBook on the Battle for Tra Bong: Events and Aftermath