The iOS 18.1 update introduces Safari Summaries, allowing users to quickly grasp webpage content without extensive scrolling. Apple Intelligence, integrated into various devices, offers tailor-made AI tools like image generation, message prioritization, and smart replies, while emphasizing user privacy. This feature enhances the browsing experience by providing clear website summaries.
RAYMOND OGLESBY @RaymondOglesby2 January 7, 2025 – 4 minutes read time
Overview
If you have ever been lost in the middle of a website and wished you could just get the gist without reading through the entire page, I have good news for you.
Safari gets Apple Intelligence! The iOS 18.1 update brings Safari summaries to webpages, letting you get the gist of an article quickly and clearly. This is one of the top iOS 18 Safari highlights, and it’s easy to implement. Here’s how
Why You Will Like This Tip
iOS 18 will summarize a website for you so you can skip the scrolling.
Enjoy a clear website summary without reading the whole thing.
Discover quickly if the article has the information you need.
System Requirements
This tip requires an iPhone 15 Pro and later models running iOS 18.1 or later. Screenshots are from iPhone 15 Pro running iOS 18.1.1.
Click here to learn how to update your iPhone to the latest iOS version.
What is Apple Intelligence
Apple Intelligence is a suite of AI-powered tools that use your personal data to generate information and recommendations tailored to you. It’s available on the iPhone, iPad, and Mac, and is integrated into the core of the operating system and existing apps.
Apple Intelligence includes features like:
Image Playground: A tool for generating cartoon-style images based on text descriptions
Genmoji: A tool for creating emojis for any situation
Writing Tools: Tools for enhancing your writing, including ChatGPT integration and reformatting tools like List and Table
Priority Messages: A tool for prioritizing messages in your inbox
Notification summaries: A tool for scanning long or stacked notifications with key details
Reduce Interruptions: A Focus that surfaces only notifications that might need immediate attention
Smart Reply: A tool in Mail that identifies questions you were asked in an email and offers relevant selections to include in your response
Apple Intelligence is designed to protect your privacy at every step. It’s aware of your personal information without collecting it, and it uses on-device processing and Private Cloud Compute to handle more complex requests.
Summarize a Safari Webpage
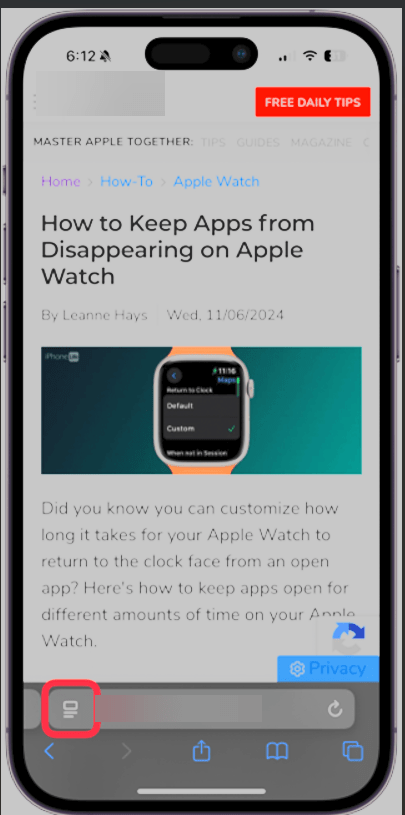
Open your webpage in Safari and tap the Page Settings button at the bottom left. Refer to the below image:
Selecting Page Settings button
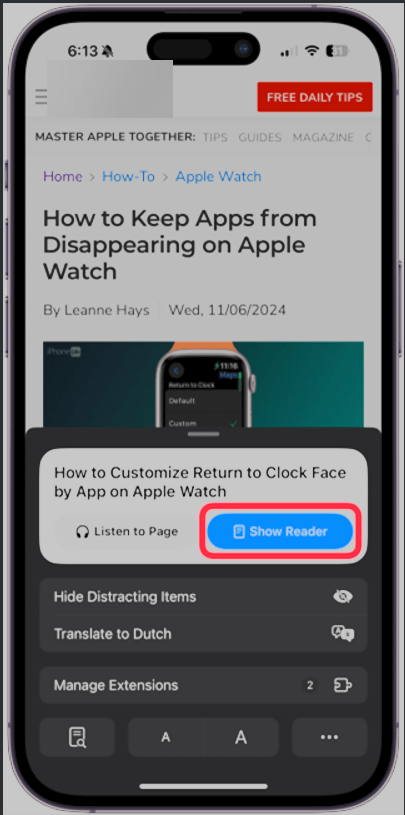
Next, tap Show Reader. See the below image:
Selecting Show Reader button
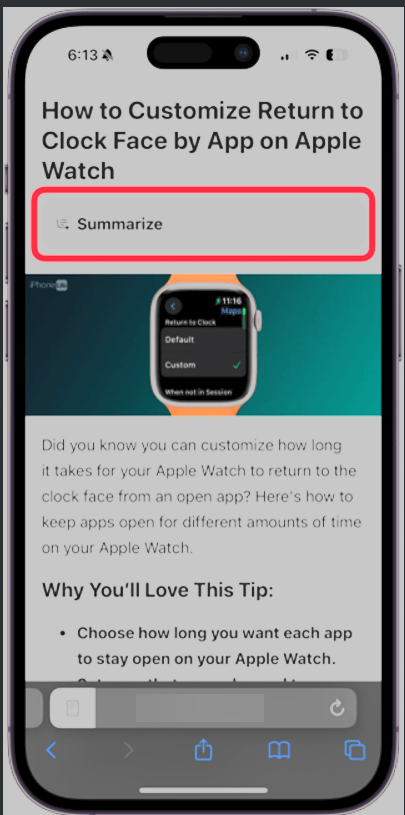
Now, tap Summarize. See the following image:
Selecting Summarize button
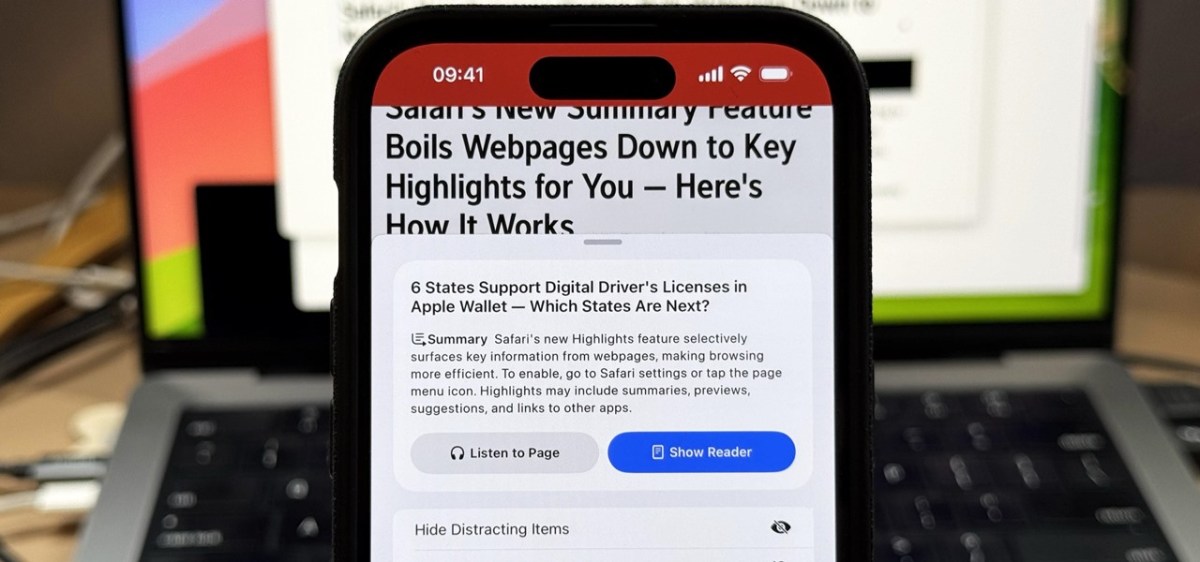
Next, you will see the summary displayed at the top of the page in a gray box. Refer to the below image:
The Summary
It’s that easy! Now, you can enjoy clear, concise summaries of the webpages you do not want to have to read through or make sure a website has the information you need before you spend ten minutes scrolling.
Disclaimer
Technology is constantly evolving, and smartphone and desktop tech rarely remains static. Therefore, the information in this post is only accurate as of the date it was written. Blog posts that are older than six months may contain instructions that are no longer compatible with your device or operating system. We hope that the content from previous posts continues to function as intended. Thank you for reading TechSavvy.Life, where technology works for you.
Quote For the Day
“Technology is a word that describes something that doesn’t work yet.”
― Douglas Adams
X (Twitter) Info
That’s it. Please feel free to share this post! One way to share is via Twitter.
Just click the Tweet icon below. This will launch Twitter where you click its icon to post the Tweet.
Check out TechSavvy.Life for blog posts on smartphones, PCs, and Macs! If you have comments or questions, email us at contact@techsavvy.life.
We value your feedback! Was this post helpful? Please share your comments with us. If you have a tech question related to your computer or smart device, feel free to reach out. Just send an email to contact@techsavvy.life, and be sure to include the device, app, and version you are using. To assist us further, you can also attach screenshots related to your inquiry.
The author’s Vietnam eBook on the “Battle for Tra Bong Vietnam: Events and Aftermath” can be accessed from a Kindle device or the Kindle App for a desktop or smartphone. The apps are free.
The author’s Vietnam eBook on the Battle for Tra Bong Vietnam: Events and Aftermath
The iOS 18 update allows users to hide apps on their iPhone, providing a way to lock them from the Home Screen and Spotlight search. While most apps can be hidden, certain default apps cannot. Hidden apps are stored in a Face ID-protected folder in the App Library for easy access.
RAYMOND OGLESBY @RaymondOglesby2 December 17, 2024 – 4 minutes read time
Overview
For a really long time, there was not a straightforward way to hide apps on iPhone, but the iOS 18 update introduced a brand new way to lock apps and hide them from the Spotlight search, your Home Screen, and the unlocked portion of the App Library.
One downside is that not all apps can be hidden. Another is that all your hidden apps go to a locked Hidden folder in the App Library. Besides this, it is a nifty feature, so let’s explore this feature for hiding apps on your iPhone.
Why YouWill Like This Tip
Most but not all apps can be hidden using a feature introduced with the iOS 18 update.
Apps hidden using this method will appear in a Hidden folder in the App Library that can be unlocked using Face ID!
System Requirements
this tip works on iPhones running iOS 18 or newer. The screenshots are from iPhone 14 Pro using iOS 18.1.1
Click here to learn how to update your iPhone to the latest iOS version.
Hide an App
First, on your Home Screen or App Library, long-press the app you wish to hide. In our example, we will be hiding the CLIPish Pro app. Refer to the below image:
Selecting an app to hide from Home screen
Next, tap the Require Face ID option. See the below image:
Selecting the Require Face ID option
Now, select the Hide and Require Face ID option. See the following image:
Selecting the Hide and Require Face ID option
Next, confirm that you wish to hide the app using Face ID and by tapping the Hide App button. Refer to the below image:
Confirm to Hide App
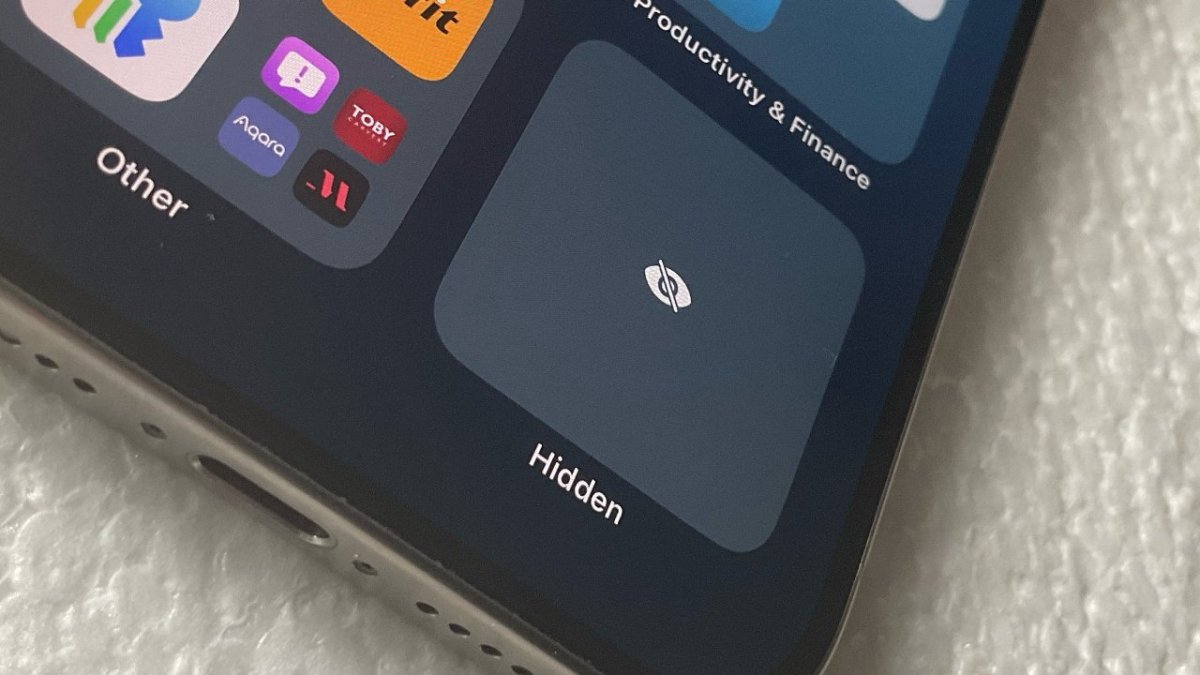
Now, any hidden apps will appear in the Hidden folder in the App Library, which is locked using Face ID. See the below image:
Your app in the Hidden folder
Apps Your Are Unable to Hide
You are unable to hide:
Apps installed with iOS 18: Apps like Photos and Wallet can mot be hidden.
Default web browser or app marketplace: Apps set as the default web browser or app marketplace can not be hidden.
Unhide an App
If you are wondering how to unhide apps on iPhones, just open the Hidden folder in the App Library. Tap inside the folder to reveal your hidden app(s). Follow the same steps, and tap the Don’t Require Face ID button. See the following image:
Selecting the Don’t Require Face ID option to unhide your app
Add App Back to Home Screen
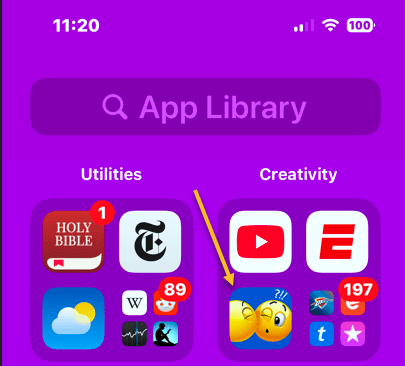
First, locate your app in the App Library. If the app has been hidden, it will be in the Hidden folder. If you have unhidden the app, it will be in a folder section. In our example, our CLIPish Pro app is in the Creativity section. Refer to the below image:
Selecting your app to add back to your Home screen
Next, long-press the app and tap the Add to Home Screen option. Your app will appear on your Home screen. See the below image:
Selecting the Add to Home Screen option
Disclaimer
Technology is constantly evolving, and smartphone and desktop tech rarely remains static. Therefore, the information in this post is only accurate as of the date it was written. Blog posts that are older than six months may contain instructions that are no longer compatible with your device or operating system. We hope that the content from previous posts continues to function as intended. Thank you for reading TechSavvy.Life, where technology works for you.
Quote For the Day
.“Technology is a gift of God. After the gift of life, it is perhaps the greatest of God’s gifts. It is the mother of civilizations, of arts and of sciences.”
―Freeman Dyson
X (Twitter) Info
That’s it. Please feel free to share this post! One way to share is via Twitter.
Just click the Tweet icon below. This will launch Twitter where you click its icon to post the Tweet.
Checkout TechSavvy.Life for blog posts on smartphones, PCs, and Macs! You may email us at contact@techsavvy.life for comments or questions.
We value your feedback! Was this post helpful? Please share your comments with us. If you have a tech question related to your computer or smart device, feel free to reach out. Just send an email to contact@techsavvy.life, and be sure to include the device, app, and version you are using. To assist us further, you can also attach screenshots related to your inquiry.
The author’s Vietnam eBook on the “Battle for Tra Bong Vietnam: Events and Aftermath” can be accessed from a Kindle device or the Kindle App for a desktop or smartphone. The apps are free.
The author’s Vietnam eBook on the Battle for Tra Bong Vietnam: Events and Aftermath
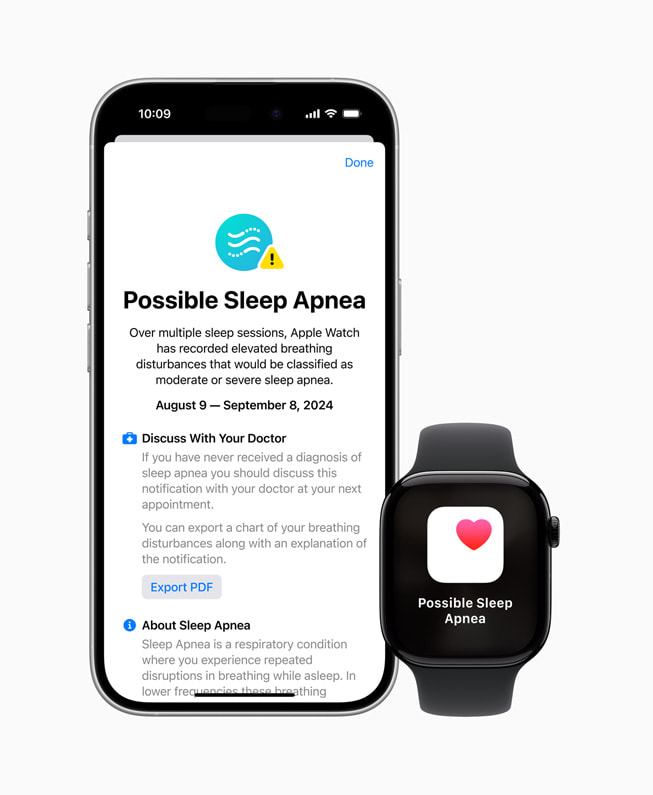
Apple Watch now features sleep apnea detection for users over 18 who haven’t been previously diagnosed. By tracking breathing disturbances through its accelerometer while sleeping, the watch warns users if issues persist over 30 days. However, it’s crucial to consult a doctor for an accurate diagnosis rather than solely relying on these notifications.
RAYMOND OGLESBY @RaymondOglesby2 December 10, 2024 – 6 minutes read time
Overview
The new Sleep Apnea Apple Watch feature uses the watch’s internal accelerometer to detect breathing disturbances. Sleep apnea detection is only available on newer Apple Watch models and users over 18 years old who have not been diagnosed with sleep apnea in the past.
About Sleep Apnea
Sleep apnea is a respiratory condition where you experience repeated disruptions in your breathing while you sleep. These breathing disturbances are fairly common, and people typically experience a few disturbances a night. Your alcohol intake, upper respiratory illnesses, and even some medications can lead to elevated breathing disturbances. When you wear your Apple Watch to bed, it uses the accelerometer to look for breathing disturbances while you sleep. These are categorized as “Elevated” or “Not Elevated.” Over a 30-day evaluation period, if you consistently experience “Elevated” breathing disturbances, you receive a notification, letting you know it identified signs of sleep apnea. You should talk to your doctor if you receive a sleep apnea notification.
Why You Will Like This Tip
Set up Sleep apnea Apple Watch notifications to learn if you are experiencing any signs of sleep apnea.
Sleep apnea notifications can help you know when it’s time to make an appointment with your doctor.
You must wear your Apple Watch to sleep for a minimum of 10 nights over a 30 day period. Your data will be analyzed every 30 days.
Sleep apnea notifications are intended for use by people 18 years or older who have not been diagnosed with sleep apnea.
The screenshots are from iPhone 14 Pro running iOS 18.1.1.
Set Up Notifications
Sleep Apnea is a much-anticipated Apple Watch feature that is finally here. This post explores how to set up and use notifications for sleep apnea breathing disturbances.
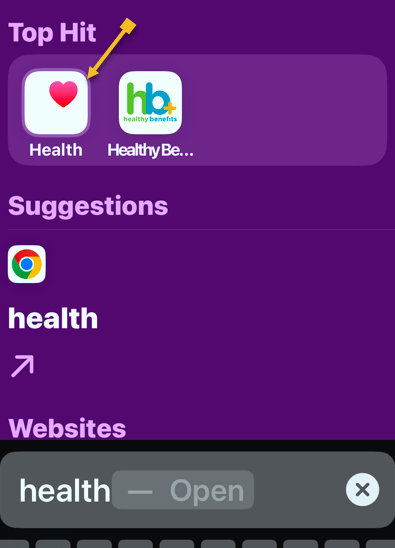
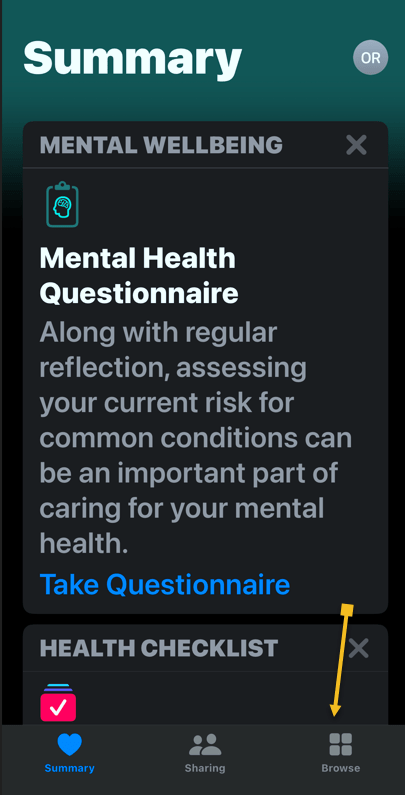
First, open the Health app. Refer to the below image:
Next, navigate to the Browse tab if you are not already there. See the below image:
Now, scroll down and select either Sleep or Respiratory. See the following image:
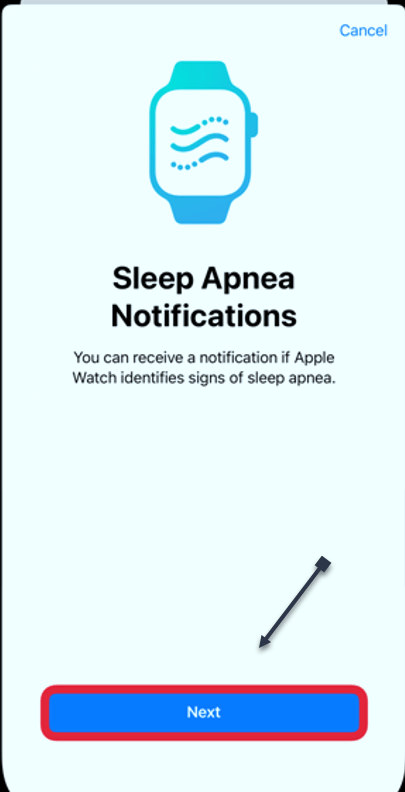
Next, scroll down until you see Sleep Apnea Notifications, tap Set Up. Refer to the below image:
Now, tap Next. See the below image:
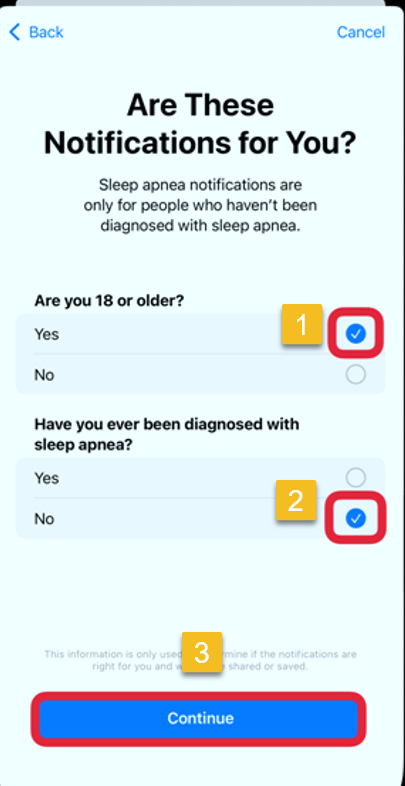
Next, you can only track sleep apnea if you are over 18 and have not been diagnosed with sleep apnea. If applicable, tap on Yes and No respectively. Then tap Continue. See the following image:
Now, tap Next. Refer to the below image:
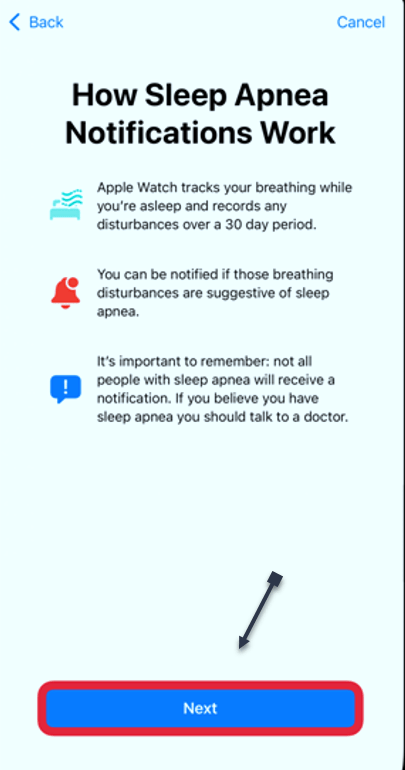
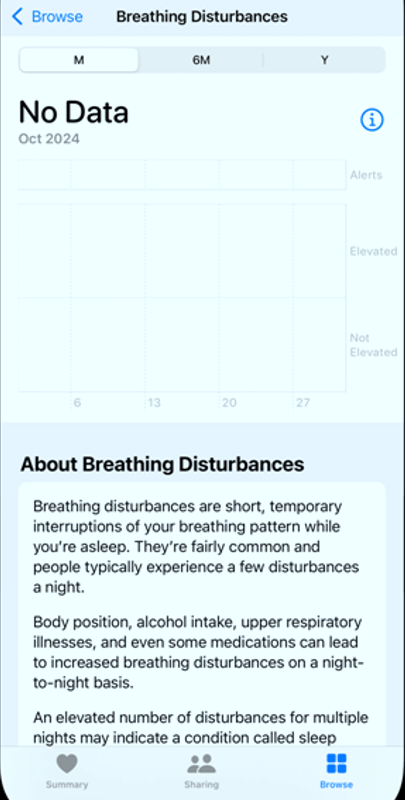
Next, you will be taken to a page showing Breathing Disturbances. If this is your first time using the app, you will not see any data here yet. But you can scroll down to read more about them to learn what to expect. See the below image:
There is no specific Sleep Apnea app, but you can track any disturbance within the Health app. From now on, you will be notified if any breathing disturbances are detected. Please keep in mind that while the Apple Watch may be able to detect sleep apnea, you will have to see your doctor to get a proper diagnosis and receive any necessary medical care.
Enabling the Apple Watch
Turn on Track Sleep with Apple Watch. It should appear during the initial setup, although you can go to the Watch app on your iPhone > My Watch Tab.
Select Sleep and toggle on Track Sleep with Apple Watch.
Wear your watch to sleep for at least 10 nights in a 30-day period to get analyzed results.
Viewing Your Results
Your results will be reflected in the Health app as soon as your first night. If it detects an elevated level of breathing disturbances, it will proactively send you an alert.
If you want to view the data for yourself, you can open the Health app once more and navigate back to breathing disturbances. It will show each night’s results on a graph, ranging from not elevated to elevated. You can view it each night or over time. See the following image:
To be clear, if a positive detection is triggered, it’s not diagnosing you with anything. The data can be exported and shared with your health care provider where they can make a further diagnosis.
Turning Off Sleep Apnea Notifications
First, open the Health app on your iPhone and tap your photo or initials at the top right.
Next, tap
Health Checklist > Sleep Apnea Notifications
Now, turn Sleep Apnea Notifications to OFF.
Summary
The Sleep Apnea Notifications feature is not intended to diagnose, treat, or aid in the management of sleep apnea.
Not all people with sleep apnea receive a notification.
If you believe you have sleep apnea, talk to your doctor.
Disclaimer
Technology is constantly evolving, and smartphone and desktop tech rarely remains static. Therefore, the information in this post is only accurate as of the date it was written. Blog posts that are older than six months may contain instructions that are no longer compatible with your device or operating system. We hope that the content from previous posts continues to function as intended. Thank you for reading TechSavvy.Life, where technology works for you.
Quote For the Day
“Technology is a word that describes something that doesn’t work yet.”
― Douglas Adams
X (Twitter) Info
That’s it. Please feel free to share this post! One way to share is via Twitter.
Just click the Tweet icon below. This will launch Twitter where you click its icon to post the Tweet.
Checkout TechSavvy.Life for blog posts on smartphones, PCs, and Macs! You may email us at contact@techsavvy.life for comments or questions.
We value your feedback! Was this post helpful? Please share your comments with us. If you have a tech question related to your computer or smart device, feel free to reach out. Just send an email to contact@techsavvy.life, and be sure to include the device, app, and version you are using. To assist us further, you can also attach screenshots related to your inquiry.
The author’s Vietnam eBook on the “Battle for Tra Bong Vietnam: Events and Aftermath” can be accessed from a Kindle device or the Kindle App for a desktop or smartphone. The apps are free.
The author’s Vietnam eBook on the Battle for Tra Bong Vietnam: Events and Aftermath
The Control Center on iOS 18 and iPadOS 18 simplifies access to frequently used features by allowing customization and multiple screens. Users can manage Wi-Fi, Bluetooth, volume, and more, enhancing organization. By arranging controls and adding shortcuts, users can optimize their experience, making navigation more efficient and personalized.
RAYMOND OGLESBY @RaymondOglesby2 December 3, 2024 – 6 minutes read time
Overview
For quick access to frequently used apps and settings, Control Center is just a swipe or click away. And with iOS 18 and iPadOS 18, it’s even easier to customize and use.
Navigating the settings on your iPhone, iPad, and Mac can be difficult. That’s where the Control Center comes in, providing quick access to a variety of features that might otherwise be hidden within the device’s menus. From the Control Center, you can easily adjust settings for Wi-Fi, Bluetooth, and AirDrop, as well as control brightness and volume. It also allows you to manage Focus mode, access music controls, switch to dark mode, and enable screen mirroring. Additionally, you can customize the Control Center by adding or removing features as needed.
For many years, the Control Center on your iPhone and iPad was restricted to a single screen. If you wanted to change the controls, you had to navigate into the settings of your device. However, with the introduction of iOS 18 and iPadOS 18, you can now set up multiple screens and customize them directly within the Control Center. Let’s explore how to personalize the updated Control Center.
Why You Will Like This Tip
Organize the Control Center so that your most frequently used controls are easily accessible at the front.
Maintain a tidy and organized Control Center..
System Requirements
This tip is for iPhones running iOS 18 or later. The screenshots are from iPhone 14 Pro running iOS 18+.
Click here to learn how to update your iPhone to the latest iOS version.
Customize the Control Center
First, swipe down from the upper right edge to open the Control Center. Refer to the below image:
Swiping down to access Control Center
Next, rap and hold in an empty area. See the below image:
Taping any empty area
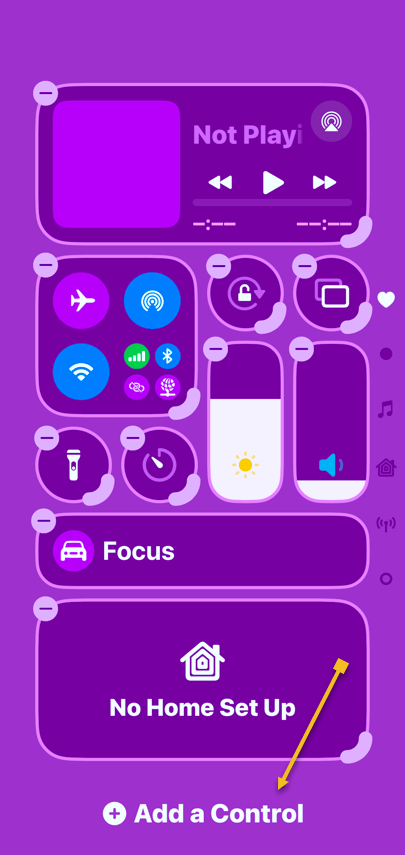
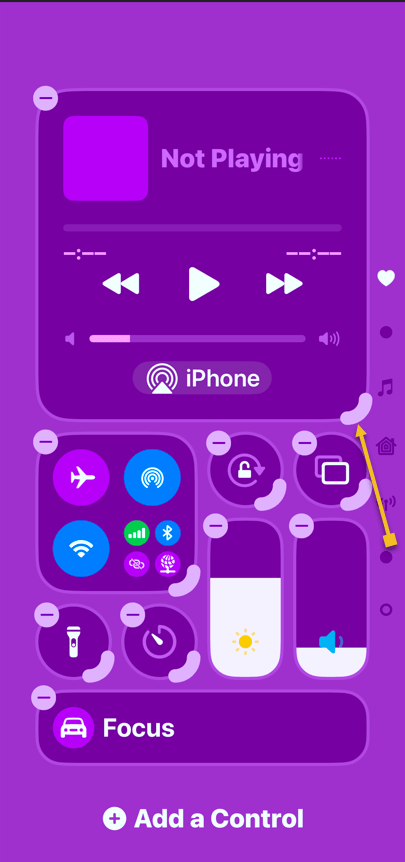
Now, the controls will have minus symbols next to them, indicating that you are in Edit mode. Tap Add a Control to get started. See the following image:
Selecting Add a Control button
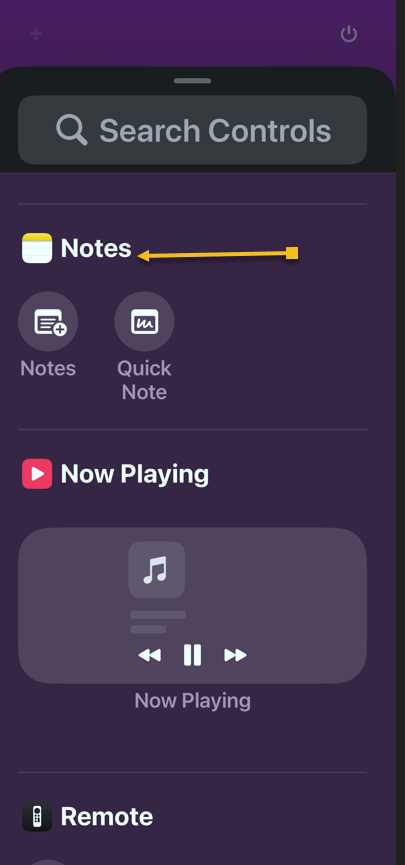
Next, find a control you want easy access to and tap on it to add it to the Control Center. Refer to the below image:
Selecting to add the Notes app
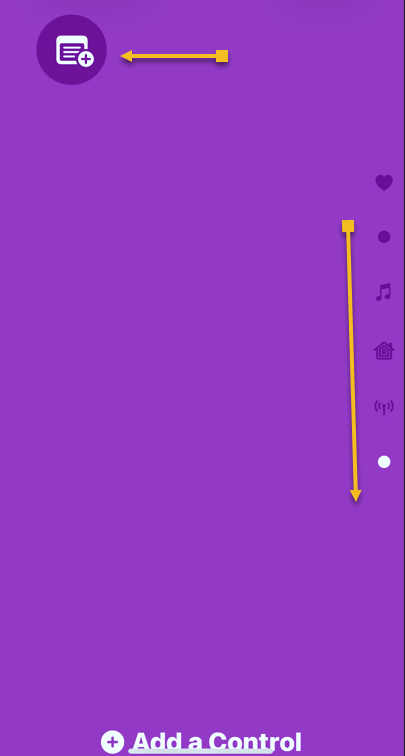
Now, if your first page becomes too full, a second page will be automatically created. You can swipe up and down to navigate between the Control Center pages. Each page is indicated by a dot on the far right side of the screen. Please note that we have a total of six pages. See the image below:
Notes app has been added
Next, to change the size of a control, tap and drag the corner. Keep in mind that some controls only have one size. See the following image:
Selecting Playback control to resize
Now, view your resized Playback control. Refer to the below image:
Playback control has been resized
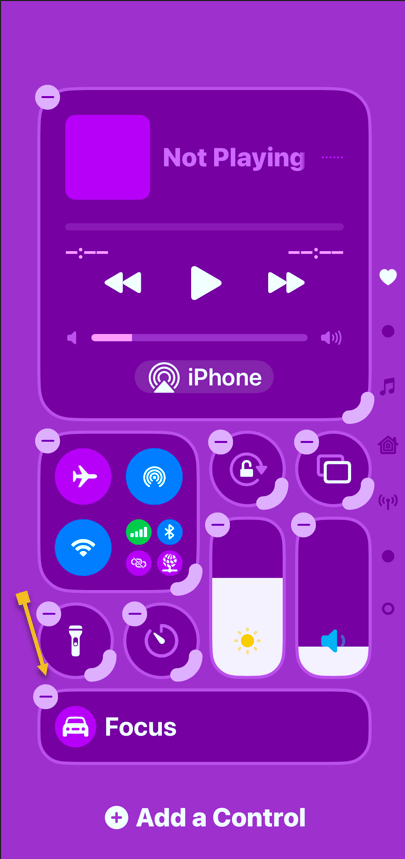
Next, to remove a control, simply tap the minus symbol next to it. See the below image:
Selecting to remove the Focus control
Now, you can place controls anywhere without worrying about order. Our Control Center has been rearranged from six pages to only three pages, as indicated by the dots on the right side. See the following image:
Final Control Center
FAQ
Why does my iPhone say SOS in the top right corner?
If your iPhone cannot connect to a cellular network or Wi-Fi, it may display ‘SOS’ in the top right corner. This indicates that your device can only make emergency calls.
What does 5GUC mean?
5GUC stands for 5G Ultra Capacity. This is T-Mobile’s higher frequency 5G network. Other cellular providers have similar higher frequency networks with different names.
What are the icons on the top right of iPhone?
At the top of your iPhone screen, you will typically see the strength of your cellular network represented by bars. To the right of this, there will be an indicator showing 4G, LTE, 5G, or a similar symbol if you are connected to a cellular network. If you are connected to Wi-Fi, you will see a Wi-Fi symbol instead. Finally, you will also find the battery indicator for your iPhone.
What do the iPhone signal symbols mean?
The signal symbols indicate whether you are using cellular data or Wi-Fi, as well as the strength of the wireless connection.
Summary
That’s how to customize the Control Center on your iPhone. We recommend placing your most-used controls on the first page.
Disclaimer
Technology is constantly evolving, and smartphone and desktop tech rarely remains static. Therefore, the information in this post is only accurate as of the date it was written. Blog posts that are older than six months may contain instructions that are no longer compatible with your device or operating system. We hope that the content from previous posts continues to function as intended. Thank you for reading TechSavvy.Life, where technology works for you.
Quote For the Day
“The march of science and technology does not imply growing intellectual complexity in the lives of most people. It often means the opposite.”
– Thomas Sowell
(X) Twitter Info
You are finished with a revised Control Center. Please feel free to share this post! One way to share is via Twitter.
Just click the Tweet icon below. This will launch Twitter where you click its icon to post the Tweet.
Checkout TechSavvy.Life for blog posts on smartphones, PCs, and Macs! You may email us at contact@techsavvy.life for comments or questions.
We value your feedback! Was this post helpful? Please share your comments with us. If you have a tech question related to your computer or smart device, feel free to reach out. Just send an email to contact@techsavvy.life, and be sure to include the device, app, and version you are using. To assist us further, you can also attach screenshots related to your inquiry.
The author’s Vietnam eBook on the “Battle for Tra Bong Vietnam: Events and Aftermath” can be accessed from a Kindle device or the Kindle App for a desktop or smartphone. The apps are free.
The author’s Vietnam eBook on the Battle for Tra Bong Vietnam: Events and Aftermath
The post explains how to enable the text-to-speech feature on iPhones or iPads, allowing users to listen to content like web pages or ebooks while multitasking. It details the setup process through the Accessibility settings and provides tips on adjusting voice options and speaking rates for an enhanced listening experience.
If you find it more convenient to listen to some text on your iPhone or iPad rather than read it, you can easily enable that capability. You might, for example, want your device to read a web page, ebook, or another document while you perform household chores.
RAYMOND OGLESBY @RaymondOglesby2 November 19, 2024 – 5 minutes read time
Overview
Apple ensured that the iPhone came with a broad array of built-in accessibility features so anyone can use it. Text-to-speech is just one of these accessibility options. Let’s explore how to set up and use text-to-speech.
Why You Will Like This Tip
Listen to web articles or books when you are busy with other tasks.
Have your iPhone or iPad read to you if you have difficulty seeing the screen well.
System Requirements
This tip works on iPhones running iOS 16 or newer. Screenshots are from iPhone 14 Pri running iOS 18+
Click here to learn how to update your iPhone to the latest iOS version.
How to Setup
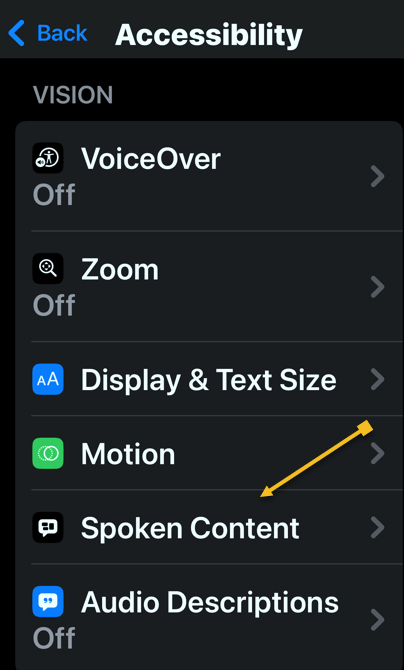
First, open the Settings app, and tap Accessibility. Refer to the below image:
Selecting the Accessibility option
Next, tap Spoken Content. See the below image:
Selecting the Spoken Content option
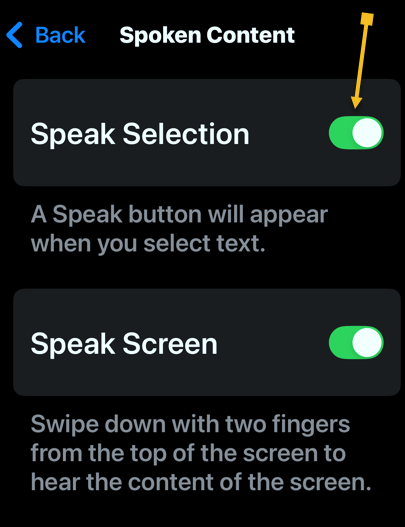
Now, tap the toggle next to Speak Selection to enable or disable it. See the following image:
Enabling the Speak Selection toggle
Tap the Highlight Content option to highlight each word as it is spoken (this is optional). Refer to the below image:
Selecting the Highlight Content option
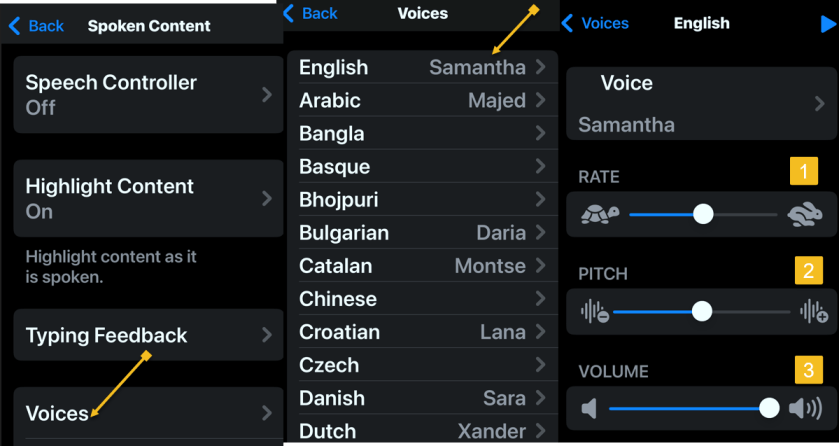
Next, you can tap Voices to choose a different computer-generated voice. See the below image:
Selecting a Voice and its options
Now, you can also select your Default Language. (Ours is set to Current Locale which is English). See the following image:
Selecting the Default Language
If you change your Default Language, you can turn the toggle next to Detect Languages to Off. This will let your iPhone read in other languages instead of translating in your default language. Refer to the below image:
Enabling the Detect Languages toggle
The Speaking Rate slider allows you to adjust how fast or slow the text-to-speech voice reads. See the below image:
Setting the Speaking Rate slider
Next, you can add Pronunciations, if the text-to-speech voice is not pronouncing something correctly. See the following image:
Adding Pronunciations
How to Use
To use text-to-speech, tap and hold some text to highlight it or use the Select or Select All option. Refer to the below image:
Highlighting text to read aloud
Now, tap the Speak option, and your iPhone will read the text aloud. See the below image:
Selecting the Speak option to read the highlighted text
Next, to stop your iPhone from reading the text, tap the highlighted text, then tap the Pause option. See the following image:
Selecting Pause option
Summary
You can use text-to-speech to have your iPhone or iPad read aloud to you if you have trouble reading everything on your screen, or while doing chores, cooking, or going for a walk.
Disclaimer
Technology is always changing. Rarely is there static tech for smartphones and desktops. Thus, the contents of this post are only valid at the time of writing. Blog posts older than six months may have directions incompatible with your device or OS. Hopefully, older post content will continue to work as advertised. Thank you for reading TechSavvy.Life for Technology at Work For You.
Quote For the Day
“Proverbs are all very fine when there’s nothing to worry you, but when you’re in real trouble, they’re not a bit of help.”
L.M. Montegomery
(X) Twitter Info
Congratulations, you are finished. Please feel free to share this post! One way to share is via Twitter.
Just click the Tweet icon below. This will launch Twitter where you click its icon to post the Tweet.
Checkout TechSavvy.Life for blog posts on smartphones, PCs, and Macs! You may email us at contact@techsavvy.life for comments or questions.
Was this post helpful? We would love to hear your comments. Do you have a computer or smart device tech question? I will do my best to answer your inquiry. Just send an email to contact@techsavvy.life. Please mention the device, app, and version you are using. To help us, you can send screenshots of the data related to your question.
The author’s Vietnam eBook on the “Battle for Tra Bong Vietnam: Events and Aftermath” can be accessed from a Kindle device or the Kindle App for a desktop or smartphone. The apps are free.
The article explains how to save web pages to the iPhone Notes app for future reference. Users can share links with additional notes for better organization, particularly when managing projects.
RAYMOND OGLESBY @RaymondOglesby2 November 12, 2024 – 4 minutes read time
Overview
Did you find a web page you want to save for later? You can easily share it to the Notes app so that you can return to it again. Or if you find an article relevant to a project you are working on, you can share it with one of your notes, add text, and open your note anytime to find the link. Let’s explore how this is done.
Why You Will Like This Tip
Save articles to read at a later date.
Easily keep your thoughts about an important website in one place.
Keep related web pages together in one note when planning projects.
System Requirements
This tip works on iPhones running iOS 16 or later. The screenshots are from iPhone 14 Pro running iOS 18.
Click here to learn how to update your iPhone to the latest iOS version.
Let’s Get Started
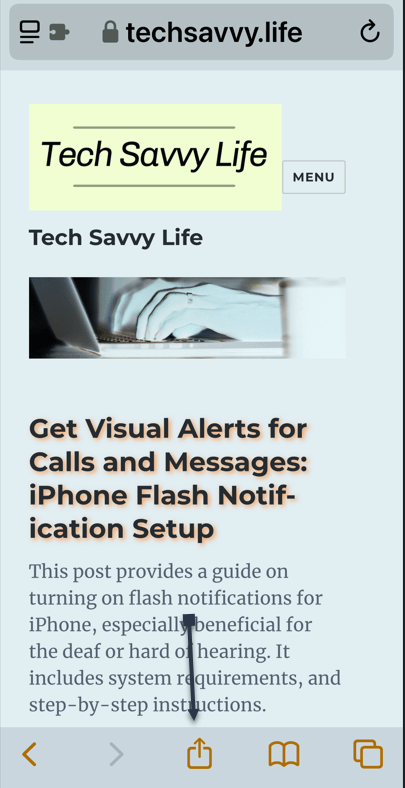
To share a webpage, you first need to open the page in Safari and tap the Share icon. Refer to the below image:
Selecting the Share icon
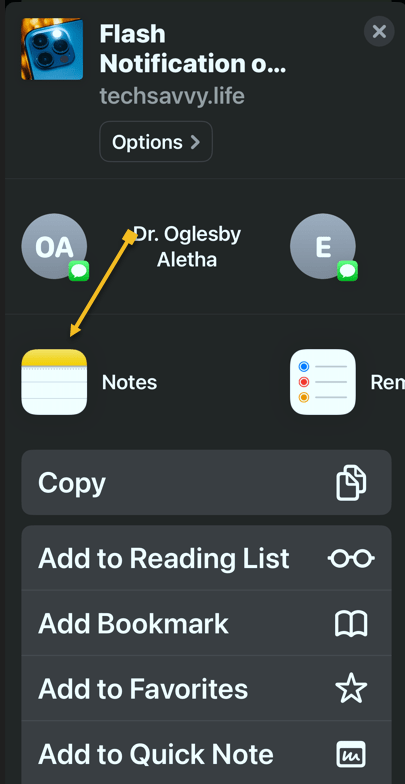
Next, scroll through the app list, and tap Notes. See the below image:
Selecting the Notes app
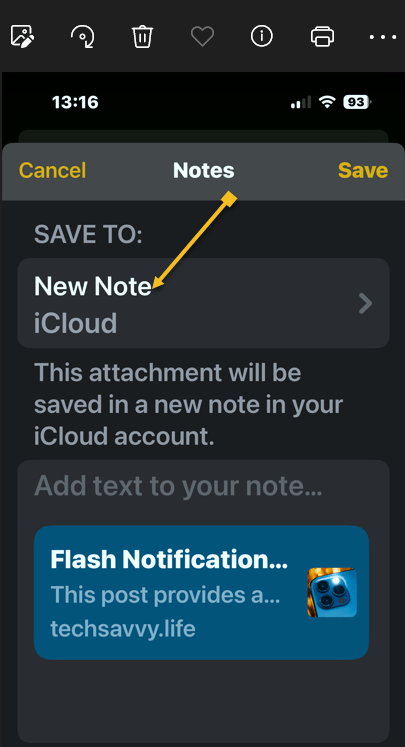
Now, tap a New Note to select whether you want to save this page to a new note or an existing one. See the following image:
Selecting a New note
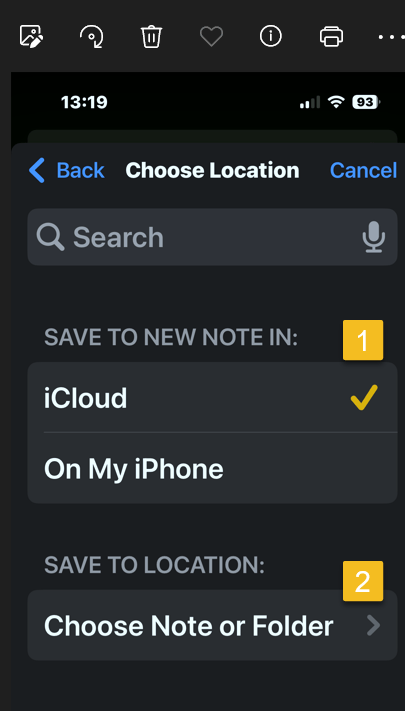
Next, choose where to save the new note, then tap Choose Note or Folder. Refer to the below image:
Selecting a location for the new note and a folder
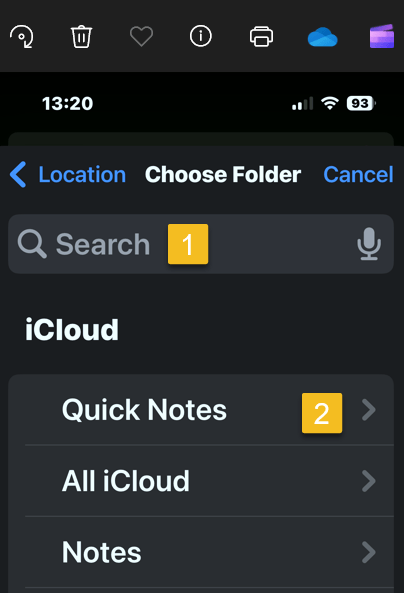
Now, tap the Search Bar to search for a specific one, or scroll and select one. In our example, we are selectingthe Quick Notes folder. See the below image:
Selecting the Search or scroll to find one
Next, tap Create New Note to create a new note and save the website to it. See the following image:
Selecting the Create New Note button
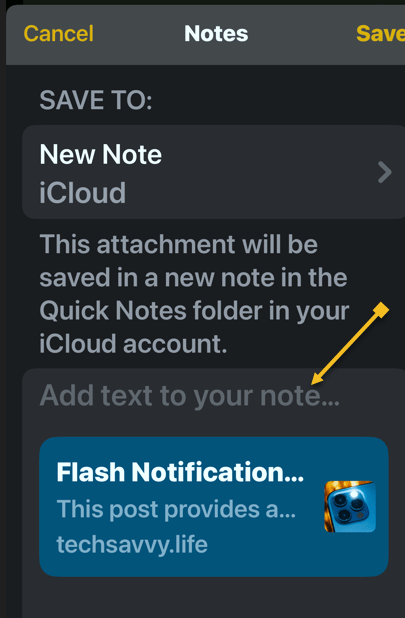
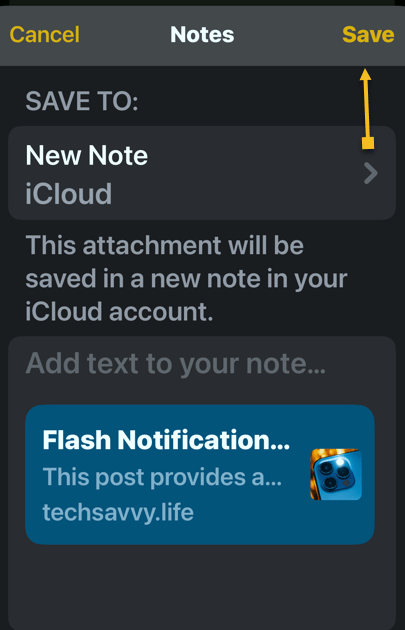
Next, tap Add text to your note… if there are any extra details you want to add. Refer to the below image:
Optional, add text for the new note
Now, tap Save. See the below image:
Save your note
If you save it as a new note, it will have the same title as the web page. You can tap the thumbnail to open the article when you open your Note. See the following image:
Your new note with a thumbnail of your page
That’s how to add a hyperlink in the iPhone Notes app for sharing. You can return to this note when you want to read that article.
Disclaimer
Technology is always changing. Rarely is there static tech for smartphones and desktops. Thus, the contents of this post are only valid at the time of writing. Blog posts older than six months may have directions incompatible with your device or OS. Hopefully, older post content will continue to work as advertised. Thank you for reading TechSavvy.Life for Technology at Work For You.
Quote For the Day
“Order is one of the needs of life which, when it is satisfied, produces a real happiness.”
-Maria Montessori
X (Twitter) Info
That’s it. Please feel free to share this post! One way to share is via Twitter.
Just click the Tweet icon below. This will launch Twitter where you click its icon to post the Tweet.
Checkout TechSavvy.Life for blog posts on smartphones, PCs, and Macs! You may email us at contact@techsavvy.life for comments or questions.
Was this post helpful? We would love to hear your comments. Do you have a computer or smart device tech question? I will do my best to answer your inquiry. Just send an email to contact@techsavvy.life. Please mention the device, app, and version you are using. To help us, you can send screenshots of the data related to your question.
The author’s Vietnam eBook on the “Battle for Tra Bong Vietnam: Events and Aftermath” can be accessed from a Kindle device or the Kindle App for a desktop or smartphone. The apps are free.
The author’s Vietnam eBook on the Battle for Tra Bong Vietnam: Events and Aftermath
The latest iOS updates enhance the Messages app by allowing users to use bold, italics, and animated text effects in iMessage on iOS 18 or later. These features add flair and emphasis to messages, but recipients must also have iOS 18 to view them properly.
The Messages app is much livelier thanks to the latest updates to iOS. With these updates, you can express yourself in more ways than ever with special effects. You can now bold text, italicize it, and even apply some of these effects to emojis! Let’s find out how to add the impact to iMessage in iOS 18.
What’s to Like About This Feature
Add some extra flair to every text you send.
Emphasize parts of a message to make it stand out.
System Requirements
This tip is for iPhones running iOS 18 or later.
Click here to learn how to update your iPhone to the latest iOS version.
Adding Effects to a Message
First, open an iMessage conversation, and tap the Text Effects button to the lower right. Refer to the below image:
Selecting the Text Effects button
Next, there is a wide variety of text effects to choose from. Just highlight the text to which you want to apply an effect. The top row is simply for formatting the text. You can choose between Bold, Italics, Underline, Strikethrough, or all at once. See the below image:
Selecting text formatting options
Now, you can also apply some animation texts to give your texts some extra flair.
Thankfully, a preview of each animation effect will play on a loop so you can see how they look to your recipient(s).
See the following image for the Big and Small effects:
Selecting Big and Small text effects
Next, you can try the other six effects by tapping its button. To turn off an effect, tap the button again.
Note! Your recipient(s) must be running iOS 18 to see the effects. If they are using iOS 17 or below, the message will be in plain text.
Disclaimer
Technology is always changing. Rarely is there static tech for smartphones and desktops. Thus, the contents of this post are only valid at the time of writing. Blog posts older than six months may have directions incompatible with your device or OS. Hopefully, older post content will continue to work as advertised. Thank you for reading TechSavvy.Life for Technology at Work For You.
Quote For the Day
“Real eyes, realize, real lies…”
Tupac Shakur
X (Twitter) Info
That’s it. Please feel free to share this post! One way to share is via Twitter.
Just click the Tweet icon below. This will launch Twitter where you click its icon to post the Tweet.
Checkout TechSavvy.Life for blog posts on smartphones, PCs, and Macs! You may email us at contact@techsavvy.life for comments or questions.
Was this post helpful? We would love to hear your comments. Do you have a computer or smart device tech question? I will do my best to answer your inquiry. Just send an email to contact@techsavvy.life. Please mention the device, app, and version you are using. To help us, you can send screenshots of the data related to your question.
The author’s Vietnam eBook on the “Battle for Tra Bong Vietnam: Events and Aftermath” can be accessed from a Kindle device or the Kindle App for a desktop or smartphone. The apps are free.
The author’s Vietnam eBook on the Battle for Tra Bong Vietnam: Events and Aftermath
The Visual Look Up feature in the Photos app allows iOS users to identify landmarks in their images using AI. This tool enhances travel experiences by providing information about locations, helping users remember where photos were taken.
RAYMOND OGLESBY @RaymondOglesby2 July 23, 2024 – 2 minutes read time
Overview
If you are familiar with the Photos app, you might be familiar with a feature called Visual Look Up, which uses AI to identify objects in your photos. Most people have heard about its ability to recognize specific faces and identify plants. But, did you know that you can also use Visual Look Up to identify locations and important landmarks?
It’s so cool to know at a glance exactly where a photo was taken, especially if you have recently been traveling and have been to numerous historical sights or landmarks. It can be difficult to keep track of what photo was taken where. Now with the AI of the Visual Look Up feature, you no longer have to remember!
Why You Will Like This Tip:
Get the most out of the Visual Look Up feature by learning to use it to identify locations.
Quickly and easily obtain additional info about the landmarks and locations you have visited.
Not sure what that cool landmark in front of you is? Use Visual Look Up to find out!
System Requirements
This is for iPhones running iOS 16 or later. Screenshots are from iPhone 14 Pro running iOS 18+
Click here to learn how to update your iPhone to the latest iOS version.
Identifying Landmarks
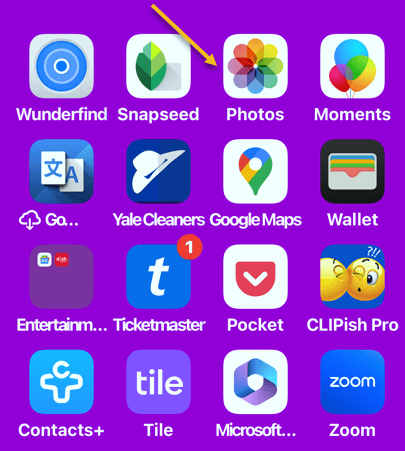
First, open the Photos app. Refer to the below image:
Accessing the Photos app
Next, select a photo that features a famous location or landmark. (This will not work if the photo is of your shoes at the statue of Andrew Jackson. It needs to be a photo of Andrew Jackson himself, otherwise, the AI will not be able to identify it.) See the below image:
Select a photo
Now, tap the info button at the bottom. If the AI works on this photo, the Info button will be decorated with sparkles. See the following image:
Selecting the Info button
Next, tap the Look Up Landmark. Refer to the below image:
Selecting the Look Up Landmark option
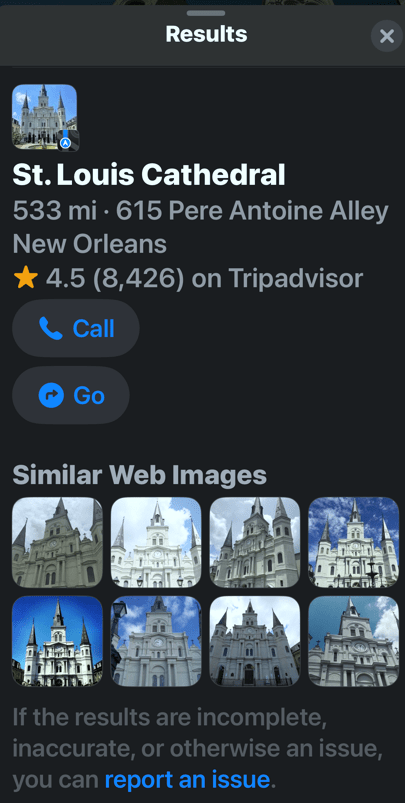
Now, you can select various options for further inquiry, like getting directions, placing a call to the location, or looking up further information about the location via the Internet. See the below image:
Options for your landmark photo
Summary
Now you can use Visual Look Up which uses AI to identify locations and important landmarks in your photos.
It can be difficult to keep track of what photo was taken where. But now with this feature. you no longer have to remember the landmark photo location.
Disclaimer
Technology is always changing. Rarely is there static tech for smartphones and desktops. Thus, the contents of this post are only valid at the time of writing. Blog posts older than six months may have directions incompatible with your device or OS. Hopefully, older post content will continue to work as advertised. Thank you for reading TechSavvy.Life for Technology at Work For You.
Quote For the Day
“The great myth of our times is that technology is communication.”
Libby Larsen
X (Twitter) Info
A very nice feature for iOS. Please feel free to share this post! One way to share is via Twitter.
Just click the Tweet icon below. This will launch Twitter where you click its icon to post the Tweet.
Checkout TechSavvy.Life for blog posts on smartphones, PCs, and Macs! You may email us at contact@techsavvy.life for comments or questions.
Was this post helpful? We would love to hear your comments. Do you have a computer or smart device tech question? I will do my best to answer your inquiry. Just send an email to contact@techsavvy.life. Please mention the device, app, and version you are using. To help us, you can send screenshots of the data related to your question.
The author’s Vietnam eBook on the “Battle for Tra Bong Vietnam: Events and Aftermath” can be accessed from a Kindle device or the Kindle App for a desktop or smartphone. The apps are free.
The author’s Vietnam eBook on the Battle for Tra Bong Vietnam: Events and Aftermath
This post provides tips for handling AI-generated summaries in Google search results. It explains how to disable these overviews using specific search modifiers.
RAYMOND OGLESBY @RaymondOglesby2 July 23, 2024 – 3 minutes read time
This is for devices running Google or Bing. Screenshots are from Windows 10 desktop
Get the Latest Desktop Google Update
Open Google, click the 3-dot menu icon (upper right corner), then click the Settings option. If Google is outdated, it will automatically update.
Why You Will Like This Tip
View your Google or Bing search results without an AI-generated summary.
Narrow your search results to what you just want to preview.
Overview
We rely on Google every day to provide us information. But what happens when our source of knowledge becomes messy and unreliable? AI Overviews utilize Google’s Gemini AI to provide an answer to your query right on the search page; no need to click.
Using the AI Modifier
Still in its infancy, this feature occasionally surfaces incorrect information, so some web surfers look to disable it entirely. There are a few ways to make an AI Overview go away, but no method is as simple as tricking Google itself into getting rid of it. Google uses search modifiers, named operators, which help narrow search results. Here are a few examples:
Use quotations (” “) to search for the exact phrase
Add site: to search a single website
Search for a certain type of file with filetype:
Exclude terms with a minus (-) symbol. The minus symbol stands for NOT.
If we ask “who owns Facebook” an AI-generated summary will be displayed. Refer to the below image:
With AI-generated summary
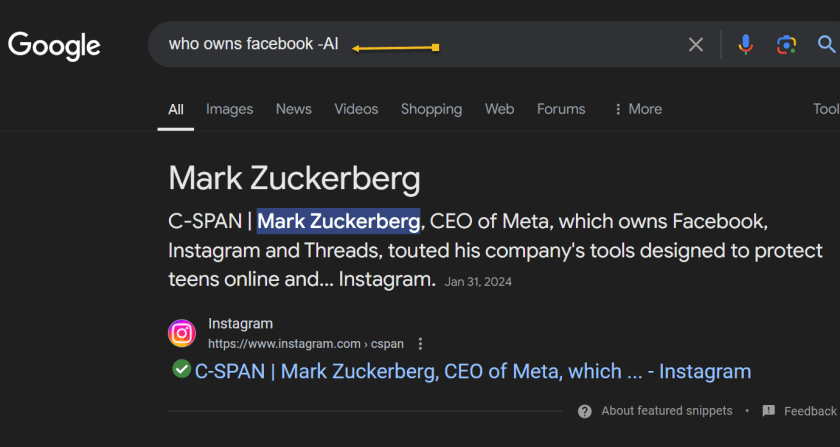
And if you add the term -AI at the end of the query, an overview is not generated. It’s a very simple solution to the AI Overview problem that can be quickly repeated on subsequent queries without needing multiple steps. See the below image:
Without AI-generated summary
However, it’s worth noting that this does not work because of the -AI modifier. On subsequent tests, we found that putting pretty much anything in there (Ex: -i, –sports, -farm) also did the same thing.
Summary
So, no, Google did not add a secret AI kill switch to its search engine. Instead, AI Overviews are likely only available under certain conditions, and by using a search modifier, you circumvent those parameters. Still, it’s an easy way to game the system until we get an easier way to disable these overlays.
Disclaimer
Technology is always changing. Rarely is there static tech for smartphones and desktops. Thus, the contents of this post are only valid at the time of writing. Blog posts older than six months may have directions incompatible with your device or OS. Hopefully, older post content will continue to work as advertised. Thank you for reading TechSavvy.Life for Technology at Work For You.
Quote For the Day
“Real gs move in silence like lasagna.”
Lil Wayne
X (Twitter) Info
That was easy. Please feel free to share this post! One way to share is via Twitter.
Just click the Tweet icon below. This will launch Twitter where you click its icon to post the Tweet.
Checkout TechSavvy.Life for blog posts on smartphones, PCs, and Macs! You may email us at contact@techsavvy.life for comments or questions.
Was this post helpful? We would love to hear your comments. Do you have a computer or smart device tech question? I will do my best to answer your inquiry. Just send an email to contact@techsavvy.life. Please mention the device, app, and version you are using. To help us, you can send screenshots of the data related to your question.
The author’s Vietnam eBook on the “Battle for Tra Bong Vietnam: Events and Aftermath” can be accessed from a Kindle device or the Kindle App for a desktop or smartphone. The apps are free.
The author’s Vietnam eBook on the Battle for Tra Bong Vietnam: Events and Aftermath
Social media feeds are controlled by algorithms that track user interactions to serve content. Although helpful, they can misinterpret preferences. To regain control, users can reset their watch history on YouTube, adjust settings on Facebook and Instagram, and modify interests on LinkedIn and Twitter, or even create new accounts for a fresh start.
RAYMOND OGLESBY @RaymondOglesby2 October 15, 2024 – 9 minutes read time
This is for devices using Social Media. Screenshots are from iPhone 14 Pro running iOS 17.6.1
Click here to learn how to update your iPhone to the latest iOS version.
Overview
Almost everything you see in your social media feeds today is governed by algorithms. Think of them as the digital rules and intelligence that social media companies use to deliver a steady stream of interesting content to your eyes. They are invisible conductors that note everything you like, click, or comment on and use that information to serve up more content you likely engage with.
Algorithms are far from perfect, though. Sometimes, they pick up on the wrong signals and stuff your feed with things you do not care about. If you find yourself increasingly uninterested in the posts you see in your feed, it’s often possible to reset those algorithms. Doing it correctly can completely change what your social networks show when you log in.
Let’s explore how to take back control of your social media.
YouTube
YouTube feeds you content based on what you watch, search for, and subscribe to. As YouTube says on some pages (accessible below), “Keeping your history makes YouTube more personal.” But familiarity can breed contempt.
First, reset your Watch History. On the mobile app:
Tap your name > Cog icon> Settings > Manage All History
Refer to the below image:
Manage YouTube history
From here, you have a few options. You likely have Auto-Delete (Off) set up; click that, and you can tell YouTube to delete the tracked history of anything older than 36, 18, or 3 months. The shorter the time frame, the bigger the reset to your suggestions will be.
Alternatively, click where it says DELETE with a down arrow to access a menu to delete what you have seen today, in a custom range of time, or everything for all time. That final one is the nuclear option. Your suggestions will be totally fresh.
While here, click the Saving Your YouTube History link to change what YouTube saves. You may not want it to save searches because you may look for some wacky stuff. Or set it to turn off any YouTube history saving whatsoever. Scroll down the page to YouTube Customize Your Feed Feedback and click Delete to get rid of videos you specifically picked for your home feed in the past.
(On the desktop, click your avatar at the upper right and select Your Data in YouTube. Scroll down to YouTube Watch History and toggle the On button to Off so your history storage is paused. Click Manage your YouTube Watch History to access the menus as mentioned above, like Auto-Delete).
Clicking “NotInterested” under select videos can also impact the algorithm.
For a genuinely full reset, unsubscribe to every YouTube channel you follow.
On mobile, click Subscriptions at the bottom, then click All at the top, and you will see the full list. Click the bell icon to the right of each for a menu that includes Unsubscribe. (On Desktop, use Subscriptions> Manage to get to the list with the menus.)
Facebook
Facebook’s main display is called the Feed. It features updates, photos, videos, and more from people, Pages, and groups you follow. posts based on what it believes you will like.
Thankfully, there are plenty of ways to adjust the FacebookFeed. Click your avatar profile pic at the upper right on the desktop and go to
Settings and Privacy > Feed
You will see options here to manage your favorites (people/groups you want to see the most), unfollows (people you do not want to dump, but do not want to see as much of), snoozes (people you want to temporarily unfollow), and reconnect (it lets you turn off unfollows). See the below image:
Manage Facebook feed
You can also opt to avoid looking at Facebook’s main page. Go right to Feeds (via the left-hand navigation), and then you can view only the Favorites, Friends, Groups, or Pages you want to see.
As you use Facebook daily, be sure to perform hides, snoozes, and unfollows on posts as you encounter them to “train” the algorithm and steer it toward the kinds of content you actually want to see.
You also can and should go into Facebook Ad Preferences and change things so you can impact the advertising in your Feed. You can also do this with ads as they pop up. Click the X to hide an ad immediately, or use the three-dot menu to hide or report it. You can also limit advertising topics you see by going to:
Settings & Privacy > Settings > Account Center > Ad Preferences > Customize ads
then click “See All” next to Ad Topics.
You can use Page Moderation to block certain words or phrases so they do not appear, at least in the comments. Go to:
Settings > Followers and Public Content > Hide comments containing specific words
You choose the list of words to block.
Since everything you see on Facebook is tied entirely to who you friend and follow, a complete reset would require you to unfriend everyone. Starting a new profile is more manageable. This is also pretty easy; click your profile pic to see a button that says See all profiles. In the following menu, it shows + Create new profile or Page. A personal profile is just for individuals, but you can make a new one to get a fresh, clean feed. A page is more for a business or organization, that multiple people can control. No matter what you create, you can easily switch back and forth between the profiles/pages. See the following image:
Create Facebook profile
Instagram
Instagram is part of Meta, just like Facebook, so many of the same rules we listed above apply. For example, the Ad Preferences/Ad Topics are similar. Access them by clicking:
Menu > Settings > Account Center > Ad Preferences.
Again, there’s no direct way to reset the algorithm, but you can manipulate things by clicking the three-dot menu on posts to set the person as an unfollow or to add to favorites. Click into the account of someone you see, and on the following menu, you can add a person as Close Friend, Favorite, Mute (Posts and/or Stories), Restrict (which limits interaction without a complete block), or Unfollow.
Under Settings, you will find Muted accounts, Blocked accounts, Close Friends, and other lists you can change as desired.
The best reset is to open a new account. You can do that by logging out of Instagram and creating a new user profile. After that, log in to either account, go to:
Settings > Account Center > Accounts > Add Account
and log into the second one. You can link the two accounts (or even a Facebook account) and switch between them. Remember, if you follow all the same people on the new account, it will look like the previous one.
X (Twitter)
Twitter gives you so little control over your feed that if you want to reset the type of content that the platform serves you, your best bet is to start a totally new account. If that’s a bit too drastic for you, try to adjust your existing feed by going to
Settings & Privacy > Privacy and Safety > Content You See
This will let you uncheck topics and interests the service believes you are into. Sadly, you can not uncheck them all at once. Also, under Privacy and Safety, scroll down to Ads Preferences, and uncheck all that.
When using the service, click the 3-dot ellipsis menu on any ads you do not like to block them. Same with anyone you follow that you have lost interest in. If you want to really get rid of everyone you follow to start fresh, go to Following and click the Following button (it will turn to a red Unfollow) next to every name to unfollow; this will take a while if there are a lot of them. If you do not want to do it manually, there’s a Chrome extension called X (Twitter) Mass Unfollow.
LinkedIn
Microsoft’s social network for businesspeople (or those looking for work) does a pretty good job of just showing you the people you follow, but likes to sneak in a few ads based on what it thinks you like. Under your profile, pick:
Settings & Privacy > Advertising Data > Interests and traits
uncheck anything you are not into. Or turn them all off, but of course, then your ads are less relevant. In fact, go through all the “Data collected on LinkedIn” and “Third-party data” entries. If you turn them all off, you will get a totally new feed, albeit probably irrelevant.
Source: Social Media platforms
Disclaimer
Technology is always changing. Rarely is there static tech for smartphones and desktops. Thus, the contents of this post are only valid at the time of writing. Blog posts older than six months may have directions incompatible with your device or OS. Hopefully, older post content will continue to work as advertised. Thank you for reading TechSavvy.Life for Technology at Work For You.
Quote For the Day
“Proverbs are all very fine when there’s nothing to worry you, but when you’re in real trouble, they’re not a bit of help.”
LM Montgomery
X (Twitter) Info
That’s it. Please feel free to share this post! One way to share is via Twitter.
Just click the Tweet icon below. This will launch Twitter where you click its icon to post the Tweet.
Checkout TechSavvy.Life for blog posts on smartphones, PCs, and Macs! You may email us at contact@techsavvy.life for comments or questions.
Was this post helpful? We would love to hear your comments. Do you have a computer or smart device tech question? I will do my best to answer your inquiry. Just send an email to contact@techsavvy.life. Please mention the device, app, and version you are using. To help us, you can send screenshots of the data related to your question.
The author’s Vietnam eBook on the “Battle for Tra Bong Vietnam: Events and Aftermath” can be accessed from a Kindle device or the Kindle App for a desktop or smartphone. The apps are free.
The author’s Vietnam eBook on the Battle for Tra Bong Vietnam: Events and Aftermath