Have you ever wanted to share your iPhone contacts with your Windows 10 PC? I have wanted to do this for a year. It used to work but my PC went “south” last year. I finally did some research and came up with this post for you to implement. You can share your smart device contacts through Apple’s iCloud service. To use this service, your contacts must be synced with iCloud. So, lets get started.
This is for iPhone or iPad and Windows 10 operating system
Open the Settings app on your iPhone. Its usually located on your home screen. Your screen should look similar to the following image:
My iPhone home screen
Tap your name at the top of the screen. See following screenshot:
My iPhone Settings screen
Syncing Contacts
Tap iCloud
Verify that your Contacts is being synced. Either the toggle switch will be green or you will see iCloud storage being used like the below image. If not, tap the toggle button to enable the process and sync your contacts.
My iPhone iCloud Storage screen
On your Windows 10 PC, log in to iCloud website with your Apple ID and Password
Click on the Contacts applet. See following screenshot:
iCloud applets on Windows 10 PC screen
Selecting/Exporting Contacts
Select a Contact from your list. See the following image for my selection of Chris Dow:
iCloud Contacts screen
Click the small gear icon at the bottom left corner
Select Export vCard. Refer to following screenshot:
Selecting and Exporting an iCloud Contact screen
You can select more than one contact by selecting a single name and using the “Shift” key to select the last contact. There is an option to Create Group at the bottom right for your multiple contact selection.
Note! It is best to export just one contact. Although you can select multiple contacts, only one contact data (the first one selected) is exported, especially for Outlook.
By default, the exported VCF file is placed in your PC Downloads folder.
Open your File Explore and find the VCF file. Refer to following image:
File Explorer Downloads folder screen with Chris Dow VCF file
Using Your VCF File
Right click on the VCF file and select Open
Select where you want to install your contact(s). You have several choices, like Outlook, the People app and Windows Contacts
Select your choice and click OK
Your choice will open for your review.
For Outlook, click the Save & Close option to complete the export. See following screen::
Exported VCF file from iCloud to Microsoft Outlook in Windows 10 screen
That’s it. You are done.
Enable iCloud Contacts Sharing
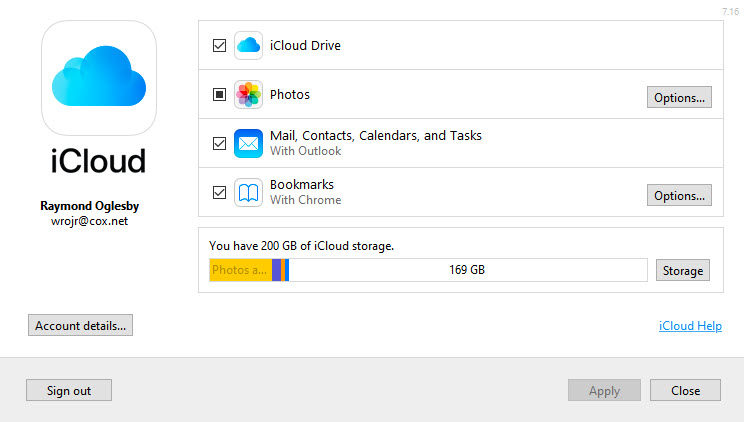
BUT WAIT, I want to share all my Contacts via iCloud to my Windows 10 PC, not just a few. You can use iCloud for Windows to synchronize your contacts and other data between your iOS device and Outlook. Lets get started.
This works with the following variations of Outlook:
Outlook for Office 365, Outlook 2019, Outlook 2016, Outlook 2013 and Outlook 2010
Please feel free to leave a comment. I would love hearing from you. Do you have a computer tech question? I will do my best to answer your inquiry. Please mention the app and version that you are using. To help me out, you can send screenshots of your data related to your question.
Drop down lists are used to select specific data, in our example, a list of Salutations. If the user tries to enter a Salutation that is not in the list, Excel rejects the entry.
I am using a simple drop down list in an Excel sheet. This feature is not well known nor initiative.
Salutations was a BIG DEAL for a religious organization that I worked for as a Consultant. The company had a donor base of 25,000+ names/addresses. (Of course, I was using a database, not Excel, to manage the data.) If the Salutation was incorrect on a donor letter, some donors refused to give monies for the company projects. For example, do you address them as Mr. and Mrs. or Dr. and Mrs. or Mr. and Dr.? Some donors wanted no Salutation. I spent a lot time getting the Salutations correct.
This is for Excel for Office 365 Windows and Mac versions. Other versions of Excel will be similar.
Setting Up the Excel Sheet
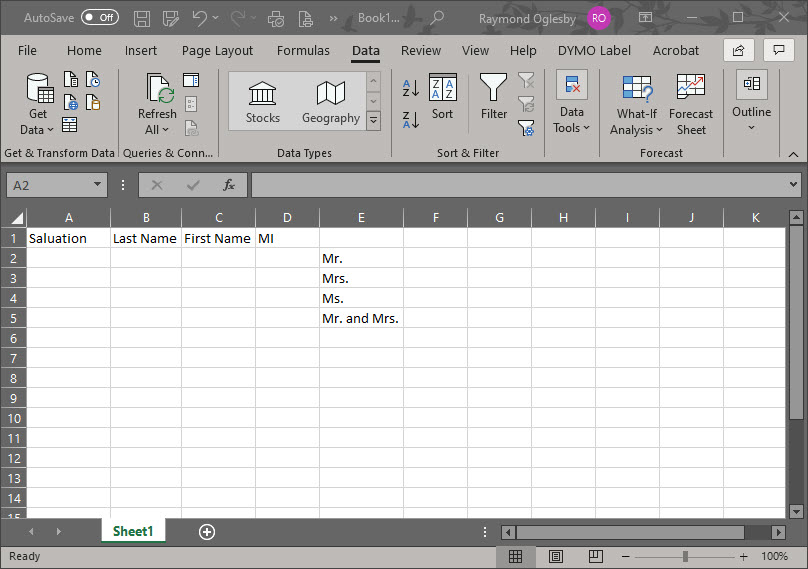
Enter the headings in Row 1 (Optional)
Create a list of cells E2:E5. Alternatively, you could put the list in another sheet.
Select the empty cell A2. (You can position the drop down list in most any cell or even multiple cells.)
Setting up Excel for a drop down list
Using Data Validation
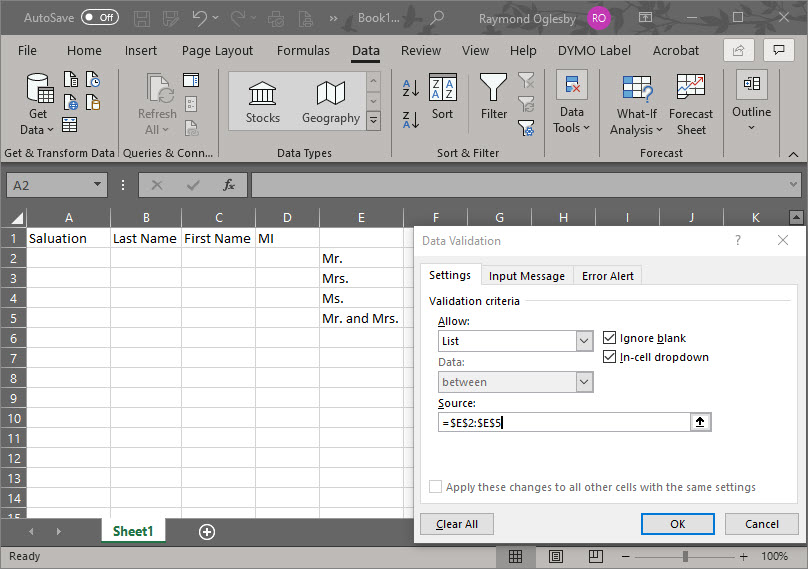
Select the Data tab
Select Data Validation
Choose List from the Allow options drop down list
Click the Source control and drag to highlight cells E2:E5. Alternatively, you could enter the cell reference $E$2:$E$5 or use a sheet and cell reference if your list is in another sheet.
Ensure that the In Cell dropdown option is checked. If you leave this unchecked, Excel forces users to enter only the list values, but it won’t present a drop down list. The users would have to guess the values; not a good idea!
See the following screenshot:
Entering the Allow and Source option
Click OK
You can add the drop down list to multiple cells. Select the range of data input cells instead of a single cell. Also, you can select noncontinuous cells by holding down the Shift key while you click the appropriate cells.
You can copy and paste this drop down cell to any other cells in your sheet.
Below is a screenshot where Mr. was selected as a Salutation for cell A2:
Excel drop down list selection
I Would Like to Hear from You
Please feel free to leave a comment. I would love hearing from you. Do you have a computer tech question? I will do my best to answer your inquiry. Please mention the app and version that you are using. To help me out, you can send screenshots of your data related to your question.
Google Chrome is adding a new feature for controlling media within your Chrome browse on a desktop or laptop. Instead of trying to figure out where the video/sound is coming from, you can hear and/or see it in your Chrome browser. The update is rolling out gradually and is for Chrome version 79+. Instead of waiting for the update you can always go to the flags menu (see below) and manually trigger the new media playback controls.
This is for any device that uses Google Chrome.
Check Chrome Version
First, let’s check what version of Chrome you have; just follow these steps:
Click on the Menu icon in the upper right corner of the screen, the one with 3 dots
Click on Help
Click on About Google Chrome
Your Chrome browser version number is displayed like the example below:
Chrome version screen
Close Chrome
Update Chrome
If you have a lower a version than 79, let’s try to update by doing the following:
Open Chrome
Click on Menu icon in the upper right corner of the screen, the one with the 3 dots
Click UpdateGoogle Chrome. Note! If you don’t see this button, you’re on the latest version.
Close Chrome
Setup Media Control
Open Chrome
Type in chrome://flags as the URL like the screenshot below:
Chrome URL for flags
Type in Global Media Controls as your Search, like the example below:
Click on the Default drop down box and select Enabled
Click the Relaunch button in the lower right of the screen
Type in chrome://flags as the URL
Type in Global Media Controls as your Search
Your screen should show the Global Media Controls Enabled like the screen below:
Close Chrome
After a browser restart, a Play button should show up whenever you have media playing.
If you don’t see the option, head to YouTube and play a video. A Play button should show up next to the address bar. Clicking on it will display the media content like title, source of the content, the play/pause and skip buttons. This feature works for lots of websites to include Spotify, Netflix, Amazon Prime, Dailymotion and Microsoft.
I Would Like to Hear from You
Please feel free to leave a comment. I would love hearing from you. Do you have a computer tech question? I will do my best to answer your inquiry. Please mention the app and version that you are using. To help me out, you can send screenshots of your data related to your question.
Are you unable to share a Messenger video on your iPhone to social media, like Facebook? This share feature is not available on the smartphone. But it is possible on your desktop or laptop.
This is for any device using Messenger and Facebook
Messenger on iPhone
On your iPhone, open Messenger and find the video you want to share like the example below:
Messenger video
You can click the Up Arrow rectangle box to send the video to certain friends and/or Create a Group. But we want to share the video to Facebook. Following are the steps:
Messenger on Desktop/Laptop
Open Messenger or Facebook on your desktop/laptop then select Messenger
Move your mouse next to the Up Arrow rectangle box
A Reply and More actions will magically appear
Click on More
Click on Save to Facebook
Your screen will look like the below image:
Saving Messenger video to Facebook
Facebook
Open Facebook on your Desktop/Laptop
Go to Home menu option on Facebook
On the left hand side menu, expand Explore (if necessary) and locate Saved
Click on Saved and you will see the video as shown below:
Saved video on Facebook
Click on the Share button to share on Facebook
Sometimes the author has blocked a video from being shared. If so, the Share button will not be displayed.
Please feel free to leave a comment. I would love hearing from you. Do you have a computer tech question? I will do my best to answer your inquiry. Please mention the app and version that you are using. To help me out, you can send screenshots of your data related to your question.
Just how big can a Microsoft Word document be? The short answer, it depends. The amount of text, photos, images and videos content determines the document size. Also, your computer system resources plays a part.
The maximum file size of an “all text” document in Microsoft Word 2007 or later is 32 MB. If you add photos, images or videos, the maximum file size jumps to 512 MB or a half of a gigabyte. Although Word can handle a very large file, it becomes more unmanageable as you approach the 512 MB limit.
Older file formats use the “.doc” file extension while the newer versions, Word 2007 and above, use the “.docx” extension.
This is for Word for Office 365 Windows and Mac versions. Other versions of Word will be similar.
If you are working with the old format, “.doc” extension, you can covert the file to the newer format as follows:
Open Microsoft Word
Locate the file with a “.doc” extension
Click on File>Save As
From the drop down box, select Word Document (*.docx)
Click Save
Check Your Word Document File Size
There are several ways to check the size of your document. One way is as follows:
Open File Explorer
Locate the folder where the document resides
Click on View>Details
You will see the Size column denoting the file size
A second way is very similar.
Open File Explorer
Locate the file
Right click on the file name
Click on Properties
OR
Open File Explorer
Locate the file
Click Home on the main menu
Click Properties
Click Properties from the sub menu
A third way is from the Word document itself as follows:
Either using Word to locate and open the document or using File Explorer to locate the file; then double click to open
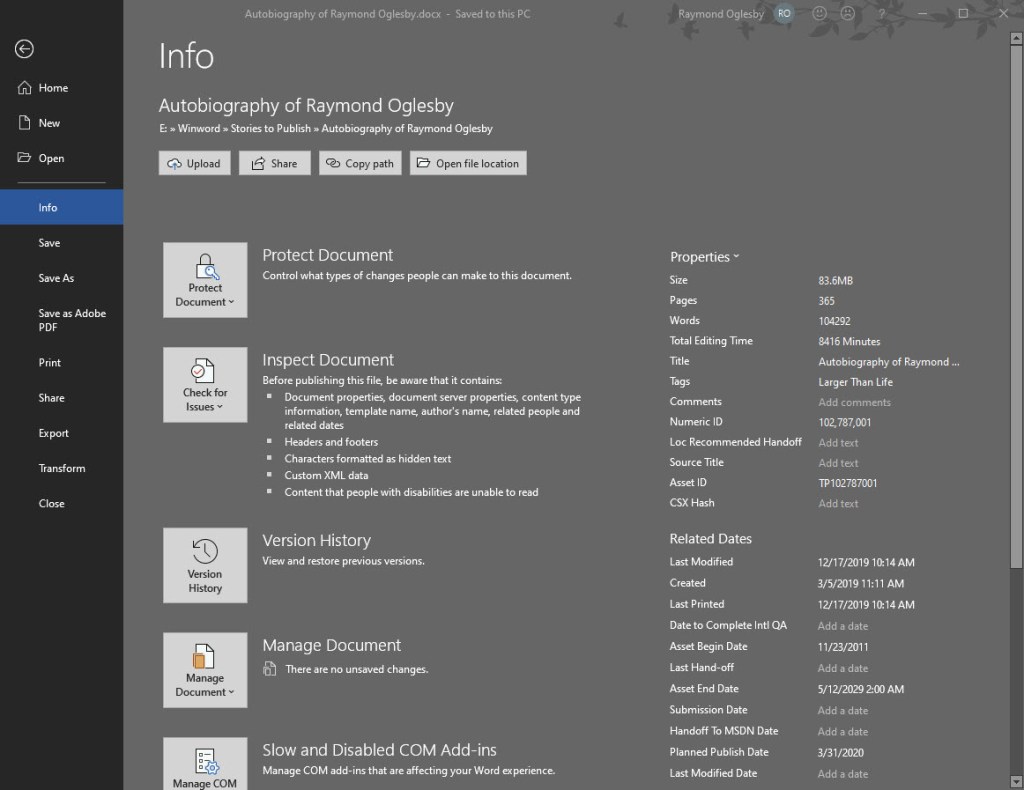
From the main menu, click on File>Info
Under Properties is the Size of the document
Your screen should look like the below image:
File Info screenshot
File Info Properties
Document properties, also known as metadata, are details about a file that describe or identify it. They include details such as title, author name, subject and keywords that identify the document’s topic or contents. You can use these keywords for searching Word documents. For example, in Word, you can use the Keywords property (also called Tags) to add the keyword “customers” to your sales documents. You can then search for all sales documents with that keyword.
Some entries can be changed. At the bottom of the File Info screen is the Show All Properties. Click on this to see more detail about your document. The grayed out options are the ones you can update.
Other properties are automatically updated. You can also search for these entries. For example, you can search for all files created after January 1, 2020, or for all files that were last changed yesterday.
A Personal Observation
I have an autobiography Word document that is 356 pages with 375 photos and images. The file size is only 83.6 MB (see above image). You should be able to manage a Word document with 1400 pages and 1400 images/photos and still not reach the 500 MB limit. Currently, I have no videos in the document. If I did, that would drastically increase the file size.
How to Reduce the Size of your Word Document
One way would be to split the document into two Word files. Of course, this would result in two Table of Contents, Bibliographies, etc. This may not be the right choice.
Another way is to compress the size of your images/photos. First, you should covert a “.doc” file extension document into the new “.docx” format as mentioned in this post.
To compress your images/photos, do the following:
Make a backup copy of your original Word document. Although you are using the Save As option to Save the file with a new file name, I prefer working with a backup copy.
Open your backup Word document
Click on File>Save As>More Options at the top of the screen
A screenshot is below:
More Options screenshot
In the Save As dialog box, click Tools>Compress Pictures at the bottom of the screen
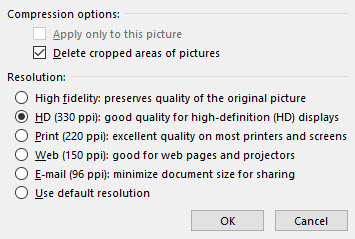
In the latest version of Word, you are presented with four Options as shown below:
Photos compression options
For the smallest possible size:
Click “Email (96 ppi) …“
Click OK
Click Save
This option will result in the poorest image quality. All your images/photos will be automatically compressed. Choosing any other option will result in a larger Word document.
Take a look at the results of your compressed document. Do you like the results? If not, then repeat the above steps with another backup copy of your document.
Once you are satisfied, then rename the compressed document back to the original file (overwrite the original file) or rename to a different file name.
I Would Like to Hear from You
Please feel free to leave a comment. I would love hearing from you. Do you have a computer tech question? I will do my best to answer your inquiry. Please mention the app and version that you are using. To help me out, you can send screenshots of your data related to your question.
Did you recently obtain a new iPhone? Are you concerned about losing the device? Apple owners can find the device with the Find My app for iOS 13 and above or Find My iPhone for older iOS. We are going to use iCloud to tract down your device.
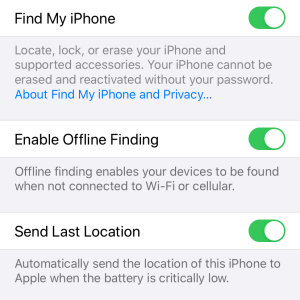
Before your iPhone goes missing, there are a few options to turn on. For iOS 13+, do the following:
Tap on Settings
Tap on <Your Name>
Tap on Find My
Tap on Find My iPhone
Enable all three slider controls by tap and hold, then slide until the option is lit (highlighted in green)
For older iOS, tap on Settings, <Your Name>, iCloud, Find My iPhone and enable all three slider controls
Your screen should look like the image below:
Find My iPhone Screenshot
First, using another device, try calling your number. If that doesn’t work, lets try using your browser to locate your device.
Once again, the following is for iOS 13+. The steps are similar for older iOS.
If you don’t have an iCloud account, you can download iCloud for Windows
Signin using your Apple ID and password
Your screen should look like the below image:
Signin to iCloud
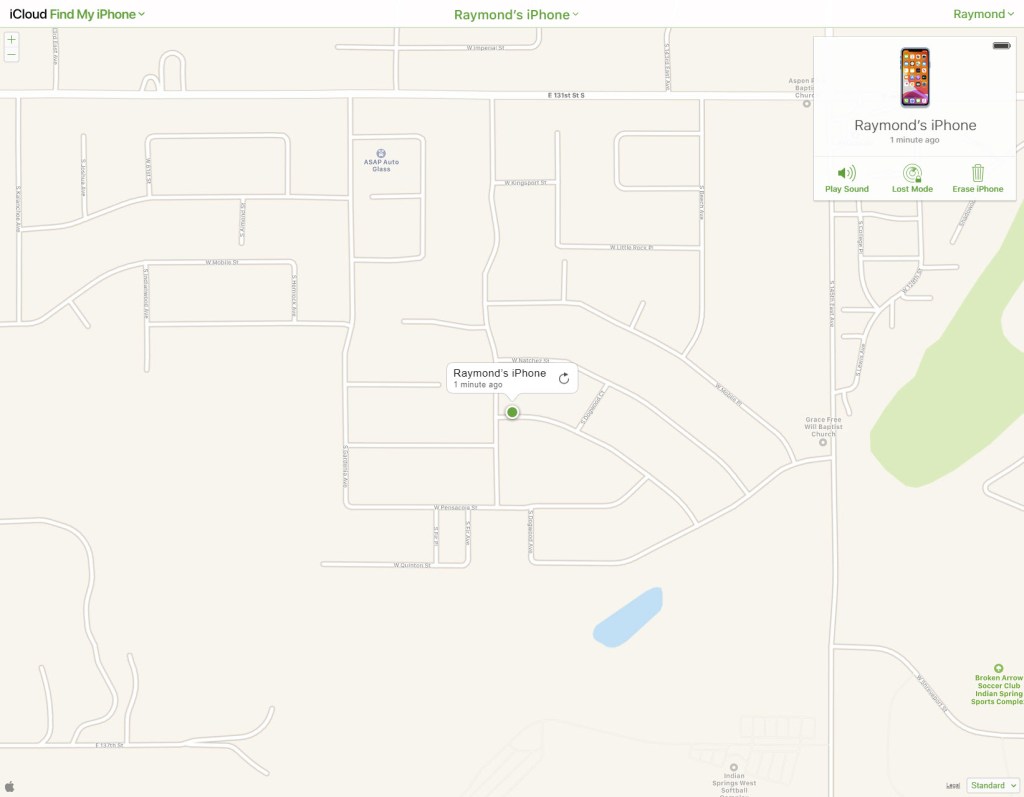
Click the Find iPhone icon
Select the All Devices drop down box at the top of the screen and find your iPhone
Select your iPhone on the map, its a green dot
Your results should look like the below image:
Screenshot of my iPhone location
You now have three options:
Play Sound on your iPhone
Place the iPhone in Lost Mode which locks the iPhone so no one can access it. If someone finds its, the device will display your contact information.
Erase iPhone. Please do not do this unless all hope is gone of recovering the device. Once the iPhone is erased, all personal information is gone. Your device can no longer be tracked through the app.
Locate Other Lost Devices
You may want to find any lost device like Airpods, headphones, Fitbit tracker, Apple Pencil, iPad, Apple Watch and others. As of this post, Wunderfind is a free iPhone app from the Apple Store. It is worth a look. Click here for a preview.
I Would Like to Hear from You
Please feel free to leave a comment. I would love hearing from you. Do you have a computer tech question? I will do my best to answer your inquiry. Please mention the app and version that you are using. To help me out, you can send screenshots of your data related to your question.
Along with using the program Belarc Adivsor for a software inventory of your PC; there are two programs I recommend for a hardware inventory.
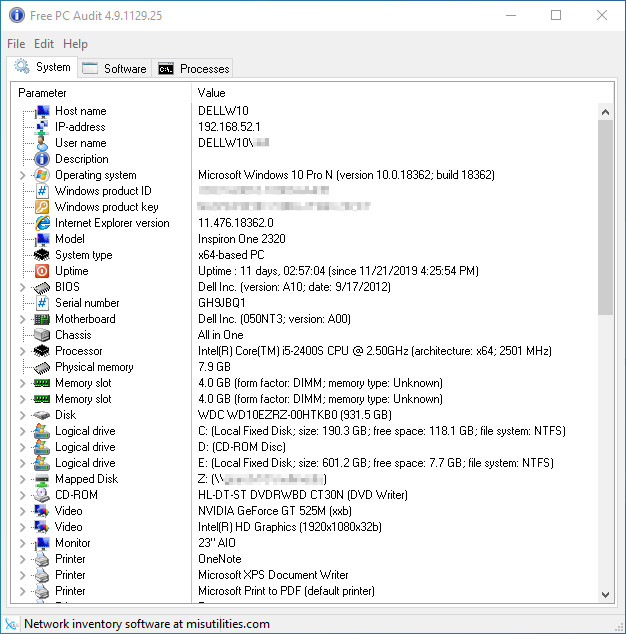
One is the freeware program called PC Audit; a system, hardware and software information tool. It extracts details of all components of the PC, shows installed software with version and product key. The free PC Auditdoes not require installation and can be used as a portable application. It can be run from a removable storage device such as a CD-ROM drive, USB flash drive or flash card.
This professional tool is designed to collect and present the maximum amount of information possible about your computer’s hardware and software which makes them suitable for users searching for driver updates, computer manufacturers, system integrators and technical experts as well.
The program is compatible with: from Windows NT up to Windows 10 and the Mac
Just click here to download PC Audit. Then click the Free Download button. You can either save the executable file to your download folder or just click the executable file (located in the lower left hand corner of your browser) to run. The program will present your machine’s hardware as shown below:
PC Audit Snapshot
In my limited research, I only found a trial network version for a hardware inventory of a Mac. You can check it out here.
The other program is also a free program called Speccy. (Their is a Pro version available for a price.) Speccy is the place to start if you need to know what’s inside your PC. See a quick summary, or dive deeper into every aspect of your PCs hardware so you can make informed upgrade and purchasing decisions.
Speccy gives you detailed information on every piece of hardware in your computer. Save time trawling through your computer for stats like CPU, motherboard, RAM, graphics cards and more. See everything laid out for you in one clean interface.
Speccy allows you to save your scan results directly as a snapshot, XML or text file for easy sharing. Handy for making sure your new computer has the right specs, or if tech support need to diagnose an issue with your computer.
My favorite of these two programs is Speccy. The program is from the same company that makes CCleaner discussed in an earlier post.
System requirements:
Windows 10, 8.1, 7, Vista and XP. Including both 32-bit and 64-bit versions, but not RT tablet editions.
Installation
Click here to download Speccy; then click on the Download Free Version button. The screen will scroll to the bottom. Just click on the Free Download button. Finally, click on the Download button for the free version. They go through all these hoops in an attempt to get you to buy the Pro version.
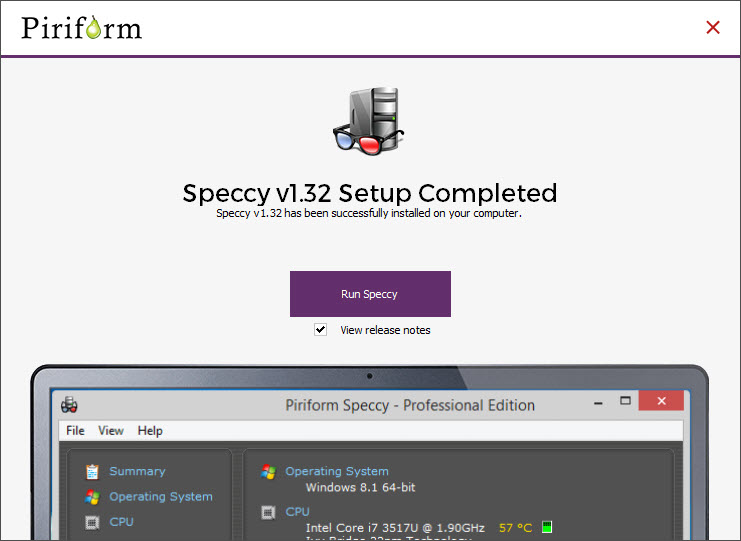
To install, click on the executable file in the lower left hand of your browser and follow the install instructions. A shortcut will be installed on your desktop. Once installed, click on Run Speccy button as shown below:
Speccy Run screen
Viewing Speccy Results
Below is an actual screenshot of my Dell XPS hardware:
Speccy snapshot of my PC
From the Main Menu, click on File for loading, saving, publishing, etc a snapshot of your results. You can save the results to a XML or text file.
Just click on the various menu options to expand that section. Check on the CPU option to see how “Hot” your PC is running or the RAM option to see what brand and type of memory modules are installed. You may want to upgrade or add more RAM. The items in blue and the little blue arrows are expandable; just click on them to see more or less detail.
I Would Like to Hear from You
Please feel free to leave a comment about using these programs. I would love hearing from you. Do you have a computer tech question? I will do my best to answer your inquiry. Please mention the app and version that you are using. To help me out, you can send screenshots of your data related to your question.
Many years ago I ran across this funny name program called Belarc Advisor. As an IT consultant, this program helped me a lot in ascertaining what hardware and software was installed on a machine.
The Belarc Advisor program is a free download licensed for personal use at home or work on a standalone machine. (Their is a network version for a price.) The Belarc Advisor builds a detailed profile of your installed software and hardware, local network inventory, missing Microsoft hotfixes, anti-virus status, security benchmarks and displays the results in a Web browser. Sorry, their is no free Mac version but you can find alternatives, just click here.
Belarc Advisor excels at providing those hard to find product keys or serial numbers for your installed programs.
Belarc products are used world wide in over 50 million computers. All of the profile information is kept private on your computer and is not sent to any web server. Some requirements are as follows:
Operating Systems: Runs on Windows 10, 2016, 8.1, 2012 R2, 8, 2012, 7, 2008 R2, Vista, 2008, 2003 SP2, XP SP3. Both 32-bit and 64-bit Windows are supported. Their commercial products also run on all other versions of Windows and on the Macintosh OS X, Linux, and Solaris operating systems.
Browsers: Runs on Internet Explorer, Google Chrome, Microsoft Edge, Firefox, Safari, Opera, and many others.
Either save the installer executable file to your download folder and run from there or click the file located in the lower left hand corner to install.
You may get a popup dialog box about Windows is protecting your PC. If so, click on the More Info link then click Run anyway.
Follow the install instructions.
Click Yes to check for new Advisor definitions. When finished, click OK.
Advisor will now build a profile of your machine and check your local network.
A profile will be presented in your browser as noted in below screenshot:
Partial snapshot of my Dell XPS machine using Belarc Advisor
Your Machine Profile Results
In the upper left hand corner is a menu for the sections of the profile. Just click on one or scroll.
Under the section Software Versions and Usage, you can click on the “i” for details.
Your product keys are in the Software Licenses section. These are the ones the program was able to find.
Pay attention to the Virus Protection, Missing Security Updates and Installed Microsoft Hotfixes sections to see if your machine is up-to-date.
Since the profile is presented in your browser, you can right click anywhere and select Print to print the results.
You may be surprised at all the hardware and software installed on your machine.
My next post will deal with a detailed hardware inventory. Belarc Advisor is mainly for a listing of your installed software.
I Would Like to Hear from You
Please feel free to leave a comment about using Belarc Advisor. I would love hearing from you. Do you have a computer tech question? I will do my best to answer your inquiry. Please mention the app and version that you are using. To help me out, you can send screenshots of your data related to your question.
This utility, which has the most comprehensive knowledge of auto-starting locations, shows you what programs are configured to run during system bootup or login, and when you start various built-in Windows applications like Internet Explorer, Explorer and media players. These programs and drivers include ones in your startup folder, Run, RunOnce, and other Registry keys. Autoruns reports Explorer shell extensions, toolbars, browser helper objects, Winlogon notifications, auto-start services, and much more. Autoruns goes way beyond other autostart utilities.
By default Autoruns starts by the Hide Signed Microsoft Entries option which helps you to zoom in on third-party auto-starting programs. Also, by default, the option to Hide Empty Locations is turned on. I recommend keeping these options.
You’ll probably be surprised at how many programs are launched automatically!
Running Autoruns:
Close all running programs
Empty your Recycle Bin
Click the following for Autoruns for Windows. We are going to just run the program instead of installing. If you want to install, click the download link at the top of the page and follow its instructions..
Click the Run Now from Sysinternals Live. Its located at the top underneath the download link. The autoruns.exe file should appear at the bottom of your screen.
Click on the file to run
The program has several options in the main menu to include File, Entry, Options and Help that you can explore. For our purposes, you want to know what entries cannot be found. To do this:
Click on each tab, like Logon, and look for any entry highlighted in yellow as shown in the image at the top of this post. At the end of the entry, the program will say “File Not Found”. Uncheck the box at the beginning of the entry. This lets Autoruns bypass this entry, in our case, on Logon. The Logon tab is the most important as it depicts what programs are loaded when you start your PC. If you want to stop a program on startup, just uncheck the box for the entry.
Do this for every tab at the top of the screen as shown below:
My screenshot for Logon Tab
When you uncheck a yellow highlighted entry, you may get the following popup dialog box:
If so, click on Run as Administrator and the program will restart giving you Admin privileges. Now you are able to uncheck the “File Not Found” entry(s).
Do this for every tab at the top of the program
Close Autoruns and any other running programs and reboot your PC.
I Would Like to Hear from You
Please feel free to leave a comment. I would love hearing from you. Do you have a computer tech question? I will do my best to answer your inquiry. Please mention the app and version that you are using. To help me out, you can send screenshots of your data related to your question.
This is the second post in a series on “cleaning” your machine. The instructions are for a PC using the free program Defraggler. For a Mac, the best solution is also free: Back up your drive using Time Machine and do a clean install.
Before following this post, refer to the previous post on Delete Junk Files. There is no sense in defragging junk files.
This is for Windows based operating systems
Definitions:
Fragmentation occurs on a hard drive, a memory module, or other media (like SSD) when data is not written closely enough physically on the drive. Those fragmented, individual pieces of data are referred to generally as fragments.
Defragmentation, then, is the process of un-fragmenting or piecing together, those fragmented files so they sit closer, physically, on the drive or other media, potentially speeding up the drive’s ability to access the file.
Why Fragmentation:
Fragments, like you just read, are simply pieces of files that aren’t placed next to each other on the drive. That might be kind of strange to think about, and nothing you would ever notice, but it’s true.
For example, when you create a new Microsoft Word file, you see the whole file in one place, like on the Desktop or in your Documents folder. You can open it, edit it, remove it, rename it, whatever you want. From your perspective, this is all happening in one place, but in reality, at least physically on the drive, this is often not the case.
Instead, your hard drive is probably saving portions of the file in one area of the storage device while the rest of it exists somewhere else on the device, potentially far away… relatively speaking, of course. When you open the file, your hard drive quickly pulls together all the pieces of the file so it can be used by the rest of your computer system.
When a drive has to read pieces of data from multiple different areas on the drive, it can not access the whole of the data as fast as it could if it had all been written together in the same area of the drive.
Over time, as more and more fragmentation occurs, there can be a measurable, even noticeable, slowdown. You might experience it as general computer sluggishness but, assuming excessive fragmentation has occurred, much of that slowness may be due to the time it takes your hard drive to access file after file, each in any number of different physical places on the drive.
A dedicated defragging tool is what you need. Disk Defragmenter is one such defragger and is included for free in the Windows operating system. That said, there are many third-party options as well, the better of which do a considerably better job at the defragmentation process than Microsoft’s built-in tool.
At the top you see the Download Free Version button
Click on Download Free Version. The screen will scroll to the bottom.
Click on the Free Download button
Click on the Download button. I don’t know why they make this so difficult.
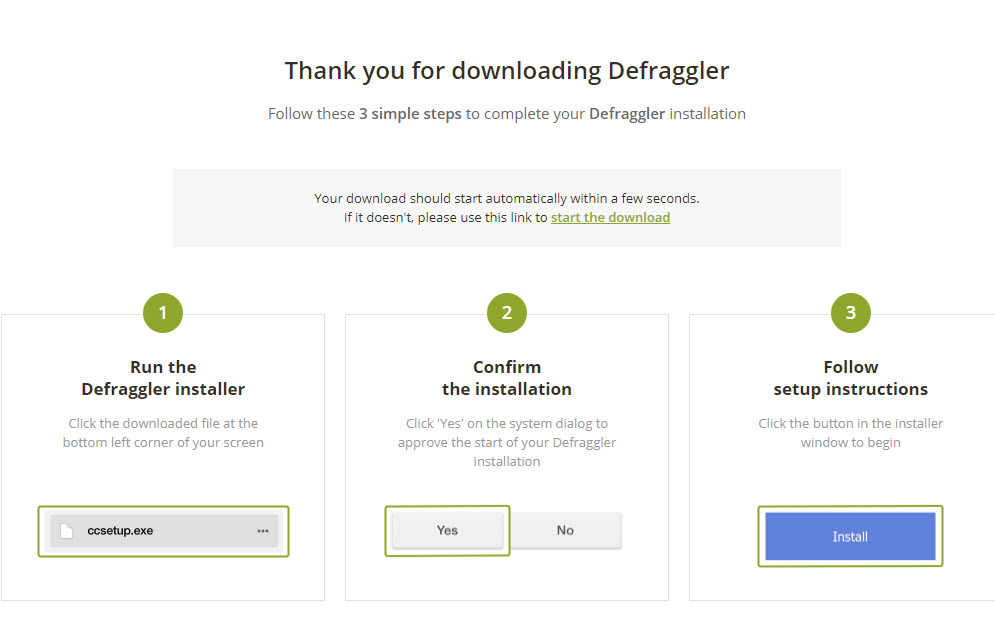
Follow the download instructions. Below is an image of what to expect:
Download of Defraggler
After downloading, click the Install button
After installation has finished, you are presented with two options: Reboot Now or I want to manually reboot later. For this demonstration, I am choosing the second option.
Click the Finish button
A shortcut will appear on your desktop
Run Defraggler Analyze
Now we are ready to run the Defraggler program
First, restart/reboot your machine
Click on the desktop Defraggler shortcut
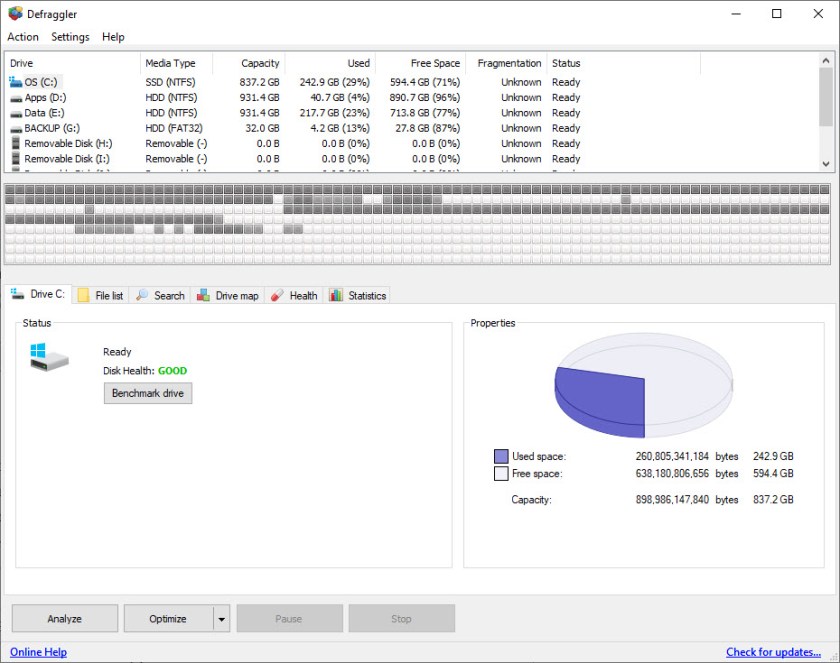
You are presented a screen like my image below
Analyze option
Next highlight a drive other than as SSD drive or flash drive and click the Analyze button. It is not recommended you defrag an SSD drive or a flash drive. These drives have no moving parts. Starting with Windows 7 these drives automatically have a TRIM operation to free up space. If I get a decent response to this post, I will explain how to check to see if TRIM is enabled in a future post.
If the Disk Health does not show GOOD in green you may have a problem. Your hard disk is either bad or is going bad. I recommend closing any open programs and shut down your machine. Kindly take the PC to your local Geek shop, like Geek Squad at Best Buy, and have them take a look at your hard drive. If it needs to be replaced, hopefully, they can copy your data from the old drive to the new one.
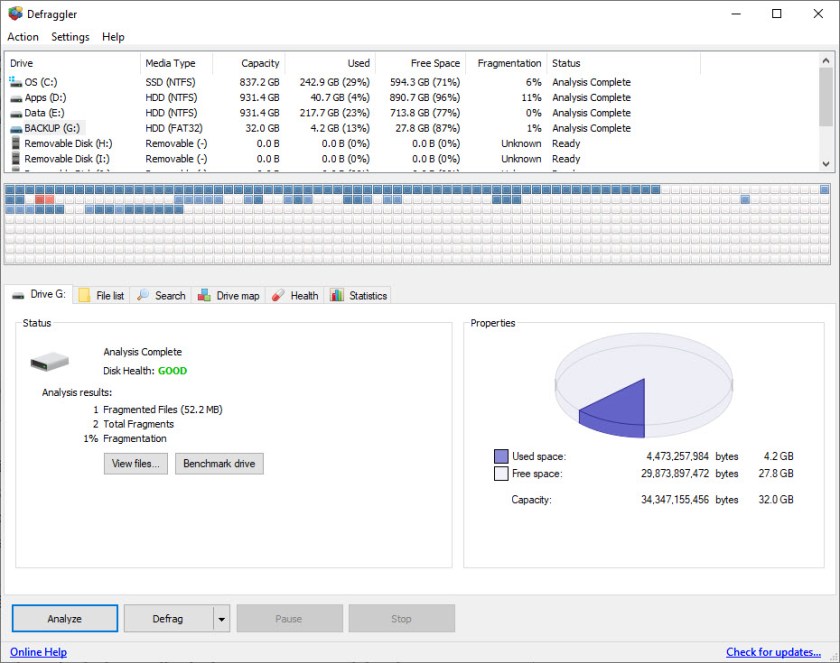
Following is my screenshot showing the Analyze results of my drives:
Analyze results
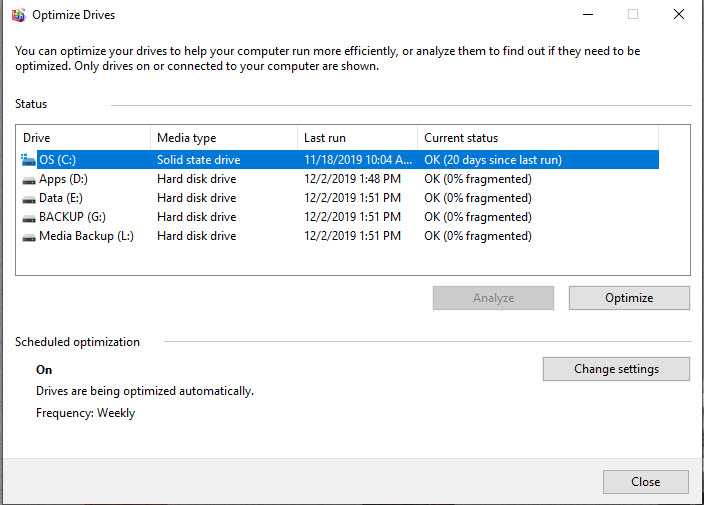
Now I want to show you what the Windows 10 Optimizer stated about the status of my hard drive.
Windows analyze results
There is a big difference on C and D drives. Windows Optimizer says 0%, Defraggler has much different results; C drive is 6% and D drive is 11% defragged. In my experience, Defraggler is the best software to defrag your hard drive(s) and/or partitions.
On my PC, I have one hard drive split into 3 partitions, C, D and E. C is an SSD drive that contains the Operating System. D drive contains all my programs. E drive stores my backup data. (G and L partitions are for my external backup drive.) By doing this, I can easily backup all my data because its only located in one place, the E drive. Windows wants to store your data all over the place. So, if you are buying a new machine, I recommend partitioning your hard drive into 3 partitions and point any program data to the E drive. Install all your programs on the D drive. Some programs give you no options on where to store the program or data; these programs default to drive C. Okay, enough of my soap box drama. Lets continue.
After Analysis is completed, if any drive shows greater than 10% fragmentation, I recommend you defrag the drive.
Run Defraggler Defrag
To run properly, Defraggler needs at least 10% free space on your hard drive. It will run, rather slowly, if there is less than 10% free space available.
Click on the drop down box of Defrag and choose Quick Defrag. This defrag process can take several hours. You can pause or stop the defrag and continue later. I recommend defragging just before you go to sleep; let the program run all night. Also, I recommend you turn off your screen saver before running.
After running, if the fragmentation still shows greater than 10%, then run the Defrag option from the drop down box.
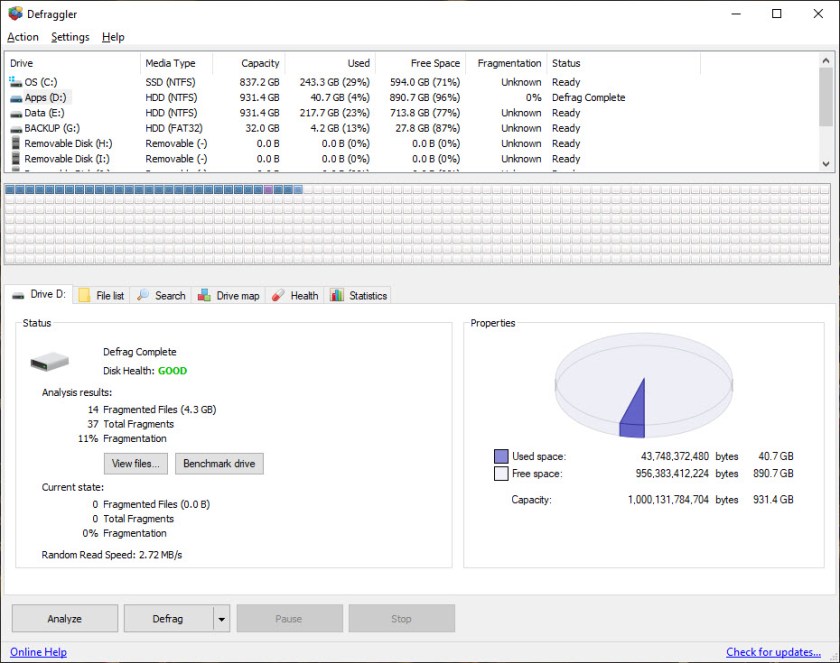
Below is the image after I defragged partition D:
Defraggler results
Notice that partition has no fragmented files. I recommend analyzing your hard drive every 4 months and defragging if necessary. The only sub option I use is the File List to see which files are fragmented.
Remember, your SSD or flash drives will not need to be analyzed/defragged by Defraggler.
Shut down Defraggler and any other running program and reboot your PC.
I Would Like to Hear from You
Please feel free to leave a comment. I would love hearing from you. Do you have a computer tech question? I will do my best to answer your inquiry. Please mention the app and version that you are using. To help me out, you can send screenshots of your data related to your question.