Whenever you log-in to Windows 10, your name appears above the password entry. What if you want to change your name? This post addresses this issue.
Whether you use a local account or a Microsoft Account, it’s relative easy to change your display name.
This is for Windows 10 devices
Copyright Scott Adams, Inc./Distributed by Universal Uclick for UFS
Changing Your Display Name for a Microsoft Account
To change you name for a Microsoft Account, you need to open your account preferences on the Microsoft website.
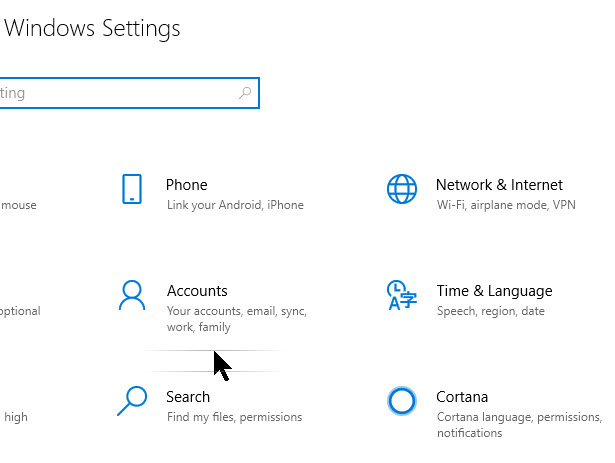
Opens the Settings app by pressing the Windows key+I or type in Settings in the Cortana search field, then click the Settings app at top of the screen. Then click on the Accounts option. Refer to below image:
Selecting your Accounts option
Below your name and photo, click on Manage my Microsoft account. See following image:
Selecting Manange my Microsoft account
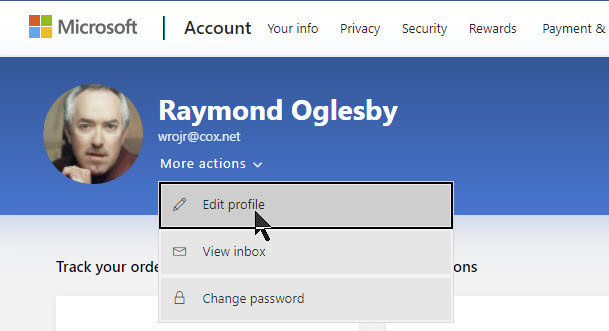
Signin to your Microsoft Account if not already signed. This will open your account preferences in your browser. After your browser opens, click the More Actions drop-down box, then click on Edit Profile from the options list. See below image:
Selecting Edit Profile
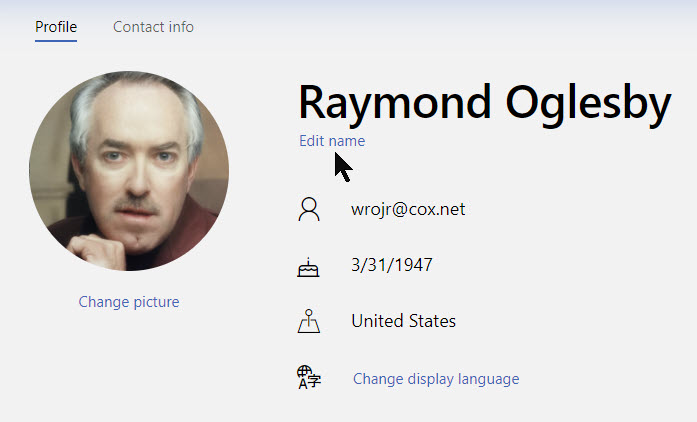
Below your name, click Edit Name. Refer to below image:
Selecting Edit your name
Enter your first and last name, solve the CAPTCHA challenge, then click Save to update your name. See following image:
Changing your firsr and/or last name and entering the CAPTCHA letters
When your Profile page reloads, it will update with the name change.
Note! When you change your Microsoft Account name, it changes on all devices that you use to log-in with this account.
For your new name to show on your Windows 10 log-in screen, you will have to log out of Windows 10. Be sure to save any unsaved work or applications before signing out.
Changing Your Display Name for a Local Account
A local account is a basic approach in using Windows 10. Local accounts don’t have the added features like syncing files, settings, browser history, etc. across multiple devices.
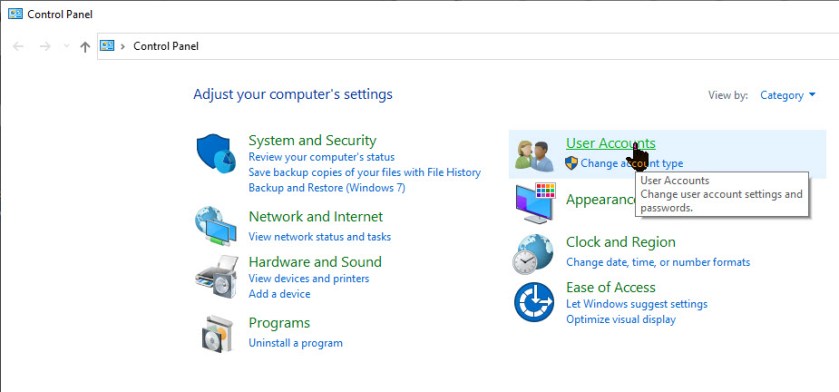
If you want to change your local account name, fire up the Control Panel. In the Cortana search box, type in Control Panel then click on the Control Panel app at the top of the screen.
Next click on the User Accounts option. Refer to below image:
Selecting User Accounts from the Control Panel
Now click on User Accounts one more time. See below image:
Selecting User Accounts again
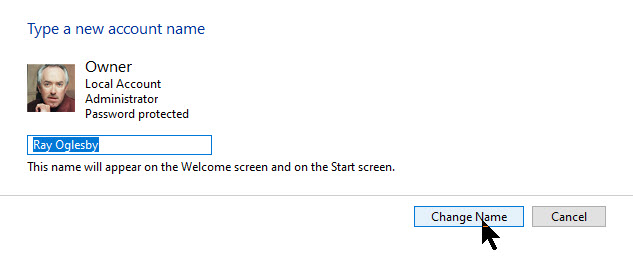
Now, select Change your account name option to change your log-in name. See following image:
Selection for changing your account name
Note:If an organization manages your device or you don’t have administrator privileges, you won’t be able to change your name.
Enter the new log-in name into the text field, then click the Change Name button to save your changes. Refer to below image:
Changing your log-in name
You are done and may now close the Control Panel window. For your new name to show on your Windows 10 log-in screen, you will have to log out of Windows 10. Be sure to save any unsaved work or applications before signing out.
I Would Like to Hear From You
Please feel free to leave a comment. I would love hearing from you. Do you have a computer or smart device tech question? I will do my best to answer your inquiry. Please mention the device, app and version that you are using. To help me out, you can send screenshots of your data related to your question.
The author’s Vietnam eBook on the Battle for Tra Bong: Events and Aftermath
Creating and using custom AutoText entries for frequently used phrases is a great way to speed up your content creation in Microsoft Word. By default, Word has very few entries so you may want to add your own. The good news is you can set up these time-savers in just a few clicks!
The software does come with lots of AutoText Document fields, like Author, Company Info, Status and other built-in entries such as Headers, Footers, Tables, Watermarks, etc., that you can choose for your document. You can use these entries in addition to your own AutoText entries for your documents.
Note! Your AutoText entries maintain its formatting when inserted into a document.
This is for PCs, Macs and other platforms that support Word
Copyright Scott Adams, Inc./Distributed by Universal Uclick for UFS
Creating an AutoText Entry
To begin, highlight the text in your Word document that you’d like to use to create your new AutoText entry. Refer to below image:
Selecting the text for your AutoText entry
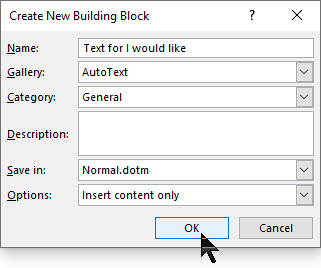
Press Alt+F3 to open the Create New Building Block window. Then, type in a name (within the 32-character limit) for your AutoText entry. Next, click OK. See following image:
Saving your AutoText entry
Your AutoText entry will be saved. Now that was easy.
Using an AutoText Entry
To use your AutoText entry, place your cursor where you want to insert the text in your Word document. Navigate to the Insert tab and click the Explore Quick Parts icon in the Text group. See below image:
Accessing your AutoText
A drop-down menu will be displayed. Hover your pointer over AutoText. Refer to below image:
Selecting the AutoText feature
A list of AutoText entries will appear. Select the one you want to use. See below image:
Inserting your custom AutoText entry
The entry you selected will be inserted into your document.
Deleting an AutoText Entry
If your AutoText list is getting crowded, or you made a mistake when you created a custom entry, you can delete them.
To do so, go back to the Insert tab and select the Text group. Then click the Explore Quick Parts icon, and then hover your pointer over AutoText.
From here, right-click the AutoText entry you want to delete. In the context pop-up menu that appears, click the option Organize and Delete. Refer to following image:
Accessing the Delete option
The Building Blocks Organizer window will be displayed with your AutoText entry highlighted. At the bottom of this dialog box, click on Delete. See below image:
The delete button at the end of the AutoText entries
A message box will appear asking you to confirm the deletion of your entry. To delete this entry, click Yes. Refer to below image:
Confirming your custom AutoText deletion
Now your entry will be deleted. You have successfully adding, inserted and deleted an AutoText entry. That’s it.
I Would Like to Hear from You
Please feel free to leave a comment. I would love hearing from you. Do you have a computer or smart device tech question? I will do my best to answer your inquiry. Please mention the device, app and version that you are using. To help us out, you can send screenshots of your data related to your question.
The author’s Vietnam eBook on the Battle for Tra Bong: Events and Aftermath
Your hard drive has been acting strange. It’s making clicking or screeching sounds, it’s unable to find files, crashes on boot, slow transfer speed or seems to be moving slowly. Your hard drive is dying.
Since it is a mechanical device it has moving parts unlike a Solid State Device (SSD) which has none. But even a SSD will eventually fail.
Even if your hard drive is healthy, over time, it will die. You should keep an eye on it’s health once in a while for your peace of mind. Let’s see how to do this.
This is for Windows 10 devices and Macs
Copyright Scott Adams, Inc./Distributed by Universal Uclick for UFS
To Tweet about this post, click the Tweet icon below to launch Twitter, then click its Tweet icon to post.
Check out TechSavvy.Life for their blog posts on smartphone apps, PCs. and Macs!
Most modern drives have a feature called S.M.A.R. T. (Self-Monitoring, Analysis and Reporting Technology) that monitors different drive attributes in an attempt to detect a failing disk. That way, your computer will automatically notify you before data loss occurs and the drive can be replaced while it still remains functional.
Check in Windows
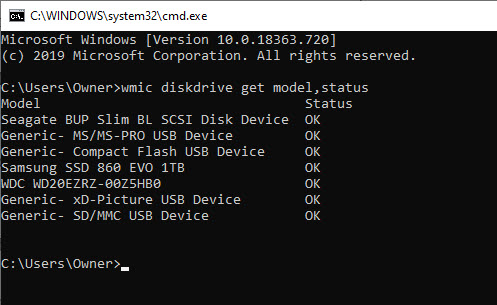
In Windows 10, you can manually check the S.M.A.R.T. status of your drives from the Command Prompt. Just right-click the Start button, select Run, and type “cmd“, then click OK or type “cmd” into the Cortana search bar, then click OK. In the Command Prompt pop-up box, type:
wmic diskdrive get model,status
It will return “Pred Fail” if your drive’s death is imminent; “Bad”, “Unknown” or “Caution” if its time to take care of a drive or “OK” if it thinks a drive is doing fine. Refer to below image:
Checking your hard drives health
Check on a Mac
On a Mac, you can check S.M.A.R.T. status by opening the Disk Utility program, clicking on the drive and looking at “S.M.A.R.T. Status” in the bottom left, which will either read “Verified” or “Failing”.
SMART Status can be Misleading
However, this basic S.M.A.R.T. information can be misleading. You only know when your drive is near death, but you can start to experience problems even if the basic S.M.A.R.T. status is okay.
You can also use Defraggler program I discussed in a previous post. When you use the Analyze feature of the program, it will show your disk health. Click here for the post on using Defraggler.
Manufacture Check
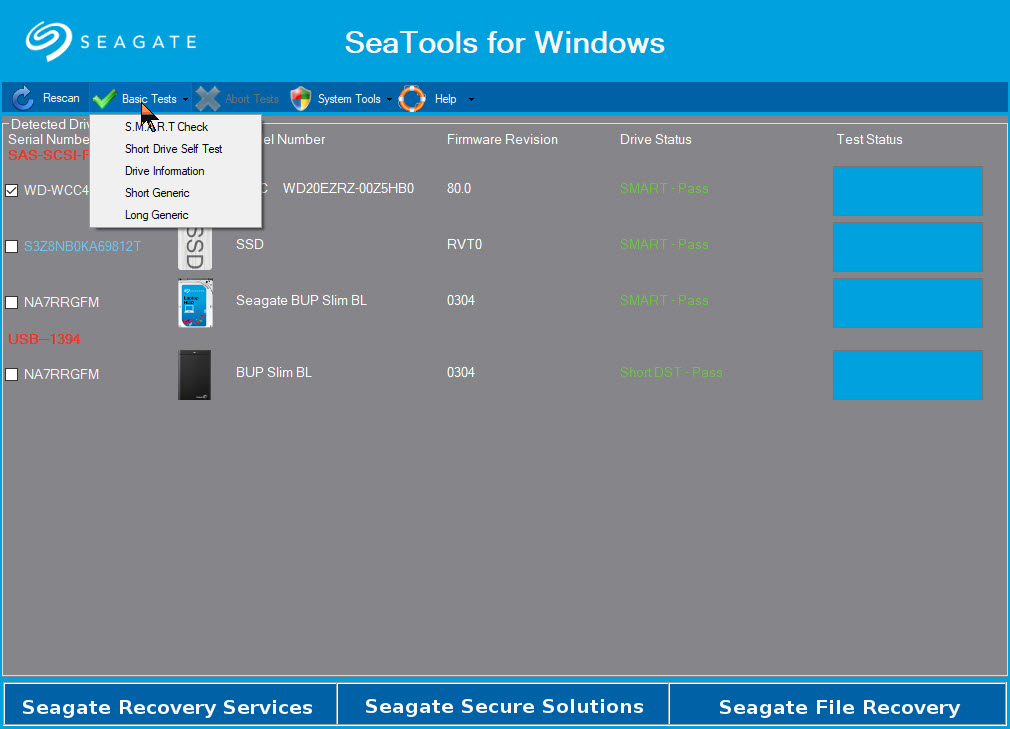
If you want an even deeper, more accurate picture into your drive’s health, check its manufacturer’s website for a dedicated tool; for example, Seagate has SeaTools for its drives, Western Digital has Data Lifeguard Diagnostic for its drives and Samsung has Samsung Magician for its SSDs. These tools can sometimes take into account certain technologies specific to their hard drives and SSDs.
Note! You may find that the SeaTools (Seagate) utility is the only software you will need. In the below image, it can diagnose Samsung, Western Digital as well as Seagate using several methods:
SeaTools for Windows options
Is Your Drive Almost Dead
Drives with the “Pred Fail” status won’t necessarily fail tomorrow. They could chug along for a year or be dead as a doornail in a few days if not hours.
If you’re getting warnings, it’s time to back up your files before your drive fails. Failure to act may cost you serious money to recover your data.
Now is not the time for a full backup, however: you don’t want to stress the drive with too many reads or it could fail while you’re backing up. Instead, plug in an external drive and copy your most important files onto it; family photos, work documents and anything else that can’t easily be replaced. Then, once you know those are safe, you can try doing a full drive clone with something like EaseUS Todo Backup Free.
I got a S.M.A.R.T. status of “Pred Fail” on my main hard drive. I quickly backed up my important files to an external drive. I never finished before it died. I tried the trick off turning my desktop on its side, then upside down. I got a little more life from the hard drive. Then I removed the hard drive and gently shook the device. I could hear the spindle sliding; then I knew if was totally dead. But it’s worth trying this trick.
Is Your Drive Dead
If your hard drive has already stopped working, things get a lot tougher and you’ll probably need a professional data recovery service which can cost $1,000 or more. But if you have pricelrss data on the drive, it may be worth it to you.
Prepare for Hard Drive Failure
It’s not a matter of “if” your hard drive will fail; it’s a matter of “when”. All hard drives fail eventually and if you want to avoid losing all your important files, you absolutely have to back up your computer regularly; including when the drive is healthy.
Take some time to set up an automatic, cloud based backup like Google Backup and Sync using Google Drive. It is one of the best things you can do to protect yourself from heartache later on. Or at least back up to an external drive using Windows 10 built-in File History Tool.
If your drive failed catastrophically with no warning, you can get back up and running in no time by having an up-to-date backup.
That’s it. Please feel free to share this post! One way to share is via Twitter, as mentioned below.
I hope you have found this post helpful. If so, click the Tweet icon below. This will launch Twitter where you click its icon to post the Tweet.
I have found TechSavvy.Life blog posts extremely helpful. Check them out for posts on smart phone apps, Macs and PCs!
Please feel free to leave a comment. I would love hearing from you. Do you have a computer or smart device tech question? I will do my best to answer your inquiry. Please mention the device, app and version that you are using. To help me out, you can send screenshots of your data related to your question.
The author’s Vietnam eBook on the Battle for Tra Bong: Events and Aftermath
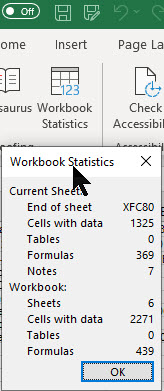
Microsoft Excel is getting a quick summary view of workbook statistics. This simple dialog box includes the boundaries of the sheets, tables, links, formulas and notes.
In a couple of clicks you can now view the workbook statistics.
This is for Excel in Office 365 on PCs and Macs
Copyright Scott Adams, Inc./Distributed by Universal Uclick for UFS
First, open an existing Excel workbook. Navigate to the Review tab and click on it. In the menu bar, head to the Proofing group. You will see the icon Workbook Statistics, just click on it to view. Refer to below image:
There are details for current sheet and the entire workbook. It is similar to Microsoft Word’s Word Count feature.
I Would Like to Hear From You
Please feel free to leave a comment. I would love hearing from you. Do you have a computer or smart device tech question? I will do my best to answer your inquiry. Please mention the device, app and version that you are using. To help us out, you can send screenshots of your data related to your question.
The author’s Vietnam eBook on the Battle for Tra Bong: Events and Aftermath
If you know the right keyboard shortcut and the right commands, the Windows 10 Run command can be a powerful tool. Lets explore 12 Run commands everyone should know.
With a simple keyboard shortcut and a few keystrokes, you can reach your destination before other users can click their mouse on the right icon.
The key is learning and knowing these common Run commands.
The examples are for Windows 10 operating system. Also works for Windows 7 and Windows 8.
Copyright Scott Adams, Inc./Distributed by Universal Uclick for UFS
Open the Run Command Dialog Box
To use these commands we need to bring up the Run command dialog box. There are two comman ways of doing this as follows:
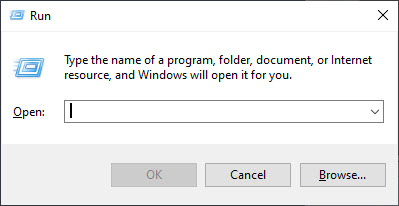
1. Right click the Start menu icon and select the Run command from a list 2. Use the keyboard shortcut by selecting and holding the Window icon button and press the “R” key. See following image:
The Run dialog box
You will simply enter your Run command and press the Enter key or press OK.
The Run Commands
Note! The quotation marks are for emphasis only; they are not part of the command itself and should not be included in the Run command box. Also, the Run remembers your command(s).
1.“\” – Open the default drive, usually drive “C“ This will display the contents of your default configuration to include your Quick Access library. The presumption is that this is where your documents, photos and other files can be most easily found. At times you may just want to open File Explorer to the main hard drive root folder.
2. “.” – Open the Home folder of the current user This command will open the Home folder for the current user.
3. “..” – Open the Users folder Typing two periods (“..”) will open File Explorer in the Users folder, giving quick access to all the user’s folders, providing you have the proper credentials. This is a good command for performing system administrative tasks.
4. “control” – Open the Control Panel Windows 10 has placed many of the common configuration settings into an area known as Settings, which can be found as an entry in the Start menu. While this is fine for many configuration settings, there are times when you have to load the full Windows 10 Control Panel. On those occasions, type control into the Run command box. Refer to below image:
The Control Panel
5. “msconfig” – Open System Configuration The System Configuration app is a holdover from previous versions of the Windows operating system, but it is still useful for Windows 10. This command will open an app that grants you access to boot variations including certain startup services during the boot sequence. Also, their are many options to view, add or change under the Tools tab. See following image:
System Configuration screen
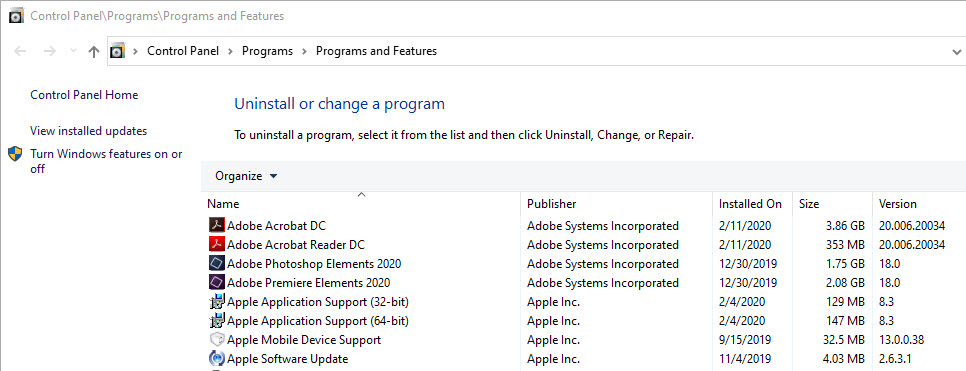
6. “appwiz.cpl” – Open Programs and Features Lets say you want to uninstall a program; you may use this command to do so. Although you can use the Control Panel command to accomplish this task, using this command is much faster. See below image:
Uninstall a program
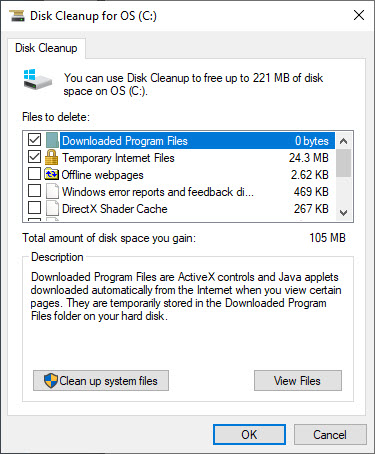
7. “cleanmgr” – Open Disk Cleanup utility Another holdover from previous versions of Windows is the Disk Cleanup utility. Most disk cleanup processes in Windows 10 are handled automatically behind the scenes, but there are occasions where you may want to perform disk cleanup manually. Refer to below image:
8. “resmon” – Open Resource Monitor A utility app that most users ignore, but really shouldn’t, is the Windows 10 Resource Monitor. If your PC starts lagging or the hard drive seems to be spinning up without cause, run this command and troubleshoot the problem. See below image:
The Resource Monitor
9. “calc”, “notepad”, “mspaint”, etc – Open common apps Another good use for the Run command is to start basic Microsoft applications that you may not use every day and don’t want on your desktop or taskbar but that you still use from time to time.
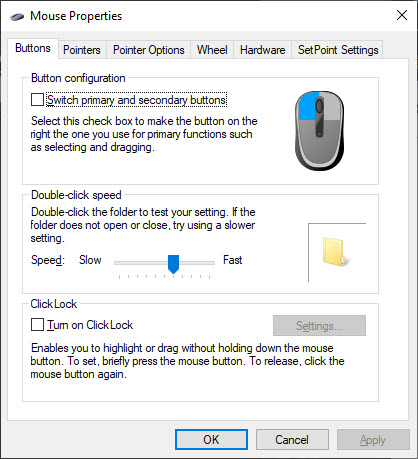
10. “main.cpl” – Adjust your mouse settings One of the first things you need to adjust on a new Windows 10 PC are the mouse settings. A mouse cursor that is too small or moves too slowly across the screen can be frustrating. This is fastest way to get to those settings. Refer to below image:
Settings for the mouse
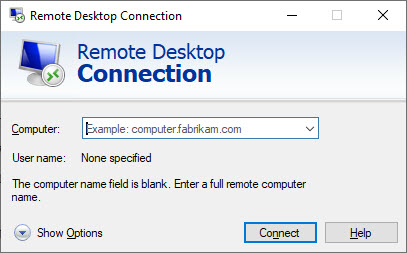
11. “mstsc” – Open Remote Desktop A modern workforce is a mobile workforce, which means many of us have to access our workstation PCs remotely using the Windows 10 Remote Desktop app. See following image:
Open Remote Desktop
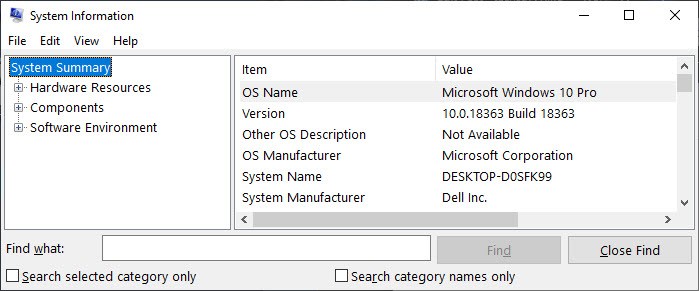
12. “msinfo32” – Access System Information While troubleshooting problems with help desks, it is not uncommon for the technician to ask for detailed system information. Rather than clicking through several different screens, use this Run command. Refer to below image:
System Ongormation scree
You Don’t Have to Remember the Commands
Tip: As you try these Run commands, you will notice that your previous entry is displayed. You can scroll through all previous commands by using the up and down arrow keys or click the drop down arrow to see your entries. This allows less keystrokes, faster access and best of all, you don’t have to memorize these Run commands. They are available even if you Shutdown or Restart your device.
Please feel free to leave a comment. I would love hearing from you. Do you have a computer or smart device tech question? I will do my best to answer your inquiry. Please mention the device, app and version that you are using. To help us out, you can send screenshots of your data related to your question.
The author’s Vietnam eBook on the Battle for Tra Bong:Events and Aftermath
Every once in a while you should delete Chrome’s data for faster load times and to correct erratic behavior. If this is your first time to do this, be patient, it may take a minute or so.
If you’re trying to fix loading or formatting issues to improve your browsing experience on Google Chrome, clearing your data is an excellent place to start.
For example, if Chrome is slow or unresponsive or you change a document like deleting a sentence but the sentence is still there after saving the document, its time to clear your Chrome browser data. Before doing this, log out or exit your running applications. If an application’s behavior is erratic, its recommended you log out instead of just exiting the program.
This is for Google Chrome on multiple platforms
Copyright Scott Adams, Inc./Distributed by Universal Uclick for UFS
What Happens When your Data is Deleted?
When you visit a website, it will save (or remember) certain information on your hard or SSD drive. Cookies save a user’s browsing data and cache (stored information) helps webpages load more quickly by remembering images, videos, text and other parts of the webpage from your last visit instead of reloading everything with each visit.
When you clear your data, all information gets deleted. You control how much data is deleted. The load time of previously visited sites will increase because Chrome needs to load the content of the webpage again.
Clearing Chrome’s Data
To clear your data in Chrome, you’ll need to access the browser’s Settings menu. There are three different ways to do this.
The first way is to click the three vertical dots icon (the hamburger icon) in the top-right corner of the screen, hovering over the More Tools option and then selecting Clear Browsing Data. Refer to below image:
Clear your browing data option
In the above image, you may notice the shortcut key. To go straight to the page to clear your data, hold and press down on the Ctrl + Shift + Delete keys.
The third way is to enter chrome://settings/clearBrowserData in the address bar. See following image:
Alternate way to clear your browsing data
Now, the Clear Browsing Data window will be displayed.
The first thing you’ll do here is select the Time range for deleting the data. Click the drop down arrow next to Time range to expand the menu, then select the desired Time range; the default is All Time. It is recommended you use the default Time range. See below image:
Selecting your time range for clearing your data
Next, check the four boxes next to Browsing history, Download history, Cookies and 0ther site data and Cached images and files. If you want to clear passwords (not recommended), then checkmark Passwords and other sign-in data. Checking this box will force you to re-enter passwords you have setup before entering a website(s). Refer to below image:
Selecting your options for clearing data
Now click the Clear Data button to clear your data. See following image:
The last option for clearing your data
The process of clearing your data will take a litte while. If this is the first time, it may take several minutes, just be patient.
I Would Like to Hear from You
Please feel free to leave a comment. I would love hearing from you. Do you have a computer or smart device tech question? I will do my best to answer your inquiry. Please mention the device, app and version that you are using. To help us out, you can send screenshots of your data related to your question.
The author’s Vietnam eBook on the Battle for Tra Bong: Events and Aftermath
I recently read a post about finding your Microsoft Windows 10 product key. Microsoft likes to hide it but there are occasions you need to know the key. The key is a 25-characters code, making it virtually impossible to remember.
This is for Windows XP through 10 devices
Copyright Scott Adams, Inc./Distributed by Universal Uclick for UFS
That post gave a long command to use and a complicated Visual Basic Script (vbs) from an unknown author to be saved as a text file to run. To make things even more complicated, using two methods, the author showed two different keys. But there is a pain free way to find the key that I posted about using Belarc Advisor. This free software program is among the best to provide a detailed inventory of your device’s hardware and software.
Scroll down the report till you see the Software Licenses section. There you will find your Windows product key plus other software keys. See below image:
I Would Like to Hear from You
Please feel free to leave a comment. I would love hearing from you. Do you have a computer or smart device tech question? I will do my best to answer your inquiry. Please mention the device, app and version that you are using. To help me out, you can send screenshots of your data related to your question.
The author’s Vietnam eBook on the Battle for Tra Bong: Events and Aftermath
Over the past few months, I have researched on how to do this, create a footer that I can use repeatly without doing a manual insert of footer elements. I finally found an article on how to partly do this. In my example, we are going in inset a document footer with the latest date on the left, the document name in the middle and the page number on the right. Yes, it will take a little time but it’s worth the one-time investment. You will save time and effort in using this feature.
If you’ve got a favorite document footer like mine, you can save that using the Quick Parts feature of Microsoft Word. What a lot of users don’t know is that Quick Parts can be saved under different categories to be accessible under different menus.
Let’s use my favorite footer as an example. I’ve constructed one in a blank document using a three column table: the left column has the current Date, the middle column contains the File Name and the right column shows “Page X of Y“. Also, I’ve turned off the borders in the table; those lines you see are simply the grid lines that display in Word.
This is for Word for Office 365 PCs and Macs that support Quick Parts. Other versions of Word will be similar.
Copyright Scott Adams, Inc./Distributed by Universal Uclick for UFS
Lets get started.
Navigate to the the Insert tab, then to the Header option. Head to the bottom of the options and select Edit Footer. Your footer will be activated with the pointer in the left hand column.
Once again, go to the Insert tab, then select the Table option. Highlight the first 3 columns with your pointer. You will see 3 x 1 table description at top of your screen. Now, just click on the third grid element in the first row and the table will be inserted into your footer. See following image:
Selecting the table to be inserted for the custom footer
Inserting Current Date
In the first column of the footer table, type in the text Date: (there is one space after the text) then navigate to the Insert tab and click on the Date & Time option in the Text group. Select your date format and click OK. See below image:
Selecting the current Date format to be inserted into your custom footer
Inserting File Name
Now, hit the Tab key once, or move your pointer to the middle column. Again, go to the the Insert tab, then to the Footer option. Navigate to the bottom of the options and select Edit Footer. In the Insert group, select Document Info, then select File Name.
UPDATE: If you do not see Document Info, in the Search box type in “Add document info” and follow its steps.
Refet to below image:
Selecting the File Name to be inserted
Note! For demo purposes, I named this example document as &Filename. See below image:
Showing the inserteed Date and File Name for your custom footer
Inserting Page Number
Now, tab once more or position your pointer in the right column. Once again, from the Insert tab, select Page Number from the Header & Footer group. Next, hoover your pointer over Current Position and select Bold Numbers under the Page X of Y group. Refer to below image:
Inserting the Page Number as bold text for Page X of Y into your custom footer
Your footer elements will look similar to the following image:
Showing all elements for your custom footer
Formatting the Custom Footer
Now, you may want to align your footer elements. In my example, I am aligning the File Name to be centered. For the Page Number, I am choosing right justified. The Date is already left justified. At this point, you can change the font and/or font size and other formatting options. You may want to change font size for File Name to allow for long document names. Refer to below image:
Aligning the footer elements for your custom footer
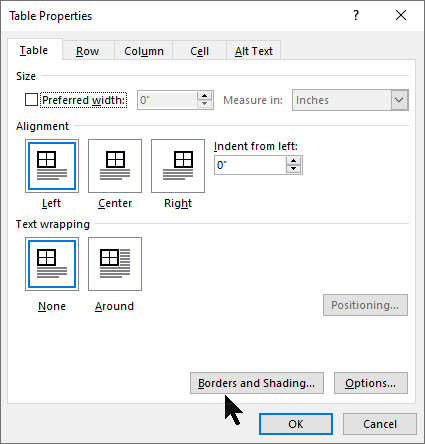
Next, lets remove the borders for our footer table. Right click on the “+” sign located to the left of the table, then select Table Properties. See below image:
Accessing the Table Properties for your custom footer
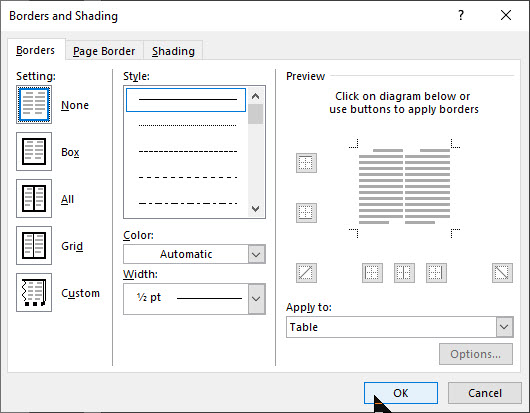
Now, select Borders and Shadings option. Under the Borders tab, select the None option, then click OK, then click OK again to remove the borders. Refer to below image:
Removing the borders for your custom footer
Your final footer result will be similar to the following image:
The final result of your custom footer
If you make a mistake, start from the miscue or start from stratch. As you can see, there are a lot of manual steps. So, instead of repeating all of the above just to insert a footer, we can easily access our favorite footer by using the Quick Parts feature.
Setting Up the Quick Part Feature
Highlight the footer with your pointer or click on the “+“sign located to the left of the table. Next, navigate back to the Insert tab. Select the Quick Parts option in the Text group. Then choose Save Selection to Quick Park Gallery. See below image:
Saving your custom footer to Quick Parts
Give the Footer a unique name, mine is My Best Footer. In the Gallery drop-down box, select Footers. In the Category drop-down box, select General. Now, give the footer a Description. When you are finished, click OK. Refer to below image:
Setting up the custom footer building block
Now your favorite footer will be an available selection whenever you click Footer on the Insert tab. Refer to following image:
Displaying your custom footer entry
Using Your Custom Footer
To try out your custom footer, open a blank document. Navigate to the Insert tab (click one), select the Footer option (click two). Locate your recent entry and click on it (click three). Your footer selection will be inserted. And you only used three clicks! See below image:
Inserting your custom footer into a document
There are a whole bunch of other Quick Parts Galleries available for you to save your favorite snippets in. For example, you could have a Quick Parts that inserts your “ Initials _____” on the last page of a draft. Another Quick Parts would be creating and inserting your favorite Watermark.
Edit Your Custom Footer Properties
Navigate to the Insert tab. Select the Quick Parts option in the Text group. Then choose the Building Blocks Organizer option. Next, locate and click on your custom footer entry. Then, click on the Edit Prolerties tab. Here you can change the custom Name, the Gallery, the Category, etc. Its best to leave the Gallery set to Footers and Category set to General.
UPDATE: To make your custom footer float to the top, select enter a new Category, and label it Alpha instead of selecting General.
Once you are finished, click OK. Refer to below image:
Editing your custom footer properties
Delete Your Custom Footer
Navigate back to the Insert tab. Select the Quick Parts option in the Text group. Then choose Building Blocks Organizer option. Next, locate and click on your custom footer entry. Then, click on the Delete tab. To complete the deletion process, click OK. See following image:
Deleting your custom footer
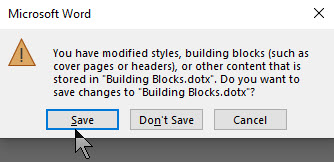
When you Exit Microsoft Word, you will see the following screen. Make sure you click Save to save your custom footer in the Building Blocks.dotx file, where your custom footer is stored. This is easy to overlook. If you don’t Save, you will lose your custom footer or any other snippet you created during your Word session.
Your final dialog box upon exiting Word. You must click Save to save your work.
You have successfully created, inserted, edited and deleted a custom footer.
I Would Like to Hear From You
Please feel free to leave a comment. I would love hearing from you. Do you have a computer or smart device tech question? I will do my best to answer your inquiry. Please mention the device, app and version that you are using. To help us out, you can send screenshots of your data related to your question.
The author’s Vietnam eBook on the Battle for Tra Bong: Events and Aftermath
In PowerPoint, it’s hard to remember what slide number you are presenting. As an aid, we can add the slide number to our slides.
One way, we could manually add a number using a text box. But what if you added or deleted a slide? This would require you to manually update your slide numbers; a time consuming and error prone task.
Instead, you can have the slide numbers update automatically on all your hidden and active slides. By default, your slide numbers appear in your slide footer, but you can move and format them.
This is for PowerPoint for Office 365 Windows and Mac versions. Other versions of PowerPoint will be similar.
Copyright Scott Adams, Inc./Distributed by Universal Uclick for UFS
Adding Slide Numbers
Open a PowerPoint presentation with several slides to see the feature. Click the Insert tab. In the Text section, click the Header & Footer icon. See below image:
Text dialog box
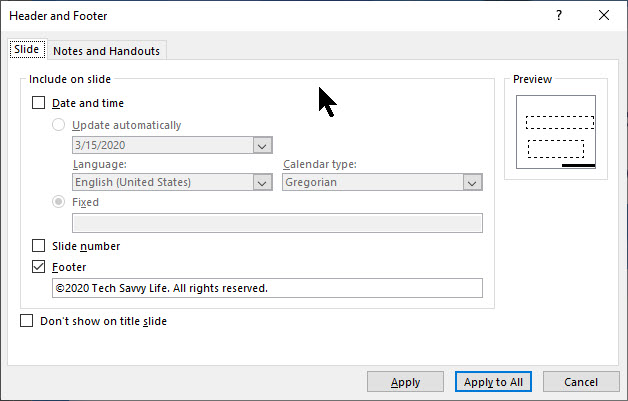
The Header & Footer options box will open. Refer to below image:
Slide Header and Footer options
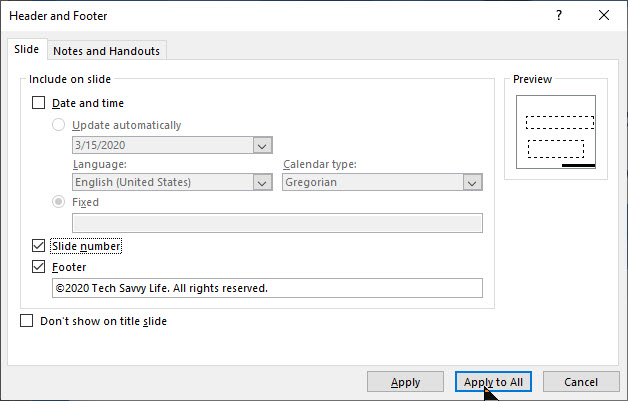
Under the Slide option, place a check in the Slide number checkbox. To add your slide number to all of your slides, select Apply to All button. Refer to below image:
Checkmarking the Slide Number option
Your slide number will appear in the bottom right corner. Note! The number place holder will be small. See following image:
Sliode Number placeholder
Remove Slide Numbers
To remove your slide numbers, follow the steps above. In the Header & Footer options options box, simply uncheck the Slide number checkbox. Then click Apply to All button. Your slide numbers will be removed.
Format Slide Numbers
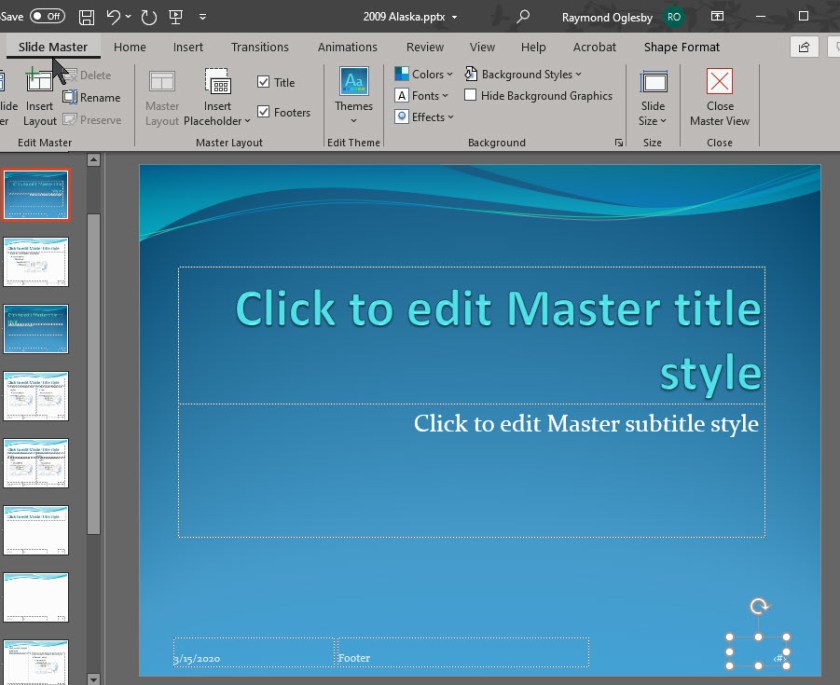
We are going to use PowerPoint Slide Master to make the slide number in a different font, color, size or position.
To do this, click View from the main menu, then select Slide Master. This will load the Slide Master editing box. You will see the slide number box in its default position at the bottom right section of the slide. See following image:
Accessing the Slide Master
Note! You could add a text box with the word “Slide” next to the slide number; this is not shown.
When you move or apply a different font, size or color, it will apply to all your slides.
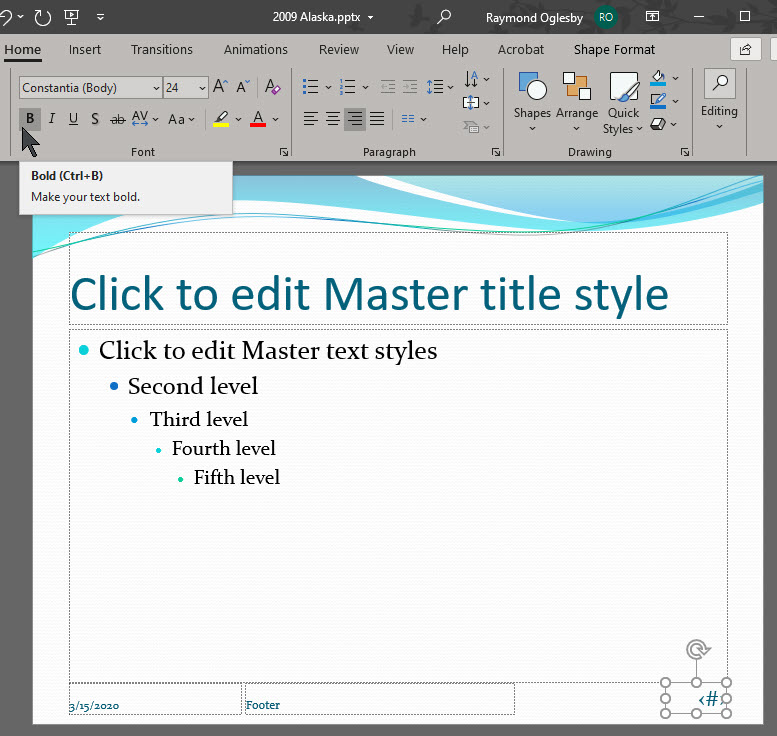
To edit the text box, select the box then select the Home tab. See below image:
Selecting the Home tab for editing
Then you can use the available options in the Font and Paragraph sections to format the number like choosing Bold, Underline, etc. I have set the number to be Bold and made the font size bigger. See below image:
Editing the Slide Number placeholder
Once you have finished editing, return back to the Slide Master tab and click Close Master View button. Refer to below image:
Closing the Slide Master
Be sure to Save your presentation with the automatic slide numbering feature.
Please feel free to leave a comment. I would love hearing from you. Do you have a computer or smart device tech question? I will do my best to answer your inquiry. Please mention the device, app and version that you are using. To help me out, you can send screenshots of your data related to your question.
The author’s Vietnam eBook on the Battle for Tra Bong: Events and Aftermath
We know we can pin Apps to the taskbar. But did you know you can pin your drives, both local and network drives. Instead of opening File Explorer and choosing a drive which requires two clicks, this can be done in one click from your taskbar.
This is for Windows 10 devices
Copyright Scott Adams, Inc./Distributed by Universal Uclick for UFS
Create a Shortcut for a Drive
Create a shortuct by a right click on the desktop. Then select New followed by Shortcut from the menu. Refer to below image:
Creating a shortcut
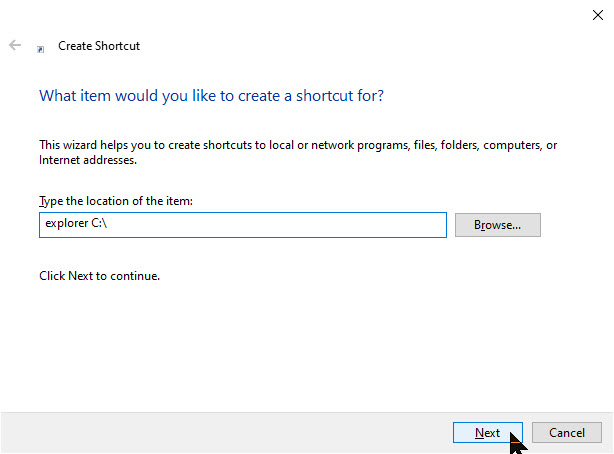
The shortcut wizard will appear. (If the wizard does not appear, you will have to manually edit the Shortcut tab.) In the field Type the location of the item, enter explorer C:\. See below image:
The first screen of the shortcut wizard
Click Next. Assign a name to the shortcut like Drive C. See following image:
The second screen of the shortcut wizard
To complete the wizard, click Finish. The shortcut will be displayed on your desktop. Right click on the the desktop shortcut and select Properties from the context menu to preview the shortcut. Notice the Target and Start in fields have been updated. See below image:
Setting up a shortcut for drive C
Change the Icon for the Shortcut
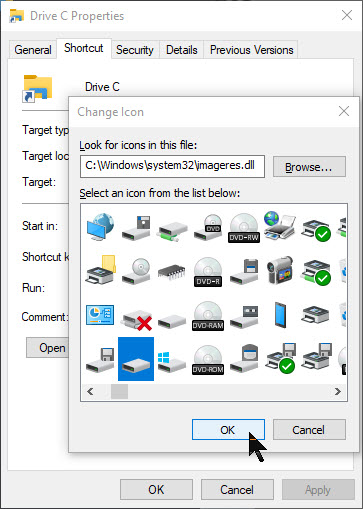
Again, right click on the shortcut and select Properties from the context menu. Go to the Shortcut tab and select Change Icon. You will see an Address field that denotes the default location of the icon. To change this, enter C:\Windows\system32\imageres.dll in the field. Refer to below image:
Changing the default location for the icon
Click OK. Look through the icons and choose the drive icon. You could also use your own custom icon. See following image:
Choosing the drive icon
Click OK to select the icon. Then click OK again to save your changes. Then right click on your desktop shortcut and select Pin to taskbar and/or Pin to Start from the context menu. See below image for the final result of pinning Drive C to the taskbar:
Drive C example pinned to the taskbar
From your taskbar, click the drive icon to open File Explorer for the designated drive. You may now delete the desktop shortcut.
If you are pinning multiple drives, it’s a good idea to use custom icons. If you go with the default icons, they will all look the same. You could hover your mouse over a pinned drive to reveal which drive will open or use a custom icon. Another idea is to remember which drive is which. To make the icons stand out, you could separate the pinned drives from your other apps by using taskbar dividers.
I Would Like to Hear from You
Please feel free to leave a comment. I would love hearing from you. Do you have a computer or smart device tech question? I will do my best to answer your inquiry. Please mention the device, app and version that you are using. To help me out, you can send screenshots of your data related to your question.
The author’s Vietnam eBook on the Battle for Tra Bong: Events and Aftermath