Using the Ctrl+Shift+V Shortcut

Tired of pasting and getting weird fonts and formatting in Windows 10 or 11? Avoid using Notepad as an intermediary. Try Ctrl+Shift+V shortcut and you will get only the text you want.

RAYMOND OGLESBY @RaymondOglesby2
August 11, 2022

Tired of pasting and getting weird fonts and formatting in Windows 10 or 11? Avoid using Notepad as an intermediary. Try Ctrl+Shift+V shortcut and you will get only the text you want. Here’s why.

This is for Windows 10/11 and Mac. Screenshots are from Windows 10

Dilbert and Metaverse
Copyright Scott Adams, Inc./Distributed by Universal Uclick for UFS

Paste Without Formatting

By default, when you normally Copy with Ctrl+C and Paste with Ctrl+V in Windows, the clipboard captures not only the text you have selected but also the styling that goes with it. That includes font style, text color, attributes such as bold and italics, and even bulleted lists.

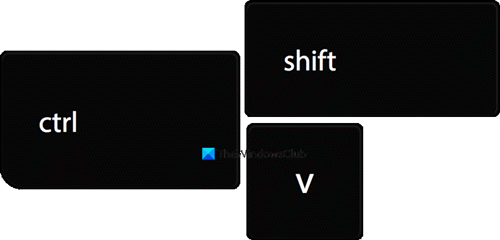
Fortunately, there’s an easy way to avoid it. The next time you want to paste only the text without any formatting or style information, press Ctrl+Shift+V on your keyboard in Windows 10/11. (On a Mac, you can press Option+Shift+Command+V for a similar result).

Microsoft Word Fix

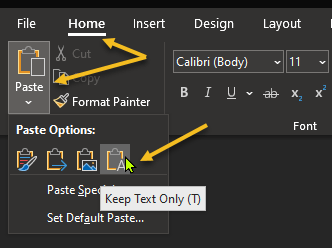
In Microsoft Word, Ctrl+Shift+V does not work. Instead, you will need to use a special option in the ribbon menu. To do so, switch to the Home tab and click Paste, then select the icon that looks like a clipboard with an “A” on it (Keep Text Only) which will paste without formatting. Refer to the below image:

Word Shortcut 1
Selecting the Keep Text Only option

You can also change the default behavior in Word to always paste without formatting. To do so, navigate to

File > Options

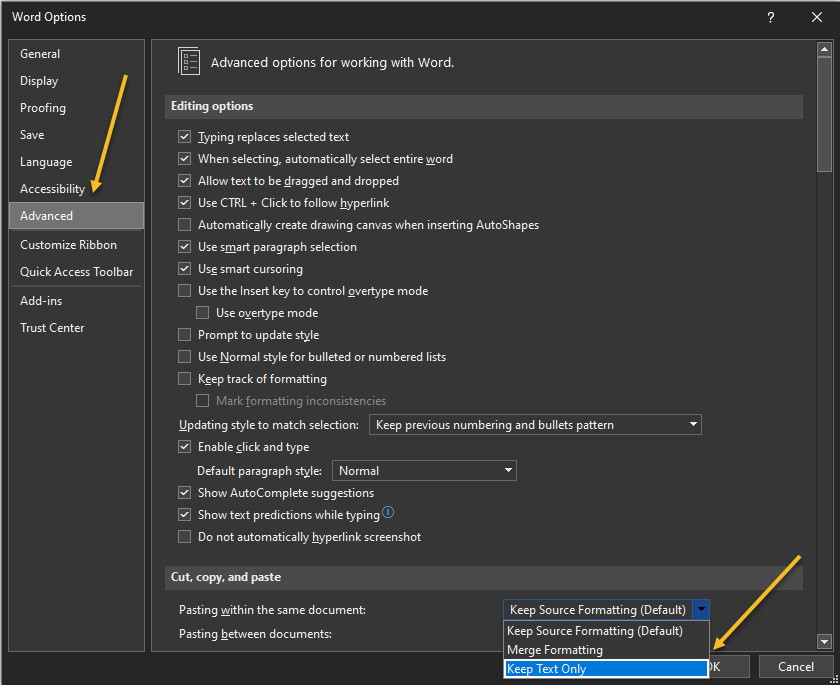
In the Options menu that opens, click Advanced in the sidebar, then choose Keep Text Only in the Cut, Copy, and Paste drop-down menus. This way, you can make Ctrl+V always paste as Keep Text Only in Word. See the below image:

Word Shortcut 2
Selecting the Keep Text Only option for Pasting within the same document

Quote For the Day

Our business is about technology, yes.But its also about operations and customer relationships.

Michael Dell

Tweet Info

That’s it. Please feel free to share this post! One way to share is via Twitter.

Just click the Tweet icon below. This will launch Twitter where you click its icon to post the Tweet.

Checkout TechSavvy.Life for blog posts on smartphones, PCs, and Macs! You may email us at contact@techsavvy.life for comments or questions.

I Would Like to Hear From You

Please feel free to leave a comment. I would love to hear from you. Do you have a computer or smart device tech question? I will do my best to answer your inquiry. Just send an email to contact@techsavvy.life. Please mention the device, app, and version you are using. To help us out, you can send screenshots of your data related to your question.

Author’s E-Book

You can access the e-book from a Kindle device, the Kindle App for the desktop or smartphone, which is a free app.

The author’s Vietnam eBook on the Battle for Tra Bong Vietnam: Events and Aftermath

How to Make Text Shortcuts on iPhone

Typing things out on an iPhone keyboard can be tiresome, but it does not have to be that way for everything. You can make custom text shortcuts to automatically be replaced with longer words or phrases. It’s a super handy feature.

RAYMOND OGLESBY @RaymondOglesby2
August 9, 2022

Typing things out on an iPhone keyboard can be tiresome, but it does not have to be that way for everything. You can make custom text shortcuts to automatically be replaced with longer words or phrases. It’s a super handy feature. Let’s explore how to set up text shortcuts.

This is for the iPhone. Screenshots are from iPhone XR running iOS 15.6+

Dilbert and Fired
Copyright Scott Adams, Inc./Distributed by Universal Uclick for UFS

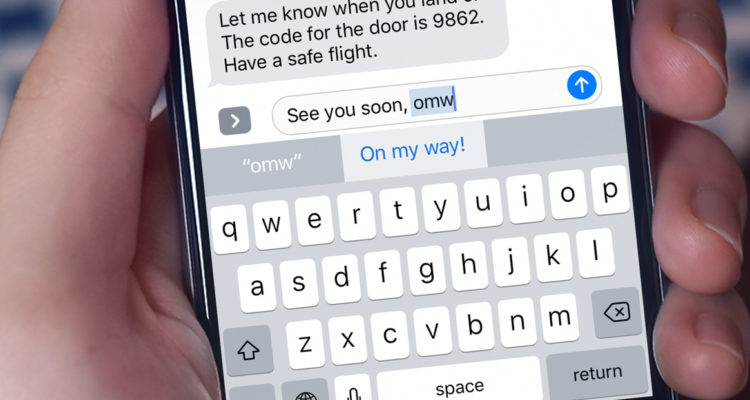
There’s a lot you can do with the iPhone’s Text Replacement feature. One example is included on every iPhone by default; omw is automatically replaced with On my way. You can use that same idea for anything. All you need is a shortcut and a phrase to go with it.

Note: The Text Replacement feature only works with the default iPhone keyboard, not third-party keyboards from the App Store.

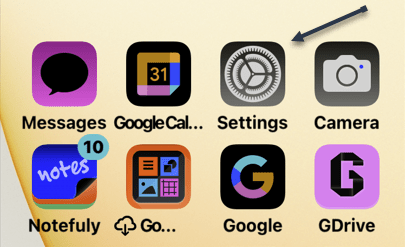
First, open the Settings app on your iPhone (this is also available on iPad). Refer to the below image:

Text 1
Selecting the Settings app

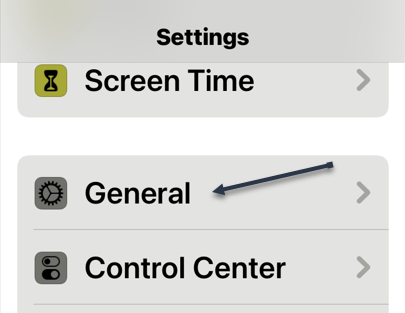
Next, go to the General section. See the below image:

Text 2
Selecting the General option

Now, select the Keyboard settings. See the following image:

Text 3
Selecting the Keyboard option

Next, go to Text Replacement. Refer to the below image:

Text 4
Selecting the Text Replacement option

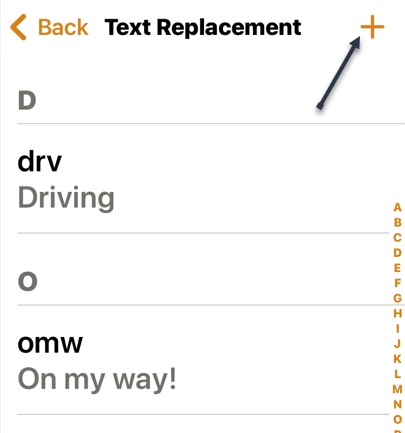
Now, tap the “+” icon in the top right-hand corner. See the below image:

Text 5
Selecting the add icon

Next, enter a Phrase and a Shortcut. The Phrase will replace the Shortcut. Tap Save when you are done. See the following image:

Text 6
Entering a Phrase and Shortcut

Now, your shortcut will be added. Refer to the below image:

Text 7
Your added shortcut

Next, you are ready to use it! We are using the Notes app for our example. Simply type the shortcut and you will see the full phrase appear above the keyboard. You can tap the phrase to insert it or continue typing by tapping the spacebar or return and it will automatically be inserted. Tap Done to finish in the Notes app. See the below image:

Text 8
Using your new text shortcut

This is a great time-saving feature for typing out longer phrases. One handy tip is to use your name as a shortcut for your entire address.

Quote For the Day

Technology should improve your life… not become your life.

Billy Cox

Tweet Info

You are finished. Please feel free to share this post! One way to share is via Twitter.

Just click the Tweet icon below. This will launch Twitter where you click its icon to post the Tweet.

Checkout TechSavvy.Life for blog posts on smartphones, PCs, and Macs! You may email us at contact@techsavvy.life for comments or questions.

I Would Like to Hear From You

Please feel free to leave a comment. I would love to hear from you. Do you have a computer or smart device tech question? I will do my best to answer your inquiry. Just send an email to contact@techsavvy.life. Please mention the device, app, and version you are using. To help us out, you can send screenshots of your data related to your question.

Author’s E-book

You can access the e-book from a Kindle device, the Kindle App for the desktop or smartphone, which is a free app.

The author’s Vietnam eBook on the Battle for Tra Bong Vietnam: Events and Aftermath

How to Make Taskbar Clock Display Seconds in Windows 10

Windows 10’s taskbar Clock can display the precise time down to the second. This feature requires a Registry hack to enable and only works on Windows 10.

RAYMOND OGLESBY @RaymondOglesby2
August 4, 2022

Windows 10’s taskbar Clock can display the precise time down to the second. This feature requires a Registry hack to enable and only works on Windows 10. Let’s find out.

This is for Windows 10

Dilbert and Selfish
Copyright Scott Adams, Inc./Distributed by Universal Uclick for UFS

Editing the Registry

Warning: The Registry Editor is a powerful tool and misusing it can render your system unstable or even inoperable. This is a pretty simple hack and, as long as you stick to the instructions, you should not have any problems. If you have never worked with the Registry Editor before, consider reading about how to use the Registry Editor before you get started. And definitely back up the Registry and create a System Restore point before making changes.

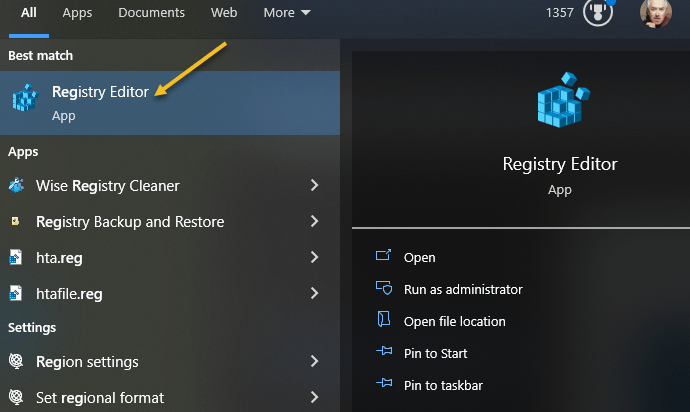
First, open the Registry Editor by clicking Start, typing “regedit” into the Cortana search box at the bottom of the Start menu, and pressing Enter. Give the Registry Editor permission to make changes to your PC. Refer to the below image:

Clock 1
Selecting the Registry Editor

Next, use the left sidebar to navigate to the following key in the Registry Editor:

HKEY_CURRENT_USER\Software\Microsoft\Windows\CurrentVersion\Explorer\Advanced

See the below image:

Clock 2
Accessing the Advanced Key

Now, right-click the Advanced key in the left pane and select:

New > DWORD (32-bit) Value

See the following image:

Clock 3
Accessing the 32-bit DWORD

Next, name the value

ShowSecondsInSystemClock

and press Enter. If you type “Sustem” instead of “System” or “Second” instead of “Seconds” in the name, these will not work, it must be the exact wording. Refer to the below image:

Clock 4
Naming the new Key

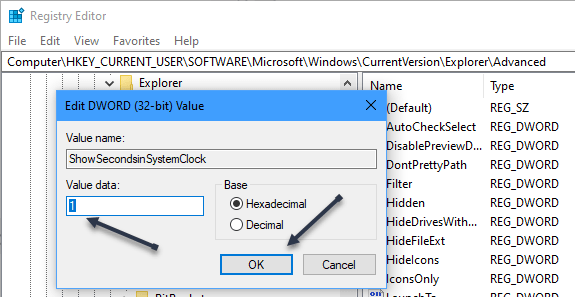
Now, double-click the value you just created, enter a value data of 1, and click OK. See the below image;

Clock 5
Assigning the value of 1 to the new Key

Next, you can now close the Registry Editor. You will have to sign out and sign back in again before your changes will take effect. To view the Clock with seconds, view the Date and Time in your System Tray in the lower right-hand corner. See the following image:

Clock 6
The Clock with seconds in System Tray

Quote For The Day

Making duplicate copies and computer printouts of things no one wanted even one of in the first place is giving America a new sense of purpose.

Andy Rooney

Tweet Info

That’s it. Please feel free to share this post! One way to share is via Twitter.

Just click the Tweet icon below. This will launch Twitter where you click its icon to post the Tweet.

Checkout TechSavvy.Life for blog posts on smartphones, PCs, and Macs! You may email us at contact@techsavvy.life for comments or questions.

I Would Like to Hear From You

Please feel free to leave a comment. I would love to hear from you. Do you have a computer or smart device tech question? I will do my best to answer your inquiry. Just send an email to contact@techsavvy.life. Please mention the device, app, and version you are using. To help us out, you can send screenshots of your data related to your question.

Author’s E-Book

You can access the e-book from a Kindle device, the Kindle App for the desktop or smartphone, which is a free app.
The author’s Vietnam eBook on the Battle for Tra Bong Vietnam: Events and Aftermath

How to Disable Flash Notifications on iPhone

Want to stop your iPhone’s flash from blinking when you receive a notification on your phone? If so, you can toggle off the flash notifications feature and the LED flash won’t blink anymore.

RAYMOND OGLESBY @RaymondOglesby2
August 2, 2022

Want to stop your iPhone’s flash from blinking when you receive a notification on your phone? If so, you can toggle off the flash notifications feature and the LED flash will not blink anymore. It’s simple to disable.

This is for the iPhone. Screenshots are from iPhone XR using iOS 15.5+

Copyright Scott Adams, Inc./Distributed by Universal Uclick for UFS

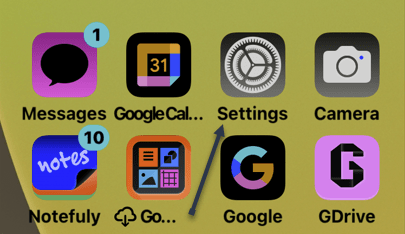
First, open the Settings app on your iPhone. Refer to the below image:

Flash 1
Accessing Settings

Next, in Settings, choose Accessibility. See the below image:

Flash 2
Accessing Accessibility option

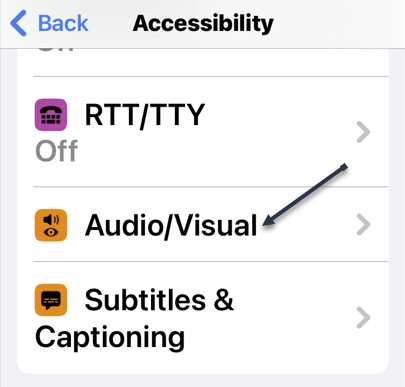
Now, from Accessibility, scroll down to the Audio/Visual option and tap it. See the following image:

Flash 3
Accessing Audio/Visual option

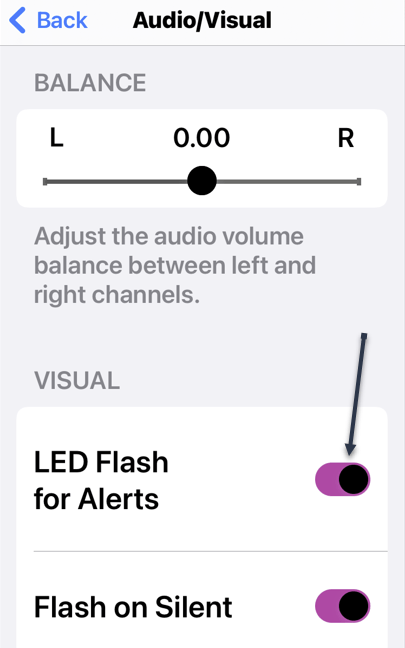
Next, in Audio/Visual, scroll down to the Visual section, and toggle OFF the LED Flash for Alerts. Refer to the below image:

Tip: To manage the flash alerts for when your iPhone is on silent mode, use the Flash on Silent option.

Flash 4
Disable LED Flash for Alerts option

From now on, your iPhone’s flash will not blink when you receive a new notification. Your regular notifications and their alerts will continue to arrive, though.

Quote For The Day

Once a new technology rolls over you, if you’re not part of the steamroller, you’re part of the road.

Stewart Brand

Tweet Info

That’s it. Please feel free to share this post! One way to share is via Twitter.

Just click the Tweet icon below. This will launch Twitter where you click its icon to post the Tweet.

Checkout TechSavvy.Life for blog posts on smartphones, PCs, and Macs! You may email us at contact@techsavvy.life for comments or questions.

I Would Like to Hear From You

Please feel free to leave a comment. I would love to hear from you. Do you have a computer or smart device tech question? I will do my best to answer your inquiry. Just send an email to contact@techsavvy.life. Please mention the device, app, and version you are using. To help us out, you can send screenshots of your data related to your question.

Author’s E-Book

You can access the e-book from a Kindle device, the Kindle App for the desktop or smartphone, which is a free app.
The author’s Vietnam eBook on the Battle for Tra Bong Vietnam: Events and Aftermath

Is “FBI Surveillance Van” in Your Wi-Fi List

If you are trying to connect to a Wi-Fi access point and you see “FBI Surveillance Van” in your SSID list, should you be worried? Is there an FBI van outside your door?

RAYMOND OGLESBY @RaymondOglesby2
July 28, 2022

If you are trying to connect to a Wi-Fi access point and you see “FBI Surveillance Van” in your SSID list, should you be worried? Is there an FBI van outside your door? Let’s explore this surprisingly common situation.

This is for Wi-Fi routers

Dilbert and Musk
Copyright Scott Adams, Inc./Distributed by Universal Uclick for UFS

It’s a Joke

If you see “FBI Surveillance Van,” “FBI Van,” “NSA Van,” or “Police Surveillance Van” on your list of Wi-Fi routers or access points, do not worry; It’s just someone nearby playing a practical joke. This joke originated in the early days of Wi-Fi—in the 2000s; because it ties into a common fear that someone might be lurking nearby and watching you. Also, in the early days of Wi-Fi, some people used scary-sounding SSID names as a deterrent to keep people from connecting to their open (not password protected) Wi-Fi access points.

How is this possible? A Wi-Fi network name is called an SSID (“Service Set Identifier”), and people can enter any SSID they want in their Wi-Fi router or hotspot’s settings. Since everyone nearby connecting to Wi-Fi can see these SSIDs (unless they are hidden), some people use them as a public opportunity to crack a joke.

There are other dangers in using this kind of joke in the context of people who might take it seriously. In fact, an SSID named “FBI_SURVEILLANCE_VAN” made the news in 2011 in relation to a teen that plotted a violent event. This inspired a long discussion on Techdirt and a post on Gawker about whether it’s wise to name your router “FBI Surveillance Van,” even if you think it’s funny.

Is it Really a Joke?

As seen above, we already know the “FBI Surveillance Van” SSID is a joke based on ample cultural evidence on the internet. But beyond that, is there another way to know it’s just a joke?

Yes, we can. The point of law enforcement surveillance is to keep an eye on a suspect, often in secret, using a tactic called covert surveillance. The reason they keep the surveillance secret is that it might alter the suspect’s behavior if the suspect knew they were being watched.

So if an FBI van were parked nearby secretly watching someone, would they publicly announce it with an obvious Wi-Fi SSID name? No. Also, if the purported FBI agents inside this hypothetical surveillance van needed internet access, would they get it through a Wi-Fi router in their van? No, they would likely use an alternative, secure means of doing so that did not rely on consumer technology; or simply use cellular internet. They do not need to provide Wi-Fi access to your neighborhood.

Then there’s the question of the FBI’s choice of surveillance vehicle itself. Does the FBI really conduct surveillance from a van like we see in films? Possibly, but this 2008 account from NPR describes surveillance taking place mostly from ordinary cars, and sometimes on foot. What little evidence we have shows that they did use at least one van in the 1980s, but that was before the modern digital communications era.

So while we can not definitively say that the FBI is not spying on you, we can say this: If they are, it has nothing to do with a name in your Wi-Fi list.

Quote For the Day

One machine can do the work of fifty ordinary men. No machine can do the work of one extraordinary man.

Elbert Hubbard

Tweet Info

That’s it. Please feel free to share this post! One way to share is via Twitter.

Just click the Tweet icon below. This will launch Twitter where you click its icon to post the Tweet.

Check out TechSavvy.Life for blog posts on smartphones, PCs, and Macs! You may email us at contact@techsavvy.life for comments or questions.

I Would Like to Hear From You

Please feel free to leave a comment. I would love to hear from you. Do you have a computer or smart device tech question? I will do my best to answer your inquiry. Just send an email to contact@techsavvy.life. Please mention the device, app, and version you are using. To help us out, you can send screenshots of your data related to your question.

Author’s E-Book

You can access the e-book from a Kindle device, the Kindle App for the desktop or smartphone, which is a free app.

The author’s Vietnam eBook on the Battle for Tra Bong Vietnam: Events and Aftermath

Five Ways to Damage Your Smartphone Battery

There’s a lot of information out there about how to treat smartphone batteries. We can argue about the best practices, but there are some clearly bad things that can ruin batteries quickly.

RAYMOND OGLESBY @RaymondOglesby2
July 26, 2022

There’s a lot of information out there about how to treat smartphone batteries. We can argue about the best practices, but there are some clearly bad things that can ruin batteries quickly. Let’s find out.

This is for the smartphone

Copyright Scott Adams, Inc./Distributed by Universal Uclick for UFS

Smartphone batteries get worse over time, it’s inevitable. There are systems in place to slow it down as much as possible, but some things speed up that process and can even skip right to the end of it.

Damaged Cables

One of the worst and most dangerous things you can do is use cheap or incompatible cables with your phone. If you have ever heard a story about a phone spontaneously catching fire, it’s usually the fault of the cable.

It’s best to stick with charging accessories from the manufacturer of your phone or trusted brands. Avoid super low-cost accessories that do not have a lot of reviews. iPhone users can look for the Made for iPhone sticker to feel safe. All of this applies to wireless chargers as well. Refer to the below image:

Smartphone Battery 1
Damaged cables

Down to Zero

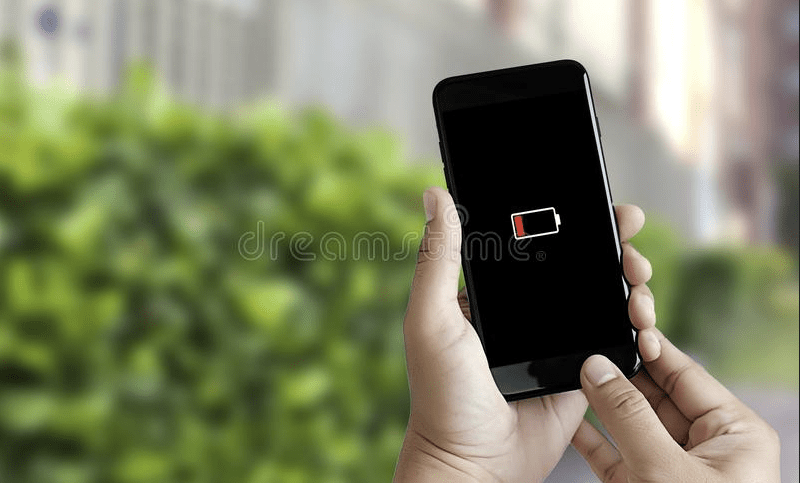
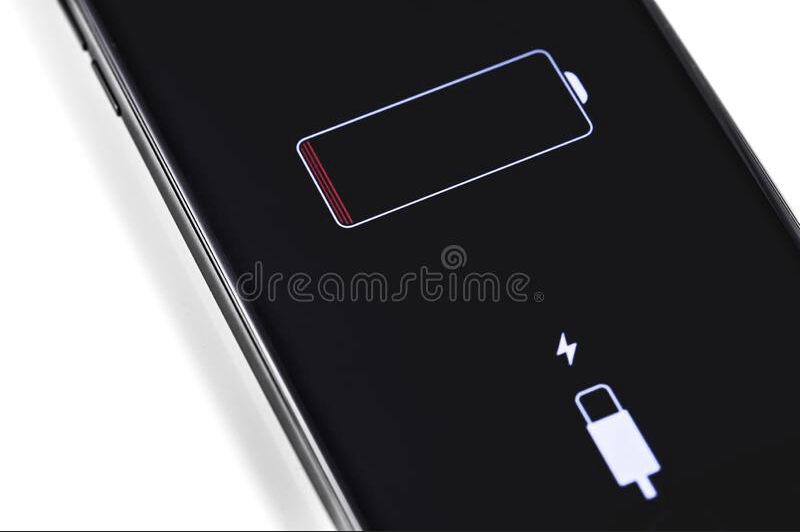
Charging cycles are what impact the lifespan of a battery the most. The constant cycle of charging and discharging slowly degrades the battery’s health. What makes it even worse is when your phone is frequently starting the cycle from 0%.

It’s best to keep your phone charged between 20-80% as much as possible. Some phones have features to help you do this, but they can only do so much. Shorter charge cycles are better for the battery, so try not to let it get below 20% as much. See the below image:

Smartphone Battery 2

Battery at zero charge

Keeping It Plugged In

It goes the opposite direction, too. Keeping your phone plugged in at 100% all the time is just as bad as letting it get to 0%. Charging your phone overnight is not necessarily bad, but you should not charge it more than you need to.

When the battery reaches 100% charge will protect itself by stopping charging. However, as soon as it drops back down to 99% it will charge back up to 100% again. This small cycle repeats itself over and over and it’s not good for the battery.

The good news is the iPhone and some Android phones now have Adaptive or Optimized charging features to reduce these charging cycles overnight. They keep the battery at around 80% most of the night and then finish the last 20% around your usual wake-up time. See the following image:

Smartphone Battery 3
Plugged in all the time

Extreme Heat

Most electronics do not like heat. This is especially true for batteries, including the ones in your phone. Excessive heat can shorten the lifespan of the battery. That’s another reason why it’s not great to keep your phone plugged in all the time.

Heat can come from other sources as well. Playing games that require a lot of resources, leaving your phone in a hot car, or letting it bake in the sun at the beach. All of these things can overheat your phone and damage the battery in the process. Refer to the below image:

Smartphone Battery 4
Smartphones in extreme heat

Screen Brightness

We have noticed this the most amongst adults, and their phone brightness levels are blinding. They are not only causing hurt to the eyes but also to the humble battery. Screens use the most amount of resources on the phone. That means, the higher the brightness level, the more battery drainage will occur. So, keep your brightness levels to a minimum, but also not to a point where you have to squint! See the below image:

Smartphone Battery 5
Screen brightness

The good news is you probably do not have to worry about ruining your smartphone’s battery. Most of these things are common sense. Stick with name-brand charging accessories, do not overly exhaust or juice up, and keep the device at a comfortable temperature. You will get the best you can out of your battery. Regardless, over time, your battery will slowly deplete, no longer charging to 100%.

Quote For the Day

Globalization, as defined by rich people like us, is a very nice thing… you are talking about the Internet, you are talking about cell phones, you are talking about computers. This doesn’t affect two-thirds of the people of the world.

Jimmy Carter

Tweet Info

That’s it. Please feel free to share this post! One way to share is via Twitter.

Just click the Tweet icon below. This will launch Twitter where you click its icon to post the Tweet.

Check out TechSavvy.Life for blog posts on smartphones, PCs, and Macs! You may email us at contact@techsavvy.life for comments or questions.

I Would Like to Hear From You

Please feel free to leave a comment. I would love to hear from you. Do you have a computer or smart device tech question? I will do my best to answer your inquiry. Just send an email to contact@techsavvy.life. Please mention the device, app, and version you are using. To help us out, you can send screenshots of your data related to your question.

Author’s E-Book

You can access the e-book from a Kindle device, the Kindle App for the desktop or smartphone, which is a free app.

The author’s Vietnam eBook on the Battle for Tra Bong Vietnam: Events and Aftermath

How to Loop a YouTube Video on iPhone

Using just the built-in features in iPhone’s Photos and YouTube app, you can make your videos play in a loop for as long as you want. This eliminates the need to manually re-play your videos. YouTube’s app for iPhone offers the option to play all your videos in a loop.

RAYMOND OGLESBY @RaymondOglesby2
July 21, 2022

Using just the built-in features in iPhone’s Photos and YouTube app, you can make your videos play in a loop for as long as you want. This eliminates the need to manually re-play your videos. YouTube’s app for iPhone offers the option to play all your videos in a loop. Let’s explore this feature.

This is for the iPhone

Dilbert and Pill
Copyright Scott Adams, Inc./Distributed by Universal Uclick for UFS

First, launch YouTube on your phone. In the app, tap the video you would like to play.

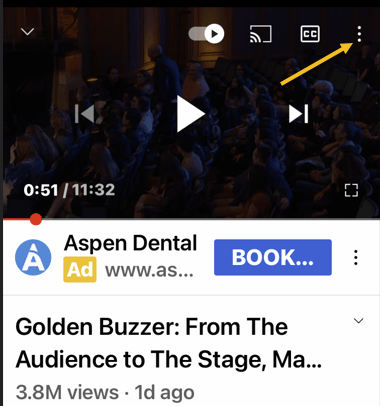
Next, on the video playback page, in the top right-hand corner, tap the Menu icon (the three dots). Refer to the below image:

Loop 1
Accessing the YouTube Video menu

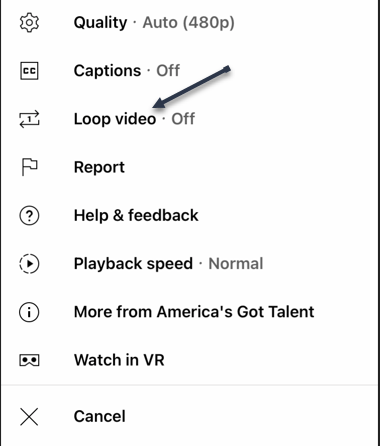
Now, from the Menu that opens, tap the Loop Video option to turn it ON. See the below image:

Loop 2
Turn ON the Loop video option

YouTube will keep playing the same video until you disable the loop. You can turn off the loop feature by tapping the same Menu icon (the three dots) and tapping Loop Video to turn it OFF.

Quote For the Day

t is questionable if all the mechanical inventions yet made have lightened the day’s toil of any human being.

John Stuart Mill

Tweet Info

That was east. Please feel free to share this post! One way to share is via Twitter.

Just click the Tweet icon below. This will launch Twitter where you click its icon to post the Tweet.

Checkout TechSavvy.Life for blog posts on smartphones, PCs, and Macs! You may email us at contact@techsavvy.life for comments or questions.

I Would Like to Hear From You

Please feel free to leave a comment. I would love to hear from you. Do you have a computer or smart device tech question? I will do my best to answer your inquiry. Just send an email to contact@techsavvy.life. Please mention the device, app, and version you are using. To help us out, you can send screenshots of your data related to your question.

Author’s E-Book

You can access the e-book from a Kindle device, the Kindle App for the desktop or smartphone, which is a free app.
The author’s Vietnam eBook on the Battle for Tra Bong Vietnam: Events and Aftermath

How to Set Emergency Bypass on iPhone

If you would like to allow certain people to call, FaceTime, or message you when you have enabled Do Not Disturb (DND) mode, activate your iPhone’s Emergency Bypass option for those people.

RAYMOND OGLESBY @RaymondOglesby2
July 19, 2022

If you would like to allow certain people to call, FaceTime, or message you when you have enabled Do Not Disturb (DND) mode, activate your iPhone’s Emergency Bypass option for those people. Let’s explore how to do just that.

This is for the iPhone

Dilbert and Criminal
Copyright Scott Adams, Inc./Distributed by Universal Uclick for UFS

When you enable Emergency Bypass for a specific contact, they can reach out to you even while you are on DND mode. You can enable this feature for phone and FaceTime calls and text messages separately.

Enable Emergency Bypass for Phone and FaceTime Calls

To allow people to get through your iPhone’s Do Not Disturb (DND) mode, first, launch the Contacts app on your phone.

Next, in the Contacts app, find and select the person you want to bypass. On the contact page, in the top right-hand corner, tap Edit. Refer to the below image:

ByPass
Selecting a contact to edit

Now, on the Edit screen, scroll down and choose Ringtone. See the below image:

ByPass 2
Selecting the Ringtone option

Next, on the Ringtone page, at the top, toggle to ON the Emergency Bypass option. Then, at the top right-hand corner, tap Done. See the following image:

ByPass 3
Turning Emergency Bypass to ON

Note!, To disable the feature, turn off the “Emergency Bypass” option.

Now, your selected person will now be able to make regular, and FaceTime calls with you even when you have chosen not to be disturbed.

Enable Emergency Bypass for Text Messages on iPhone

If you want certain people to send you text messages when you have Do Not Disturb (DND) turned on, first, launch the Contacts app on your iPhone. Then find and tap your contact.

Next, on the Contact page, in the top right-hand corner, tap Edit. Refer to the below image:

ByPass 4
Selecting a contact to edit

Now, on the Edit page, scroll down and tap Text Tone. See the below image:

ByPass 5
Selecting the Text Tone option

Next, on the Text Tone page, at the top, toggle to ON the Emergency Bypass option. Then save your changes by tapping Done in the top right-hand corner. See the following image:

ByPass 6
Turning Emergency Bypass to ON

Note!, To disable the feature, turn off the “Emergency Bypass” option.

Now, your iPhone will now allow text messages from your selected contact whether you have or have not enabled Do Not Disturb (DND) mode.

Quote For the Day

Technological progress has merely provided us with more efficient means for going backwards.

Aldous Huxley

Tweet Info

That’s it. Please feel free to share this post! One way to share is via Twitter.

Just click the Tweet icon below. This will launch Twitter where you click its icon to post the Tweet.

Checkout TechSavvy.Life for blog posts on smartphones, PCs, and Macs! You may email us at contact@techsavvy.life for comments or questions.

I Would Like to Hear From You

Please feel free to leave a comment. I would love to hear from you. Do you have a computer or smart device tech question? I will do my best to answer your inquiry. Just send an email to contact@techsavvy.life. Please mention the device, app, and version you are using. To help us out, you can send screenshots of your data related to your question.

Author’s E-book

You can access the e-book from a Kindle device, the Kindle App for the desktop or smartphone, which is a free app.

The author’s Vietnam eBook on the Battle for Tra Bong Vietnam: Events and Aftermath

How to Stop Facebook Messenger Opening at Startup for Windows 10/11

Recently, we had Facebook Messenger start loading at startup. We had not enabled this to happen; it seemed to have a mind of its own.

RAYMOND OGLESBY @RaymondOglesby2
July 14, 2022

Recently, we had Facebook Messenger start loading at startup. We had not enabled this to happen; it seemed to have a mind of its own. Let’s explore one way to fix this behavior.

This is for Windows 10 and 11. Screenshots are from Windows 10

Dilbert and Pill
Copyright Scott Adams, Inc./Distributed by Universal Uclick for UFS

Besides us, Windows users have raised complaints that Facebook Messenger opens up automatically as soon as the OS starts up.

Notably, this issue is not limited only to Facebook Messenger, but it is happening to other apps, including Windows Messenger, Skype, etc. as well.

The result of this is that the unwanted process running right during the startup makes the boot a bit slow, and hampers the overall performance of the Windows PC.

Reportedly, the issue is so severe that sometimes, users are also experiencing frozen screens, blue screens, high CPU and RAM usage, laptops getting heated up, etc., problems.

This can be pretty annoying if you simply do not use any of the apps on your PC.

Reasons for Startup Issue

Apps opening or running during Windows startup is quite common, but for some essential apps. For instance, system processes, antivirus software, and productivity tools load right during the startup.

However, there are a few notorious apps that muscle their way into the startup process. These apps are not necessary to load up during the startup as they are not essential.

There are a few reasons why several users are experiencing Facebook Messenger or other apps opening during Windows startup. 

The app is added to the list of start-up apps. This can be done by the software itself, without your input. For some users, apps like Facebook Messenger have made their way to the top of the startup apps list and caused trouble for them.

Besides, most apps come with a built-in toggle or option to run the program at startup. For obvious reasons, if this feature is turned on, your PC will load the program during startup.

Stop the App From Opening at Startup

The fix we like the best for Windows 10/11 is using Windows Settings.

First, press the Win + I buttons to open Settings, or right-click the Start icon, then the Settings option. Refer to the below image:

Startup Messenger 1
Accessing Settings

Next, on the Settings screen, click on Apps. See the below image:

Startup Messenger 2
Accessing Apps

Now, select Startup from the list of options in the left pane. See the following image:

Startup Messenger 3
Selecting Startup option

Next, locate the Messenger app. You may see two Messenger apps. To the right of the Messenger app(s), toggle the switch to OFF. Refer to the below image:

Startup Messenger 4
Toggle Messenger app(s) apps to OFF

Now, exit Settings and reboot. You should not see Facebook Messenger loaded.

Quote For The Day

The digital camera is a great invention because it allows us to reminisce. Instantly.

Demetri Martin

Tweet Info

You are finished. Please feel free to share this post! One way to share is via Twitter.

Just click the Tweet icon below. This will launch Twitter where you click its icon to post the Tweet.

Checkout TechSavvy.Life for blog posts on smartphones, PCs, and Macs! You may email us at contact@techsavvy.life for comments or questions.

I Would Like to Hear From You

Please feel free to leave a comment. I would love to hear from you. Do you have a computer or smart device tech question? I will do my best to answer your inquiry. Just send an email to contact@techsavvy.life. Please mention the device, app, and version you are using. To help us out, you can send screenshots of your data related to your question.

Author’s E-book

You can access the e-book from a Kindle device, the Kindle App for the desktop or smartphone, which is a free app.
The author’s Vietnam eBook on the Battle for Tra Bong Vietnam: Events and Aftermath

Exploring the Line Under the Battery Icon on iPhone Lock Screen

The iPhone has a pretty simple and intuitive interface, but there are still some things that appear with no explanation. One such thing is the line under the cell signal, Wi-Fi, and battery icons on the lock screen.

RAYMOND OGLESBY @RaymondOglesby2
July 12, 2022

The iPhone has a pretty simple and intuitive interface, but there are still some things that appear with no explanation. One such thing is the line under the cell signal, Wi-Fi, and battery icons on the Lock screen.

This is not the first mysterious thing to appear in this region of the iPhone screen. iOS 14 and iPad OS 14 introduced little green and orange dots to indicate when apps are using the camera and microphone. Let’s explore this curious UI element.

This is for the iPhone. Screensho9ts are from iPhone XR

Dilbert and Anxiety
Copyright Scott Adams, Inc./Distributed by Universal Uclick for UFS

It’s a Handle for Opening the Control Center

The Line under the battery was introduced in iOS 11.2 On a basic level, it’s an indicator of where the Control Center can be opened. You can think of it as the handle at the bottom of the Lock screen for swiping up.

Note! If you do not see this Line, try changing your wallpaper and/or font. Even if you do not see the Line, this feature will still work. Your Line will be a different color depending on your screen color.

Refer to the below image:

Line 1
Accessing the Line

The Control Center is a special menu that contains toggles for things such as Airplane Mode, Wi-Fi, and Bluetooth. It can also be used for shortcuts to Flashlight, QR code Scanner, Calculator, and much more.

It’s a Privacy Feature

The Line has a second purpose that may be even more important. It does not just show where the Control Center is, it indicates that the Control Center can be opened from the Lock screen. Why is that important? If you see that Line, anyone can open the Control Center, even if the iPhone is locked. Thankfully, that’s something you can change if it bothers you.

Removing the Line

You can not really permanently remove the Line, but you can make it so the Control Center can not be opened when your iPhone is locked. The Line will still be present when the device is unlocked, though.

First, launch Settings, then tap the Face/Touch ID & Passcode section. See the below image:

Line 2

Accessing the Face/Touch ID & Passcode option

Next, switch the Control Center toggle to OFF, under the Allow Access When Locked section. See the following image:

Line 3
Toggle OFF the Control Center toggle

This is a really small thing, but small things can be confusing sometimes. Apple does not do a good job of explaining why this Line is there, it just is. Now you can explain it to your less knowledgable iPhone friends.

Quote For the Day

Technological progress has merely provided us with more efficient means for going backwards.

Aldous Huxley

Tweet Info

You are finished. Please feel free to share this post! One way to share is via Twitter.

Just click the Tweet icon below. This will launch Twitter where you click its icon to post the Tweet.

Check out TechSavvy.Life for blog posts on smartphones, PCs, and Macs! You may email us at contact@techsavvy.life for comments or questions.

I Would Like to Hear From You

Please feel free to leave a comment. I would love to hear from you. Do you have a computer or smart device tech question? I will do my best to answer your inquiry. Just send an email to contact@techsavvy.life. Please mention the device, app, and version you are using. To help us out, you can send screenshots of your data related to your question.

Author’s E-book

You can access the e-book from a Kindle device, the Kindle App for the desktop or smartphone, which is a free app.
The author’s Vietnam eBook on the Battle for Tra Bong Vietnam: Events and Aftermath