How to Use Safety Check in Google Chrome

Google Chrome offers a tool that lets you perform a checkup to secure your web browsing.

Google Chrome offers a tool that lets you perform a checkup to secure your web browsing. Let’s explore this feature.

This is for devices running Google Chrome. Screenshots are from Windows 10 PC

Dilbert and Keyboard
Copyright Scott Adams, Inc./Distributed by Universal Uclick for UFS

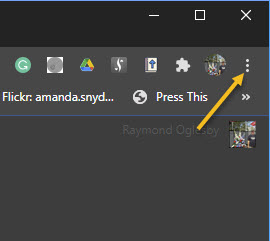
First, launch the Chrome web browser on your Windows 10, Mac, Chrome OS, or Linux computer and click the three-dot (hamburger icon) located in the top-right corner. Refer to below image:

Selecting the hamburger icon

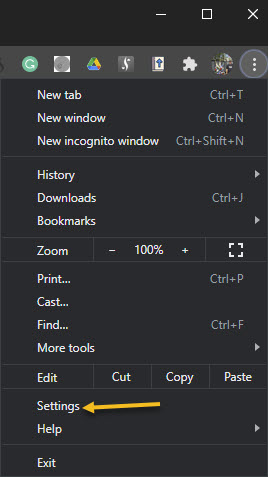
Next, click on Settings from the drop-down menu. See below image:

Selecting the Settings option

Now, scroll down to find the Safety Check section and click the Check Now option. See following image:

Selecting the Check Now option

Next, Chrome will kick off the Safety Check test. Depending on how much browsing data you have, this can take anywhere from a few seconds to a couple of minutes. When finished, just click the Review option by any listing. Refer to below image:

Selecting the Review button

In this process, Chrome scans a total of four core modules to look for any malicious code. It will make sure that the browser app is on the most recent version for protection against the latest internet viruses and that all of your installed third-party extensions are harmless. It will also check whether any of your saved passwords have been compromised in a data breach and that Safe Browsing, a setting that warns you against suspicious sites, is enabled.

Once the Safety Check is complete, Chrome will pull up shortcuts for anything that may need your immediate attention, such as reviewing compromised credentials.

After running Safety Check on my PC, it found comprised passwords. See below image where we are displaying three of them:

Viewing Comprised Passwords

After taking the recommended steps, you can also run the Safety Check again to ensure that your new security settings are active.

There’s another feature you can use by switching on Enhanced Safe Browsing, an advanced mode that allows Google to assess your browsing for potential threats and suggest privacy-focused improvements. However, we do not recommend using this option because you are choosing to share a copy of your browsing data with Google.

You are finished. Please feel free to share this post! One way to share is via Twitter.

Just click the Tweet icon below. This will launch Twitter where you click its icon to post the Tweet.

Check out TechSavvy.Life for blog posts on smartphones, PCs, and Macs! You may email us at contact@techsavvy.life for comments or questions.

I Would Like to Hear From You

Please feel free to leave a comment. I would love hearing from you. Do you have a computer or smart device tech question? I will do my best to answer your inquiry. Just send an email to contact@techsavvy.life. Please mention the device, app and version that you are using. To help us out, you can send screenshots of your data related to your question.

The author’s Vietnam eBook on the Battle for Tra Bong: Events and Aftermath

How to Bookmark Multiple Tabs in Safari

Safari on the iPhone and iPad has a hidden feature that lets you quickly bookmark all open websites to a single folder. To keep things as you had left it, quickly bookmark all the tabs in Safari using this feature.

Safari on the iPhone and iPad has a hidden feature that lets you quickly bookmark all open websites to a single folder. To keep things as you had left it, quickly bookmark all the tabs in Safari using this feature.

This is for iPhone and iPad

Dilbert and Auditors
Copyright Scott Adams, Inc./Distributed by Universal Uclick for UFS

First, open the Safari app on your iPhone or iPad and then tap the URL bar. Here, enter a URL and then press the Go button to open the website. Repeat this process to open all of the websites that you want to bookmark at once. Refer to below image:

Tabs 1
Entering a URL to save

Method 1 – Closing a Few Bookmarks

If you already have websites open, tap the Tabs button, and close any webpage that you do not want to bookmark.

Method 2 – Closing All Bookmarks

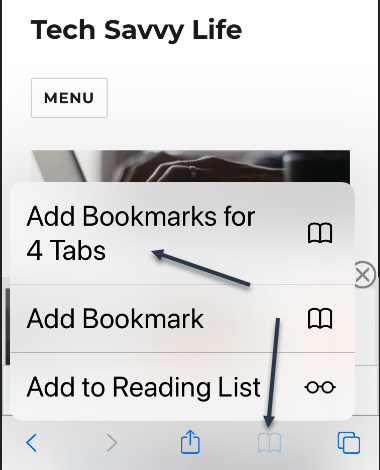
If you have lots of open bookmarks, tap and hold the Bookmarks button and then view the Add Bookmarks For X Tabs option. You may want to close all, then add tabs using the above process. (In my example. I am closing 208 and adding 4 bookmarks). Once you have done this, select the Add Bookmarks For X Tabs option.

Related

How To Close Safari Tabs Automatically on iPhone or iPad

See below image:

Tabs 2
Adding bookmarks you have saved

Creating a New Bookmarks Folder

Now, from the next page, give the new folder a name. By default, Safari will save the folder in Favorites but you can tap the button to see all available locations.

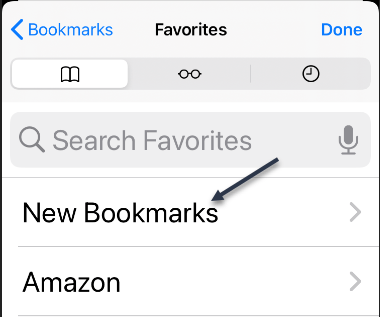
Next, after choosing the folder, tap the Save button. (In my example, I entered a new folder of New Bookmarks with 4 tabs). See following image:

Tabs 3
Creating a new bookmarks folder

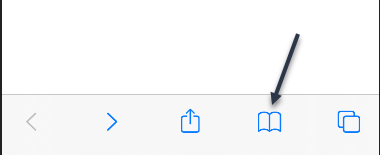
Safari has now saved all of your open tabs. To access the tabs later, tap the Bookmarks button from the bottom toolbar. Refer to below image:

Tabs 4
Accessing the bookmarks

Now, locate the folder where you saved the bookmarks. Then tap and hold the folder to see the options. See below image:

Tabs 5
Accessing your new bookmarks folder

Deletion Process

Next, tap the Open In New Tabs button to reopen all of the tabs. Also, you can tap the Delete button to delete the folder. See following image:

Tabs 6
Open or Delete bookmark(s)

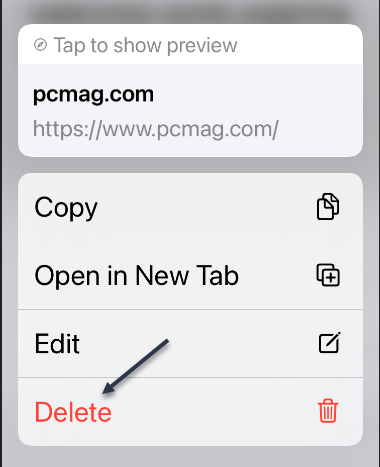
Now, select a tab to see its options, then tap the Delete option to delete the bookmark. Note! If you do not select a bookmark and press Delete, all your tabs will be deleted, so be careful. Refer to below image:

Tabs 7
Delete a bookmark

Quote For the Day

The past, like the future, is indefinite and exists only as a spectrum of possibilities.

Stephen Hawking

That’s it. Please feel free to share this post! One way to share is via Twitter.

Just click the Tweet icon below. This will launch Twitter where you click its icon to post the Tweet

Check out TechSavvy.Life for blog posts on smartphones, PCs, and Macs! You may email us at contact@techsavvy.life for comments or questions.

I Would Like to Hear From You

Please feel free to leave a comment. I would love hearing from you. Do you have a computer or smart device tech question? I will do my best to answer your inquiry. Just send an email to contact@techsavvy.life. Please mention the device, app and version that you are using. To help us out, you can send screenshots of your data related to your question.

The author’s Vietnam eBook on the Battle for Tra Bong: Events and Aftermath

How to Disable Snap to Maximize in Windows 10

You are using Windows 10, then suddenly; Snap. You have just dragged a window too close to the top edge of the screen, and now it’s maximized! If this automatic window snapping is not what you want, it’s easy to turn off.

You are using Windows 10, then suddenly; Snap. You have just dragged a window too close to the top edge of the screen, and now it’s maximized! If this automatic window snapping is not what you want, it’s easy to turn off.

This is for devices running Windows 10

Dilbert and Science
Copyright Scott Adams, Inc./Distributed by Universal Uclick for UFS

Why Windows Snap

The fact that certain windows will maximize when dragged too close to the edge of the screen is thanks to a Windows 10 feature called Snap Assist. It allows you to quickly make windows snap to fill available spaces on the screen without having to resize each one.

To visualize this, let’s say you have a Web browser, Word document, File Explorer, and the Windows 10 Settings app all open on your Windows 10 device. When you snap one of those applications, like Microsoft Word, to the left side of your screen, Windows 10 will show you a layout of your remaining open apps on the right side of the screen. Clicking any one of them will maximize that app and snap it to the right side of the screen.

But not everyone enjoys this feature, and there’s an easy way to turn it off.

How to Disable Snap

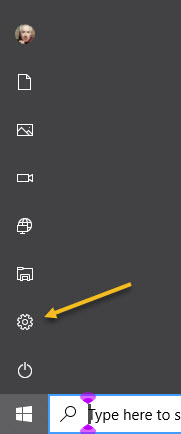
First, launch the Settings app by opening the Start menu and clicking the small gear icon in the left side of the Start menu. You can also press Windows+I to launch it. Refer to below image:

Snap 1
Accessing Settings app

Now, in Settings, click System. See below image:

Snap 2
Accessing System section

Next, in System settings, click Multitasking in the sidebar. Then, locate the Snap windows option and flip the toggle to turn it Off, See following image:

Snap 3
Turning Snap feature to Off; default is On

Now, close Settings. You can now position windows anywhere on the screen without them snapping into place.

Quote For the Day

Technology is supposed to make our lives easier, allowing us to do things more quickly and efficiently. But too often it seems to make things harder, leaving us with fifty-button remote controls, digital cameras with hundreds of mysterious features and book-length manuals, and cars with dashboard systems worthy of the space shuttle.

James Surowiecki

That’s it. Please feel free to share this post! One way to share is via Twitter.

Just click the Tweet icon below. This will launch Twitter where you click its icon to post the Tweet.

Check out TechSavvy.Life for blog posts on smartphones, PCs, and Macs! You may email us at contact@techsavvy.life for comments or questions.

I Would Like to Hear From You

Please feel free to leave a comment. I would love hearing from you. Do you have a computer or smart device tech question? I will do my best to answer your inquiry. Just send an email to contact@techsavvy.life. Please mention the device, app and version that you are using. To help us out, you can send screenshots of your data related to your question.

The author’s Vietnam eBook on the Battle for Tra Bong: Events and Aftermath

How to Reset Windows 10 Settings App

On Windows 10, you can reset the Settings app when it does not want to open, keeps crashing, or when you are experiencing other problems.

On Windows 10, you can reset the Settings app when it does not want to open, keeps crashing, or when you are experiencing other problems.

If you are dealing with these problems, Windows 10 includes a way to reset the Settings app using the built-in secret option. Let’s explore how to reset the Settings app when it’s not working.

This is for devices running Windows 10

Dilbert and Files
Copyright Scott Adams, Inc./Distributed by Universal Uclick for UFS

Like with resetting any other app, when you reset the Settings app, it removes a variety of settings and brings them back to their default values. This can fix bugs and other problems that are caused by your custom settings.

To start resetting Settings, first, click your Start menu. Now, in the Cortana search box (next to the Start menu) type in “settings” (without the quotes). Next, in the search results, right-click the app and select App settings. Refer to below image:

Reset 1
sAccessing App settings

In the Settings window, scroll down to the Reset section and click Reset. See below image:

Reset 2
Accessing Reset section

You will get a prompt stating your app’s data will be deleted. Click Reset in the prompt to continue. See following image:

Reset 3
Selecting the Settings Reset option

The Settings app is now reset. Now, you can launch it as mentioned above or by pressing Windows+I.

If this does not fix your issue, you might want to reset your entire Windows 10 PC. (We recommend you only do this as a last resort). This brings all your settings to their default states, potentially fixing many issues on the computer.

The first principle is that you must not fool yourself and you are the easiest person to fool.

Richard P Feynman

That’s it. Please feel free to share this post! One way to share is via Twitter.

Just click the Tweet icon below. This will launch Twitter where you click its icon to post the Tweet.

Check out TechSavvy.Life for blog posts on smartphones, PCs, and Macs! You may email us at contact@techsavvy.life for comments or questions.

I Would Like to Hear From You

Please feel free to leave a comment. I would love hearing from you. Do you have a computer or smart device tech question? I will do my best to answer your inquiry. Just send an email to contact@techsavvy.life. Please mention the device, app and version that you are using. To help us out, you can send screenshots of your data related to your question.
The author’s Vietnam eBook on the Battle for Tra Bong: Events and Aftermath

How to Access Saved Credit Cards in Safari

Autofill gives you the ability to save contact and credit card information on Safari so you do not have to re-enter the long card number and expiration date every time you buy something on the Web.

Autofill gives you the ability to save contact and credit card information on Safari so you do not have to re-enter the long card number and expiration date every time you buy something on the Web.

Old cards remain saved on Autofill, even when they have expired. Let’s explore this feature.

This is for iPhone and iPad

Dilbert and Late
Copyright Scott Adams, Inc./Distributed by Universal Uclick for UFS

View Your Credit Cards

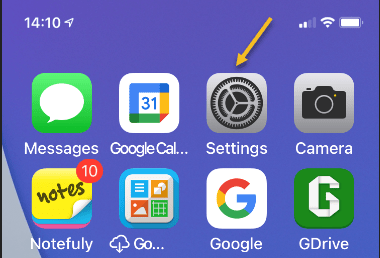
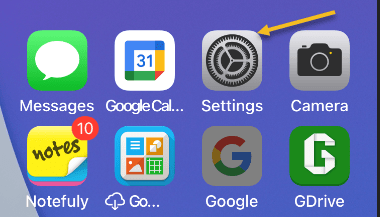
First, open Settings on your iPhone or iPad. Refer to below image:

Accessing Settings

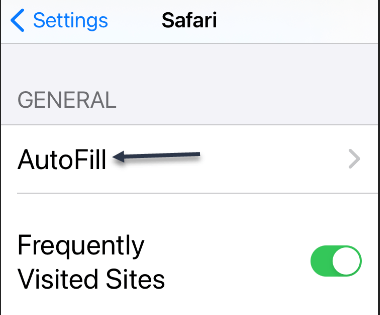
Next, in Settings, tap Safari. See below image:

Accessing Safari option

Now, in Safari, tap AutoFill. See following image:

Accessing AutoFill option

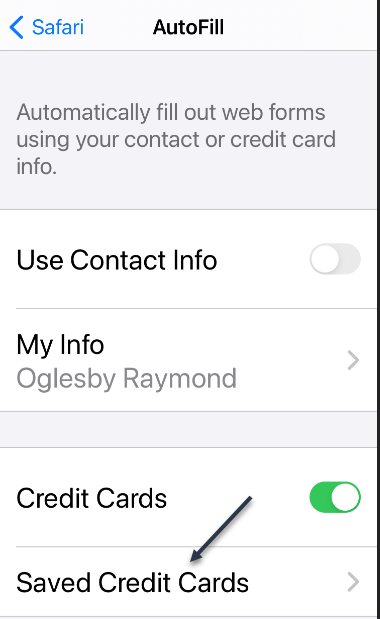
Next, in Safar’s AutoFill settings, tap Saved Credit Cards. Refer to below image:

Accessing your Saved Credit Cards

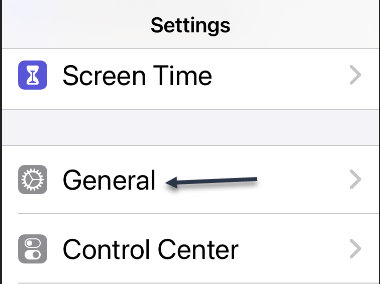
Now, when prompted, enter your PIN or validate your identity with Touch ID or Face ID, Next, you will see a list of credit cards that Safari has saved. Tap any entry in the list to see more details.

On the details screen, you will see the full credit card number and expiration date for the card if Safari has saved that information (Note that the three-digit CVV number on the card’s back is never stored.) See below image:

Viewing Saved Credit Card list

Next, if you need to edit the information on the card, tap Edit in the upper right-hand corner. See following image:

Editing a credit card

Now, when you are done editing, tap Done.

Add a Credit Card

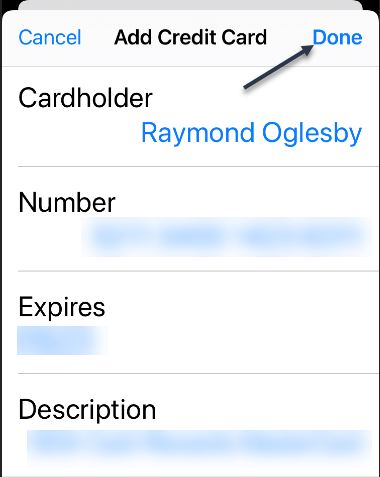
If you go back one screen to the credit card list, you can also add a credit card to the list by tapping Add Credit Card. Just enter your information for the credit card. Refer to below image:

Adding a credit card

Delete a Credit Card

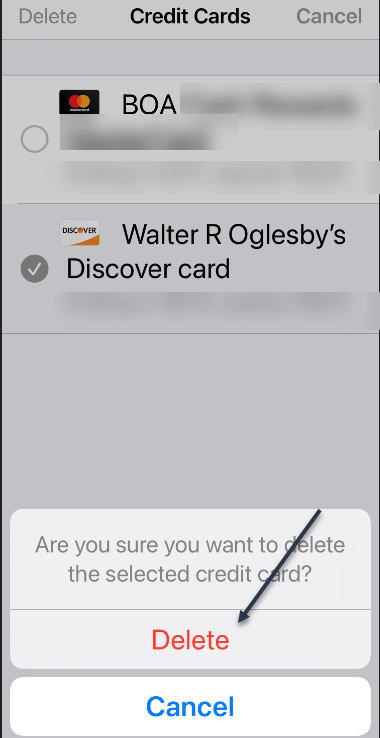
As well as add, you can delete a card from the list by tapping Edit, checkmark the card, and tapping Delete. See below image:

Deleting a credit card

A pop-up message will appear asking you to confirm the deletion. See following image:

Confirming the deletion

When you are done, exit Settings.

Quote For the Day

Technology is a useful servant but a dangerous master.

Christian Lous Lange

You are finished. Please feel free to share this post! One way to share is via Twitter.

Just click the Tweet icon below. This will launch Twitter where you click its icon to post the Tweet.

Check out TechSavvy.Life for blog posts on smartphones, PCs, and Macs! You may email us at contact#@techsavvy.life for comments or questions.

I Would Like to Hear From You

Please feel free to leave a comment. I would love hearing from you. Do you have a computer or smart device tech question? I will do my best to answer your inquiry. Just send an email to contact@techsavvy.life. Please mention the device, app and version that you are using. To help us out, you can send screenshots of your data related to your question.
Copyright Scott Adams, Inc./Distributed by Universal Uclick for UFS

How to Name Chrome Windows for Alt+Tab and Taskbar

If you keep many Google Chrome windows open to organize your tabs like me, you can go one step further and name each window. Chrome’s built-in naming feature makes it easy to remember the windows name in the Taskbar or the overview screen (Alt+Tab).

If you keep many Google Chrome windows open to organize your tabs like me, you can go one step further and name each window. Chrome’s built-in naming feature makes it easy to remember the windows name in the Taskbar or the overview screen (Alt+Tab).

The Windows naming feature was introduced in Chrome 90 and is available for Chrome on Windows 10, Mac, and Linux. It is easy to use and can save you from opening the wrong window.

This is for devices running Chrome 90. Screenshots are from Windows 10

Dilbert and Workplace
Copyright Scott Adams, Inc./Distributed by Universal Uclick for UFS

First, launch Chrome and open a Chrome window. Next, click the three-dot menu (the hamburger) icon in the top-right of the Chrome window. Refer to below image:

Name 1
Accessing the main menu

Now, from the drop-down menu, select More Tools. See below image:

Name 2
Selecting More Tools option

Next, from the expanded options, click Name Window. If you don’t see this, you are not running Chrome 90. To check your Chrome version, go to:

Click the three-dot menu (the hamburger) icon > Help > About Google Chrome

Now, your Google version will be displayed. Google should auto update to the latest version.

See following image for your expanded options:

Name 3
Accessing Name window option

A pop-up text box will appear. Now, enter the name for the window and click OK. Refer to below image:

Name 4
Naming your window

Alternatively, you can right-click the title bar of the Chrome window and select Name Window from the drop-down menu and go through the process of assigning it a name. See below image:

Name 5
Accessing Name window option from title bar

You will now see this name in the Alt+Tab on Windows 10. See following image:

Name 6
Your Alt+Tab named window

Additionally, this name will appear in the Taskbar on Windows 10. Refer to below image:

Name 7
Your Taskbar named window

Quote For the Day

The more you eliminate the inefficient use of information, the better it is for productivity.

Mitch Kapor

You are finished. This is probably a pretty niche feature, but for those of us who like to organize Chrome tabs by separating them out into windows, it’s a handy little trick.

Please feel free to share this post! One way to share is via Twitter.

Just click the Tweet icon below. This will launch Twitter where you click its icon to post the Tweet.

Check out TechSavvy.Life for blog posts on smartphones, PCs, and Macs! You may email us at contact@techsavvy.life for comments or questions.

I Would Like to Hear From You

Please feel free to leave a comment. I would love hearing from you. Do you have a computer or smart device tech question? I will do my best to answer your inquiry. Just send an email to contact@techsavvy.life. Please mention the device, app and version that you are using. To help us out, you can send screenshots of your data related to your question.

The author’s Vietnam eBook on the Battle for Tra Bong: Events and Aftermath

How to Remove Weather and News Widget in Windows 10

Surprise! Microsoft rolled out a taskbar “Weather and News” widget in June 2021. And it is a mess. The widget is running MSN.com all the time in the background, and uses the Edge browser. I do not use either. Besides, you have to go through a myriad of screens to configure the widget. Microsoft is trying to make money by posting ads through the widget.

Surprise! Microsoft rolled out a taskbar “Weather and News” widget in June 2021. And it is a mess. The widget is running MSN.com all the time in the background, and uses the Edge browser. I do not use either. Besides, you have to go through a myriad of screens to configure the widget. Microsoft is trying to make money by posting ads through the widget. Let’s explore how to remove this feature.

This is for devices running Windows 10

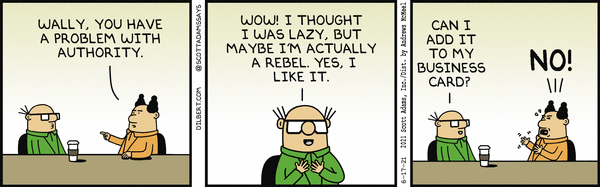
Dilbert and Rebel
Copyright Scott Adams, Inc./Distributed by Universal Uclick for UFS

It’s pretty hard to miss when it appears. You will see a weather forecast in a small box next to the clock and notification area. Selecting the widget opens a panel with more weather info, stocks, sports scores, news, and more. For me, I do not need or want this widget running MSN.com in the background. I can get the widget “cards” info when I want it.

You already have the news and weather through Live Tiles on the desktop. You really do not need duplicated access.

Interesting, if you move the taskbar to the top, left, or right on the screen, the widget disappears. Bug or feature? I think it’s a bug. But, who knows. When Windows 11 arrives in the fall, the UI will change to be Mac-like, a revamped tablet interface, among many other modifications. Microsoft may fix the widget by then.

Fortunately, it’s easy to get rid of it. First, right-click anywhere on the taskbar to load the widget. Refer to below image:

Taskbar 1
The Weather and News widget

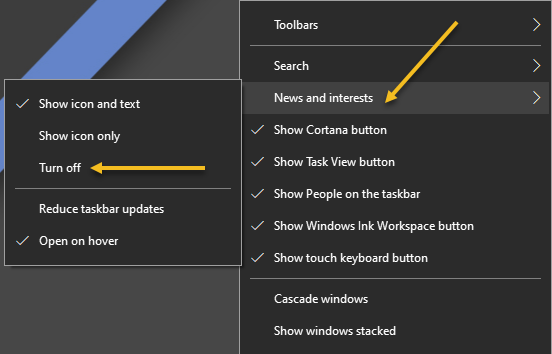
From the menu, select News and interests and then click Turn off from the submenu. See below image:

Taskbar 2
Turning off the Widget

The weather widget will no longer be present in your taskbar. If you would like to bring it back at any time, simply open the same menu and select Show icon and text.

Alternatively, you can also select Show icon only for a smaller widget that takes up less room on your taskbar.

Quote For the Day

We live in a society exquisitely dependent on science and technology, in which hardly anyone knows anything about science and technology.

Carl Sagan

That was easy. Please feel free to share this post! One way to share is via Twitter.

Just click the Tweet icon below. This will launch Twitter where you click its icon to post the Tweet.

Check out TechSavvy.Life for blog posts on smartphones, PCs, and Macs! Please email us at contact@techsavvy.life for comments or questions.

I Would Like to Hear From You

Please feel free to leave a comment. I would love hearing from you. Do you have a computer or smart device tech question? I will do my best to answer your inquiry. Just send an email to contact@techsavvy.life. Please mention the device, app and version that you are using. To help us out, you can send screenshots of your data related to your question.
The author’s Vietnam eBook on the Battle for Tra Bong: Events and Aftermath

How to Set Your Music App Using Siri on iPhone and iPad

In iOS 14 and iPadOS 14 or higher you can train Siri to learn your go-to music app. Siri will ask you which audio app you would like to use and remembers your choice.

In iOS 14 and iPadOS 14 or higher you can train Siri to learn your go-to music app. Siri will ask you which audio app you would like to use and remembers your choice.

This if for the iPhone and iPad running iOS or iPadOS 14 or higher

Dilbert and Board
Copyright Scott Adams, Inc./Distributed by Universal Uclick for UFS

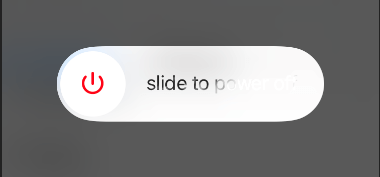
First, update your iOS/iPadOS to 14 or higher. Next, launch Siri. On newer Apple devices, you can do this by saying “Hey Siri” (if you have it turned on) or long-press the Side/Top/Power button on your iPhone or iPad with Face ID. Refer to below image:

Music 1
Accessing the Power button

On older iPhones or iPads with a Touch ID sensor, long-press the Home button.

Now, Siri will start listening for a voice command when you see its icon appear on-screen. Ask your phone or tablet to play a song, artist, podcast, or audiobook. For example, you can say “Play Carole King,” or “Play Horse With No Name,” or “Listen to the Vergecast.” See below image:

Music 2
Siri enabled and listening

Next, your device will ask you which music or audio app you would like to listen to the song, artist, podcast, or audiobook on. Tap the app that you would like to use. See following image:

Music 3
Select an audio app

Occasionally, Siri might ask for your permission to access an app’s data before it can control playback. Just grant the voice assistant permission by tapping the Yes button from the pop-up screen. Refer to below image:

Music 4
Giving permission to access app

Now, Siri’s on-screen overlay will transform into an audio widget. You can control playback, volume, and more from this window. Tapping outside of the widget will make it disappear, but your music, audio, or podcast will continue playing in the background. See below image for the jazz song “Touching Peace.”

Music 5
Siri audio widget

For the full playback screen from Apple Music, see following image:

Music 6
Siri audio widget in full screen

From now on, if you ask Siri to play a song or audio program, your device will default to whichever app you selected. It will no longer automatically open the Apple Music app.

As mentioned, setting the default music app is not a setting “baked” into your device. On occasion, Siri might prompt you to reselect which audio app you would like to use to help train the Voice Assistant.

Also, you are not locked into only using the app you just chose. Instead, you can be specific in your command to Siri to open a song, artist, podcast, or audiobook in a particular app that you have installed on your device. For example, you can say, “Listen to 1984 by George Orwell in Audible.”

Quote For the Day

He who has a why to live can bear almost any how.

Friedrich Nietzsche

You are finished. Please feel free to share this post! One way to share is via Twitter.

Just click the Tweet icon below. This will launch Twitter where you click its icon to post the Tweet.

Check out TechSavvy.Life for blog posts on smartphones, PCs, and Macs! You may email us at contact@techsavvy.life for comments or questions.

I Would Like to Hear From You

Please feel free to leave a comment. I would love hearing from you. Do you have a computer or smart device tech question? I will do my best to answer your inquiry. Just send an email to contact@techsavvy.life. Please mention the device, app and version that you are using. To help us out, you can send screenshots of your data related to your question.
The author’s Vietnam eBook on the Battle for Tra Bong: Events and Aftermath

What’s Coming in Windows 11

Just before Apple’s June 24th announcement, it’s not a long shot to know some of the features being moved onto Windows 11. Here are the major ones.

Courtesy of TechRadar

Just before Apple’s June 24th announcement, it’s not a long shot to know some of the features being moved onto Windows 11. Here are the major ones.

This is for 2021 Fall release of Windows 11

Dilbert and Job
Copyright Scott Adams, Inc./Distributed by Universal Uclick for UFS

A New Look for Windows 11

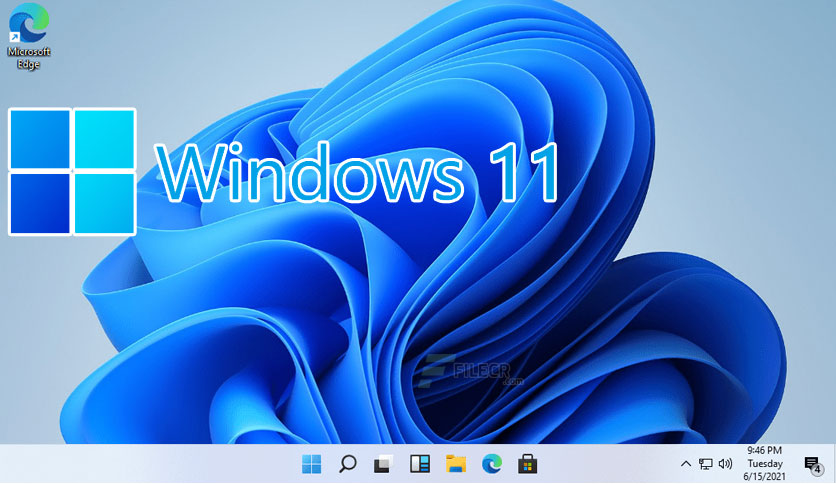
Windows 11 image courtesy of Windows Central

In the latest Insider dev channels, there are already countless icons that have seen a redesign, giving most of these the most dramatic changes in looks since Windows 7.

It’s been long rumored that the UI is currently being redesigned, with a new font, Segoe UI Variable, already enabled in dev versions as early as build 21376. However, Microsoft’s design team is also looking for a new font, asking users, to pick from five fonts to replace Calibri.

There’s been a recent job posting, that gives even more weight to a redesign coming. It described the role as “building new parts and modernizing existing parts of the Windows UX, conducting user research to understand users’ needs.”

While this could also mean a subtle refresh of Windows 10, it could mean a huge redesign for Windows 11, if it is confirmed at the June 24 event.

With the recent build of 21996 confirming the Windows 11 name, we can also see a refresh UI, with the start button and the icons on the taskbar moving to the middle, being reminiscent of the dock from macOS.

It’s not just the fonts and the icons that are seeing a refresh for Windows 11, it even goes to the corners across the whole of the operating system, which looks to set it apart even further from Windows 10.

Task Manager courtesy of Windows Latest

Alongside the new look, there’s also the implementation of rounded corners coming up. This will remove the sharp edges across the whole of the user interface and bring a softer appearance to Windows 11.

The start menu is now apparently at the center of the taskbar, but there is a way to bring the classic menu back to the left.

From app windows to the Start Menu, to buttons, Live Tiles, and even the Action Center, there is a redesign. This redesign feature could have a dramatic effect on how Windows 11 looks, and help make it stand out to users if they are upgrading from Windows 10.

Windows 11 new OS features

A big update to Windows 11 will not just be to the look of the operating system, but in the useful features that it can bring to many situations.

It’s been reported that Microsoft will be including battery usage statistics to the Settings app. Smartphones have had this sort of feature for many years, but it’s been conspicuously absent in Windows.

Other rumored features that could be moved over to Windows 11 could include the ability to uninstall most of the pre-installed Microsoft apps, improvements to Snap Assist for external displays, and a dashboard for your Microsoft Account that lives in the taskbar. 

Additionally, recent test builds have suggested that the Taskbar and File Explorer processes usually seen in Task Manager looks to be separated, at long last.

Alongside this, right clicking on the Taskbar for Task Manager is now absent, alongside the keyboard shortcut of Win + X to switch to PowerShell is also gone. Personally, I want the right-click back for the Task Manager.

Windows 11 tablet improvements

Tablet mode has been one of Windows’ weaker points ever since Windows 8. 

However the most important feature currently rumored is a new gesture layer that would sit above the user interface and allow trackpad-like gestures on a touchscreen.

Pen and voice inputs are both expected to receive further refinement as well, with a new UI for voice and context menu for pen are both planned. These tablet features could be a showcase for Windows 11, especially with future Surface products in the pipeline from Microsoft. To have a new, numbered operating system for its upcoming tablets could be a big selling point for new users.

Quote For the Day

Absence of evidence is not evidence of absence.

Carl Sagan

That’s it for now on Windows 11 features. There will be more to come. Please feel free to share this post! One way to share is via Twitter.

Just click the Tweet icon below. This will launch Twitter where you click its icon to post the Tweet.

Check out TechSavvy.Life for blog posts on smartphones, PCs, and Macs! You may email us at contact@techsavvy.life for comments or questions.

I Would Like to Headr From You

Please feel free to leave a comment. I would love hearing from you. Do you have a computer or smart device tech question? I will do my best to answer your inquiry. Just send an email to contact@techsavvy.life. Please mention the device, app and version that you are using. To help us out, you can send screenshots of your data related to your question.
The author’s Vietnam eBook on the Battle for Tra Bong: Events and Aftermath

Five Real Life Samples of Malware

Chances are good you will never seen malware up close and personal. Even if you threw caution to the winds and visited a dangerous site or clicked a treacherous link, your antivirus software probably wiped out any offending program before the latter could say boo. So, you might wonder, just what does malware look like? Would I even recognize a malware program if I saw it?

Courtesy of PC Mag

Chances are good you will never seen malware up close and personal. Even if you threw caution to the winds and visited a dangerous site or clicked a treacherous link, your antivirus software probably wiped out any offending program before the latter could say boo. So, you might wonder, just what does malware look like? Would I even recognize a malware program if I saw it?

To be fair, a lot of malicious programs do not look like anything at all. A virus, for example, tries its best to hide from view while infecting other files and computers. A bot sits quietly on your computer until it gets orders from the command and control center to spew some spam or participate in a DDoS attack on a major website. Trojans, by contrast, appear to be useful, legitimate programs, putting up a pretty façade to hide background activities like stealing your personal data. And when ransomware hollers for your attention, it’s bad news.

This is for all devices

Dilbert and Video
Copyright Scott Adams, Inc./Distributed by Universal Uclick for UFS

The Horror of Ransomware

If a ransomware attack hits your computer, you will not know it at first. The ransomware stays out of sight, quietly encrypting your important files. Once the dirty work is done, the malware totally demands your attention with its ransom note. The perpetrators promise that if you pay the specified ransom (usually in Bitcoin or some other cryptocurrency) you will get your files back, but if they take your money and run, you do not have any recourse. You really do not want a direct encounter with ransomware.

Malware Bundled

Sometimes the problem with an installation is notthe program itself, but the software that’s bundled with it. You may find completely legitimate software—even antivirus programs; bundled with adware, spyware, or other unwanted trash. In a case like that, the security vendor is not to blame. A third party created the deceptive bundle. AppEsteem is a young company with a mission to expose these deceptors and to warn legitimate companies when they stray too far toward the dark side of bundling.

The installer shown here offers a free player for FLV video files. Along with the player you are privileged to receive a shady Adware program masquerading as a coupon browser. There’s a checkbox that says you agree to its terms; uncheck the box and you can not proceed. No video player for you! The best thing that can happen with this kind of bundling is that you’re forced to install a program you did not want. Mostly it’s worse than that, because the bundled bonus is malware. Refer to below image:

Malware 2
Bundled Malware

Now here’s something handy; a multi-utility install program. If you read Russian, you know it’s “the fastest and most convenient way to install programs.” Just check the boxes for the ones you want and turn the installer loose. The list includes browsers, messenger programs, video players, even antivirus utilities. But when you install them, you also get a dose of malware. See below image:

Malware 3
Utility Pack Malware

Trojan Horses

Here, we have a sharp-looking utility designed, apparently, to ensure that your PC does not limp along with old, outdated drivers. However, if you try to update any drivers, or back up your existing drivers, you must pay. This is a model used both by some legitimate programs and by rogue antivirus scareware utilities. Lucky you, though: there’s a promotional price that ends today. Its overt activities are just a wee bit suspicious. See following image:

Malware 4
Driver Malware

Want to get into smartphone repair? This set of tools and manuals looks like it might be a big help. Alas, you ca not see just what you’re getting until you pay for your registration. While you are perusing schematics, it collects personal information behind the scenes and takes orders for further unwanted activity from a remote command and control server. Refer to below image:

Malware 5
Smartphone Malware

You probably do not know this, but the EXE files that represent programs on your Windows computer are also called PE files, short for Portable Executable. Every PE file starts with an extensive header that contains a ton of information telling Windows about the program. Malware researchers learn a lot by digging into that header. See below image:

Malware 6
Portable Executable Malware

Lets Hope You Don’t See These

As you can see, malicious programs, like legitimate programs, run the gamut from sad-looking attempts to totally professional ones. With any luck, and with powerful, up-to-date antivirus protection, these images are the only malware you will ever see. Malware is just one of many threats to your devices and private information.

The best utility for finding Malware on your device is Malwarebytes, download here.

Email/Phone Scams

A few reminders to keep the bad guys away in your emails and phone calls:

  • Do not click that link. Instead hover your mouse over each element of the email and look for anything suspicious. If suspicious, do not click that link – per my son, VP at True Digital Security.
  • Do not open emails from FedX, USPS, Wells Fargo, Walmart, Cox Communications, Thank You, SSA, or VA if you have no dealings with them. They will contact you by mail not by phone.
  • Do not give out personal informati0n over the phone. If you need to contact someone, you initiate the call.
  • Never buy gift cards or give out their serial number.
  • If your Userid or Password has been leaked in a data breech, change them as soon as possible.

Quote For the Day

I don’t pretend we have all the answers. But the questions are certainly worth thinking about.

Arthur C Clarke

That’s it. Please feel free to share this post! One way to share is via Twitter.

Just click the Tweet icon below. This will launch Twitter where you click its icon to post the Tweet.

Check out TechSavvy.Life for blog posts on smartphones, PCs, and Macs! You may email us at contact@techsavvy.life for comments or questions.

I Would Like to Hear From You

Please feel free to leave a comment. I would love hearing from you. Do you have a computer or smart device tech question? I will do my best to answer your inquiry. Just send an email to contact@techsavvy.life. Please mention the device, app and version that you are using. To help us out, you can send screenshots of your data related to your question.

The author’s Vietnam eBook on the Battle for Tra Bong: Events and Aftermath