I am Raymond Oglesby, an Information Technology (IT) specialist with 30 years in the field. I have taught Microsoft Applications and troubleshot computers in 15 countries and many States. My career was focused on mainframes and desktops from application development to implementation. I have written hundreds of programs for various architectures. I decided to start a blog to share my knowledge and experiences with you. I plan on updating this blog at least twice a week about smart phone apps to Windows.
Please feel free to leave a Comment or Tweet. I would love to hear from you. Do you have a computer tech question? I will do my best to answer your inquiry. Please mention the app and version that you are using. To help me out, you can send screenshots of your data related to your question.
Windows 10 users may have noticed that by default, File Explorer opens to Quick Access. Quick Access gives you a view of recent and frequently used files and folders. You also have the option to Pin items to Quick Access.
Windows 10 users may have noticed that by default, File Explorer opens to Quick Access. Quick Access gives you a view of recent and frequently used files and folders. You also have the option to Pin items to Quick Access.
If you prefer, you can change the default to open to This PC instead. This PC option shows your drives, network locations, and user folders like Documents, Desktop, and Downloads.
This is for devices running Windows 10
Copyright Scott Adams, Inc./Distributed by Universal Uclick for UFS
First, open any File Explorer window. Next, in the menu, click:
File > Options > Change folder and search options
Refer to below image:
Accessing the Change folder option
Now, in Folder Options, click the General tab. Next, click the menu beside Open File Explorer to. See below image:
Accessing where to open File Explorer
Now, in the menu that appears, select This PC. Next, click OK to close the window. See following image:
Choosing This PC option to open File Explorer
The next time you open File Explorer, you will see This PC as the first location that opens.
Quote For the Day
Technology is a useful servant but a dangerous master.
Christian Lous Lange
That was easy. That’s it. Please feel free to share this post! One way to share is via Twitter.
Just click the Tweet icon below. This will launch Twitter where you click its icon to post the Tweet.
Check out TechSavvy.Life for blog posts on smartphones, PCs, and Macs! You may email us at contact@techsavvy.life for comments or questions.
Please feel free to leave a comment. I would love hearing from you. Do you have a computer or smart device tech question? I will do my best to answer your inquiry. Just send an email to contact@techsavvy.life. Please mention the device, app and version that you are using. To help us out, you can send screenshots of your data related to your question.
The author’s Vietnam eBook on the Battle for Tra Bong: Events and Aftermath
If you need to see how many formulas, pivot tables, or form controls you have in a spreadsheet or workbook, check out the Workbook Statistics feature in Microsoft Excel.
If you need to see how many formulas, pivot tables, or form controls you have in a spreadsheet or workbook, check out the Workbook Statistics feature in Microsoft Excel. Let’s explore this feature.
This is for devices running Excel. Screenshots are from Excel in Office 365 on Windows 10
Copyright Scott Adams, Inc./Distributed by Universal Uclick for UFS
You may have found statistics in Word helpful for seeing the number of pages, words, or characters. Getting statistics in Excel can be just as useful. You may have a workbook for a class with specific requirements, or you may have a spreadsheet for business that you want to review for unnecessary elements.
View Your Sheet/Workbook Statistics
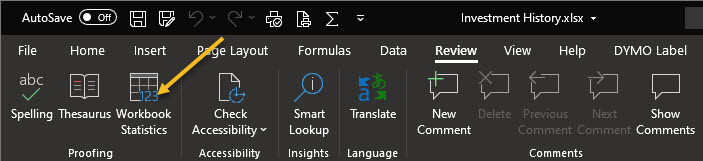
First, open your Excel workbook. Next, navigate to the Review tab. Now, click Workbook Statistics in the Proofing section. You can also press Ctrl+Shift+G. (Note that the shortcut will not work in Excel for the Web.) Refer to below image:
Accessing Workbook Statistics button
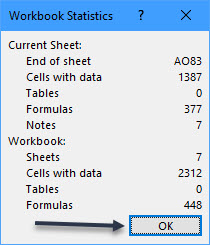
Now, a small window will open to display the data for your current sheet at the top and the entire workbook at the bottom. See below image:
Displaying one Sheet Statistics
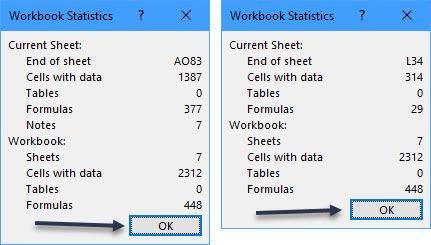
If you want details for a different sheet in your workbook, close the Workbook Statistics window by clicking OK. Next click the tab for the sheet that you want to see and follow the same steps listed above. As a downside, the sheet and workbook name are not shown. See following image:
Displaying two Sheets and Workbook Statistics
Data Included
You can see a the following data with the Workbook Statistics feature. This is helpful for situations where you expect to see something in your current sheet or workbook and you do not, or vice versa. Statistics may differ slightly between the spreadsheet and the entire workbook.
Spreadsheet Statistics:
The end of the sheet (the last cell with data)
Cells with data
Tables and PivotTables
Formulas
Charts
Images and objects
Form controls
Comments and notes
Workbook Statistics:
Number of sheets
Cells with data
Tables and PivotTables
Formulas
Charts
External connections
Macros
You can view Workbook Statistics in Excel for Microsoft 365 on Windows and Mac as well as in Excel on the Web. The only difference is that Excel online does not display the complete data lists written above for sheets and workbooks.
The scientific theory I like best is that the rings of Saturn are composed entirely of lost airline luggage.
Mark Russell
That’s it. Please feel free to share this post! One way to share is via Twitter.
Just click the Tweet icon below. This will launch Twitter where you click its icon to post the Tweet.
Check out TechSavvy.Life for blog posts on smartphones, PCs, and Macs! You may email us at contact@techsavvy.life for comments or questions.
Please feel free to leave a comment. I would love hearing from you. Do you have a computer or smart device tech question? I will do my best to answer your inquiry. Just send an email to contact@techsavvy.life. Please mention the device, app and version that you are using. To help us out, you can send screenshots of your data related to your question.
The author’s Vietnam eBook on the Battle for Tra Bong: Events and Aftermath
The Shortcuts app that comes pre-installed on iOS and iPadOS devices has proven to be incredibly useful especially with the release of iOS & iPadOS 14. There are so many things that you can do now with the Shortcuts app, Although you have access to a set of suggested shortcuts, you are not limited to using those alone. In fact, third-party shortcuts created by the community can be installed on your device too.
The Shortcuts app that comes pre-installed on iOS and iPadOS devices has proven to be incredibly useful especially with the release of iOS & iPadOS 14. There are so many things that you can do now with the Shortcuts app, Although you have access to a set of suggested shortcuts, you are not limited to using those alone. In fact, third-party shortcuts created by the community can be installed on your device too. Let’s explore how to do this.
This is for the iPhone and iPad
Copyright Scott Adams, Inc./Distributed by Universal Uclick for UFS
There are several shortcuts websites to chose from. We will be focused on using the Shortcuts Gallery, one of the largest repositories of shortcuts. It includes proper descriptions, steps, and download links. Shortcuts are also sorted by category, so it’s easy to find what you want.
Enable Untrusted Shortcuts
Before you can start installing third-party shortcuts, you have to enable the feature. By default, shortcuts downloaded from the web are blocked because they have not been verified by Apple.
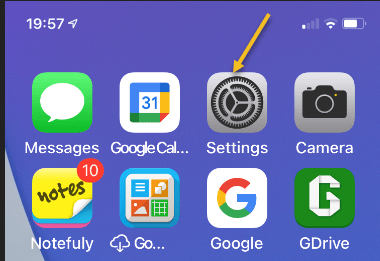
First, tap your Settings app on your iPhone or iPad. Refer to below image:
Accessing Settings
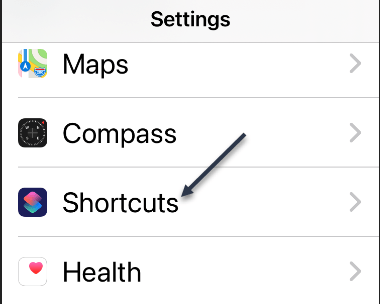
Next, scroll down and tap Shortcuts. See below image:
Accessing Shortcuts
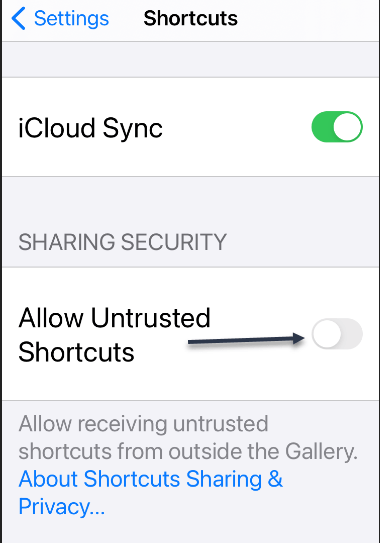
Now, toggle to On the Untrusted Shortcuts option. (Note! If you see a message saying you must first run a shortcut, then download a Shortcut from your Shortcut app and run it.) See following image:
Enabling Untrusted Shortcuts
Next, in the pop-up message that appears, tap Allow. Refer to below image:
Allow Untrusted Shortcuts
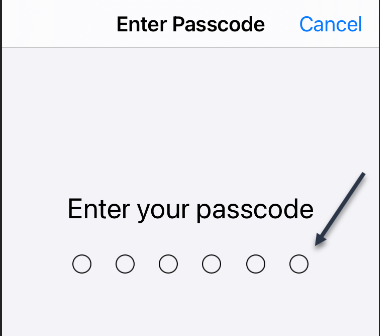
Next, enter your device’s passcode to verify that you own this iPhone or iPad. See below image:
Entering your Passcode
You are ready to go to install third-party shortcuts.
Install Third-Party Shortcuts
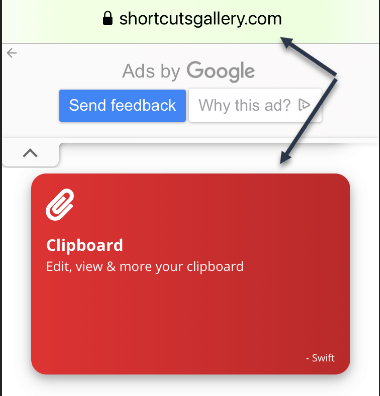
In our example, we will install the Clipboard shortcut from the Shortcuts Gallery website. Open the website in your browser on your iPhone or iPad. Now, tap the shortcut you want to download. See following image:
Finding a Shortcut
Next, tap the Get Shortcut button. Refer to below image:
Get the chosen Shortcut
Now, the shortcut in the Shortcuts app will open. Scroll to the bottom, and then tap Add Untrusted Shortcut. See below image:
Adding the Untrusted Shortcut
Your new shortcut will be at the top of the list in your My Shortcuts. Just tap it to start using it. See following image:
Your newly added Shortcut
After you have downloaded more shortcuts, you can organize them in folders. This will make it easier to launch them from an iPhone Home screen Widget.
Quote For the Day
We cannot solve our problems with the same thinking we used when we created them.
Albert Einstein
That’s it. Please feel free to share this post! One way to share is via Twitter.
Just click the Tweet icon below. This will launch Twitter where you click its icon to post the Tweet.
Check out TechSavvy.Life for blog posts on smartphones, PCs, and Macs! You may email us at contact@techsavvy.life for comments or questions.
Please feel free to leave a comment. I would love hearing from you. Do you have a computer or smart device tech question? I will do my best to answer your inquiry. Just send an email to contact@techsavvy.life. Please mention the device, app and version that you are using. To help us out, you can send screenshots of your data related to your question.
The author’s Vietnam eBook on the Battle for Tra Bong: Events and Aftermath
Did you know you can drag tabs between browser windows within Chrome, Edge, Firefox, and Safari on Windows, Linux, and Mac? (But not between different browser types.) It seems obvious in retrospect, but many people never notice.
Did you know you can drag tabs between browser windows within Chrome, Edge, Firefox, and Safari on Windows, Linux, and Mac? (But not between different browser types.) It seems obvious in retrospect, but many people never notice. Let’s explore how this is done.
This is for modern browsers. Screenshots are from Chrome in Windows 10
Copyright Scott Adams, Inc./Distributed by Universal Uclick for UFS
First, open Google Chrome, Microsoft Edge, Apple Safari, or Mozilla Firefox on a Mac or PC. Open a few tabs in one browser window and then press Ctrl+n (or Command+n on a Mac) to open another browser window.
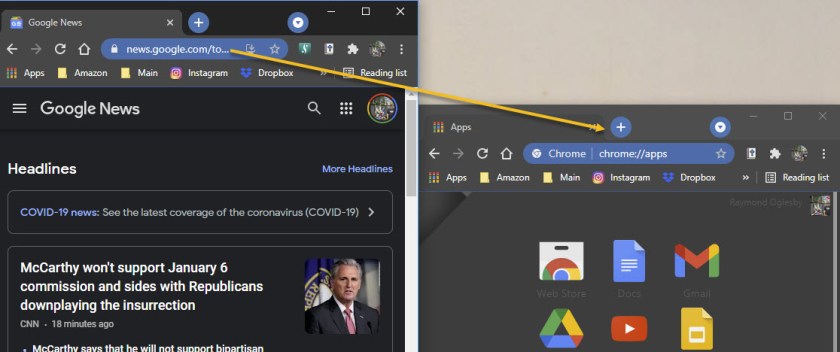
To move a tab between browser windows, click and drag the tab from the tab bar in one window onto the tab bar in another window.
(In Safari, you can alternatively just drag a tab and drop it anywhere on top of another Safari browser window.) Refer to below image for using Chrome:
Once you drag the tab into the other window’s tab bar, you will see that tab appear in the tab list of the destination window. See below image:
In Chrome, Edge, and Firefox, you can select multiple tabs. Just hold down Ctrl (or Command on a Mac) and click on multiple tabs. Once they are selected, you can drag them off into a new window, or you can close all of them by pressing any tab’s X button.
Quote For the Day
Part of the inhumanity of the computer is that, once it is competently programmed and working smoothly, it is completely honest.
Isaac Asimov
That’s it. Please feel free to share this post! One way to share is via Twitter.
Just click the Tweet icon below. This will launch Twitter where you click its icon to post the Tweet.
Check out TechSavvy.Life for blog posts on smartphones, PCs, and Macs. You may email us at contact@techsavvy.life for comments or questions.
Please feel free to leave a comment. I would love hearing from you. Do you have a computer or smart device tech question? I will do my best to answer your inquiry. Just send an email to contact@techsavvy.life. Please mention the device, app and version that you are using. To help us out, you can send screenshots of your data related to your question.
The author’s Vietnam eBook on the Battle for Tra Bong: Events and Aftermath
Generally speaking, the more you tweet, the further your past tweets move down your profile page. However, Twitter makes it possible to pin a tweet so that it stays at the top of your page until you remove it.
If you use Twitter regularly, you may occasionally post a message that gains attention with other users or that you want to stand out from the rest of your feed.
Generally speaking, the more you tweet, the further your past tweets move down your profile page. However, Twitter makes it possible to pin a tweet so that it stays at the top of your page until you remove it.
Pinning tweets to the top of your Twitter profile will not take more than a few seconds, and you can unpin a tweet or choose a new one to pin in its place at any time. Let’s explore how to do this.
Note! You can only have one pinned tweet at a time. Pinning a new tweet will unpin any tweet you already have pinned.
This is for the iPhone and Android using Twitter
Copyright Scott Adams, Inc./Distributed by Universal Uclick for UFS
Pin a Tweet
Twitter’s mobile apps for iOS and Android allow you to pin tweets to your profile. You can also do this on your desktop.
First, open the Twitter app. Make sure you are logged in to your account.
Next, in the top-left corner of the app, tap the three horizontal lines. Refer to below image:
Accessing the Twitter menu
In the menu that opens, select Profile. See below image:
Accessing your Profile
Your Twitter profile opens. Now, scroll down and find the tweet to pin.
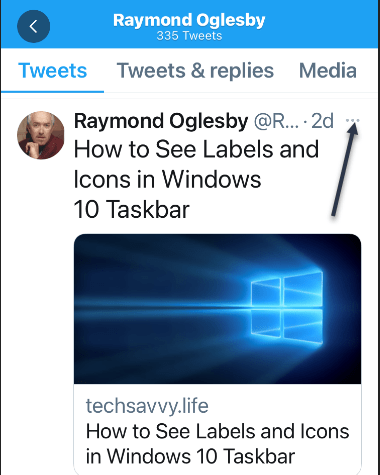
When you find the tweet, at the top-right corner of that tweet, tap the three-dots hamburger menu. See following image:
Accessing the Tweet menu
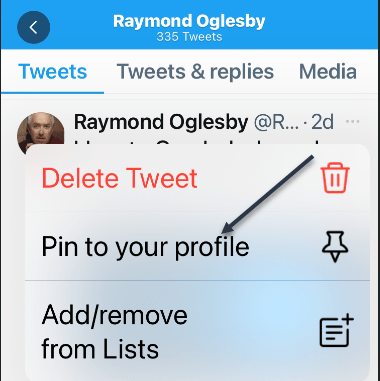
From the menu that pops up from the bottom of your phone’s screen, select Pin to profile. Refer to below image:
Accessing Pin tweet to your Profile
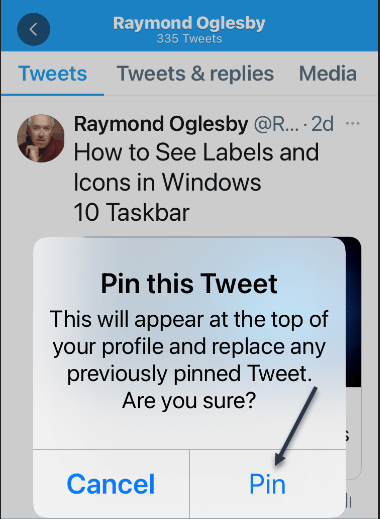
Select Pin in the prompt that appears in the middle of your phone’s screen. See below image:
Pin your tweet
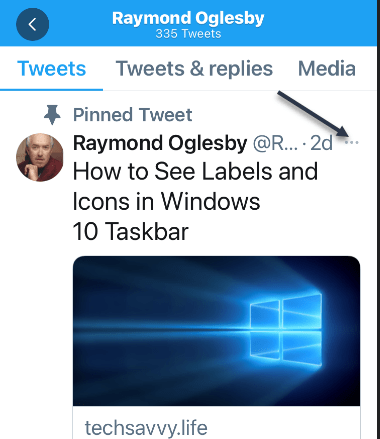
Your selected tweet is now pinned to your profile page. See following image:
Your pinned tweet
Unpin a Tweet
To unpin the tweet, scroll to the top of your profile page in Twitter’s mobile app. Then, at the top-right corner of the pinned tweet, tap the three-dots hamburger menu. Refer to below image:
Accessing your tweet menu
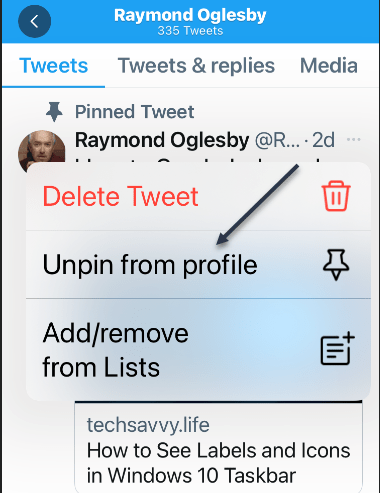
In the menu that appears from the bottom of your phone’s screen, tap Unpin from profile. See below image:
Accessing Unpin tweet from your Profile
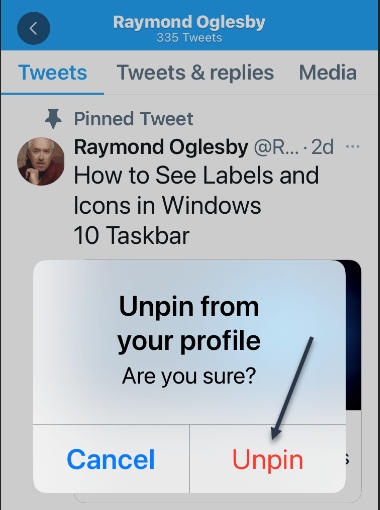
Select Unpin in the prompt. See following image:
Unpin your tweet
And your tweet disappears from the top area of your Twitter profile.
It’s easy to pin and unpin tweets on Twitter, and you should make use of this feature to display your most important tweet at the top of your profile page.
Quote For the Day
The true sign of intelligence is not knowledge but imagination.
Albert Einstein
That’s it, a nifty feature. Please feel free to share this post! One way to share is via Twitter.
Just click the Tweet icon below. This will launch Twitter where you click its icon to post the Tweet.
Check out TechSavvy.Life for blog posts on smartphones, PCs, and Macs! You may email us at contact@techsavvy.life for comments or questions.
Please feel free to leave a comment. I would love hearing from you. Do you have a computer or smart device tech question? I will do my best to answer your inquiry. Just send an email to contact@techsavvy.life. Please mention the device, app and version that you are using. To help us out, you can send screenshots of your data related to your question.
The author’s Vietnam eBook on the Battle for Tra Bong: Events and Aftermath
If your iPhone or iPad storage is full, or you just want to clean up, it’s easy to delete screenshots that you might not need on your device using the built-in Photos app. The latest iOS and iPadOS versions have a separate folder for just screenshots.
If your iPhone or iPad storage is full, or you just want to clean up, it’s easy to delete screenshots that you might not need on your device using the built-in Photos app. The latest iOS and iPadOS versions have a separate folder for just screenshots. Let’s explore how to delete screenshots.
This is for the iPhone and iPad
Copyright Scott Adams, Inc./Distributed by Universal Uclick for UFS
Accessing Media Types
First, open the Photos app on your iPhone or iPad. If you can not find it, swipe downward with one finger from the middle of the home screen to open Spotlight search. Now, type “photos,” and then tap the Photos app icon. Refer to below image:
Accessing Photos
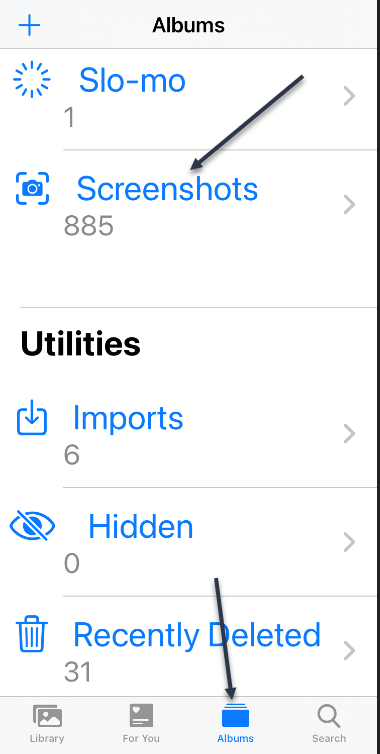
For the iPhone: Tap Albums at the bottom of the screen, and then select Screenshots from the Media Types list. See below image:
Accessing Screenshots for iPhone
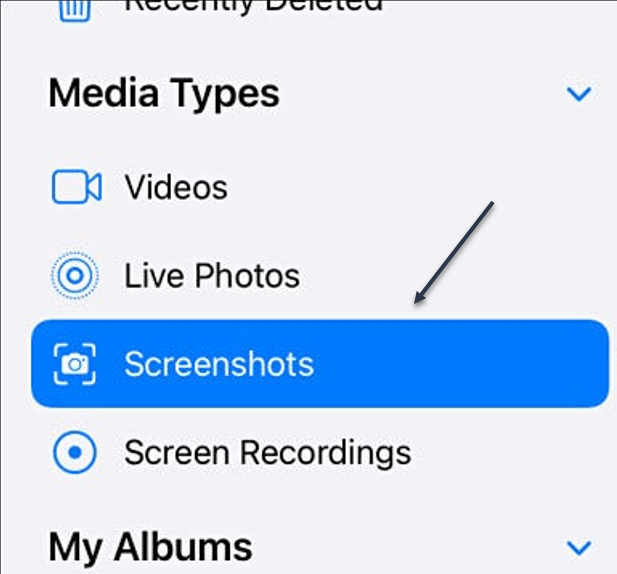
For the iPad: In Photos, open the sidebar by tapping Photos in the upper-left corner of the screen. Now, select Screenshots from the Media Types section. See following image:
Accessing Screenshots for iPad
Delete a Screenshot
Your album of all the screenshots stored on your device will be displayed. To delete a single screenshot, tap its thumbnail to open it in a detailed view. Refer to below image:
Open a Screenshot
Next, when you have a screenshot open for closer viewing, delete it by tapping the Trashcan icon in the lower-left (iPhone) or upper-right (iPad) corner of the screen. See below image:
Delete a single Screenshot
Now, you will see a pop-up menu asking to confirm. Just select Delete Photo.
Delete Multiple Screenshots
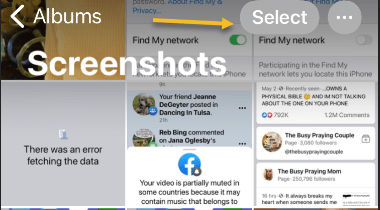
To delete multiple screenshots, go back to the Screenshots album overview that shows thumbnails of all your screenshots. Next, tap the Select button in the upper-right corner of the screen. See following image:
Selecting multiple Screenshots
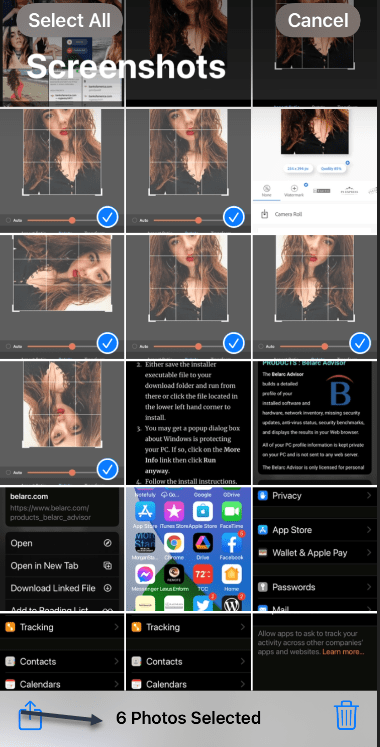
You are now in selection mode. You can select all the screenshots in the album by tapping Select All, or you can select multiple screenshots by tapping their thumbnails. When it’s selected, each photo’s thumbnail will have a small circle with a check mark in the lower-right corner. Refer to below image:
Your selected Screenshots
You can also quickly select a large number of screenshots by tapping a thumbnail with your finger and holding it down lightly while you drag it halfway down the screen. The screenshot thumbnail list will start scrolling while selecting images. To stop selecting, lift your finger.
When you have selected all the screenshots that you want to delete, tap the Trashcan icon in the corner of the screen. Next, when you are asked to confirm, tap Delete Photos. See below image:
Delete your selected Screenshots
By default, the screenshots that you just deleted will be permanently removed from your device in 30 days.
Delete All Screenshots
If you want to permanently remove the screenshots sooner, first, navigate to your Recently Deleted album in the Photos app.
For the iPhone: Navigate to Albums > Recently Deleted.
For the iPad: Open the sidebar and tap Recently Deleted under Utilities.
See following image:
Open Recently Deleted album
When you see the gallery of your recently deleted screenshot thumbnails, you can individually select and delete them with the Delete button. To delete all Recently Deleted images at once, tap Select in the corner of the screen, and then select Delete All. Refer to below image:
Delete All Screenshots
Now, when you are asked to confirm, tap Delete Photos. All of your screenshots will be permanently deleted.
Quote For the Day
Look up at the stars and not down at your feet. Try to make sense of what you see, and wonder about what makes the universe exist. Be curious.
Stephen Hawking
You are finished. Please feel free to share this post! One way to share is via Twitter.
Just click the Tweet icon below. This will launch Twitter where you click its icon to post the Tweet.
Check out TechSavvy.Life blog posts for smartphones, PCs, and Macs! You may email us at contact@techsavvy.life for comments or questions.
Please feel free to leave a comment. I would love hearing from you. Do you have a computer or smart device tech question? I will do my best to answer your inquiry. Just send an email to contact@techsavvy.life. Please mention the device, app and version that you are using. To help us out, you can send screenshots of your data related to your question.
The author’s Vietnam eBook on the Battle for Tra Bong: Events and Aftermath
If you need to quickly remove all the images and graphics from a Microsoft Word document, it’s easy to use a built-in option to delete them all at once.
If you need to quickly remove all the images and graphics from a Microsoft Word document, it’s easy to use a built-in option to delete them all at once. Let’s explore how this is done.
This is for devices running Microsoft Word
Copyright Scott Adams, Inc./Distributed by Universal Uclick for UFS
The Technique
Microsoft Word includes a feature called Find and Replace to find items in your documents and replace them with something of your choice. Using this feature, you can find all the images in your document and replace them with nothing. This removes the images and leaves a blank space where they were located.
As a slight drawback, this technique will also remove all charts and graphs from your document.
The Removal Process
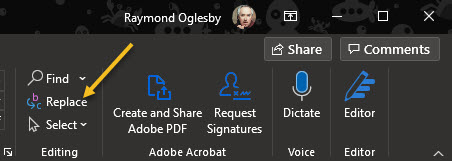
First, open your document with Microsoft Word. Next, in the menu at the top of the window, click Home. Now, click Replace in the Editing section of the toolbar. Refer to below image:
Accessing the Replace button
Next, in the Find and Replace window, click the Find what box. In this box, type:
^g
(Alternately, you can click the More button, and then select Special and Graphic from the drop-down menu. Word will insert a ^g for you.)
In this case, ^g is a special code that means “graphic.” This “graphic” tag includes all images, charts, or graphs in your document. But no need to worry, you can undo this step later if you remove the images by mistake.
Now, click Replace All at the bottom of the window. See below image:
Selecting Replace All to remove all images
All images in your document will be removed. A pop-up window will appear denoting the number of images removed. Click OK to close the window. See following image:
Pop-up window denoting number of images replaced with a blank line
If you want to bring them back, press Ctrl+Z on Windows or Command+Z on Mac to undo the removal process. Or, you can insert images again if necessary. (You may need to edit your document to remove blank lines). Now, save your changes (if any) and exit Word.
Quote For the Day
The art of teaching is the art of assisting discovery.
Mark Van Doren
That was easy. Please feel free to share this post! One way to share is via Twitter.
Just click the Tweet icon below. This will launch Twitter where you click its icon to post the Tweet.
Check out TechSavvy.Life for blog posts on smartphones, PCs, and Macs! You may email us at contact@techsavvy.life for comments or questions.
Please feel free to leave a comment. I would love hearing from you. Do you have a computer or smart device tech question? I will do my best to answer your inquiry. Just send an email to contact@techsavvy.life. Please mention the device, app and version that you are using. To help us out, you can send screenshots of your data related to your question.
The author’s Vietnam eBook on the Battle for Tra Bong: Events and Aftermath
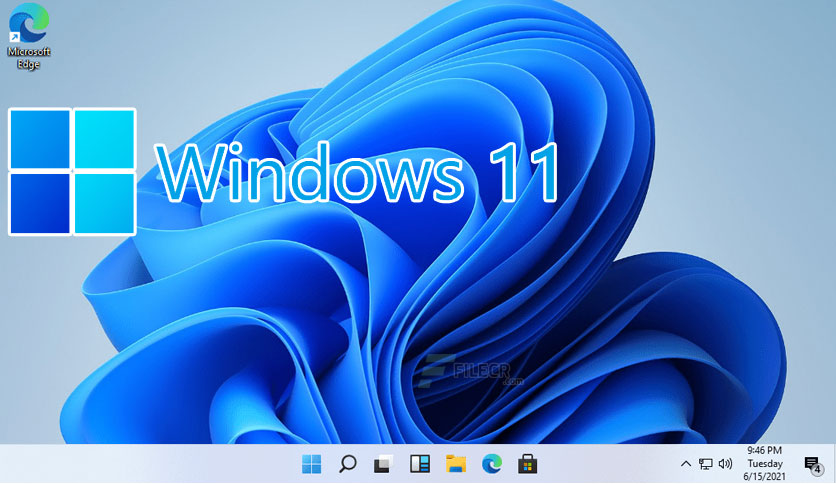
Following are the basic requirements for installing Windows 11 on a PC. If your device does not meet these requirements, you may not be able to install Windows 11 and might want to consider purchasing a new device.
Following are the basic requirements for installing Windows 11 on a PC. If your device does not meet these requirements, you may not be able to install Windows 11 and might want to consider purchasing a new device. If you are unsure whether your PC meets these requirements, you can check with your PC Original Equipment Manufacturer (OEM) or, if your device is already running Windows 10, you can use the PC Health Check app to assess compatibility.
Note! As of this writing, the PC Health Check app has been removed from the App Store. The reason is because the app is denying millions of PCs for the upgrade. Microsoft has some hurdles to overcome. Let’s find out.
This is for Windows 10 devices
Copyright Scott Adams, Inc./Distributed by Universal Uclick for UFS
The Requirements
Processor:
1 gigahertz (GHz) or faster with 2 or more cores on a compatible 64 bit processor System on a Chip (SoC)
RAM:
4 gigabyte (GB)
Storage:
64 GB or larger storage device
System firmware:
UEFI, Secure Boot capable
TPM:
Trusted Platform Module (TPM) version 2.0
Graphics card:
Compatible with DirectX 12 or later with WDDM 2.0 driver
Display:
High definition (720p) display that is greater than 9” diagonally, 8 bits per color channel
Internet connection and Microsoft accounts:
Windows 11 Home edition requires internet connectivity and a Microsoft account to complete device setup on first use. Switching a device out of Windows 11 Home in S mode also requires internet connectivity.
For all Windows 11 editions, internet access is required to perform updates and to download and take advantage of some features. A Microsoft account is required for some features.
Check Your Version of Trusted Platform Module (TPM)
To check this, we are going to use the Device Manager.
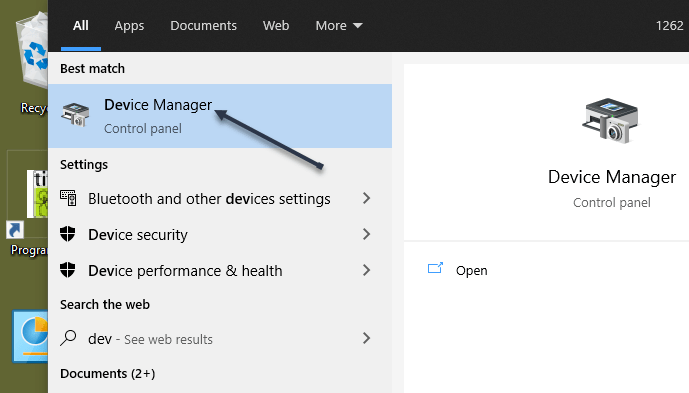
First, type “device manager” in the Cortana search box in lower left-hand corner. Next, in the search results, click on Device Manager in upper left-hand corner. Refer to below image:
Selecting Device Manager
Now, after the Device Manager opens, scroll down and click on Security Device to expand the menu and see if any TPM entries exist. See below image:
Opening Security devices for TPM entry
This computer meets the requirement for version 2.0 of TPM.
If you have TPM 1.2, you may be able to upgrade to Windows 11; there are no guarantees.
Quote For the Day
No sensible decision can be made any longer without taking into account not only the world as it is, but the world as it will be.
Isaac Asimov
That’s it. Please feel free to share this post! One way to share is via Twitter.
Just click the Tweet icon below. This will launch Twitter where you click its icon to post the Tweet.
Check out TechSavvy.Life for blog posts on smartphones, PCs, and Macs! You may email us at contact@techsavvy.life for comments or questions.
Please feel free to leave a comment. I would love hearing from you. Do you have a computer or smart device tech question? I will do my best to answer your inquiry. Just send an email to contact@techsavvy.life. Please mention the device, app and version that you are using. To help us out, you can send screenshots of your data related to your question.
The author’s Vietnam eBook on the Battle for Tra Bong: Events and Aftermath
Turning off your iPhone seems like it should be a simple task; and it is, provided you remember the specific buttons you are supposed to press to power down your device. The challenge is that Apple has changed the method every few models so that turning off your iPhone on an older device is quite different than what’s required to turn off the newer models.
Turning off your iPhone seems like it should be a simple task; and it is, provided you remember the specific buttons you are supposed to press to power down your device. The challenge is that Apple has changed the method every few models so that turning off your iPhone on an older device is quite different than what’s required to turn off the newer models. Let’s explore how to turn off and on your device.
This is for the iPhone
Copyright Scott Adams, Inc./Distributed by Universal Uclick for UFS
To help you turn off your iPhone, there are the different ways you can shut down an iPhone based on Apple’s assorted models. It all comes down to the position of the Sleep/Wake button and whether your iPhone is unlocked with a Passcode, Touch ID, or FaceID.
Sometimes you need to completely shut down your iPhone, perhaps to help with troubleshooting, or to save your battery life during a long period of inactivity, or the device is acting strangely. Fortunately, it’s easy to do.
What is Sleep Mode vs Shutting Down
Normally, when you briefly press the top or side button on your iPhone, the screen on your device turns off, but the iPhone stays running. This is called sleep mode or lock mode. While it turns off the screen, it does not completely power off the device.
In contrast, shutting down your iPhone starts a special software shutdown process where your iPhone cleans up and prepares for power-off. Then, your iPhone turns off completely.
Perform Hardware Shutdown
If you need to turn off your iPhone, the easiest way to do so is by using a hardware button on your device. How to do this varies slightly by model, since certain iPhones include different types of buttons:
On iPhones without a Home Button: Simultaneously hold the side button and the volume up or down button for about four seconds until the power-off slider appears on the screen.
On iPhones with a Home Button and a Side Button: Hold the side button for a few seconds until the power-off slider appears.
On iPhones with a Home Button and a Top Button: Press and hold the top button until the power-off slider appears.
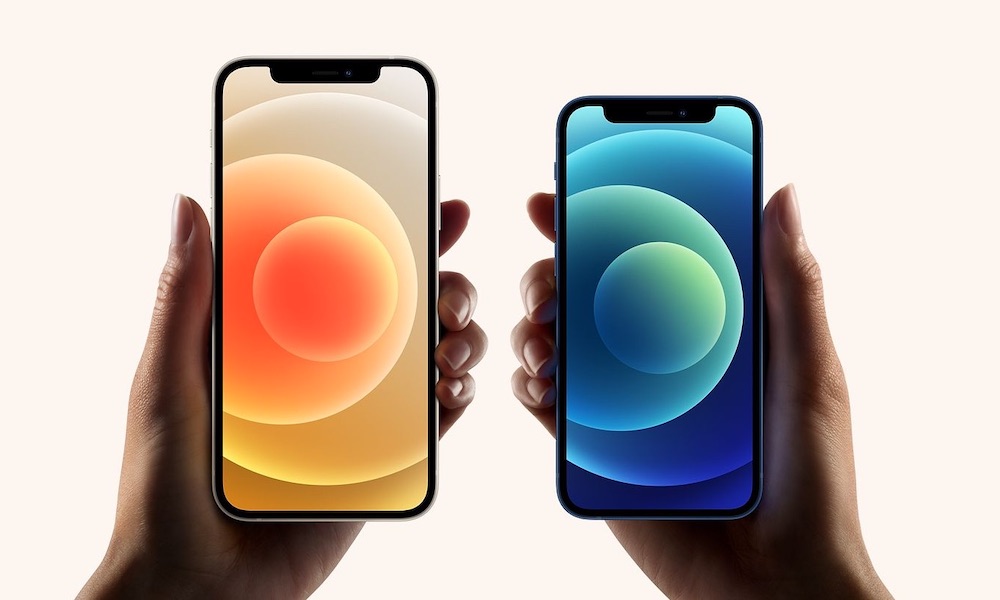
Refer to below image:
Apple
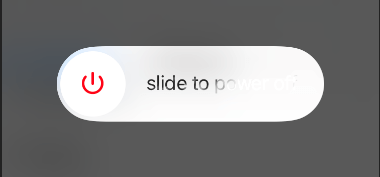
When the Slide to Power Off slider appears, swipe your finger to the right. See below image:
Hardware shut down
Now, your iPhone will shut down and power off completely.
Perform Shutdown via Settings
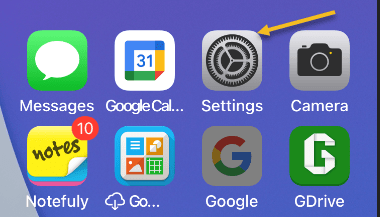
First, open Settings on your iPhone. See following image:
Accessing Settings
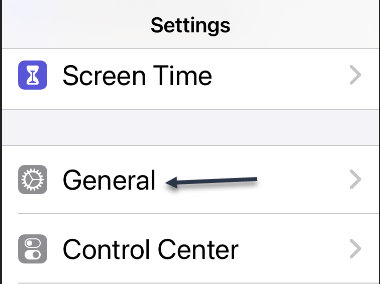
Next, in the Settings app, tap General. Refer to below image:
Accessing General option
Now, on the General page, scroll down to the bottom of the page and tap Shut Down. See below image:
Accessing Shut Down option
When the Slide to Power Off slider appears, swipe your finger to the right. See following image:
Software shut down
Now, your iPhone will shut down and power off completely.
Restart
If you just powered off, waiting 10 seconds is a good rule of thumb before a restart.
For newer models, (12, 11, 10), press and quickly release the volume up button, press and quickly release the volume down button, then press and hold the side button. When the Apple logo appears, release the button.
For iPhone SE (2nd generation), 8, 7, or 6, press and hold the side button until you see the Apple logo, then release the button.
Quote For the Day
A little more persistence, a little more effort, and what seemed hopeless failure may turn to glorious success.
Elbert Hubbard
That was easy.. Please feel free to share this post! One way to share is via Twitter.
Just click the Tweet icon below. This will launch Twitter where you click its icon to post the Tweet.
Check out TechSavvy.Life for blog posts on smartphones, PCs, and Macs! You may email us at techsavvy.life for comments or questions.
Please feel free to leave a comment. I would love hearing from you. Do you have a computer or smart device tech question? I will do my best to answer your inquiry. Just send an email to contact@techsavvy.life. Please mention the device, app and version that you are using. To help us out, you can send screenshots of your data related to your question.
The author’s Vietnam eBook on the Battle for Tra Bong: Events and Aftermath
As of Google Chrome version 90 and higher, you can create a link to selected text on a web page. When clicked, this link takes you to the page and highlights the selected text.
As of Google Chrome version 90 and higher, you can create a link to selected text on a web page. When clicked, this link takes you to the page and highlights the selected text. Let’s explore how to create such links.
This is for devices running Chrome 90 and higher. Screenshots are from Windows 10 PC
Copyright Scott Adams, Inc./Distributed by Universal Uclick for UFS
Enable the Feature
For some of us, Chrome’sCopy Link to Text feature is enabled by default, for others, it’s not. If this is your case, you will have to manually enable it on Chrome’s experimental flags page.
First, open Google Chrome on your computer. In the address bar of any window, type:
chrome://flags
and press Enter. Refer to below image:
Enabling Chrome flags
Now, on the Experiments tab that opens, click the search box at the top and type this:
Copy Link To Text
See below image:
Setting up the feature
Next, in the search results, click the drop-down menu beside Copy Link To Text and select Enabled. See following image:
Enabling the feature
Now, Chrome will ask you to restart the browser so that the change can take effect. Click Relaunch in bottom left-hand corner. Refer to below image:
Restart Chrome
After Chrome restarts, the feature will now be enabled.
Create the Link
To use the Copy Link to Text feature, first, open a site and select the text that you want to copy a link for using your mouse or keyboard. See below image:
Highlight the link
Next, right-click the highlighted text and select Copy Link to Highlight from the menu. See following image:
Copy highlighted link
Now, Chrome will copy the link for your selected text to your clipboard. You can now share this link via social media, send it in an email, paste it in a text editor, or use any other method. Refer to below image for sending the link via email:
Paste the link in an email
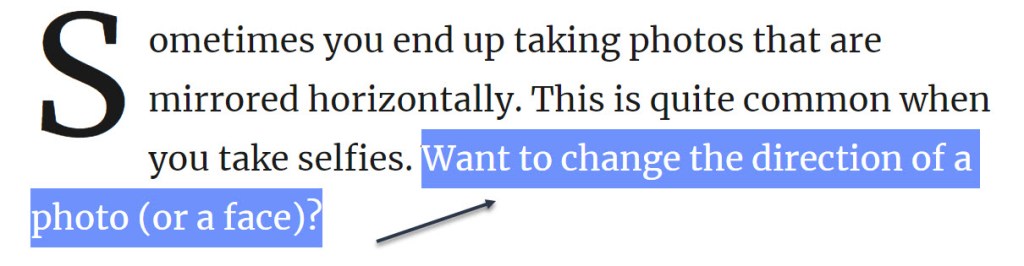
When the recipient clicks the link, they will be taken directly to the page with the previously selected passage highlighted. See below image:
Once the above email link is clicked, you will see the highlighted text in the original document
It’s a very handy feature.. Repeat as often as you like.
Quote For the Day
Hard work spotlights the character of people: some turn up their sleeves, some turn up their noses, and some don’t turn up at all.
Sam Ewing
You are finished. Please feel free to share this post! One way to share is via Twitter.
Just click the Tweet icon below. This will launch Twitter where you click its icon to post the Tweet.
Check out TechSavvy.Life for blog posts on smartphones, PCs, and Macs! You may email us at contact@techsavvy.life for comments or questions.
Please feel free to leave a comment. I would love hearing from you. Do you have a computer or smart device tech question? I will do my best to answer your inquiry. Just send an email to contact@techsavvy.life. Please mention the device, app and version that you are using. To help us out, you can send screenshots of your data related to your question.
The author’s Vietnam eBook on the Battle for Tra Bong: Events and Aftermath