I am Raymond Oglesby, an Information Technology (IT) specialist with 30 years in the field. I have taught Microsoft Applications and troubleshot computers in 15 countries and many States. My career was focused on mainframes and desktops from application development to implementation. I have written hundreds of programs for various architectures. I decided to start a blog to share my knowledge and experiences with you. I plan on updating this blog at least twice a week about smart phone apps to Windows.
Please feel free to leave a Comment or Tweet. I would love to hear from you. Do you have a computer tech question? I will do my best to answer your inquiry. Please mention the app and version that you are using. To help me out, you can send screenshots of your data related to your question.
Do you get frustrated when your smart device switches to landscape from portrait mode (or vice versa) when you don’t want it to? There is a way to prevent this behavior through Orientation Lock.
This is for iOS devices iPhone and iPad running iOS 7 and above
Set the Lock
To do this, launch the Control Center by one of the following ways:
1. iPhone 10 and above – Swipe down from upper right hand corner
2. iPhone 8 or earlier – Swipe up from bottom of screen
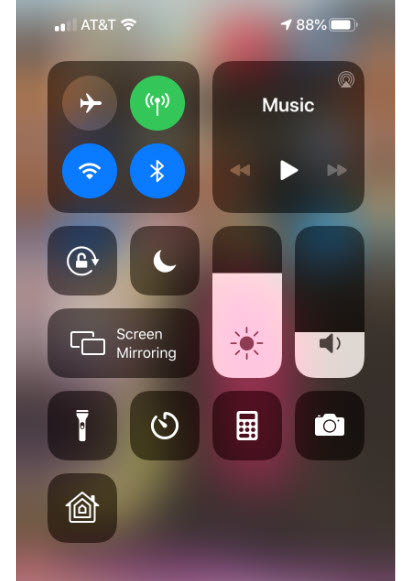
See below image:
The Orientation Lock screen
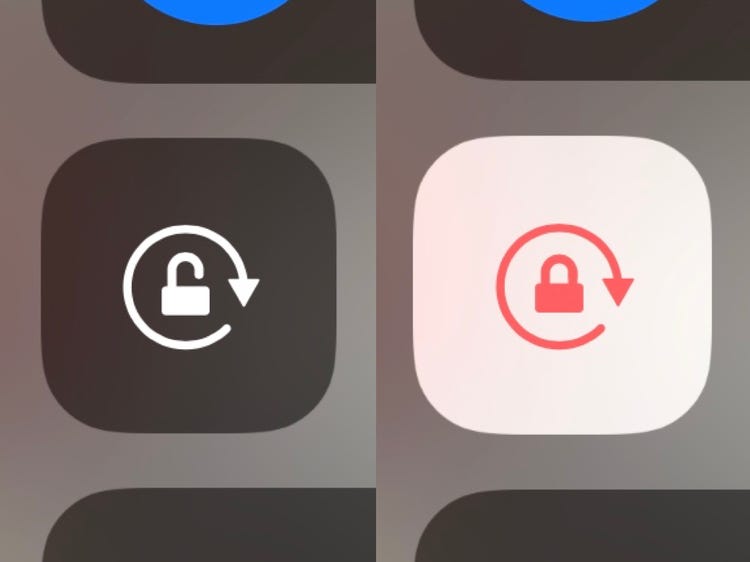
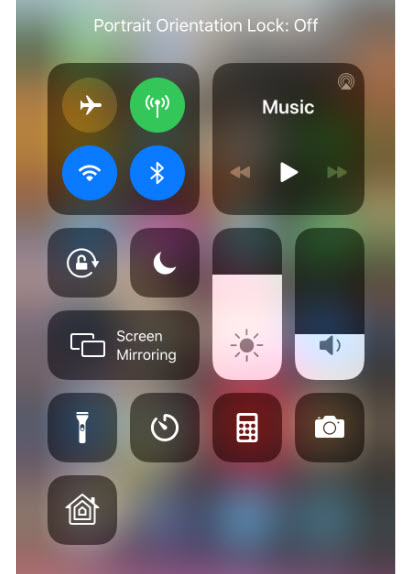
Tap the Orientation Lock icon (the one with an open lock and a curved arrow) to set the lock to its current position. A brief message will appear at the top to confirm the lock and the icon will be highlighted. Refer to following image:
Turning on the Orientation Lock
Swipe to close Control Center
Verify the Lock
Launch the Control Center. A small lock icon will be displayed in the Status Bar next to the Battery Level icon. See following image:
Verifying the Orientation Lock is on
Swipe to close Control Center
Turn Off the Lock
Launch the Control Center
Tap the Orientation Lock icon
A brief message will appear at the top to confirm the lock is turned off and the icon will no longer be highlighted. See following image:
Turning off the Orientation Lock
Swipe to close the Control Center
Note!Not all apps support screen rotation. Some apps only work in portrait or landscape mode. This is particularly true of some games and video apps. For those apps, your screen rotation settings don’t matter. The app will only display in the orientation it supports.
I Would Like to Hear from You
Please feel free to leave a comment. I would love hearing from you. Do you have a computer tech or smart device question? I will do my best to answer your inquiry. Please mention the device, app and version that you are using. To help us out, you can send screenshots of your data related to your question.
The author’s Vietnam eBook on the Battle for Tra Bong: Events and Aftermath
Normally, we chose an adjacent range of cells with headers for printing in Excel. However, there are occasions we want to print nonadjacent cell ranges. There are some of us who didn’t realize you could do this in a single print area. Let’s see how this is done.
This is for Excel for Office 365 Windows and Mac versions. Other versions of Excel will be similar.
Copyright Scott Adams, Inc./Distributed by Universal Uclick for UFS
First Method of Selecting Cells
One method is holding down the “Cntl” key while selecting the range of cells you want in your Print Area.
Select your first range of cells
Press and hold the “Cntl” key
Select additional ranges of cells
Release the “Cntl” key
Click the PageLayout tab
Click Print Area
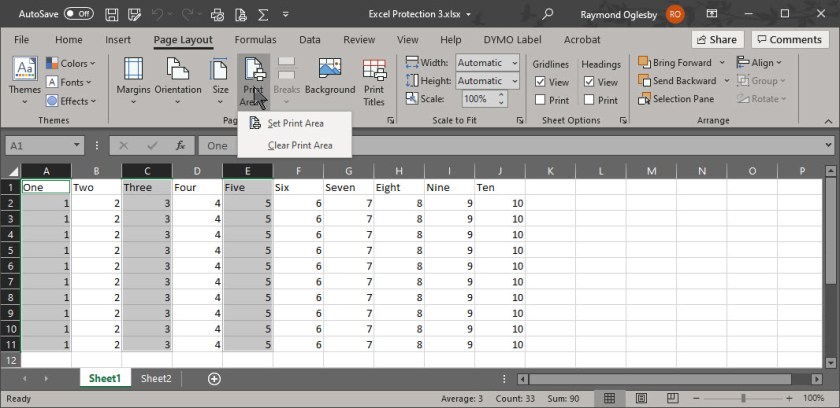
Click Set Print Area. See following image for my selection of nonadjacent cells in Print Area:
Selecting nonadjacent cells Print Area
Please note that each range you selected will print on a separate page in the same order that you selected regardless of cells location. Also, your current page settings will apply to all your pages. For example, you are unable to mix Landscape and Portrait printing.
Second Method of Selecting Cells
Another method is adding nonadjacent cells to an existing Print Area.
Select a range of cells you want to add to your Print Area
Click the Page Layout tab
Click Print Area
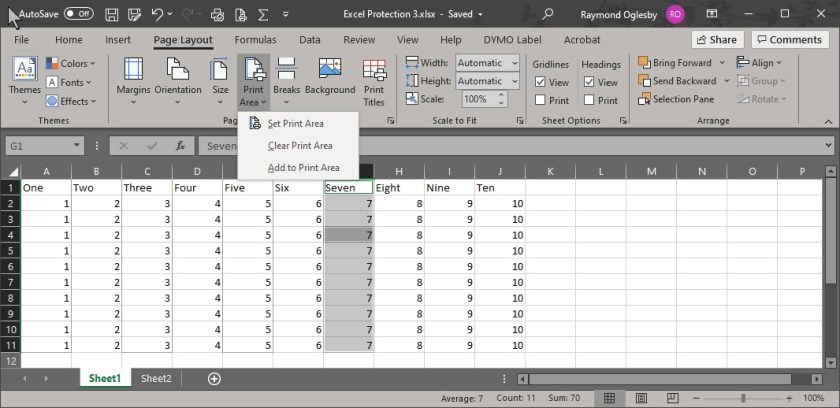
Click Add to Print Area. Refer to below image:
Adding a nonadjacent cell range to Print Area
As with the first method, each range will print on a separate page in the order selected and with the same print settings.
Locate the Print Area
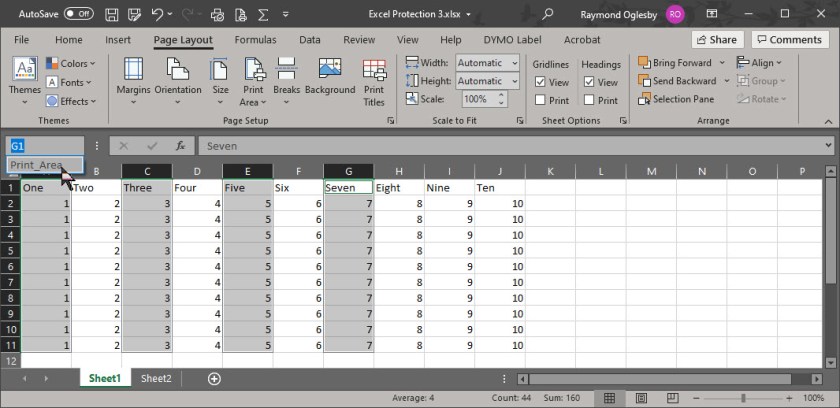
In the Name box to the left of the Formula bar, click it’s drop down arrow and select Print_Area. See following image:
Using the Name box to show the Print Area
Alternatively, from the View tab, click Page Break Preview in the workbook Views group to see the Print Area.
Click Normal to return to default Excel view.
Two Methods on Printing Your Ranges
You may not want each nonadjacent cell range printed on a separate page. You have two options:
Move the cell ranges adjacent to each other and reset your Print Area
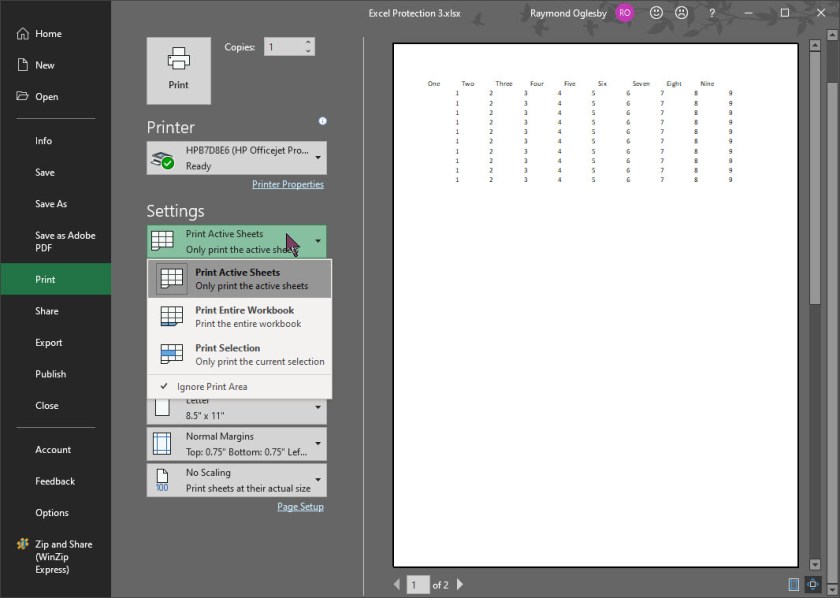
Before printing, select the option to Ignore Print Area. The Active Sheet is now ready for printing. Your Print Area is still saved, you are just ignoring it. Refer to following image:
Ignoring the Print Area for printing
I Would Like to Hear from You
Please feel free to leave a comment. I would love hearing from you. Do you have a computer or smart device tech question? I will do my best to answer your inquiry. Please mention the device, app and version that you are using. To help us out, you can send screenshots of your data related to your question.
The author’s Vietnam eBook on the Battle for Tra Bong: Events and Aftermath
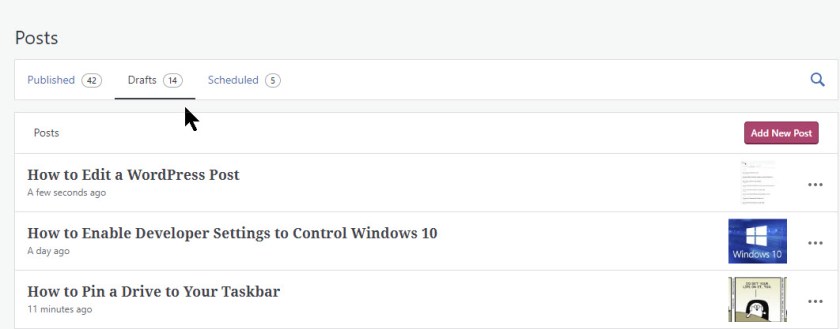
What has happen to WordPress? When you clicked on a Draft, Scheduled or Published post, WordPress would assume you wanted to View the blog post. In a recent update, WordPress now assumes you want to Edit the blog post. This is frustrating. I simply want to view a post and make changes “on the fly”. Now you have to click Save Draft, Update or Schedule the post regardless if you made a change or not. Refer to below image on how I used to view/edit by clicking on a post:
Viewing my Drafts posts in the Editor
Following is my exchanges with WordPress engineers.
My comment: “I go to Posts and click to open a draft. The Save Draft is displayed in upper right corner. All I do is view the post, I make no changes. I want to leave the post, I then have to save it. I go back into the post, sometimes it ask to Restore the backup.
But I made no changes. This is frustrating. Same thing happens to a Scheduled post. I always have to update. It didn’t use to work this way. If I made no changes, I just used the back arrow; now I always have to save and sometimes restore from a backup.”
See following image asking me to Restore the backup when I made no changes:
Asking me to restore the backup when I made no changes
WordPress response: “I just ran a test on your site, and did find that if I open a post, and keep it open for more than 30 seconds, close it and then go back into it, it’s providing the message of restoring a backup, even though no changes were made.
Clicking Update on the unchanged post, before closing it, gets rid of the message and avoids it from appearing at all.
It’s not really a bug or a problem, it’s the result of opening a post for a period of time, even if no changes are made.
You can prevent it by clicking Update before exiting any post or page that you open.”
My response: “Microsoft products are smart enough to know if you have made a change. When you edit a document, and you don’t’ save it , Microsoft will prompt you if you want to save. WordPress should do the same. If all I am doing is viewing a post, it should not prompt me to save or update.”
WordPress response: “Thank you for the critical feedback! We are always working to improve our editing experience and feedback like this is helpful. One of our genuine concerns is that users do not lose their content while they are working on their post or page. With that said, we hope to ensure that users are prompted to save even the smallest changes made to their posts so that they don’t lose their work.
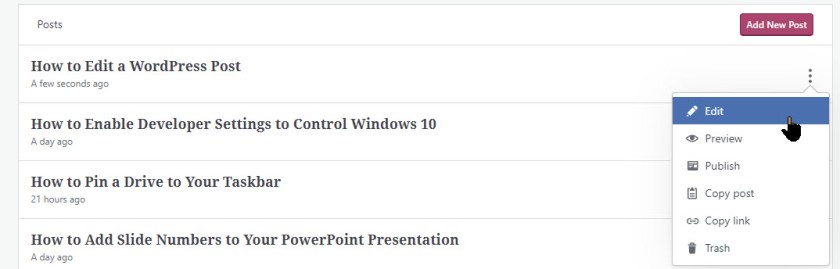
My best suggestion here is to view your published posts instead of the posts within the editor. This will give you a better sense of what your readers see as well and will ensure that no unwanted changes are made to the posts or pages. You can click on the three dots to the right of the post or page title and click “View” to see the published version of the post/page.”
Refer to below image on how to Edit or Preview a post:
How you must edit or preview a post
Are you experincing this behavior from your WordPress blog site?
I have done the usual like logging in and out of WordPress; clearing my Chrome cache and cookies at least twice. But I still have problems.
I Would Like to Hear from You
Please feel free to leave a comment. I would love hearing from you. Do you have a computer or smart device tech question? I will do my best to answer your inquiry. Please mention the device, app and version that you are using. To help me out, you can send screenshots of your data related to your question.
The author’s Vietnam eBook on the Battle for Tra Bong: Events and Aftermath
For many users, we just expect the operating system to work as advertised. But what if you need to know or just curious about what happens in the background upon boot/restart or shutdown of your PC. Microsoft Windows 10 hides this from users by default, they assume you don’t need to see it. But for technical users or those troubleshooting problems, it would be helpful to know what is happening as the machine boots or restarts. With a tweak to the Windows 10 Registry we can see its boot/restart or shutdown behavior. To do this we are going to turn on Verbose Boot Mode.
This post involves editing the Windows 10 Registry. It is recommended that you backup the Registry before making any changes. Below are the steps to backup the Registry using a free software program called RegBak. The RegBak program was covered in an earlier post. I am posting about RegBak again in case you missed it or you may click here to view the previous post.
This is for Windows 10 operating system
Copyright Scott Adams, Inc./Distributed by Universal Uclick for UFS
The RegBak Software Utility
The program I recommend is called RegBak, a freeware program. You can download the program here. Click the Download button for RegBak then click the regbak.exe file at the bottom of the screen and follow the install instructions. Once installed, you should see a screen like the one below:
After installing RegBak
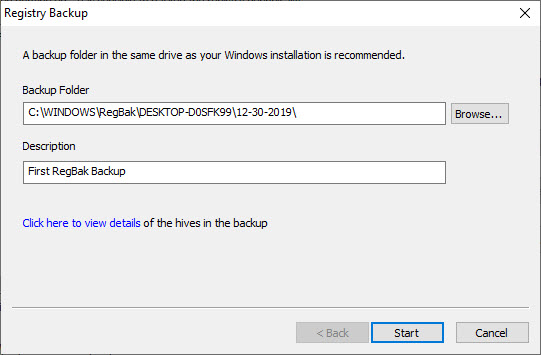
To backup your Windows registry:
Click the New Backup button
Enter a Description (this is optional)
Click Start
Below is a screenshot:
Starting to run RegBak
Click Close
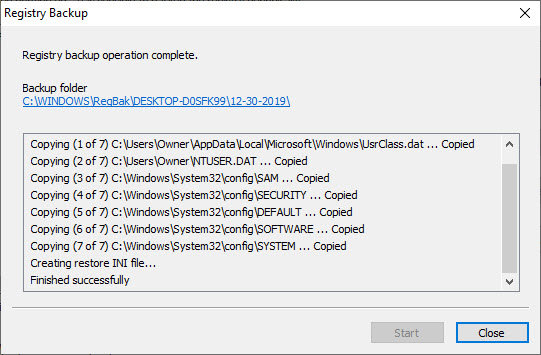
Your screen will look like the below image:
Results of running RegBak
Click Close to exit
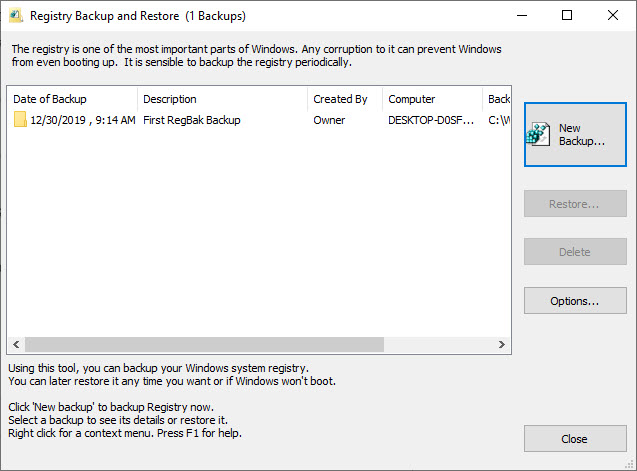
Your screen should look like the below image:
Registry backup complete
To Restore from a backup: Note! only do this if your Registry is corrupt.
Highlight a backup entry
Click the Restore button
Click Close
You can also delete a backup by highlighting an entry and clicking on Delete. Feel free to check out the Options button. I would just leave the default options as is.
Changing the Registry
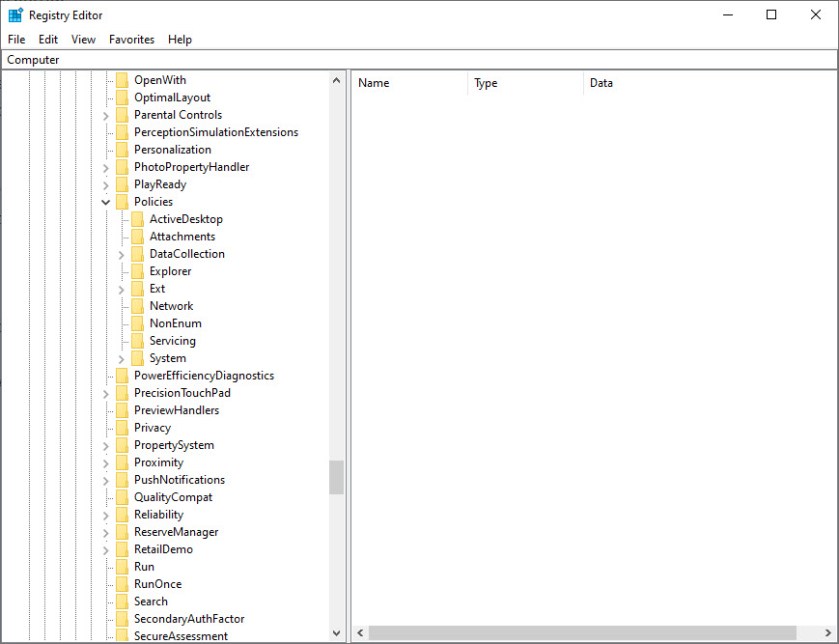
After you have backup up the Registry, type “regedit.exe” (without quotes) in the Cortana search box. You will see a similar screen like below:
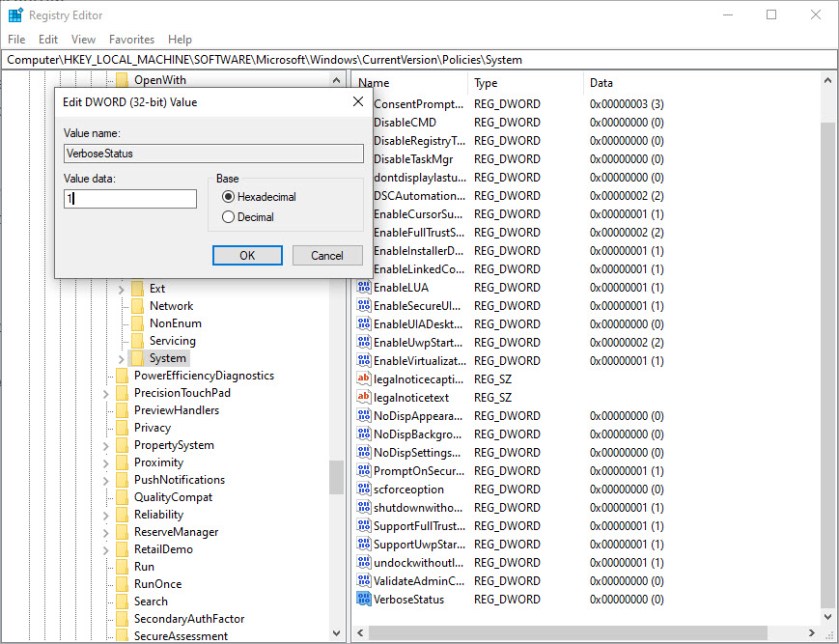
Right click the System folder Select New Select DWORD (32 bit) Value Name the new DWORD to VerboseStatus Change its current value of 0 to a 1. See following image:
Registry Editor key change for turn on Verbose Mode screen
Click OK to accept the change Click File>Exit to quit your edit of the Registry
The next time you boot/restart or shutdown your PC you should see a list of your boot/restart or shutdown activity. As mentioned earlier, the information is helpful in resolving computer problems. In my testing, this is not what I expected; I wanted to see a lot more detail than what was provided. It did help me resolve a shutdown problem. Its worth a try to see if it helps you.
When you need to, you can change the VerboseStatus value back to a 0 to turn the feature off.
I Would Like to Hear from You
Please feel free to leave a comment. I would love hearing from you. Do you have a computer tech or smart device question? I will do my best to answer your inquiry. Please mention the device, app and version that you are using. To help us out, you can send screenshots of your data related to your question.
The author’s Vietnam eBook on the Battle for Tra Bong: Events and Aftermath
Yes, you can now hear Podcasts on your Amazon Echo device. Apple Podcasts and others, like Spotify and iHeartRadio, are now options to choose from for your favorite podcasts.
We are going to link your Echo device to one of these podcast services. Our example is linking Apple Podcasts to the Amazon Echo. The ways this is done is somewhat clumsy. The Echo seems to be hard to program; it’s not straightforward. But follow along, it’s not time consuming and is worth it.
This is for iOS devices (iPhone and iPad) and the Amazon Echo
Starting Alexa
Open the Alexa app on your smart device. If you have yet to download the app, head to the Apple Store to download and install.
Tap the hamburger icon, the one with 3 dots in upper right hand corner or tap on the menu icon in upper left hand corner
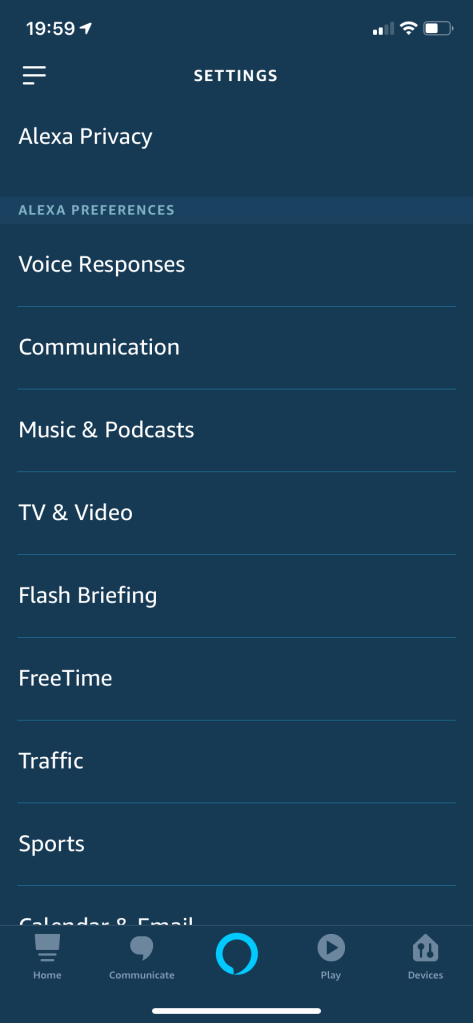
Select Settings. You will see the following screen:
The Settings image
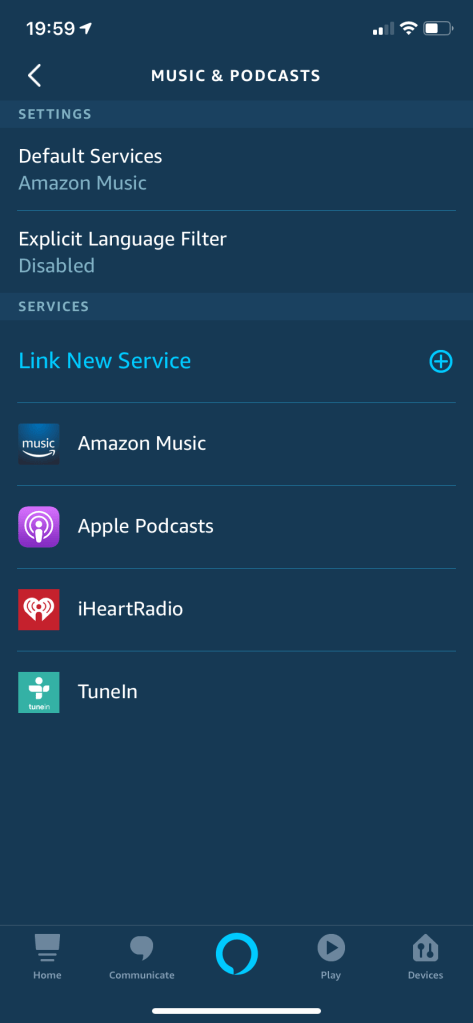
Select Music & Podcasts. Refer to following image:
The Music & Podcasts screen
Setting up the Link
Select Link New Service.
Select Apple Podcasts. Refer to following image:
Enabling the Apple Podcasts image
Tap ENABLE TO USE.
You will be asked to enter your Apple ID, Password and Passcode depending on your login procedure
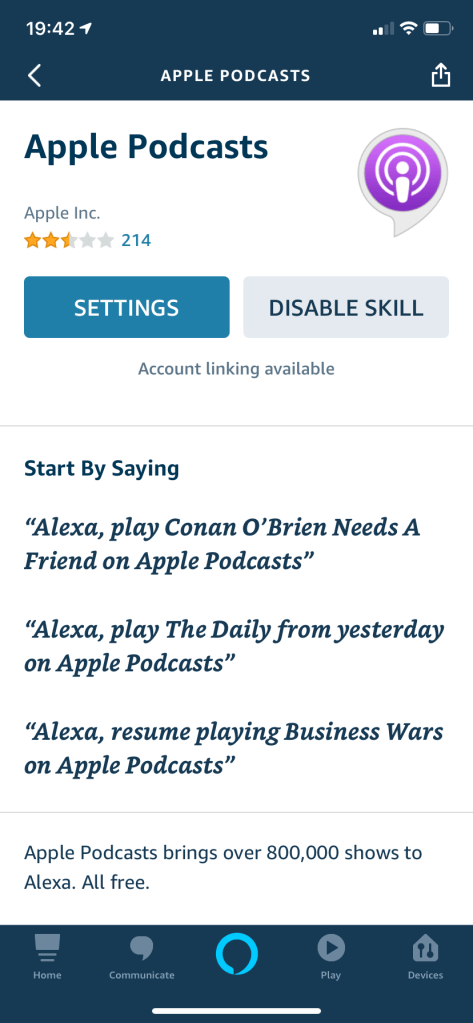
Tap SETTINGS. See following screen:
The Apple Podcasts settings screen.
Linking the Service to Echo
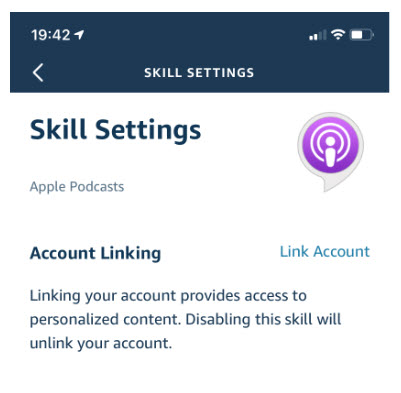
On the Skill Settings screen, tap on the Link Account link. See below image:
The link screen for Apple Podcasts
Allowing Access for the Link
Tap Allow on the AccessRequest screen. You may see a different screen depending on what service you are linking. Refer to below image for Apple Podcasts:
Allowing the link to Apple Podcasts image
Linkage for the Podcast Service Completed
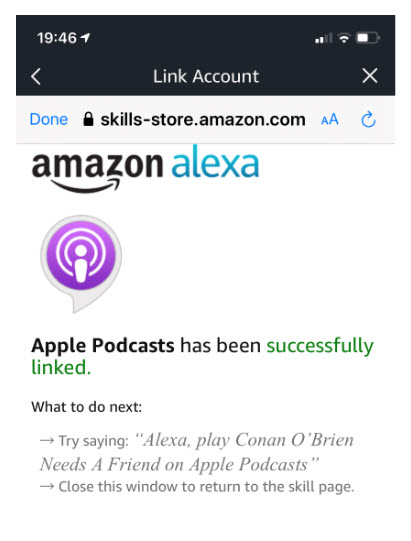
You will see that Apple Podcasts has been successfully linked. See following image:
Apple Podcasts now linked to Amazon Echo screen
Click Done
Now you can listen to your favorite Apple Podcasts. Just repeat the above steps to add other podcast service(s).
I Would Like to Hear from You
Please feel free to leave a comment. I would love hearing from you. Do you have a computer or smart device tech question? I will do my best to answer your inquiry. Please mention the device, app and version that you are using. To help me out, you can send screenshots of your data related to your question.
The author’s Vietnam eBook on the Battle for Tra Bong: Events and Aftermath
I get frustrated when Microsoft Word does not remember my last zoom setting for a document. At times it seems to just forget. It will bring up four pages when I only want to work on one page. To help us out, let’s explore a few options of the Zoom feature.
The Zoom bar is located on the right side of the status bar at the bottom for a Word document. To use the Zoom bar, click and drag the slider to the right or left to zoom out or in. As you do so, the page percentage decreases or increases. Also, you can click the “+” or “-” sign to zoom out or in by 10% increments.
This is for Word for Office 365 Windows and Mac versions. Other versions of Word will be similar.
The Zoom Dialog
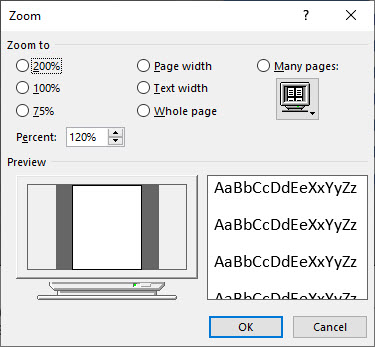
If you want more control, the Zoom Dialog Box offers a few more options. To access this, select View>Zoom. You will see the following screen:
Word Zoom options
You can choose a predefined option, like “75%”, as noted on the left hand side of the dialog box. Alternatively, you can choose the up and down arrows in the Percent button to increase or decrease the percentage in 1% increments. These percentages will differ depending on your device’s screen size of your Word windows (full screen, half screen, etc). When you are finished, click OK.
Some Shortcuts
If your are using a touchscreen or touchpad, you can take advantage of the pinch to zoom feature. This feature allows you to zoom out or in by placing two fingers on the screen. To Zoom out, you pinch your fingers together, to Zoom in, you separate your fingers.
If you are using a mouse, you can hold the Ctrl button and scroll the wheel up or down to Zoom in and out. Some mouses have separate flywheel buttons for zooming in or out.
I Would Like to Hear from You
Please feel free to leave a comment. I would love hearing from you. Do you have a computer or smart device tech question? I will do my best to answer your inquiry. Please mention the device, app and version that you are using. To help us out, you can send screenshots of your data related to your question.
The author’s Vietnam eBook on the Battle for Tra Bong: Events and Aftermath
The Coronavirus is in the news in a big way, almost a Pandemic by World Health Organization. The news has you aware of how many times you touch your face, how many times do you touch your device?
What you Will Need
What can we do about this? To get our gadgets gleaming, you will need microfiber cloths, cotton swabs, isopropyl alcohol, compressed air spray and distilled water. Before you apply any cleaning, unplug or turn off your device. We are going to disinfect your device and give everything else a general cleaning.
Cleaning your Phone or Tablet
Phones and tablets have fingerprint resistent coating that could come off. Manufactures generally recommend wiping them down with distilled water on a microfiber cloth, then using cotton swabs to clean around the edges of the screen, buttons and camera lens.
What To Do
Apple recently released its updated guidelines for cleaning. They endorse using 70 percent isopropyl alcohol wipe or Clorox Disinfecting Wipes. You may gently wipe the nonporous surfaces such as the screen, keyboard or other exterior surfaces.
You can create a mixure by using 70 percent alcohol and 30 percent water in a spray bottle. Be sure to wash your hands before starting the cleaning. Then remove any case (leave on any protective screen), spritz the cloth with the solution and thoroughly wipe down your device. Let it dry completely. Then be sure to wash your hands again.
What To Avoid
Do not use bleach
Avoid getting moisture in any opening
Do not submerge your Apple device in any cleaning agents
Don’t use the wipes on fabric or leather surfaces
Do not reuse the microfiber cloth
Avoid using Windex
Cleaning Your Desktop or Laptop
First unplug your device and remove the battery for a laptop. Turn your laptop or PC keyboard upside down and (gently) shake out to get rid of dirt and crumbs. Then grab a can of compressed air blaster (available at WalMart and similar places) and blast it. Use cotton swaps to get inside the crevices like the keys.
Lightly spray a microfiber cloth with your solution and wipe down the plastic and metal surfaces to include external devices.
To clean the screen, use a screen cleaning product or your mixture and spray onto a microfiber cloth. For a laptop, a one stop solution is to try 3M Notebook and Tablet Cleaning Wipes. If you have a touch screen, clean it with a microfiber cloth; for smudges, use only water or eyeglass cleaner applied to the cloth to remove them.
Don’t forget the mouse. Using the same mixture, dab it on a cotton swab and run it over the feet of the mouse and any crevices. Then take a microfiber cloth dipped in the mixture and go over the body of the mouse and cord.
I Would Like to Hear from You
Please feel free to leave a comment. I would love hearing from you. Do you have a computer or smart device tech question? I will do my best to answer your inquiry. Please mention the device, app and version that you are using. To help us out, you can send screenshots of your data related to your question.
There is a way to compare the contents in two sheet tabs in the same workbook. Lets see how this is done. In my example, Sheet1 has eleven rows, Sheet2 has ten rows. See following image:
The two sheets
This is for Excel for Office 365 Windows and Mac versions. Other versions of Excel will be similar.
Opening a Second Window for Comparing Contents
In the View tab of the Window group, click New Window
Setting up for a new window
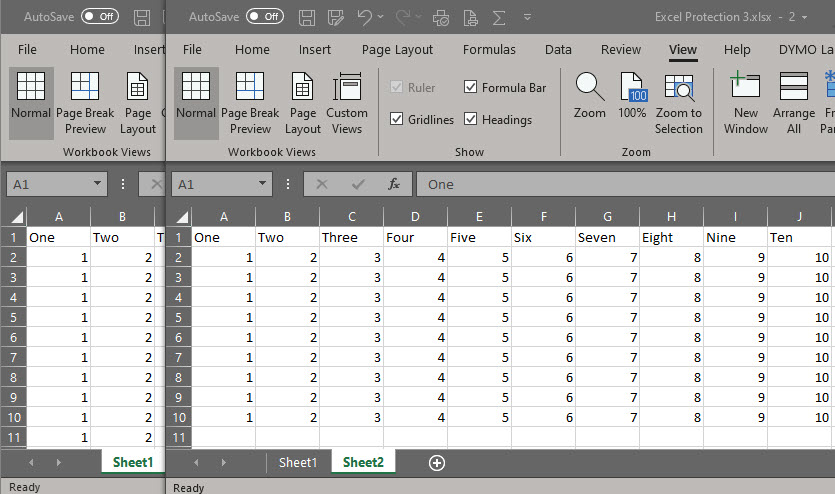
A second window of the same workbook opens, like a clone. At the end of the workbook name is a number denoting the sheet, either a one or a two. The new window becomes the active sheet.
The two windows
Setting Up Side by Side Viewing
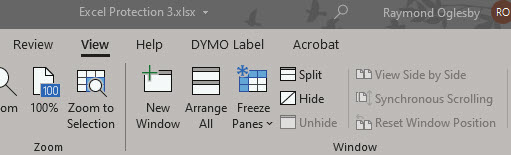
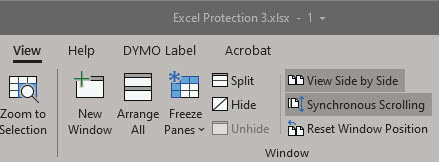
In the View tab of the Window group, click View Side by Side
A Compare Dialog box may appear. If so, choose the sheet you want to compare with the active sheet.
Click View Side by Side. When you select this view, Synchronous Scrolling should already be turned on. This allows you to scrool both worksheets at the same time. If its not turned on, click the View tab, then click Sychronous Scrolling. See below image:
Setting up for viewing side by side
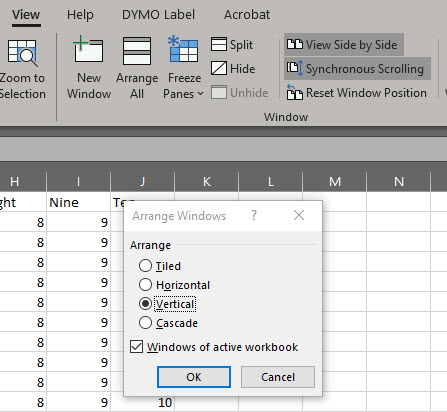
If the two windows didn’t arrange side by side, from the View tab, click Arrange All>Vertical and check the box for Windows of active workbook. Refer to following image:
Setting up how to view the side by side comparison
Viewing the Two Sheets Side by Side
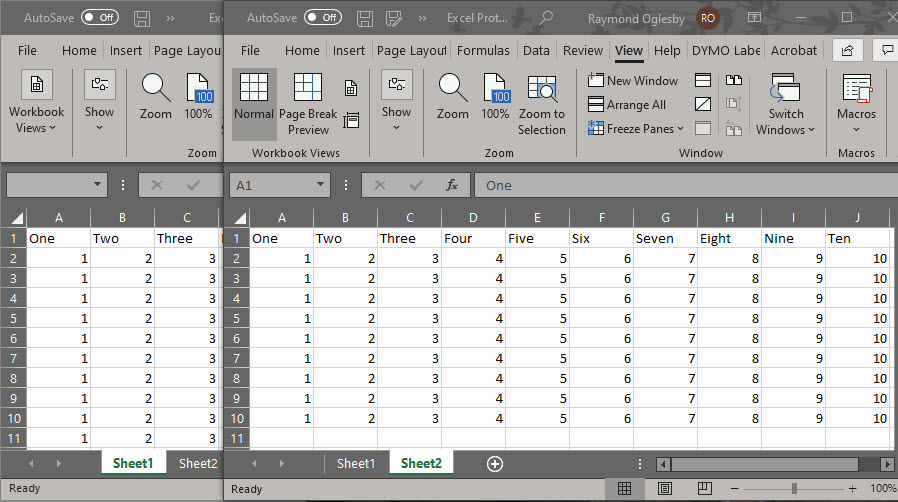
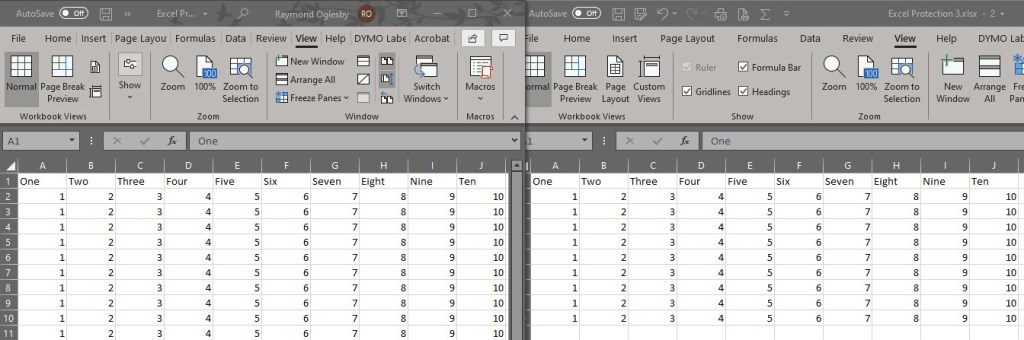
You can now synchronously scroll both up and down, left and right to compare the contents of the two sheet tabs in the same workbook. See final image below:
Comparing the two sheets in same workbook
When you are finished, to restore your window size, close one of the two windows, then click the Maximize Button in upper right hand corner of the worksheet window.
I Would Like to Hear from You
Please feel free to leave a comment. I would love hearing from you. Do you have a computer or smart device tech question? I will do my best to answer your inquiry. Please mention the device, app and version that you are using. To help us out, you can send screenshots of your data related to your question.
Apple added the Dark Mode feature in iOS 13+. This allows less eye strain, especially at night, and promotes a healthier sleep. You can use Dark Mode all the time or have your iPhone automatically turn it on.
This is for iPhone and iPad
1. Enable Dark Mode
Tap Settings
Tap Display and Brightness
Select Light or Dark
Toggle on Automatic to enable auto switching. You can also setup a schedule under Options. Refer to following image:
Enable Dark Mode on automatic schedule
Note! Not all apps support Dark Mode, especially Facebook and Messenger.
2. Enable Night Shift
This feature is for iOS 9.3 and above. It limits blue light and makes the iPhone “warmer” for a healthier sleep.
Tap Settings
Tap Display and Brightness
Tap Night Shift
You can enable a “Sunset to Sunrise” automatic schedule or choose a custom schedule. See following image:
Enabling Night Shift on a schedule
3. Enable Night Vision
Night vision naturally occurs in low light as our pupils adjust to reduced light. By using a red filter, the iPhone simulates night vision. This feature places a red filter across the screen. You can adjust the amount of red color being displayed.
Tap Settings
Tap Accessibility
Tap Display and Text Size
Scroll down and tap Color Filters and toggle it on. Tap Color Tint from the list. Move the Intensity and Hue sliders all the way to the right. The screen will be very red in color. Refer to following image: (Note! The reddish color does not show up in a screenshot)
Enabling Night Vision
4. Adjust the Flashlight
To do this, launch the Control Center by one of the following ways:
1. iPhone 10 and above – Swipe down from upper right hand corner
2. iPhone 8 or earlier – Swipe up from bottom of screen
See below image:
Tap and hold the Flashlight icon. You will see a segmented bar in five sections. Tap a section to control the brightness of the Flashlight. It will keep this brightness setting until you change it by following the above steps. Refer to below image:
Adjusting the Flashlight intensity
5. Enable Led Flash for Alerts
Let’s say you are on silent mode and want to be notified of alerts at night. We can use the camera flash to alert you of a push notification or a phone call.
Tap Settings
Tap Accessibility
Tap Audio/Visual
Toggle on LED Flash for Alerts. Optionally, you can toggle on Flash on Silent. See following image:
Enabling LED flash on alerts
Personally, I like the auto switching of Dark Mode. This feature reduced my eye strain at night. I wrote this post at night using Dark Mode on my iPhone. It was much easier to write and edit than using Light Mode.
I Would Like to Hear from You
Please feel free to leave a comment. I would love hearing from you. Do you have a computer tech or smart device question? I will do my best to answer your inquiry. Please mention the device, app and version that you are using. To help us out, you can send screenshots of your data related to your question.
If you are like me, you have dozens of apps on your smart device. Instead of swiping screen by screen to locate and launch an app, let’s explore another method using Spotlight Search.
This is for iPhone and iPad
Launch Spotlight Search
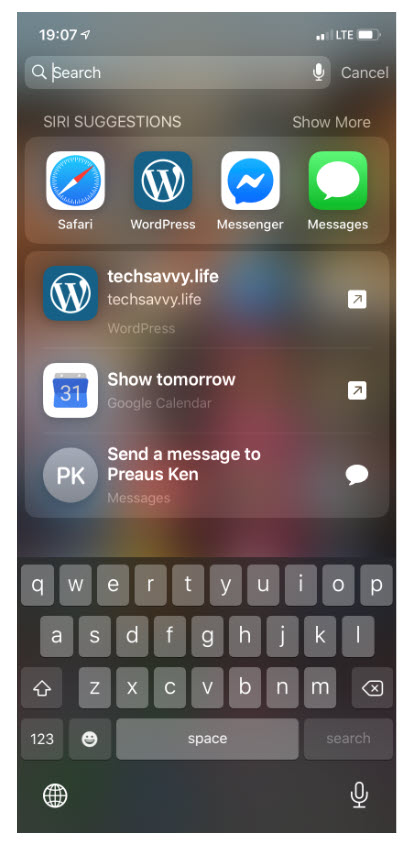
Near the middle of any screen, especially the Home screen, tap and swipe down. This will open the Spotlight with a keyboard and a search bar. See below image:
Launch of Spotlight
Finding an App
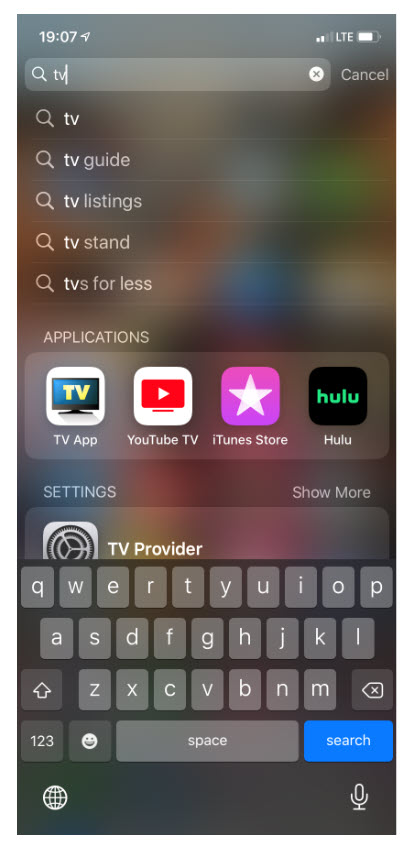
Type a few letters of the app name. In my example, I am searching for “TV App”. See following image:
Finding an app using Spotlight search
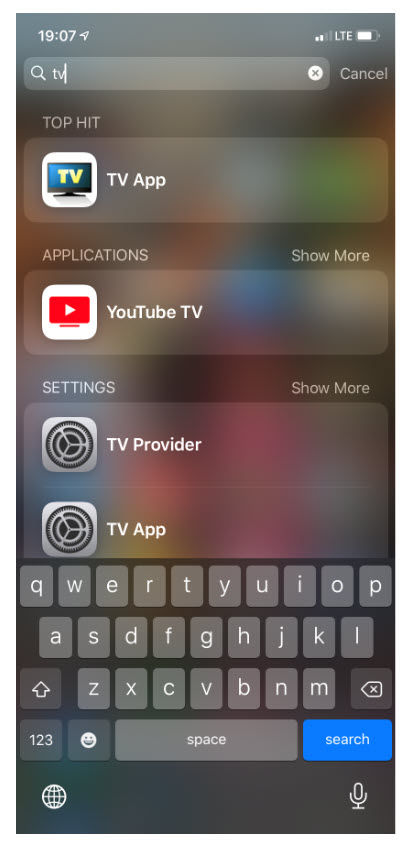
Spotlight will suggest a “Top Hit” and other possibilities. Refer to below image:
Spotlight Top Hit for your search
Launch the App
Once you find your app, tap it’s icon to launch. See following image for launching “TV App”:
Launching the Spotlight search app
You can also use Siri to locate and launch an app. Once Siri is activated, just say “Launch” followed by the app name.
I Would Like to Hear from You
Please feel free to leave a comment. I would love hearing from you. Do you have a computer tech or smart device question? I will do my best to answer your inquiry. Please mention the device, app and version that you are using. To help me out, you can send screenshots of your data related to your question.