Want to see live-updating resource usage stats from your system’s CPU, memory, disk, network or GPU? Windows 10 has some built-in perfomance monitors that can help. You can even have Windows show these panels always on top of other open windows.
Want to see live-updating resource usage stats from your system’s CPU, memory, disk, network or GPU? Windows 10 has some built-in perfomance monitors that can help. You can even have Windows show these panels always on top of other open windows.
The best way is to use the Task Manager.. It has some easy-to-ise performance panels displaying real time stats of your machine. Let’s explore how to use this feature.
This is for Windows 10 operating system
Copyright Scott Adams, Inc./Distributed by Universal Uclick for UFS
Check out TechSavvy.Life for their blog posts on smartphone apps, PCs. and Macs!
Windows 10’s Task Manager comes with performance stats that were added back in Windows 8. This post relates to Windows 10.
First, open the Task Manager by pressing Ctrl-Alt-Del and choosing Task Manager or by right-clicking the Taskbar or the Start button and selecting Task Manager. Refer to below image:
Selecting the Task Manager
Floating Panels
Now, select the Task Manager Options and chose Always on Top if you want the tool’s panels to appear on top of other open windows. See below image:
Selecting Always on Too option
The Performance Tab
Next, click thePerformace tab. If you don’t see it, click More Details first, at the bottom of your screen. See following image:
The CPU performance panel
Now, choose the performance graph from the sidebar you want to see. You will see options for your computer’s CPUs, memory, storage devices (including SSDs, hard disks, and USB devices), network connections (wired Ethernet and Wi-Fi), and GPUs (graphics processors.)
To show just a performance graph, double-click anywhere on a graph in the right pane. You can also right-click a graph and select Graph Summary View. Refer to below image:
Selecting Grap Summary Virw option
The Performance Graphs
You can resize this smaller window and also click-and-drag anywhere inside it to position it wherever you like on your desktop. See below image:
The CPU Summary Graph
To enlarge or make the Task Manager window smaller, just double-click inside it,
If you want to change the graph to another one just right click in the graph, chose the View option and make your selection. See following image:
Selecting the Virw Option
Also, you can select a different graphfrom the sidebar. Refer to below image:
The C: drive view
That’s it. I hope you found this post helpful.
I have found TechSavvy.Life blog posts extremely helpful. Check them out for posts on smart phone apps, Macs and PCs!
Please feel free to leave a comment. I would love hearing from you. Do you have a computer or smart device tech question? I will do my best to answer your inquiry. Please mention the device, app and version that you are using. To help us out, you can send screenshots of your data related to your question.
The author’s Vietnam eBook on the Battle for Tra Bong: Events and Aftermath
Let’s say you need to know information about your Windows 10 file system, version, build number, product key and more. If you are looking into configuration or troubleshooting, this information would be essential to know.
Let’s say you need to know information about your Windows 10 file system, version, build number, product key and more. If you are looking into configuration or troubleshooting, this information would be essential to know. Let’s explore how to find this.
This is for the Windows 10 operating system
Copyright Scott Adams, Inc./Distributed by Universal Uclick for UFS
Check out TechSavvy.Life for their blog posts on smartphone apps, PCs. and Macs!
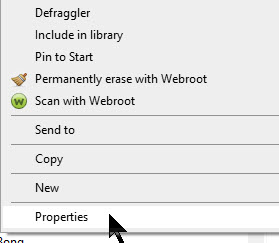
First, launch File Explorer. Next, locate a drive. ie, drive C; and right-click on it. Now, in the pop-up menu, select Properties. Refer to below image:
Selecting your drive’s Properties
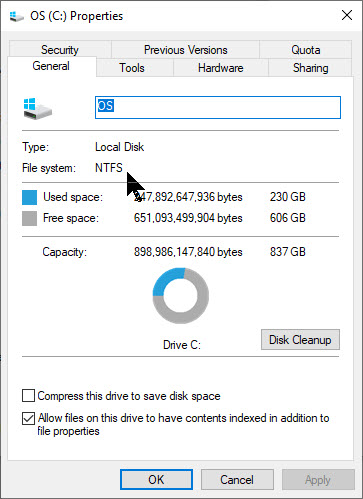
In the Properties window, under the General tab you will see the File System label followed by the type of File System. See below image;
Determining your File System
Normally you will see NTFS, shorthand for New Technology File System, the default for Windows 10. On older versions of Windows, you may see the legacy file system of FAT32, shorthand for File Allocation Table 32.
If you have multiple drives, simply repeat the above for each drive.
Discover the Version, Build Number and More
First, launch the Settings app by pressing the Windows+I keys. Next, go to System. See following image:
Accessing Settings
On the left, scroll to the bottom and select About. On the right, you see information about your system. The amount of information you see differs depending on the Windows 10 version that you have installed. Now, scroll down to the Device specifications section. Here you find the data you are looking for. Refer to below image:
Determining your Device and Windows specifications
System Type – it tells you whether you use a 32-bit or 64-bit version of Windows 10
Edition – displays the edition of Windows 10 that you have: Pro, Home, Enterprise, Education, etc
Version – displays the version of Windows 10 that is installed
OS Build – displays the Windows 10 build number that you use
The latest Version as of this writing is
2004 – The ninth update to Windows 10, codenamed 20H1. It was named the May 2020 Update and released on May 27, 2020.
A number higher than a 2004 – The tenth major update for Windows 10 is codenamed 20H2. The update is expected to launch in October or November 2020.
The most recent update to Windows 10, launched in May 2020, has a OS Build of 19041.264. As you can see from my PC screenshot, I do not have the latest version installed.
The OS Build number changes with each update made by Microsoft to Windows 10. This information along with the Version is useful for troubleshooting purposes when you call tech support.
Discover Your Product Key and Much More
Finding your product key was featured in a previous post. You can find this, the above information and much more in one program. Simply click the link below on downloading, installing and running BelArc Advisor.
Please feel free to leave a comment. I would love hearing from you. Do you have a computer or smart device tech question? I will do my best to answer your inquiry. Please mention the device, app and version that you are using. To help us out, you can send screenshots of your data related to your question.
The author’s Vietnam eBook on the Battle for Tra Bong: Events and Aftermath
Windows 10 can automatically free up disk space by getting rid of files and content that you don’t need by the Storage Sense feature. Whenever you are low on disk space, if enabled, Storage Sense will intelligently run and delete temporary files and applications no longer needed.
Windows 10 can automatically free up disk space by getting rid of files and content that you don’t need by the Storage Sense feature. Whenever you are low on disk space, if enabled, Storage Sense will intelligently run and delete temporary files and applications no longer needed. Let’s explore how to do this.
This is for the Windows 10 operating system
Copyright Scott Adams, Inc./Distributed by Universal Uclick for UFS
Check out TechSavvy.Life for their blog posts on smartphone apps, PCs. and Macs!
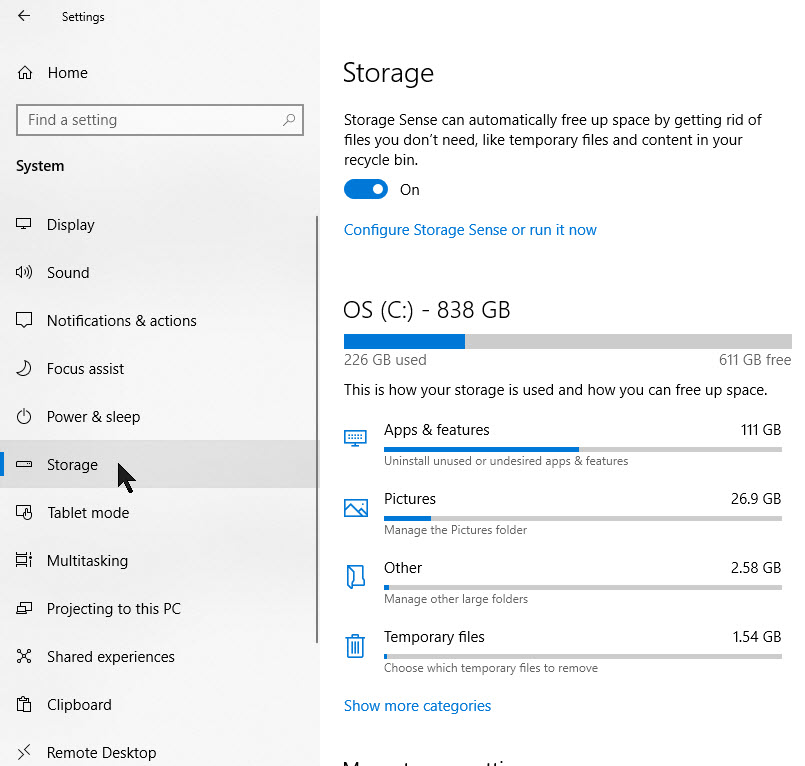
First, launch Settings by clicking the Start button, then click the Gear icon on the left side of your screen. Also you can press the Windows+I keys to open Settings. Next, click the System icon, then click Storage. Refer to below image:
Accessing the Storage option
At the top of Storage options, click the toggle to the On position. Next, under the toggle, click Configure Storage Sense or run it now blue ink. See below image:
Enabling Storage Sense
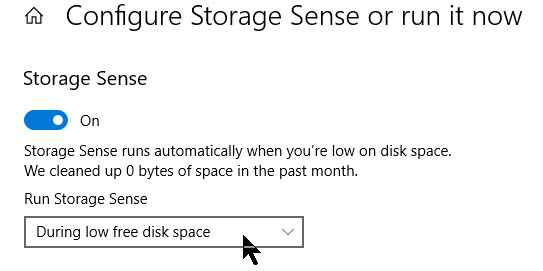
In the Storage Sense options, let’s examine a few different settings. First, is the frequency of when Storage Sense runs You set this option from a drop-down menu labeled Run Storage Sense. You can set it to run Every day, week or month; or whenever disk space is low (the default). Just click the menu and select the option that works best for you. See following image:
Configure when Storage Sense runs
Set Options
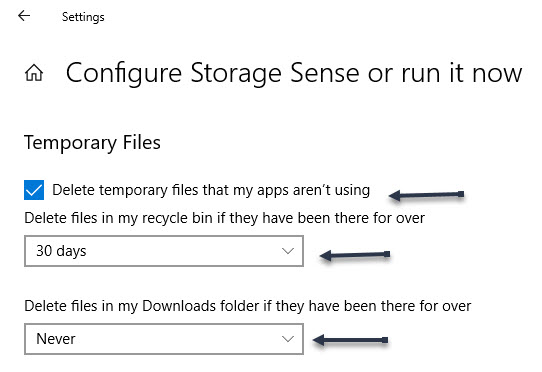
Under the Temporary Files section, the first option we want to enable is Delete temporary files that my apps aren’t using.
The second option is a drop-down menu labeled Delete files in my Recycle Bin if they have been there for over with selections of Never, 1 day, 14 days, 30 days, or 60 days. Select an option to your liking.
Finally, the third option is labeled Delete files in my downloads folder if they have been there for over and make your selection from the drop-down menu (default is Never). Automatically deleting files in your Downloads folder may not always be a great idea. However, if you don’t keep important files in the folder you can set a period of Never, 1 day, 14 days, 30 days or 60 days. In the example below we are enabling the first option, setting the second option to 30 days and the third option to Never. Refer to below image:
Setting Temporary Files options
Setting OneDrive
Another feature of Windows 10 is OneDrive which lets you access all the files saved in your OneDrive cloud, with File Explorer, regardless of whether they are downloaded or not on your PC. However, if you work with many of those files locally they can quickly add up and eat up space. If you want, you can configure Storage Sense to automatically mark the OneDrive files that you haven’t opened for a specified amount of time as online-only. That means that those files are still kept in your OneDrive cloud and are still accessible from File Explorer, but they no longer occupy space on your PC.
Under the Locally available cloud content heading there are two options. From the iCloud Drive option, chose an entry from thedrop-down menu. You can choose whethereContent will become online-only if not opened for more than Never, 1 day, 14 days, 30 days, or 60 days. Simply, repeat the above for the second option, iCloud Photos. However, note that this setting is available in Storage Sense only if the location of your OneDrive folder is on your C: drive, where Windows 10 is installed. See below image:
Setting iCloud Drive and Photos option
Clear Space Now
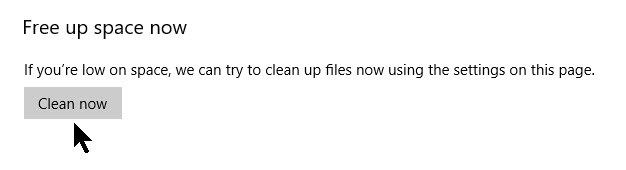
Finally, under the heading, Free up space now section is a Clear Now button. If you need to clean your Windows 10 C: drive urgently, click or tap this button. That runs Storage Sense immediately, without waiting for its schedule. See following image:
Once activated, Storage Sense will intelligently run whenever your device is low on storage space or according to your schedule.
Storage Sense looks for and removes files such as, but not limited to:
Temporary setup files
Old indexed content
System cache files
Internet cache files
Device driver packages
System downloaded program files
Dated system log files
System error memory dump files
System error minidump files
Temporary system files
Dated Windows update temporary files
If you have turned on the removal of old files in your Downloads folder, these will be removed as well according to your time interval setting.
The fact that Windows 10 includes an option to clean your disk and recover free space automatically is a good thing. It can prove quite useful, especially for users who struggle with limited space on their Windows 10 computers and devices. As a end note, remember that Storage Sence can be very aggressive in removing files.
That’s it. If you didn’t already use it, try Storage Sense and let us know what you think about this feature and/or TechSavvy.Life in the Comments or click to Tweet below.
I have found TechSavvy.Life blog posts extremely helpful. Check them out for posts on smart phone apps, Macs and PCs!
Please feel free to leave a comment. I would love hearing from you. Do you have a computer or smart device tech question? I will do my best to answer your inquiry. Please mention the device, app and version that you are using. To help us out, you can send screenshots of your data related to your question.
The author’s Vietnam eBook on the Battle for Tra Bong: Events and Aftermath
The Recycle Bin is a temporary storage space for files, folders and programs that have been deleted. The feature is primarily meant as a safety net in case you ever want to go back and retrieve deleted data. To remove the deleted files from your system completely, you will need to empty the Recycle Bin. It is recommended that you clear out your Recycle Bin regularly to avoid accumulating junk files and slowing down your system.
The Recycle Bin is a temporary storage space for files, folders and programs that have been deleted. The feature is primarily meant as a safety net in case you ever want to go back and retrieve deleted data. To remove the deleted files from your system completely, you will need to empty the Recycle Bin. It is recommended that you clear out your Recycle Bin regularly to avoid accumulating junk files and slowing down your system.
You can empty it manually by a simple right-click on the Recycle Bin icon (usually on the Desktop) and selecting Empty Recycle Bin option.
But there is a more efficient option. We are going to use Storage Sense to delete files of a certain age automatically every day, week, or month. Let’s explore how to do this..
This is for the Windows 10 operating system
Copyright Scott Adams, Inc./Distributed by Universal Uclick for UFS
Check out TechSavvy.Life for their blog posts on smartphone apps, PCs. and Macs!
First, launch Settings by clicking the Start button, then click the Gear icon on the left side of your screen. Also you can press the Windows+I keys to open Settings. Next, click the System icon, then click Storage. Refer to below image:
Accessing the Storage option
At the top of the Storage options, click the toggle to the On position. Next, under the toggle, click Configure Storage Sense or run it now blue ink. See below image:
Enabling Storage Sense
In the Storage Sense options, let’s examine a few different settings. First, is the frequency of when Storage Sense runs You set this option from a drop-down menu labeled Run Storage Sense. You can set it to run Every day, week or month; or whenever disk space is low (the default). Just click the menu and select the option that works best for you. See following image:
Configure when Storage Sense runs
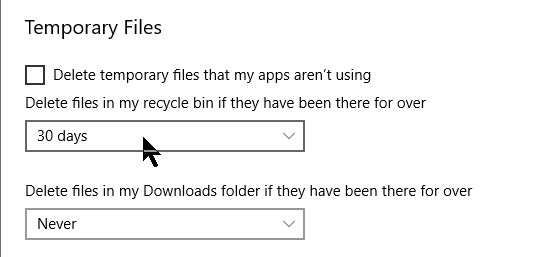
For now, we are only talking about deleting files in the Recycle Bin, uncheck the box beside Delete temporary files that my apps aren’t using if you don’t want Storage Sense removing old temporary files. Also, set the Delete files in my Downloads folder option to Never using the drop-down menu.
Between these two options, you’ll find a drop-down menu labeled Delete files in my Recycle Bin if they have been there for over with the options of Never, 1 day, 14 days, 30 days, or 60 days.
What does this mean? Whenever Storage Sense is run (as set previously above), it will automatically delete files that are in your Recycle Bin for longer than that period of time. Just set this option to your liking. Note! This only applies to the Recycle Bin on the your root drive (normally drive C:). Refer to below image:
Setting when to delete Temporary Files
Now, just close the Settings dialog box.
If you ever change your mind about the frequency of the Recycle Bin emptying (or want to disable it), just go to:
Settings > Storage
Set Storage Sense to Off. Or, you can change the interval options again to your your liking.
That’s it. You are finished. I hope you liked this blog post. Please feel free to leave a Comment or click the Tweet button below.
Please feel free to leave a comment. I would love hearing from you. Do you have a computer or smart device tech question? I will do my best to answer your inquiry. Please mention the device, app and version that you are using. To help us out, you can send screenshots of your data related to your question.
The author’s Vietnam eBook on the Battle for Tra Bong: Events and Aftermath
Windows 10, stores significant amounts of cache to make the system faster and more responsive. This is very efficient if you have tons of storage and free RAM to work with or a high performance CPU. Unless you have a considerable amount of RAM you will eventually run into problems that will slow down your PC, causing it to lag and maybe even hang if you load it with a lot of tasks.
Windows 10, stores significant amounts of cache to make the system faster and more responsive. This is very efficient if you have tons of storage and free RAM to work with or a high performance CPU. Unless you have a considerable amount of RAM you will eventually run into problems that will slow down your PC, causing it to lag and maybe even hang if you load it with a lot of tasks.
Let’s explore how to clear your Windows 10 cache to keep your PC running smoothly.
This is for the Windows 10 operating system
Copyright Scott Adams, Inc./Distributed by Universal Uclick for UFS
Check out TechSavvy.Life for their blog posts on smartphone apps, PCs. and Macs!
To cleanup your temporary file cache, browser cache like Chrome and Edge, Windows and Application traces and much more, I recommend using the free Wise Disk Cleanup tool over the built-in Disk Cleanup app in Windows 10. Click here to see my post on the Wisk Disk Cleanup tool. In this post, are instructions on downloading, installating and running the application.
Clear Your Domain Name Server (DNS) Cache
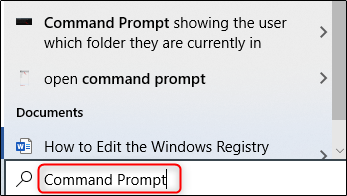
To clear your DNS cache, we need to open the Command Prompt with admin privileges. First, enter Command Prompt in the Cortana search box located in lower left hand corner of the Task Bar. Refer to below image:
Accessing the Command Prompt
The Command Prompt app will appear in the search results in upper left hand corner. Now, click on Run as administrator from the menu on the right. See below image:
Running the Command Prompt as an Administrator
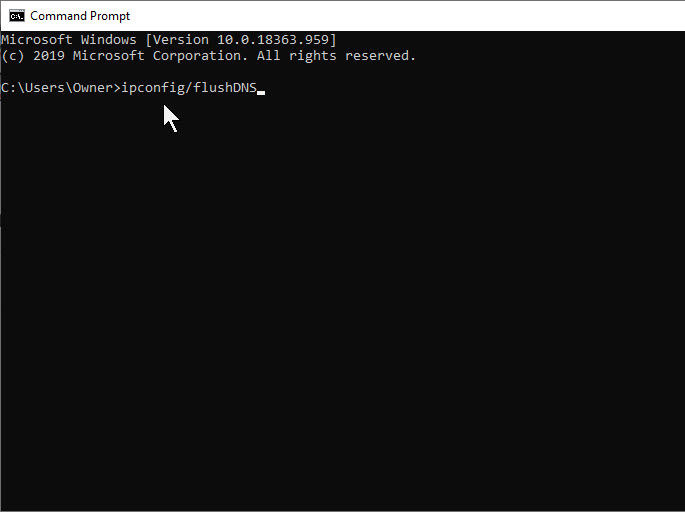
Next, enter the following command:
ipconfig/flushDNS
and press the Enter key. See following image:
Entering the command to flush the DNS
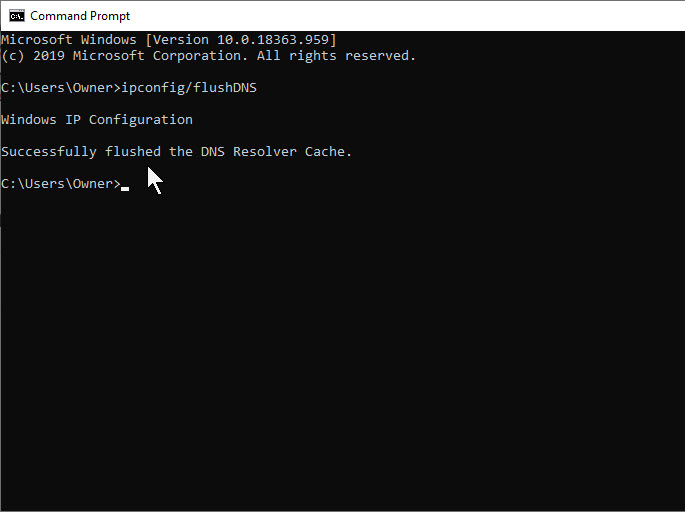
You will receive a message about the status of clearing the DNS cache. Refer to below image:
Message indicating clearing DNS was successful
Clear Your Windows Store Cache
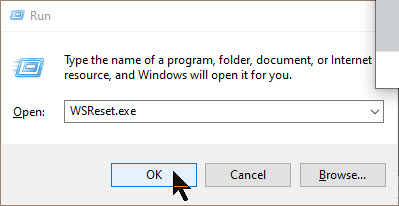
First, open the Run command by pressing the Windows+R command. Next, enter WSReset.exe in the Run box and click OK. Refer to below image:
Entering command to reset Windows Store cache
A black window will appear for a few seconds. Don’t be alarmed, it is clearing the Windows Store cache. See below image:
While processing the clearing of Windows Store you will get a blank black screen
Once it is finished, the black window will disappear and the Windows Store app will launch. Just close this application.
Clear Your Location Cache
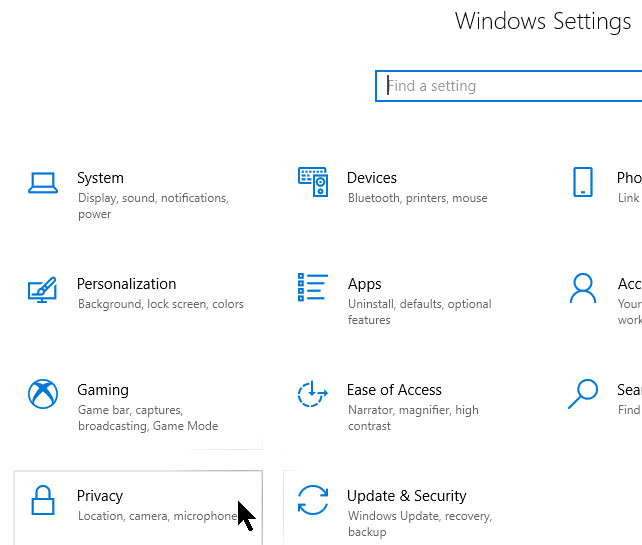
First, enter Settings in the Cortana search box located in lower left hand corner of the Task Bar. The Settings app will appear in the search results in upper left hand corner. Click on the Settings app and select the Privacy option. See following image:
Accessing the Privacy option
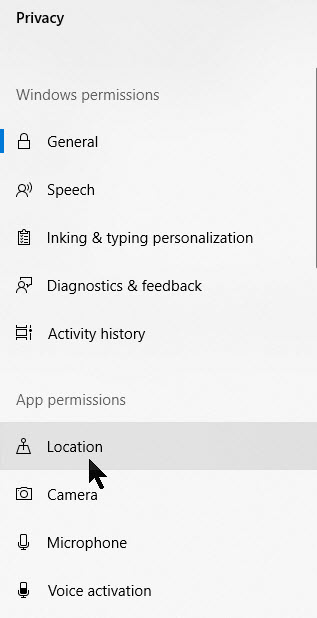
Now, in the App Permissions section, select the Location option. Refer to below image:
Accessing the Location option
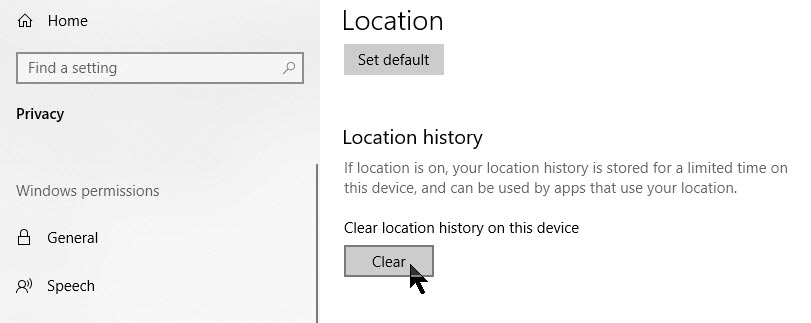
Next, scroll down till you see the Location History group. Here, select Clear under the Clear location history on this device heading. See below image:
Clearing your Location History
When finished, a small checkmark will appear beside the Clear button.
I hope you found this post helpful. Please feel free to comment or tweet out that you like TechSavvy.Life.
I have found TechSavvy.Life blog posts extremely helpful. Check them out for posts on smart phone apps, Macs and PCs!
Please feel free to leave a comment. I would love hearing from you. Do you have a computer or smart device tech question? I will do my best to answer your inquiry. Please mention the device, app and version that you are using. To help us out, you can send screenshots of your data related to your question.
The author’s Vietnam eBook on the Battle for Tra Bong: Events and Aftermath
In Windows 10, whenever you delete a file or folders, it gets stored in the Recycle Bin. So, if you have accidentally deleted the file and want to restore it, you can easily do so from the Recycle Bin.
In Windows 10, whenever you delete a file or folders, it gets stored in the Recycle Bin. So, if you have accidentally deleted the file and want to restore it, you can easily do so from the Recycle Bin.
But the downside is that when you delete the file, the storage space on your drive remains the same. So, you will need to delete the file from the Recycle Bin as well to free up the space.
Let’s explore how to bypass the Recycle Bin using two methods when deleting files and folders in Windows 10.
Copyright Scott Adams, Inc./Distributed by Universal Uclick for UFS
This is for the Windows 10 operating system
Check out TechSavvy.Life for their blog posts on smartphone apps, PCs. and Macs!
First, select the file or folders in File Explorer. Next, press the Shift+Delete keys to delete immediately.
Also, you can also right-click on a file or folder and click on the Deleteoption from the context menu, while pressing the Shift key. Refer to below image;
Using the context menu Delete option
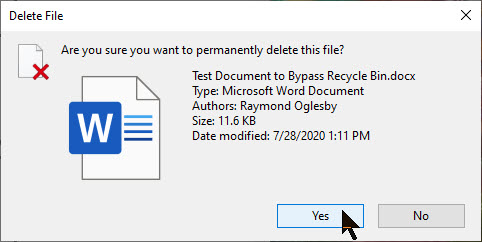
Windows will ask you if you want to permanently delete the file. Just press Enteror click Yes to confirm. See below image:
Confirmation message to delete
The file or folders are immediately gone. They cannot be recovered except through special software or highly technical recovery methods.
Method Two – Skip Recycle Bin
You can tell Windows to stop using the Recycle Bin altogether.
First, right-click on the Recycle Bin icon (usually located on the desktop). Next, select Properties. Refer to below image:
Accedssing the Recycle Bin Properties
In the Properties window, enable the option that says Don’t move files to the Recycle Bin.
Note that you will have to make changes to the settings for each drive for which you need to directly delete files. For instance, if your computer has three drives — C, D, and E and you want the new settings for all three, you need to apply the settings for all three drives by selecting them before enabling the option.
Now, click OK to save your settings. See below image:
Enabling Don’t Move Files to the Recycle Bin option
Now whenever you delete the files from your computer, they won’t be moved to Recycle Bin. Instead, all the files and folders that you delete will be automatically removed from the computer and you cannot restore them except as mentioned above.
So, it is a good idea to have the option Display delete confirmation dialog enabled. When enabled, you will be asked to confirm your choice every time you delete files or folders. See following image:
Enabling a Confirmation Dialog message before deleting
I have found TechSavvy.Life blog posts extremely helpful. Check them out for posts on smart phone apps, Macs and PCs!
Please feel free to leave a comment. I would love hearing from you. Do you have a computer or smart device tech question? I will do my best to answer your inquiry. Please mention the device, app and version that you are using. To help us out, you can send screenshots of your data related to your question.
The author’s Vietnam eBook on the Battle for Tra Bong: Events and Aftermath
It can be frustrating when you have an application that won’t respond. You click the X but nothing happens., it appears to be frozen. But manually turning off your computer by hitting the power button can damage your computer. Instead of waiting for the application to respond, let’s explore how to force quit applications on a Windows 10 device in three ways.
It can be frustrating when you have an application that won’t respond. You click the X but nothing happens., it appears to be frozen. But manually turning off your computer by hitting the power button can damage your computer. Instead of waiting for the application to respond, let’s explore how to force quit applications on a Windows 10 device in three ways.
This is for the Windows 10 operating system
Copyright Scott Adams, Inc./Distributed by Universal Uclick for UFS
Click on the frozen application to bring it into focus. Now, press Alt+F4 to close it.
If you don’t select a window or application, this shortcut may cause your computer to shut down or you may receive the Shut Down Windows command prompt.
Use the Task Manager
Press Ctrl+Shift+Esc to launch the Task Manager. Alternatively, you can right click the Windows task bar and select Task Manager from the menu. Refer to below image:
Accessing the Task Manager
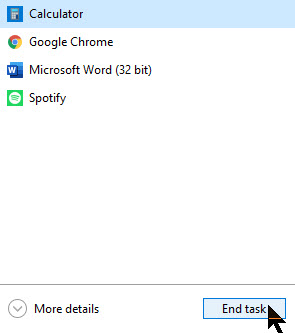
You will see a list of currently running applications. Now click on the task you want to force quit, then select End Task. See below image:
The running tasks
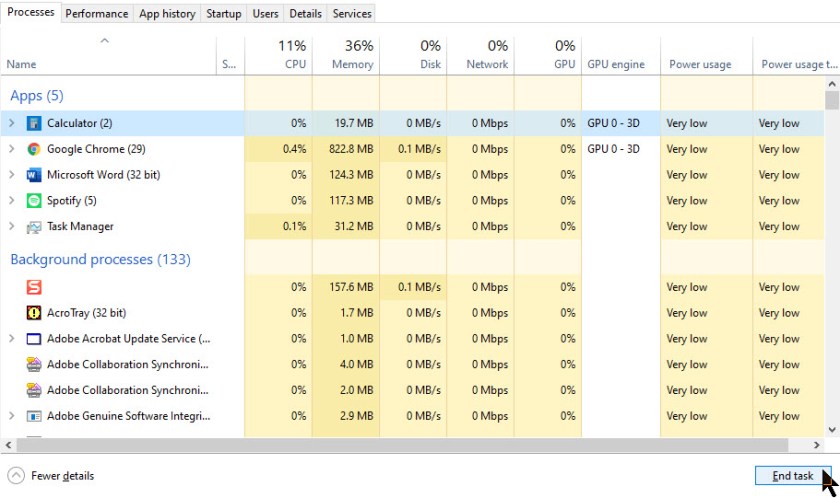
If you don’t see your application in the list, hit the More derails button in the bottom left corner of the window. You should find your task in the Processes tab. Now, click End Task. Your frozen program should now close. See following image;
Expanded list of running tasks
Use the Command Prompt
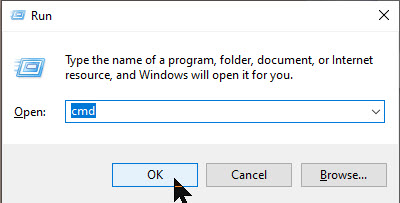
Click the Windows+R to open the Cortana search box. Now enter cmd and press Enter or hit the OK button. See below image:
Entering the command for the Command Prompt
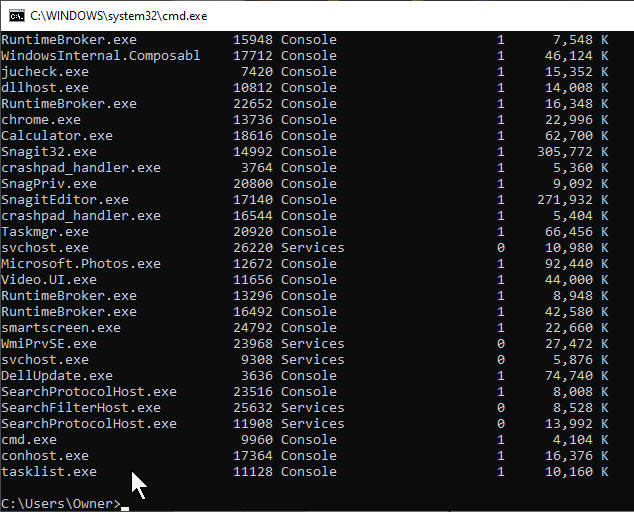
In the Command Prompt, enter tasklist and press Enter. This will display a list of currently running programs and tasks along with associated information. Refer to below image:
List of running tasks
Locate your frozen application. Now, enter taskkill/im {name_of_program}.exe.” Replace {name_of_program} with the name of the program you want to force quit. Remember to leave a space between taskill/im and the name of the program. Finally, press the Enter key.
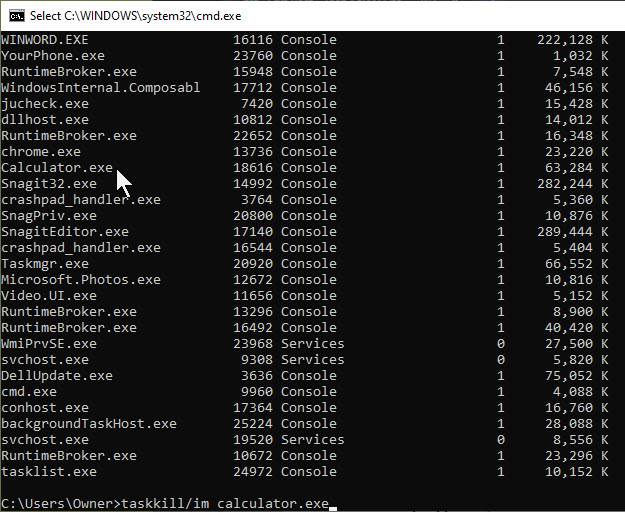
For example, let’s force quit the calculator program. You would enter the following command:
taskkill/im calculator.exe
then press the Enter key. See below image:
Entering the command to force quit the calculator program
A message will be returned indicating if you have successfully force quit the application. See following image:
Message indicating success in force quit of calculator program
If the above methods fail to work, you can reboot or shutdown your computer to kill the frozen app.
I have found TechSavvy.Life blog posts extremely helpful. Check them out for posts on smart phone apps, Macs and PCs!
Please feel free to leave a comment. I would love hearing from you. Do you have a computer or smart device tech question? I will do my best to answer your inquiry. Please mention the device, app and version that you are using. To help us out, you can send screenshots of your data related to your question.
The author’s Vietnam eBook on the Battle for Tra Bong: Events and Aftermath
If you’re having trouble comfortably reading text that is either too small or too big on a website in Google Chrome, there’s a quick way to change it.
If you’re having trouble comfortably reading text that is either too small or too big on a website in Google Chrome, there’s a quick way to change it. Let’s explore how to do this.
Chrome includes a feature called Zoom that allows you to quickly make text and images bigger or smaller on any website. You can zoom a web page from anywhere between 25% and 500% of its usual size.
When you navigate away from a page, Chrome will remember your zoom level for that website when you come back to it.
This is for devices using Google Chrome
Copyright Scott Adams, Inc./Distributed by Universal Uclick for UFS
Press Ctrl and 0 (zero) to return to the default size, normally 100%
Method 2: Using the Mouse
Press and hold the Ctrl key and rotate the scroll wheel on your mouse. Depending on which direction you spin the wheel, the text will become larger or smaller.
Method 3: Using the Menu
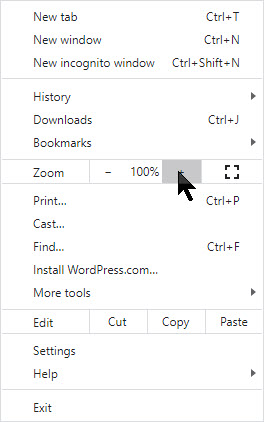
Select the Hamburger icon (the one with 3 dots) in the top-right of the Chrome web browser. Refer to below image:
The Hamburger icon
In the Zoom section, select the + (plus) button to increase the size of text and images. Select the – (minus) button to decrease the size of text and images. See below image:
Selecting a Zoom level
Press the Esc key to hide the menu.
Reset Zoom
One way is to use any of the zoom methods listed above to set the zoom level to 100%.
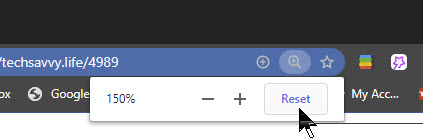
Another way is to select the magnifying glass icon in the address bar (this will only appear if you are zoomed to a level other than 100%), then select Reset. If you dont see the magnifying glass (normally due to numerous icons), just press and hold the Ctrl key while pressing the + (plus) or – (minus) key or mouse scroll. See following image;
Resetting the Zoom
Set a Custom Default
You can customise the default zoom level used by the Google Chrome browser. This way, text and images will always appear larger or smaller whenever you use the browser. To do so:
Select the Hamburger icon (the one with 3 dots) in the top-right of the Chrome web browser. Refer to below image:
The Hamburger icon
Select Settings from the menu. See below image;
Accessing the Settings
In the search box at the top of the Settings page, type “page zoom”. See following image:
Using the Settings search box
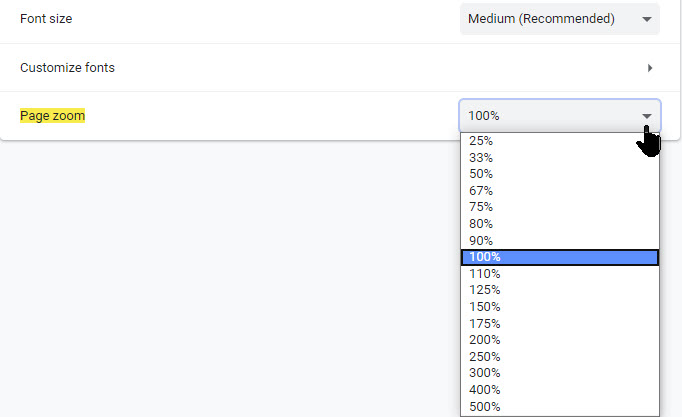
Under the Appearance options, select the drop-down menu for Page zoom and choose a new default zoom level. Refer to below image:
Selecting a custome Zoom level
That’s it. Now you can make your Chrome browsing easier on your eyes.
I have found TechSavvy.Life blog posts extremely helpful. Check them out for posts on smart phone apps, Macs and PCs!
Please feel free to leave a comment. I would love hearing from you. Do you have a computer or smart device tech question? I will do my best to answer your inquiry. Please mention the device, app and version that you are using. To help us out, you can send screenshots of your data related to your question.
The author’s Vietnam eBook on the Battle for Tra Bong: Events and Aftermath
Microsoft Word for Windows has a “text to speech” or Speak feature to read back a document. It’s hiding away behind the Ribbon but works fine once you’ve found it. We are going to add the icon to the Quick Access Toolbar (QAT) for easy accessiblity.
Microsoft Word for Windows has a “text to speech” or Speak feature to read back a document. It’s hiding away behind the Ribbon but works fine once you’ve found it. We are going to add the icon to the Quick Access Toolbar (QAT) for easy accessiblity. Lets explore how to do this.
This is for Microsoft Word 2010 through latest version
Copyright Scott Adams, Inc./Distributed by Universal Uclick for UFS
Speak button can be put on the Quick Access Toolbar (QAT) or Ribbon. Refer to below image for the Speak icon on QAT:
The Speak icon on Quick Access Toolbar
While in Word, select some text or Ctrl + A for the whole document, then click the Speak icon. If there’s no selection, clicking Speak will say the current word at the cursor.
Add the Speak Icon
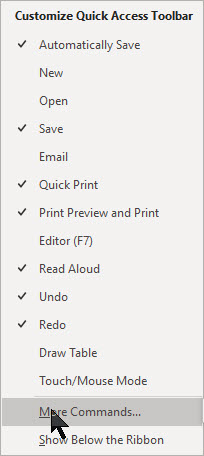
You’ll find Speak on the Commands not on the Ribbon list. The easiest choice is adding it to the Quick Access Toolbar. Just click on the Down Arrow in the Menu Bar and select More Commands. See below image:
More Commands option
The Quick Access Toolbar will be displayed. Select Commands Not in the Ribbon from the drop down box and locate the Speak command. Next, click the Add button to add the command to the Quick Access Toolbar. Click OK when finished. Refer to below image:
Adding the Speak option to the Quick Access Toolbar
Now it’s on the Quick Access Toolbar. Just select some text and click the Speak icon.
Change the Voice
To access the controls for Speak or Read Aloud:
Access the Control Panel via the Cortana search bar. Just enter Control Panel, then click the button in upper left hand corner.
Click Speech Recognition
Click Text to Speech
Word Speak is making use of a little-appreciated Text to Speech part of Windows. See following image:
Text to Speech dialog
That means the Speech options available depend somewhat on the version of Windows, not Office. Some of the options are:
Voice Selection – the English language options are “David” or “Zira” – male or female.
Preview Voice – click to hear the current voice.
Voice speed – faster or slower than the Normal setting.
To start the Speech at Windows startup, click the Speech Recognition tab and checkmark Run Speech Recognition at startup. When finished, click OK. See below image:
Selecting Text to Speech at Windows startup
I have found TechSavvy.Life blog posts extremely helpful. Check them out for posts on smart phone apps, Macs and PCs!
Please feel free to leave a comment. I would love hearing from you. Do you have a computer or smart device tech question? I will do my best to answer your inquiry. Please mention the device, app and version that you are using. To help us out, you can send screenshots of your data related to your question.
The author’s Vietnam eBook on the Battle for Tra Bong: Events and Aftermath
Recently, Microsoft has changed how the Search works. It is now more robust with many new options. The Search box is now located at the top of the screen in the title bar. This is called Microsoft Search and is available in both client and web apps.
Recently, Microsoft has changed how the Search works. It is now more robust with many new options. The Search box is now located at the top of the screen in the title bar. This is called Microsoft Search and is available in both client and web apps.
This is for devices running Outlook. Screenshots are from Office 365
Copyright Scott Adams, Inc./Distributed by Universal Uclick for UFS
First, you will notice the Search box is bigger and longer. Also, Microsoft has added two keyboard shortcuts; CNTL+E and ALT+Q for those people who favor the keyboard over a mouse.
Now when you click inside the Search box or use a keyboard shortcut, a menu appears that shows recent searches, people and actions. See following image:
The Search box menu
The menu is in a fixed position and covers up a lot of tools found on the Search tab ribbon. If you want to access these tools you have click on a blank space outside the Search results. See below image:
Click off the Search box
Using the Search Box
As you type in the Search box, the menu will filter down search terms, people, and actions to match what you type. This is the biggest change in Microsoft Search: it no longer just searches through email. The new feature searches everything in Outlook, including Outlook functionality.
If you want to know how to edit emails, type “edit” in the Search box and, below any emails that match the word, the menu will display relevant commands. Refer to below image:
The Search box actions
Filter Your Search
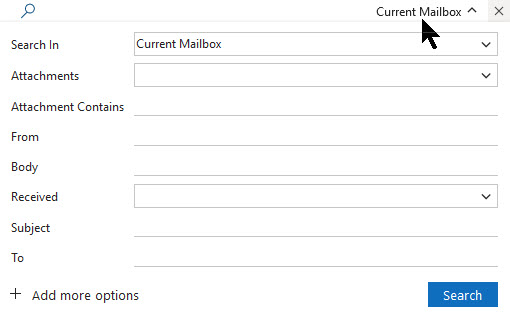
Unlike the old Search, Outlook now has a much better and easier user interface for filtering your search. Click the drop-down arrow next to the Search box and a simple search menu appears. See following image:
The Search box filters
Type into these filters and Outlook will automatically add the correct syntax to the Search box (as noted below). You no longer need to remember the right commands to type. Refer to below image:
Setting up a filter
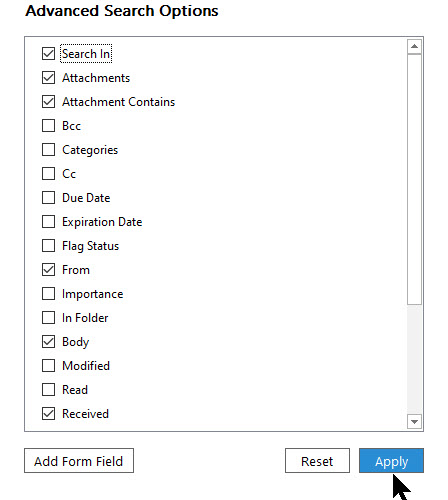
You are not limited to the default search fields, now you can change the default search fields as well. Just click Add More Options. This will bring up additional options you can turn on or off. Click Apply when you’re done.See below image:
More Search options
The Search Command
If you’re not a fan of the new dropdown, the Search tab on the ribbon is still there, although now it only appears when you click into the Search box, then click on a blank space in the ribbon. See following image:
The Search command
The new Search has more power and functionality than the old Search box and provides more screen space for your actual emails. It’s a definite improvement. Enjoy the new Search feature.
I have found TechSavvy.Life blog posts extremely helpful. Check them out for posts on smart phone apps, Macs and PCs!
Please feel free to leave a comment. I would love hearing from you. Do you have a computer or smart device tech question? I will do my best to answer your inquiry. Please mention the device, app and version that you are using. To help us out, you can send screenshots of your data related to your question.
The author’s Vietnam eBook on the Battle for Tra Bong: Events and Aftermath