We all have our favorite smart device apps. This would include Facebook, Twitter, Instagram, LinkedIn, Tumblr, Reddit and others. What happens when you turn off your device, power off or shutdown? These apps are still active and readily available when your device is turned back on.
These apps offer you convenient access by keeping you logged in. When you log into a financial institution, say Bank of America or Morgan Stanley, you are logged out within two minutes of no activity.
Our favorite apps should do the same. By staying logged in, the apps are more subjective to hacks by others.
Of course, by logging out, means you have to reenter a UserID, Password and Passcode, if using Two Factor Authentication, to gain access. And that can be a pain but it’s worth it.
If you are selling or disposing a smart device, you should log out all apps. Also, you may consider erasing all data and/or resetting your device. Only do this if you no longer need the device.
I would like the app industry to follow the same logging out protocol as financial entities. What do you think? Please take the one question survey.
I Would Like to Hear from You
Please feel free to leave a comment. I would love hearing from you. Do you have a computer or smart device tech question? I will do my best to answer your inquiry. Please mention the device, app and version that you are using. To help me out, you can send screenshots of your data related to your question.
I ran across this neat feature of Microsoft PowerPoint that I want to share with you. As a presenter, you are in control of what is being displayed. Instead of presenting all your bullet points at once lets dim there appearance one at a time. The “dim text” feature allows the audience to focus on one topic. For my example I am using a single slide with five bullet points.
This is for PowerPoint for Office 365 Windows and Mac versions. Other versions of PowerPoint will be similar.
Launch PowerPoint
Open PowerPoint on your Desktop/Laptop or Mac
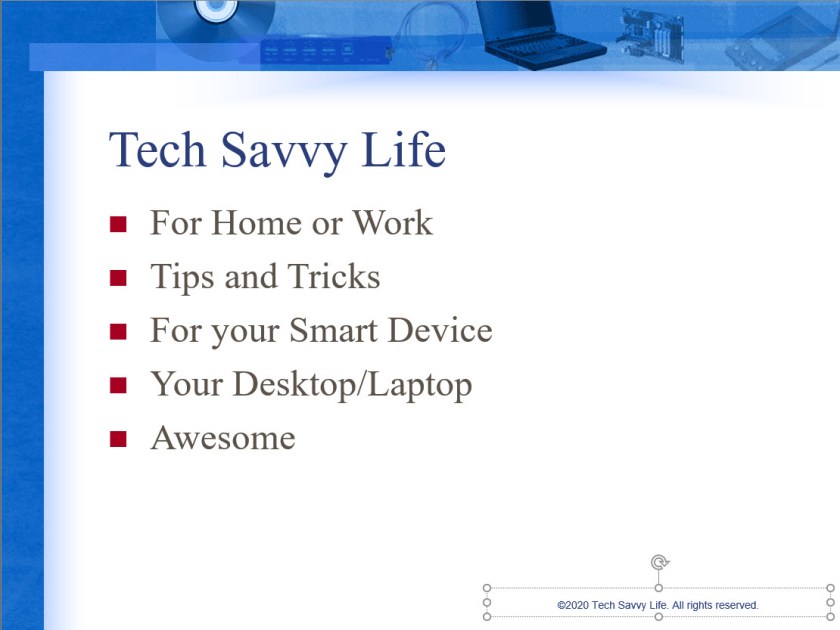
Find a slide that contains bullet points or text you want to dim. See my example below:
PowerPoint Slide Bullet Points screen
Highlight a bullet point or text
Select the Animations tab and choose the Appear animation
Set Animations
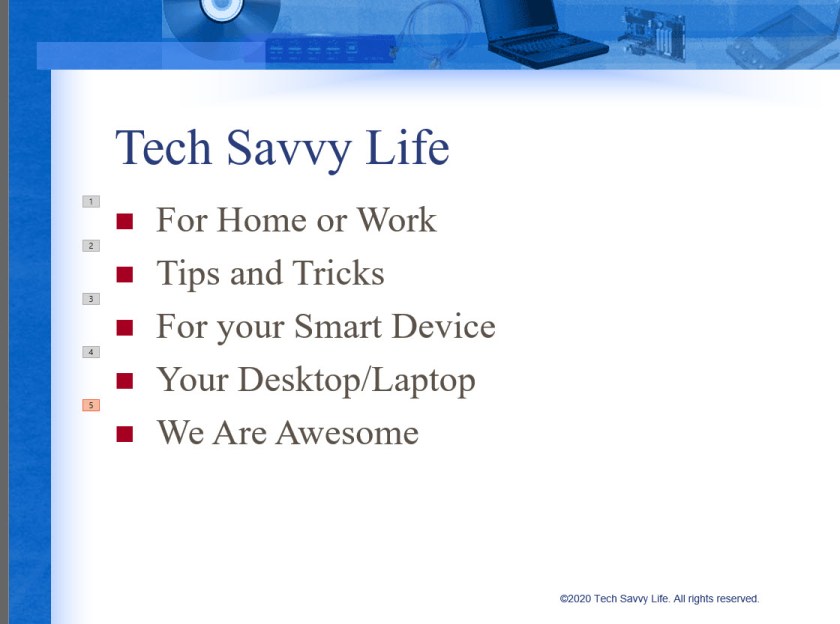
The animation will be successfully applied if you see a number next to the bullet point or slide.
Repeat the above steps until you have applied an animation to each bullet point or text. Refer to the following image:
PowerPoint Slide with Animation applied screen
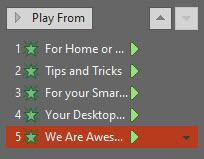
Select all the Animations by using the “Ctrl” key and clicking on each animation.
Select the arrow next to the right side of the animation
PowerPoint Animations screen
Set Effects
Select Effect Options. See following image:
PowerPoint Effects screen
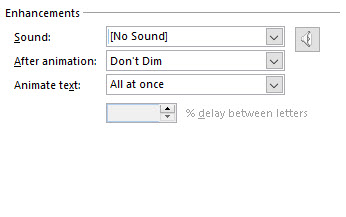
Change Behavior for Dimming
We are going to change the behavior of the default Don’t Dim option by clicking the arrow next to the item (a drop down box selection) and select a color slightly different than your bullet points or text. You want your color selected to be visible to the audience. For my example, I selected a light red color:
PowerPoint Color Selection for Animation screen
Click OK
Test Your Slide
Now its time to test out your slide. You should see something like the following screen as you manually or automatically select each bullet point.
PowerPoint using the Dim Feature
This is a nifty feature for your next text presentation. Save your slide or presentation, you are finished.
I Would Like to Hear from You
Please feel free to leave a comment. I would love hearing from you. Do you have a computer tech question? I will do my best to answer your inquiry. Please mention the app and version that you are using. To help me out, you can send screenshots of your data related to your question.
Do you want to protect your Microsoft Excel workbook or a sheet in your workbook? If so, this blog post is for you. We are going to password protect a workbook, protect a sheet in a workbook and the Excel file itself.
This is for Excel for Office 365 Windows and Mac versions. Other versions of Excel will be similar.
Protect a Workbook
I recommend you start with a blank Excel workbook, just in case you forget a password. To assign a password to an Excel workbook, do the following:
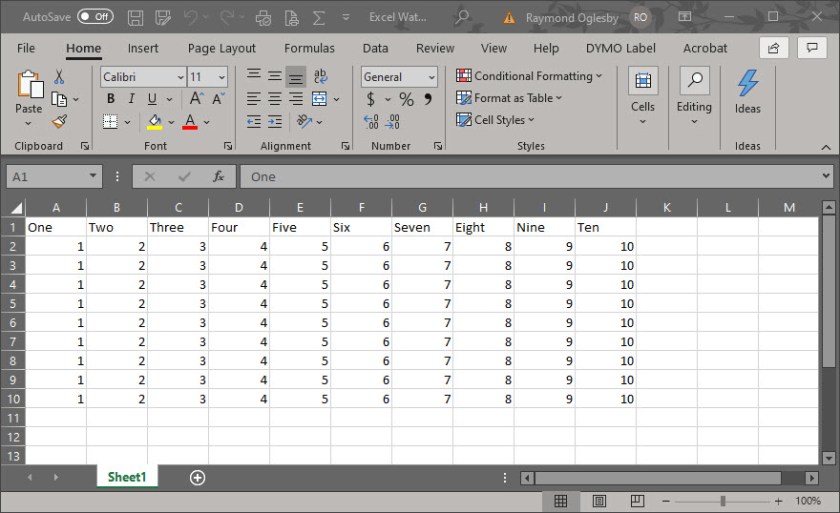
Open a blank Excel workbook. For demonstration purposes, I am using an Excel workbook that contains one sheet with cell data. You can choose an existing Excel workbook if you chose. See my workbook below :
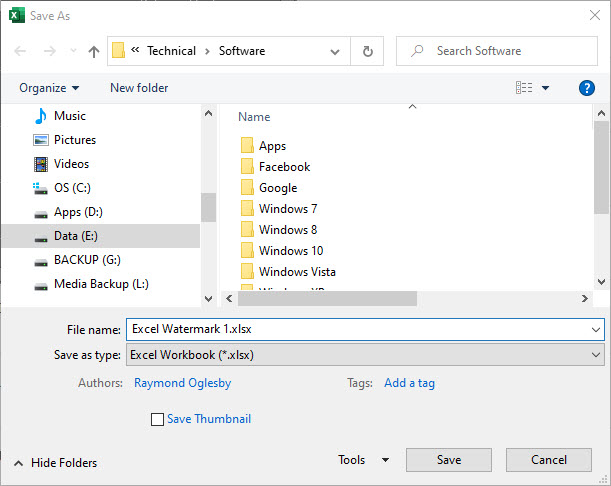
Select File>Save As
Select More options (underneath Excel Workbook drop down box)
Select the Tools drop down box
Chose General Options
Set the Password(s)
You will see notice two password boxes, one to open the workbook and one to modify the workbook
Enter one or both passwords. Make sure you write down these passwords and store them in a safe place.
You have two other options to set if you chose, Always create backup and Enable Read-only recommended. The first is self explanatory. The second option is an extra layer of protection by enabling the workbook to read-only status upon opening.
Confirm your password(s) by reentering the password(s)
Click OK
Click Save
Close or Exit Excel
Note! A user who doesn’t know the second password can open and view the data by clicking the Read Only option. This user can still modify the data, but they are unable to save their changes to the protected workbook. However, the user can save the workbook under a new name, which circumvents the protection process. Of course, password-cracking software will get you into the workbook.
Protect a Sheet
Open a blank Excel workbook. For demonstration purposes, I am using an Excel workbook that contains one sheet with cell data. You can choose an existing Excel workbook if you chose.
Select the Review tab
Click the Protect icon
Click Protect Sheet icon. Refer to following image:
Enter your password in the Password to unprotect sheet box
Click OK
In the Confirm Password dialog box, type the password again
Click OK
Save your changes
Close or Exit Excel
Tip! To remove a password, click Protect>Unprotect Sheet and enter your password. You can also select Protect Workbook icon to protect a workbook which follows.
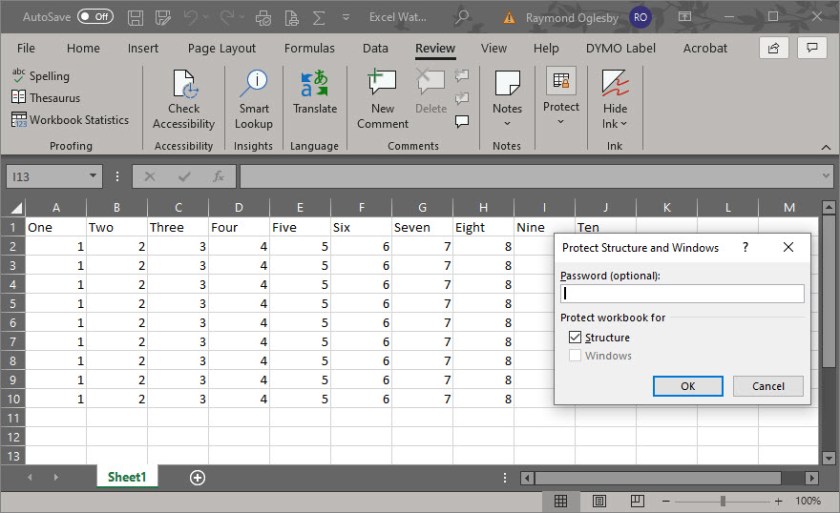
Protect Excel Structure
Open a blank Excel workbook. For demonstration purposes, I am using an Excel workbook that contains one sheet with cell data. You can choose an existing Excel workbook if you chose.
Select the Review tab
Click the Protect icon
Click Protect Workbook icon. Refer to the following image:
Select the Windows option if you want to prevent users from moving, resizing, or closing the workbook window or hide/unhide windows
Enter your password
Click OK
In the Confirm Password dialog box, type the password again
Click OK
Save your changes
Close or Exit Excel
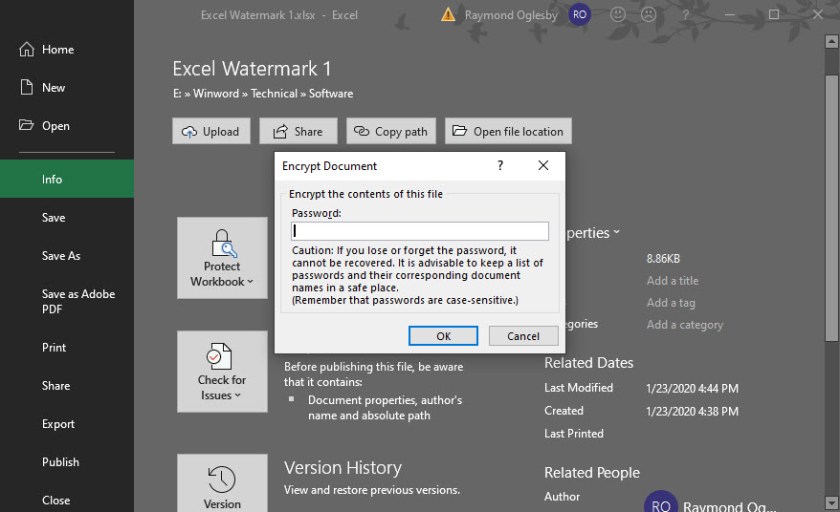
Protect the Excel File
To prevent users from accessing the data in your Excel file, we are going to protect the file with a password
Open a blank Excel workbook. For demonstration purposes, I am using an Excel workbook that contains one sheet with cell data. You can choose an existing Excel workbook if you chose.
Select File>Info. Refer to my image below:
Click Protect Workbook icon
Chose Encrypt with Password option
Enter a password in the Encrypt Document dialog box
Click OK
In the Confirm Password dialog box, type the password again
Save your changes
Close or Exit Excel
Be cautious when sharing files or passwords with other users. You still run the risk of passwords falling into the hands of unintended users. Remember to write down your passwords and store them in a safe place.
I Would Like to Hear from You
Please feel free to leave a comment. I would love hearing from you. Do you have a computer tech question? I will do my best to answer your inquiry. Please mention the app and version that you are using. To help me out, you can send screenshots of your data related to your question.
Apple had made some new enhancements to its feature browser, Safari, for the iPhone/iPad. There are a few notable features that increase our productivity regarding bookmarks and open tabs. Safari’s toolbar has only five choices for you to select from, Forward, Backward, Share, Bookmarks and New Tab/Page. Instead of just taping on a choice, we are going to press down on these icons and see what happens.
This is for an iPhone/iPad and Mac iOS 13 operating system
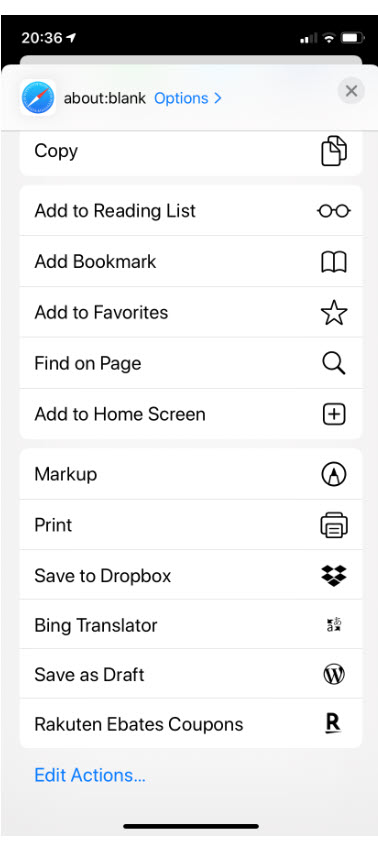
This seems to be an Apple feature. I have gotten into the habit of pressing down on every icon in iOS 13. Just press and hold the Share icon, the one with an up arrow, nothing happens until you release your hold. You will get the regular Share screen, like the image below:
Safari Share Behavior
So much for that.
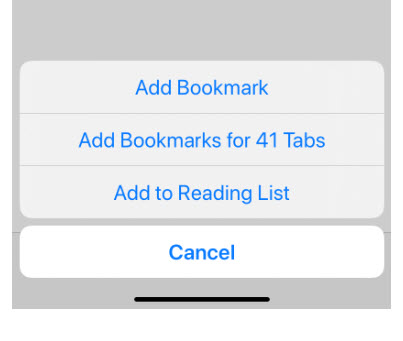
The Bookmarks
Let’s try pressing and holding the Bookmarks icon. You will get the following screenshot:
Well, that worked. I do not recommend adding Bookmarks for all open tabs; this would tend to make your bookmarks messy. It would be better just to add a Bookmark for the current tab.
Testing the New Tab/Page
Okay, lets press and hold the New Tab/Page icon. You should get the following screen:
Yea, two out of three have the press and hold feature. From this screen, you can close all open tabs or just the current one. Also, you can create a new Private Tab or a New Tab.
This time, just press the New Tab/Page icon to reveal your open tabs (normal behavior). Press and hold a tab to move it into a different location. This works in portrait or landscape mode.
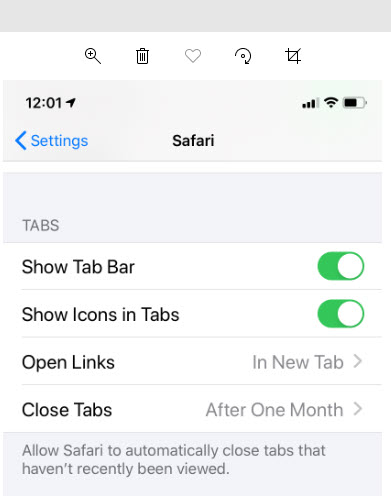
Setting the Time Interval
There is another feature to explore; setting a time interval as to when tabs are closed.
Go to Settings and select Safari. You will see the following image:
Click the Close Tabs button. Your screen should display options on when to close your Safari tabs like the following image:
Select your choice from the four options.
Okay, for now. Thanks for trying out these iPhone/iPad features for Safari in IOS 13+.
I Would Like to Hear from You
Please feel free to leave a comment. I would love hearing from you. Do you have a computer tech question? I will do my best to answer your inquiry. Please mention the app and version that you are using. To help me out, you can send screenshots of your data related to your question.
Have you ever wanted to share your iPhone contacts with your Windows 10 PC? I have wanted to do this for a year. It used to work but my PC went “south” last year. I finally did some research and came up with this post for you to implement. You can share your smart device contacts through Apple’s iCloud service. To use this service, your contacts must be synced with iCloud. So, lets get started.
This is for iPhone or iPad and Windows 10 operating system
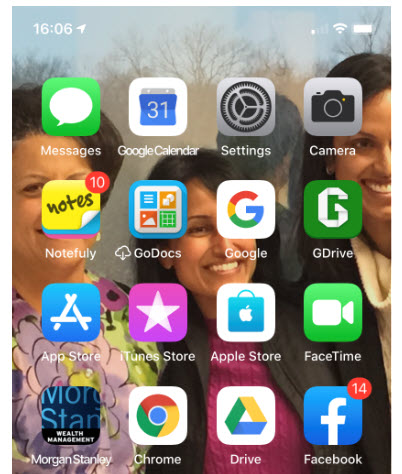
Open the Settings app on your iPhone. Its usually located on your home screen. Your screen should look similar to the following image:
My iPhone home screen
Tap your name at the top of the screen. See following screenshot:
My iPhone Settings screen
Syncing Contacts
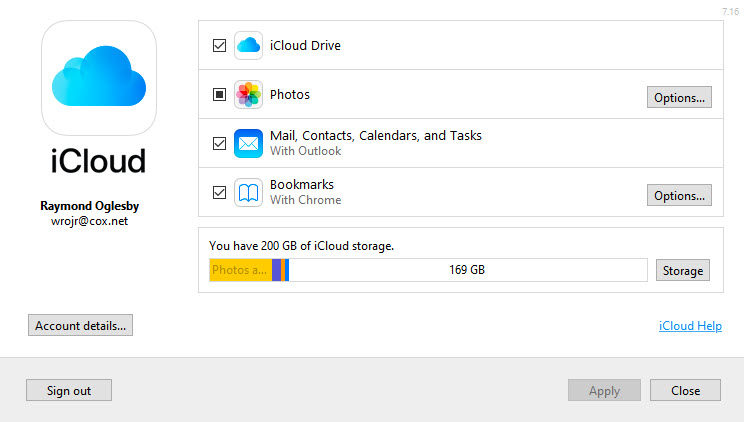
Tap iCloud
Verify that your Contacts is being synced. Either the toggle switch will be green or you will see iCloud storage being used like the below image. If not, tap the toggle button to enable the process and sync your contacts.
My iPhone iCloud Storage screen
On your Windows 10 PC, log in to iCloud website with your Apple ID and Password
Click on the Contacts applet. See following screenshot:
iCloud applets on Windows 10 PC screen
Selecting/Exporting Contacts
Select a Contact from your list. See the following image for my selection of Chris Dow:
iCloud Contacts screen
Click the small gear icon at the bottom left corner
Select Export vCard. Refer to following screenshot:
Selecting and Exporting an iCloud Contact screen
You can select more than one contact by selecting a single name and using the “Shift” key to select the last contact. There is an option to Create Group at the bottom right for your multiple contact selection.
Note! It is best to export just one contact. Although you can select multiple contacts, only one contact data (the first one selected) is exported, especially for Outlook.
By default, the exported VCF file is placed in your PC Downloads folder.
Open your File Explore and find the VCF file. Refer to following image:
File Explorer Downloads folder screen with Chris Dow VCF file
Using Your VCF File
Right click on the VCF file and select Open
Select where you want to install your contact(s). You have several choices, like Outlook, the People app and Windows Contacts
Select your choice and click OK
Your choice will open for your review.
For Outlook, click the Save & Close option to complete the export. See following screen::
Exported VCF file from iCloud to Microsoft Outlook in Windows 10 screen
That’s it. You are done.
Enable iCloud Contacts Sharing
BUT WAIT, I want to share all my Contacts via iCloud to my Windows 10 PC, not just a few. You can use iCloud for Windows to synchronize your contacts and other data between your iOS device and Outlook. Lets get started.
This works with the following variations of Outlook:
Outlook for Office 365, Outlook 2019, Outlook 2016, Outlook 2013 and Outlook 2010
Please feel free to leave a comment. I would love hearing from you. Do you have a computer tech question? I will do my best to answer your inquiry. Please mention the app and version that you are using. To help me out, you can send screenshots of your data related to your question.
Are you concerned someone may have access to your Twitter account? Do you know what devices are logged in? What if you moving to a new device; have you logged out of Twitter on the old device?
Your smart device keeps you logged in to such apps as Amazon, Apple, Facebook, Messenger, Microsoft and others. Each app has a feature to log out all devices. We want to explore logging out all devices for Twitter. Just follow these steps.
This is for iPhone or iPad and Twitter
Your Profile Screen
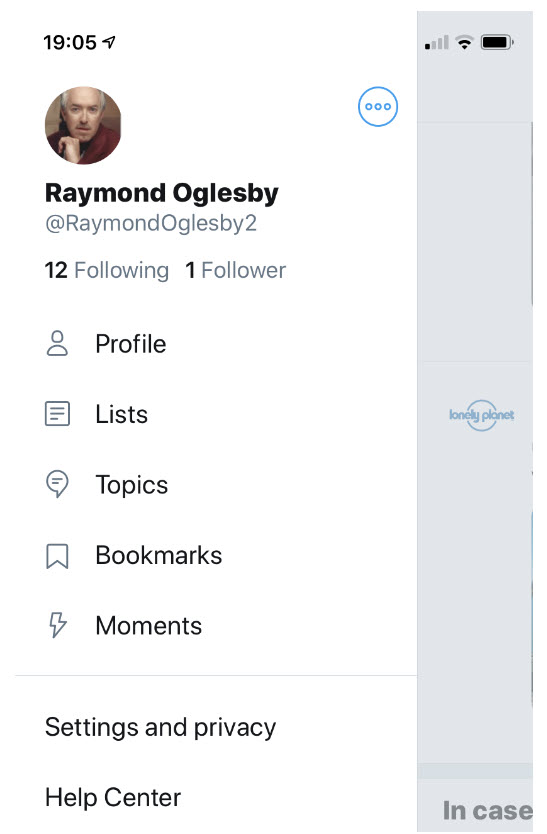
Tap your profile photo or swipe left to right. You will see the following image:
Twitter Log Out Profile screenshot
Your Settings Screen
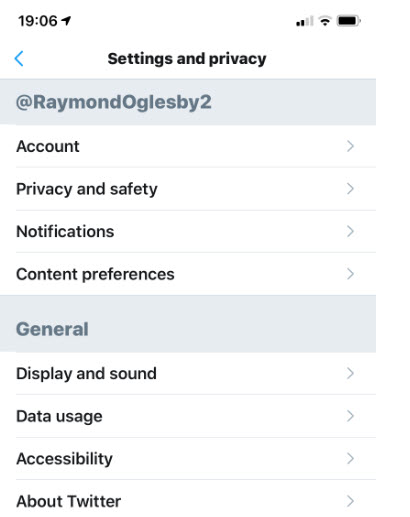
Tap on Settings and privacy. You will see the following screen:
Twitter Log Out Settings screenshot
Your Account Screen
Tap on Account. Following is a screenshot:
Twitter Log Out Account screenshot
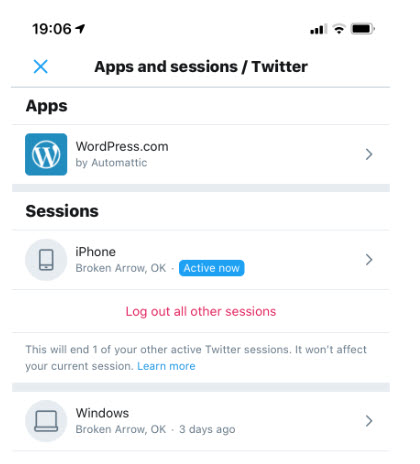
Your Sessions Screen
Tap on Apps and sessions. You will see the following screen:
Twitter Log Out Devices screenshot
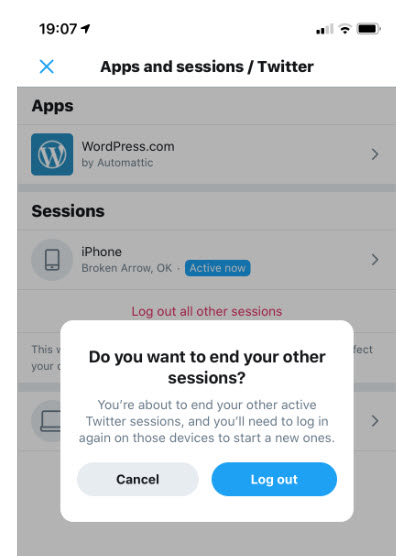
Your Log Out Screen
Your devices that have access to your account is displayed. Tap on Log out all other sessions. You will see the following screen:
Twitter Log Out All Sessions screenshot
Tap Log out
That’s it. You are done. You now will have to log back in to use Twitter.
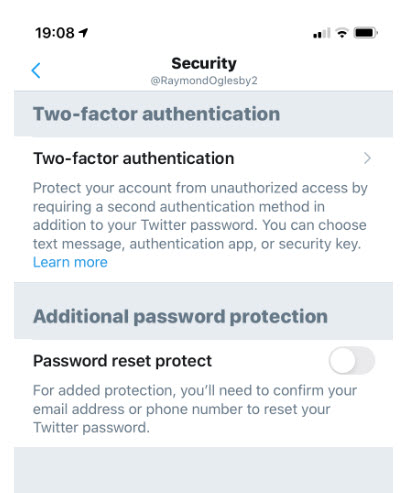
Your Two Factor Authentication Screen
To make your Twitter account more secure, you may want to setup Two-factor authentication. This is on the third screen in this post, under the Account option. Just tap on Security and you will see the following screen:
Twitter Log Out Two-Factor Authentication screenshot
Select Two-factor authentication, choose one of three options displayed on your screen and follow its directions.
I recommend setting up Two-factor authentication whenever the option is available.
I Would Like to Hear from You
Please feel free to leave a comment. I would love hearing from you. Do you have a computer tech question? I will do my best to answer your inquiry. Please mention the app and version that you are using. To help me out, you can send screenshots of your data related to your question.
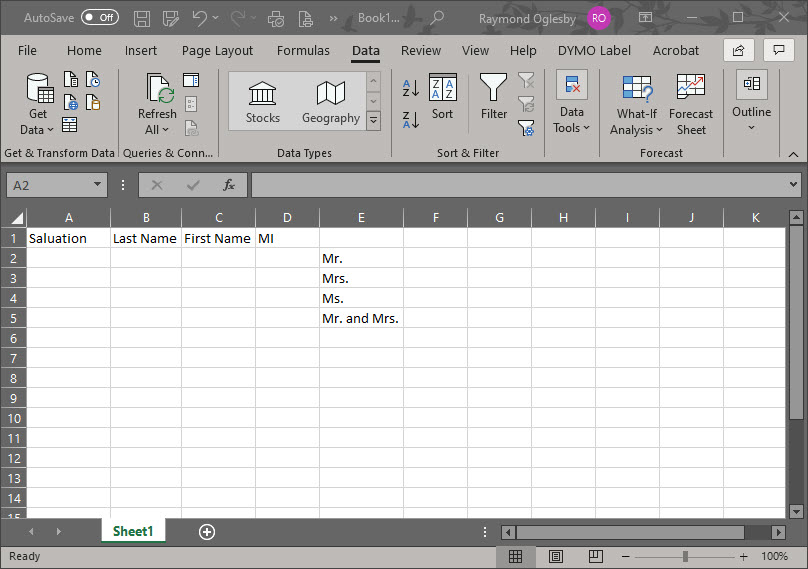
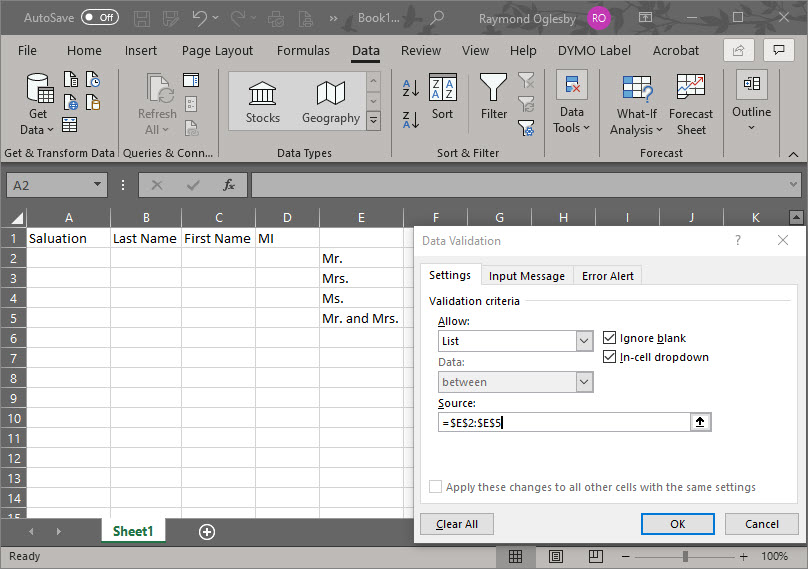
Drop down lists are used to select specific data, in our example, a list of Salutations. If the user tries to enter a Salutation that is not in the list, Excel rejects the entry.
I am using a simple drop down list in an Excel sheet. This feature is not well known nor initiative.
Salutations was a BIG DEAL for a religious organization that I worked for as a Consultant. The company had a donor base of 25,000+ names/addresses. (Of course, I was using a database, not Excel, to manage the data.) If the Salutation was incorrect on a donor letter, some donors refused to give monies for the company projects. For example, do you address them as Mr. and Mrs. or Dr. and Mrs. or Mr. and Dr.? Some donors wanted no Salutation. I spent a lot time getting the Salutations correct.
This is for Excel for Office 365 Windows and Mac versions. Other versions of Excel will be similar.
Setting Up the Excel Sheet
Enter the headings in Row 1 (Optional)
Create a list of cells E2:E5. Alternatively, you could put the list in another sheet.
Select the empty cell A2. (You can position the drop down list in most any cell or even multiple cells.)
Setting up Excel for a drop down list
Using Data Validation
Select the Data tab
Select Data Validation
Choose List from the Allow options drop down list
Click the Source control and drag to highlight cells E2:E5. Alternatively, you could enter the cell reference $E$2:$E$5 or use a sheet and cell reference if your list is in another sheet.
Ensure that the In Cell dropdown option is checked. If you leave this unchecked, Excel forces users to enter only the list values, but it won’t present a drop down list. The users would have to guess the values; not a good idea!
See the following screenshot:
Entering the Allow and Source option
Click OK
You can add the drop down list to multiple cells. Select the range of data input cells instead of a single cell. Also, you can select noncontinuous cells by holding down the Shift key while you click the appropriate cells.
You can copy and paste this drop down cell to any other cells in your sheet.
Below is a screenshot where Mr. was selected as a Salutation for cell A2:
Excel drop down list selection
I Would Like to Hear from You
Please feel free to leave a comment. I would love hearing from you. Do you have a computer tech question? I will do my best to answer your inquiry. Please mention the app and version that you are using. To help me out, you can send screenshots of your data related to your question.
Google Chrome is adding a new feature for controlling media within your Chrome browse on a desktop or laptop. Instead of trying to figure out where the video/sound is coming from, you can hear and/or see it in your Chrome browser. The update is rolling out gradually and is for Chrome version 79+. Instead of waiting for the update you can always go to the flags menu (see below) and manually trigger the new media playback controls.
This is for any device that uses Google Chrome.
Check Chrome Version
First, let’s check what version of Chrome you have; just follow these steps:
Click on the Menu icon in the upper right corner of the screen, the one with 3 dots
Click on Help
Click on About Google Chrome
Your Chrome browser version number is displayed like the example below:
Chrome version screen
Close Chrome
Update Chrome
If you have a lower a version than 79, let’s try to update by doing the following:
Open Chrome
Click on Menu icon in the upper right corner of the screen, the one with the 3 dots
Click UpdateGoogle Chrome. Note! If you don’t see this button, you’re on the latest version.
Close Chrome
Setup Media Control
Open Chrome
Type in chrome://flags as the URL like the screenshot below:
Chrome URL for flags
Type in Global Media Controls as your Search, like the example below:
Click on the Default drop down box and select Enabled
Click the Relaunch button in the lower right of the screen
Type in chrome://flags as the URL
Type in Global Media Controls as your Search
Your screen should show the Global Media Controls Enabled like the screen below:
Close Chrome
After a browser restart, a Play button should show up whenever you have media playing.
If you don’t see the option, head to YouTube and play a video. A Play button should show up next to the address bar. Clicking on it will display the media content like title, source of the content, the play/pause and skip buttons. This feature works for lots of websites to include Spotify, Netflix, Amazon Prime, Dailymotion and Microsoft.
I Would Like to Hear from You
Please feel free to leave a comment. I would love hearing from you. Do you have a computer tech question? I will do my best to answer your inquiry. Please mention the app and version that you are using. To help me out, you can send screenshots of your data related to your question.
Apple has yet to make a big deal about their new operating system. In fact, some of these new features are hidden or have changed from their last update. I am going to discuss four new features; Battery Optimization, Update All, Rearranging Apps and Sharing Photo Location. You may want to check these out.
Apple unveils a new iPhone every year. Along with it comes a new mobile operating system (iOS), in this case iOS 13+. These features work on iPhones back to 6S and SE. If you have a 6 or 5s, you are stuck with iOS 12 variations.
This is for iPhone, iPad and Mac or any other device using iOS 13
Battery Optimization Feature
The first new feature I want to address is “Battery Optimization“. Its best to use for overnight charging. This feature learns how you charge your battery and sets up a routine of charging your phone to 80% until the time right before it knows you will wake up, at which point it will finish charging to 100%.
To set up, go to Settings>Battery>Battery Health and turn on Optimized Battery Charging. Once enabled, the slider control will be lit in green. Below is a screenshot:
Optimized Battery Charging screenshot
Where is the Update All Feature?
The second feature is somewhat tricky. I don’t know why Apple took something so simple in their previous iOS and made this feature difficult. I assume they want you to rely on automatic updates. The feature is “Update All Apps“. In the new iOS, this feature seems to be missing, but we will get it back. This feature is for those who don’t want to wait for automatic updates.
First, lets go ahead and setup “Automatic Downloads“. To setup, go to Settings>iTunes & App Store>Cellular Data. To enable this feature, turn on the Automatic Downloads. The slider control will be lit in green. We are doing this in case you forget to manually update your apps.
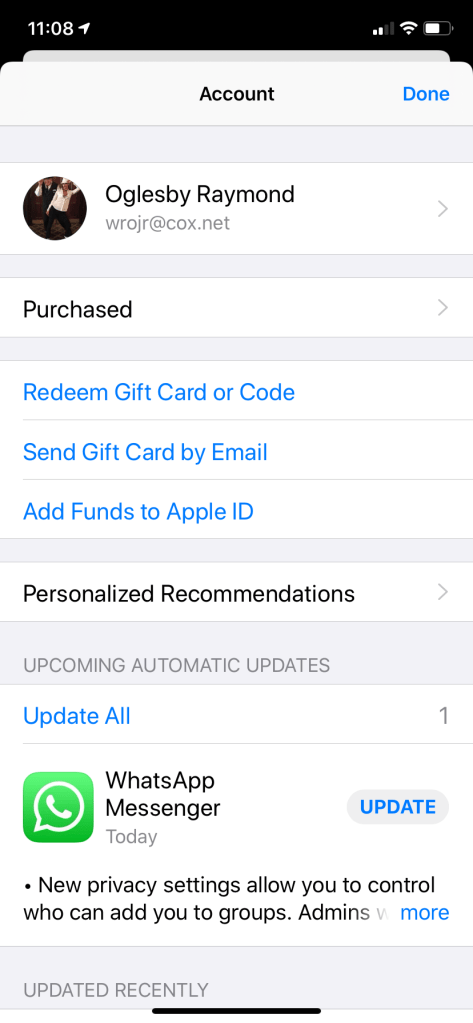
Now, lets get the Update All feature back. Go to the App Store app and click on your profile at the top (it should have a small photo of you). Your screen will look like the below screenshot:
Updated Recently screenshot
Your will notice the Updated Recently section followed by your iPhone Apps. To get the Update All feature, swipe down on the screen. Your screen will look as follows:
Update All screenshot
Notice the Update All feature magically appears IF you have pending updates. You can click this link to update all apps or manually update an app by clicking on its Update button.
Rearranging Apps Has Been Modified
The third feature is for Rearranging Apps. When you press and holdan app, a popup menu appears. These popups are different for each app. To get the “wiggles” for dragging an app to a different location or to create a folder by dragging apps on top of each other, continue topress and hold and the wiggles will appear. Even though the app icon may be hidden by the popup menu, just continue to press and hold. Tap Done at the top of the screen when finished.
A New Privacy Option for Photos
The last feature I want to mention is about a privacy option for photos. From the Photo app, select any number of photos you plan to share. Click the Share icon at the bottom. But before you share, click Options at the top; you will get the option to include location data or not. By removing the location data it makes it a lot harder for someone to track the location of the photo(s). Below is a screenshot of including the Location. To turn off, disable the Location slider control (the control will no longer be lit).
Location data for photos screenshot
I Would Like to Hear from You
Please feel free to leave a comment. I would love hearing from you. Do you have a computer tech question? I will do my best to answer your inquiry.Please mention the app and version that you are using. To help me out, you can send screenshots of your data related to your question.
Testimonials
I love you addressed nearly every frustrating feature change I have! Thanks for sharing and educating me.
Are you unable to share a Messenger video on your iPhone to social media, like Facebook? This share feature is not available on the smartphone. But it is possible on your desktop or laptop.
This is for any device using Messenger and Facebook
Messenger on iPhone
On your iPhone, open Messenger and find the video you want to share like the example below:
Messenger video
You can click the Up Arrow rectangle box to send the video to certain friends and/or Create a Group. But we want to share the video to Facebook. Following are the steps:
Messenger on Desktop/Laptop
Open Messenger or Facebook on your desktop/laptop then select Messenger
Move your mouse next to the Up Arrow rectangle box
A Reply and More actions will magically appear
Click on More
Click on Save to Facebook
Your screen will look like the below image:
Saving Messenger video to Facebook
Facebook
Open Facebook on your Desktop/Laptop
Go to Home menu option on Facebook
On the left hand side menu, expand Explore (if necessary) and locate Saved
Click on Saved and you will see the video as shown below:
Saved video on Facebook
Click on the Share button to share on Facebook
Sometimes the author has blocked a video from being shared. If so, the Share button will not be displayed.
Please feel free to leave a comment. I would love hearing from you. Do you have a computer tech question? I will do my best to answer your inquiry. Please mention the app and version that you are using. To help me out, you can send screenshots of your data related to your question.