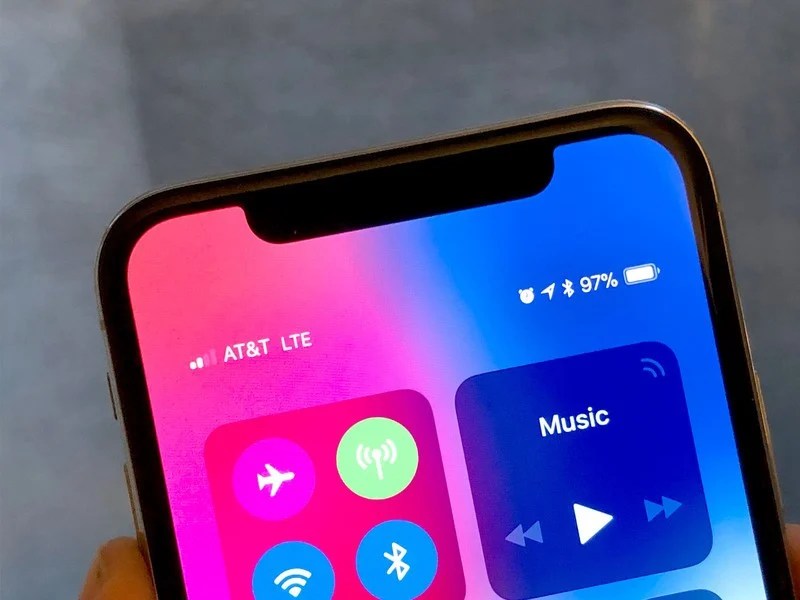
iPhone models that have notches in the upper portion of the screen (such as the iPhone X, 11, 12, 13, and their variants) do not have the option to display the numerical battery percentage on the status bar as on older models.
iPhone models that have notches in the upper portion of the screen (such as the iPhone X, 11, 12, 13, and their variants) do not have the option to display the numerical battery percentage on the status bar as on older models. So, let’s explore how to see battery percentage on newer models.
This is for iPhone and iPad. Screensho9ts are from iPhone XR
Copyright Scott Adams, Inc./Distributed by Universal Uclick for UFS
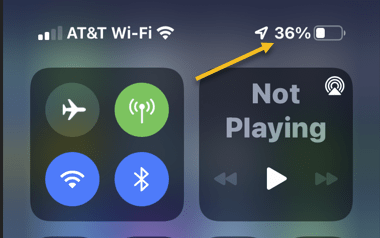
Instead, you can quickly check the battery percentage by launching Control Center. To do so, first, place your finger on the Battery icon in the upper- right-hand corner of your screen and swipe downward. Refer to the below image:
Opening the Control Center
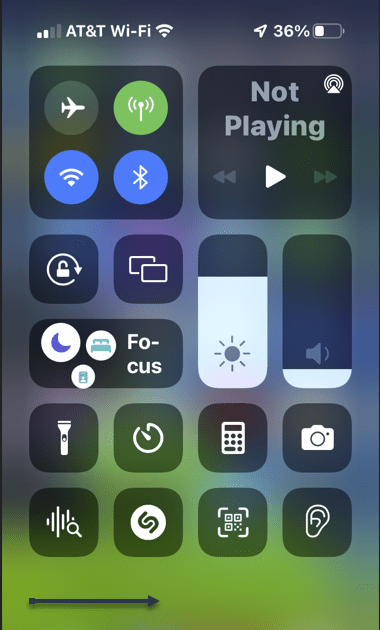
Next, when the Control Center appears, you will see the battery percentage in the upper right-hand corner of your screen. See the below image:
Your Battery percentage
To return back to your Home Screen, just tap any blank area or swipe up from thelower handle. See the following image:
Return back to the Home screen
It’s also possible to add a widget on your iPhone or iPad called “Batteries” to your Home screen (or Today View) that will let you keep an eye on your battery percentage at all times.
Quote for the Day
Technological society has succeeded in multiplying the opportunities for pleasure, but it has great difficulty in generating joy.
Pope Paul VI
Tweet Info
That’s it. Please feel free to share this post! One way to share is via Twitter.
Just click the Tweet icon below. This will launch Twitter where you click its icon to post the Tweet.
Check out TechSavvy.Life for blog posts on smartphones, PCs, and Macs! You may email us at contact@techsavvy.life for comments or questions.
Please feel free to leave a comment. I would love to hear from you. Do you have a computer or smart device tech question? I will do my best to answer your inquiry. Just send an email to contact@techsavvy.life. Please mention the device, app, and version you are using. To help us out, you can send screenshots of your data related to your question.
Author’s E-book
You can access the e-book from a Kindle device, the Kindle App for the desktop or smartphone, which is a free app.
The author’s Vietnam eBook on the Battle for Tra Bong Vietnam: Events and Aftermath
f you would like to share what you are looking at on your iPhone or iPad screen with a friend, it’s as easy as making a FaceTime call now thanks to the built-in Share Screen feature.
If you would like to share what you are looking at on your iPhone or iPad screen with a friend, it’s as easy as making a FaceTime call now thanks to the built-in Share Screen feature. Let’s explore this feature.
This is for the iPhone and iPad. Screenshots are from iPhone XR
Copyright Scott Adams, Inc./Distributed by Universal Uclick for UFS
Need to Know
To share your screen with FaceTime, both you and the person you will be sharing with need iOS 15.1 or iPadOS 15.1 or later. You also need an Apple ID to use FaceTime.
Be aware that you can not share content from apps that require a subscription or a purchase to view.
Sharing your screen in FaceTime is great for when you need help troubleshooting or would like to present information to other people remotely. While sharing your screen, notifications will be hidden. But be careful about screen sharing if you have sensitive information on your screen because the party on the other end might see it.
Share Your Screen on iPhone and iPad
To share your screen on iPhone or iPad, first, run the FaceTime app and make a call to someone else who also has FaceTime set up. Once you’re connected, tap the Screen Sharing button in the toolbar that looks like a rectangle with a person in front of it. In the pop-up that appears, tap Share My Screen. Refer to the below image:
Accessing Share My Screen
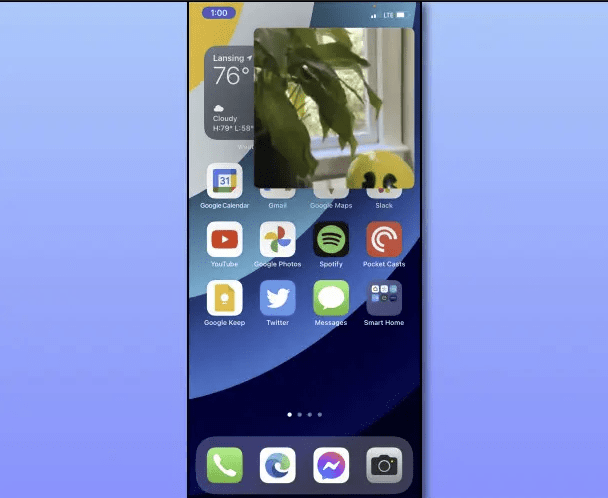
Next, when the screen-sharing starts, FaceTime shrinks to a small window on your screen, and you can use your iPhone or iPad as usual to launch apps. The person on the other side of the call will see what you are doing on your screen (but they will not see the inset video window). See the below image:
Your screen sharing
Now, to stop screen sharing, bring up the FaceTime toolbar again by tapping the video thumbnail and selecting the Screen Sharing button again. See the following image:
Stop Screen Sharing
Next, when you are done with the FaceTime call, tap End. Refer to the below image:
Ending FaceTime call
Quote For the Day
The march of science and technology does not imply growing intellectual complexity in the lives of most people. It often means the opposite.
Thomas Sowell
Tweet Info
That’s it. Please feel free to share this post! One way to share is via Twitter.
Just click the Tweet icon below. This will launch Twitter where you click its icon to post the Tweet.
Check out TechSavvy.Life for blog posts on smartphones, PCs, and Macs! You may email us at contact@techsavvy.life for comments or questions.
Please feel free to leave a comment. I would love to hear from you. Do you have a computer or smart device tech question? I will do my best to answer your inquiry. Just send an email to contact@techsavvy.life. Please mention the device, app, and version you are using. To help us out, you can send screenshots of your data related to your question.
Author’s E-book
You can access the e-book from a Kindle device, the Kindle App for the desktop or smartphone, which is a free app.
The author’s Vietnam eBook on the Battle for Tra Bong Vietnam: Events and Aftermath
If you are buying or selling a used iPhone, it’s helpful to identify how much storage space it has. It’s easy to find out how much data your iPhone can hold.
If you are buying or selling a used iPhone, it’s helpful to identify how much storage space it has. It’s easy to find out how much data your iPhone can hold. Let’s find out.
This is for the iPhone. Screensho9ts are from iPhone XR
Copyright Scott Adams, Inc./Distributed by Universal Uclick for UFS
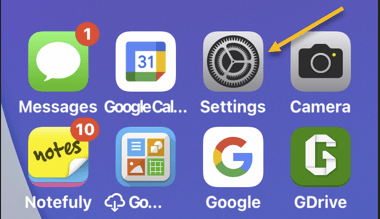
First, open the Settings app on your iPhone by tapping the Gear icon, usually found on your Home Screen. Refer to the below image:
Accessing Settings
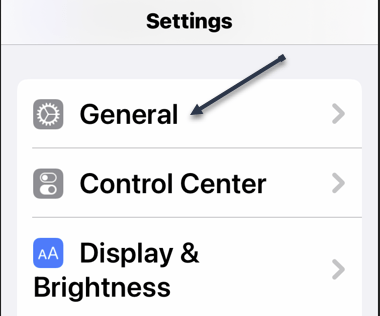
Next, in Settings, tap General. See the below image:
Accessing General option
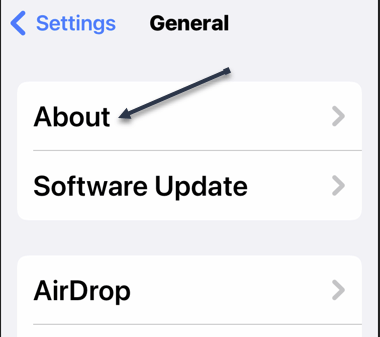
Now, in General, select About. See the following image:
Accessing About option
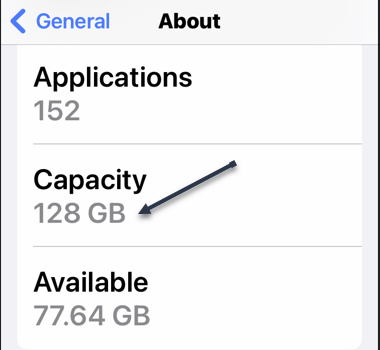
Next, in About, scroll down and locate the entry labeled Capacity. Beside it, you will see your iPhone’s maximum storage capacity listed. For example, you will see 64 GB for a 64 GB model or 128 GB for an iPhone that can store 128 GB of data. Refer to the below image:
Your Capacity
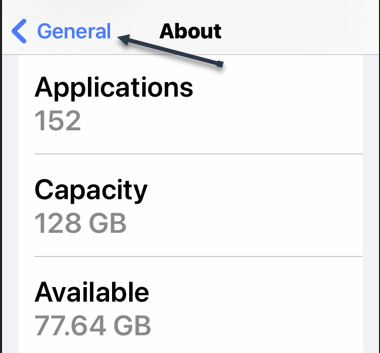
Now, if you would like more detail on how your storage is being used, tap General in the upper left-hand corner of your screen to go back one menu. See the below image:
Go back one screen
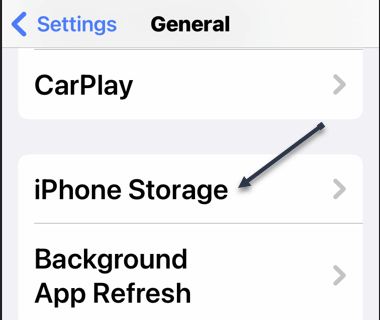
Next, in General, select iPhone Storage. See the following image:
Selecting the iPhone Storage option
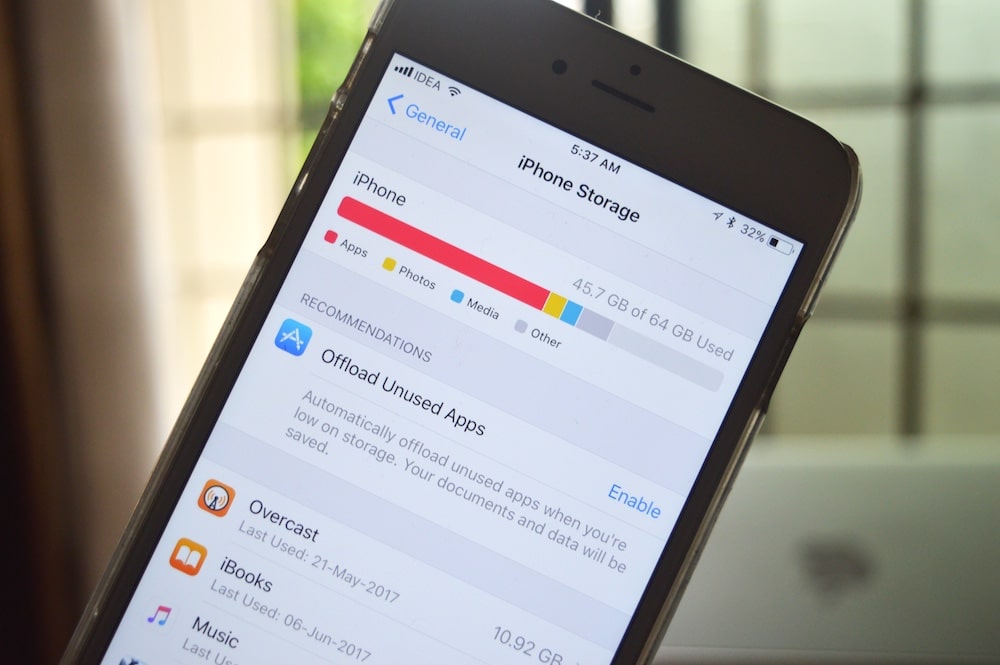
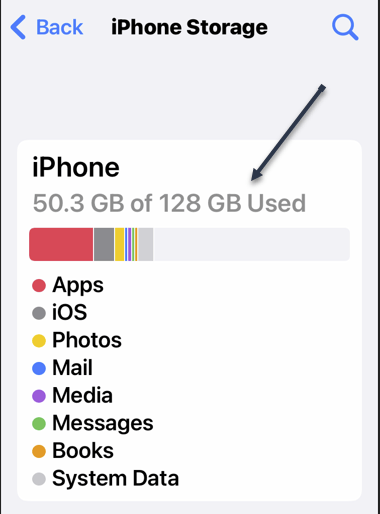
Now, under iPhone Storage, you will see the capacity of the iPhone listed in a phrase such as “50.3 GB of 128 GB Used.” You will also see a breakdown of how that storage space is being utilized. Refer to the below image:
Viewing your iPhone storage usage
Next, in that menu, you can review which apps take up the most space and even delete them if necessary.
Quote For the Day
Getting information off the Internet is like taking a drink from a fire hydrant.
Mitch Kapor
Tweet Info
That’s it. Please feel free to share this post! One way to share is via Twitter.
Just click the Tweet icon below. This will launch Twitter where you click its icon to post the Tweet.
Check out TechSavvy.Life for blog posts on smartphones, PCs, and Macs! You may email us at contact@techsavvy.life for comments or questions.
Please feel free to leave a comment. I would love to hear from you. Do you have a computer or smart device tech question? I will do my best to answer your inquiry. Just send an email to contact@techsavvy.life. Please mention the device, app, and version you are using. To help us out, you can send screenshots of your data related to your question.
Author’s E-book
You can access the e-book from a Kindle device, the Kindle App for the desktop or smartphone, which is a free app.
The author’s Vietnam eBook on the Battle for Tra Bong Vietnam: Events and Aftermath
If you do not wish to keep a single or an entire chat in your Facebook Messenger, the company allows you to delete individual or all your messages at once.
If you do not wish to keep a single or an entire chat in your Facebook Messenger, the company allows you to delete individual or all your messages at once. Let’s find out on your desktop and mobile.
Note! Your deleted messages can not be restored, so make sure you really want to get rid of your messages.
This is for devices using Facebook Messenger. Screenshots are from iPhone XR and Windows 10. Messenger’s latest version is 2022 so screenshots may be different from your device.
Copyright Scott Adams, Inc./Distributed by Universal Uclick for UFS
You can remove, unsend, or delete messages or chats. This post gives you different methods on how to “back out” your messages or chats. This means you can “undo” mistakenly sent messages. For the Unsend, you have 10 minutes to retract the original message. The Remove feature deletes the message.
Delete Messages on the Desktop
If you are on a desktop computer like Windows, Mac, Linux, or Chromebook, use the Facebook website to delete individual or all messages from your account.
First, launch a web browser on your computer and access Facebook. Log in to your account on the site if you are not already logged in.
Next, in Facebook’s top right-hand corner, click the Messenger icon. Refer to the below image:
Accessing Messenger
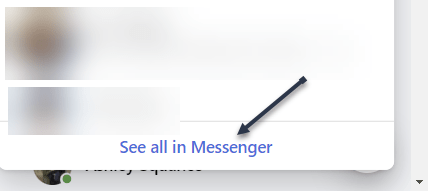
Now, in the Messenger panel, at the bottom, click See All in Messenger. See the below image:
Selecting all messages
Next, in the Chats sidebar on the left, you will see all your conversations. Select the chat in which you want to delete messages.
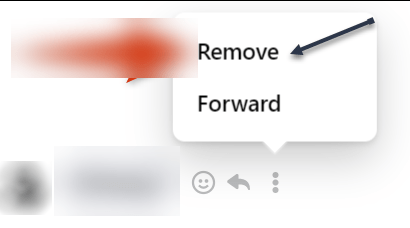
Now, on the right pane, find the individual message to delete. Then hover over that message, click the Menu icon (the three vertical dots), and choose Remove. See the following image:
Remove a message in a chat
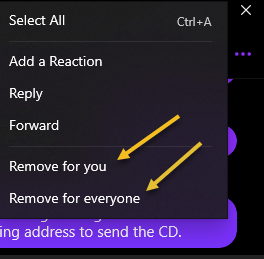
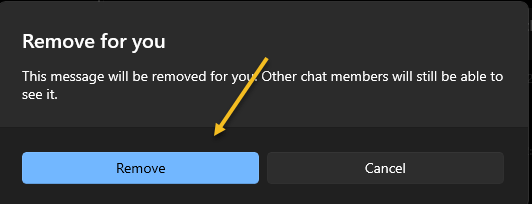
Next, depending on the message you select, click either Remove for you or Remove for everyone. Refer to the below image:
Selecting your option
Now, if you have selected your own message, select Remove For You.
In the window’s bottom left-hand corner, click Remove and your message will be deleted. See the below image:
Removing only for you
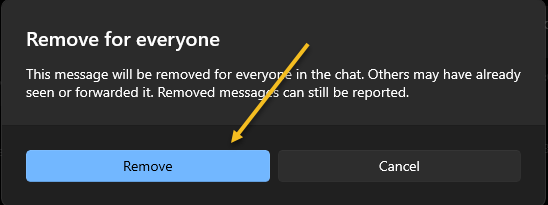
Next, if you have selected an everybody message, select Remove for everyone.
In the window’s bottom left-hand corner, click Remove and your message will be deleted. See the following image:
Removing for everyone
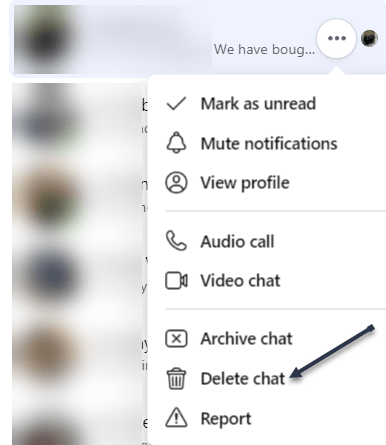
Now, if you would like to delete an entire conversation, then in the left sidebar, find that conversation. Then hover over that chat, click the Menu icon (the three vertical dots), and choose Delete Chat. Refer to the below image:
Selecting to delete a chat
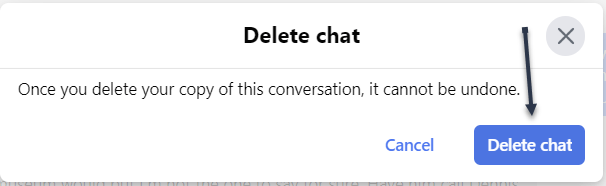
Next, in the prompt that opens, click Delete Chat. See the below image:
Confirming to delete a chat
Now, Facebook will delete your selected chat on the desktop.
Delete Messages on Mobile
On your iPhone, iPad, or Android phone, make use of the Messenger app to delete your individual messages or entire chats.
First, launch the Facebook Messenger app.
Next, tap the conversation from which you want to remove messages.
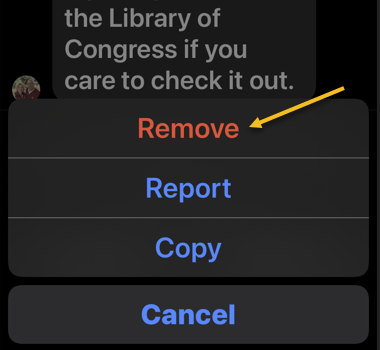
Now, on the conversation page, tap and hold on to the message to remove. If you have selected the other party’s message, then in the menu that opens, select More > Remove. If you have selected your own message, then tap Remove. The message is deleted on your end, but the other party can still access it. See the following image:
Remove a message
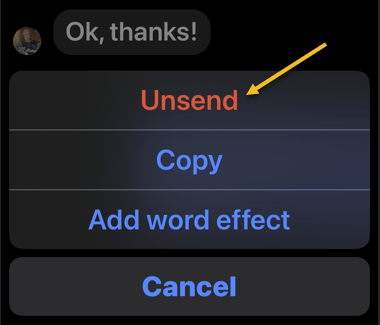
Next, To delete the message from everyone involved in the chat, choose Unsend. Refer to the below image:
Unsend a message
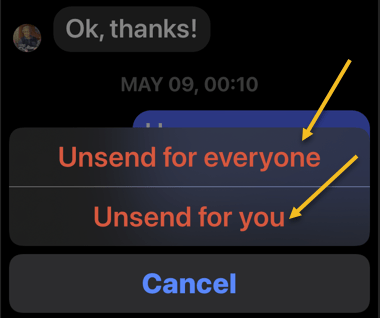
Now, you can choose Unsend for everyone or Unsend for you. See the below image:
Selecting an option to Unsend
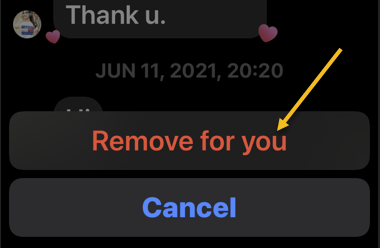
Next, to remove the message only from your own chat history, select Remove For You. See the following image:
Selecting Remove for you option
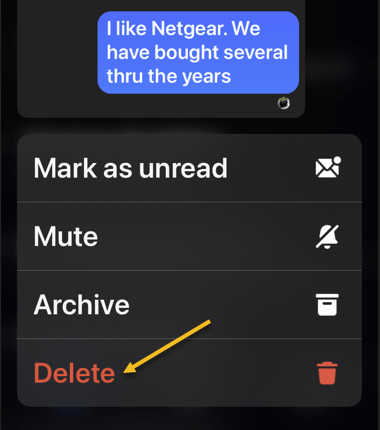
Now, you can also delete entire chats with someone. To do so, tap and hold on to the chat to delete. Then, in the menu that opens, select Delete. Refer to the below image:
Delete a chat
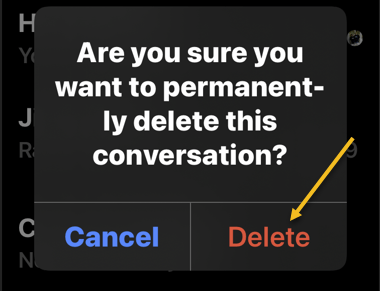
Next, in the prompt that opens, tap Delete. See the below image:
Confirm the delete
Now, you have successfully deleted your messages from Facebook Messenger on mobile.
Quote For the Day
People are stunned to hear that one company has data files on 185 million Americans.
Ralph Nader
Tweet Info
You are finished. Please feel free to share this post! One way to share is via Twitter.
Just click the Tweet icon below. This will launch Twitter where you click its icon to post the Tweet.
Check out TechSavvy.Life for blog posts on smartphones, PCs, and Macs! You may email us at contact@techsavvy.life for comments or questions.
Please feel free to leave a comment. I would love to hear from you. Do you have a computer or smart device tech question? I will do my best to answer your inquiry. Just send an email to contact@techsavvy.life. Please mention the device, app, and version you are using. To help us out, you can send screenshots of your data related to your question.
Author’s E-book
You can access the e-book from a Kindle device, the Kindle App for the desktop or smartphone, which is a free app.
The author’s Vietnam eBook on the Battle for Tra Bong Vietnam: Events and Aftermath
Reading is great, but sometimes you want or need to listen. Let your computer or phone do the reading for you. Let’s explore some tools to do this.
This is for the mobile or desktop
Copyright Scott Adams, Inc./Distributed by Universal Uclick for UFS
Some people struggle with reading text on a screen, or physically can not. Others might want their computer to read something to them aloud while they do something else. There are plenty of reasons to use a text-to-speech tool, also called a “screen reader”.
Although there are standalone text-to-speech apps, you probably do not need them. That’s because every operating system, and several well-known pieces of software, offer a text-to-speech feature, and they are all quite good.
Spoken Content for iPhone
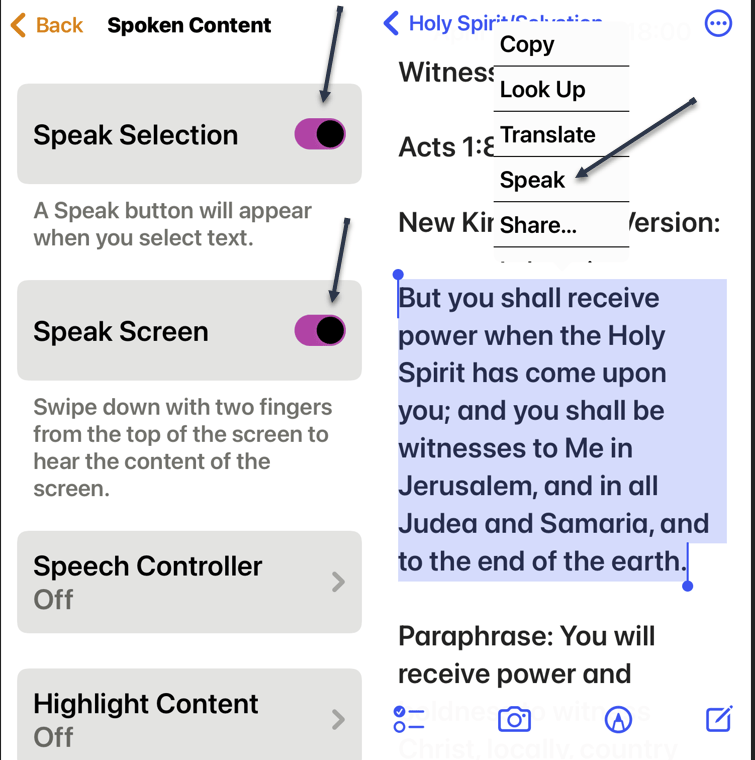
The iPhone’s text-to-speech feature is very easy to use. First, to turn it on, head to:
Settings > Accessibiltu > Spoken Content
and enable Speak Selection and Speak Screen. Once enabled, any text you highlight in any application will have a Speak option, which you tap to activate. We have highlighted some text from the Notes app to be read to us. Refer to the below image:
Spoken Content for iPhone
Read Aloud for Browsers
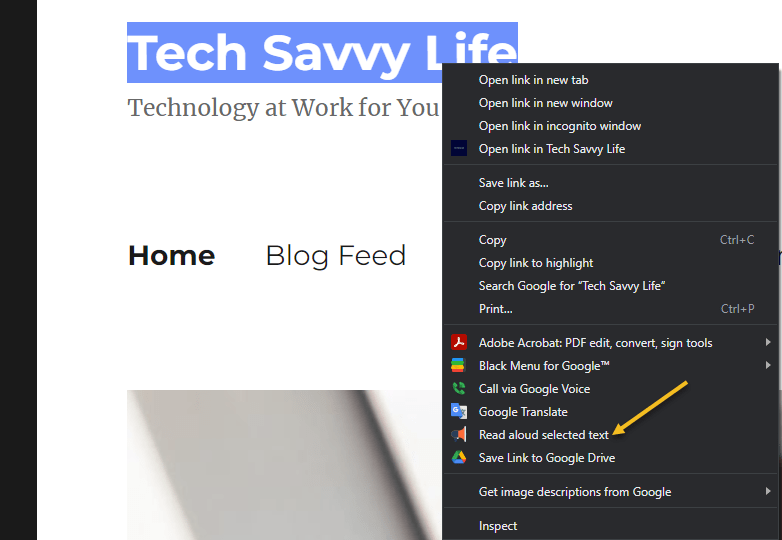
Read Aloud is an extension for Chrome, Firefox, and Edge that can read whatever website you currently have open. First, you will need to download the extension. After downloading, in Chrome, right-click on some highlighted text and choose the Read aloud selected text option. See the below image:
Read Aloud for browsers
Immersive Reader for Office and Edge
Microsoft Office applications have a built-in text-to-speech feature but it’s a little hard to find. First, in any document, click the Immersive Reader tab. If you do not see it, search for it, and from then on it should appear in your interface permanently. Highlight some text, then right-click and select Read Aloud to hear your document read back to you with the corresponding word highlighted as it goes. Immersive Reader is perfect for copy editing and reviewing long documents. See the following image:
Immersive Reader for Office
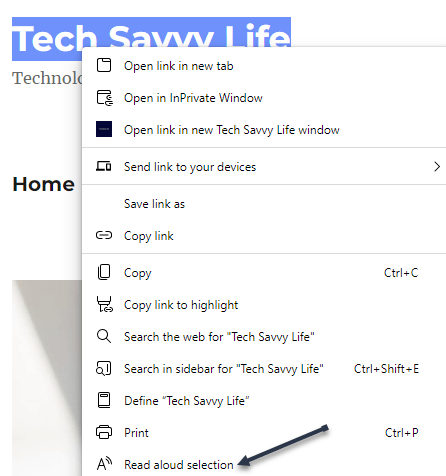
Microsoft Edge has this feature, too. Highlight some text, then right-click and select Real aloud selection. Refer to the below image:
Immersive Reader for Edge
Natural Reader
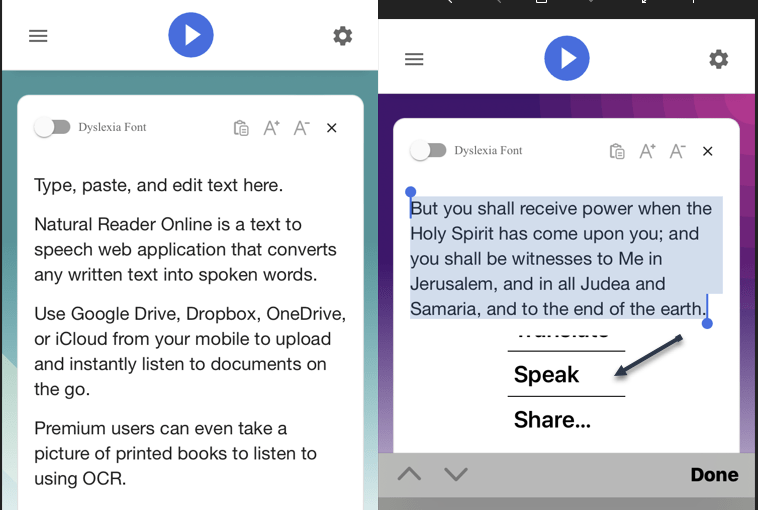
First, download the mobile version (ours is for the iPhone). Then head to
NaturalReaders.com/online (note the plural in the URL)
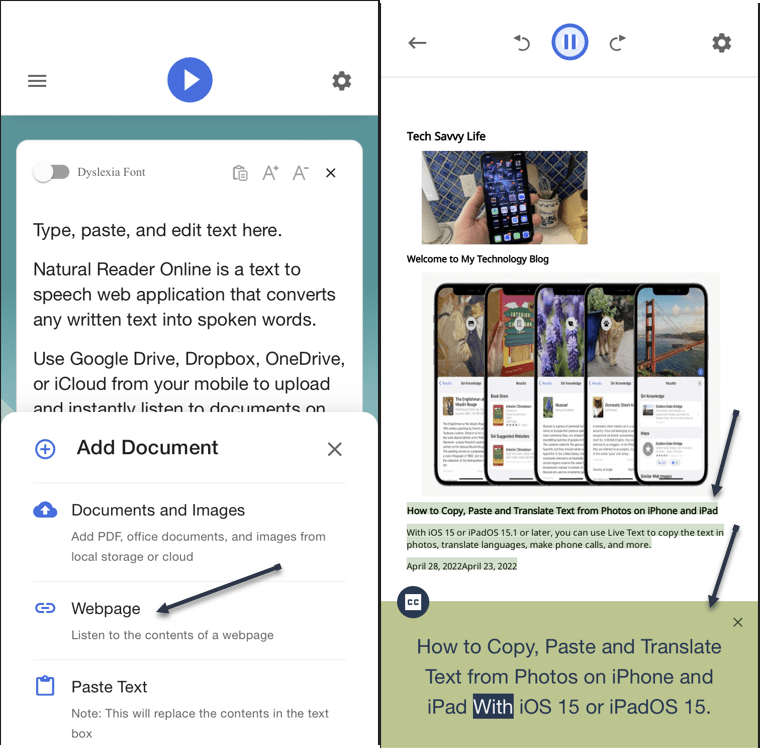
and paste some text, highlighting it to hear it read on a mobile device. See the below image:
Natural Reader on mobile
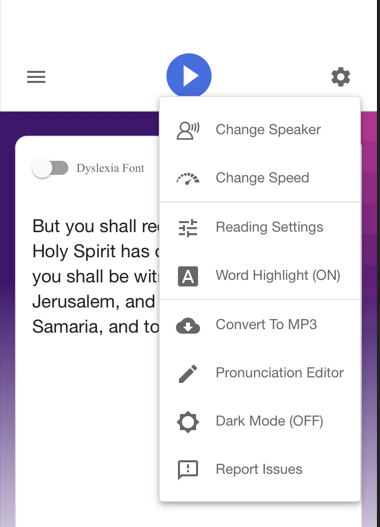
You can also drag documents into your browser window if you prefer. Natural Reader has a variety of voices, and you can control the speed of reading. Just click the Gear icon on the upper right-hand corner for options. See the following image:
Natural Reader options
You can upgrade for features like a Chrome extension, OCR for scanned documents, higher quality voices, and the ability to create MP3 files; these features cost $9.99 a month. The paid version also supports uploading documents, including Microsoft Word, Apple’s Pages, and even image files with text on them. The free version is perfect for quick listening. Refer to the below image for an example of listening to a webpage:
Natural Reader for web pages
Quote For the Day
Technology is so much fun but we can drown in our technology. The fog of information can drive out knowledge.
Daniel J Boorstin
Tweet Info
That’s it. Please feel free to share this post! One way to share is via Twitter.
Just click the Tweet icon below. This will launch Twitter where you click its icon to post the Tweet.
Check out TechSavvy.Life for blog posts on smartphones, PCs, and Macs! You may email us at contact@techsavvy.life for comments or questions.
Please feel free to leave a comment. I would love to hear from you. Do you have a computer or smart device tech question? I will do my best to answer your inquiry. Just send an email to contact@techsavvy.life. Please mention the device, app, and version you are using. To help us out, you can send screenshots of your data related to your question.
Author’s E-book
You can access the e-book from a Kindle device, the Kindle App for the desktop or smartphone, which is a free app.
The author’s Vietnam eBook on the Battle for Tra Bong Vietnam: Events and Aftermath
Many things are easy and obvious on Apple devices. But every so often you come across something that is not. If you want to mark all your emails as read on iPhone and/or iPad and clear those indicators, let’s explore how this is done.
Many things are easy and obvious on Apple devices. But every so often you come across something that is not. If you want to mark all your emails as read on iPhone and/or iPad and clear those indicators, let’s explore how this is done.
This is for the iPhone and iPad
Copyright Scott Adams, Inc./Distributed by Universal Uclick for UFS
Whether you have a mailbox full of unread messages or just a group that you want to mark as read, you can do both in the Mail app on your Apple device.
Mark as Read on iPhone and iPad
First, open the mailbox in the Mail app on iPhone or iPad or choose All Inboxes to take care of all your mailboxes at once. You can also pick a specific folder. Tap Edit on the top right-hand corner and Select All on the top left-hand corner.
On the bottom left-hand corner, tap Mark and select the Mark as Read option. Refer to the below image:
Selecting all emails as read
Mark as Read on Mobile
Maybe you have just a group of emails that you want to mark. They might be newsletters, promotional emails, or confirmation messages.
First, open the mailbox or folder in the Mail app and tap Edit on the top right-hand corner.
Next, you can select each message one at a time if they are not adjacent to each other. Or, to select a range of emails that are next to each other, drag your finger through them to mark them all quickly.
Now, tap Mark on the bottom left-hand corner and select the Mark as Read option. See the below image:
Selecting 2 emails as read
You can also use the Search feature to find particular emails and mark messages as “read” the same way.
Once you clear those unread indicators in your inbox or badge on the Mail icon, you can start fresh with new messages.
Quote For the Day
You affect the world by what you browse.
Tim Berners-Lee
Tweet Info
That’s it. Please feel free to share this post! One way to share is via Twitter.
Just click the Tweet icon below. This will launch Twitter where you click its icon to post the Tweet.
Check out TechSavvy.Life for blog posts on smartphones, PCs, and Macs! You may email us at contact@techsavvy.life for comments or questions.
Please feel free to leave a comment. I would love to hear from you. Do you have a computer or smart device tech question? I will do my best to answer your inquiry. Just send an email to contact@techsavvy.life. Please mention the device, app, and version you are using. To help us out, you can send screenshots of your data related to your question.
Author’s E-book
You can access the e-book from a Kindle device, the Kindle App for the desktop or smartphone, which is a free app.
The author’s Vietnam eBook on the Battle for Tra Bong Vietnam: Events and Aftermath
Are you not a big fan of Google Chrome’s Live Captions, which displays the text version of your media files? If so, it’s easy to turn this feature off/on both temporarily and permanently.
Are you not a big fan of Google Chrome’s Live Captions, which displays the text version of your media files? If so, it’s easy to turn this feature off/on both temporarily and permanently. Let’s explore this feature.
This is for devices using Google Chrome. Screenshots are from Windows 10
Copyright Scott Adams, Inc./Distributed by Universal Uclick for UFS
Temporary Disable Live Captions
You can turn off Chrome’s Live Captions for a specific playback session while keeping it enabled for all other sessions.
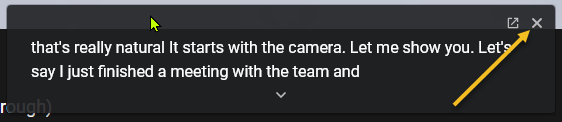
First, open a video containing a voice. The speaker’s voice will be displayed as Live Captions. To close this Live Captions, in the top right-hand corner of Chrome’s Live Captions box, click the “X” icon. Note! We are assuming the Live Captions option has been disabled (see below section). Refer to the below image:
Live Caption being displayed
Live Captions will immediately disappear from your screen, and you can enjoy your media playback without any interruptions.
Permanently Stop Live Captions
If you do not wish to see live captions for any of your media playbacks in Chrome, turn the feature OFF permanently and it will not bother you anymore.
First, from Chrome’s top right-hand corner, select the three dots icon (the Menu icon). See the below image:
Selecting the Menu icon
Next, in the Menu box, click Settings. See the following image:
Selecting Settings
Now, on the Settings screen, from the left sidebar, select Advanced. Refer to the below image:
Selecting Advanced
Next, in the expanded Advanced menu, click Accessibility. See the below image:
Selecting Accessibility
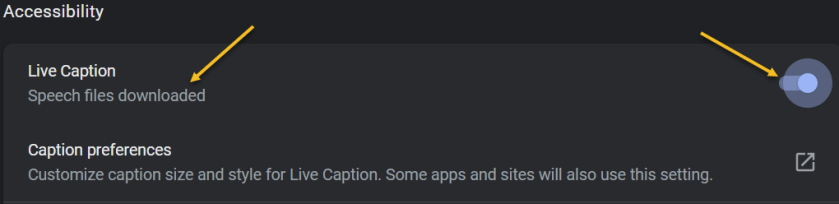
Now, on the right, in the Accessibility pane, toggle the Live Caption option to OFF. See the following image:
Disable Live Caption
If you want to enable the option again, toggle the Live Caption option to ON. You may see the message “Speech files downloaded” below the Live Caption. Refer to the below image:
Enable Live Caption
Going forward, Chrome will not display any captions for your media playbacks in the browser.
Quote For the Day
Technology is supposed to make our lives easier, allowing us to do things more quickly and efficiently. But too often it seems to make things harder, leaving us with fifty-button remote controls, digital cameras with hundreds of mysterious features and book-length manuals, and cars with dashboard systems worthy of the space shuttle.
James Surowiecki
Tweet Info
You are finished. Please feel free to share this post! One way to share is via Twitter.
Just click the Tweet icon below. This will launch Twitter where you click its icon to post the Tweet.
Check out TechSavvy.Life for blog posts on smartphones, PCs, and Macs! You may email us at contact@techsavvy.life for comments or questions.
Please feel free to leave a comment. I would love to hear from you. Do you have a computer or smart device tech question? I will do my best to answer your inquiry. Just send an email to contact@techsavvy.life. Please mention the device, app, and version you are using. To help us out, you can send screenshots of your data related to your question.
Author’s E-book
You can access the e-book from a Kindle device, the Kindle App for the desktop or smartphone, which is a free app.
The author’s Vietnam eBook on the Battle for Tra Bong Vietnam: Events and Aftermath
Your iPhone’s Mail app makes it easy to add photos, videos, and other file types as attachments to your emails. We will show you how to add files from various sources to your emails on your iPhone.
Your iPhone’s Mail app makes it easy to add photos, videos, and other file types as attachments to your emails. We will show you how to add files from various sources to your emails on your iPhone.
This is for the iPhone
Copyright Scott Adams, Inc./Distributed by Universal Uclick for UFS
When you choose to attach a photo or video, Mail opens iPhone’s default Photos app to let you add your items. For other file types, Mail opens iCloud Drive from where you can choose and attach your files. You may also choose other cloud storage providers to attach your files.
Attach Photo or Video
First, launch Mail on your iPhone. Then, in Mail’s bottom right-hand corner, tap the Pencil icon to compose a new email. Refer to the below image:
Selecting to compose an email
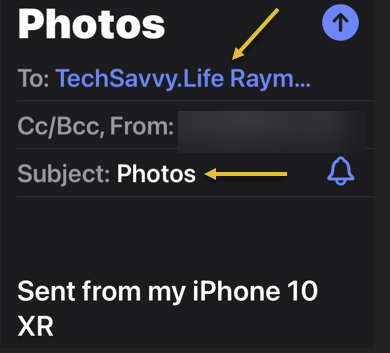
Next, you will see a New Message page. Here, tap the To field and enter the recipient’s email address, then tap the Subject and enter a subject for your email. See the below image:
Addressing the email
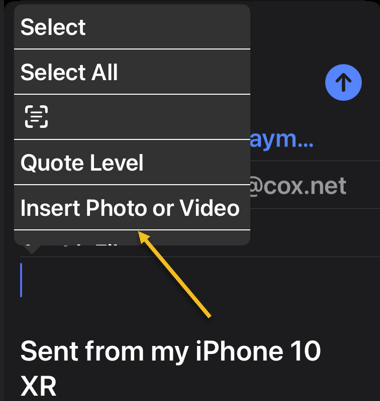
Now, to attach a photo or video to this email, tap and hold anywhere on the email’s body (the large text area). Then in the menu that opens, choose Insert Photo or Video. See the following image:
Selecting the Insert a Photo or Video option
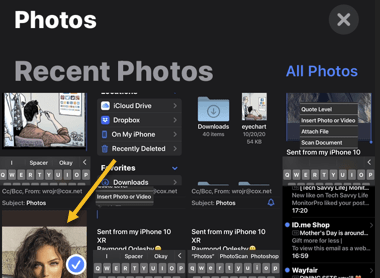
Next, Mail will open your iPhone’s Photos app where you can select the photo or video you want to add to your email. Tap an item when your item opens in full screen. Refer to the below image:
Selecting a photo
N0w, back on the New Message page, you will see your selected photo or video attached to your email. See the below image:
Your selected photo
Attach Other File Types
Next, to attach another file type, tap and hold on the email body and choose Attach File. See the following image:
Selecting Attach File option
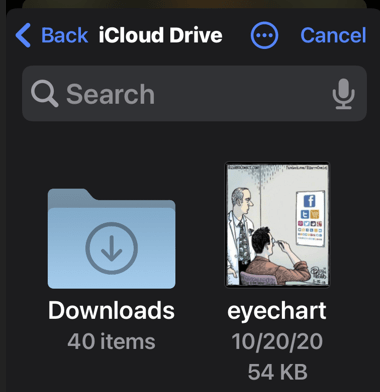
Now, your iCloud Drive page will open where you can select a file to add to your email. Refer to the below image:
Select a file from iCloud Drive
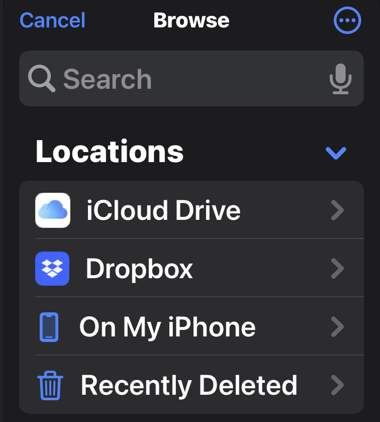
Next, to use another cloud storage, in the top-left-hand corner, tap Locations Select your cloud storage to pick your files. See the below image:
Selecting a Location to attach a file
Your files are now attached to your email, and you may send out your email as usual. The recipient will get your email with your attached content.
Quote For the Day
Defect-free software does not exist.
Wietse Venema
Tweet Info
That’s it. Please feel free to share this post! One way to share is via Twitter.
Just click the Tweet icon below. This will launch Twitter where you click its icon to post the Tweet.
Check out TechSavvy.Life for blog posts on smartphones, PCs, and Macs! You may email us at techsavvy.life for comments or questions.
Please feel free to leave a comment. I would love to hear from you. Do you have a computer or smart device tech question? I will do my best to answer your inquiry. Just send an email to contact@techsavvy.life. Please mention the device, app, and version you are using. To help us out, you can send screenshots of your data related to your question.
Author’s E-book
You can access the e-book from a Kindle device, the Kindle App for the desktop or smartphone, which is a free app.
The author’s Vietnam eBook on the Battle for Tra Bong Vietnam: Events and Aftermath
Wondering, “How do I turn off a Live Photo?” If a Live Photo you take captures a bit of video or audio you do not want, you can convert the Live Photo to a still image and keep or delete the original.
Wondering, “How do I turn off a Live Photo?” If a Live Photo you take captures a bit of video or audio you do not want, you can convert the Live Photo to a still image and keep or delete the original. Let’s explore how to change a Live Photo to a still picture.
This is for the iPhone
Copyright Scott Adams, Inc./Distributed by Universal Uclick for UFS
Can you save a still from a Live Photo? Yes! It’s easy to save a Live Photo as still and keep the Live Photo intact. This is helpful if you plan to edit a Live Photo but do not want to lose the live version, or if you just want to save iPhone storage.
First, Open the Photos App. Refer to the below image:
Accessing the Photos app
Next, tap the Albums tab, then scroll to the bottom and tap Live Photos. See the below image:
Accessing the Live Photos option
Now, tap the Live Photo you want to turn into a still, then tap the Share icon. See the following image:
Selecting the Share icon
Next, scroll down and tap Duplicate. Refer to the below image.
Selecting the Duplicate option
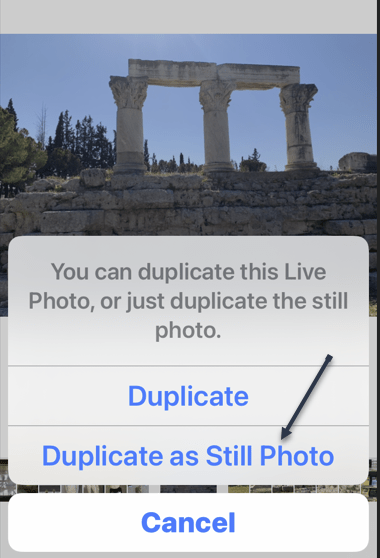
Now, tap Duplicate as Still Photo. See the below image:
Selecting Duplicate as Still Photo option
Next, if you want to delete the Live or Still photo, locate it, and tap the Trash icon in the lower right-hand corner. See the following image:
Deleting the photo
Quote For the Day
The real problem is not whether machines think but whether men do.
B. F. Skinner
Tweet Info
That’s it. Please feel free to share this post! One way to share is via Twitter.
Just click the Tweet icon below. This will launch Twitter where you click its icon to post the Tweet.
Checkout TechSavvy.Life for blog posts on smartphones, PCs, and Macs! You may email us at contact@techsavvy.life for comments or questions.
Please feel free to leave a comment. I would love to hear from you. Do you have a computer or smart device tech question? I will do my best to answer your inquiry. Just send an email to contact@techsavvy.life. Please mention the device, app, and version you are using. To help us out, you can send screenshots of your data related to your question.
Author’s E-book
You can access the e-book from a Kindle device, the Kindle App for the desktop or smartphone, which is a free app.
The author’s Vietnam eBook on the Battle for Tra Bong Vietnam: Events and Aftermath
By default, modern iPhones capture small videos called Live Photos every time you take a picture with the Camera app. These Live Photos take up a lot of expensive storage space, and if you do not use them, they could be wasting your money.
By default, modern iPhones capture small videos called Live Photos every time you take a picture with the Camera app. These Live Photos take up a lot of expensive storage space, and if you do not use them, they could be wasting your money. Let’s explore what you should do instead.
This is for the iPhone
Copyright Scott Adams, Inc./Distributed by Universal Uclick for UFS
Storage Space is Expensive
If you regularly enjoy taking and sharing Live Photos, they are not a waste of space. Live Photos are a neat feature. But if you never use them, you are storing a lot of unnecessary data that could be costing you money.
Storage space comes at a premium in the Apple universe, with larger storage sizes on iPhones often costing hundreds of dollars more than the lower-end models. You pay more for larger iCloud storage as well which holds your iCloud Photo backups.
An Apple Live Photo captures three seconds of audio and video in addition to a still photo. Typically, a video takes up more space than a still photo because it incorporates many still photo frames and audio as well.
Taking test photos on an iPhone 13 we examined the Live Photo file sizes. The still photo part of a typical Live Photo was about 5 megabytes, and the video file was about 8 megabytes, totaling 13 megabytes for a complete Live Photo. Multiply that out by the thousands of photos people usually store on their devices, and the 8 MB of extra video data adds up quickly. If you take 1000 live photos at 13 megabytes each, that’s 13 gigabytes of space. If you take 1000 still photos instead (at 5 megabytes each), that would only take up 5 gigabytes of space. You have saved 8 gigabytes of wasted space by turning off Live Photos.
Disable Taking Live Photos
Apple makes it easy to disable Live Photos, but the process is still somewhat confusing.
First, open the Camera app and make sure you are in “Photo” mode (not “Video” or “Portrait,” for example).
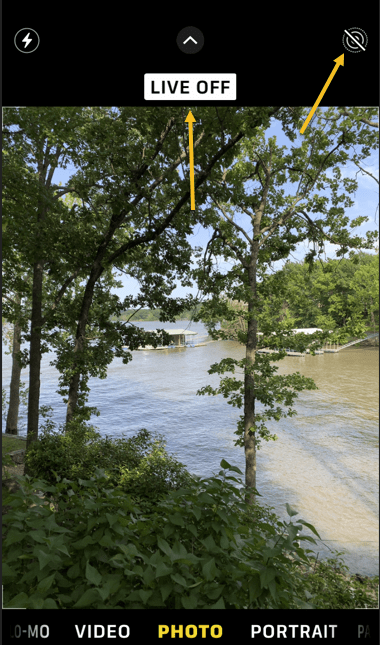
Next, locate the Live Photo button on the toolbar, which looks like three concentric circles (one of which is a dotted circle). This will disable Live Photo for this session, and you can confirm it when you see the Live Off message and a slash through the Live Photo icon. Refer to the below image:
Live Photo is off
Now, this change is only temporary; for now. By default, the next time you re-launch the Camera app, the Live Photo feature will turn back on automatically. To make sure it stays off, you will need to toggle a switch in Settings.
Next, to make the necessary change, open the Settings app, which you can usually find on your Home screen. See the below image:
Accessing Settings
Now, In Settings, navigate to:
Camera > Preserve Settings
See the following image:
Accessing the Preserve Settings option
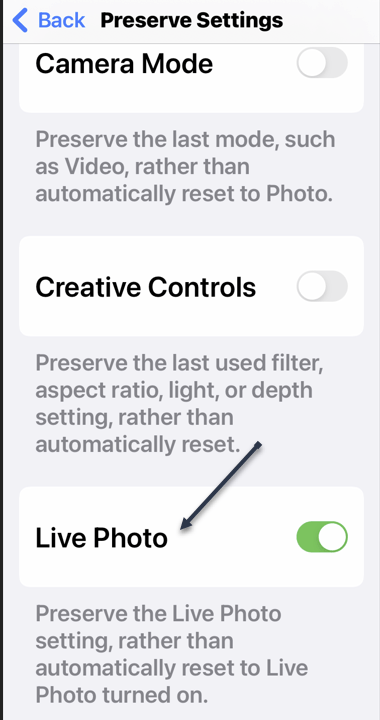
Next, scroll down and toggle the switch beside Live Photo to the OFF position. Refer to the below image:
Accessing the Live Photo option
This switch makes the Camera app preserve your Live Photo on or off setting between sessions. So if you turn it off and relaunch the Camera app later, Live Photo will still be off the next time.
(If you change your mind, you can still manually turn Live Photos to ON at any time by tapping the Live Photo icon on the toolbar in Camera.)
After a while of taking normal still photos, you will notice that they do not take up as much space as Live Photos, and that means you will have room for even more photos on your iPhone (and in your iCloud Drive). If you already have thousands of Live Photos stored, there’s no easy way to convert them all to still photos to save space. You can do the conversion process one at a time, however.
Quote For the Day
t has become appallingly obvious that our technology has exceeded our humanity.
Unknown
Tweet Info
That’s it. Please feel free to share this post! One way to share is via Twitter.
Just click the Tweet icon below. This will launch Twitter where you click its icon to post the Tweet.
Checkout TechSavvy.LIfe for blog posts on smartphones, PCs, and Macs! You may email us at contact@techsavvy.life for comments or questions.
Please feel free to leave a comment. I would love to hear from you. Do you have a computer or smart device tech question? I will do my best to answer your inquiry. Just send an email to contact@techsavvy.life. Please mention the device, app, and version you are using. To help us out, you can send screenshots of your data related to your question.
Author’s E-book
You can access the e-book from a Kindle device, the Kindle App for the desktop or smartphone, which is a free app.
The author’s Vietnam eBook on the Battle for Tra Bong Vietnam: Events and Aftermath