I am Raymond Oglesby, an Information Technology (IT) specialist with 30 years in the field. I have taught Microsoft Applications and troubleshot computers in 15 countries and many States. My career was focused on mainframes and desktops from application development to implementation. I have written hundreds of programs for various architectures. I decided to start a blog to share my knowledge and experiences with you. I plan on updating this blog at least twice a week about smart phone apps to Windows.
Please feel free to leave a Comment or Tweet. I would love to hear from you. Do you have a computer tech question? I will do my best to answer your inquiry. Please mention the app and version that you are using. To help me out, you can send screenshots of your data related to your question.
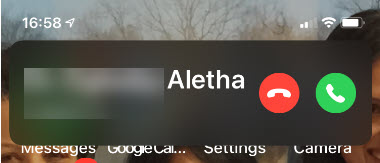
In iOS and iPad OS 14, Apple introduced persistent call banners instead of full-screen notifications. This means that when your device is unlocked, regular, FaceTime, and third-party VoIP incoming call banners take only a small space at the top.
In iOS and iPad OS 14, Apple introduced persistent call banners instead of full-screen notifications. This means that when your device is unlocked, regular, FaceTime, and third-party VoIP incoming call banners take only a small space at the top.
Incoming Call banner mode
This compact UI feature is turned on by default. While you can swipe down on a banner to quickly expand the incoming call to the full-screen mode, it is not a permanent solution.
However, if you want a big contact picture in incoming calls, or do not like the new style, or it’s too easy to miss and you prefer the old way, here is how to activate this feature in iOS and iPadOS 14.
This is for iPhone or iPad running iOS or iPadOS 14
Copyright Scott Adams, Inc./Distributed by Universal Uclick for UFS
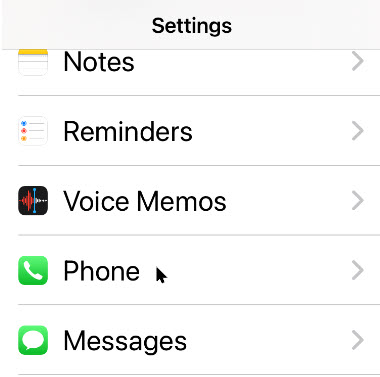
Open the Settings app (the gear icon). Refer to below image:
Accessing Settings
Next, scroll down to the Phone section. See below image:
Accessing the Phone option
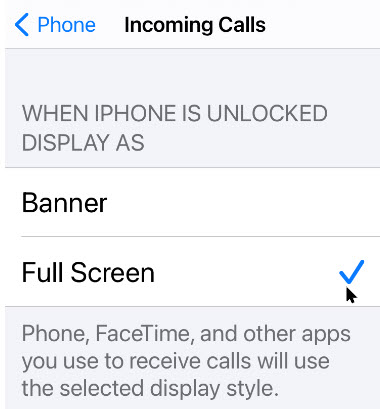
Now, choose Incoming Calls option. See following image:
Accessing Incoming Calls option
Next, checkmark the Full Screen option. Refer to below image:
Selecting Full Screen for incoming calls
The next time you receive a phone call (a cellular or a VoIP call), you will see a full-screen incoming call notification. See below image:
Incoming Calls full screen mode
That’s it. Please feel free to share this post! One way to share is via Twitter.
Just click the Tweet icon below. This will launch Twitter where you click its icon to post the Tweet.
Check out TechSavvy.Life for blog posts on smartphones, PCs, and Macs! Feel free to email us at contact@techsavvy.life.
Please feel free to leave a comment. I would love hearing from you. Do you have a computer or smart device tech question? I will do my best to answer your inquiry. Just send an email to contact@techsavvy.life. Please mention the device, app and version that you are using. To help us out, you can send screenshots of your data related to your question.
The author’s Vietnam eBook on the Battle for Tra Bong: Events and Aftermath
Out of the box, the Start menu includes a default layout with elements and settings that usually fit most people. However, if you want to make it more functional and personal, the experience available on Windows 10 is highly customizable.
On Windows 10, the Start menu is an essential component, as it is the experience you use every day to find apps, settings, and files.
Out of the box, the Start menu includes a default layout with elements and settings that usually fit most people. However, if you want to make it more functional and personal, the experience available on Windows 10 is highly customizable.
Starting with the October 2020 update, Windows 10 now defaults to a light theme that takes away accent colors from your Start menu and Taskbar. If you would like to select a custom color for your Start menu, there is an easy way to pick it in Settings. Let’s explore how to do this.
This is for devices running Windows 10
Copyright Scott Adams, Inc./Distributed by Universal Uclick for UFS
Selecting Colors Settings
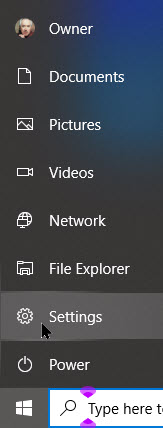
First, launch Settings by pressing Windows+I keys or by opening the Start menu and clicking the gear icon on the left. Refer to below image:
Accessing Settings
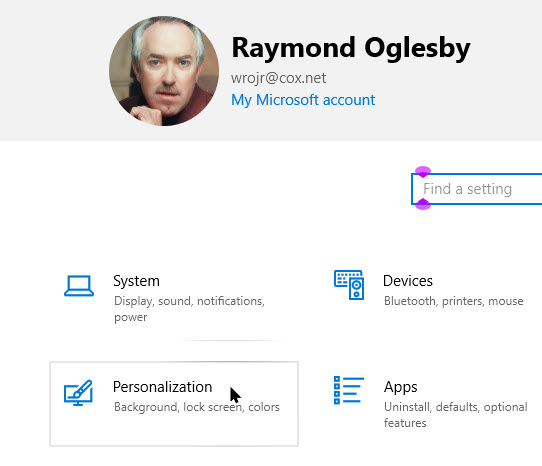
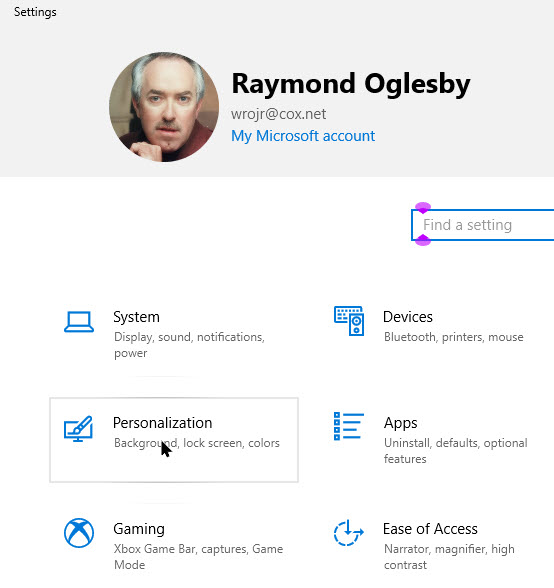
In Settings, click the Personalization option. See below image:
Accessing Personalization option
Now, in its settings, click the Colors option. See following image:
Accessing Colors option
Selecting your Colors
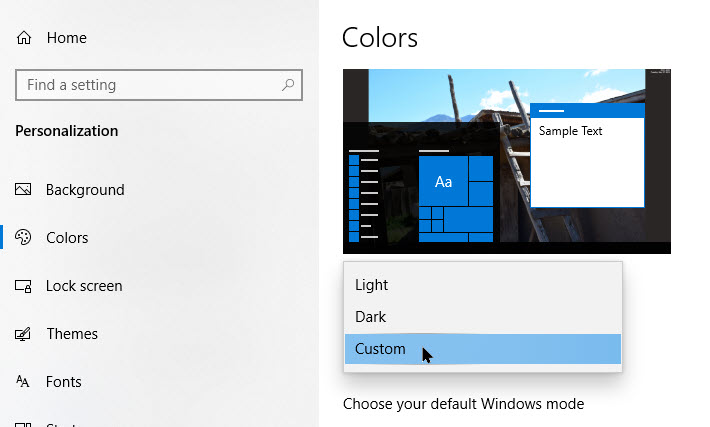
Next, in the Colors settings, locate the Choose your color drop-down menu. In this menu, select Custom. Refer to below image:
Selecting Custom color option from drop-down
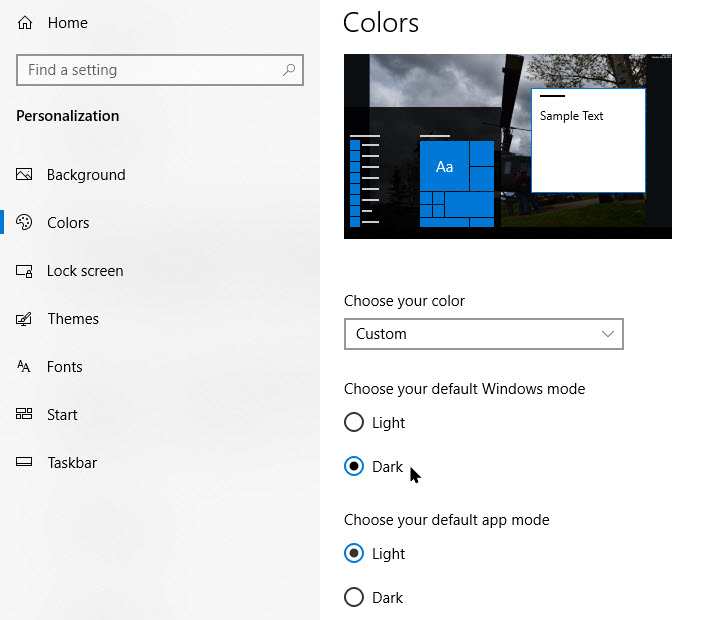
Now, two new choices will appear. Under Choose your default Windows mode, select Dark. This Dark mode is required for colorizing of your Start menu.
Now, under Choose your default app mode, select one of two options, Light or Dark, whichever one you would like the best. See below image:
Selecting Dark mode
Selecting your Accent Color
Next, scroll down the Colors page and locate the Choose your accent color section.
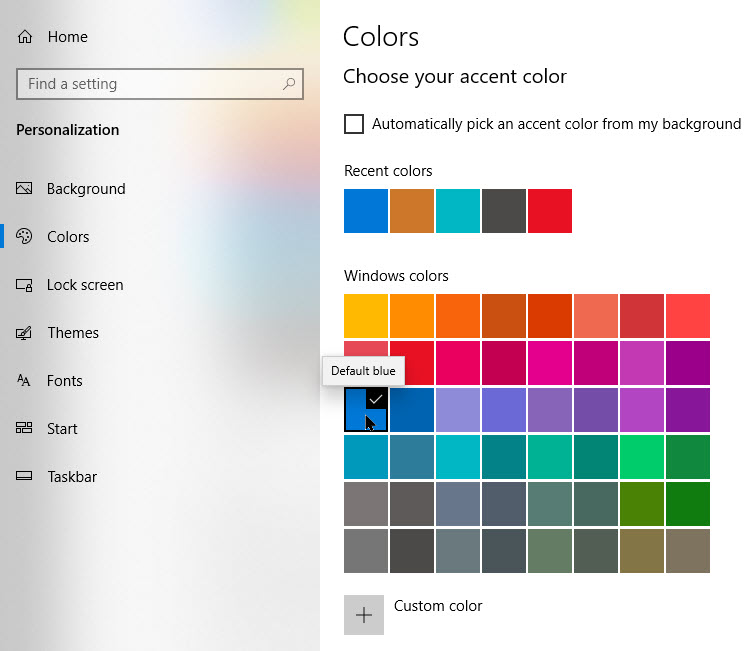
If you want the color to automatically match your desktop background image, checkmark Automatically pick an accent color from my background. Otherwise, click a color in the grid that you would like to use for your Start menu and Taskbar. You can also pick a custom color by clicking the Custom color button below the grid. See following image:
Selecting your accent color
Now, locate the Show accent color on the following surfaces section and checkmark Start, taskbar, and action center.
Note! If this option is greyed out, make sure you select Dark as your default Windows mode above. It won’t work in Light mode. Refer to below image:
Selecting your accent color on surfaces
Your New Look
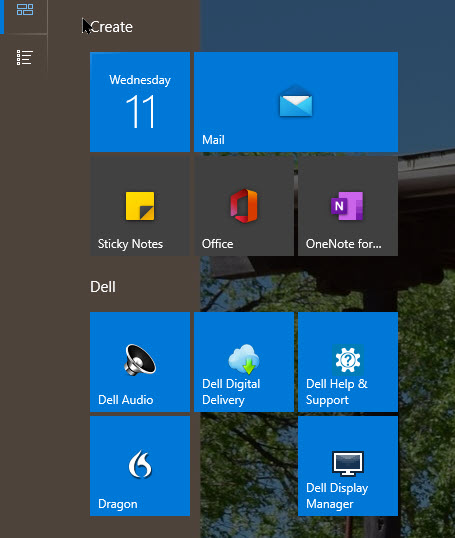
The next time you open your Start menu, you will see that it has changed to the accent color you selected. See below image:
Your new Start colorized icons
If you ever want to switch back to the standard Windows 10 theme, open
Settings > Personalization > Colors
and select Light in the Choose your color drop-down menu.
That’s it. Please feel free to share this post! One way to share is via Twitter.
Just click the Tweet icon below. This will launch Twitter where you click its icon to post the Tweet.
Check out TechSavvy.Life for blog posts on smartphones, PCs, and Macs! Feel free to email us at contact@techsavvy.life.
Please feel free to leave a comment. I would love hearing from you. Do you have a computer or smart device tech question? I will do my best to answer your inquiry. Just send an email to contact@techsavvy.life. Please mention the device, app and version that you are using. To help us out, you can send screenshots of your data related to your question.
The author’s Vietnam eBook on the Battle for Tra Bong: Events and Aftermath
Sound Recognition, first introduced in iOS 14, lets iPhone users with hearing loss receive visual alerts when the iPhone detects certain sounds like smoke alarms, sirens, door knocks, or dogs barking.
Sound Recognition, first introduced in iOS 14, lets iPhone users with hearing loss receive visual alerts when the iPhone detects certain sounds like smoke alarms, sirens, door knocks, or dogs barking. It does this with onboard intelligence, so no network connection is required. Let’s explore how to setup and use this feature.
This is for the iPhone running iOS 14+
Copyright Scott Adams, Inc./Distributed by Universal Uclick for UFS
Setup Sound Recognition
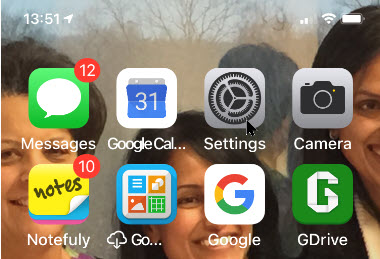
First, launch Settings (the gear icon). Refer to below image:
Accessing Settings
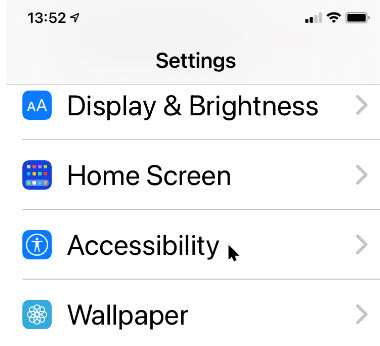
in Settings, scroll down and tap Accessibility. See below image:
Accessing Accessibility
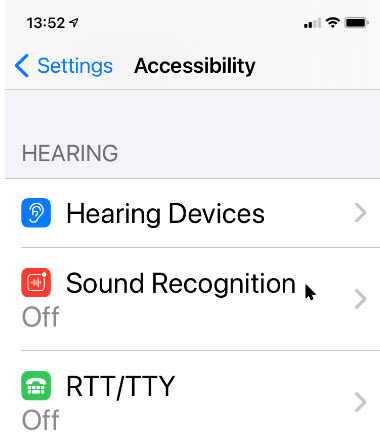
In Accessibility, navigate to the Hearing section. Now, tap Sound Recognition. See following image:
Accessing Sound Recognition
Enabling Sounds
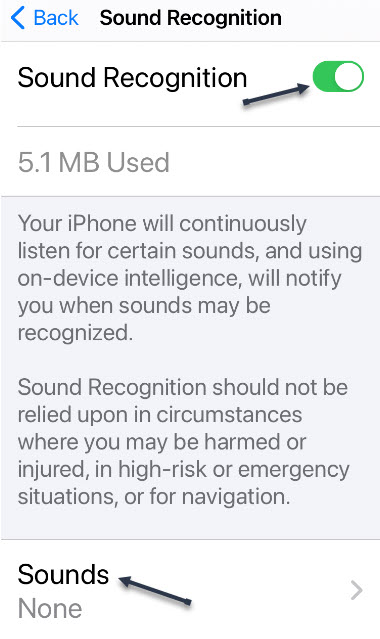
In Sound Recognition settings, tap the switch beside Sound Recognition to turn it on. Next, tap Sounds below that to choose which sounds to recognize. Refer to below image:
Enabling Sound Recognition
Siri is Disabled
Once you enable a Sound, a message will be displayed about Siri being disabled if you Turn On Sound Recognition, or you may Cancel. See below image:
Hey Siri message if a Sound is enabled
Now, you will see a list of switches that correspond to types of sound your iPhone can recognize, such as sirens and water running. As of iOS 14, here’s the full list:
Fire Alarm
Siren
Smoke Alarm
Cat
Dog
Appliances
Car Horn
Door Bell
Door Knock
Water Running
Baby Crying
Tap the switch beside each sound that you would like for your iPhone to recognize. You can enable any combination of them, or all of them. See following image where I enabled Fire, Smoke, and Dog:
Enabling Sounds
Now, to save your selection(s), press the Back link in upper left-hand corner, then exit Settings.
The Notifications
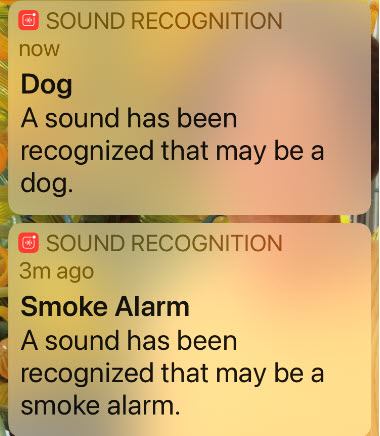
If you wouldd like to test the Sound Recognition feature, try searching for sounds like “Smoke Alarm” or “Dog Barking” on YouTube. When triggered, Sound Recognition will place an alert notification at the top of your screen. Later, you can see a list of these alerts in your iPhone’s Notification Center. Refer to below image:
Sound Recognition notifications
If you wish to activate other sounds or disable them, navigate back to the Sounds in the Sound Recognition screen. Also, you could create a shortcut in the Control Center to activate/deactivate the Sounds.
A Viewpoint
I usually don’t comment on what Apple engineers intended to do or how a feature is to work. This feature does work as advertised. But, if my house was on fire and the alarm goes off, I want my iPhone to blast our a fire alarm sound. What good is a notification alert; yikes, my house is burning! I don’t have time to grab my iPhone and launch the Notification Center. To me, this is a flaw.
While sleeping, I would like for my iPhone to blast out the sound of a fire or smoke alarm and call 911. Other sounds you might wnat to hear through your iPhone is Baby Crying and Water Running. For these reasons, this is a poorly designed feature.
At the same time,I realize that Apple wants no liability claims for missing sounds, like smoke or fire. They chose not to use the iPhone as an alarm in Sound Recognition.
That’s it. Please feel free to share this post! One way to share is via Twitter.
Just click the Tweet icon below. This will launch Twitter where you click its icon to post the Tweet.
Check out TechSavvy.Life for blog posts on smartphones, PCs, and Macs! Feel free to email us at contact@techsavvy.life.
Please feel free to leave a comment. I would love hearing from you. Do you have a computer or smart device tech question? I will do my best to answer your inquiry. Just send an email to contact@techsavvy.life. Please mention the device, app and version that you are using. To help us out, you can send screenshots of your data related to your question.
The author’s Vietnam eBook on the Battle for Tra Bong: Events and Aftermath
On Windows 10, the Start menu is an essential component, as it is the experience you use every day to find apps, settings, and files.
On Windows 10, the Start menu is an essential component, as it is the experience you use every day to find apps, settings, and files.
Out of the box, the Start menu includes a default layout with elements and settings that usually fit most people. However, if you want to make it more functional and personal, the experience available on Windows 10 is highly customizable.
We are going to explain a little know feature, manage the system folders. Here’s how to do this:
This is for devices running Windows 10
Copyright Scott Adams, Inc./Distributed by Universal Uclick for UFS
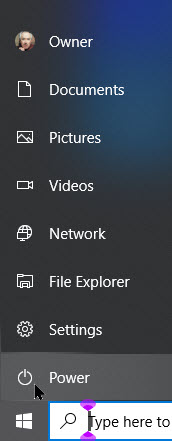
The User, Documents, Pictures, Settings and Power options are now tucked away in a column on the far left of the Start menu. Click the button at the top left of the Start menu to expand this column. Refer to below image:
The default Start menu System folders
First, launch Settings by pressing Windows+I. Now click the Personalization option. See below image:
Accessing Personalization option in Settings
Next, click the Start option. See following image:
Accessing the Start option
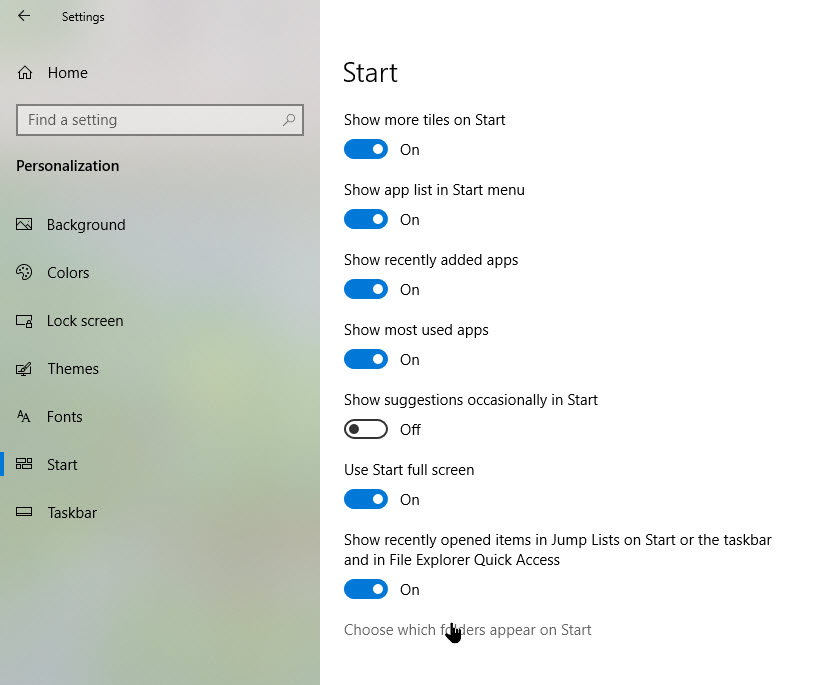
On the right, scroll all the way to the bottom and click the Choose which folders appear on Start link. Refer to below image:
Accessing the System folders link
Now, choose whatever folders you want to appear on the Start menu. See below image:
Enable/Disable System folders to appear on Start Menu
I have selected several folders. To view an icon’s associated text, just hover your mouse over an icon. See following image for the my new system Start menu:
Your new System folder Start menu
That’s it. Please feel free to share this post! One way to share is via Twitter.
Just click the Tweet icon below. This will launch Twitter where you click its icon to post the Tweet.
Check out TechSavvy.Life for blog posts on smartphones, PCs, and Macs! Feel free to email us at contact@techsavvy.life.
Please feel free to leave a comment. I would love hearing from you. Do you have a computer or smart device tech question? I will do my best to answer your inquiry. Just send an email to contact@techsavvy.life. Please mention the device, app and version that you are using. To help us out, you can send screenshots of your data related to your question.
The author’s Vietnam eBook on the Battle for Tra Bong: Events and Aftermath
Your device can serve as a magnifier so you can better view the world around you. The built-in Magnifier tool uses the camera to zoom in like a magnifying glass. You can use the Magnifier to better see faraway objects or enlarge items that are closer to you, like text in a book or on a computer screen.
Your device can serve as a magnifier so you can better view the world around you. The built-in Magnifier tool uses the camera to zoom in like a magnifying glass. You can use the Magnifier to better see faraway objects or enlarge items that are closer to you, like text in a book or on a computer screen. Lets explorehow to use the Magnifier.
This is for the iPhone or iPad running iOS 14+
Copyright Scott Adams, Inc./Distributed by Universal Uclick for UFS
Setup Magnifier
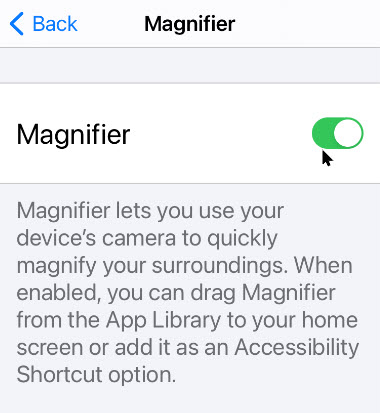
To enable the feature, go to
Settings > Accessibility > Magnifier
and toggle On the switch for Magnifier. Refer to below image:
Accessing the Magnifier
The Magnifier then appears on your Home Screen as an app. To launch the tool, just tap its icon. In my example, my first available Home Screen area is at the bottom right of the 6th page. See below image:
Accessing the Magnifier app
The Magnifier Toolbar
Notice that the objects within the view of your camera are magnified in the viewfinder. Using the Magnifier panel at the bottom of your screen, drag the slider or pinch your fingers in and out to zoom in and out of the object. You can move the Magnifier panel around the screen by dragging any empty area of it with your finger. See following image:
The Magnifier Toolbar
The Brightness Option
Tap the icon for Brightness and then drag the slider to increase or decrease the brightness. Tap the icon again to turn off the Brightness slider. Refer to below image:
The Brighness option
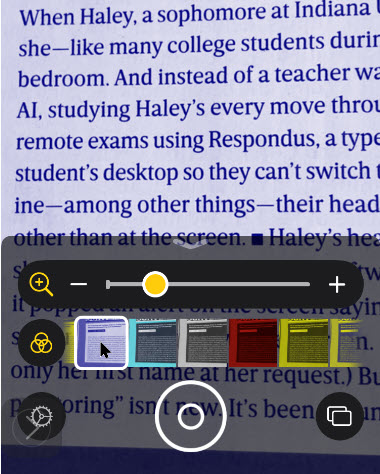
The Filter Option
Tap the Filter icon to choose between different filters and find one that improves the clarity of the object. Tap the icon again to turn off the Filter gallery. Tap the Flashlight icon to turn on your device’s flashlight and throw more light onto the object. See below image:
The Filter option
The Capture and View Options
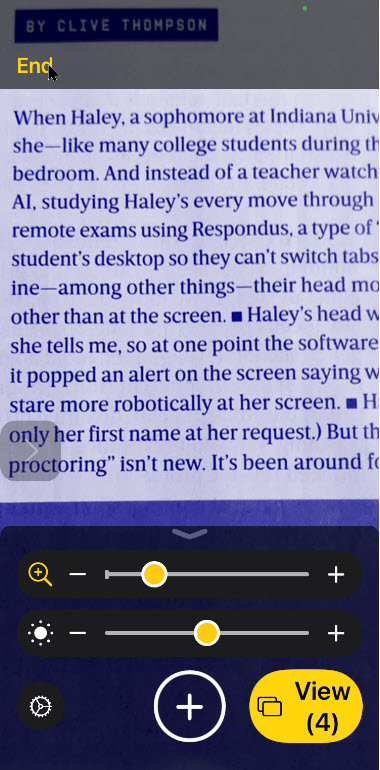
To capture an image of the object you are viewing, press the Shutter button. You can then view any images you capture by tapping the View button. Swipe through the thumbnails of your captured images at the bottom left-hand corner and tap a specific picture to view it. See following image:
Selecting a snapshot to view
The Share Option
From here, you can also tap the Share icon to share an image with someone else via an app or service. Refer to below image:
Sharing your snapshot via Social Media
Close the Magnifier
Tap the End link at the upper left-hand corner to return to the Magnifier screen. See following image:
Close the Magnifier
That’s it. Please feel free to share this post! One way to share is via Twitter.
Just click the Tweet icon below. This will launch Twitter where you click its icon to post the Tweet.
Check out TechSavvy.Life for blog posts on smartphones, PCs, and Macs! Feel free to email us at contact@techsavvy.life.
Please feel free to leave a comment. I would love hearing from you. Do you have a computer or smart device tech question? I will do my best to answer your inquiry. Just send an email to contact@techsavvy.life. Please mention the device, app and version that you are using. To help us out, you can send screenshots of your data related to your question.
The author’s Vietnam eBook on the Battle for Tra Bong: Events and Aftermath
While in desktop mode, Windows 10 allows you to use the Start menu in a full-screen mode or in a way that only covers part of the screen.
While in desktop mode, Windows 10 allows you to use the Start menu in a full-screen mode or in a way that only covers part of the screen. Lets explore how to do this.
Depending on how you have your Start menu configured, a full-screen Start menu covers the entire screen (but not the Taskbar), and you can change between a “pinned tiles” view and an “all apps” view using the buttons in the upper-left corner.
In either view, you will see a screen full of shortcuts that you click on to launch an application. Refer to below image for a partial view of my desktop:
Partial Desktop screen
To configure whether you see the full-screen Start menu in desktop mode or not, we need to make a change in Windows Settings.
This is for devices running Windows 10 operating system
Copyright Scott Adams, Inc./Distributed by Universal Uclick for UFS
First, click the Start menu, select the Gear icon on the bottom left, then click Settings, or press the Windows+I keys to open Settings. See below image:
Accessing Settings
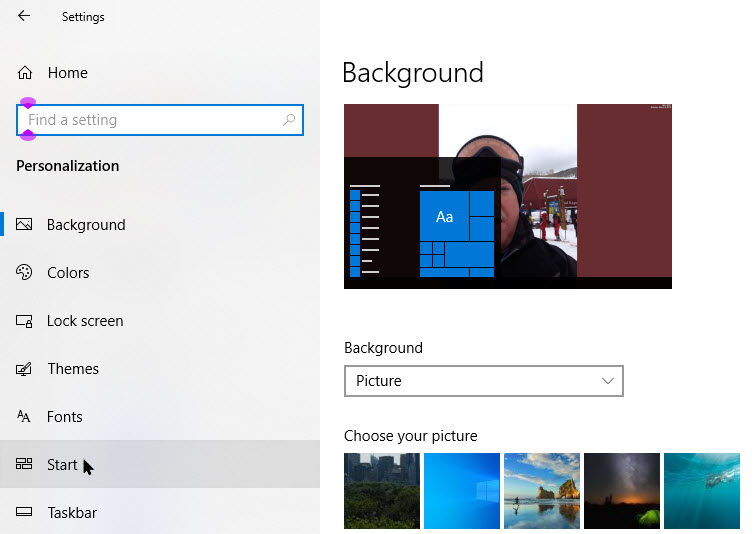
Now, click on Personalization. See following image:
Access Personalization
Next, select Start from the sidebar to open the its settings. Refer to below image:
Accessing Start option
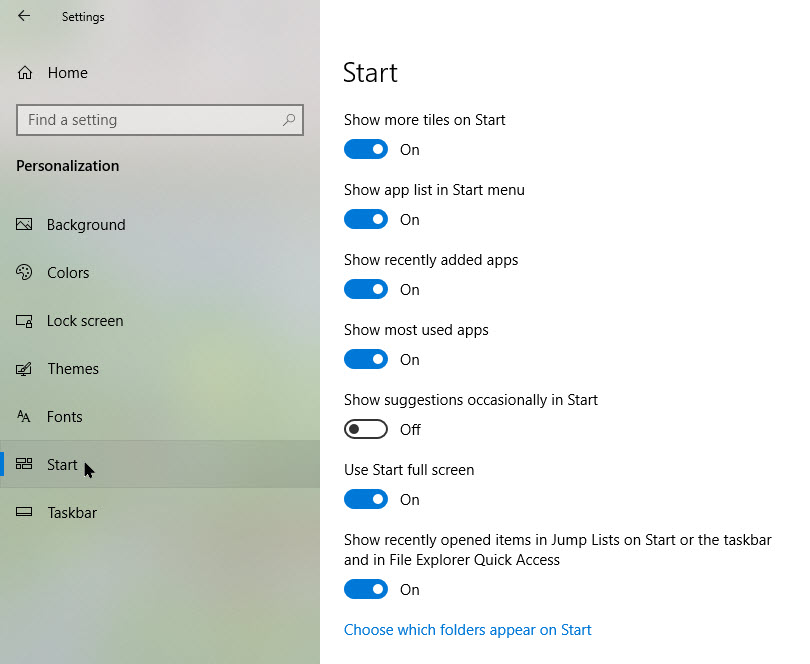
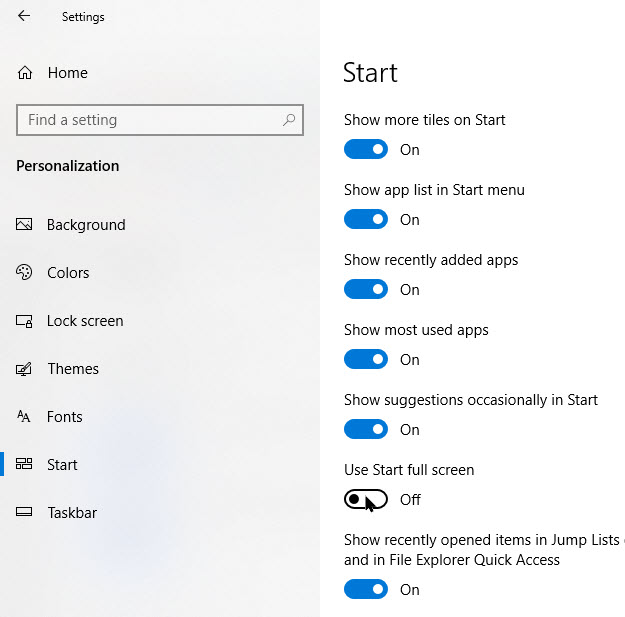
In Start menu settings, scroll down to the switch labeled Use Start Full Screen. If you would like to use the Start menu full screen in desktop mode, set this switch to On. If you do not want Start to cover the entire screen when you open it in desktop mode, set this switch to Off. See below image:
Disabling Start Full Screen
Note! If your PC is in tablet mode, it will always show a full-screen Start menu.
You do not have to use a full-screen Start menu to get more room for shortcuts. If you would like to use a larger Start menu without having it occupy the full screen, you can easily resize the Start menu by clicking and dragging its edges.
Also, you can add a few more tiles by enabling the switch labeled Show more tiles located at the top of Start menu settings. Refer to above image.
You arte finished. Please feel free to share this post! One way to share is via Twitter.
Just click the Tweet icon below. This will launch Twitter where you click its icon to post the Tweet.
Check out TechSavvy.Life for blog posts on smartphones, PCs, and Macs! Feel free to email us at contact@techsavvy.life.
Please feel free to leave a comment. I would love hearing from you. Do you have a computer or smart device tech question? I will do my best to answer your inquiry. Just send an email to contact@techsavvy.life. Please mention the device, app and version that you are using. To help us out, you can send screenshots of your data related to your question.
The author’s Vietnam eBook on the Battle for Tra Bong: Events and Aftermath
Apple’s default web browser on iPhone or iPad is Safari, but have you ever taken the time to investigate its many hidden features and settings? We are going to concentrate on three features regarding security, privacy and the new start page. You may be amazed at what you find, at least we were.
Apple’s default web browser on iPhone or iPad is Safari, but have you ever taken the time to investigate its many hidden features and settings? We are going to concentrate on three features regarding security, privacy and the new start page. You may be amazed at what you find, at least we were.
With iOS or iPadOS 14 and higher, Safari has a few new tricks up its sleeve, including privacy reports, and password monitoring. Let’s explore three hidden features.
This is for the iPhone and iPad
Copyright Scott Adams, Inc./Distributed by Universal Uclick for UFS
Your PrivacyReport
Cross-site trackers monitor your web-based activities as you surf from one site to another, an activity that can certainly raise privacy concerns. Safari blocks such trackers from profiling you by default, and now allows you to see which sites and trackers are blocked.
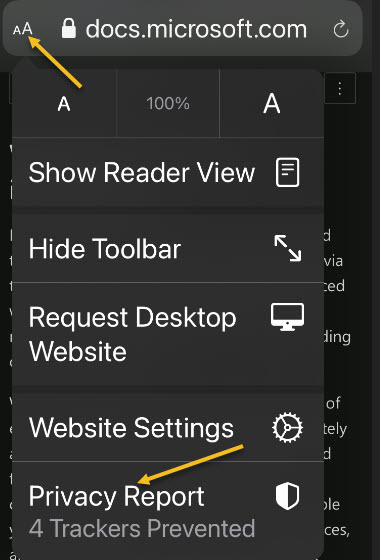
First, to check your Privacy Report, tap the aA icon in upper left-hand corner of a website. Next, tap Privacy Report. Refer to below image:
Accessing the Privacy Report
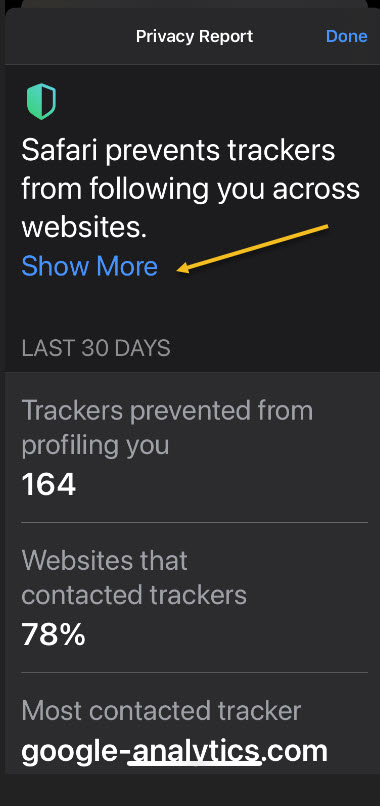
Now, your report will open. See below image:
Your Privacy Report
In my Privacy Report, I have 164 trackers with 78% of visited websites with trackers.
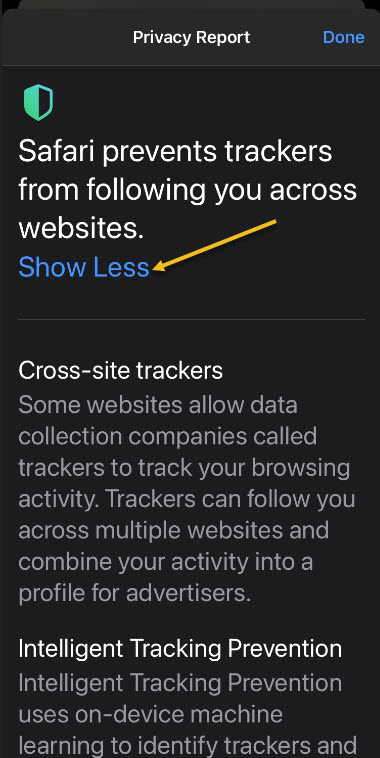
Next, click the Show More link to learn more about the cross-site tracking and how Apple blocks them and to read about trackers. The window reveals how many trackers were prevented from profiling you and how many sites contacted such trackers. See following image:
Stats about your browsing
Let’s go back one screen and tap the Show Less link. Now, scroll down till you see two tabs. Websites and Trackers tabs. Refer to below image:
Verbage about trackers
Next, tap on a Website to see which trackers were blocked. See below image:
Selecting a website for tracking info
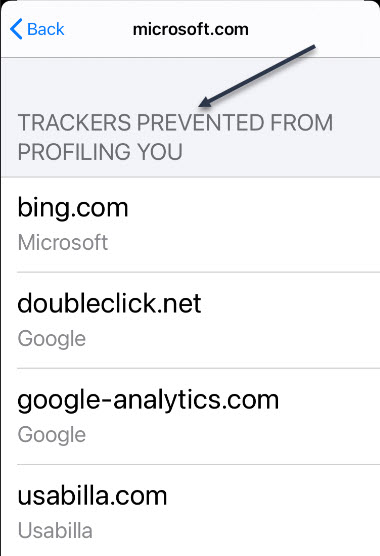
In my example, I selected Microsoft.com. Yes, even Microsoft has trackers. You may be alarmed at the number and percentage of trackers wanting to profile you, especially if you access Safari a lot. Your device is blocking them.
You may tap on the Trackers link to see a list of trackers. See following image:
The list of trackers for a website
My son works for a cyber security firm. He helps recover “hacked” devices. If a person wants to “hack” your device, with the proper tools, they can. The best you can do, is to “protect” your device. by using security features on your device and apps, having strong passwords, using multi factor authentication, and the like.
Your iCloud Passwords
On your iPhone or iPad, you can now see any passwords saved in the iCloud Keychain that has been leaked in a data breach, are being reused for multiple login credentials, or are considered weak.
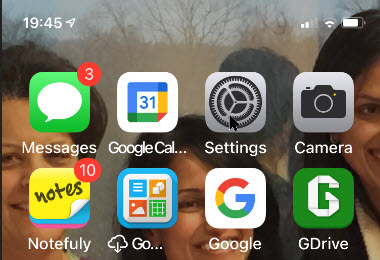
First, launch Settings (the gear icon). Refer to below image:
Accessing Settings
Now, scroll down to the Passwords option and tap it. See below image:
Accessing the Passwords option
Next, tap the SecurityRecommendations option. See following image:
Accessing Security Recommendations option
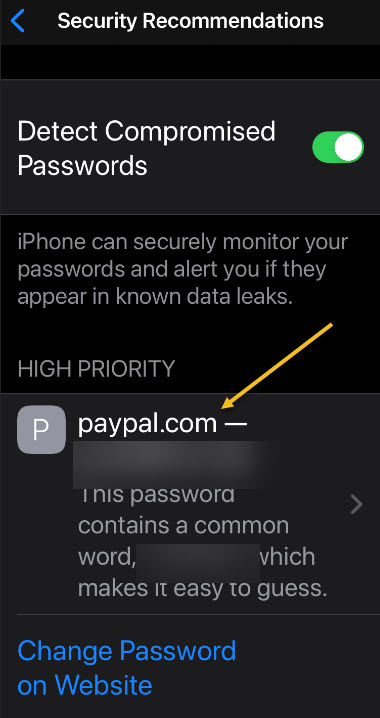
Now, you can tap a specific entry to delete or change the password. You may be surprised by passwords you have forgotten. Apple has provided a link to access the website for updating these passwords. In my example, I have one High Priority password that I need to change; one that I had forgotten about. The password for PayPal website has been erased for privacy purposes. Refer to below image:
Your comprised passwords
Your New Start Page
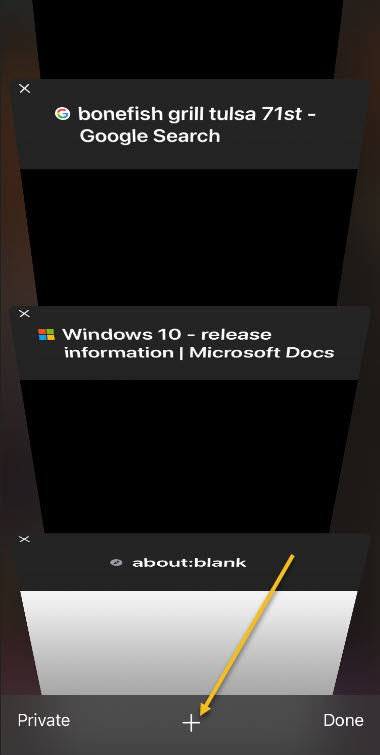
Safari debuted a new Start page with the release of iOS/iPadOS 13. Open a new tab by taping the plus “+” button at the bottom of your screen. See below image:
Selecting a new tab
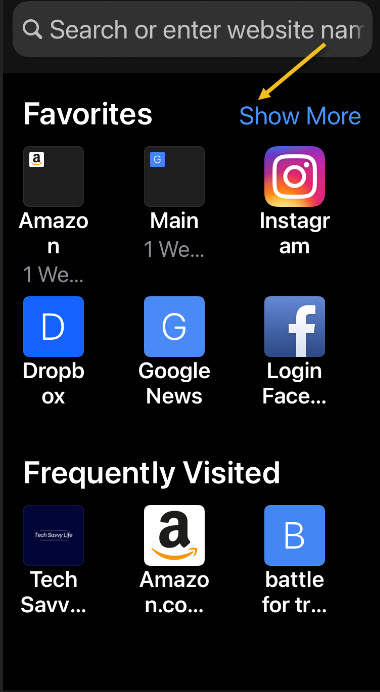
Now, you will see your bookmarks, frequently visited sites, and Siri suggested sites. Tap the Show More or Show Less link in the upper right to see more or fewer icons. See following image:
Your new Start page
Using SpeedTest
Althrough not a feature of privacy in Safari, you may want to know about the speed of your ISP for downloads and uploads. This tool is best used for a PC or Mac. Simply, head over to SpeedTest in your browser for your ISP speeds. Next, click the big round GO button. When it is finished, you will see your results like the image below:
Results of running SpeedTest
You can click the GO button again to rerun the test. Your results will differ depending on the time of day and Internet traffic. The firm, Ookla, has specific apps for your operating system that you can download and use.
That’s it. Please feel free to share this post! One way to share is via Twitter.
Just click the Tweet icon below. This will launch Twitter where you click its icon to post the Tweet.
Check out TechSavvy.Life for this post and similar blog posts on smartphones, PCs, and Macs!
Please feel free to leave a comment. I would love hearing from you. Do you have a computer or smart device tech question? I will do my best to answer your inquiry. Please mention the device, app and version that you are using. To help us out, you can send screenshots of your data related to your question.
The author’s Vietnam eBook on the Battle for Tra Bong: Events and Aftermath
Zoom is an accessibility feature that makes everything on your iPhone or iPad’s screen bigger and much easier to read.
Zoom is an accessibility feature that makes everything on your iPhone or iPad’s screen bigger and much easier to read.
It defaults to 5x magnification but can be set from 1x to 15x, depending on your preference and needs. You can pair it with Voice Over for further assistance to those with visual impairments.
Let us explore how to setup and use this feature.
This is for iPhone or iPad running iOS 14+
Copyright Scott Adams, Inc./Distributed by Universal Uclick for UFS
Setup Zoom Settings
To enable the feature, go to
Settings > Accessibility > Zoom
and toggle On the switch for Zoom. Refer to below image:
Accessing the Zoom feature
A small window pops up that zooms in on the portion of the screen on which the window is resting. You can move the Zoom window by dragging the small bar that appears in the middle bottom of the window. You can also swipe up and down on the screen to change which section is zoomed in. (Note! We are unable to capture the screen while in Zoom.)
Turning on the Follow Focus button moves the Zoom window to the text you are typing and will follow along as you type. Turning on Smart Typing moves the Zoom window when a keyboard pops up so that the text is zoomed in but the keyboard is not. See below image:
Two Zoom options
More Zoom Settings
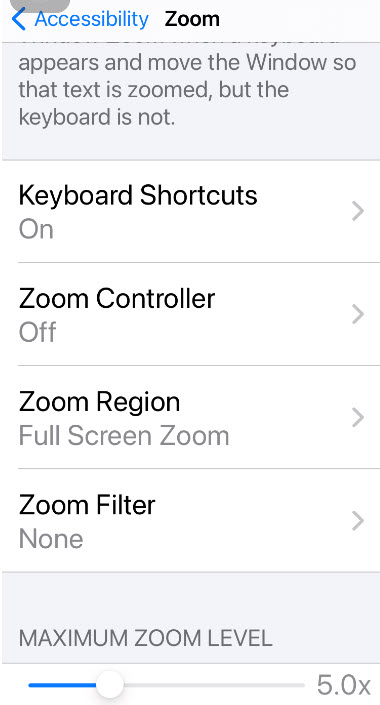
On the Zoom settings, you can toggle Keyboard Shortcuts, Zoom Controller, Zoom Region, and Zoom Filter. Each switch has an associated menu of features to choose. At the bottom of the Zoom settings, you may adjust the Maximum Zoom Level (the default is 5x). See following image:
More Zoom options
The Keyboard Shortcuts is a list of shortcuts to use on your keyboard for various Zoom features. Refer to below image:
Zoom Keyboard Shortcuts
Setup Zoom Controller
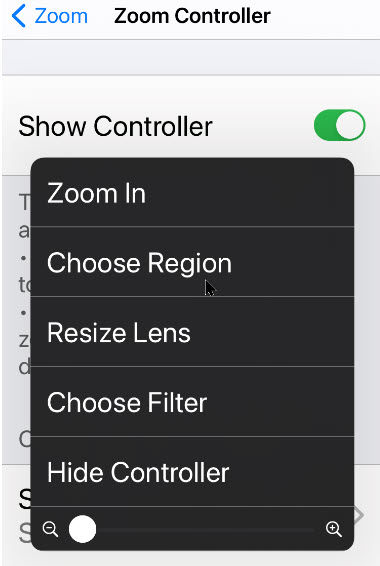
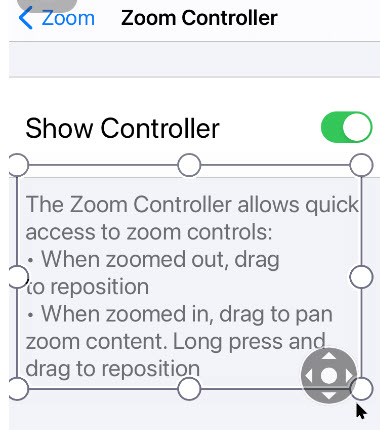
Show Controller displays a round on-screen controller that you can use to move the Zoom window around the screen. Tap the controller to display a menu with options to zoom in/out, choose the region, resize the lens, choose a filter, or hide/show the controller. See below image:
Zoom Controller options
You can zoom in or out with the first menu option. Choosing Region lets you choose a Full Screen Zoom or a Window Zoom.
Full-Screen Zoom makes the Zoom window disappear, while the entire screen is zoomed in instead. With Window Zoom, you use the Zoom window to zoom in on a small section of the screen as you move it around. See followimg image:
Zoom window options
Resize Lens feature allows you to resize the Zoom area you are viewing by grabbing and dragging on its handles. Refer to below image:
Resize Lens option
The option to Choose Filter applies a specific color filter to the Zoom window in an attempt to make the text easier to read. See below image:
Zoom filter options
iPhone/iPad Tapping Shortcuts
Once you have Zoom enabled, you can use it on the fly. Here’s how to use it:
Double-tap with three fingers anywhere on the screen to enable and disable zoom. You can do this from pretty much anywhere.
Drag three fingers around the screen to pan around and move to another area of the screen.
Use one or two fingers to scroll in the particular section that is on the display.
Tap and hold the anchor to drag the magnifying glass up and down the screen.
That’s it. I hope you have found this post helpful. If so, click the Tweet icon below. This will launch Twitter where you click its icon to post the Tweet.
I have found TechSavvy.Life blog posts extremely helpful. Check them out for posts on smart phone apps, Macs and PCs!
Please feel free to leave a comment. I would love hearing from you. Do you have a computer or smart device tech question? I will do my best to answer your inquiry. Please mention the device, app and version that you are using. To help us out, you can send screenshots of your data related to your question.
The author’s Vietnam eBook on the Battle for Tra Bong: Events and Aftermath
One of the most common forms of shorthand communication developed for the mobile age is the icon-based vocabulary known as Emoji. You have seen those seen Emoji pictures on social media. It’s available for Microsoft Word in Windows 10, MacOS, iOS, iPadOS, and Android.
One of the most common forms of shorthand communication developed for the mobile age is the icon-based vocabulary known as Emoji. You have seen those seen Emoji pictures on social media. It’s available for Microsoft Word in Windows 10, MacOS, iOS, iPadOS, and Android.
Microsoft Word is an indisputable application in the documentation world. When preparing documentations, you can easily insert Emoji to jazz up a Word document on various devices.
You can enter an Emoji in Word in the same way you can enter an Emoji in any other application. While typing in a Word document, just use the appropriate keyboard shortcut for your operating system. Let!s explore how this is done.
This is for devices supporting Microsoft Word. Screenshots are from Windows 10
Copyright Scott Adams, Inc./Distributed by Universal Uclick for UFS
Open Rmoji Keyboard
Open your Word document and position the cursor where you want to insert the Emoji.
For Windows 10 – Press, “Windows + Period” keys or “Windows + Semicolon” keys to open the Emoji picker.
For MaOS – Press “Command + Control + Space” keys to open Emoji keyboard on a Mac, which is a Character Viewer app in MacOS.
For iPhone, iPad, or Android phone, you can use the standard Emoji keyboard.
These keyboard shortcuts work in basically all Windows or Mac applications.
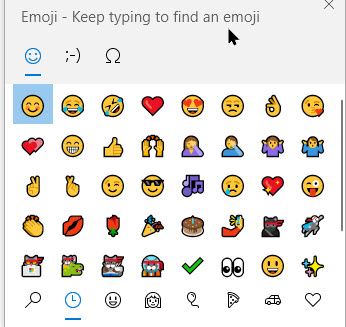
A pop-up will be displayed with all popular emoji symbols. The most frequently used Emoji will appear first. Refer to below image:
The Emoji keyboard
Searching for an Emoji
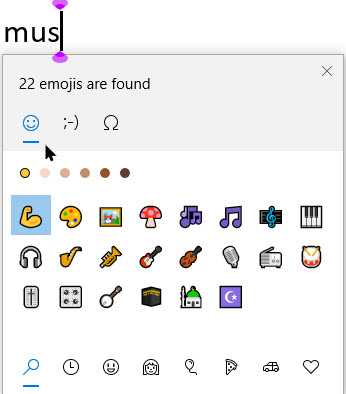
On both Windows and Mac, you can start typing the name of an Emoji to search for it. For example, to find “music” related Emoji, just start typing a few characters of the keyword. You can also just scroll through the long list of Emoji to find one.
Use the arrow keys and press Enter or click an Emoji to insert it. See below image:
Searching for a music Emoji
The Emoji you insert into your document will appear as a colorful icon. You can resize them. adjust their font size, just as you would with any other text in the document.
See following image for an inserted “music”Emoji followed by text:
Inserting an Emoji followed by some text
I hope you have found this post helpful. If so, click the Tweet icon below. This will launch Twitter where you click its icon to post the Tweet.
I have found TechSavvy.Life blog posts extremely helpful. Check them out for posts on smart phone apps, Macs and PCs!
Please feel free to leave a comment. I would love hearing from you. Do you have a computer or smart device tech question? I will do my best to answer your inquiry. Please mention the device, app and version that you are using. To help us out, you can send screenshots of your data related to your question.
The author’s Vietnam eBook on the Battle for Tra Bong: Events and Aftermath
The Translate app, introduced in iOS 14, allows you to quickly translate between languages using text or voice input. With speech output, support for a dozen languages, and a comprehensive built-in dictionary, it’s an essential tool for travelers or students.
The Translate app, introduced in iOS 14, allows you to quickly translate between languages using text or voice input. With speech output, support for a dozen languages, and a comprehensive built-in dictionary, it’s an essential tool for travelers or students.
By default, the app uses cloud services to perform translations. However, you can also enable offline translation on your iPhone running this app by downloading the languages.
As a disclaimer, Apple warns that the offline translations might not be as accurate as online translations. This is because in the offline mode, the app does not use Apple’s cloud computing’s ability to deliver the best translated results.
Still, it’s handy if you do not have a network connection, especially while traveling to third world countries where Internet bandwidth is poor. It is also ideal if you have a sensitive job and do not want any translation data transferred over the Internet or potentially stored in the cloud
Let’s explore how to setup offline translation.
This is for the iPhone running iOS 14
Copyright Scott Adams, Inc./Distributed by Universal Uclick for UFS
Accessing Translate
First, launch Settings (the Gear icon). Refer to below image:
Accessing Settings
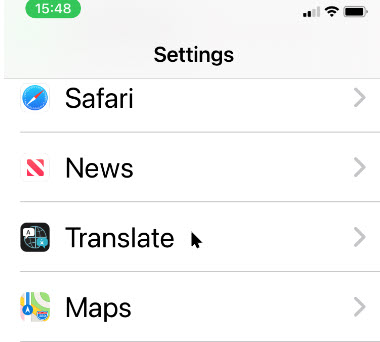
Next, scroll way down and tap Translate. See below image:
Accessing Translate option
Enable On Device
Now, toggle to On the label On device mode. See following image:
Enabling on=device mode
Download Languages
A pop-up will be displayed alerting you that you need to download languages to translate locally on your device. Just tap Open App. Refer to below image:
Accessing Open App link
Next, a pop-up message will be displayed about the download of languages. See below image:
Downlaod of languages message
On the next screen, tap either of the two language pair buttons at top of the page. See following image:
In the list that appears, scroll down to the AvailableOffline Languages section. Now, tap the language you want to use offline, and it will download automatically. Please wait for the download to finish.
Now, repeat the above procedure for other language(s).
Once a language is downloaded, a checkmark will appear beside it. In my example, I have downloaded Spanish, so now I have English and Spanish for offline translations. Refer to below image:
Checkmark of downloaded languages
Translate Off Line
Next, tap Done in upper right-hand corner and you will be returned to the main Translate screen. Now, type in your text and the app will translate as usual but without a network connection. All of your translations will stay on your local device. See below example for translation from English to Spanish:
Translating Englis to Spanish
To return to cloud service translation, just toggle Off the label On device mode in Settings.
You are finished! You now have mastered offline translation on your iPhone.
I hope you have found this post helpful. If so, click the Tweet icon below. This will launch Twitter where you click its icon to post the Tweet.
I hope you have found this post helpful. If so, click the Tweet icon below. This will launch Twitter where you click its icon to post the Tweet.
Please feel free to leave a comment. I would love hearing from you. Do you have a computer or smart device tech question? I will do my best to answer your inquiry. Please mention the device, app and version that you are using. To help us out, you can send screenshots of your data related to your question.
The author’s Vietnam eBook on the Battle for Tra Bong: Events and Aftermath