There might be times when it would be helpful to add a YouTube video to a Microsoft Word document. It can help you get your point across or help with training. Inserting the YouTube video directly into the document makes it easier to watch it. Word allows you to include the video right inside the document. Then the reader does not need to click a link to the video and launch a separate browser instance.
There might be times when it would be helpful to add a YouTube video to a Microsoft Word document. It can help you get your point across or help with training. Inserting the YouTube video directly into the document makes it easier to watch it. Word allows you to include the video right inside the document. Then the reader does not need to click a link to the video and launch a separate browser instance. Let’s explore how this is done.
This is for Word. Screenshots are from Word in Office 365 and Chrome using Windows 10
Copyright Scott Adams, Inc./Distributed by Universal Uclick for UFS
If you follow my example, I will be using a YouTube video from the 2008 Winner in a Poland ballroom dance competition on BBC One. I have been ballroom dancing for 15 years and this is one of the best ballroom dance videos I have found. As of this writing, the video has been viewed over 3.9 million times. I hope you enjoy the video and this post.
Copy YouTube Video URL
To insert a YouTube video into your Word document, open your browser of choice (I am using Chrome) and go to the YouTube website. Now, search for a YouTube video that you want to use by typing the name of the video in the search bar. Next, click the search button or simply press Enter. Refer to below image:
Entering your YouTube video name
Next, select the video from the search results by clicking it. See below image:
Accessing your YouTube video
Now, highlight the video’s URL in the browser’s address bar. Right-click and then select Copy from the context menu. (This is the easiest option). See following image:
Copy the URL of your YouTube video
Copy YouTube Embed Code
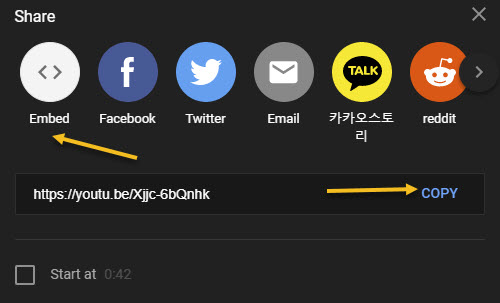
Alternately, to get the embed code, click Share under the video. Refer to below image:
Accessing your YouTube video Share option
Next, in the Share window, select Embed. See below image:
Selecting your YouTube video Embed option
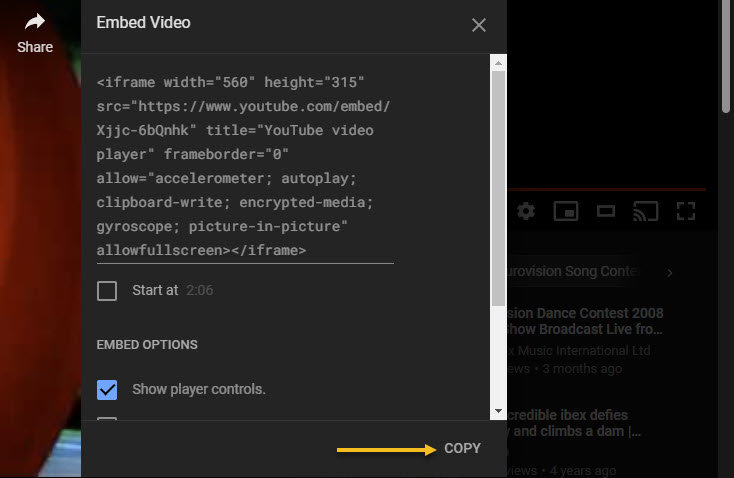
Now, the Embed Video window will appear. Click Copy to copy the code to your clipboard. Optionally, if you want to start the video from a specific time, check the box next to Start At and enter the desired time. See following image:
Copy your YouTube video Embed code
Insert URL or Embed Code
With the URL or embed code copied to your clipboard, open Word. Next, place your pointer where you want to insert your video.
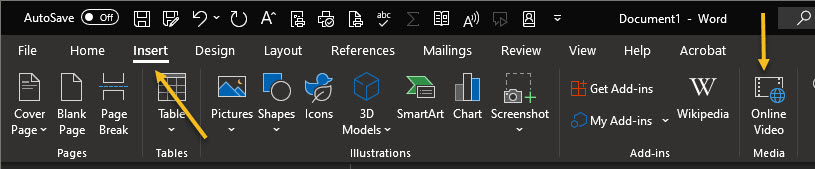
Now, from the top toolbar, click the Insert tab, then select Online Video in the Media group. Refer to below image:
Selecting the Inset option for Online Video
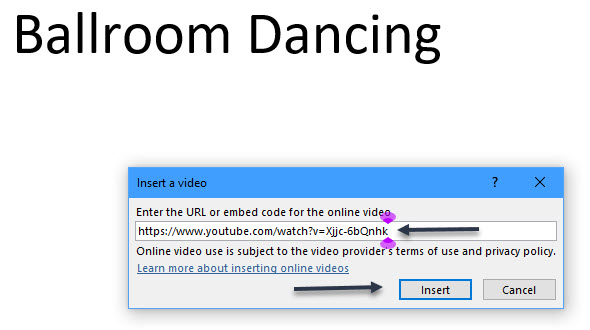
The Insert a Video dialog box will appear. Next, paste (Ctrl+V or right-click > Paste) the URL or embed code in the text box, then click Insert. See below image where I used the URL:
Copy/Paste the URL of your YouTube video
The video will now be inserted into the Word document. Clicking the play button will make the video pop out in the foreground while the background is dimmed. Press the Play button again to start. To pause, just click the video.
Your YouTube Video in Word
All of the normal video controls you would find on YouTube are also available for the video inserted into your Word document. See following image on how the video is displayed in Word:
Your YouTube video inside of a Word document
Quote For the Day
Everybody gets so much information all day long that they lose their common sense.”
Gertrude Stein
That’s it. Please feel free to share this post! One way to share is via Twitter.
Just click the Tweet icon below. This will launch Twitter where you click its icon to post the Tweet.
Check out TechSavvy.Life for blog posts on smartphones, PCs, and Macs! You may email us at contact@techsavvy.life for comments or questions.
Please feel free to leave a comment. I would love hearing from you. Do you have a computer or smart device tech question? I will do my best to answer your inquiry. Just send an email to contact@techsavvy.life. Please mention the device, app and version that you are using. To help us out, you can send screenshots of your data related to your question.
The author’s Vietnam eBook on the Battle for Tra Bong: Events and Aftermath
Are you wondering how to create multiple folders in Windows 10 or even in Windows 7? That can be very useful if you’re a analyst, for instance. Say that you need to make a folder for each month of the year on your Windows PC. Sure, you can manually create a folder for each month, but that might take some time. Fortunately, there is a way to automate this.
Are you wondering how to create multiple folders in Windows 10 or even in Windows 7? That can be very useful if you are a analyst, for instance. Say that you need to make a folder for each month of the year on your Windows PC. Sure, you can manually create a folder for each month, but that might take some time. Fortunately, there is a way to automate this. Let’s see how to create multiple folders at once, using a simple Command Prompt.
This is for devices running Windows 10
Copyright Scott Adams, Inc./Distributed by Universal Uclick for UFS
Using the Command Prompt
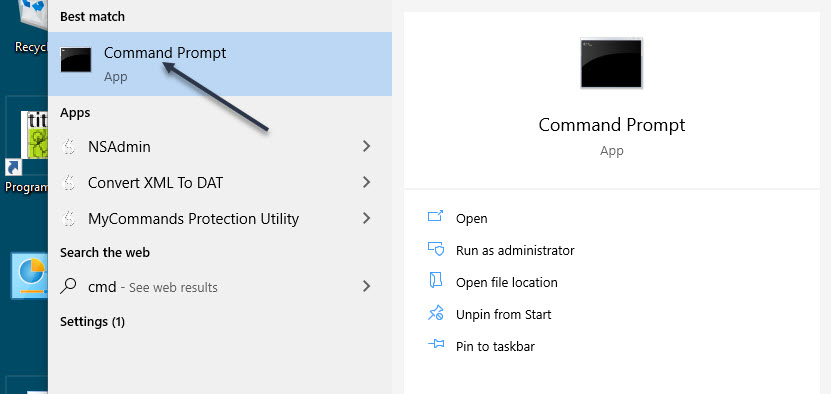
First, click the Start button from the Taskbar and type “cmd” (without quotes) in the Cortana Search bar (next to the Start button). Next, choose Command Prompt from the search results. Refer to below image:
Accessing the Command Prompt
Next, you can change directories in Command Prompt using the “cd” command (without quotes) and switch to the directory where you want to make your folders. See below image:
Changing the directory
Now. using the “md” command (without quotes) you can make a new directory for your folders. You want to create twelve folders, one for each month in a year with the following command:
md Jan Feb Mar Apr May Jun Jul Aug Sep Oct Nov Dec
See following image:
Making the Folders
If you want multiple words for a folder, just enclose the words in quotes, for example:
md “2021 Jan“ “2021 Feb” and so on.
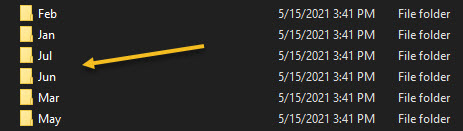
Next, you can close the Command Prompt and open the destination in Windows Explorer to check the newly made folders. Refer to below image for some of the created folders: (Due to Explorer sorting, we are only showing some consecutive ones.)
The created Folders
There are other ways to accomplish creating multiple folders at once, but this method is the easiest.
Quote For the Day
People who are really serious about software should make their own hardware.
Alan Kay
That’s it. Please feel free to share this post! One way to share is via Twitter.
Just click the Tweet icon below. This will launch Twitter where you click its icon to post the Tweet.
Check out TechSavvy.Life for blog posts on smartphones, PCs, and Macs! You may email us at techsavvy.life for comments or questions.
Please feel free to leave a comment. I would love hearing from you. Do you have a computer or smart device tech question? I will do my best to answer your inquiry. Just send an email to contact@techsavvy.life. Please mention the device, app and version that you are using. To help us out, you can send screenshots of your data related to your question.
The author’s Vietnam eBook on the Battle for Tra Bong: Events and Aftermath
The advantage of the Microsoft Office suite is that all the programs in the collection work quite well together. An example is the ability to link or embed a Microsoft PowerPoint slides into a Microsoft Word document.
The advantage of the Microsoft Office suite is that all the programs in the collection work quite well together. An example is the ability to link or embed a Microsoft PowerPoint slides into a Microsoft Word document. Lets explore how this is done.
This is for devices running PowerPoint and Word
Copyright Scott Adams, Inc./Distributed by Universal Uclick for UFS
Linking vs. Embedding Explained
If you link or embed a PowerPoint slide in a Word document, the goal is always the same; to provide an external reference that complements the content of the document. However, there are subtle differences between linking and embedding that you should be aware of.
The difference between linking and embedding an object is how the object’s data is stored and how the object’s content is updated. Since data is stored differently between the two methods, the content update process will also be different.
If you link an object, then that link simply sends the reader to the location of the source object when clicked. The file itself does not actually store any data from the linked object to the file. This is advantageous if the object you are linking to is large in size and you need to reduce the size of your Word document. The downside is that if the location of the linked object changes, the link in your Word document will break.
If you embed an object, then you do not need to worry about whether the location of the object changes, as it becomes part of the document itself. That is, Word stores the object data in the actual Word file. The good news is that you do not have to worry about broken links in your document. The downside is that when the object is updated, those updates are not reflected in your embedded object, because there is no link connecting it to the source. Also, you will need to consider that the file size increases with embedded objects.
Link or Embed a PowerPoint Slide into a Word Document
First, open the PowerPoint project that contains the slide you want to link or embed. Now, select the desired slide by clicking its preview thumbnail. Refer to below image:
Selecting a PowerPoint slide
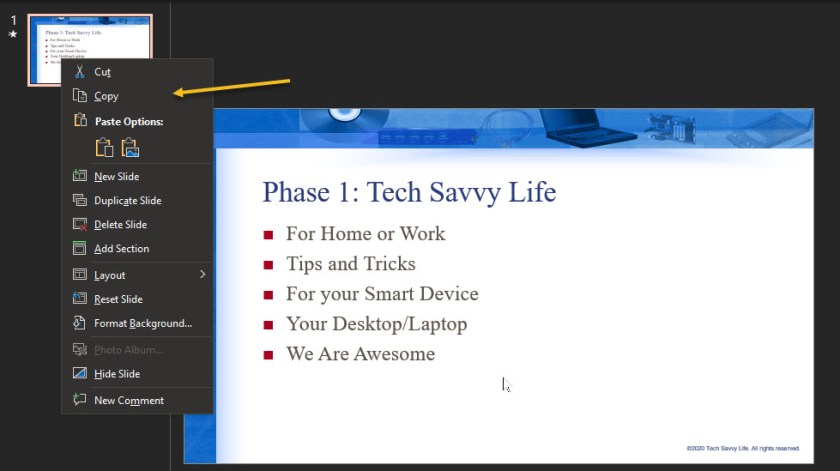
Next, copy the slide to your clipboard by using the Ctrl+c (Cmd+c on Mac) keyboard shortcut, or by right-clicking the slide and selecting Copy from the context menu. See below image:
Selecting the Copy option
Now, open your Word documentyou would like to link or embed the slide to. In the Clipboard group of the Home tab, click the down arrow under Paste. See following image:
Selecting the Paste option
In the drop-down menu, click Paste Special. Refer to below image:
Selecting the Paste Special option from drop-down list
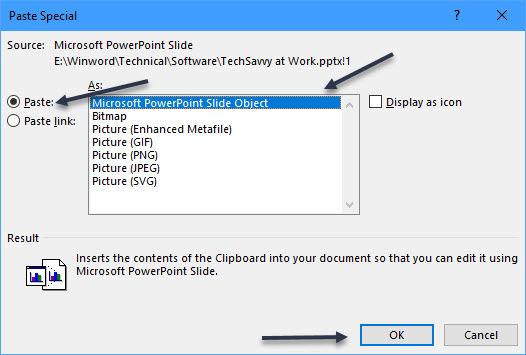
The Paste Special window will appear. If you have copied the PowerPoint slide to your clipboard, you will see a Microsoft PowerPoint Slide Object option in the box under As. Next, click it to select the option. If you do not see this option, repeat the above steps. You may not have copied the slide to your Clipboard.
To embed the slide, click the bubble icon next to Paste.
To link the slide, click the bubble icon next to Paste Link.
Now, select OK to insert the linked or embedded object. See below image:
Selecting the Paste option to embed the PowerPoint slide
Your final Word document should look like the following image:
Your Word document with the PowerPoint slide embedded
The Microsoft PowerPoint slide is now linked or embedded into your Microsoft Word document.
That was easy. You are now finished. Please feel free to share this post! One way to share is via Twitter.
Just click the Tweet icon below. This will launch Twitter where you click its icon to post the Tweet.
Check out TechSavvy.Life for blog posts on smartphones, PCs, and Macs! You may email us at contact@techsavvy.life for comments or questions.
Please feel free to leave a comment. I would love hearing from you. Do you have a computer or smart device tech question? I will do my best to answer your inquiry. Just send an email to contact@techsavvy.life. Please mention the device, app and version that you are using. To help us out, you can send screenshots of your data related to your question.
The author’s Vietnam eBook on the Battle for Tra Bong: Events and Aftermath
Have you ever noticed the message you see when you install a browser extension in Chrome, for example? For most browser extensions, a message appears stating that the extension can “Read and modify all of your information on the websites you visit.”
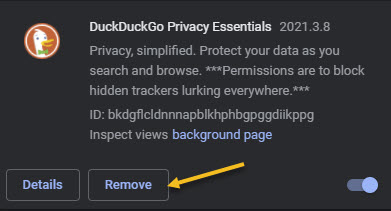
Have you ever noticed the message you see when you install a browser extension in Chrome, for example? For most browser extensions, a message appears stating that the extension can “Read and modify all of your information on the websites you visit.” Refer to below image where we are looking at DuckDuckGo Privacy Essentials extension, an Internet privacy company, on their permissions:
Viewing a Chrome extension for permissions
What! Does not look secure to me as it reads all data on your device. You want to remove this browser extension and similar extensions for privacy issues.
To review your Chrome browser extensions:
Open Chrome, and click the 3-dot hamburger icon in upper-right hand corner.
Click on More Tools, then Extensions. They will be listed alphabetically.
Find a browser Extension that is enabled. Click on its Details button. Now, scroll down to the Permissions and Site Access sections to view how it is accessing your data.
You may be surprised as to the information the Extension is collecting on you. Let’s explore what this is about.
This is for modern day browsers like Edge, Chrome, Firefox, and Safari. Screenshots are from Chrome desktop version
Copyright Scott Adams, Inc./Distributed by Universal Uclick for UFS
This means that the browser extension has full access to all web pages you visit. It can see which web pages you are browsing, read their content and look at everything you write. It can even modify the web pages; for example by inserting additional ads. If the extension is malicious, it can collect all your private information; from web activity and emails you write to your passwords and financial information; and send it to a remote server on the Internet.
I am tired of receiving fake emails, texts, tweets, posts, and so on. Recently I have been receiving media from Thank You, USPS, Wells Fargo, Cox Communications, and so on.
This is primarily due to my accounts being compromised and sold. Another reason is some browser extensions is watching my activity.
If a browser extension is completely reliable and trustworthy, that’s fine. The browser extension may behave responsibly and not capture any data or interfere with your banking information.
We do not say that you have to uninstall every browser extension you have. Instead, you just realize the enormous access you give to the browser extensions you install and act on accordingly.
See below image for a popular Chrome extension, Todolist, permissions allowing access to its web site:
Viewing a Chrome extension for permissions
But keep this in mind; if you do not trust the add-on, you may not want to run it in the first place. We recommend you click the Remove button to delete any extension you do not trust. See following image:
Removing a Chrome extension
That’s it. Please feel free to share this post! One way to share is via Twitter.
Just click the Tweet icon below. This will launch Twitter where you click its icon to post the Tweet.
Check our TechSavvy.Life for blog posts on smartphones, PCs, and Macs! You may email us at contact@techsavvy.life for comments or questions.
Please feel free to leave a comment. I would love hearing from you. Do you have a computer or smart device tech question? I will do my best to answer your inquiry. Just send an email to contact@techsavvy.life. Please mention the device, app and version that you are using. To help us out, you can send screenshots of your data related to your question.
The author’s Vietnam eBook on the Battle for Tra Bong: Events and Aftermath
No matter who you are or what your profession is, the Calculator app is one of the most used applications. If you use the Calculator app extensively, here is how you can keep Calculator “always on top” in Windows 10.
No matter who you are or what your profession is, the Calculator app is one of the most used applications. If you use the Calculator app extensively, here is how you can keep Calculator “always on top” in Windows 10.
This is for devices running Windows 10
Copyright Scott Adams, Inc./Distributed by Universal Uclick for UFS
In the Windows 10 build 18956 (20H1), Microsoft added this new option to the Calculator app.
The Calculator has a number of different modes, including Standard, Scientific, Graphing, CurrencyConversation, and more. Note! This feature only works with the Standard mode, but it is still handy.
This feature is pretty useful when you use the Calculator in conjunction with some other app. If you are writing a document and need to do a couple of quick calculations, switching between applications each and every time is a bit annoying. So let us save some time and enable this feature.
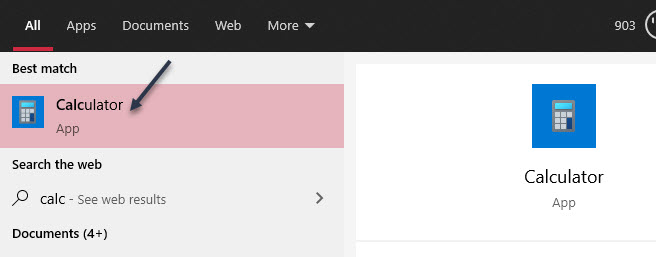
First, open the Calculator app from the Start Menu pinned apps or Tiles; or click the Cortana Search box in the taskbar, type calc then open Calculator from the search result. Refer to below image:
Accessing the Calculator app
Now, the Calculator will open in the last mode you used. If you are not already in Standard mode, click the hamburger icon in the top left and select it. See below image:
Accessing the drop-down menu to select Standard calculator
Next, tap the keep-on-top icon next to the Standard title. See following image:
Selecting the “always on top” icon
The Calculator will pop-out to a slightly smaller window that will always “stay on top”. You can drag it around by grabbing the top bar. To slightly resize it, grab the edges of the window. Refer to below image:
The Standard calculator
To close the window, just click the “X”. No more switching back and forth between windows to do simple math.
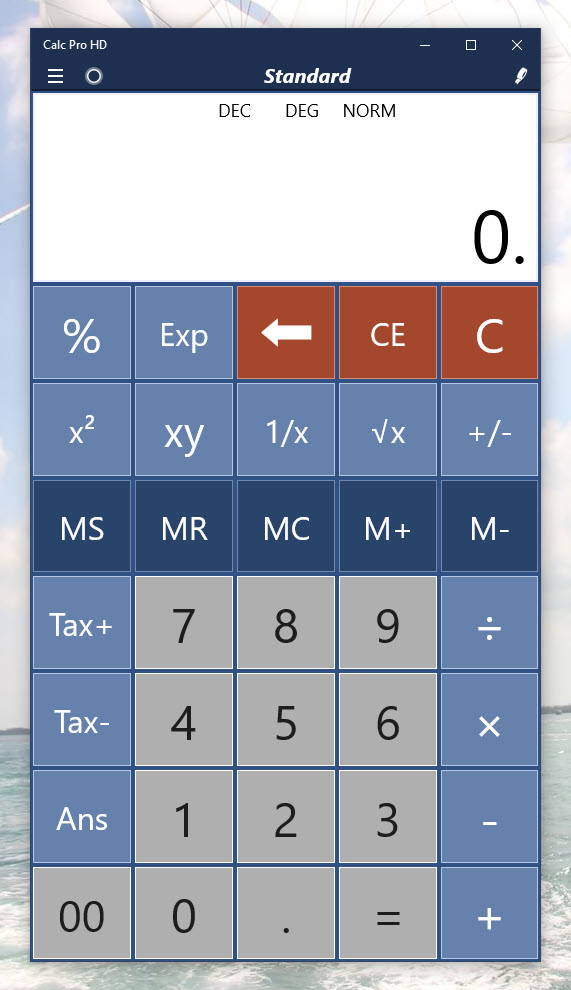
An alternative Calculator that I recommend is Calc Pro HD. There is a free and paid version. It offers a more attractive interface plus more features. The paid version offers 10 calculators to meet your needs.
Although “not always on top”, it is “always available” by allowing you to use voice commands to perform your calculations!
Please feel free to leave a comment. I would love hearing from you. Do you have a computer or smart device tech question? I will do my best to answer your inquiry. Just send an email to contact@techsavvy.life. Please mention the device, app and version that you are using. To help us out, you can send screenshots of your data related to your question.
The author’s Vietnam eBook on the Battle for Tra Bong: Events and Aftermath
Windows 10 has a hidden video editor that works a bit like Windows Movie Maker or Apple iMovie. You can use it to trim videos or create your own home movies and slideshows. You can even have it create videos automatically. Lets explore how to find and use the Video Editor.
Windows 10 has a hidden video editor that works a bit like Windows Movie Maker or Apple iMovie. You can use it to trim videos or create your own home movies and slideshows. You can even have it create videos automatically. Lets explore how to find and use the Video Editor.
This is for devices running Windows 10
Copyright Scott Adams, Inc./Distributed by Universal Uclick for UFS
Open Video Editor Inside of Photos App
You can get started with a custom video project by launching the Photos app from your Start menu. Enter “Photos” (without quotes) in the Cortana search box next to Start. Now, click the the New Video button and select an entry from the drop-down list. Also, you can switch to the Video Editor app. This is confusing; launching the Video Editor inside of Photos. Where to launch the Video Editor depends on what you are trying to do. (See section on DetermineWhere to Launch the Video Editor below). Refer to below image:
Selecting a new video inside the Photos app
Open Video Editor Outside of Photos app
Also, Windows 10 now lets you launch the Video Editor from the Start menu, too. First, click the Start menu. Next, in the Cortana search box next to Start, enter “Video Editor” (without quotes). Now, in the upper left-hand corner, click the Video Editor app shortcut. See below image:
Selecting the Video Editor app outside of the Photos app
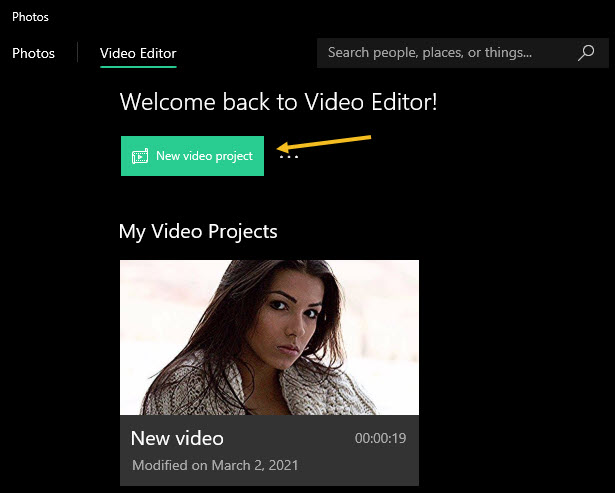
Now, launch the Newvideo project shortcut in the upper left-hand corner. If you have used the Video Editor, a Welcome Back message will be displayed. Note! You are now in the Photos app under the Video Editor tab. See following image:
Selecting a new video project
This shortcut opens the list of “Video Projects” in the Photos app. From here, you can create a new video using the New Video tab, then click the Add button and chose a location for your photos. Also, you may edit an existing video using the Pencil icon. Refer to below image:
Create or Edit a video
Determine Where to Launch the Video Editor
To quickly make smaller edits on individual videos—for example, to trim an individual video rather than combining multiple videos together; you must open those videos directly in the Photos app from File Explorer.
Using the File Explorer
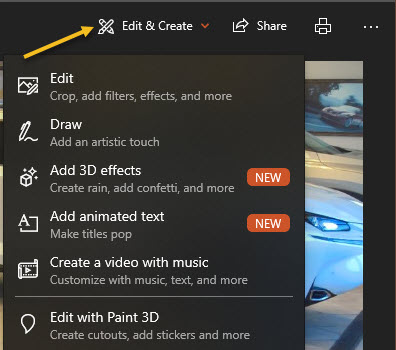
First, select an image from the File Explorer, open the image in the Photos app, Now, click on the Edit & Create button and select an entry from the drop-down list. See below image:
Create. add effects, or edit a video
From here, play around with the various tools and effects. Click Finish when done to export your video in mp4 format. Have fun in creating and editing your videos.
That’s it. Please feel free to share this post! One way to share is via Twitter.
Just click the Tweet icon below. This will launch Twitter where you click its icon to post the Tweet.
Check out TechSavvy.Life for blog posts on smartphones, PCs, and Macs! You may email us at contact@techsavvy.life for comments or questions.
Please feel free to leave a comment. I would love hearing from you. Do you have a computer or smart device tech question? I will do my best to answer your inquiry. Just send an email to contact@techsavvy.life. Please mention the device, app and version that you are using. To help us out, you can send screenshots of your data related to your question.
The author’s Vietnam eBook on the Battle for Tra Bong: Events and Aftermath
Has Windows been acting flaky? It could be a specific piece of software that’s wreaking havoc on your system. Maybe you have installed a new application or driver. Perhaps Windows is crashing or blue screening and you have no idea why. Do not worry because all is not lost if you have a system Restore Point waiting to roll your PC back to functionality.
Has Windows been acting flaky? It could be a specific piece of software that’s wreaking havoc on your system. Maybe you have installed a new application or driver. Perhaps Windows is crashing or blue screening and you have no idea why. Do not worry because all is not lost if you have a system Restore Point waiting to roll your PC back to functionality.
This is for devices running Windows 10. Also works for Windows 8 and 7. Screenshots are from Windows 10
Copyright Scott Adams, Inc./Distributed by Universal Uclick for UFS
A Restore Point is essentially a snapshot of Windows at any given time. You can create restore points on a regular basis, and if Windows ever breaks, you can bring it back to a point from before the problem occurred. The best part of using this method over a Recovery Drive is that only system files and settings will be affected, while all your documents and personal files will be left untouched.
Windows automatically creates a Restore Point, if enabled, at key moments, such as when you install certain software programs and drivers or apply Windows updates. However, you should manually create these points yourself on a regular basis, perhaps once a month, to ensure that your system can be restored to a recent state in the event of a mishap. You should also create one before you attempt any type of major change to Windows that could inadvertently lead to unstable behavior or other issues.
Create a Automatic Restore Point
First, locate the Restore Point utility by clicking Start and entering the text “restore” (without quotes) in the Cortana search box located next to Start. Refer to below image:
Entering the Restore search criteria in Cortana search boc
Next, click your search result, Create a restore point, in upper left-hand corner. See below image:
Selecting the Control Panel applet to Create a Restore Point
Now, you will be taken to the System Protection tab of the System Properties window.
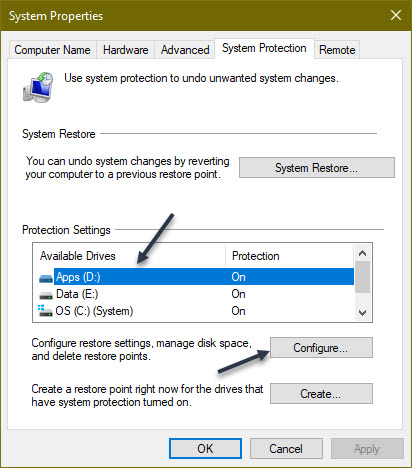
If System Protection has not yet been enabled, the Create button is grayed out. In this case, select the drive you want to protect and then click the Configure button.
If System Protection is enabled for a drive, highlight the drive and click the Configure button. See following image:
Selecting a drive to Configure
Next, click the Turn on System Protection radio button if not enabled. You will now need to decide how much disk space you want to devote to all your restore points. If you run out of space, the oldest restore points will start getting deleted. If you have ample free space, then you may want to devote more storage for the restore points. Otherwise, you can stick with the suggested percentage, usually anywhere from 1% to 3% depending on the overall size of the drive or move the slider to the percentage you want. Once set, click OK. Refer to below image:
Configuring the drive and amount of storage space for a Restore Point
Your restore points will be created automatically at certain key moments. You can repeat these steps if you have other drives that you wish to protect. You can also return to this screen in the future to delete all existing system restore points if you are running low on disk space. To do this, click the Delete button and click Continue to confirm the deletion.
Create a Manual Restore Point
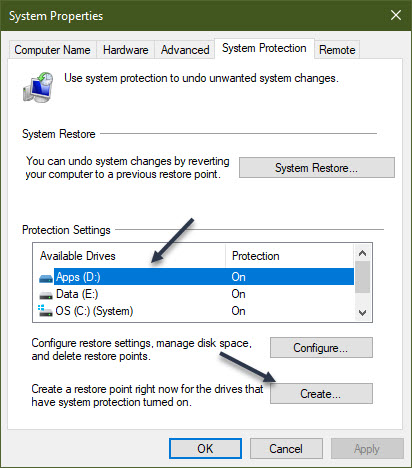
Head back to the Configure screen (second image above). This time, highlight an available drive and click the Create button. See below image:
Selecting to create a manual Restore Point
Next, type in a name for the restore point. Since the current date and time will automatically be added to the name, you might want to include a note about the action you are about to take or another reason for the restore point. If you have multiple drives, include the drive name or letter in the name. Now, click the Create button. See following image:
Assigning a name for the Restore Point
Windows will tell you if the restore point was created successfully. Now, click the Close button. Refer to below image:
Pop-up message indicating the success of creating a Restore Point
You can repeat the above steps if you want to create a restore point for your other drives. When done, click OK to shut down the System Protection window
Restore to a Previous State
If you have an issue, you can return to the System Protection window and click the System Restore button. See below image:
Selecting the System Restore button
At the Restore system files and settings screen, Windows explains what SystemRestore does. Click Next to continue. See following image:
Verbage screen about the Restore
Now, select a drive restore point, then click the Scan for affected programs button. Refer to below image:
Selecting Scan for affected programs button
Windows scans for any applications that were added since the last restore point in order to delete them and looks for any that were removed in order to restore them. It also scans for any programs and drivers that might be restored but may not work correctly and may need to be reinstalled. Note the results if Windows finds anything important. After the scan completes, click Close to return to the previous SystemRestore window. See below image:
Displaying the results (if any) of the scan. PAY CLOSE ATTENTION to this screen!
Make sure the restore point you want to use is selected. Now, click Next. See following image:
Continuing the Restore
Windows will display a Confirm your restore point window. Next, click the Finish button. Refer to below image:
Confirming your Restore. PAY CLOSE ATTENTION to this screen!
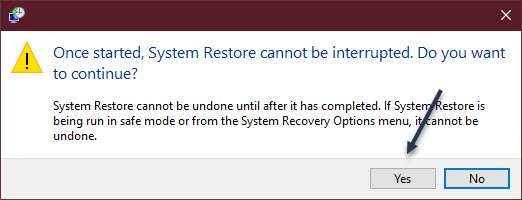
You will be told that the System Restore cannot be interrupted. Next, click Yes to continue. See below image:
One last chance to back out of the Restore. PAY CLOSE ATTENTION to this screen!
Windows will bring your system back to the restore point you selected and reboot, telling you that your files and settings are being restored. Once Windows is back up again, you can log back in.
Next, you should receive a pop-up screen regarding the success of the Restore. You may now need to reinstall any applications, drivers, or other software that were removed. You will also want to play around in Windows to see if the problem that prompted you to restore it has been eliminated.
You are now finished. Now you know how to create a system RestorePoint for all your hard drives and restore your system to a previous state. Please feel free to share this post! One way to share is via Twitter.
Just click the Tweet icon below. This will launch Twitter where you click its icon to post the Tweet.
Check out TechSavvy.Life for blog posts on smartphones, PCs, and Macs! You may email us at contact@techsavvy.life for comments or questions.
Please feel free to leave a comment. I would love hearing from you. Do you have a computer or smart device tech question? I will do my best to answer your inquiry. Just send an email to contact@techsavvy.life. Please mention the device, app and version that you are using. To help us out, you can send screenshots of your data related to your question.
CThe author’s Vietnam eBook on the Battle for Tra Bong: Events and Aftermath
Have you ever been getting things done with a bunch of apps open then suddenly need to logout or restart your PC? It can be annoying when you log back in and having to restart all the apps you were using. For some good news, Windows 10 offers a switch in Settings that will resume select apps after logging out and back in again. This makes Windows remember which apps to reopen so you can resume where you left off.
Have you ever been getting things done with a bunch of apps open then suddenly need to logout or restart your PC? It can be annoying when you log back in and having to restart all the apps you were using. For some good news, Windows 10 offers a switch in Settings that will resume select apps after logging out and back in again. This makes Windows remember which apps to reopen so you can resume where you left off.
This is for devices running Windows 10
Copyright Scott Adams, Inc./Distributed by Universal Uclick for UFS
This feature works with most modern apps like Office, Edge, other apps you have downloaded from the Microsoft Store, or those apps considered restartable. It might not work with legacy desktop apps like Photoshop, for example. Still this is a nice feature, so let’s explore how this is done.
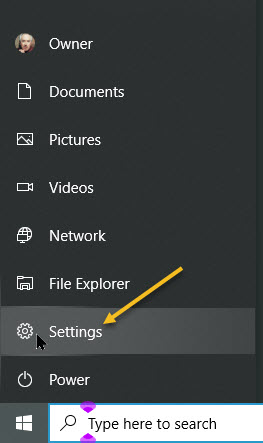
First, open Settings by clicking the Start menu and select the small gear icon, or press Windows+I. Refer to below image:
Accessing Settings
Next, in the Settings screen, click on Accounts. See below image:
Accessing Accounts
Now, on the Accounts screen, click Sign-in options in the sidebar. See following image:
Accessing Sign-in options
In Sign-in options, scroll down the page until you see the Restart apps option. Toggle the switch just below it until it’s turned On.
Turning on Restart apps
Now, you may exit Settings.
The next time you log out and log back in, what Microsoft calls your “restartable apps” will be reloaded automatically.
These are its universal apps available through the Store. The Windows Store only includes apps written for Microsoft’s new “Universal Windows Platform,” or UWP.
Legacy apps (that use the Win32 API) written for Windows versions prior to Windows 8 may not be restarted automatically. Still, you may find this feature useful.
That’s it. Please feel free to share this post! One way to share is via Twitter.
Just click the Tweet icon below. This will launch Twitter where you click its icon to post the Tweet.
Check out TechSavvy.Life for blog posts on smartphones, PCs, and Macs! You may email us at contact@techsavvy.life for comments or questions.
Please feel free to leave a comment. I would love hearing from you. Do you have a computer or smart device tech question? I will do my best to answer your inquiry. Just send an email to contact@techsavvy.life. Please mention the device, app and version that you are using. To help us out, you can send screenshots of your data related to your question.
The author’s Vietnam eBook on the Battle for Tra Bong: Events and Aftermath
If you do not want Google Chrome to remember your activity, you can browse the web privately in Incognito mode.
If you do not want Google Chrome to remember your activity, you can browse the web privately in Incognito mode.
It is easy to quickly open an Incognito window using a keyboard shortcut. Lets explore how to do this.
This is devices running Google Chrome
Copyright Scott Adams, Inc./Distributed by Universal Uclick for UFS
First, open Chrome. Next, with any Chrome browser window open, press the following keyboard combination to open a new Incognito window:
Windows, Linux, or Chrome OS: Press Ctrl + Shift + N.
Mac: Press ⌘ + Shift + N.
After pressing the keyboard shortcut, a special Incognito window will open. If you want to block third-party cookies, just toggle the switch to On, the default setting. Refer to below image:
Your Incognito window
Whenever you are in Incognito mode, you will be able to tell because the Chrome browser window’s toolbar will have a darker color scheme and there will be a small Incognito icon beside the address bar in the toolbar. See below image:
The icon and text telling you are in Incognito mode
You can switch between Incognito windows and regular Chrome windows. You will only browse in private when you are using an Incognito window.
While browsing within an Incognito window, Chrome will not locally store your browsing history, site data, cookies, or saved form data once you close the Incognito window. However, downloaded files and bookmarks will be saved unless you manually remove them.
At any time, you can press Ctrl+T (or ⌘ + T on Mac) to open a new tab within the Incognito window, and browsing activity within that tab will be locally private as well.
Remember that Incognito mode is not perfect, and it does not protect you from those who might view your activity on the web remotely, such as your employer, school, ISP, or the websites you visit. It is only to prevent local snooping of your browsing history.
If you see a number next to the Incognito text at the top right, you have more than one Incognito window open. See following image:
Your number of Incognito windows open
When you are ready to stop private browsing, you will need to close the Incognito window(s). To do so using a keyboard shortcut:
Windows, Linux, or Chrome OS: Press Alt + F4
Mac: Press ⌘ + Shift + W
Or you can just click the “X” in the corner of the window with your mouse.
That’s it. Please feel free to share this post! One way to share is via Twitter, as mentioned below.
I hope you have found this post helpful. If so, click the Tweet icon below. This will launch Twitter where you click its icon to post the Tweet.
Check out TechSavvy.Life for blog posts on smartphones, PCs, and Macs! You may email us at contact@techsavvy.life for comments or questions.
Please feel free to leave a comment. I would love hearing from you. Do you have a computer or smart device tech question? I will do my best to answer your inquiry. Just send an email to contact@techsavvy.life. Please mention the device, app and version that you are using. To help us out, you can send screenshots of your data related to your question.
The author’s Vietnam eBook on the Battle for Tra Bong: Events and Aftermath
Nobody wants their communications to have spelling errors left in, so let Microsoft Outlook help by automatically spell checking emails before they are sent.
Nobody wants their communications to have spelling errors left in, so let Microsoft Outlook help by automatically spell checking emails before they are sent. Of course you can manually check before sending by opening an Outlook email and head to:
Review > Spelling & Grammar
But who wants to do this for every email you send. Instead, the Microsoft Outlook desktop client has a setting that forces spell check to take place after you click the Send button. If no errors are found, the email is sent like normal. If a spelling error is found, Outlook gives you the option to correct it before the email is sent.
This is for PCs running Outlook
Copyright Scott Adams, Inc./Distributed by Universal Uclick for UFS
To enable this feature, open the Outlook desktop application and click:
File > Options
Refer to below image:
Accessing Options
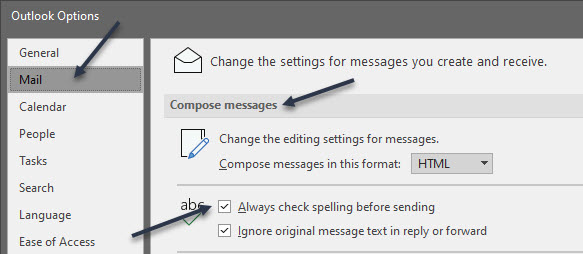
Next. in the Mail > Compose Messages section, toggle on the Always check spelling before sending checkbox. See below image:
Enabling Spell Check
Now, click OK in the bottom-right corner to save and close the Options panel. See following image:
Saving your change
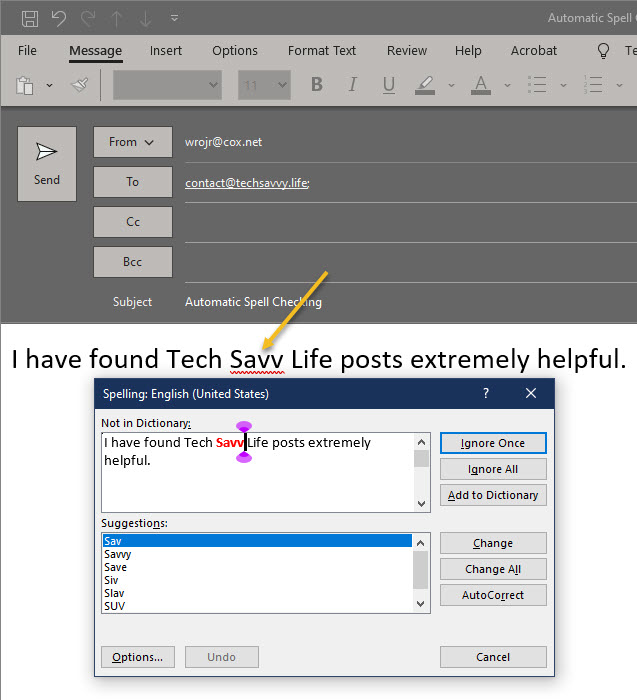
Now, when we click Send on an email with a spelling error, Microsoft Outlook will pick it up and give you the chance to change it. Refer to below image:
Spell Check in action
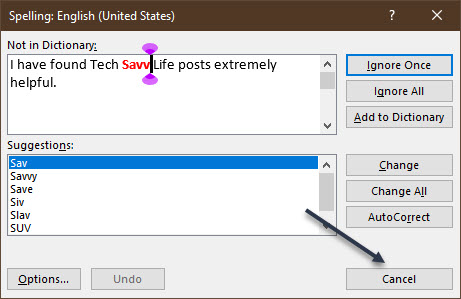
If the spell checker has found a misspelled word and you want to change it, click Cancel. Or, you could use one of its suggestions. See below image where “Savvy” is misspelled:
Cancel your email
If you choose to cancel, a dialog box will open that lets you quit sending the email. Click No to stop the email from being sent. See following image:
Cancel sending your email
Note! The spell checker will not pick up the wrong words, just words that are spelled incorrectly. So, if you meant to type in “Savvy” but instead typed “Savoy”, the spell checker will not pick that up because “Savoy” is a correctly spelled word.
You are finished. Please feel free to share this post! One way to share is via Twitter.
Just click the Tweet icon below. This will launch Twitter where you click its icon to post the Tweet.
Check out TechSavvy.Life for blog posts on smartphones, PCs, and Macs! You may email us at contact@techsavvy.life for comments or questions.
Please feel free to leave a comment. I would love hearing from you. Do you have a computer or smart device tech question? I will do my best to answer your inquiry. Just send an email to contact@techsavvy.life. Please mention the device, app and version that you are using. To help us out, you can send screenshots of your data related to your question.
The author’s Vietnam eBook on the Battle for Tra Bong: Events and Aftermath