I am Raymond Oglesby, an Information Technology (IT) specialist with 30 years in the field. I have taught Microsoft Applications and troubleshot computers in 15 countries and many States. My career was focused on mainframes and desktops from application development to implementation. I have written hundreds of programs for various architectures. I decided to start a blog to share my knowledge and experiences with you. I plan on updating this blog at least twice a week about smart phone apps to Windows.
Please feel free to leave a Comment or Tweet. I would love to hear from you. Do you have a computer tech question? I will do my best to answer your inquiry. Please mention the app and version that you are using. To help me out, you can send screenshots of your data related to your question.
NASA launched the James Webb Space Telescope (JWT) in December 2021, giving scientists a fresh look at the universe and giving the rest of us some cool wallpapers.
NASA launched the James Webb Space Telescope (JWT) in December 2021, giving scientists a fresh look at the universe and giving the rest of us some cool wallpapers. There’s an easy way to check out the latest images and save them for your device’s wallpaper. Let’s explore how.
This is for desktop and mobile devices
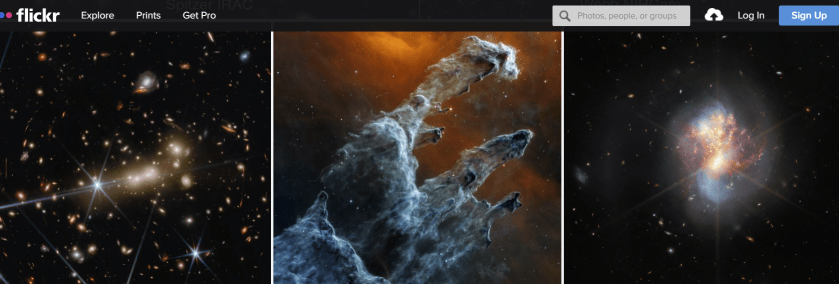
MACS NIRCam Image – Dense Cosmic Knot in the Early Universe
Processed images from JWT have been published on Twitter, the telescope’s official website (this is a really cool site), and other locations, but there’s another portal you may not have seen. NASA operates a Flickr site for the telescope, which contains images of engineering tests, control centers, and best of all, space pictures. To see all the photos, you need to signup for Flickr in the top right-hand corner. Refer to the below image for an example of their gallery:
Deep Space – Pillars of Creation – Emerging Galaxies
You can browse through the whole collection in your browser, and saving the full-resolution version of an image is as easy as clicking the Download button (the arrow pointing down). If you have a Flickr account, you can also follow the account to see new pictures. After creating your Flickr account, in the Search box (located in the upper right-hand corner), type in James Web Telescope to view the images.
In the 32-year run (and counting) of the Hubble Space Telescope is any indication, the JWT should continue giving us fantastic images for years to come.
Disclaimer
Technology is always changing and rarely is there static for smartphones and desktops. Thus, the contents of this post are only valid at the time of writing. Blog posts older than six months may have directions that are incompatible with your device or OS. Hopefully, older post content will continue to work as advertised. Thank you for reading TechSavvy.Life for Technology at Work For You.
Quote For the Day
Technology means you can now do amazing things easily; but you couldn’t easily do them legally.
Lawrence lessig
Tweet Info
That’s it. Please feel free to share this post! One way to share is via Twitter.
Just click the Tweet icon below. This will launch Twitter where you click its icon to post the Tweet.
Checkout TechSavvy.Life for blog posts on smartphones, PCs, and Macs! You may email us at contact@techsavvy.life for comments or questions.
Please feel free to leave a comment. I would love to hear from you. Do you have a computer or smart device tech question? I will do my best to answer your inquiry. Just send an email to contact@techsavvy.life. Please mention the device, app, and version you are using. To help us out, you can send screenshots of your data related to your question.
Author’s E-Book
You can access the e-book from a Kindle device, the Kindle App for the desktop or smartphone, which is a free app.
The author’s Vietnam eBook on the Battle for Tra Bong Vietnam: Events and Aftermath
Google has confusing named products, and that might be most apparent with Google Wallet and Google Pay. These two apps have taken a convoluted path to get where they are today. So, which one should you be using?
Google has confusing named products, and that might be most apparent with Google Wallet and Google Pay. These two apps have taken a convoluted path to get where they are today. So, which one should you be using?
This is for diPhone and Android. Screenshots are from iPhone XR running iOS 16+
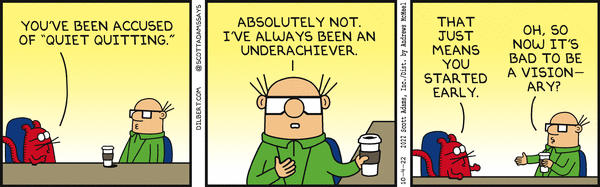
Copyright Scott Adams, Inc./Distributed by Universal Uclick for UFS
Both Google Wallet and Pay have seen some pretty drastic revamps over the years. Their purposes have changed a lot and confused many people in the process. Let’s see what these products have to offer.
Some History
You may be surprised to learn that the original version of Google Wallet was introduced way back in 2011. The service was primarily for sending money to people and there was a physical Google Wallet credit card as well.
The Google Wallet card allowed people to pay for things in physical and online stores with the funds in their accounts. This was before mobile payments with tap-to-pay were widely supported. The Wallet card was a very clever solution.
Eventually, tap-to-pay gained enough traction that Google launched AndroidPay in 2015. It maintained Google Wallet and Android Pay separately until 2018 when the two were combined into a single service called Google Pay. The Wallet card was discontinued in 2016.
Then, in 2020, Google Pay got a massive overhaul with a bunch of new features. All of Google’s mobile payment services were under one umbrella… for a while. In the summer of 2022, the service was split in two, with the Google Wallet branding making a return.
That’s where things stand as of September 2022. Google Pay and Google Wallet exist as two separate products; sometimes. More on that later.
Google Wallet
Google Wallet can most easily be summed up by its name; it’s a digital wallet. You can add credit cards, debit cards, loyalty cards, transportation passes, event tickets, vaccine cards, and gift cards.
Basically, Google Wallet is for paying for things online and in physical stores with tap-to-pay. It features a very simple interface that shows your cards, tickets, and passes. Google Wallet is only available for Android since the iPhone does not allow non-Apple apps for tap-to-pay.
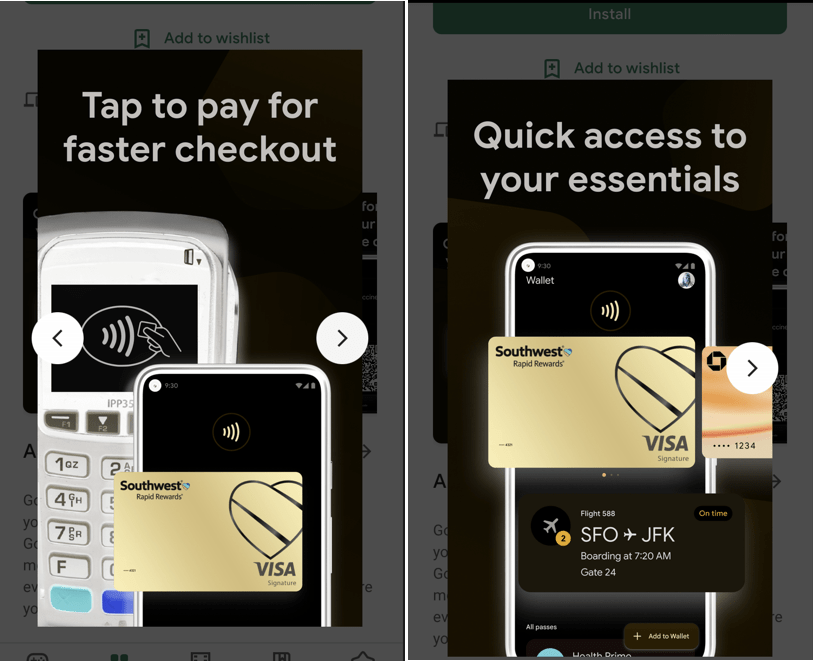
Google Wallet can generally be used with any card reader that has an Apple Wallet, Google Pay, or the contactless tap-to-pay icon. For online purchases, look for the Google Pay or Google Wallet buttons at checkout. It will take some time for the Wallet branding to replace Google Pay. Refer to the below image:
Google Wallet
Google Pay
Google Pay received a massive overhaul in 2020, and it’s pretty much the same experience now. The tap-to-pay functionality is still present in Google Pay, but that’s not the only thing it can do.
The Google Pay app has peer-to-peer payments, shopping deals, cashback offers, and a full-blown banking experience with personal finance insights. You can think of Pay as a combination of services similar to Venmo, PayPal, RetailMeNot, and Mint.
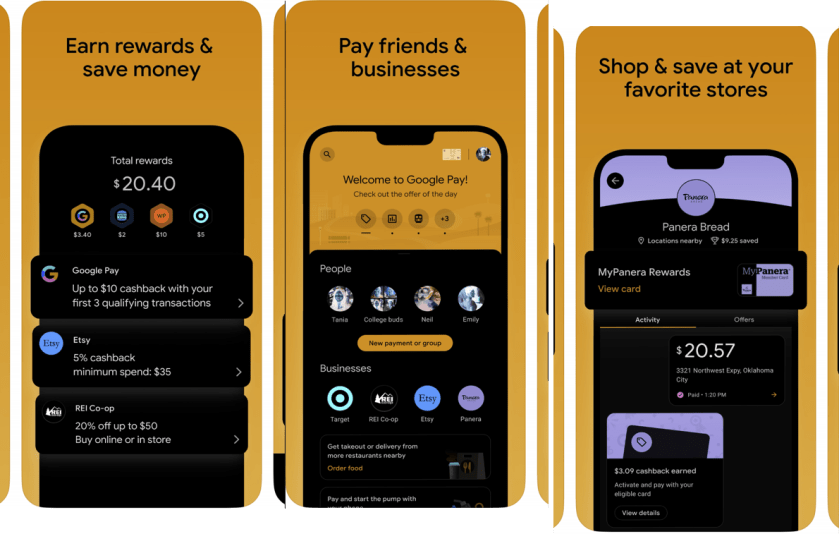
Unlike Google Wallet, Google Pay is available on both Android and iPhone. The tap-to-pay functionality does not work on the iPhone, but the other features do. It’s a feature-packed app that tries to do a lot of things. In fact, it might be too much for some people, which is why Google Wallet exists. See the below image:
Google Pay
Which App to Use?
Depending on where you live, you may not even need to decide which app to use. Google Pay and Google Wallet only exist side-by-side in the U.S. and Singapore. In every other country, Google Wallet entirely replaced Google Pay, and India does not have Wallet at all (as of September 2022).
Google Pay can do everything Google Wallet can do, but Google Wallet can not do everything Google Pay can do. If you are in a country that has both, you can choose between the full experience (Pay) or just mobile payments (Wallet). There’s no reason to have both.
Use Google Pay if you want peer-to-peer payments, deals, rewards, or personal finance tools. If you only care about mobile payments, Google Wallet is a much more streamlined experience for that. The choice is even simpler for iPhone users; Google Pay is the only option.
In closing, Google Wallet is for mobile payments, Google Pay is for mobile payments, and more. In the author’s opinion, it’s still too complicated.
-Courtesy of other tech blog posts
Quote For the Day
Books don’t need batteries.
Nadine Gordimer
Tweet Info
That’s it. Please feel free to share this post! One way to share is via Twitter.
Just click the Tweet icon below. This will launch Twitter where you click its icon to post the Tweet.
Checkout TechSavvy.Life for blog posts on smartphones, PCs, and Macs! You may email us at contact@techsavvy.life for comments or questions.
Please feel free to leave a comment. I would love to hear from you. Do you have a computer or smart device tech question? I will do my best to answer your inquiry. Just send an email to contact@techsavvy.life. Please mention the device, app, and version you are using. To help us out, you can send screenshots of your data related to your question.
Author’s E-Book
You can access the e-book from a Kindle device, the Kindle App for the desktop or smartphone, which is a free app.
The author’s Vietnam eBook on the Battle for Tra Bong Vietnam: Events and Aftermath
Duplicate photos and videos take up precious space on your iPhone. Since iOS 16, Apple has offered the ability to easily find and delete duplicates in the Photos app; no third-party app is required.
Duplicate photos and videos take up precious space on your iPhone. Since iOS 16, Apple has offered the ability to easily find and delete duplicates in the Photos app; no third-party app is required. Let’s explore how to do this.
This is for the iPhone running iOS 16+. Screenshots are from iPhone XR
Copyright Scott Adams, Inc./Distributed by Universal Uclick for UFS
iOS 16 Required
This feature was released with iOS 16. You can see your current iOS version under:
Settings > General > About > iOS Version
Refer to the below image:
Your iOS version
If you need to, you can upgrade to iOS 16 by going to
Settings > General > Software Update
Find and Delete Duplicates in Photos
Note! After updating the iOS. It could take anything from a few hours to a few days for the Duplicates album to appear.
First, to find duplicate photos and videos, open the Photos app on your iPhone and tap the Albums tab at the bottom of the screen. See the below image:
Selecting your Albums
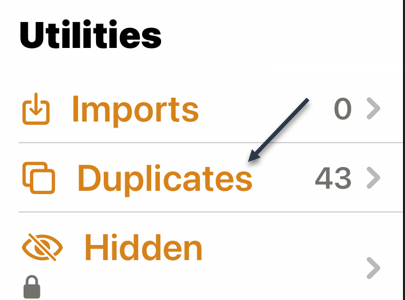
Next, scroll down to the bottom of the page to the Utilities section where you will find the Duplicates album. See the following image:
Selecting Duplications option
Now, tap on Duplicates to see a list of all the duplicate photos and videos found on your iPhone. Refer to the below image:
Your Duplications total
Next, you will see a preview of each image and the relevant file size. You can review each duplicate entry individually, then tap on Merge to save one of the photos or videos. iOS will automatically keep the higher-quality version.
Now, you will need to confirm that you wish to merge the photos or videos in the pop-up window that opens. See the below image:
Merge the current Duplicate
Next, if you do not have time to merge each duplicate individually, you can merge everything at once. To do this, tap Select at the top of the screen followed by Select All. Then, tap Merge at the bottom of the screen. See the following image:
Merge all your Duplicates
Processing Your Photos
You might find that after merging all of your duplicates, more appear as your whole library finishes processing.
Apple states that the detection process requires your iPhone to be locked and connected to power. The size of your library and the tasks running on your device will influence the speed at which the process completes.
If your photos are stored in an iCloud Photo Library, removing duplicates is a good way of freeing up precious iCloud storage.
Quote For the Day
Cars will soon have the Internet on the dashboard. I worry that this will distract me from my texting.
Andy Borowitz
Tweet Info
That’s it. Please feel free to share this post! One way to share is via Twitter.
Just click the Tweet icon below. This will launch Twitter where you click its icon to post the Tweet.
Checkout TechSavvy.Life for blog posts on smartphones, PCs, and Macs! You may email us at contact@techsavvy.life for comments or questions.
Please feel free to leave a comment. I would love to hear from you. Do you have a computer or smart device tech question? I will do my best to answer your inquiry. Just send an email to contact@techsavvy.life. Please mention the device, app, and version you are using. To help us out, you can send screenshots of your data related to your question.
Author’s E-Book
You can access the e-book from a Kindle device, the Kindle App for the desktop or smartphone, which is a free app.
The author’s Vietnam eBook on the Battle for Tra Bong Vietnam: Events and Aftermath
The SendTo menu in Windows has been a useful feature for a long time. It may be buried in the right-click context menu in File Explorer, but you can use it to send files to a specific location, copy photos to a new device, or print your work in moments. It also comes with default entries you may never use and lack certain features you may want.
The SendTo menu in Windows has been a useful feature for a long time. It may be buried in the right-click context menu in File Explorer, but you can use it to send files to a specific location, copy photos to a new device, or print your work in moments. It also comes with default entries you may never use and lack certain features you may want. Let’s explore tweaking what appears in the SendTo menu.
This is for Windows 11, 10, and 8.1. Screenshots are from Windows 10
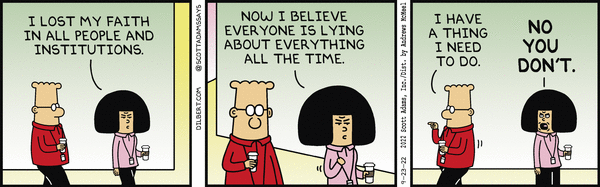
Copyright Scott Adams, Inc./Distributed by Universal Uclick for UFS
Open the SendTo Menu
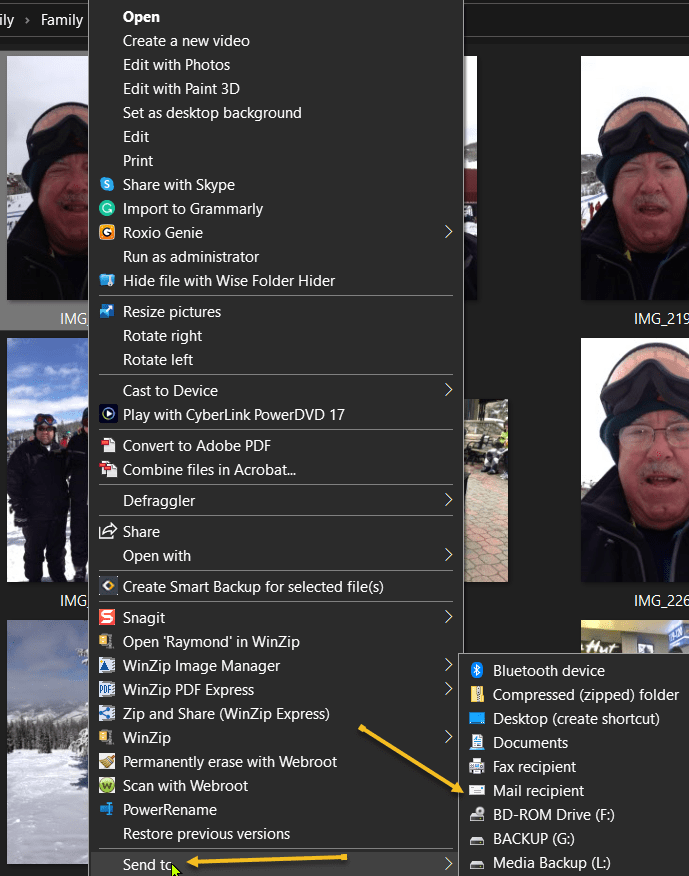
The SendTo function works the same in Windows 11, 10, and 8.1. First, open File Explorer and right-click on a file, such as a word processing document, spreadsheet, text file, or image file. From the pop-up menu, move your mouse to the SendTo command. menu.
The SendTo menu opens, revealing various locations and applications to which you can send the file. First, click a specific entry, such as a Bluetooth device, a compressed zip file, a Mail recipient, or your Documents folder. The file you selected is then sent to the chosen destination. Refer to the below image:
Your SendTo menu
Remove Entries
Next, press the Windows Key + R to trigger the Run window. At the Open field in the window, type shell:SendTo and then click OK. See the below image:
Accessing SendTo via Run command
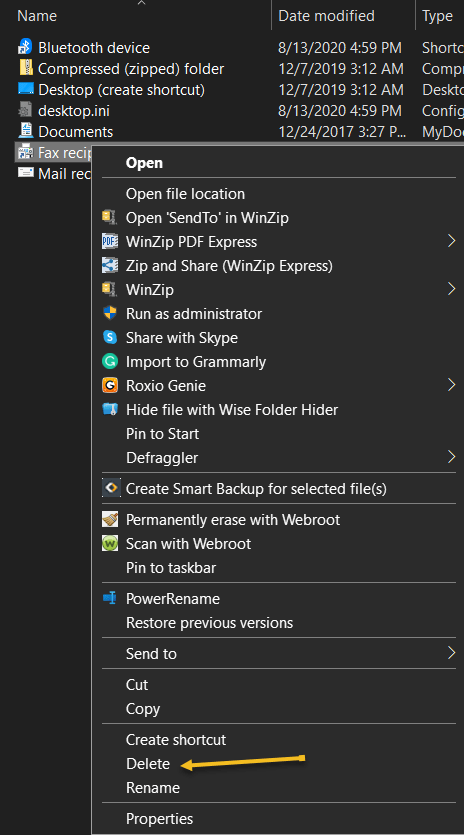
Now, the File Explorer opens to the SendTo folder for your user account. From here, you can delete any entries you would never use by right-clicking on them and selecting Delete from the pop-up menu. See the following image:
Delete a SendTo option
Add Entries
When adding new entries to the menu, you need to know the path of the executable file for the app you want to add. Let’s say you wish to play songs from Windows Media Player and want to add them to the SendTo menu. First, you would create a SendTo entry for it in the SendTo folder. To do so, open File Explorer, then right-click on any empty area of the folder.
Next, select New > Shortcut. In the window that opens to create the shortcut. Refer to the below image:
Create a shortcut
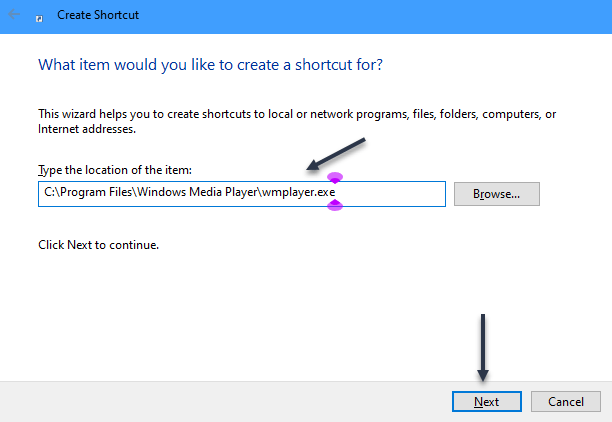
Now, browse to or type the following path: C:\Program Files\Windows Media Player\wmplayer.exe, then click Next. See the below image:
Location of the shortcut
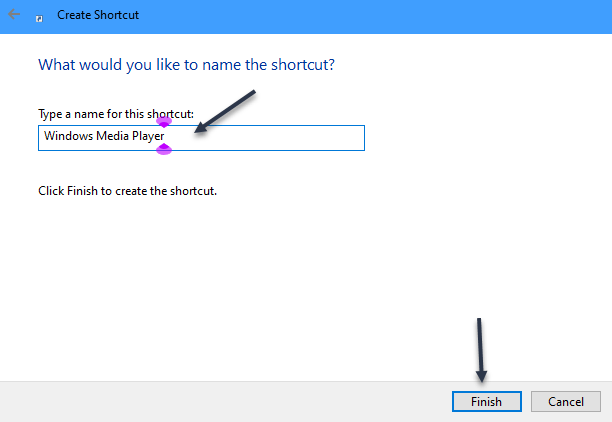
Next, you would then change the name for the shortcut to Windows Media Player and click Finish. See the following image:
Name the shortcut
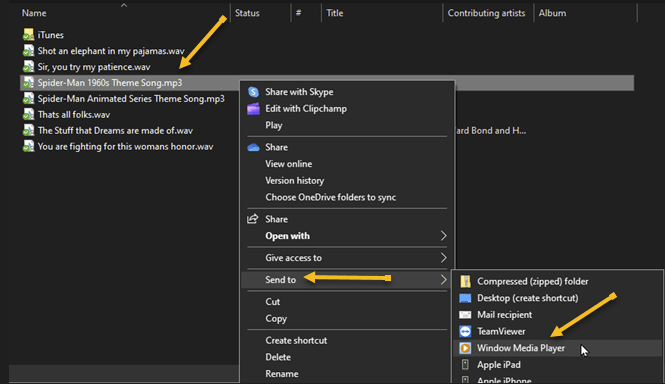
Now you can send any type of audio file to Windows Media Player if you right-click on it and open the SendTo menu. Refer to the below image:
Send a file to your new entry
Quote For the Day
To err is human, but to really foul things up you need a computer.
Paul Ehrlich
Tweet Info
That’s it. Please feel free to share this post! One way to share is via Twitter.
Just click the Tweet icon below. This will launch Twitter where you click its icon to post the Tweet.
Checkout TechSavvy.Life for blog posts on smartphones, PCs, and Macs! You may email us at contact@techsavvy.life for comments or questions.
Please feel free to leave a comment. I would love to hear from you. Do you have a computer or smart device tech question? I will do my best to answer your inquiry. Just send an email to contact@techsavvy.life. Please mention the device, app, and version you are using. To help us out, you can send screenshots of your data related to your question.
Author’s E-Book
You can access the e-book from a Kindle device, the Kindle App for the desktop or smartphone, which is a free app.
The author’s Vietnam eBook on the Battle for Tra Bong Vietnam: Events and Aftermath
Notifications are a blessing and a curse. They can be great in a lot of situations, but you probably ignore most of them. There are several things we can do to make Notifications on your iPhone work a little better.
Unfortunately, the notification situation on the iPhone is a bit messy. There are a lot of settings and options, but Apple does not explain a lot of them well. Let’s explore some things to get the best notification experience.
This is for the iPhone. Screenshots are from iPhone XR running iOS 16+
Copyright Scott Adams, Inc./Distributed by Universal Uclick for UFS
Stop From Turning on the Screen
By default, iPhone notifications always turn on the screen. Not only can this be annoying, but it also drains the battery faster if you get a lot of them.
Each app has three different types of alerts it can do; Lock Screen, Notification Center, and Banners. Simply turning off the Lock Screen option will prevent notifications from turning on the screen. First, head to:
Settings > Notifications
and scroll down and find an app, then tap on the app. Under the Alerts section, uncheck the Lock Screen option. Refer to the below image:
Disabling the Lock Screen option
Delivery Quietly
Notifications do not have to be loud and annoying. You have the option to make them appear Quietly. This can be done directly from the notification, as shown above, or from Settings.
When a notification is delivered quietly, it basically just appears on your device without any fanfare. You will still see it in the Notification Center and Home screen badge, but not on the Lock screen, and it will not vibrate or make a sound.
First, head to:
Settings > Notifications
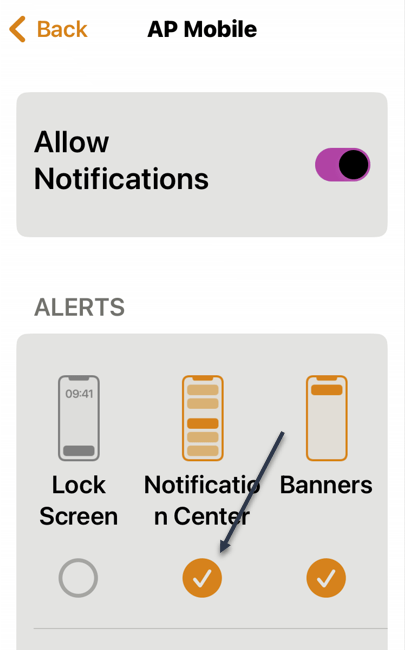
and scroll down and find an app, then tap on the app. Under the Alerts section, check the Notification Center option. See the below image:
Enabling Deliver Quietly option
Group/Ungroup
Notifications from the same app can be grouped together. They appear as a bundle on the Lock screen and Notification Center. This is enabled by default, but it can be tweaked for any app.
Each app has three different options for Notification Grouping, Automatic is the default.
Automatic: The Notifications from the app are intelligently grouped by threads, topics, and other criteria.
By App: All the Notifications from the app are grouped together.
Off: Notifications are not grouped at all.
Just tap on Notification Grouping to see the options See the following image:
Selecting Group or Ungroup option
Using Focus
One of the iPhone’s most powerful notification features is called Focus. It’s essentially a way to make personalized Do Not Disturb modes for specific situations. First, head to:
Settings > Focus
and select one or create your own. Refer to the below image:
Setup Focus
iPhone notifications can be great and they can be awful. It’s up to you to customize the experience to your liking. If your iPhone is becoming too much of a distraction and frustration, try the above tips.
Quote For the Day
The human spirit must prevail over technology.
Albert Einstein
Tweet Info
You are finished. Please feel free to share this post! One way to share is via Twitter.
Just click the Tweet icon below. This will launch Twitter where you click its icon to post the Tweet.
Checkout TechSavvy.Life for blog posts on smartphones, PCs, and Macs! You may email us at contact@techsavvy.life for comments or questions.
Please feel free to leave a comment. I would love to hear from you. Do you have a computer or smart device tech question? I will do my best to answer your inquiry. Just send an email to contact@techsavvy.life. Please mention the device, app, and version you are using. To help us out, you can send screenshots of your data related to your question.
Author’s E-Book
You can access the e-book from a Kindle device, the Kindle App for the desktop or smartphone, which is a free app.
The author’s Vietnam eBook on the Battle for Tra Bong Vietnam: Events and Aftermath
You can schedule emails on your iPhone using the default Mail app without the need for third-party services. Plus, it works with any email address you want to add to your phone.
You can schedule emails on your iPhone using the default Mail app without the need for third-party services. Plus, it works with any email address you want to add to your phone. Let’s explore this feature in iOS 16+.
This is for the iPhone. Screenshots are from iPhone XR running iOS 16+
Copyright Scott Adams, Inc./Distributed by Universal Uclick for UFS
iOS 16 Required
The ability to schedule email was added to the Mail app in iOS 16. If you do not see the option, make sure you have upgraded to iOS 16 under the:
Settings > General > Software Update
You can check your current software version under the:
Settings > General > About
Some third-party mail apps also offer this service (including Gmail for iPhone), but make sure you are in Apple’s stock Mail app if you are trying to follow these instructions.
Schedule Emails Using the Mail App
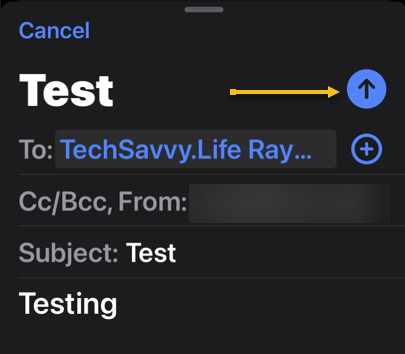
To schedule an email, first, launch the Mail app and tap the Compose button to start writing a new message. Once you have added a recipient, subject, and body to the email, you will notice the Send button (an upward arrow) turn blue. Refer to the below image:
Compose your email
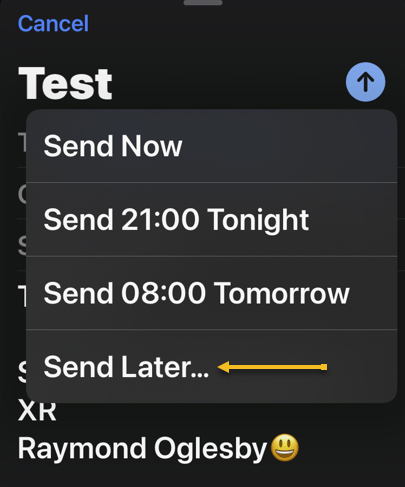
Next, to schedule the email, tap and hold the Send button. You will see a few options depending on the current time of day. See the below image:
choosing the Send Later option
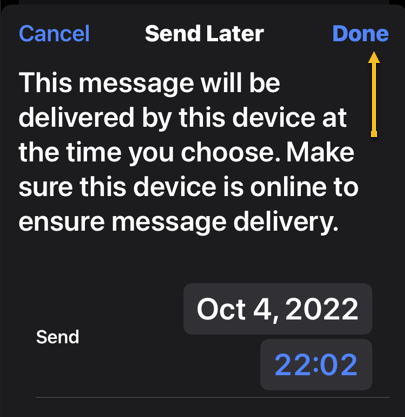
Now, we want to manually schedule the message. Tap Send Later… and enter a date and time manually. Hit Done to schedule the message. See the following image:
Tapping Done to schedule your email
Next, you can always tap the Send button (without holding) to send the email immediately. And if you accidentally send an email when you meant to schedule it, you can tap the Undo option at the bottom of the screen within 10 seconds. Refer to the below image:
Choosing to undo sending your email
Note! You can customize how long you have to undo sending an email under Settings > Mail. Inside these settings, you can choose between 10 seconds, 20 seconds, or 30 seconds.
Find Your Scheduled Email
Messages that have been scheduled will appear in a separate mailbox in the Mail app. First, launch Mail, then look at the top of the screen in the Mailboxes view.
Note! If you do not see a list of mailboxes, you are probably browsing a specific mailbox. You can use the back arrow in the top left-hand corner of the screen to get back to the main view.
Next, you should see the Send Later mailbox. If you do not, tap Edit in the top right-hand corner and tap the circle next to the Send Later inbox to enable it. Then, tap Done. You should now see the mailbox in your list. See the below image:
Accessing your scheduled emails
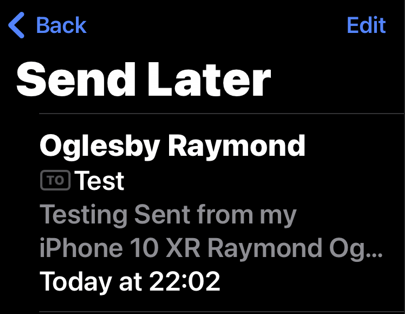
Now, you can tap on the mailbox to see which messages are due to go out and the time they will be sent. See the following image:
Viewing your scheduled email
Note! You are unable to edit a message once it has been scheduled. You will have to delete it and schedule a new one. To delete your email, swipe the message to the left and tap Trash.
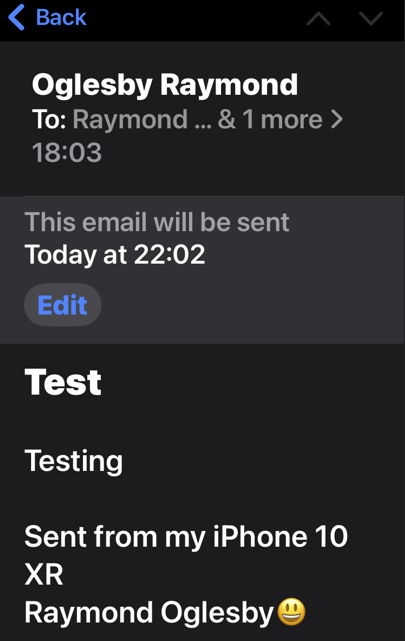
Next, if you selected the scheduled email, you can tap Edit next to it to change the time the email will be sent. Refer to the below image:
Notification on when the email will be sent
Warning! Be careful here, as tapping Edit will immediately change the scheduled time to now. That means if you hit Done instead of Cancel, your email will be sent immediately, with no option to undo it.
Quote For the Day
We are the children of a technological age. We have found streamlined ways of doing much of our routine work. Printing is no longer the only way of reproducing books. Reading them, however, has not changed.
Lawrence Clark Powell
Tweet Info
You are finished. Please feel free to share this post! One way to share is via Twitter.
Just click the Tweet icon below. This will launch Twitter where you click its icon to post the Tweet.
Checkout TechSavvy.Life for blog posts on smartphones, PCs, and Macs! You may email us at contact@techsavvy.life for comments or questions.
Please feel free to leave a comment. I would love to hear from you. Do you have a computer or smart device tech question? I will do my best to answer your inquiry. Just send an email to contact@techsavvy.life. Please mention the device, app, and version you are using. To help us out, you can send screenshots of your data related to your question.
Author’s E-Book
You can access the e-book from a Kindle device, the Kindle App for the desktop or smartphone, which is a free app.
The author’s Vietnam eBook on the Battle for Tra Bong Vietnam: Events and Aftermath
The iPhone camera is capable of shooting two aspect ratios, 4:3 and 16:9. The 4:3 aspect ratio uses the full megapixels, whereas the 16:9 crops in for a wider view.
The iPhone Camera is capable of shooting two aspect ratios, 4:3 and 16:9. The 4:3 aspect ratio uses full megapixels, whereas the 16:9 crops in for a wider view. Let’s explore this feature.
This is for the iPhone. Screenshots are from iPhone XR running iOS 16+
Copyright Scott Adams, Inc./Distributed by Universal Uclick for UFS
The difference between 4:3 and 16:9 is the width of the photo. However, it’s not that simple on the iPhone. Shooting in 16:9 does not necessarily mean you will get captured more from the sides of the shot. Depending on the cameras on your iPhone, it may simply crop the 4:3 photo.
First, open the Camera app on your iPhone. Refer to the below image:
Accessing Camera
Next, tap the Arrow at the top of the screen. To turn off Live Photo, tap the Concentric Circle icon. See the below image:
Accessing the Arrow and optionally turning off Live Photo
Now, some controls will slide up from the bottom of the screen. Tap the 4:3 or 16:9 button. See the following image:
Accessing the Aspect Ratio
Next, you can choose 16:9, Square, or 4:3. Refer to the below image:
Changing the Aspect Ratio to 16:9
Again, keep in mind that the 16:9 aspect ratio typically is a lower resolution than 4:3 since it’s cropping the shot. If you want to always take full advantage of the Camera hardware, shoot in 4:3.
To set your last Camera settings go to:
Settings > Camera > Preserve Settings > Camera Mode
and turn it ON, then open the Camera and take a photo.
Photos with Aspect Ratio
Aspect Ratio 4:3Aspect Ratio 16:9
Quote For the Day
Computers are useless. They can only give you answers
Pablo Picasso
Tweet Info
That’s it. Please feel free to share this post! One way to share is via Twitter.
Just click the Tweet icon below. This will launch Twitter where you click its icon to post the Tweet.
Checkout TechSavvy.Life for blog posts on smartphones, PCs, and Macs! You may email us at contact@techsavvy.life for comments or questions.
Please feel free to leave a comment. I would love to hear from you. Do you have a computer or smart device tech question? I will do my best to answer your inquiry. Just send an email to contact@techsavvy.life. Please mention the device, app, and version you are using. To help us out, you can send screenshots of your data related to your question.
Author’s E-Book
You can access the e-book from a Kindle device, the Kindle App for the desktop or smartphone, which is a free app.
The author’s Vietnam eBook on the Battle for Tra Bong Vietnam: Events and Aftermath
Copyright Scott Adams, Inc./Distributed by Universal Uclick for UFS Let’s explore these myths.
This is for smartphones
Copyright Scott Adams, Inc./Distributed by Universal Uclick for UFS
Maintain Battery Life Forever
Let’s open with the most persistent overarching myth: that you can somehow baby your phone’s battery to keep it in good health forever.
A smartphone battery is, ultimately, a consumable good. Like a battery in your car, the battery exists to be used and, when it has reached the end of its life cycle, replaced.
Sure it’s a minor hassle to get the battery on your phone replaced, given that many phones have sealed-body designs now. But it’s not particularly expensive to do so. You might have to spend $50-$70 for a new battery.
Kill Apps to Save Battery Life
Your phone was designed to be used the way the vast majority of people use it: opening apps when needed, never actually closing them, and just letting unused apps sit off to the side when moving on to the next app; leaving the original apps to hang out in a sort of suspended state until needed again.
Your phone was not designed with the idea that you, the end user, would force quit an app when you were done using it as if you were closing apps down on a desktop computer. That’s true for iPhones, and it’s true for Android-based phones.
Yes, there are rare instances of poorly coded applications using too much background data or otherwise negatively impacting your battery life. If you have an app you really need to use, and it’s one of those apps, force quitting it when you are not actually using it might be wise.
But for the majority of us, closing apps is a waste of time, and actually hurts the performance and battery life of your phone.
Discharge the Battery to 0% Before Using
The consumer use of lithium-ion batteries is fairly recent. Because of that, many people either have first-hand experience with older (and more finicky) batteries or were given advice by people who did.
Some types of rechargeable batteries suffer from “memory” issues. That’s not the case with lithium-ion batteries. In fact, you should go out of your way to avoid fully draining the battery. In general, your phone battery is healthier when it is being regularly used and charged.
However, once or twice a year it is useful to let your lithium-ion battery drain all the way down before recharging to recalibrate the battery. That does not extend the life of the battery, but it does ensure that your phone software can accurately report the charge of the battery.
While Charging Don’t Use It
This myth is based on the idea that heat is damaging to your phone and to the battery life. That’s not entirely untrue. Your battery is healthier operating near room temperature (and actually works a little better in cooler-than-room temperature conditions). Electronics, in general, do not like heat.
But the little bit of heat introduced by charging and then the extra heat introduced by you using the phone is not a big deal. Should you charge your phone while sitting in the direct summer sun, playing the most demanding mobile game you have? No, probably not. But anything short of those kinds of stress-test conditions is fine.
Third-Party Chargers Will Damage Your Phone
Is it ideal to only use first-party OEM chargers created by the manufacturer specifically for your smartphone? Sure. Is it a huge risk to do otherwise? In most cases, not at all.
There are plenty of really great third-party chargers out there from reputable companies like Anker, Belkin, Spigen, and so on.
What you want to avoid are the poorly constructed and poorly quality chargers you find at gas stations, flea markets, and other places where bargain-basement no-name products are sold. Do not trust your phone to a $4 gas station charger.
Fast and Wireless Charging Will Damage Your Battery
Let’s lump these two together because the basis of the myth is the same. There is a long-standing belief that using a fast charger or a wireless charger damages your battery because it introduces excess heat that degrades the battery circuits.
Technically, it’s true that the brief period of intense charging during the peak of a fast charging cycle introduces more heat than not using fast charging would introduce.
It’s also technically true that the inherent inefficiency of a wireless charger over a wired charger will also introduce extra heat.
Neither of these has an impact significant enough to merit any real consideration, that’s why new cars feature wireless charging.
Charging Overnight Damages Your Battery
Here’s another myth that was significantly more true in the past and barely relevant today: leaving your phone plugged in to charge overnight is bad for the battery.
In the past, smartphones were not smart about battery management. Your phone would charge up to 100%, stop charging, and then after slowly discharging, it would charge back up again. Modern phones have adaptive charging, and they strategically manage the charging window to minimize battery damage.
Having a fully charged and ready-to-go phone in the morning far outweighs any minor wear and tear overnight charging might put on the battery.
Battery Is Damaged by Turning It Off at Night
This myth, depending on who shares it, goes both ways. Some people will tell you turning the phone off is good for the battery. Some people will tell you leaving the phone on all the time is bad for the battery. The truth is, neither state really matters much.
Your phone is designed to be on all the time. Not a single phone manufacturer has designed their device with the intention that you power it down and put it in a drawer when you are not using it.
Sure, you can extend the life of a lithium-ion battery by charging it to roughly 50-60% and then storing it in a cool, dry place. But this is your smartphone, you do not have to put it in storage, instead, you use it every day.
Disable Bluetooth and Other Features
Years ago, disabling features to save battery life was a far more useful tip than it is now. To be certain, any features on your smartphone that require energy such as Wi-Fi, Bluetooth, background data, and so on, will impact your battery life.
Turning off Wi-Fi when you are on a plane and not using the plane’s in-flight Wi-Fi, for example, is a straightforward way to squeeze out a little battery life if you do not have a charger handy. And disabling background data updates for a particular app that is aggressively polling for data you do not need constant updates about is also a wise decision.
But turning off Bluetooth and Wi-Fi, leaving your phone in Airplane Mode, or disabling all background data is overkill. For day-to-day use, it just makes your phone a pain to use.
The same thing goes for Low-Power Mode. If you are stuck between locations where you can charge your phone, by all means, use it. But keeping your phone in Low-Power Mode just makes it more frustrating to use.
Micro-managing how you charge your smartphone can, at best, only add a tiny amount to the battery’s lifespan and is hardly worth worrying about.
Quote For the Day
The only way to define your limits is by going beyond them.
Arthur C Clarke
Tweet Info
That’s it. Please feel free to share this post! One way to share is via Twitter.
Just click the Tweet icon below. This will launch Twitter where you click its icon to post the Tweet.
Checkout TechSavvy.Life for blog posts on smartphones, PCs, and Macs! You may email us at contact@techsavvy.life for comments or questions.
Please feel free to leave a comment. I would love to hear from you. Do you have a computer or smart device tech question? I will do my best to answer your inquiry. Just send an email to contact@techsavvy.life. Please mention the device, app, and version you are using. To help us out, you can send screenshots of your data related to your question.
Author’s E-Book
You can access the e-book from a Kindle device, the Kindle App for the desktop or smartphone, which is a free app.
The author’s Vietnam eBook on the Battle for Tra Bong Vietnam: Events and Aftermath
Starting with iOS 16, the iPhone Home screen includes a small Search button located just above the dock. If you find the addition annoying, Apple makes it easy to remove the Search button.
Starting with iOS 16, the iPhone Home screen includes a small Search button located just above the dock. If you find the addition annoying, Apple makes it easy to remove the Search button. Let’s explore this easy fix.
This is for the iPhone. Screenshots are from iPhone XR running iOS 16+
Copyright Scott Adams, Inc./Distributed by Universal Uclick for UFS
Apple likely added the new search button in iOS 16 because launching Spotlight Search on an iPhone had previously been a mysterious process (you swipe downward with one finger in the middle of the Home screen.) With the new button, all you have to do is tap it, and Spotlight opens instantly. Refer to the below image:
Accessing Search button
To remove this Search button, first, open Settings on your iPhone by tapping the Gear icon. See the below image:
Accessing Settings
Next, in Settings, scroll down and tap Home Screen. See the following image:
Accessing the Home Screen option
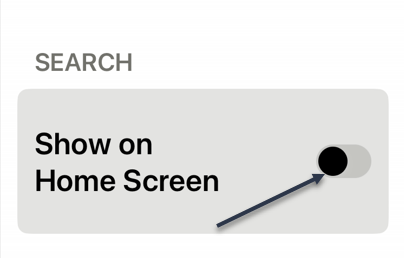
Now, on Home Screen settings, locate the section labeled Search and toggle the Show on Home Screen to the OFF position. Refer to the below image:
Disable the Search button on Home Screen
ANext, exit Settings, and you will see that the Search button has been replaced with the Home screen page number dots like iOS 15 and earlier. See the below image:
Back to the dots
These dots visually show you the Home screen you are on. You can hold your finger on them, then slide it to quickly scroll through your Home screen pages.
Even after you disable this Search button, you can swipe downward with one finger in the middle of the Home screen to open Spotlight search.
Quote For the Day
Maxwell’s equations were foundational for our revolution in technology; without them we would have had no television, radio, computers, iPods, X ray etc.
James Clerk Maxwell (1831-1879), physics
Tweet Info
You are finished. Please feel free to share this post! One way to share is via Twitter.
Just click the Tweet icon below. This will launch Twitter where you click its icon to post the Tweet.
Checkout TechSavvy.Life for blog posts on smartphones, PCs, and Macs! You may email us at contact@techsavvy.life for comments or questions.
Please feel free to leave a comment. I would love to hear from you. Do you have a computer or smart device tech question? I will do my best to answer your inquiry. Just send an email to contact@techsavvy.life. Please mention the device, app, and version you are using. To help us out, you can send screenshots of your data related to your question.
Author’s E-Book
You can access the e-book from a Kindle device, the Kindle App for the desktop or smartphone, which is a free app.
The author’s Vietnam eBook on the Battle for Tra Bong Vietnam: Events and Aftermath
If you use Microsoft Word to create your documents, then you are likely familiar with the features you use every day. But there are plenty of features that fly under the radar that could be just as useful, if not more.
If you use Microsoft Word to create your documents, then you are likely familiar with the features you use every day. But there are plenty of features that fly under the radar that could be just as useful, if not more.
Here, we will look at just three Word features you should be using. These tools can save you time, improve the readability of your document, and even enhance your overall Microsoft Word experience.
This is for devices using Microsoft Word. Screenshots are from Windows 10
Copyright Scott Adams, Inc./Distributed by Universal Uclick for UFS
Distraction Free Writing Using Focus
If you do a lot of writing in Word, especially for things that need your full attention, you can enjoy distraction-free writing with Focus.
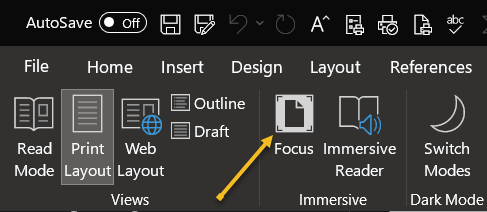
First, enable the feature by selecting Focus in the Status Bar on the View tab. Refer to the below image:
Accessing the Focus option
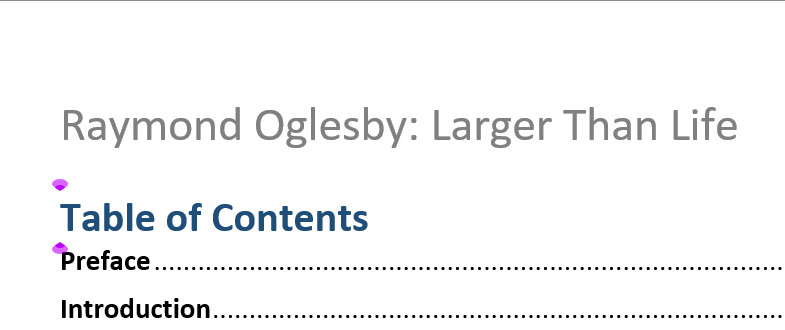
Next, you will see your document take over your entire screen with no Ribbon, Status Bar, or anything else to get in the way of your concentration. See the below image:
Your Focus enabled document
Move your cursor to the top anytime to redisplay these items or to deselect Focus and return to your normal view.
Document Preview Using Document Editor
Another terrific feature in Microsoft Word is the Editor. With it, you can check your document for spelling, grammar, punctuation, readability, and more, all in one spot.
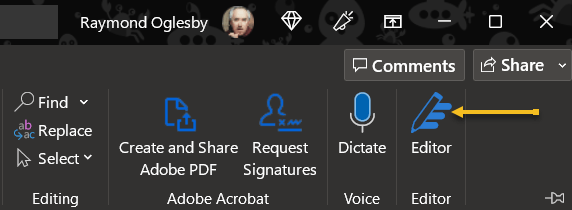
First, head to the Home tab and select Editor in the Editor section of the Ribbon. See the following image:
Accessing Editor option
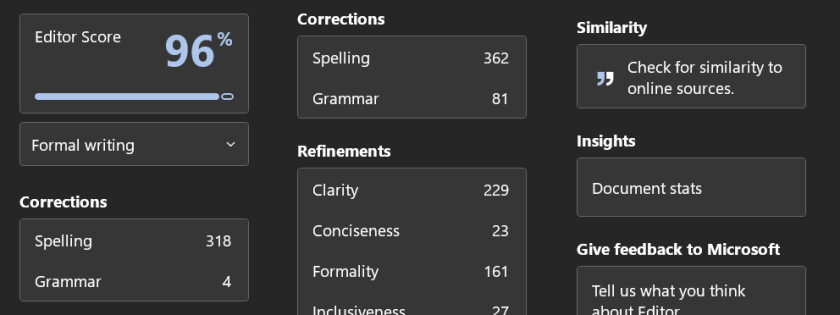
Next, when the sidebar opens, you will see your score at the top. You can then review necessary Corrections, Refinements, and see if similar documents appear on the web.
Note! For a very long document, this may take several minutes for the stats to be collected.
Refer to the below image:
Your Editor stats
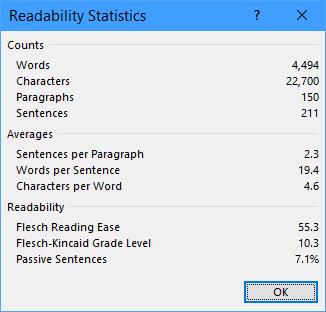
Now, select Document Stats in the Insights section to view counts of words and paragraphs, averages of characters per word and words per sentence, and readability scores for grade-level and passive sentences. See the below image:
Your Document stats
Next, click the “X” on the top right of the Editor sidebar to close the tool when you finish.
References and Citations Using Researcher
One more feature in Word that goes a bit unnoticed is the Researcher tool. With it, you can look up almost anything on the internet and insert details for it without ever leaving your document.
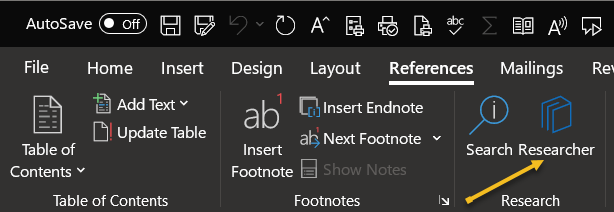
First, head to the References tab and choose Researcher in the Research section of the Ribbon. See the following image:
Accessing the Researcher option
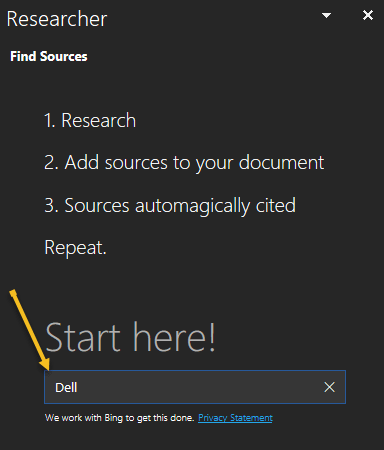
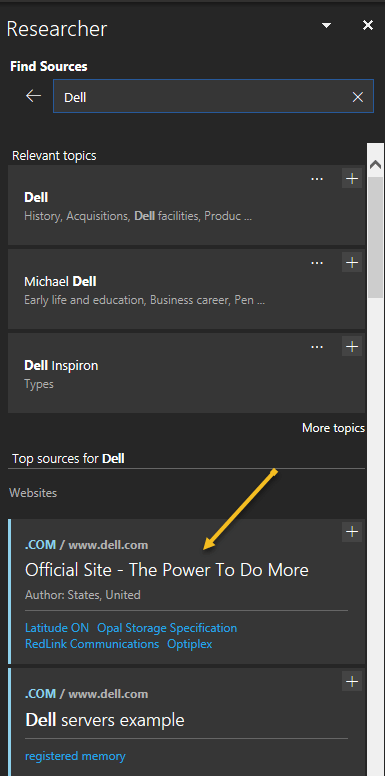
Next, the Researcher sidebar opens on the right. Enter your search term into the box and press Enter. Refer to the below image:
Entering your search
Now, you will see the results of your search. Select one to read more. See the below image:
Your search results
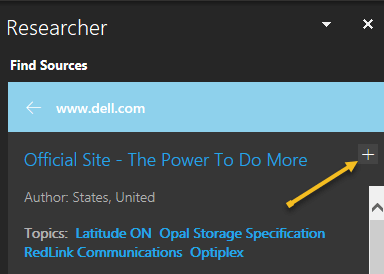
You can copy and paste the text you see into your document, then click the plus sign on the top right of the item in the sidebar to add a citation for it. See the following image:
Add a citation to your document
Researcher is a handy and helpful tool for essays, papers, and research documents.
These three features can help you no matter what type of document, article, or paper you create in Microsoft Word.
Quote For the Day
My life is now a constant assessment of whether what’s happening in real life is more entertaining than what’s happening on my phone.
Damien Fahey
Tweet Info
You are finished. Please feel free to share this post! One way to share is via Twitter.
Just click the Tweet icon below. This will launch Twitter where you click its icon to post the Tweet.
Checkout TechSavvy.Life for blog posts on smartphones, PCs, and Macs! You may email us at contact@techsavvy.life for comments or questions.
Please feel free to leave a comment. I would love to hear from you. Do you have a computer or smart device tech question? I will do my best to answer your inquiry. Just send an email to contact@techsavvy.life. Please mention the device, app, and version you are using. To help us out, you can send screenshots of your data related to your question.
Author’s E-Book
You can access the e-book from a Kindle device, the Kindle App for the desktop or smartphone, which is a free app.
The author’s Vietnam eBook on the Battle for Tra Bong Vietnam: Events and Aftermath